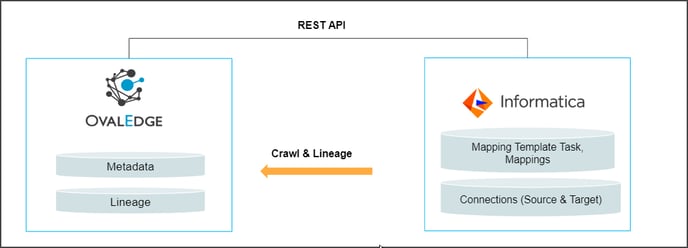
The connector supports the crawling of datasets from ICS (Connection, Connectors, Tasks, Mapping Template Tasks, Mapping Template) and lineage building for ICS (Mapping Template Task).
Connector Capabilities
|
Functionality |
Supported Objects |
|
Crawling(ICS) |
Connections Tasks Mapping Template Task Mapping Template |
|
Crawl Parameter Files |
Informatica uses parameter files to override connection and source/target objects in runtime. We require access to read parameter files to link the correct source or target during the lineage-building process. |
|
Lineage Building |
Table lineage Column lineage Order By |
Prerequisites
The following are prerequisites required for the connection of Informatica ICS.
1. API Details
2. Service Account Permission
3. Configure environment variables (Optional)
API Details
| Edition | Version | Support |
| ICS | Informatica Intelligent Cloud Services REST API | Supported |
Service Account with Minimum Permissions
The minimum privileges required to connect to the source system are as follows:
|
Operation |
Access Permission |
|
Connection validation |
Designer |
|
Crawl Folders |
Designer |
|
Crawl Workflows, Mappings, etc |
Designer |
|
Lineage Building |
Designer |
Note: Designer is a role in Informatica.
Establish Environment Variables (Optional)
This section describes the settings or instructions that you should be aware of prior to establishing a connection. If your environments have been configured, skip this step.
Configure Environment Names
The Environment Names allow users to select the environment configured for the specific connector from the dropdown list in the Add Connector pop-up window.
You might want to consider crawling the same schema in both stage and production environments for consistency. The typical environments for crawling are PROD, STG, or Temporary, and may also include QA or other environments. Additionally, crawling a temporary environment can be useful for schema comparisons, which can later be deleted, especially during application upgrade assistance.
Steps to Configure the Environment
1. Navigate to Administration > System Settings.
2. Select the Connector tab.
3. Find the Key name “connector.environment”.
4. Enter the desired environment values (PROD, STG) in the value column.
5. Click ✔ to save.Establish a Connection
To establish an ICS Connection, complete the following steps:
- Log in to the OvalEdge application, navigate to the Administration module, and click on Connectors.
- Click on the + icon (New Connector ), and the Manage Connector pop-up is displayed.
- Search/Click on the desired connector, and the connection pop-up with the selected connector details will be displayed.
|
Field Name |
Description |
|
Connector Type |
The selected connection type ‘Informatica ICS’ is displayed by default. The dropdown menu allows the user to change the connector type if required. The fields associated with the selected connection type are displayed based on the selection. |
|
Credential Manager* |
Select the option from the drop-down list where you want to save your credentials: OE Credential Manager: Informatica ICS connection is configured with the basic Username and Password of the service account in real-time when OvalEdge establishes a connection to the Informatica ICS. Users need to add the credentials manually if the database option is selected. HashiCorp: The credentials are stored in the HashiCorp database server and fetched from HashiCorp to OvalEdge. AWS Secrets Manager: The credentials are stored in the AWS Secrets Manager database server and fetched from the AWS Secrets Manager to OvalEdge. Azure Key Vault: Click here to view the complete information. For more information on Credential Manager, refer to Credential Manager. |
|
License Add-Ons |
All the connectors will have a Base Connector License by default that allows you to crawl and profile to obtain the metadata and statistical information from a datasource. OvalEdge supports various License Add-Ons based on the connector’s functionality requirements.
|
|
Connection Name* |
Enter the name of the connection, the connection name specified in the Connection Name textbox will be a reference to the Informatica ICS connection in the OvalEdge application. Example: Informatica ICS Connection1 |
|
Connector Environment |
The steps to set up environment variables are explained in the prerequisite section. |
|
Login via |
OvalEdge supports three types of Authentication to connect to Informatica ICS. Namely Native, Salesforce, and SAML SSO. |
|
Login Via Native |
|
|
Server* |
This is the Hostname or IP address of the Informatica ICS. The server name will be one of the below three based on the region of the data center. Example: |
|
Username* |
Username is required to connect to the Informatica ICS server. Enter the Service Account Name established to access the Informatica ICS environment. |
|
Password* |
Password for Informatica ICS Server account. |
|
Parameter Files Directory |
Informatica ICS uses Parameters Files in one of the mappings then, we should provide a path that contains the parameters files to link the correct source or target during the lineage-building process. Example: https://ovaledge.s3.us-west-1.amazonaws.com/OvalEdge+Clients+Poc/Documents/Parameters.txt |
|
Login Via Salesforce |
|
|
Server* |
This is the Hostname or IP address of the Informatica ICS. The server name will be one of the below three based on the region of the data center. Example: |
|
Username* |
Username is required to connect to the Informatica ICS server. Enter the Service Account Name established to access the Informatica ICS environment. |
|
Salesforce Session ID* |
A session ID identifies a user using salesforce UI or API tools, it has a time limit, and users can manually expire it by logging out or by removing it in setup. The salesforce session ID is obtained from the Client team. |
|
Salesforce Server Url* |
The Salesforce Server URL is used to access your Salesforce environment. |
|
Parameter Files Directory |
Informatica ICS uses Parameters Files in one of the mappings then, we should provide a path that contains the parameters files to link the correct source or target during the lineage-building process. Example: https://ovaledge.s3.us-west-1.amazonaws.com/OvalEdge+Clients+Poc/Documents/Parameters.txt |
|
Login Via SAML SSO |
|
|
Server* |
This is the Hostname or IP address of the Informatica ICS. The server name will be one of the below three based on the region of the data center. Example: |
|
Username* |
Username is required to connect to the Informatica ICS server. Enter the Service Account Name established to access the Informatica ICS environment. |
|
SAML Token* |
Enter SAML Token. It is obtained from the Client team. |
|
Organization Id* |
Informatica Intelligent Cloud Services organization ID. It is obtained from the Client team. |
|
Parameter Files Directory |
Informatica ICS uses Parameters Files in one of the mappings then, we should provide a path that contains the parameters files to link the correct source or target during the lineage-building process. Example: https://ovaledge.s3.us-west-1.amazonaws.com/OvalEdge+Clients+Poc/Documents/Parameters.txt |
|
Default Governance Roles* |
Select Stewards, Custodian, Owner, GovernanceRole4, GovernanceRole5, and GovernanceRole6 from the dropdown list. |
|
Admin Roles* |
Select the required admin roles for this connector.
|
|
No of Archive Objects* |
Select the toggle button to set the if the user wants to enter the count of no. of the archive objects. |
|
Select Bridge* |
Select option NO Bridge if no bridge is available for the connector. |
5. Click on the Validate button to validate the connection details.
6. Click on the Save button to save the connection. Alternatively, the user can also directly click on the Save & Configuration button that displays the Connection Settings pop-up window to configure the settings for the selected Connector. The Save & Configure button is displayed only for the Connectors for which the settings configuration is required.
Note: * (asterisk) indicates the mandatory field required to create a connection. Once the connection is validated and saved, it will be displayed on the Connectors home page.
Note: You can either save the connection details first, or you can validate the connection first and then save it.
Connection Validation Details
|
S.No. |
Error Messages |
Description |
|
1 |
Failed to establish connection, Please check the credentials(User name, Password, Server name, etc.,) |
In case of an invalid user name, wrong password, or invalid Server name |
Note: If you have any issues creating a connection, please contact your assigned OvalEdge Customer Success Management (CSM) team.
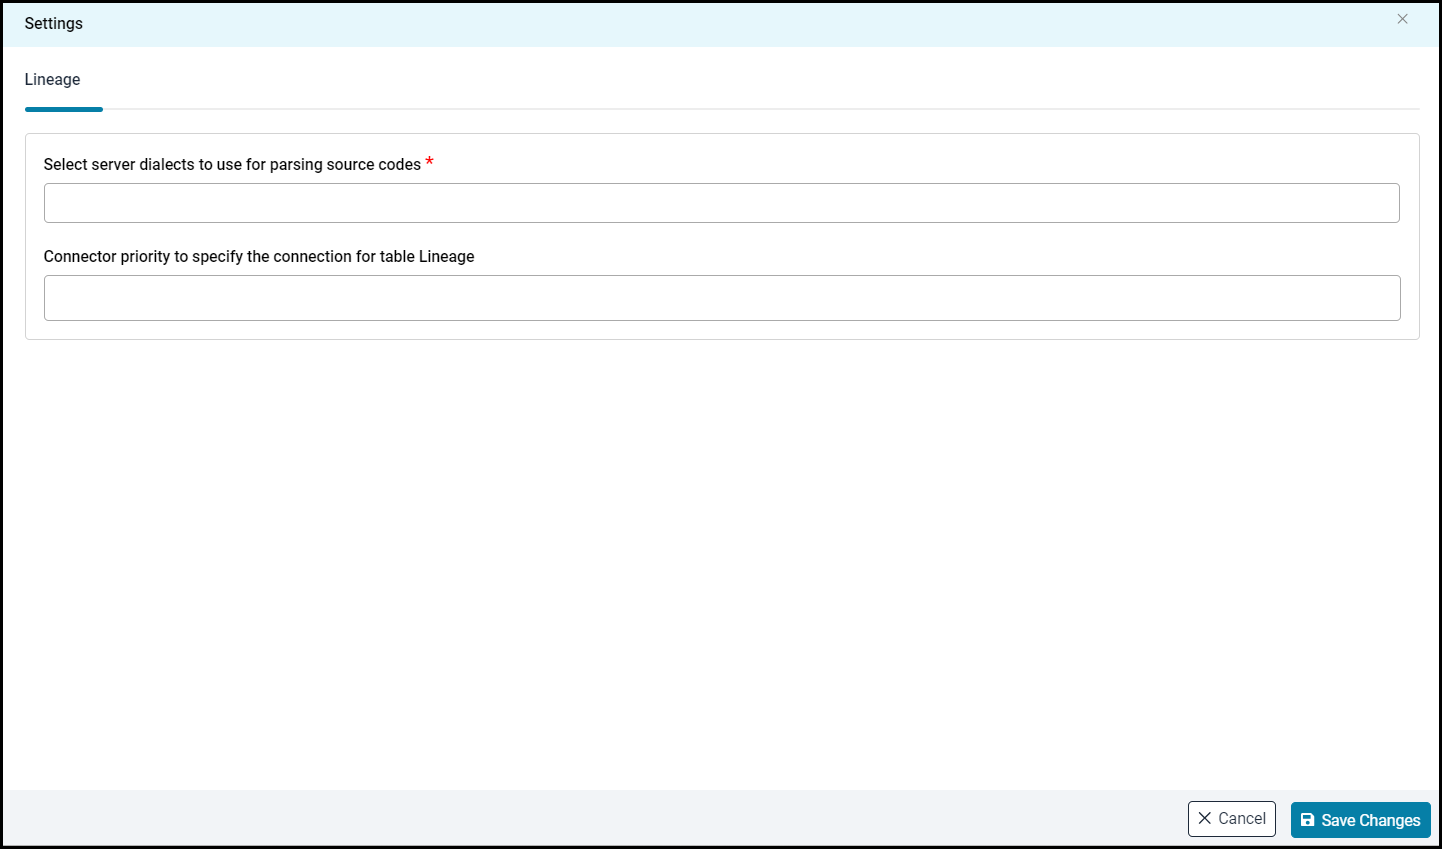
Connection Settings
Lineage
For the Informatica ICS Connector, only the Lineage setting option is available, and it is enabled when the Auto Lineage License option is selected.
The purpose of the lineage setting is to serve the option of changing the server/source connection to build the lineage. You can configure multiple servers simultaneously in the Selecting Source Server Type for lineage and also set the connection priority lists to pick the tables in the Connections Priority to pick the source table for lineage building.
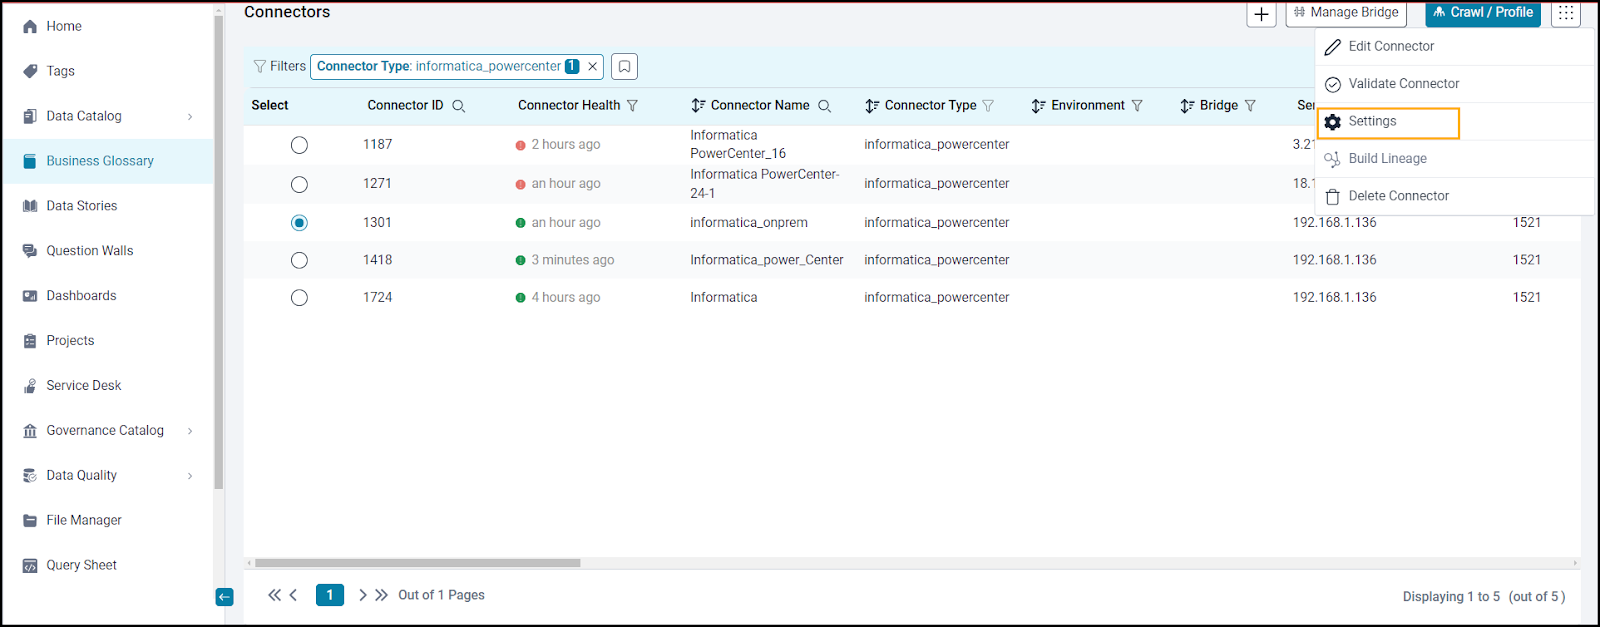
To view the Connector Settings page,
- Go to the Connectors page.
- From the 9- dots, select the Settings option.
- This will display the Connector Settings page, where you can view the connector settings.
Note: For more information, refer to the Connector Settings.
The Crawling of Schema(s)
You can use the Crawl/Profile option, which allows you to select the specific schemas for the Crawl and Schedule operations. For any scheduled crawlers, the defined run date and time are displayed to set.
- Navigate to the Connectors page and click the Crawl/Profile option.
- Select the required Schema(s) to crawl.
- Click on the Run button, which gathers all metadata from the connected source and puts it into the OvalEdge Data Catalog.
Note: For more information on Scheduling, refer to Scheduling Connector
FAQs
Question: Can you explain lineage in ICS?
Ans: Connector builds lineage for ICS as mentioned below:
Builds Table Lineage between Sources, Mapping, and Targets.
Copyright © 2024, OvalEdge LLC, Peachtree Corners GA USA