Securing User Credentials
The first step towards connecting to a database is Authentication which verifies the identity of a user or an application. To establish a connection with a Data Source (DB, ETL, Reporting Systems, File Manager), OvalEdge supports the below-mentioned Credential Manager platforms:
- OE Database
- AWS Secrets Manager
- HashiCorp Vault
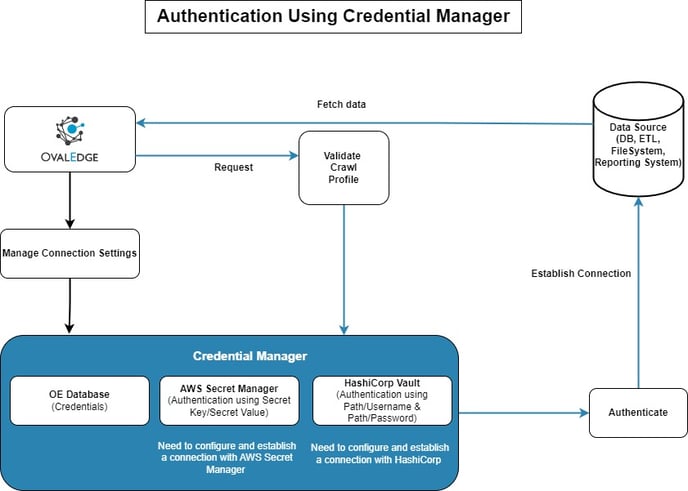
Credential Manager
Credential Manager helps to manage user credentials (Username/Password), tokens, API keys, certificates, or any sign-in information for applications, websites, or networks. It allows the users to save credential details in a centralized location to view, delete, add, and rotate credentials.
As users prefer not to reveal their credentials when authenticating, the credential manager tools help to encrypt the user credentials by creating secrets or path key values which cannot be accessed by others in any form and protect their privacy.
The connectors read the authentication information from the Credentials Manager in real-time at the time of establishing a connection to the data sources.
OE Database
OE Database provides encryption as a service with credential management to simplify encrypting credentials. It uses encryption algorithms to securely store the user credentials, such as username/password, client secrets, and API tokens, in an encrypted format in the OvalEdge database. OvalEdge platform manages and maintains the responsibility of the encryption of the credential within OvalEdge.
How are the credentials secured in the OE Database?
When the user enters the credentials related to the data sources to which the connectivity has to be established, the credentials are stored in the OvalEdge database in a secured way using the SALT applied over the encrypted value with the Ciphers. This format of storing the credentials with SALT being applied will be irreversible.
What is SALT?
SALT is random data used as an additional input layer to a one-way function that hashes data, a password, or a passphrase. It helps to safeguard passwords in storage (OE Database) in an irreversible format, even in the case of Compromise.
Establishing a connection using OE Database:
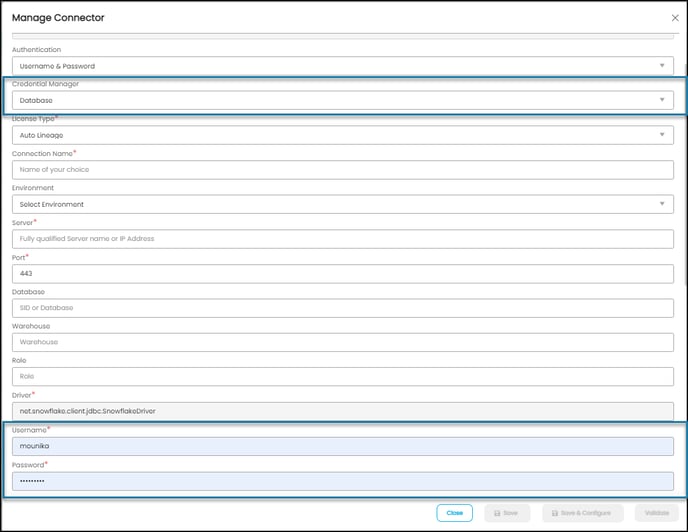
- Enter the user credential details in the Manage Connection and validate.
AWS Secrets Manager
The AWS Secrets stores and maintains the user credentials in a centralized location. It uses encryption keys to generate secret keys and also supports the secret rotation feature. The secret credentials generated in the AWS Secrets instance are used to access the data source in the OvalEdge platform. When establishing a connection with a data source, the OvalEdge application makes a call to the AWS Secrets Manager in real-time to read the secret credentials.
- Create Secrets (Access Key, Secret Key, Region) in the AWS Secret Manager.
- Connect to the AWS Secrets Manager Connector in the OvalEdge platform and configure the secret details that are generated in the AWS Secrets Manager.
- Establish a connection with a specific connector using the secret attributes (secretname/secret key, secretpassword/secretkey).
Validating AWS Secretes credentials:
- To establish a connection with a data source, the users need to connect to the AWS Secret Manager Connector in the OvalEdge platform.
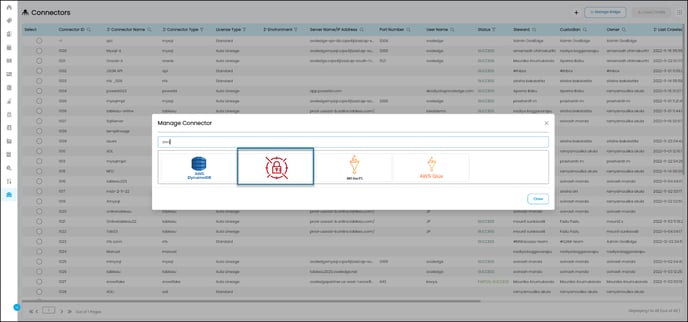
- Navigate to Administrator > Connectors > + icon (Add a Connection) > select AWS Secrets Manager.
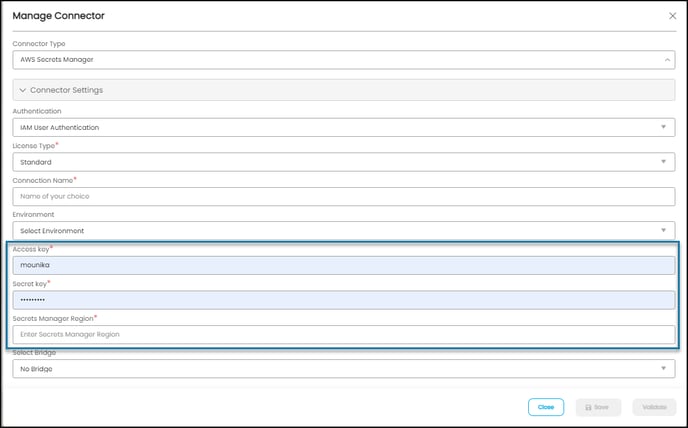
- Enter the secret credentials (Access Key, Secret Key, Region) created in the AWS Secrets Manager instance.
Field Name
Description
Connection Type*
Displays AWS Secrets Manager by default.
License Type*
By default, the License type is standard.
Connection Name*
Enter the name of the connection, the connection name specified in the Connection Name textbox will be a reference to the AWS Secrets Manager connection in the OvalEdge application.
Example: AWS Secrete Manager_1
Access Key*
Enter the access key value configured in AWS Secrets Manager.
Secret Key*
Enter the secret key configured in AWS Secrets Manager.
Secrets Manager Region*
Enter the Secret Manager Region configured in AWS Secrets Manager.
Select Bridge
By default, the No Bridge option will be displayed.
- Click on the Save button to save the connection details.
- Click on the Validate button to validate the entered connection details. Click on the Save button to save the connection details.
Note: The integration of AWS Secrets Manager will work with Cross Account via Bridge.
Establishing a connection using AWS Secretes credentials:
- Go to Administrator > Connectors > + icon Add New Connection.
- In the Manage Connector pop-up, enter the details in the fields provided.
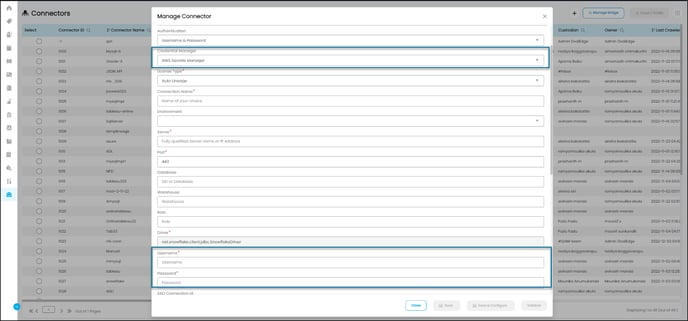
- Enter the details in the Manage Connector pop-up.
- Select AWS Secrets Manager as Credential Manager and enter the user credentials in the fields. For Example, Username - secretname/secret key, Password - secretpassword/secretkey.
- Click the Save button to save the details. Click Validate to get access to the data source
HashiCorp Vault
The HashiCorp connector generates and stores the connector secrets (Username and Password) in the HashiCorp database.
Prerequisites
- Configure the database in HashiCorp.
- Establish a HashiCorp connection to manage the secrets.
Set up a connection
To establish a connection to HashiCorp,
- Navigate to Administrator > Connectors.
- Click on the + (New Connector) icon, and the Add Connection with Search Connector pop-up window is displayed.

- Add Connector pop-up window is displayed where you can search for the HashiCorp.

- The Add Connector with HashiCorp specific details pop-up window is displayed. Enter the relevant information to connect to the HashiCorp connection.
Note: The asterisk (*) denotes mandatory fields required for establishing a connection.

Field Name
Description
Connector Type
By default, the selected connection type is displayed as HashiCorp.
Vault Name*
Enter a name for the HashiCorp connector. You can specify a reference name to identify the HashiCorp connector in OvalEdge.
Example: HashiCorp_sample
Connector Environment
The Connector Environment drop-down list allows you to select the environment configured for the connector from the drop-down list.
For example, PROD, or STG (based on the configured items in the OvalEdge configuration for the connector.environment).
The purpose of the environment field is to help you identify which connector is connecting what type of system environment (Production, STG, or QA).
Vault BaseUrl*
Enter the server name/URL to connect to the HashiCorp connector.
Vault Token*
Enter the vault token.
Admin Roles
Integration Admins*
To add Integration Admin Roles, search for or select one or more roles from the Integration Admin options, and then click on the Apply button.
The responsibility of the Integration Admin includes configuring crawling and profiling settings for the connector, as well as deleting connectors, schemas, or data objects.Security and Governance Admins*
To add Security and Governance Admin roles, search for or select one or more roles from the list, and then click on the Apply button.
The security and Governance Admin is responsible for:- Configure role permissions for the connector and its associated data objects.
- Add admins to set permissions for roles on the connector and its associated data objects.
- Update governance roles.
- Create custom fields.
- Develop Service Request templates for the connector.
- Create Approval workflows for the templates.
Select Bridge
By default, the no bridge option will be displayed.
- After entering the connection details, select the appropriate button based on your preferences.
- Validate: Click on the Validate button to verify the connection details. This ensures that the provided information is accurate and enables successful connection establishment.
- Save: Click on the Save button to store the connection details.
- Close: Click on the Close button. It closes the pop-up window.After entering the connection details, select the appropriate button based on your preferences.
- To manage the connection details of an existing connector in the HashiCorp:
- Select a connector and then click on 9-dots > Edit Connector.
- The Edit Connector Information window is displayed.
- Select the HashiCorp option from the Credential Manager drop-down list.

- Enter Username and Password.
Note: For the Username and Password, enter the details in the mentioned leased ID path format, i.e.: Path/User Name and Path/Password (Path refers to the lease ID- Example: [ID database/creds/dynmic_role]). - The above entered Username & Password will be fetched from HashiCorp for validating the connection, crawling, and profiling.
- Validate and save the connection details.
Copyright © 2025, OvalEdge LLC, Peachtree Corners, GA USA