Introduction
This article gives an in-depth understanding to the user of the Connector Settings in the OvalEdge application and its functionalities.
Overview
Connectors build the bridge between the OvalEdge and the platforms in your data ecosystem. They make the connection to the various environments possible while supporting the functions of metadata collection, profiling, querying, lineage building, etc.
Connector settings direct the behavior, guide rules and link the metadata to their proper components in OvalEdge. These settings dictate the type of data that can be transferred, the rules of data transformation, and the security methods and options that will be employed within the application.
Connector Functionalities
The Connectors tab can be found in the Administration menu of the OvalEdge application. Access to these parameters is available through the Settings menu located within the Nine dots icon on the Connectors page.
Upon selecting the connector in the first column, one may access the settings via the Nine Dots menu situated next to the gear icon.


Connector settings offer the following configuration options to users, which could change based on the connector type:
Some connectors have variations in the options listed. Please refer to the documentation for the specific connector you are working with to understand and respond to the detailed instructions for each connector.
Most connectors have the following functionalities in common:
- Crawler
- Profiler
- Data Access
- Query Policies
- Access Instructions
- Business Glossary Settings
- Others
Crawling
The crawling process is an integral part of ensuring that an organization's data is managed, governed, and utilized to achieve its business objectives. By crawling, organizations can identify and collect information on all their data resources, which may be stored across various systems and platforms, which enables them to build a comprehensive view of their data assets to understand the context, quality, and lineage of their data, which is essential for making informed decisions about data governance, management, and analytics.
Crawling collects metadata about the objects in your data ecosystem. It then reflects them as objects in your data catalog. This catalog is the foundation and the first step in building the additional capabilities of your Data Governance program.
Additionally, crawling assists organizations in identifying potential data quality issues, inconsistencies, and duplications, which can be addressed to improve the accuracy and reliability of their data. Ultimately, crawling is a critical step in ensuring that an organization's data is properly managed, governed, and utilized to achieve its business objectives.
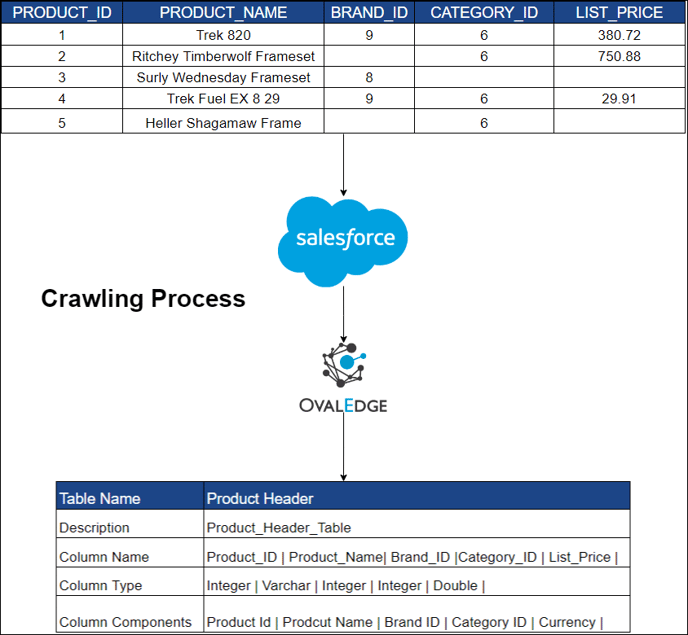
Crawler Settings
Crawling involves collecting metadata from the data source. For example, a crawler can extract the headings of each column, such as "product name", "price", "rating", "number of reviews", "brand", "category", and "seller" from an inventory. This information can be used to create a schema for the data.
The following options and rules are available in Crawler Settings:
 Crawler Options
The crawler options allows users to choose from multiple options depending on the data source being crawled (E.g., RDBMS, ETL, Files, Reports).
The crawler options let user to select the type of metadata you would like brought into your Data Catalog. Here is an example of the options available for an RDMBS-based Data Source. These options will change based on the type of data source you are collecting the metadata from. By checking the respective boxes, the OvalEdge application will perform the below actions:
Tables, Views, and Columns: By checking this option, the OvalEdge application crawls the Tables, Views, and Columns from the data source.
Procedures, Functions, Triggers & Views Source Code: During crawling, the OvalEdge application views the source code, procedures, and functions of the selected schema and imports them. This option must be checked if auto lineage is desired and will be run later.
Relationships: The relationships between tables at the selected schema level will be identified and displayed in OvalEdge.
Users & Roles: Discovery of users and their roles from the data source and importing those into OvalEdge.
Policies: This option enables users to synchronize policies created in OvalEdge from a remote source system.
Permissions: The crawling will discover the users and their roles with the type of remote access permission provided to the users of OvalEdge.
Additional Crawl
The standard crawling involves using a "Database Metadata Utility" to retrieve metadata from a database. Metadata includes information about database objects, such as tables, columns, and relationships. However, in some cases, the metadata obtained from the standard crawl might be incomplete or insufficient for specific use cases.
In such scenarios, an additional crawl can be triggered to extract more detailed metadata from specific database tables. This process ensures that the necessary metadata, often missed in standard crawls, is captured to provide a complete database view.
For example, in an Oracle database, additional crawls might retrieve metadata from the following tables:
- ALL_TAB_COMMENTS: This table provides comments or descriptive information related to regular tables, offering insights into each table's purpose or structure.
- DBA_TAB_COMMENTS: Similar to ALL_TAB_COMMENTS, but at a more privileged level. It provides comments on tables across the entire database, accessible to users with higher-level privileges.
- ALL_MVIEWS: Retrieves metadata about materialized views, which are database objects that store query results for efficiency.
- DBA_COL_COMMENTS: Contains comments for individual columns within tables, offering detailed descriptions of column-level data.
Privileges for Additional Crawl
To access these tables for an additional crawl, certain privileges are required for the service account:
- DBA_TAB_COMMENTS and DBA_COL_COMMENTS: Access to these tables requires the SELECT ANY DICTIONARY privilege, which allows the user to query data dictionary views across the entire database.
GRANT SELECT ANY DICTIONARY TO <user>; - ALL_TAB_COMMENTS and ALL_MVIEWS: No special privileges are needed. The user can query these tables for objects they can access in the database.
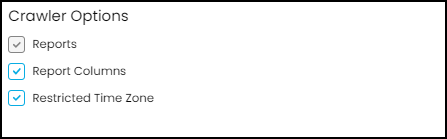
Options available in a Reports-based Data Source

By checking the respective boxes, the OvalEdge application will perform the below actions:
Reports: All reports will be discovered during the crawling process and imported into OvalEdge.
Report columns: All reports columns will be discovered during the crawling process and imported into OvalEdge.
Restricted Time Zone: This option lets users crawl the data source only during a specific time frame.
Options available in a Files-based Connectors such as “S3” and “NFS”
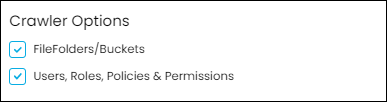
By checking the respective boxes, the OvalEdge application will perform the below actions:
FileFolders/Buckets: All Files Folders/Buckets will be discovered during the crawling process and imported into OvalEdge.
Users & Roles: Discovery of users and their roles from the data source and importing those into OvalEdge.
Policies: This option enables users to synchronize policies created in OvalEdge with a remote source system
Permissions: The crawling will discover the users and their roles with the type of remote access permission provided to the users of OvalEdge.
An additional option available for specific data sources is as follows:
Delta Crawl: This option lets users crawl the data source on or after a specific time. (E.g., let's say a data source comprises 10 reports, of which only 2 have been modified since a specific time. In this scenario, the user can select this specific time frame, and OvalEdge will exclusively crawl those 2 updated reports, thus saving the user time and computational resources.)
Crawler Rules
In the context of crawling, regular expressions (regex) can be used to refine the crawl results by specifying patterns to match against the data in the source system. For example, in the case of an inventory, a user can write a regular expression to search the data which contains or starts with or ends with a specific letter or a number. This can help to filter out irrelevant data and retrieve only the relevant information.
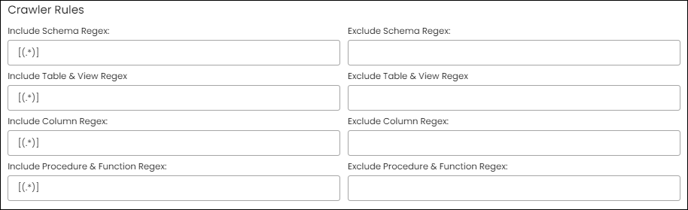
For instance, a regular expression can be used to search for all data that start with a letter or string, ends with a letter or string, or contains a letter or string. Please see the section on “Regular Expression” about how to write these expressions.
Two types of crawler rules exist, namely "Include" and "Exclude." The "Include" rule extracts Schema, Columns, Tables, Views, Procedures, and Functions that meet the criteria, whereas the "Exclude" rule omits the data objects that meet the matching criteria.
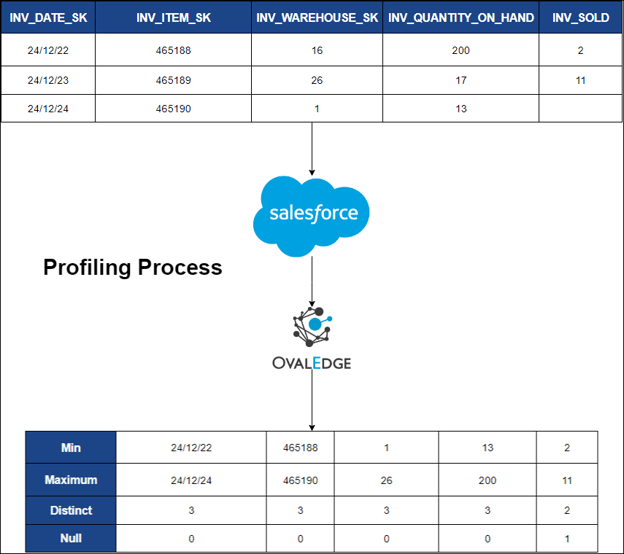
Profiling
Profiling refers to the process of collecting statistics and informative summaries about connected data sources, Evaluating the quality of a data source before utilizing it for analyses. Recognizing relationships among tables at the entity level and patterns between them. The data source needs to be crawled before attempting to profile.
In this process, we obtain a sample of records for getting the data insights. OvalEdge has a system setting (Administration > System Settings > Others tab) which can enable access to the data:
ovaledge.handleprofile.stats: if “true” (default), OvalEdge will fetch and store the sample data - hence, profiling and AI recommendations can be done.
ovaledge.handleprofile.stats: if “false”, OvalEdge will NOT fetch and store any data - hence, profiling and AI recommendations can not be done.
In OvalEdge, profiling assembles the following statistics:
- Row count for tables
- Null count for columns
- Count of distinct values
- Minimum value, Maximum value, and top 50 values.
All other statistics are inferred from the above data points. Profiling can only be performed on databases (Tables, Views, Columns) and files.
Profiler
The following options are comprised in Profiler:
- Profiler Options
- Profiler Rules
- Profiler Settings
Profiler Options
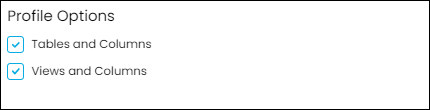
Tables and Columns, Views and Columns: By checking these options, the OvalEdge application profiles the Tables, Views, and Columns from the data source.
Profiler Rules
In the context of Profiling, regular expressions (regex) can be used to refine the Profiling results by specifying patterns to match against the data in the source system. For example, in the case of an inventory, a user can write a regular expression to search the data which contains or starts with or ends with a specific letter or a number. This can help to filter out irrelevant data and retrieve only the relevant information.
For instance, a regular expression can be used to search for all data that start with a letter or string, ends with a letter or string, or contains a letter or string. Please see the section on “Regular Expression” about how to write these expressions.

Two types of profiler rules exist, namely "Include" and "Exclude." The "Include" rule extracts columns, tables, and views that meet the criteria, whereas the "Exclude" rule omits the data objects that meet the matching criteria.
Profiler Settings
Profiler Settings allow users to schedule profiling of data sources with advanced options such as the following:
![]()
Order: If multiple profiling jobs are scheduled, The application will consider the order number and execute the jobs in sequence (e.g. Order 2 will be executed after order 1)
Day: User-specified day of the week for profiling
Start Time: User-specified time of the day to start the profiling
End Time: User-specified time of the day to end the profiling
Number of Threads: A thread refers to one execution of a query on a database at a time. The number of threads dictates how many simultaneous queries are run on the data source.
Profile Type: This option lets users choose from the 4 types of Profiling.
|
Sample: The profile is generated using a designated Sample Profile Size. This type of profiling calculates statistics such as Min, Max, Distinct, and Null Counts for columns. However, since it is only calculated on a sample size, the results may differ from the full profiles. To execute a sample profile, select the profile type as "Sample" and enter a sample profile size (the count of records to be profiled). Auto: When the Row Constraint checkbox is enabled and the total Table Row Count is greater than the configured Row count Limit, a sample profile is performed based on the count specified in the Sample Profile Size. (E.g., a sample profile is performed if the Table Row Count is, let’s say 10,000 and the configured Rowcount Limit is 5,000.) However, if the Table Row Count is below the Row count Limit, all rows in the table will be profiled. It's worth noting that when the row count constraint is set to "True," a profile type of "Auto" will always rely on the Rowcount Limit. (E.g., a full profile is performed if the Table row count is 10,000 and the configured row count limit is 15,000) Query: If the entered table row count is less than the Row count Limit, profiling will be executed on the entire table. On the other hand, if the input table row count exceeds the Row count Limit, profiling for those tables will be skipped to avoid performance issues. Disabled: This profile type prohibits profiling on the selected data source. |
Row count Constraint: The Row Count Constraint option is applicable only when the Profile Type is set to Auto. If the Row Constraint checkbox is selected and the configured Row count Limit (100) is lower than the total Table Row Count (1000), the sample profiling is performed based on the count mentioned in the Sample Profile Size. If the Row Constraint checkbox is selected, and the configured Row count Limit (1000) is greater than the total Table Row Count (100), the query is executed without considering the count specified in the Row count Limit.
Row count Limit: The maximum no of rows that should be considered for profiling.
Sample Profile Size: The total number of rows within the table data page in the Catalog.
Sample Data Count: Select this option for considering the total number of rows in profiling.
Query Timeout: Specify the query timeout duration in seconds for the execution of the query on the remote database before it times out.
Regular Expressions (Regex)
Regular expression is useful for searching for patterns in data that match either a specific set of characters or a numeric pattern. However, depending on the context and requirements of the application, the regular expression may need to be modified to ensure that it correctly matches the desired patterns and doesn't match unwanted patterns.
There are two formats for Regex patterns:
Format-1:
- Any characters: [(.*)]
- Any object name contains ‘customer’: [.*customer.*]
- Any object name contains ‘customer’ or ‘prospect’: [.*customer.*|.*prospect.*]
- Any object name starting with ‘customer’: [customer.*]
- Any object name ending with ‘customer’: [.*customer]
Format-2:
In this format, patterns are separated by commas
Supported patterns are start with, end with, and equals
Except equals, all other patterns are case-sensitive
- Any object name starts with ‘customer’: customer%
- Any object name ends with ‘customer’: %customer
Examples for Format-2:
- lineage, lineagecolumn: considers both object names lineage and lineagecolumn
- Prospect, customer%: considers the object names prospect and those start with customer
- oetable, oecolumn, %customer: considers the object names oetable, oecolumn, and those end with customer
Here is an advanced regex [.*(BKP|bkp).*|.*\\d+.*] and let's break it down to understand it better. The regex is made up of different characters and symbols that have specific meanings.
The expression starts with a "[" which denotes the start of a character class. The "." character matches any character string, while the "(" and ")" characters match open and closed parentheses respectively.
The "|" symbol is an alternation operator that matches the previous or next parts. The expression "BKP|bkp" matches either "BKP" or "bkp". The "]" character marks the end of the character class.
The "*" symbol is a quantifier that matches zero or more instances of the preceding character or group of characters. The expression ".*\\d+.*" matches any character followed by one or more digits.
Putting all the above pieces together, the regex can be used to either include or exclude any Database Schemas, Tables, Columns, Views, Procedures, or Functions that have "BKP" or "bkp" or any number anywhere in the string.
Data Access Management (RDAM)
Data Access or RDAM ( Remote Data Access Management) enables users to access desired tables and reports from remote systems. This article outlines the process of connecting to a remote system through the OvalEdge application, adding a new connection to a data source, and displaying the data on the OvalEdge dashboard.
Currently, this feature is available only on Snowflake, Databricks & S3 connectors and lets users choose from three different options.
- Remote System is Master
- OvalEdge is Master
- None

Remote System is Master
In this mode, access to remote system metadata and data in the OvalEdge platform is governed by the data access settings defined in the remote system. The changes in settings made are synchronized into the OvalEdge platform frequently or as per the defined schedule.
If any of the Users, Roles, and Permissions are updated in the Remote System, then that information is automatically updated in the OvalEdge application on a scheduled or on-demand basis. Here the OvalEdge application syncs the Users, Roles, and Permissions, from the Remote System into OvalEdge for the crawled Schema.
OvalEdge is Master
This process is used to govern data access on the Remote System using OvalEdge Security. When crawling, the user permission available on that schema will be reflected in the ‘Users & Roles’ and Security screen. Users will be able to log in with that user's default password, if required the user can change their password from the Users & Roles page.
Now, new users and roles can be added, and existing ones can be edited, or deleted within the OvalEdge and sync them to the Remote System. Here, the permissions of crawled schemas and tables can also be added, edited, deleted, and synced to the Remote system.
None
The OvalEdge application synchronizes only the users and roles information from the remote system if the user opts for the None.
Data Access Authorization
Data Access Authorization is a crucial feature that empowers users to manage and control data authorization within the OvalEdge application. There are different options available in OvalEdge that cater to this requirement.

OvalEdge Data Permissions: In this mode, the access permissions are solely determined by the data permissions set in the OvalEdge application. Any user who has access to the data in OvalEdge can perform operations on it according to their assigned privileges.
Remote System Permissions: This mode allows OvalEdge to follow the access permissions set in the Remote System. If a user has appropriate permissions in the Remote System, they can access and perform actions on the data in OvalEdge accordingly.
These authorization options provide users with the flexibility to choose the mode that best aligns with their data management needs, ensuring secure and controlled data access within the OvalEdge application.

Connector Policies: Enabling this option allows for the synchronization of policies created in OvalEdge with a remote source system.
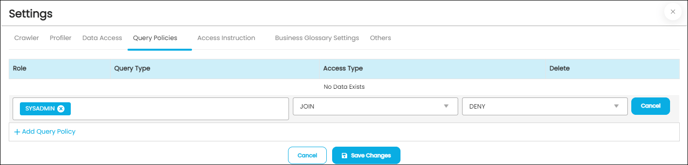
Query Policies
OvalEdge enables the use of query policies to Deny users or roles from accessing specific query types (Join, Union, Group, Sum, Avg, etc.)
For instance, an organization can restrict the SYSADMIN from running a Join
Query type as shown in the image below:
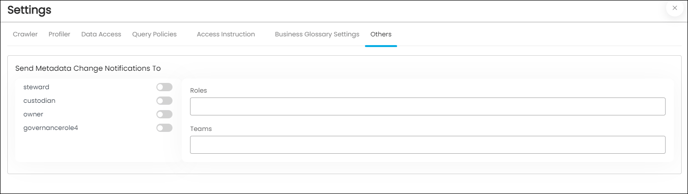
Others
Others option enables users to turn on notifications of any metadata changes, and users can choose who or which team receives the notifications of the changes.
Business Glossary
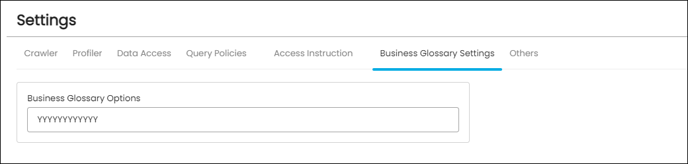
The settings in the Business Glossary allow data source admins/owners to determine how business terms are associated with data objects in their database. These settings override the data association preferences set on the business term itself.
The Business Glossary Term options are ordered as follows:
- Copy the title to catalog
- Copy the business description to the catalog
- Copy Steward to the catalog
- Copy Custodian to the catalog
- Copy Owner to catalog
- Copy GovernanceRole4 to catalog
- Copy GovernanceRole5 to catalog
- Copy GovernanceRole6 to catalog
- Restricted
- Masked
- Show classification in the dictionary
- Cascade
For example, if the setting is 'YYYYYYYYYYYY', all data association preferences will be applied to data objects in the data source when business terms are associated with them. If the setting is 'YYNNNNNNYYYY':
- The title of the business term can be copied to the data object if selected on the term.
- The business description of the term can be copied to the data object if selected on the term.
- The Steward, Custodian, Owner, and Governance Roles 4-6 of the business term cannot be assigned to the data object, even if selected on the term.
- The data of the data object can be restricted if selected on the term.
- The data of the data object can be masked if selected on the term.
- The classification defined on the term can be shown on the data object in the catalog if selected on the term.
- The Governance Roles can be cascaded to the data objects if selected on the term.
Note: Application settings always take precedence over these settings.
Lineage
Lineage refers to the process of tracking and documenting the lifecycle of data, from its origins to its destination. This includes capturing metadata about how data is created, transformed, and consumed within a system or across different systems.
Lineage provides valuable information to data professionals who need to understand the history and context of data, including its quality, completeness, and reliability. It helps organizations comply with regulatory requirements by providing transparency into data flows and supporting data governance processes.
The following image depicts a Lineage construction of an inventory table that delineates the provenance and termination points of the data.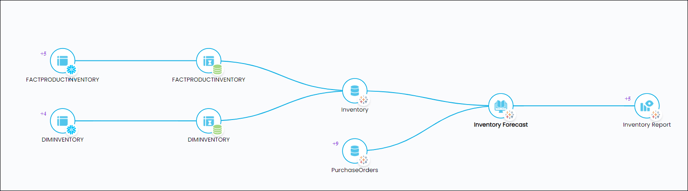
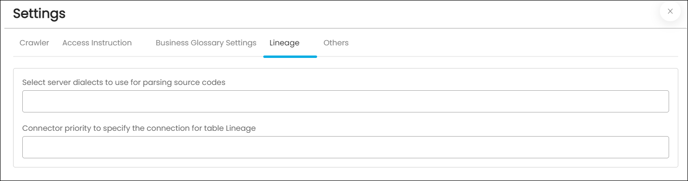
The purpose of the lineage tab is for Reports and ETL connectors with Auto Lineage License type, which serves the option of changing the server/source connection to build the lineage. This feature allows users to select multiple servers simultaneously to build the Lineage from the required tables.
- Select server dialects to use for parsing source codes: While parsing the source codes from the connector, the dialects selected will be used in the specified order.
If the first server dialect fails to parse the code, the parsing will be tried using the next server dialects and so forth till the code is parsed successfully. If all the dialects fail to parse the code, then lineage will not be built, and the status will be shown as parse failed. At least one server dialect should be specified for building lineage for the connector codes.
- Connector priority to specify the connection for table Lineage: When a table with the same name or signature is present in more than one connector cataloged table, these objects will be resolved to the above-listed connectors in the specified order. Example: Connectors - MySQL X, Oracle Y, and DB2Z, which match the customer tables found in the code to catalog the table found in the code to Catalog objects; it is found that the customer table is present in both DB2Z and Oracle Y connectors. Since Oracle Y is configured before DB2Z, the customer object lineage will be from the Oracle Y customer table.
Context URL
The OvalEdge Browser Extension utilizes the Context URL feature found in the crawler settings. By selecting the Context URL option, a user can map OvalEdge to specific URL addresses. This allows the browser to recognize the site and provide metadata results from the OvalEdge catalog even when the plugin is used outside of the OvalEdge application. It's important to note that the Context URL feature only applies to the Report connection type.
To enable the Context URL feature for a particular data source, follow these steps:
- Select the Settings option and navigate to the Connectors Setting page.
- Click on Others, then select the Context URL section.
- Enter the browser URL for the desired data source (e.g., https://tableauad.ovaledge.net).
- To add additional URLs, click on the + Add New URL option. A new textbox will appear in the Context URL section where you can provide the URL details.
Once the Context URL is set up, the OvalEdge application plugin acts as a bridge between the OvalEdge application and the Source Report Database. This allows users to view the Certification status or Endorsement Rating applied to a report using the OvalEdge application.