Connector Summary
Greenplum Database is a parallel processing (MPP) database server with an architecture specially designed to manage large-scale analytic data warehouses and business intelligence workloads. In the OvalEdge application, the Greenplum connector allows users to crawl and profile datasets like Tables, Columns, and Views and helps build the data catalog and lineage.

Connector Capabilities
The connector capabilities are shown below:
Crawling
|
Features |
Supported Objects |
Remarks |
|---|---|---|
|
Crawling |
Tables, Table Columns, Views, Stored Procedures, Functions, Triggers, Roles, Users, Permissions, Triggers, Usage Statistics |
- |
Profiling
|
Features |
Details |
Remarks |
|
Table Profiling |
Row count, Columns count, View sample data |
- |
|
View Profiling |
Row count, Columns count, View sample data |
View is treated as a table for profiling purposes. |
|
Column Profiling |
Min, Max, Null count, distinct, top 50 values |
Un-Supported datatypes: “blob", "clob", "lob", "img", "bytea", "aclitem[]", "_aclitem", "xid", "array", "json" |
|
Full Profiling |
Supported |
- |
|
Sample Profiling |
Supported |
- |
Lineage Building
|
Lineage entities |
Details |
|---|---|
|
Table Lineage |
Supported |
|
Column Lineage |
Supported |
|
Lineage Sources |
Stored Procedures, Functions, Views, SQL queries (from Query Sheet) |
Querying
|
Operation |
Details |
|---|---|
|
Select |
Supported |
|
Insert |
Not supported, by default. |
|
Update |
Not supported, by default. |
|
Delete |
Not supported, by default. |
|
Joins within database |
Supported |
|
Joins outside database |
Not supported |
|
Aggregations |
Supported |
|
Group By |
Supported |
|
Order By |
Supported |
Prerequisites
The following are prerequisites for connecting to the Greenplum:
Greenplumn jdbc driver should be placed in the jar path before creating a connection, then download the jar from here.
Drivers
The APIs/drivers used by the connector are given below:
|
Sl.No |
Driver / API |
Version |
Details |
|---|---|---|---|
|
1 |
jdbc driver |
greenplum-jdbc-5.1.4.jar |
https://mvnrepository.com/artifact/com.pivotal/greenplum-jdbc/5.1.4 |
Configuring Environment Variables
Configuring environment names enables you to select the appropriate environment from the drop-down list when adding a connector. This allows for consistent crawling of schemas across different environments, such as production (PROD), staging (STG), or temporary environments. It also facilitates schema comparisons and assists in application upgrades by providing a temporary environment that can later be deleted.
Before establishing a connection, it is important to configure the environment names for the specific connector. If your environments have been configured, skip this step.
Steps to Configure the Environment
- Log into the OvalEdge application.
- Navigate to Administration > System Settings.
- Select the Connector tab.
- Find the key name “connector.environment”.
- Enter the desired environment values (PROD, STG) in the Value column.
- Click ✔ to Save.

Service Account Permissions
A service account is required for crawling and profiling. By default, the service account provided for the connector will be used for any query operations. If the service account has a write privilege, insert, update, and delete queries can be executed. The minimum privileges required are listed below.
|
Operation |
Access Permission |
|---|---|
|
Connection Validation |
Select |
|
Crawling |
Select, Reference, and Execution |
|
Profiling |
Read, Select |
|
Query execution |
Select Execution |
Establish a Connection
To connect to Greenplum using the OvalEdge application, complete the following steps:
- Log in to the OvalEdge application.
- Navigate to Administration > Connectors.
- Click on the + (New Connector) icon.
- The Add Connector pop-up window is displayed, and you can search for the Greenplum connector.
- The Add Connector with Connector Type specific details pop-up window is displayed. Enter the relevant information to configure the Greenplum connection.
Note: An asterisk (*) denotes a mandatory field for establishing a connection.
Field Name
Description
Connector Type
This field allows you to select the connector from the drop-down list provided. By default, 'Greenplum' is displayed as the selected connector type.
Credential Manager*
Select the option from the drop-down menu where you want to save your credentials:
OE Credential Manager: The Greenplum connection is configured with the basic Username and Password of the service account in real time when OvalEdge establishes a connection to the Greenplum database. Users must manually add the credentials if the OE Credential Manager option is selected.
HashiCorp: The credentials are stored in the HashiCorp database server and fetched from HashiCorp to OvalEdge.
AWS Secrets Manager: The credentials are stored in the AWS Secrets Manager database server and fetched from the AWS Secrets Manager to OvalEdge.
For more information on Azure Key Vault, refer to Azure Key Vault.
For more information on Credential Manager, refer to Credential Manager.
License Add Ons
By default, all the connectors will have a Base Connector License, which allows you to crawl and profile to obtain metadata and statistical information from a data source.
OvalEdge supports various License Add-Ons based on the connector’s functionality requirements.
- Select the Auto Lineage Add-On license that enables the automatic construction of the Lineage of data objects for a connector with the Lineage feature.
- Select the Data Quality Add-On license to identify, report, and resolve the data quality issues for a connector whose data supports data quality using DQ Rules/functions, Anomaly detection, Reports, and more.
Connector Name*
The connection name refers to the Greenplum database connection in the OvalEdge application.
Connector Environment
The Connector Environment drop-down list allows you to select the environment configured for the connector from the drop-down list.
For example, you can select PROD or STG (based on the items configured in the OvalEdge configuration for the connector environment).
The purpose of the environment field is to help you identify which connector is connecting what type of system environment (Production, STG, or QA).
Note: The Configuring Environment Variables section explains setting up environment variables.
Server*
Specify the name of the Greenplum database instance server IP/URL, which is accessible via the OvalEdge application.
Example:
IP: 190.x1.x3.xx90
Server: ovalgreenplumdbms.com
Port*
By default, port number 5432, which is related to the Greenplum database, is displayed. A new port number can be provided if needed.
Database*
Enter the source database name for crawling.
Driver*
A JDBC driver is a Java library file with the extension .jar that connects to a database. The driver details associated with the Greenplum database will be auto-populated by default.
Username*
Enter the Service Account Username of the Greenplum Server.
Password*
Enter the password of the Greenplum server name.
Connection String
Set the Connection string toggle button to get the details from the credentials provided automatically. Alternatively, you can manually enter the string.
Format: jdbc:pivotal:greenplum://{server}:5432;database={sid}
Plugin Server
Enter the server name if you are running this as a plugin.
Plugin Port
The port number on which the plugin is running.
Default Governance Roles
Steward*
Select the Steward from the drop-down list options.
Custodian*
Select the Custodian from the drop-down list options.
Owner*
Select the Owner from the drop-down list options.
Governance Roles 4, 5, 6*
Select the respective user from the drop-down options.
Note: The drop-down list displays all the configurable roles (for a single user or a team) according to the configurations made in the OvalEdge Security > Governance Roles section.
Admin Roles
Integration Admins*
To add Integration Admin Roles, search for or select one or more roles from the Integration Admin options, then click the Apply button.
The Integration Admin's responsibilities include configuring the connector's crawling and profiling settings and deleting connectors, schemas, or data objects.Security and Governance Admins*
To add Security and Governance Admin roles, search for or select one or more roles from the list and click the Apply button.
The Security and Governance Admin is responsible for:- Configuring role permissions for the connector and its associated data objects.
- Adding admins to set permissions for the connector's roles and associated data objects.
- Updating governance roles.
- Creating custom fields.
- Developing Service Request templates for the connector.
- Creating approval workflows for Service Request templates.
No. of Archive Objects*
The number of archive objects indicates the number of recent metadata modifications made to a dataset at a remote/source location. By default, the archive objects feature is deactivated. However, users may enable it by clicking the Archive toggle button and specifying the number of objects they wish to archive.
Select Bridge*
With the OvalEdge Bridge component, any cloud-hosted server can connect with any on-premise or public cloud data source(s) without modifying firewall rules. A bridge provides real-time control, making data movement between source and destination easy. For more information, refer to
- After entering all the required connection details, select the appropriate option based on your preferences:
- Validate: Click the Validate button to verify the connection details. This ensures that the provided information is accurate and enables successful connection establishment.
- Save: Click on the Save button to store the connection details. Once saved, the connection will be added to the Connectors home page for easy access.
- Save & Configure: For certain Connectors requiring additional configuration settings, click the Save & Configure button. This will open the Connection Settings pop-up window, allowing you to configure the necessary settings before saving the connection.
- Once the connection is validated and saved, it will be displayed on the Connectors home page.


Note: You can either save the connection details first or validate the connection first and then save it.
Connection Validation Details
|
S.No |
Error Message(s) |
Description |
|
1 |
Connection Time Out |
The browser could not establish a connection to the server in time. Check if the port is enabled or not. |
|
2 |
Failed to establish a connection, please check the credentials. |
In case of an invalid username and password. |
Note: If you have issues creating a connection, please contact your assigned OvalEdge Customer Success Management (CSM) team.
Connector Settings
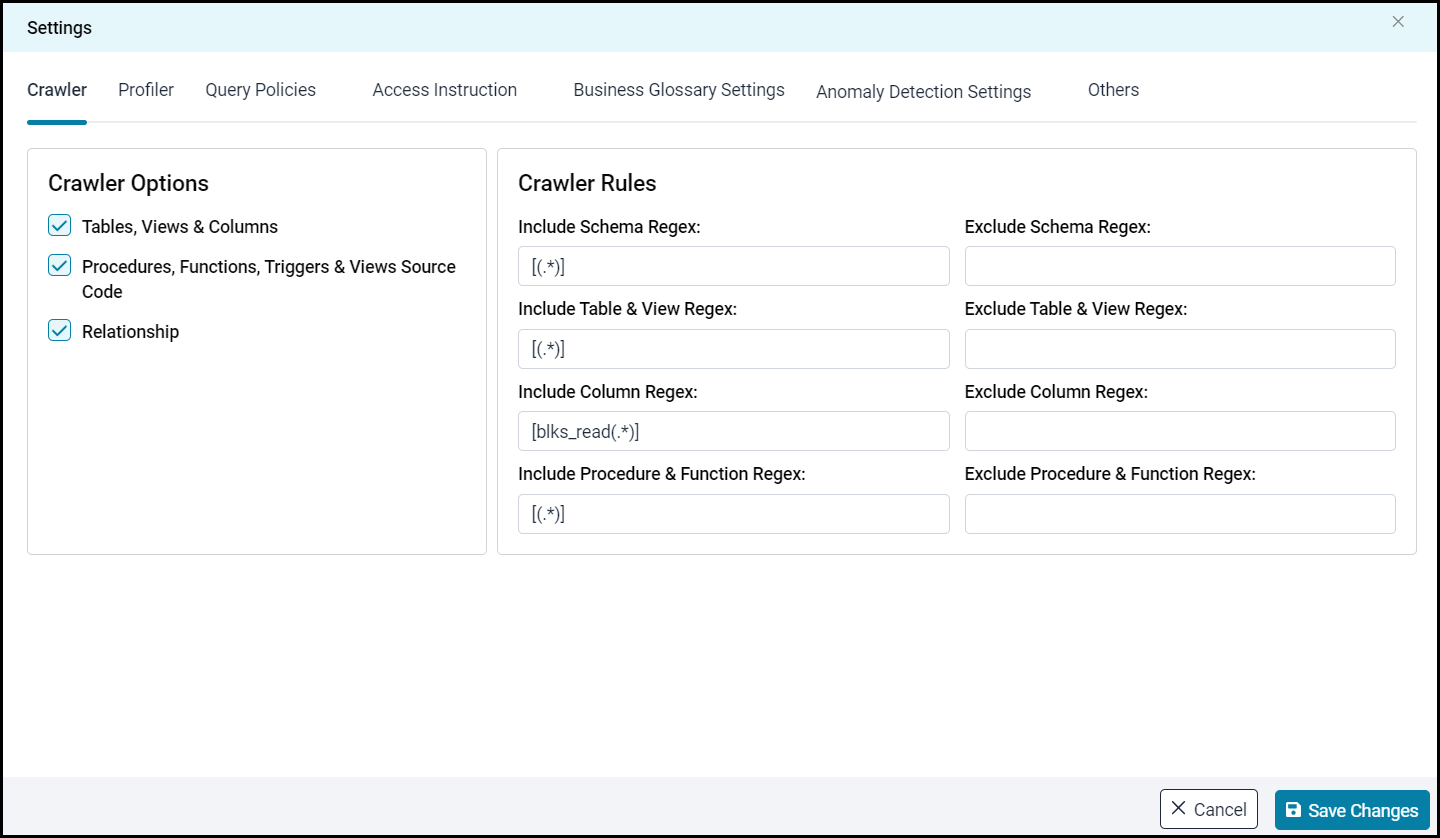
Once the connection is successfully established, various settings are provided to fetch and analyze the information from the data source.
The connection settings include Crawler, Profiler, Query Policies, Access Instruction, Business Glossary Settings, Anomaly Detection Settings, and Others.
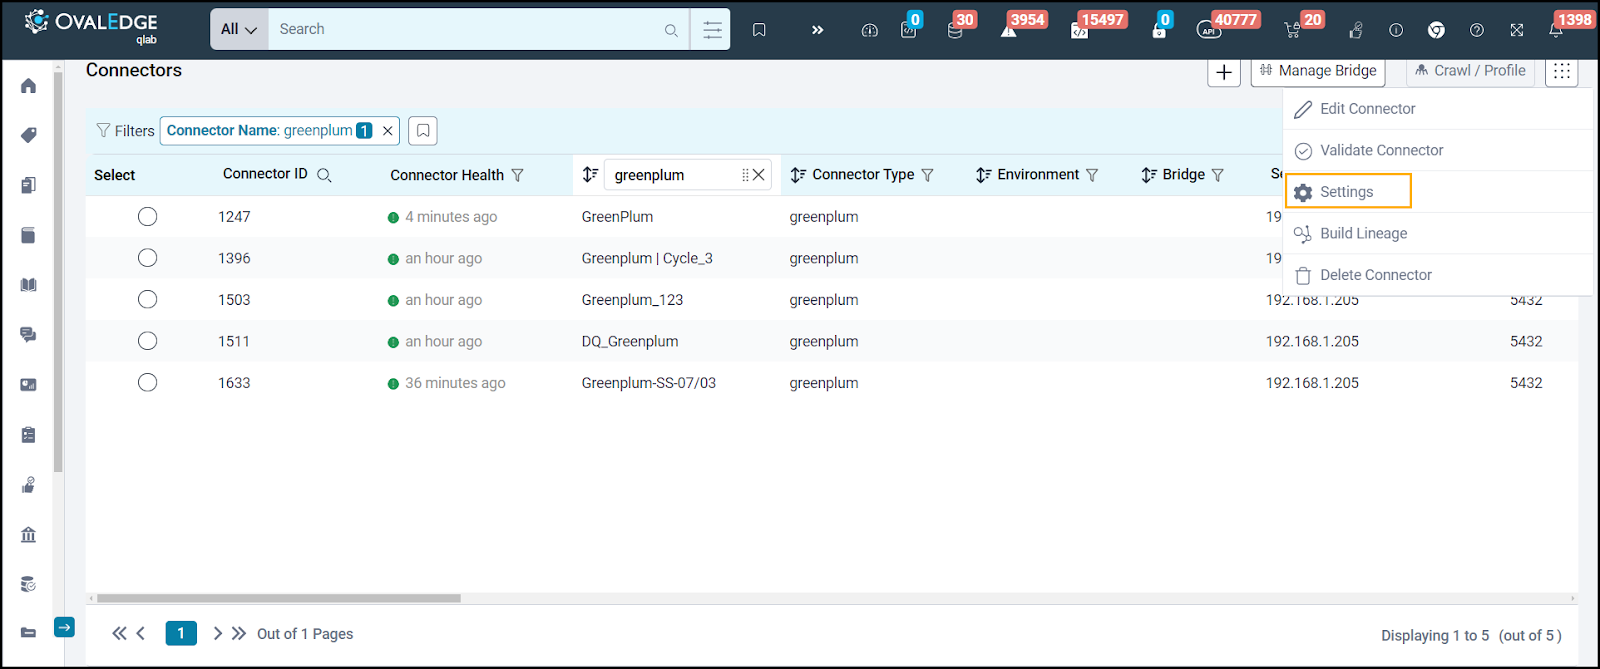
To view the Connector Settings page,
- Go to the Connectors page.
- From the 9- dots, select the Settings option.
- This will display the Connector Settings page, where you can view all the connector settings.
Connection Settings
Description
Crawler
Crawler settings are configured to connect to a data source and collect and catalog all the data elements in metadata.
Profiler
Profiler settings govern the gathering of statistics and informative summaries about the connected data source(s). These statistics can help assess the quality of data sources before using them for analysis. Profiling is always optional; crawling can be run without profiling.
Query Policies
A query policy enforces security by preventing users with specific roles from performing certain query functions on the data source.
Access Instruction
Access Instruction allows the data owner to instruct others on using the objects in the application.
Business Glossary Settings
The Business Glossary Settings provide flexibility and control over how users view and manage term association within a business glossary at the connector level.
Anomaly Detection Settings
Anomaly Detection Settings enable users to configure anomaly detection preferences at the connector level. By default, the configuration aligns with the global settings in System Settings and cannot be modified.
Others
The Enable/Disable Metadata Change Notifications option sets the change notification about metadata changes of the data objects.
- You can use the toggle button to set the Default Governance Roles (e.g., Steward, Owner Custodian, etc.).
- Using the Roles and Teams, you can select the role and team to receive the notification of metadata changes.When you have finished making your desired changes, click on Save Changes. All setting changes will be applied to the metadata.
The following is a list of connection settings and their corresponding descriptions.
Note: For more information, refer to the Connector Settings.
Crawling of Schema(s)
The Crawl/Profile option allows you to select the schema for the following operations:
Crawl, Crawl & Profile, Profile, or Profile Unprofiled. Under the Action section, the defined run date and time are displayed for any scheduled crawlers and profilers.
- Navigate to the Connectors page and click on the Crawl/Profile button.
Select Schemas to Crawl and Profile pop-up window is displayed. - Select the schema.
- The list of actions below is displayed in the Action section.
- Crawl: This allows the selected schema(s) metadata to be crawled.
- Crawl & Profile: This allows the metadata of the selected schema(s) and profiles of the sample data to be crawled.
- Profile: This allows the collection of table column statistics.
- Profile Unprofiled: This allows data that has not been profiled to be profiled.
- Schedule: Connectors can also be scheduled in advance to run crawling and/or profiling at prescribed times and selected intervals.
Note: For more information on Scheduling, refer to Scheduling Connector.
- Click on the Run button. This gathers all metadata from the connected source and puts it into the OvalEdge Data Catalog.

Additional Information
The following system-level schemas exist in every database:
- pg_catalog contains the system catalog tables, built-in data types, functions, and operators. It is always part of the schema search path, even if it is not explicitly named in the search path.
- information_schema consists of a standardized set of views that contain information about the objects in the database. These views get system information from the system catalog tables in a standardized way.
- pg_toast stores large objects, such as records that exceed the page size. This schema is used internally by the Greenplum Database system.
- pg_bitmapindex stores bitmap index objects such as lists of values. This schema is used internally by the Greenplum Database system.
- pg_aoseg stores append-optimized table objects. This schema is used internally by the Greenplum Database system.
- gp_toolkit is an administrative schema that contains external tables, views, and functions that you can access with SQL commands. All database users can access gp_toolkit to view and query the system log files and other system metrics.
Copyright © 2024, OvalEdge LLC, Peachtree Corners, GA, USA.