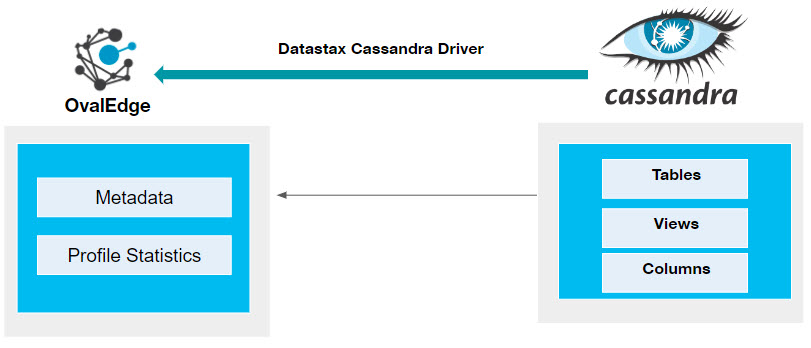
Cassandra is an open-source NoSQL distributed database that manages large amounts of data across commodity servers. It is a decentralized, scalable storage system designed to handle vast volumes of data across multiple commodity servers, providing high availability without a single point of failure. OvalEdge uses a Datastax Cassandra driver to connect to the data source, allowing users to crawl data objects and profile sample data.
 Connector Capabilities
The following is the list of objects supported by the Cassandra connector:
|
Functionality |
Descriptions |
|---|---|
|
Crawling |
|
|
Profiling |
|
Prerequisites
This section lists the prerequisites to establish a connection between the connector and OvalEdge Application.
- Driver Details
- Service Account Permission
- Configure environment variables (Optional)
Driver Details
Drivers: The drivers used by the connector are given below:
|
Driver |
Version |
Details |
|
Datastax Cassandra Driver |
3.x |
https://mvnrepository.com/artifact/com.datastax.cassandra/cassandra-driver-core/3.6.0 |
Service Account Permissions
The following are the minimum privileges required for a service account to crawl and profile the data.
|
Operations |
Permission |
|---|---|
|
Connection Validation |
SELECT |
|
Crawl Schemas |
SELECT |
|
Crawl Tables |
SELECT |
|
Profile Schemas, Tables |
SELECT |
Note: To fetch the System Views from the data source the Service Account user needs to have Read Access to the Public Synonyms.
Establish Environment Variables (Optional)
This section describes the settings or instructions that you should be aware of before establishing a connection. If your environments have been configured, skip this step.
Configure Environment Names
The Environment Names allow you to select the environment configured for the specific connector from the dropdown list in the Add Connector pop-up window.
For consistency, you might want to consider crawling the same schema in both stage and production environments. The typical environments for crawling are PROD, STG, or Temporary, and may also include QA or other environments.
Additionally, crawling a temporary environment can be useful for schema comparisons, which can later be deleted, especially during application upgrade assistance.
Steps to configure the Environment
- Navigate to Administration > System Settings
- Select the Connector tab.
- Find the Key name “connector. environment”.
- Enter the desired environment values (PROD, STG) in the value column.
- Click ✔ to save.
Establish a connection
To establish a Cassandra Connection, fill in the required fields with the relevant information in the Manage Connector pop-up window:
- Log into the OvalEdge application
- In the left menu, click on the Administration module name, and click on the Connectors sub-module name. The Connectors Information page is displayed.
- Click on + New Connector. The Add Connector pop-up window is displayed.
- Select the connection type, Cassandra. The Add Connector with Cassandra details is displayed.
Fields
Details
Connector Type
The selected connection type ‘Cassandra’ is displayed by default. The drop-down list allows the user to change the connector type if required.
Credential Manager
Select the option from the drop-down menu, where you want to save your credentials.
- Database: The connection is configured with the basic Username and Password of the service account in real time when OvalEdge establishes a connection to the Snowflake database.
- HashiCorp: The credentials are stored in the HashiCorp database server and fetched from HashiCorp to OvalEdge.
- AWS Secrets Manager: The credentials are stored in the AWS Secrets Manager database server and fetched from the AWS Secrets Manager to OvalEdge.
- Azure Key Vault: The credentials are stored in the Azure Key Vault database server and fetched from the Azure Key Vault to OvalEdge.
For more information on Credential Manager, refer to Credential Manager
License Add-Ons
All the connectors will have a Base Connector License by default that allows you to crawl and profile to obtain the metadata and statistical information from a data source.
OvalEdge supports various License Add-Ons based on the connector’s functionality requirements.
- Select the Auto Lineage Add-On license that enables the automatic construction of the Lineage of data objects for a connector with the Lineage feature.
- Select the Data Quality Add-On license to identify, report, and resolve the data quality issues for a connector whose data supports data quality, using DQ Rules/functions, Anomaly detection, Reports, and more.
- Select the Data Access Add-On license that will enforce connector access via OvalEdge with the Remote Data Access Management (RDAM) feature enabled.
Connector Name*
Select a connection name for the Cassandra database. Users can specify a reference name to identify the Cassandra database connection in OvalEdge.
Example: OvalEdge_Cassandra_Connection
Connector Environment
The OvalEdge Environment dropdown menu is used to select the environment for crawling as PROD, STG, or Temporary, and may also include QA or other environments.
Server*
Specify the server address where the database instance is located, whether on-premises or in the cloud.
Example: 34.54.23.43
Port*
Enter the port number. The default port for Cassandra when connecting to a server is usually "9042."
Key space*
A keyspace can be generally equated to an Oracle Schema or a Microsoft SQL Server database. Please provide the name of the schema or database from which you intend to crawl the data objects.
Username*
Provide the service account username required to connect to the Cassandra server.
Note: This field may be auto-filled by the web browser with the current OvalEdge user login. Please enter the Cassandra Service Account name if necessary.
Password*
Enter the service account password for accessing the Cassandra Server
Plug-in Server
Specify the server name if the data source library is running as a web server, similar to bridge-lite.
Plug-in Port
Enter the port number associated with the plugin server.
Default Governance Roles*
You can select a specific user or a team from the governance roles (Steward, Custodian, Owner) that get assigned for managing the data asset.
Note: The dropdown list displays all the configurable roles (single user or a team) as per the configurations made in the OvalEdge Security | Governance Roles section.
Admin Roles
Select the required admin roles for this connector.
To add Integration Admin Roles, search for or select one or more roles from the Integration Admin options, and then click on the Apply button.
- The responsibility of the Integration Admin includes creating a connector, configuring crawling and profiling settings for the connector, as well as deleting connectors, schemas, or data objects.
To add Security and Governance Admin roles, search for or select one or more roles from the list, and then click on the Apply button.
The security and Governance Admin is responsible for:
- Configuring role permissions for the connector and its associated data objects.
- Adding admins to set permissions for the connector's roles and associated data objects.
- Updating governance roles.
- Creating custom fields.
- Developing Service Request templates for the connector.
- Creating Approval workflows for the templates.
No of Archive Objects*
The "Number of archive objects" refers to the count of recent modifications made to the metadata data of a dataset at the remote/source location. By default, this feature is disabled. To enable it, toggle the Archive button and enter the desired number of objects to archive.
For instance, if a user sets the count to 4 and the connection is crawled, it will retrieve the last 4 changes that occurred in the remote/source of the connector. These changes can be observed in the 'version' column of the 'Metadata Changes' module.
Select Bridge
To enable OvalEdge to function as a SaaS application behind a customer's firewall, the OvalEdge Bridge is necessary.
- When a bridge has been set up, it will be displayed in a dropdown menu. Users can select the required Bridge ID.
- The user can select "NO BRIDGE" when it is not configured.
For more information, refer to Bridge Overview
- Click on the Validate button to validate the connection details.
- Click on the Save button to save the connection. Alternatively, the user can also directly click on the Save & Configure button that displays the Connection Settings pop-up window to configure the settings for the selected Connector. The Save & Configure button is displayed only for the Connectors for which the settings configuration is required.
Note: * (asterisk) indicates the mandatory field required to establish a connection. Once the connection is validated and saved, it will be displayed on the Connectors home page.
Note: It is up to the user's wish, you can save the connection details first, or you can validate the connection first and then save it.

Connection Validation Errors
|
Sl.No |
Error Message(s) |
Description |
|
1 |
Failed to establish a connection; please check the credentials |
Invalid credentials provided or user or role does not have access. |
|
2 |
The given port number is not open. |
The given port number is not accessible by the OvalEdge |
Note: If you have any issues creating a connection, please contact your assigned OvalEdge Customer Success Management (CSM) team.
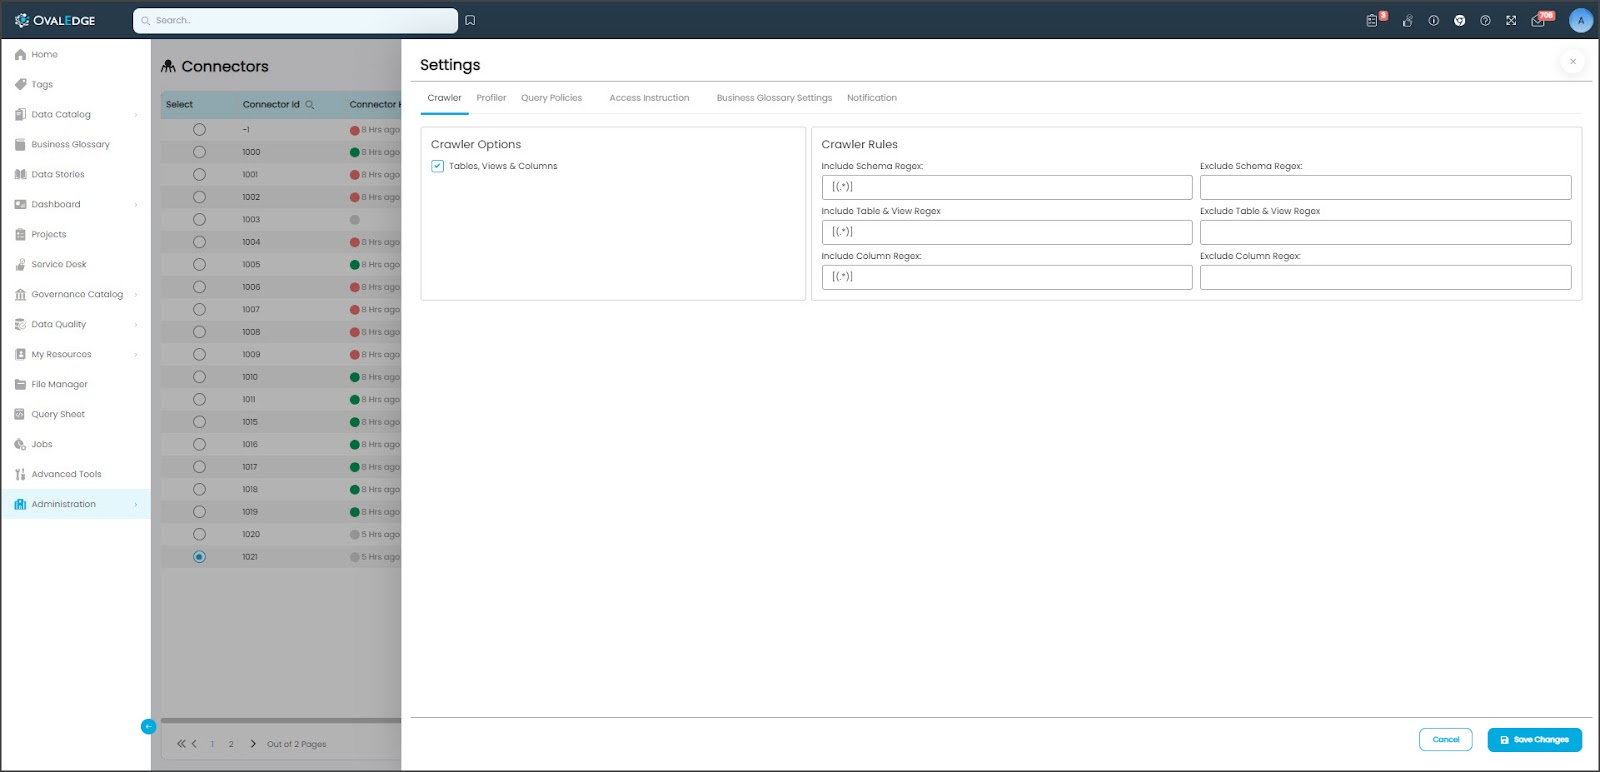
Connector Settings
Once the connection is validated successfully, various settings are provided to retrieve and display the information from the data source. The connection settings include Crawler, Profiler, Query Policies, Access Instruction, Business Glossary Settings, and Notifications.
|
Connection Settings |
Description |
|---|---|
|
Crawler |
Crawler settings are configured to connect to a data source and collect and catalog all the data elements in the form of metadata. |
|
Profiler |
Profiling is the process of gathering statistics and informative summaries about the connected data source(s). Statistics can help assess the data source's quality before using it in an analysis. Profiling is always optional; crawling can be run without profiling. |
|
Query Policies |
The Query Policies in the Crawler setting provide the right access to the Query sheet functions (Join, Union, SUM, or aggregate functions). You can specify the desired roles and permission to deny the usage of the query sheet function. A role that has been denied policy permission will not have access to those functions in the Query Sheet. Example: If the user selects the Role as “OE_HRADMIN,” Query Type as “JOIN,” and the Access Type as “DENY,” then the users associated with the OE_HRADMIN privileges are restricted from using the JOIN function in the Query Sheet page. |
|
Access Instruction |
It allows the data owner to instruct others on using the objects in the application. |
|
Business Glossary Settings |
The Business Glossary setting provides flexibility and control over how they view and manage term association within the context of a business glossary at the connector level. |
|
Notification |
The Enable/Disable Metadata Changes Notifications option is used to set the change notification about the metadata changes of the data objects.
|
For more information, refer to the Connector Settings.
The Crawling of Schema(s)
You can use the Crawl/Profile option, which allows you to select the specific schemas that need to be crawled, profiled, or unprofiled. For any scheduled crawlers and profilers, the defined run date and time are displayed to set.
- Navigate to the Connectors page, and click Crawl/Profile.
- It allows the user to select the specific schemas that need to be crawled, profiled, unprofiled, or scheduled.
- Click on the Run that gathers all metadata from the connected source into the OvalEdge Data Catalog.
Note: For more information on Scheduling, refer to Scheduling Connector
Copyright © 2023, OvalEdge LLC, Peachtree Corners GA USA