Azure Machine Learning Studio is the top-level resource for Machine Learning. This capability provides a centralized place for data scientists and developers to work with all the artifacts for building, training, and deploying machine learning models.
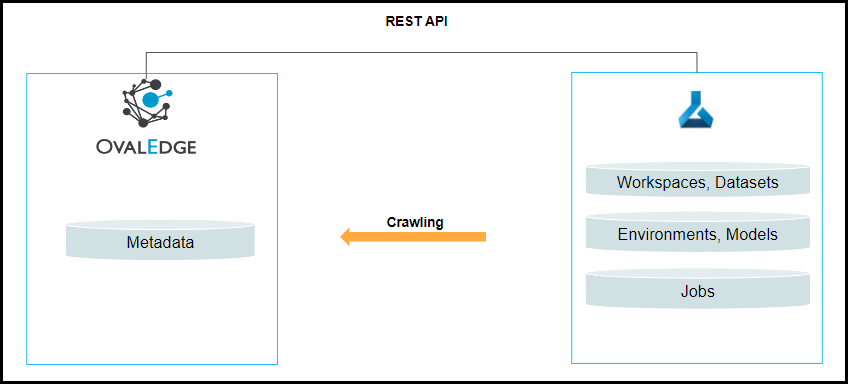
OvalEdge uses the API to connect to the Azure Machine Learning schema source, which allows the user to crawl (Workspaces, Datasets, Environments, Models, etc).
Connector Capabilities
The following is the list of objects supported by the Azure Machine Learning connector.
|
Functionality |
Supported Objects |
|
Crawling |
|
Prerequisites
The following are the prerequisites required for establishing a connection between the connector and the OvalEdge application.
Connectivity via API
The connectivity to Azure Machine Learning is via APIs, which are included in the platform.
Version
The connector currently supports the following versions of Azure Machine Learning:
|
API Version |
Support |
|
|
2018-11-19 |
Supported |
|
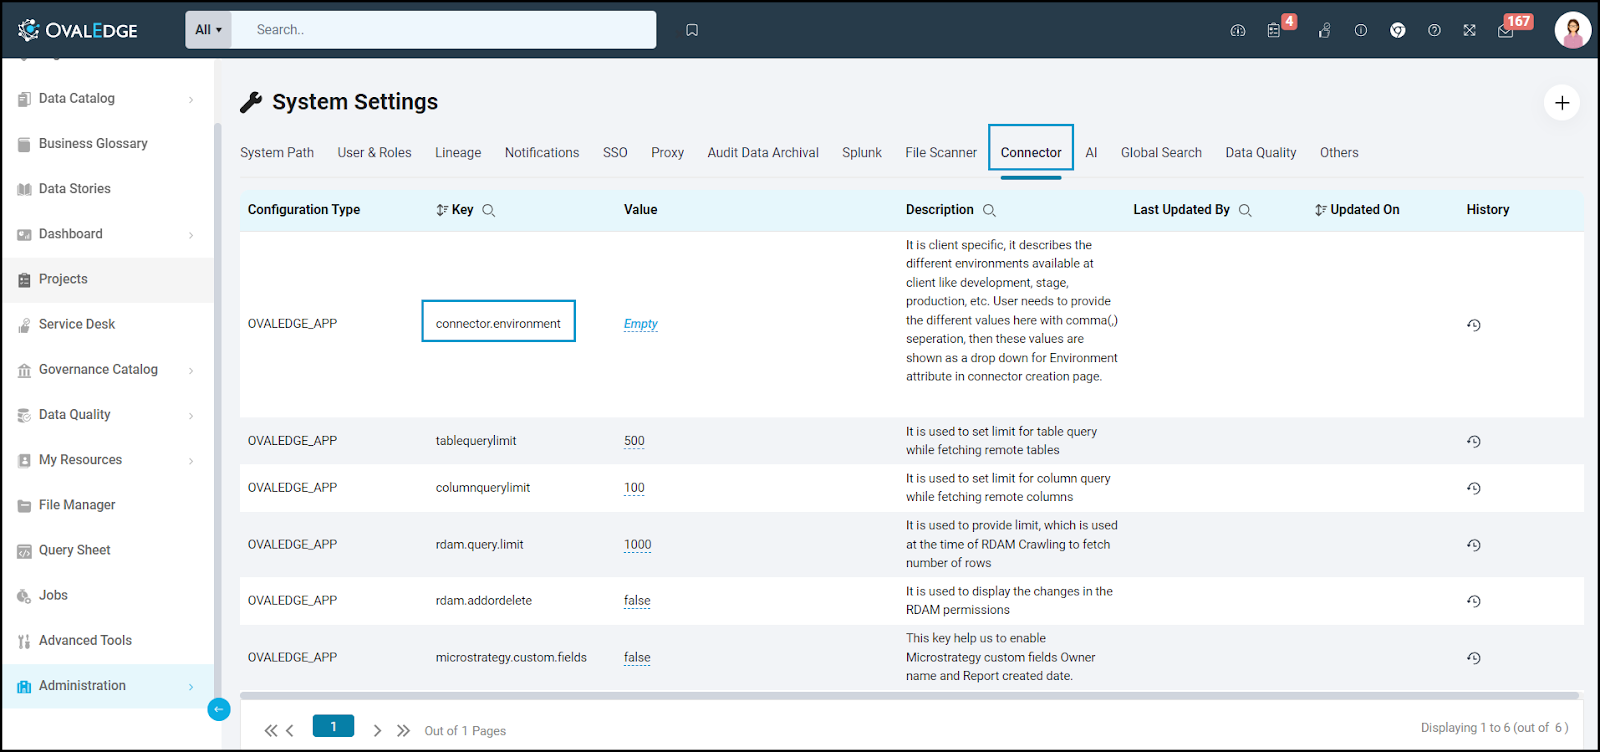
Configuring Environment Variables
Configuring environment names enables you to select the appropriate environment from the drop-down list when adding a connector. This allows for consistent crawling of schemas across different environments, such as production (PROD), staging (STG), or temporary environments. It also facilitates schema comparisons and assists in application upgrades by providing a temporary environment that can be later deleted if needed.
Before establishing a connection, it is important to configure the environment names for the specific connector. If your environments have been configured, skip this step.
Steps to Configure the Environment
- Log into the OvalEdge application.
- Navigate to Administration > System Settings.
- Select the Connector tab.
- Find the key name “connector.environment”.
- Enter the desired environment values (PROD, STG) in the Value column.
- Click ✔ to Save.
Service Account with Minimum Permissions
The minimum privileges required for a service account are listed below:
|
Operation |
Minimum Access Permission |
Remarks |
|
Connection validate |
Read |
- |
|
Crawl Metadata |
Read |
Need REST API permissions and need data scientist role for the account to crawl the metadata from REST APIs. |
|
Crawl Codes |
Read |
Need REST API permissions and need data scientist role for the account to crawl the metadata from REST APIs. |
Establish a Connection
To establish a connection, complete the following steps:
- Log into the OvalEdge application, navigate to the Administration module, and click on Connectors.
- Click on the + icon (New Connector ) and the Add Connector pop-up is displayed.
- Search/click on the desired connector and the Add Connector pop-up with the selected connector details is displayed.
Note: * (asterisk) indicates the mandatory field required to establish a connection. Once all the parameters are entered, the user can validate the details and save the connection that will be displayed on the Connector Home page.
Field Name
Description
Connector Type
By default, the selected connection type is displayed as the AzureML.
If required, the drop-down list allows the user to change the connector type and based on the selection of the connection type, the fields associated with the selected connection type are displayed.
Connector Name*
Select a connection name for Azure Machine Learning. You can specify a connection name to identify the Azure Machine Learning connection in OvalEdge.
Example: AzureML_test
Credential Manager*
The purpose of a credential manager is to enhance the security that stores the API keys, passwords, certificates, and other sensitive data securely and helps to manage access, rotates, and audit secrets.
OE Credential Manager: Azure Machine Learning connection is configured with the basic Username and Password of the service account in real-time when OvalEdge establishes a connection to the Azure Machine Learning database. Users need to add the credentials manually if the OE Credential Manager option is selected.
HashiCorp: The credentials are stored in the HashiCorp database server and fetched from HashiCorp to OvalEdge.
AWS Secrets Manager: The credentials are stored in the AWS Secrets Manager database server and fetched from the AWS Secrets Manager to OvalEdge.
Azure Key Vault: Azure Key Vault allows for secure storage and strict access mechanisms of sensitive information such as tokens, passwords, certificates, API keys, and other confidential data.
Click here for more information.
For more information on Credential Manager, refer to Credential Manager.
License Add-Ons
All the connectors will have a Base Connector License by default that allows you to crawl and profile to obtain the metadata and statistical information from a data source.
Credential Manager ConnId
When you have more than one Credential Manager ID, pick the specific ID you want in the Credential Manager ConnId field.
Client Id*
After registering your application, you'll see the application ID (or client ID) under
- Login to your Azure account.
- Select the Microsoft Entra ID (previously, Azure Active Directory) in the left sidebar.
- Click Enterprise applications.
- Click All applications.
- Select the application that you have created. Click Properties and copy the Application ID.
Connector Environment
The environment drop-down list allows you to select the environment configured for the connector from the drop-down list.
For example, PROD, or STG (based on the configured items in the OvalEdge configuration for the connector.environment).
The purpose of the environment field is to help you identify which connector is connecting what type of system environment (Production, STG, or QA).
Note: The steps to set up environment variables are explained in the prerequisite section.
Client Secret*
The application needs a client secret to prove its identity when requesting a token. For security reasons, Microsoft limits the creation of client secrets longer than 24 months and strongly recommends that you set this to a value less than 12 months.
- Login to your azure account.
- Select the Microsoft Entra ID (previously, Azure Active Directory) in the left sidebar.
- Click App registrations.
- Select the application which you have created.
- Click on All settings.
- Click on Keys.
- Type the Key description and select the Duration.
- Click Save.
- Copy and store the key value. You won't be able to retrieve it after you leave this page.
Tenant Id*
The tenant ID identifies the Microsoft Entra ID (previously, Azure AD) tenant to use for authentication. It is also referred to as the directory ID
- Login to your azure account.
- Select the Microsoft Entra ID (previously, Azure Active Directory) in the left sidebar.
- Click properties.
- Copy the directory ID.
Subscriber Id*
The subscription ID is a GUID that uniquely identifies your subscription to use Azure services.
- Login to your azure account.
- Select Subscriptions in the left sidebar.
- Select whichever subscription is needed.
- Click on overview.
- Copy the Subscription ID.
Resource Group Name*
Select the resource group based on the need.
API Version*
Currently supporting 2018-11-19
Default Governance Roles*
Users can select a specific user or a team from the governance roles (Steward, Custodian, Owner) that get assigned for managing the data asset.
Note: The drop-down list displays all the configurable roles (single user or a team) as per the configurations made in the OvalEdge Security | Governance Roles section.
Admin Roles*
Select the required admin roles for this connector.
- To add Integration Admin Roles, search for or select one or more roles from the Integration Admin options, then click the Apply button.
The responsibility of the Integration Admin includes configuring crawling and profiling settings for the connector, as well as deleting connectors, schemas, or data objects. - To add Security and Governance Admin roles, search for or select one or more roles from the list, then click the Apply button.
The security and Governance Admin is responsible for:- Configure role permissions for the connector and its associated data objects.
- Add admins to set permissions for the connector's roles and associated data objects.
- Update governance roles.
- Create custom fields.
- Develop Service Request templates for the connector.
- Create Approval workflows for the templates.
Select Bridge*
A solution is required to circumnavigate the customer firewall when OvalEdge is deployed as a SaaS application. That solution is OvalEdge Bridge. A bridge is a type of firewall that operates at the network layer.
- When a bridge has been set up, it will be displayed here in a dropdown menu. Users can select the required Bridge ID.
- The user can select "NO BRIDGE" when it is not configured.
For more information, refer to Bridge Overview
- Click on the Validate button to validate the connection details.
- Click on the Save button to save the connection. Alternatively, the user can also directly click on the Save & Configure button that displays the Connection Settings pop-up window to configure the settings for the selected Connector. The Save & Configure button is displayed only for the Connectors for which the settings configuration is required.
Note: It is up to the user's wish, you can save the connection details first, or you can validate the connection first and then save it.
Connection Validation Errors
|
Error Messages |
Description |
|
Failed to establish a connection, Please check the credentials(Client id, Client secret, etc.,) |
In case of an invalid Client id, Client secret. |
Note: If you have any issues creating a connection, please contact your assigned OvalEdge Customer Success Management (CSM) team.
The Crawling of Schema(s)
You can use the Crawl/Profile option, which allows you to select the specific schemas for the Crawl and Schedule operations: For any scheduled crawlers, the defined run date and time are displayed to set.
- Navigate to the Connectors page, and click on the Crawl/Profile option.
- By default, we are showing all the related objects by Datasets, Environments, Models, and Jobs under one schema which is AML_Schema.
- Click on the Run button that gathers all metadata from the connected source into the OvalEdge Data Catalog.
Note: For more information on Scheduling, refer to Scheduling Connector.