Microsoft SQL Server Integration Services (SSIS) is a comprehensive tool designed for enterprise-level data integration, transformation, and migration. Integrated into Microsoft's SQL Server database, SSIS facilitates the extraction, loading, and transformation (ETL) of data from various sources, including SQL Server, Oracle databases, and Excel files. Utilizing cleaning and merging processes, SSIS enhances data quality and makes it more informative.
OvalEdge uses the Microsoft JDBC Driver to establish a connection with the SSIS data source. It retrieves metadata from the SSIS database, enabling users to crawl and profile sample data. OvalEdge then constructs a lineage, illustrating the movement of crawled data and displaying relationships between objects and their profile statistics.
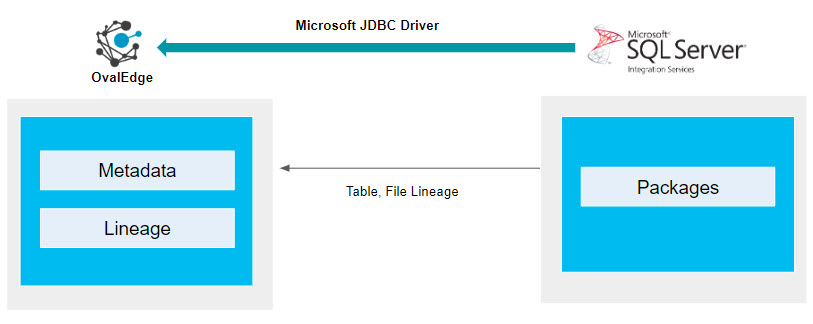
Connector Capabilities
|
Functionality |
Description |
|
Crawler |
SSIS Packages/Datasets |
|
Lineage |
Table Lineage, Table Columns Lineage, File Lineage and File Columns Lineage. |
Prerequisites
The following are the prerequisites required for establishing a connection between the connector and the OvalEdge application.
Driver Details
|
Driver |
Version |
Details |
|
Microsoft JDBC Driver |
V4.0.0 and above |
The OvalEdge Dependencies automatically include the Microsoft JDBC Driver, ensuring that the Connector comes equipped with it by default. |
Here are PowerShell scripts to enable remote access, configure necessary settings, and add new fields for SSIS:
|
powershell |
|
# Enable PowerShell Remoting Enable-PSRemoting -Force # Enable Firewall for remote access Enable-PSRemoting -Force Restart-Service WinRM winrm quickconfig # Configure Trusted Hosts Get-Item WSMan:\localhost\Client\TrustedHosts Set-Item WSMan:\localhost\Client\TrustedHosts -Value * # Set Execution Policy Set-ExecutionPolicy -Scope CurrentUser -ExecutionPolicy Unrestricted # Add new fields: sys login username, password, local file path # Default download location: C:\ssis_download_folder\download # Run ‘Set-ExecutionPolicy -Scope CurrentUser -ExecutionPolicy Unrestricted’ via PowerShell # Last check (optional): Wifi network - properties - private/public. |
These scripts cover enabling PowerShell Remoting, configuring firewall settings, setting up trusted hosts, adjusting the execution policy, and adding new fields for SSIS, including specifying the default download location. The last step is an optional check for network properties.
Service Account with Minimum Permission
By default, the service account provided for the connector will be used for any user operations.
|
Operations |
Description |
|
Connection Validation |
Read Permissions on the packages that need to be cataloged. |
|
Crawler |
Read Permissions on the packages that need to be cataloged. |
Establish Environment Variables (Optional)
This section describes the settings or instructions that you should be aware of before establishing a connection. If your environments have been configured, skip this step.
Configure Environment Names
The Environment Names allow you to select the environment configured for the specific connector from the dropdown list in the Add Connector pop-up window.
You might want to consider crawling the same schema in both stage and production environments for consistency. The typical environments for crawling are PROD, STG, or Temporary, and may also include QA or other environments. Additionally, crawling a temporary environment can be useful for schema comparisons, which can later be deleted, especially during application upgrade assistance.
Steps to configure the Environment on OvalEdge:
- Navigate to Administration | System Settings
- Select the Connector tab
- Find the Key name “connector.environment”.
- Enter the desired environment values (PROD, STG) in the value column.
- Click ✔ to save.
Establish a connection
To establish the connection, complete the following steps:
- Log into the OvalEdge application.
- In the left menu, navigate to the Administration module, and click on Connectors.
- Click on the + icon (New Connector), then the Add Connector pop-up is displayed.
- Search/Click on the desired connector and the Add Connector pop-up with the connector details is displayed.
Fields
Details
Connection Type
The selected connection type ‘SSIS’ is displayed by default.
If required, the dropdown menu allows you to change the connector type and based on the selection of the connection type, the fields associated with the selected connection type are displayed.
Authentication
OvalEdge supports two types of authentication to establish a connection with SSIS.
- SQL Server Authentication
- Windows Authentication
License Add-Ons
All the connectors will have a Base Connector License by default that allows you to crawl and profile to obtain the metadata and statistical information from a data source.
OvalEdge supports various License Add-Ons based on the connector’s functionality requirements.
- Select the Auto Lineage Add-On license that enables the automatic construction of the Lineage of data objects for a connector with the Lineage feature.
- Select the Data Quality Add-On license to identify, report, and resolve the data quality issues for a connector whose data supports data quality, using DQ Rules/functions, Anomaly detection, Reports, and more.
- Select the Data Access Add-On license that will enforce connector access via OvalEdge with Remote Data Access Management (RDAM) feature-enabled
Connection Name*
Enter a connection name for the SSIS. You can specify a reference name to identify the SSIS connector in OvalEdge.
Example: SSISConnector
Connector Environment
The OvalEdge Environment dropdown menu is used to select the environment for crawling are PROD, STG, or Temporary, and may also include QA or other environments.
Server*
Specify the server address where the database instance is located, whether on-premises or in the cloud.
Example: 34.54.23.43
Port*
Enter the port number. The default port for SSIS when connecting to a server is usually "1433."
Database*
Enter the name of the database associated with the SSIS connection.
Driver*
The JDBC driver name for the SSIS server will be automatically populated.
Username*
Provide the service account username required to connect to the SSIS server.
Note: This field may be auto-filled by the web browser with the current OvalEdge user login. Please enter the SSIS Service Account name if necessary.
Password*
Enter the service account password for accessing the SSIS Server.
SSIS Login Username*
Enter the username that is used to log in to the machine where SSIS is installed.
SSIS Login Password*
Enter the password that is used to log in to the machine where SSIS is installed.
Machine Package Path*
Enter the SSIS machine's local NFS path to download the packages.
Connection String
A connection string configures the SSIS connection object. Key-value pairs specify SSIS connections in a connection string. Toggle the button to automatically retrieve details from the provided credentials, or manually enter the connection string. Example: jdbc:sqlserver://{server}:1234;database={xyz}
Plugin Server
Specify the server name if the data source library is running as a web server, similar to bridge-lite.
Plugin Port
Enter the port number associated with the plugin server.
Default Governance Roles*
You can select a specific user or a team from the governance roles (Steward, Custodian, Owner) that get assigned for managing the data asset.
Note: The dropdown list displays all the configurable roles (single user or a team) as per the configurations made in the OvalEdge Security | Governance Roles section.
Admin Roles*
Select the required admin roles for this connector.
- To add Integration Admin Roles, search for or select one or more roles from the Integration Admin options, and then click on the Apply button.
The responsibility of the Integration Admin includes configuring crawling and profiling settings for the connector, as well as deleting connectors, schemas, or data objects. - To add Security and Governance Admin roles, search for or select one or more roles from the list, and then click on the Apply button.
The security and Governance Admin is responsible for:- Configure role permissions for the connector and its associated data objects.
- Add admins to set permissions for roles on the connector and its associated data objects.
- Update governance roles.
- Create custom fields.
- Develop Service Request templates for the connector.
- Create Approval workflows for the templates.
No of archive objects*
The "Number of archive objects" refers to the count of recent modifications made to the metadata data of a dataset at the remote/source location. By default, this feature is disabled. To enable it, toggle the Archive button and enter the desired number of objects to archive.
For instance, if a user sets the count to 4 and the connection is crawled, it will retrieve the last 4 changes that occurred in the remote/source of the connector. These changes can be observed in the 'version' column of the 'Metadata Changes' module.
Select Bridge
To enable OvalEdge to function as a SaaS application behind a customer's firewall, the OvalEdge Bridge is necessary.
- When a bridge has been set up, it will be displayed in a dropdown menu. Users can select the required Bridge ID.
- The user can select "NO BRIDGE" when it is not configured.
For more information, refer to Bridge Overview
- Click on the Validate button to validate the connection details.
- Click on the Save button to save the connection. Alternatively, you can also directly click on the button that displays the Connection Settings pop-up window to configure the settings for the selected Connector. The Save & Configure button is displayed only for the Connectors for which the settings configuration is required.
Note: * (asterisk) indicates the mandatory field required to establish a connection. Once all the parameters are entered, you can validate the details and save the connection that will be displayed on the Connector Home page.
Note: It is up to your wish, you can save the connection details first, or you can validate the connection first and then save it.

Connection Validation Errors
|
Sl.No |
Error Message(s) |
Description |
|
1 |
Failed to establish a connection. Please check the credentials. |
Invalid Username, Password, database, SSIS Login Username, and wrong SSIS Login Password. |
|
2 |
Internal Server Error |
It will respond with a 500 Internal Server Error. |
➤ If you have any issues creating a connection, please contact your assigned OvalEdge Customer Success Management (CSM) team.
Connector Settings
Once the connection is established successfully, various settings are provided to fetch and analyze the information from the data source.

|
Connection Settings |
Description |
|---|---|
|
Lineage |
The lineage options allow you to configure multiple dialects (by Selecting Source Server Type for lineage) and connection priority lists to pick the tables to build lineage.
|
For more information, refer to the Connector Settings.
Additional Information
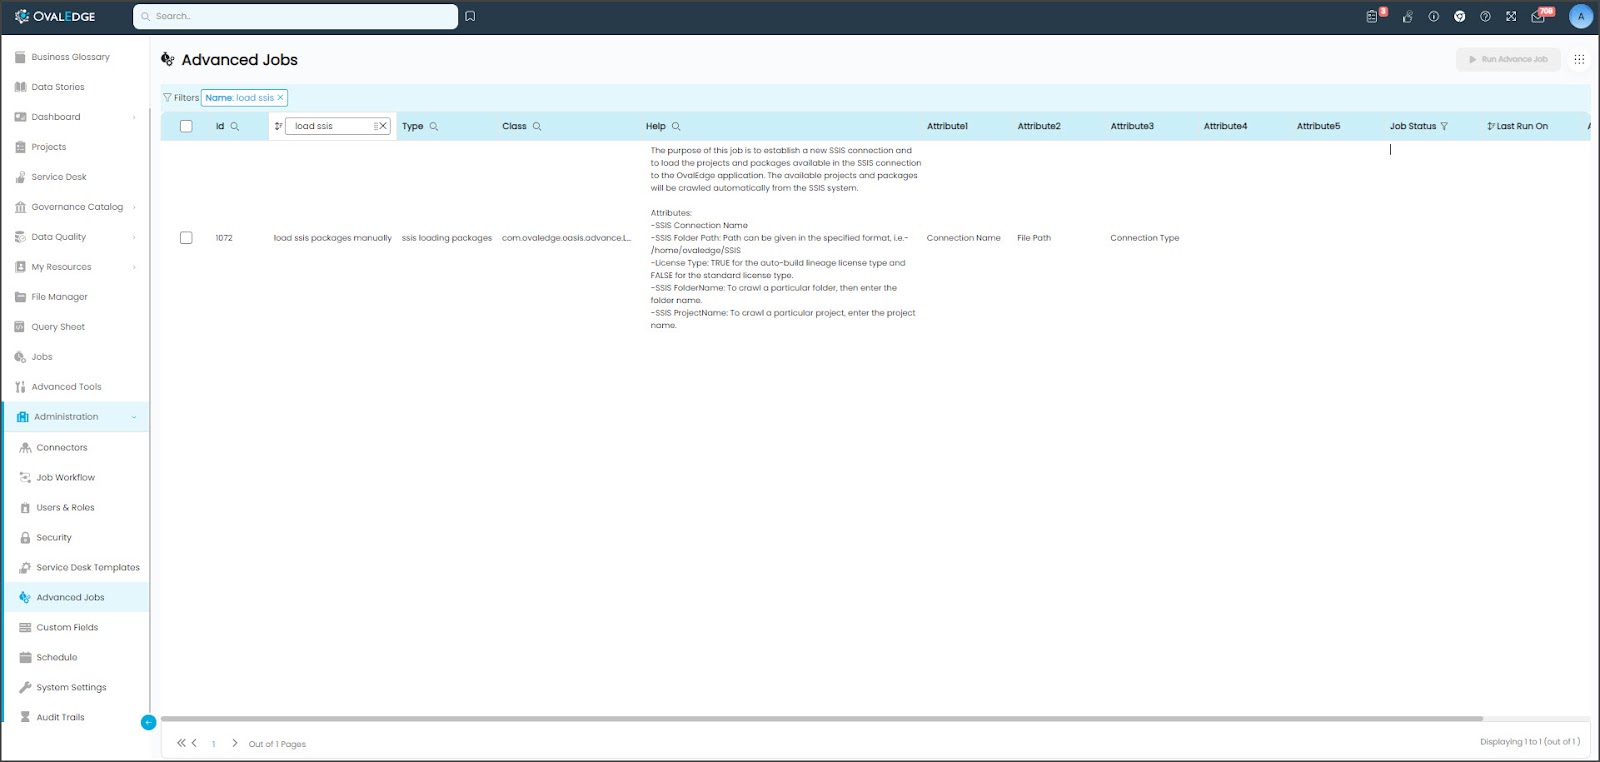
OvalEdge offers an alternative method for establishing a new connection with SSIS and importing projects and packages into OvalEdge.
- In the OvalEdge application, navigate to the Administration > Advanced Jobs module, and the list of Advanced Jobs in the OvalEdge application is displayed.
- In the Name column field, enter the “load ssis packages manually” Advanced Job name and click enter, and related advanced jobs are displayed.
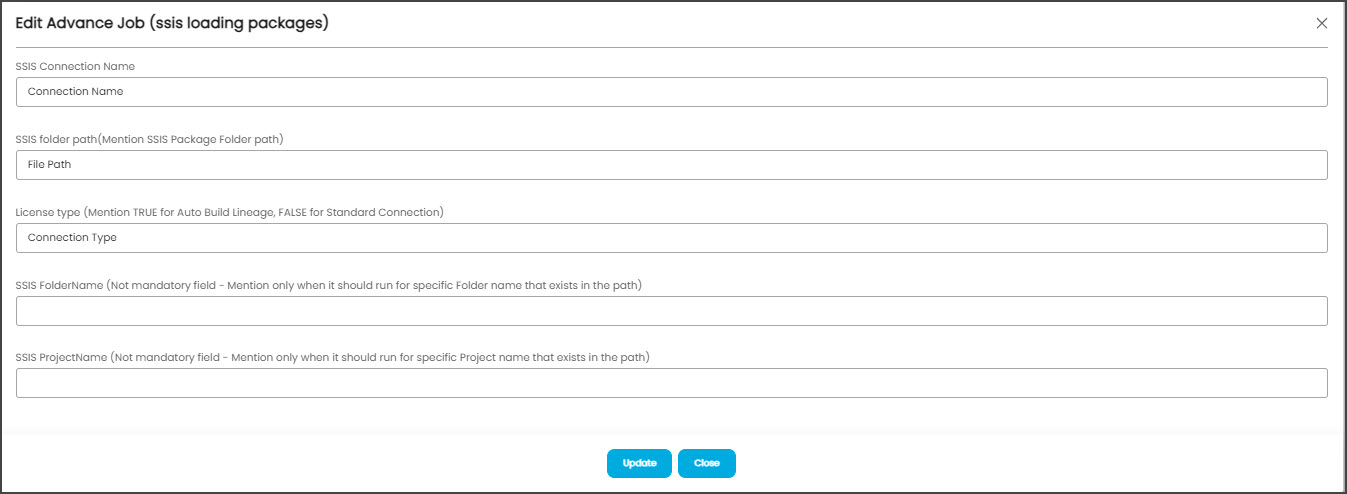
- Click on the edit icon available in the Attribute column field. The Edit Advance Job pop-up window is displayed.
- Enter the details of the parameters as mentioned below and click on the Update button.
- SSIS Connection Name: Enter a name for the SSIS connection.
Example: SSIS_1 - SSIS Folder Path: Provide the path to the SSIS folder at the source. Note: The path should be in the specified format.
Example: /home/ovaledge/SSI - License Type: Enter TRUE for the Auto Build Lineage License type and FALSE for the standard connection.
- SSIS FolderName: If you want to crawl a specific folder, enter the folder name.
- SSIS ProjectName: If you want to crawl a particular project, enter the project name.
- SSIS Connection Name: Enter a name for the SSIS connection.
- Select the check box for the advanced job, click on the Run Advanced Job button, and a confirmation message to run the advanced job is displayed.
Note: The Run Advance Job button is only enabled if the Advanced Job checkbox is selected. - Click on the Submit button, and a prompt message is displayed accordingly, whether the Job is Successful, Error, or Partial Success.
- Navigate to the Jobs module to view the logs.
- Once the job is successful, the Job Step Status is displayed as Success and the relevant data is displayed in the Data Catalog module.
Copyright © 2023, OvalEdge LLC, Peachtree Corners GA USA