Databases
OvalEdge admins (OE_ADMINADM) have default rights to connect and crawl databases, schemas, files, and report groups into OvalEdge. When ADMINS or users with admin roles crawl the data sources, they become their default owner and steward. The OE_ADMIN can assign additional user roles to each data object and modify their access permissions using the security page.
For information on the user role permissions, See User Roles and Permissions.
Add User Role to a Single Database
To add roles to a single Database,
- Expand the Administration tab in the object browser and Select Security.
- Select the Databases tab from the security menu.
- Choose a single database and click the Available Roles.
- Select a User Role/Role(s) from the list. Modify the Meta and Data permissions on the user role to access the selected database.
The abbreviations for the user role set are displayed as a superscript next to the user role selected.
Example: QA_USERMRDR. For more information on the permissions, See User Roles and Permissions.
-
Select the Databases tab from the security menu.
-
Select a single database and click the Edit button beside Available Roles.
- Select a User Role(s) from the list. Modify the Meta and Data permissions for the user role and grant appropriate access.
- The abbreviations for the user role set are displayed as a superscript next to the user role selected.
Example: QA_USERMRDR. For more information on the permissions, See User Roles and Permissions. - Click OK to add the user role, and the message Role added successfully message is displayed.
Add User Role to Multiple Databases
You can update the selected user roles on multiple databases using this option.
- Expand the Administration tab in the object browser and Select Security.
- Select the Databases tab from the security menu.
- Choose the databases or click the select all checkbox to select all the databases.

- Click the nine dots and choose Update Permissions. A pop-up menu will be displayed where you can select and manage roles.

- Select User Role(s) from the list. Modify the Meta and Data permissions on the user role to grant appropriate access.
The abbreviations for the user role set are displayed as a superscript next to the User role selected.
Example: OE_PUBLICMRDN. For more information on the permissions, See User Roles and Permissions. - Click Save Permissions to update the user role, and the message Role added successfully message is displayed.

Note: Updating roles will delete the existing roles and add the newly selected roles other than OE_ADMIN.To revoke permissions for a user role, follow steps 1 to 5, unselect a user role from the list, and click Save Permissions to save the modification.
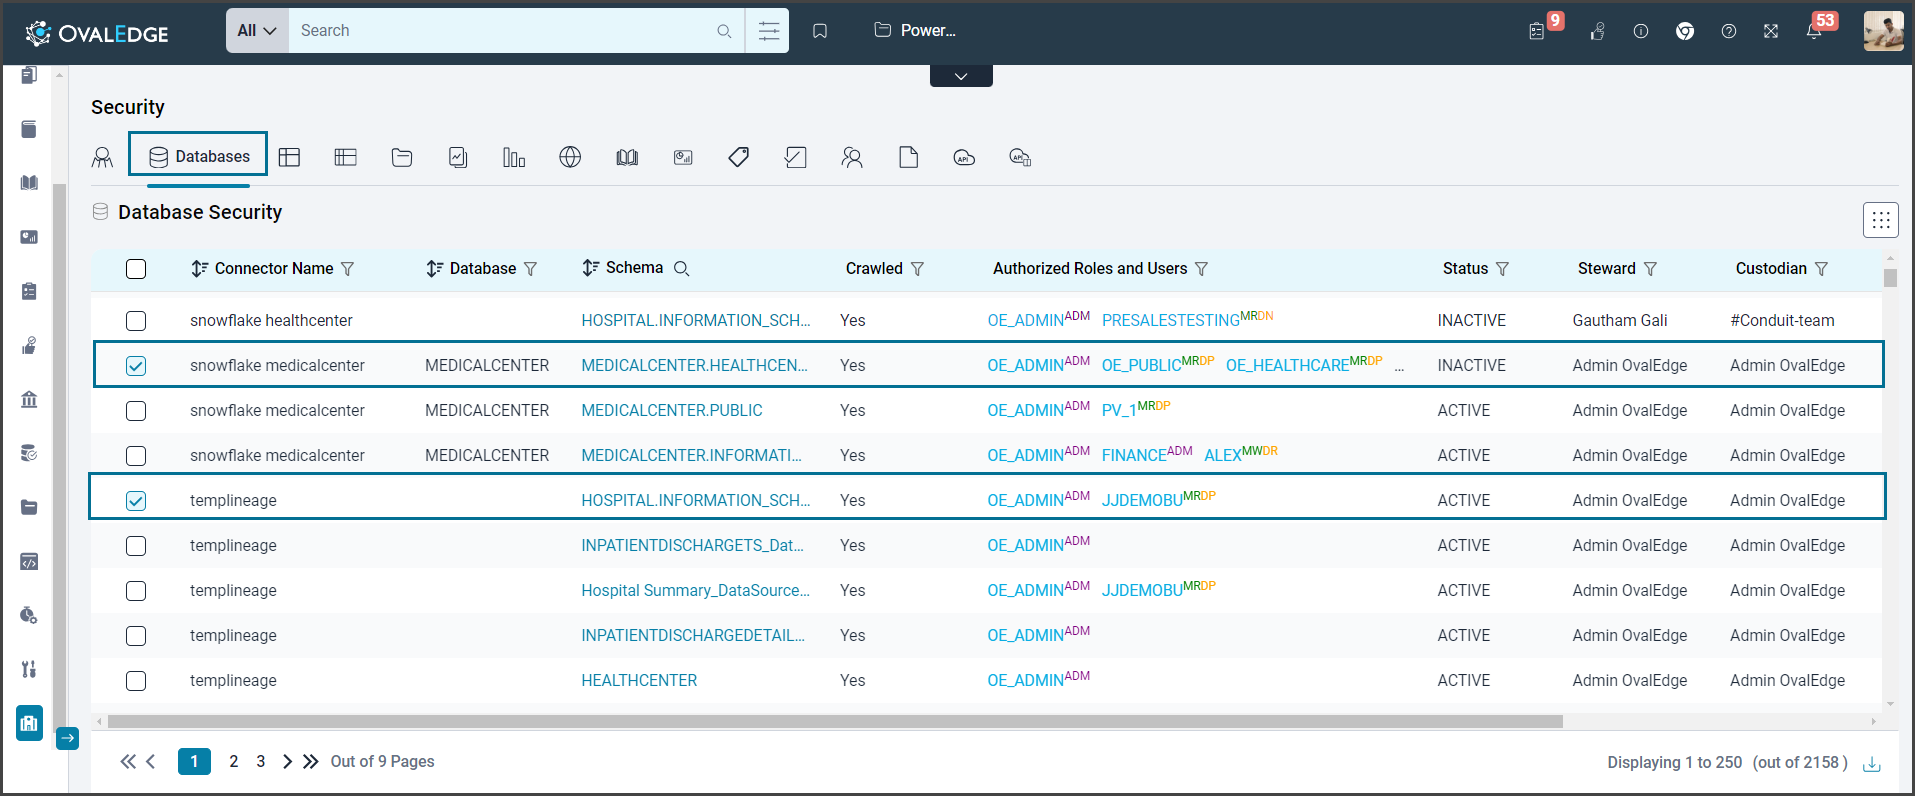
Update the Owner and Steward
You can update the Owner and/or Steward on multiple databases using this option.
- Navigate to Administration > Security.
- Select the Databases tab from the security menu bar.
- Select a database and click the nine dots.
- Choose Update Governance Roles to change the default users and assign different users.
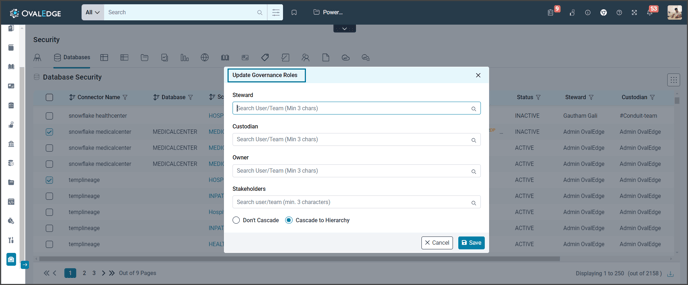
Note: You can alternatively use the edit icon on the main page to change the Owner/Steward for a single database.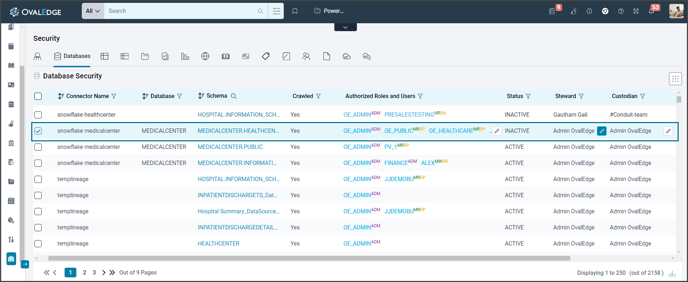

What are Reflect Changes to Table?
Select this checkbox, the tables and the columns in a schema inherit the user roles and privileges of that schema. However, the tables under a schema are managed and controlled by the Owner and steward assigned at the schema level.
Tables
Assign a User Role to a Table
If you want to assign user roles on the Tables,
- Navigate to Administration > Security.
- Select the Tables tab from the security menu bar.
- Select a table name from the list or use the search window to find the table name.
- Click the
 Edit button beside Authorized Roles and Users.
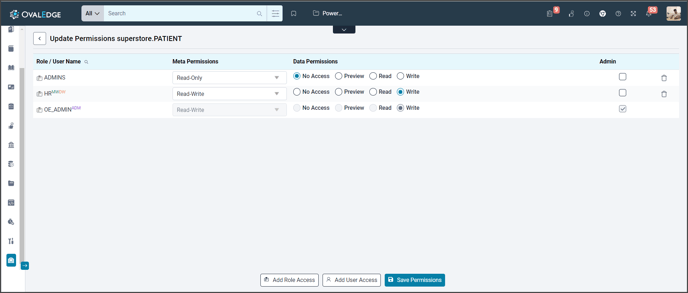
- Select a User Role from the list. Modify the Meta and Data permissions on the user role to grant appropriate access.
The abbreviations for the user role set are displayed as a superscript next to the User role selected.
Example: QA_USERMRDR. For more information on the permissions, see User Roles and Permissions. - Click Save Permissions to add the user role. A confirmation message will appear that a user role has been added.

Note: To revoke permissions to a user role, follow steps 1 to 4 and unselect a user role from the list. Click OK to save the modification.
Columns
When a user role is assigned to a database and a table, they can access all the columns within that table by default. Additionally, the column data can be secured by restricting user roles with their meta and data permissions.
Example: When you assign a Metadata Read and Data No Access user role on a table, the users can only view the metadata and will not have access to the data.
However, ADMINs can further restrict the visibility of a particular column to a user role by using the Column security option.
In OvalEdge, the Column security can act in two ways,
- Masking
- Restricting
Note: To enable the security on the columns, you should first enable the column security on the tables in the Security>>Tables page.
If you do not enable table security, you will get the following notification while enabling column-level security.
Masking a Column
When you enable the Mask column checkbox, the content of that column gets masked in the Data catalog>>data page, by displaying it as XXXXX. In OvalEdge, any masked column is on the global level. That means once you mask a column, the data in that column is X'ed to any user role accessing that data.
Restricting a Column
When you enable this Restrict column checkbox, the whole column gets removed from the view. The column disappears from the table view except for the OE_ADMIN. However, users can modify and allow more user roles to access this column.
Note: The allowed user roles are available only when a user restricts a column. Functionally, users choose to either Mask or Restrict the column data.
To enable a column-level security
- Expand the Administration tab in the object browser and Select Security.
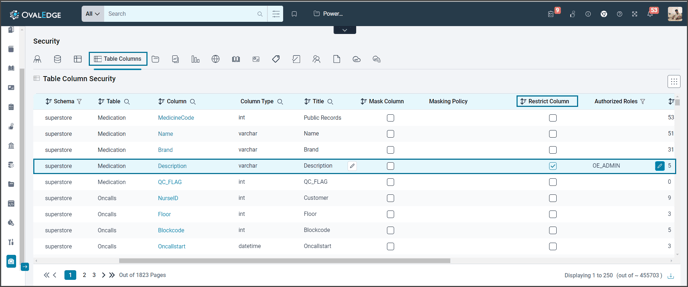
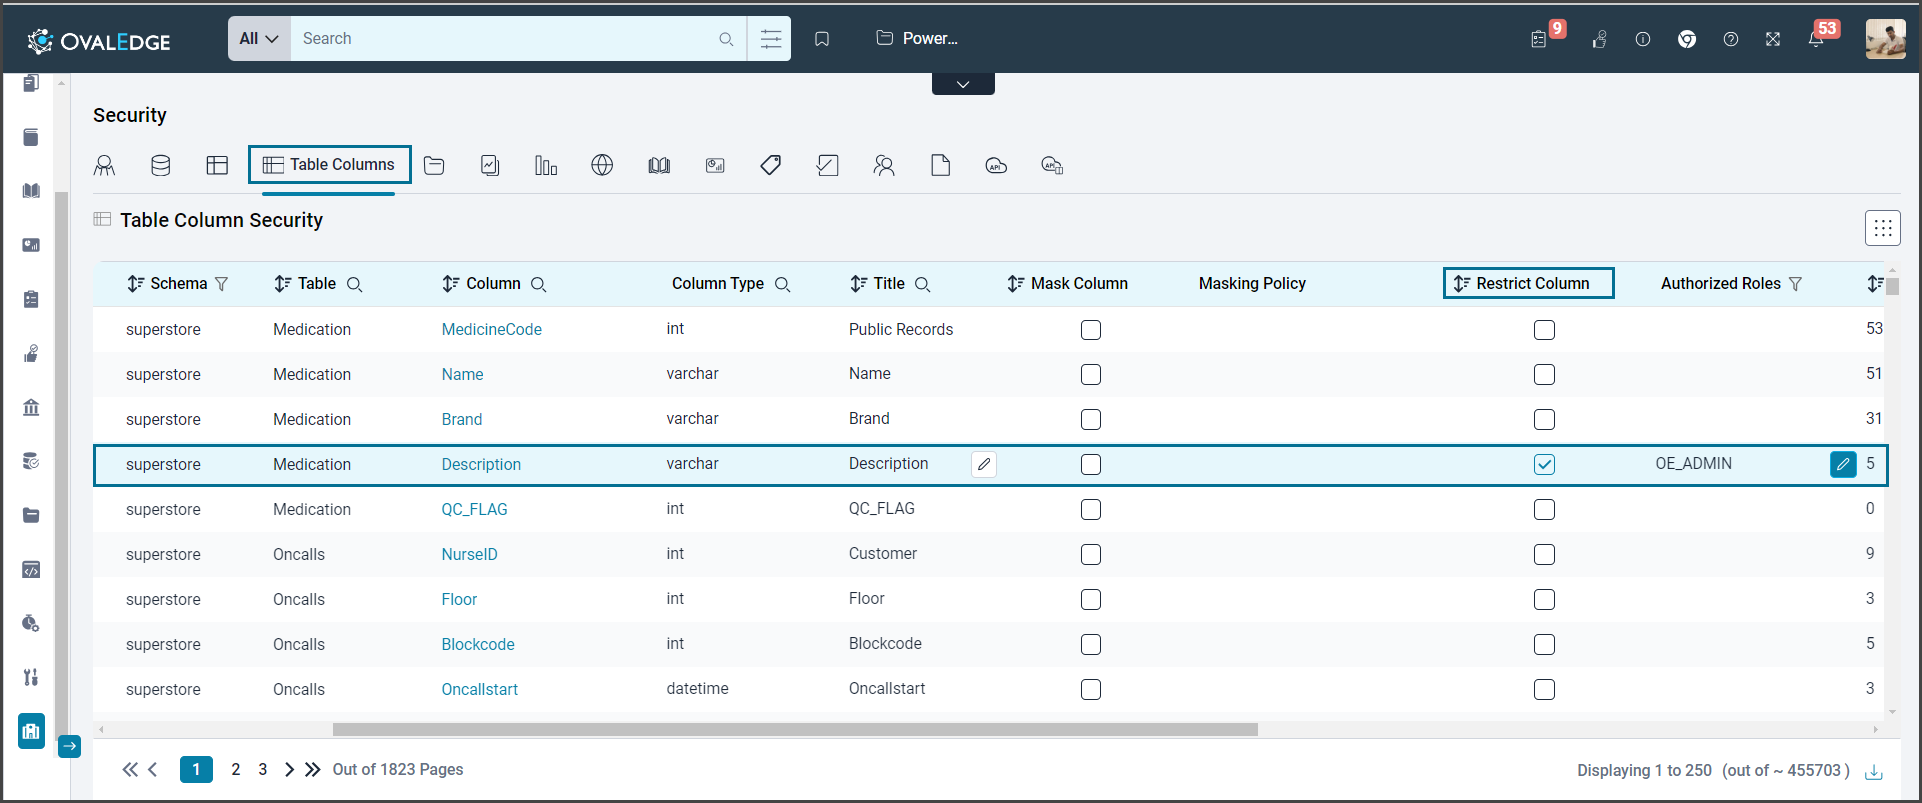
- Go to Security>>Tables tab choose a table name from the list, and enable the column security. All the columns in that table are available to enable column-level security.
- Go to Security>>Columns tab and select the table to assign a column restriction. All the columns in the selected table are displayed with a masking column and restricting column option.
- Choose a column/(s) name. Click and choose Mask Column or Restrict Column.
A tick mark is enabled on the selected column/(s) and is restricted for access by other user roles. The allowed roles to access this column are displayed to the right.
Column Type filter: A column Type filter can filter columns based on a particular data type. Example: Name, Varchar, and Date.
To disable a column-level security
- Expand the Administration tab in the object browser and Select Security.
- Select the Columns tab from the security menu.
- Choose a table name from the list. All the columns along with any column restrictions enabled are displayed below.
- To remove the column level security assigned on a column, deselect the tickmark on the selected column.
Note: Add multiple user roles on the restricted column by clicking on the “allowed roles” column and choosing roles from the drop-down list.
Add More User roles to Access Restricted Columns
- Expand the Administration tab in the object browser and Select Security.
- Select the Table Columns tab from the security menu bar.
- Choose a table name from the list. All the columns along with any column restrictions enabled are listed.
- Choose a column name. Click and select the Restrict Column. A mark is enabled on the column/(s) selected and is restricted for access by other user roles except for OE_ADMIN.
- Click the Authorized Roles and Users.
- Click on the Edit Icon inside the window and select additional user roles to allow access to view that column.
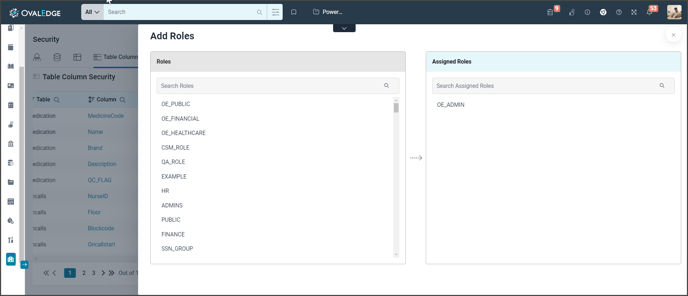
- The available user roles can view the restricted column in the Data catalog module.

Report Groups
The Report group is simply a group of Reports. Multiple Charts and dashboards can be grouped under a single Reports group to manage their security permissions easily. Grant the user role appropriate Metadata and data permissions to access reports within a particular report group. Administrators can provide access to the entire Report group.
There are two ways in which how the reports and dashboards are created.
- OvalEdge_Reports- Reports created within OvalEdge
-
BI tools- Reports/Dashboards created using Business Intelligence tools (Example: POWER BI/TABLEAU)
For reports and dashboards created in BI tools
For reports and dashboards that are created in other Business Intelligence tools, a Report group is automatically created. When a user crawls a schema/site/app workspace, all the reports and dashboards from that schema are created automatically as one reports group.
Example: When a User crawls an app workspace (OvalSampleSql) from Power BI, a new reports group called OvalSampleSql is created in the security page all the reports and dashboards within that schema are created as a single Reports Group.
For reports created in OvalEdge
- Navigate to Administration > Security.
- Select the Reports Groups tab from the security menu bar.
- Click on Add a new Reports Group.
- Select OvalEdge_Report from the reports group type list menu.
- Select the Connection.
The connection is the database name associated with the report. Choose from the drop-down list. - Enter the group name and description for the reports group.
- Click Save to save the Reports group name.
Note: You can perform actions such as update roles, update owner, and steward on a Report group the same way it is done on databases.
Delete Report Group
Administrators can delete the report group by selecting the checkbox for the appropriate report group and clicking on the delete reports group button.
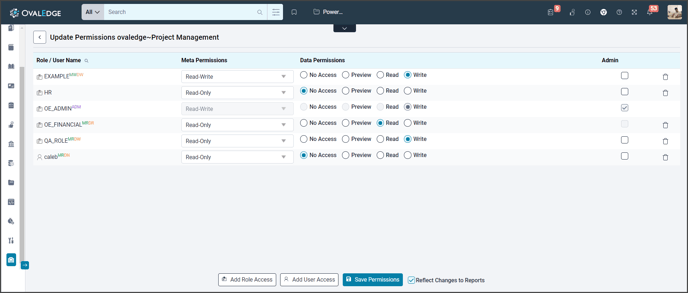
What are Reflect Changes to Reports?
When the administrator enables this checkbox, the changes get applied to all the reports in that Report Group. That means the setting gets applied to all the Reports under that Report Group.
Note: Users can Update the Roles/Owner/Steward for a report group similar to how they have updated on the database level. Refer to the <Update User Role on a Database>/ <Update the Owner and Steward> for more information.
Reports
The reports tab lists all the reports and dashboards within a reports group. The user role permissions on a particular reports group are applied to all the individual charts and dashboards within that group. The user has to select a particular report group to see the list of its contents.
Modify Permissions on a Specific Report
If a user wants to manage permission on each chart or dashboard or report they can do so using the Reports tab.
To modify permissions on a specific report,
- Expand the Administration tab in the object browser and Select Security.
- Select the Reports tab from the security menu bar and select a reports group from the drop-down list. The page displays a list of all the reports within the selection.
- Choose a report and click on the Authorized Roles and Users Edit icon. A pop-up menu to add roles is displayed.
- Choose and select a User Role from the list and click on the Save Permissions button to provide access.
- Alternatively, to revoke access to a user role, unselect the user role.

To delete a specific report from a reports group,
- Navigate to Administration > Security.
- Select the Reports tab from the security menu bar and select a reports group.
- The page displays a list of all the reports within the selection.
- Choose a report and click on the Delete icon to Delete Reports. A confirmation message appears to delete the report.
- Click Delete to remove the report from the selected report group.