Overview
This article explains what users and roles are in OvalEdge and how OvalEdge offers a simple yet complete solution for organizations to use them effectively. It covers how to create or add users and roles in OvalEdge. It also covers the types of licenses available and how organizations can specify individuals' capabilities and permissions on different data objects. The article also introduces some predefined roles in OvalEdge and how they can be used to manage access.
License Types
OvalEdge offers two primary user license types: Viewers and Authors. The assigned roles associated with each license type determine specific metadata and data permissions.
- Viewer License:
- User Profile: Suitable for typical business users, like business analysts.
- Permissions: Users with Viewer licenses can read, browse, and search curated metadata, enabling them to make decisions about their daily business activities.
- Limitations: Viewers cannot access certain actions and sub-modules within OvalEdge.
- Author License:
- User Profile: Suitable for management and administrative roles.
- Responsibilities: Authors are primarily responsible for curating metadata and determining specific access levels for other users and roles within the organization.
- Capabilities: Authors have broader permissions than Viewers, enabling them to perform various administrative tasks related to metadata and data governance.
Users
In OvalEdge, users are individuals with unique identities, typically represented by an email ID or a Single Sign-On ID. These users can be onboarded through Single Sign-On (SSO) Integration or Manual Sign-in processes. Each user in OvalEdge must have one of the offered license types, Author or Viewer. Additionally, users should be associated with at least one role.
Users in OvalEdge can have multiple roles, allowing for different permissions and access levels based on their assigned roles. It is important to note that only Author users can be assigned a Governance Role. The Governance Roles provide additional responsibilities and permissions related to data governance within the platform.
Roles
Many organizations have predefined roles to define the scope and responsibilities of individuals within that role. This practice streamlines and reduces redundancy in defining the scope for each individual. Similarly, in OvalEdge, roles can be created and assigned to establish common permissions for different users across various data objects and applications.
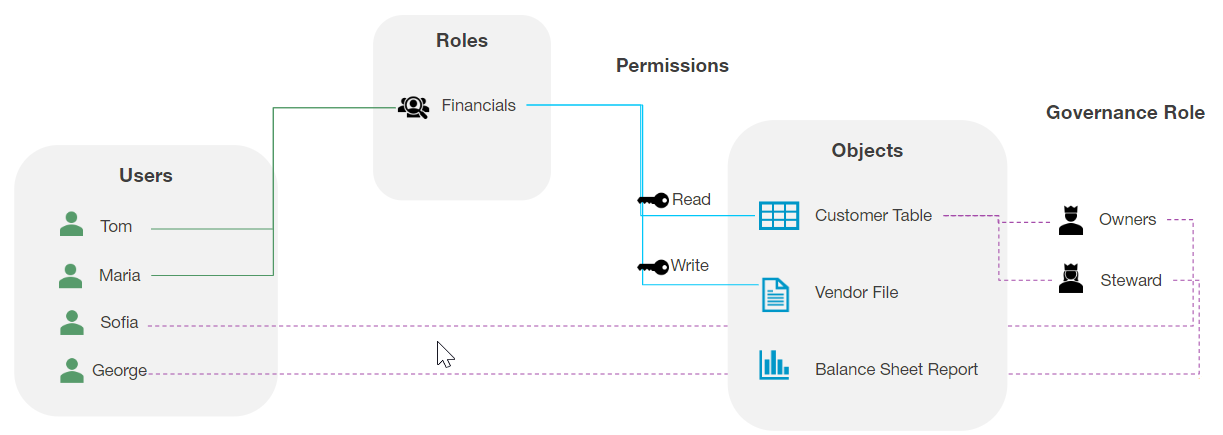
In OvalEdge, roles enable users by granting access to specific data objects with corresponding privileges, all defined by distinct Metadata and Data Permissions. These roles include permissions that allow users to interact differently with various data objects. For instance, a role configured as a Viewer user license can provide read privileges to a user. In contrast, an Author license enables users to curate metadata for business objects and update data. Roles can be directly mapped to the IAM system for seamless integration.
Example: Tom and Maria, both assigned financial roles in OvalEdge, are granted read and write privileges on the customer table and vendor file. These roles allow them to access and modify data as needed. However, it is important to note that ownership and stewardship of the customer table, vendor file, and balance sheet report lies with Sophia and George.
Teams
In OvalEdge, a team is a collaborative unit allowing users to share platform responsibilities. Teams can be assigned to Governance Roles and included in workflows, streamlining collaborative efforts among team members. For a user to be part of a team in OvalEdge, having an Author license is mandatory. Hence, users with a Viewer license cannot be part of an OvalEdge team. It is noteworthy that a team can include any number of author users.
Teams are instrumental in distributing responsibilities and employed for social engagement as part of OvalEdge. Notably, the name of a team always begins with the "#" symbol, providing a consistent and identifiable naming convention for teams in the platform.
Permissions in OvalEdge
Administrators must understand the roles and responsibilities essential to the data governance roadmap. This will aid users in efficiently setting up and managing users and roles.
Data permissions are allocated at the role level, allowing any user within the assigned role to execute that role's operations. For instance, if a role is designated to read data and write on metadata, all users in that role possess these permissions.
Users can hold multiple roles, and they have access to objects from each role. When a user is part of two roles with different permissions, the most authoritative permissions take precedence.
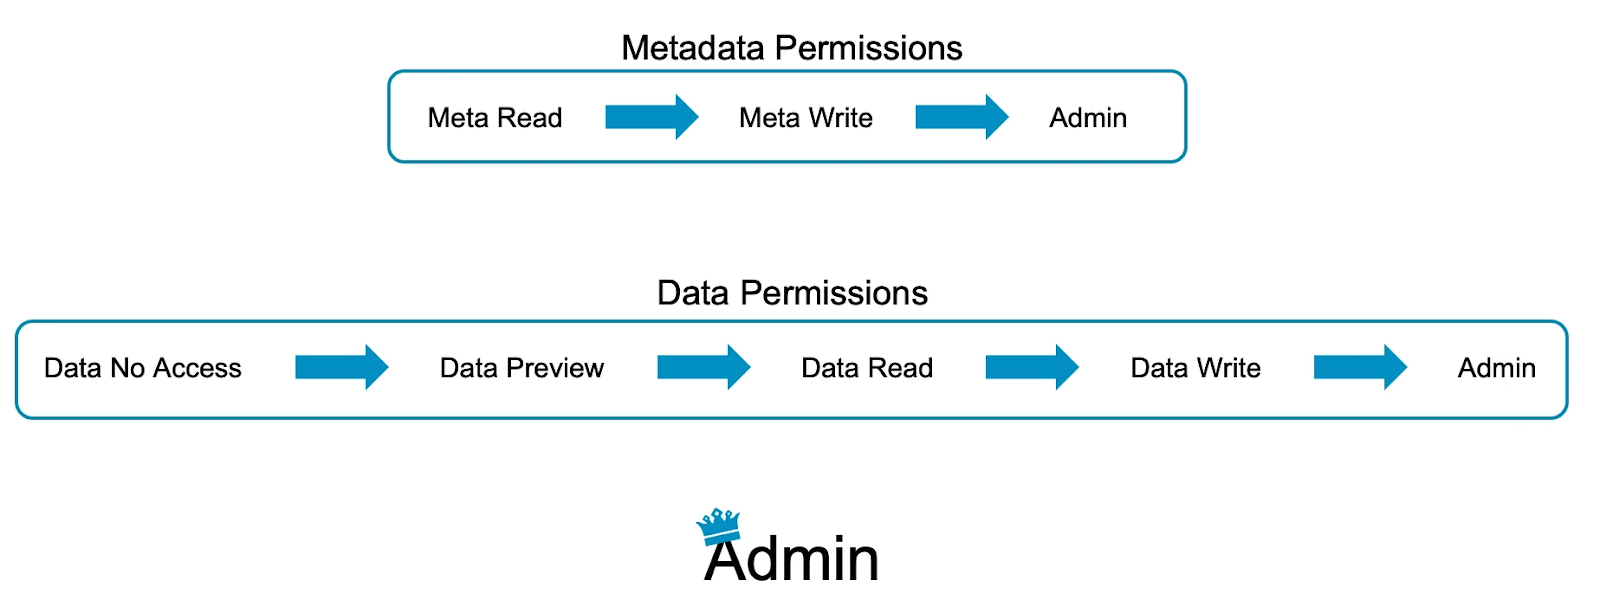
- For Metadata permissions, the hierarchy is meta-read, meta-write, and admin.
- For Data permissions, the hierarchy is data-no access, data-preview, data-read, data-write, and admin.
- Admin represents the highest level of permission.
For example, John has the "all analyst" role with meta-read and data-read permissions. Additionally, he is part of the "material analysis" role with meta-right and data-preview permissions. John retains the highest permissions from each role, resulting in meta-right and data-read permissions.

Roles are granted specific Metadata and Data permissions depending on the type of User License.
Metadata Permissions
|
Metadata Permission |
Description |
|
|
MR |
Metadata - Read |
Users with this permission can view the Metadata. Note: Users with a Viewer License type can only have Metadata Read permission. |
|
MW |
Metadata - Write |
Users with this permission can view and edit the Metadata. Note: Users with an Author License type can have -Metawrite permission and can update the metadata in the Data Catalog. |
|
ADM |
Admin |
Users with this permission have Meta Write and Data Write privileges. They can administer the security as well. |
Data Permissions
|
Data Permission |
Description |
|
|
DN |
Data - No Access |
Users with this permission cannot view any Data. It restricts access to any form of Data. |
|
DP |
Data - Preview |
Users with this permission can view sample data and profile statistics, but they cannot query the data. For example, users can only view data in the Data tab of Tables and see profiled information. |
|
DR |
Data - Read |
Users with this permission can view sample data, profile statistics, query the data source system, and download the Data. The Query Sheet module provides access to view and run certain types of queries (Select) and download the data. |
|
DW |
Data - Write |
Users with this permission can view sample data, profile statistics, query and write to the data source system using the Query Sheet, and download the data. The Query Sheet module allows users to view and write queries for Insert, Update, or Delete operations on the data. |
|
ADM |
Admin |
Users with this permission have Meta Write and Data Write privileges. They can administer the security as well. |
|
Important: A role can only have one metadata permission and one data permission or Admin permission. |
To manage users and roles in OvalEdge, navigate to Administration and select the Users & Roles module. Visit the Users & Roles tab at the top of the page. To change a user's role, click the edit icon in the Role column and select the desired role.

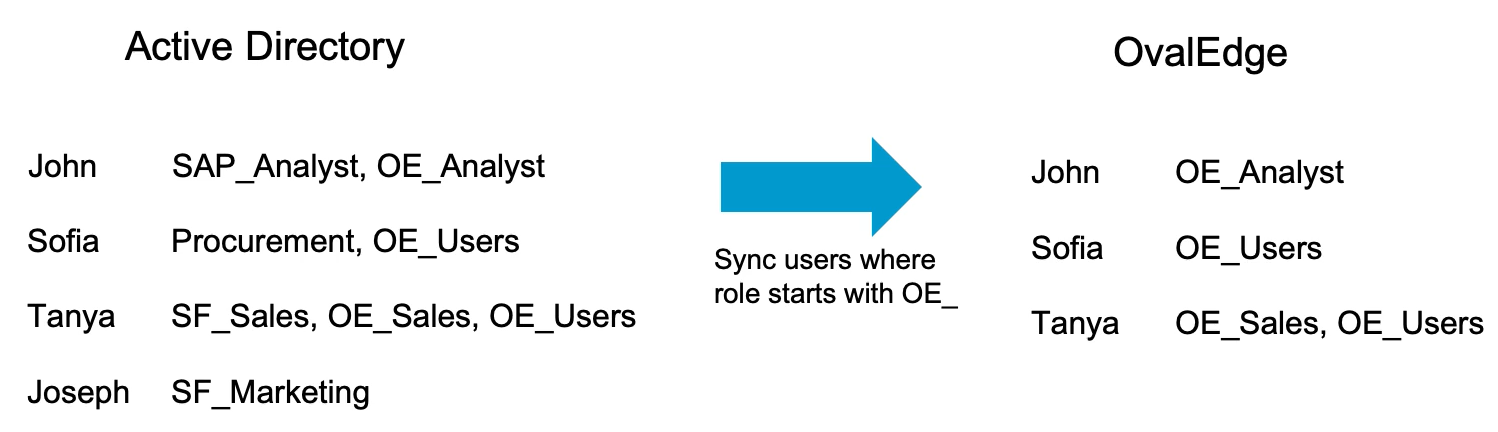
Although administrators can map users to roles within OvalEdge, it is more common to use Single Sign-On (SSO) for mapping users and roles, such as through Active Directory or LDAP. When OvalEdge is configured for SSO, administrators must establish rules for syncing OvalEdge roles with SSO roles.
An example rule might involve syncing all roles starting with "OE underscore" or syncing all roles containing "OvalEdge." When a user logs into OvalEdge through SSO, the roles automatically sync with OvalEdge.
Integrating SSO with OvalEdge
Organizations can integrate their Single Sign-On (SSO) with OvalEdge to facilitate seamless access to metadata crawled into OvalEdge for users and groups. Authentication and Authorization can be managed entirely by SSO or in a hybrid approach where authentication is handled by SSO and authorization is managed within OvalEdge.
- Authentication and Authorization Options:
- ovaledge.extauth.authtype is set to Remote: Both Authentication and Authorization are handled by SSO.
- ovaledge.extauth.authtype defined as Hybrid: Authentication is done by SSO, and Authorization is managed within OvalEdge.
- Roles Mapping with SSO Groups:
- IAM teams can set up roles in OvalEdge corresponding to SSO Groups.
- If roles in OvalEdge match SSO Group names, users will be automatically mapped to those roles in OvalEdge.
- Default Role Assignment:
- If no role is assigned to a user, the default role configured in system settings (ovaledge.role.public) is assigned.
- This default role is also assigned if a user logs in without an associated role.
- SSO Configurations:
- saml.role.prefix: Removes any defined prefixes for roles in Active Directory when mapping them to OvalEdge roles.
- saml.role.suffix: Removes any defined suffixes for roles in Active Directory when mapping them to OvalEdge roles.
- ldap.allow.emptyemail: Allows the association of a dummy email address to users without an email id in LDAP for user login.
- User Interface for Non-Administrator Users:
If a user other than a "Users & Roles Administrator" logs in:
- Users Tab: Displays a list of all OvalEdge users with search, sort, and filter options.
- Users & Roles Tab: Provides information on which roles are associated with each user and user details.
Governance Roles & Responsibilities
Data governance can be complex and multifaceted, requiring the right team to support its implementation and ongoing organizational maintenance. Common roles include data owner, data steward, data custodian, data governance manager, data governance consultant, data governance engineer/administrator, data governance committee members, and various stakeholders such as data quality specialists and security engineers.
Note: Organizations can customize their Governance Roles in OvalEdge.
- Data Owner: A data owner is a high-level executive with influence and control over the data. They oversee the business process of generating the data and understanding its meaning. While not directly involved in data maintenance, they represent business value at the committee level, guiding, prioritizing, and assisting in addressing issues.
- Data Steward: Data stewards, often administrators or subject matter experts, understand the processes behind the data. They draw on their expertise in contributing and reading reports, supporting business practices, and monitoring data quality alerts. Data stewardship is usually performed alongside primary departmental responsibilities.
- Data Custodian: Representing the IT side of data governance, data custodians handle technical responsibilities, including supporting terms definition, reporting changes to data repositories, and collaborating with data stewards on technical debt planning. They often come from the BI or data services team.
These governance roles can be assigned to an individual user of the author license type or a team. When a team is given a governance role, any team member can perform the required operation, such as approving a data quality issue. OvalEdge permits administrators to configure up to six governance roles, with three roles—steward, owner, and custodian—available by default. These roles' names, however, can be customized, for example, renaming a custodian to an expert.
To configure these roles, navigate to Administration on the left panel, select the Security module, and access the Governance Roles tab at the top of the screen. Users can configure the specific governance roles at the data catalog and business glossary level.
Types of Administrators in OvalEdge
OvalEdge has various administrator roles, each serving specific functions across different modules. All OvalEdge Administrator roles fall under the Author License type and are configured from System Settings. Configuring these various administrators is Optional, and if not done specifically, then the default admin role, which is configured out of the box, which is OE_ADMIN holds all these responsibilities. These additional administrators bring in modularity, and the organization desires they can utilize.
- Role Admin:
Configuration: “ovaledge.role.admin”
Description: A configurable role is set in System Settings under Users & Roles. This role functions as Super Administrator.
- Tag Administrator:
Configuration: “ovaledge.tag.role”
Description: A system-configured role that manages tag creation, management, and deletion.
- Domain Creator:
Configuration: “ovaledge.domain.creator”
Description: A system-configured role designated for creating domains. Only users with this role can create a domain.
- Users & Roles Administrator:
Configuration: “oe.user&role.admin”
Description: A system-configured role allowing users to add or edit Users & Roles, performing all related operations in Users & Roles Management.
- Project Administrator:
Configuration: “role.project.admin”
Description: A system-configured role specifically for creating projects. Only users with this role can create a project.
- Connector Creator:
Configuration: “ovaledge.connector.creator”
Description: A system-configured role responsible for creating connectors within OvalEdge, accessible through the Connectors Tab.
- Integration Admin:
Configuration: Assigned during connector creation
Responsibilities: Responsible for editing connector settings, crawling, profiling, recrawling, reprofiling, and scheduling crawl/profile.
- Data Access Administrator:
Description: An administrator role with specific permissions for accessing RDAM screens and performing various reprofiling access management operations. By default, this role has limited permissions, allowing only access to view metadata at the Catalog level.
- Security & Governance Admin (SGA):
Responsibilities: Act as the admin for a specific connector. Manage metadata and data permissions for the connector. Can provide various permissions to roles and users on each data asset within the connector.
Description: An administrator role with Author license type, defined during Connector creation. SGAs can exist for different system types (e.g., RDBMS, Reporting tools), and multiple SGAs can exist on a Connector. Editing SGAs is possible only from the Security page of the Common Administration.
Users & Roles Management
Under Common Administration, the Users & Roles Management Module is available, and the tabs presented vary depending on the type of user logged in. In many organizations, the IAM (Identity and Access Management) team, responsible for creating users and roles and determining default access permissions, can utilize OvalEdge's system-configured role called "Users & Roles Administrator" in the system configuration ("oe.user&role.admin"). This role allows the creation, modification, or deletion of users, roles, and teams.
Specifically, for a role defined as "Users & Roles Administrator," the Users & Roles Management module displays three tabs: Users Tab, Roles Tab, and Users & Roles Tab, and for other users, only the Users Tab and Users & Roles Tab are displayed.
Users Tab
In the Users tab, the admin user can create new users in the application, assign pre-configured roles, modify License Type, change passwords, and delete/deactivate user profiles as required.
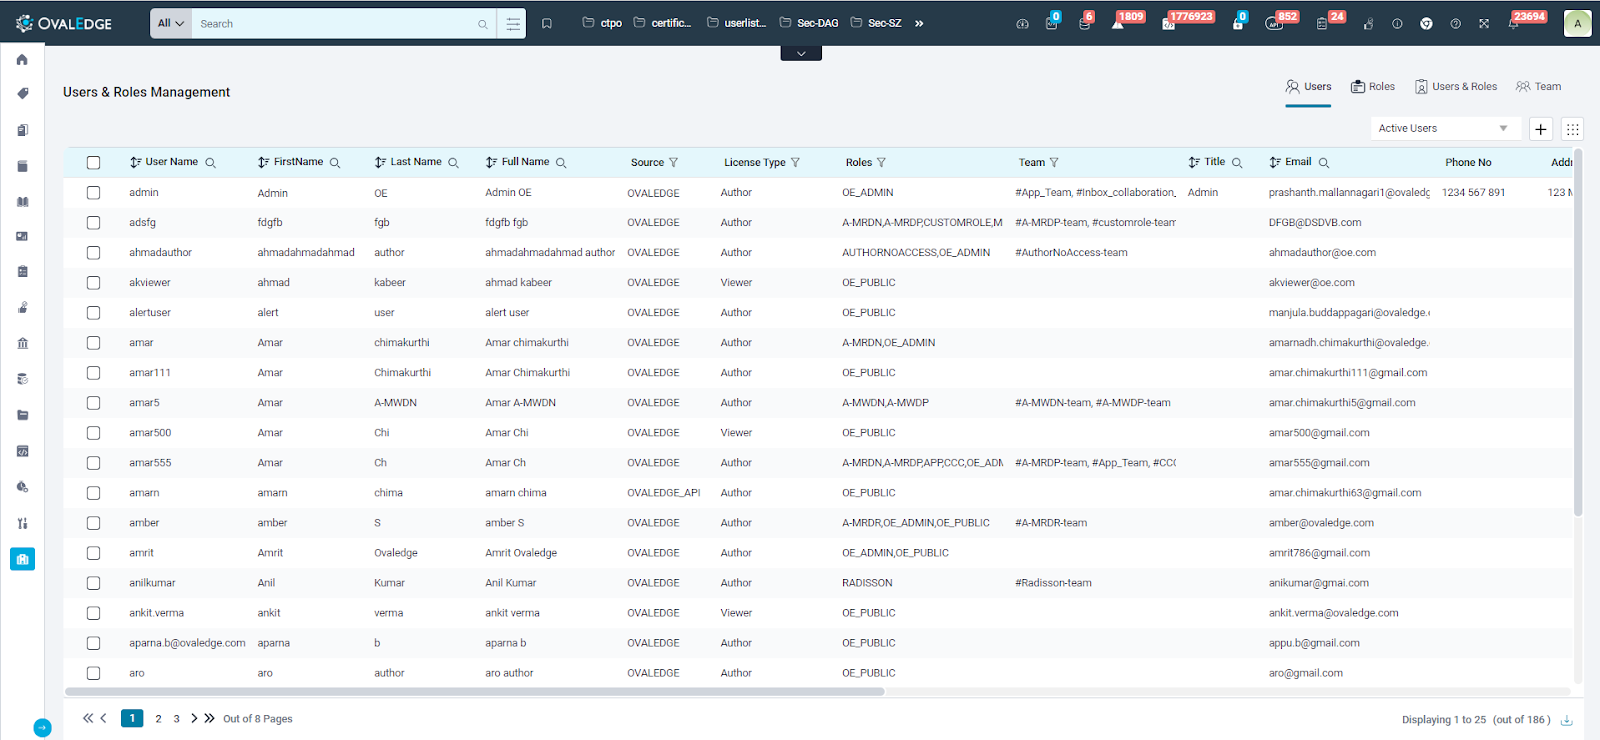
View Users
In OvalEdge, authorized Roles and Users can see a list of all the users who are currently logged in with the following details:
- Username: Unique identifier for the user.
- First Name: User's first name.
- Last Name: User's last name.
- Full Name: Complete name of the user.
- Source: Platform source where the user was created (the source can be OvalEdge, OvalEdge_API, SAML, OAuth )
- License Type: User's assigned license type (Author & Viewer).
- Roles: Roles associated with the user.
- Team: Teams to which the user belongs.
- Title: Title given to the user.
- Phone Number: User's contact number.
- Address: User's address.
- Manager: Full name of the Data Owner responsible for data maintenance.
- Data Governance Manager: Name of the Data Governance Manager establishing policies, access management, and data standards.
- Data Control Manager: Name of the Data Control Manager overseeing data processing and storage.
- Slack ID: User's Slack identifier for easy identification.
- Created Date: The date on which the user was created in the application.
- Last Updated Date: The date on which any user information was last updated in OvalEdge.
- Last Login Time: Timestamp of the user's last login to OvalEdge.
- User Access Initialized: Indicates if user access has been initialized for data objects (Yes if initialized, No if not yet initialized). With Initialise user access, a job gets triggered that makes all associations with respect to roles a user has. If this is not done, the user may get a loading status for a while on the first login.
Add Users
Adding or creating a new user in OvalEdge is only available for the Users & Roles Admin. Once a new user is added, the user license count increases. Users can be added through various methods:
- OvalEdge's Users Tab
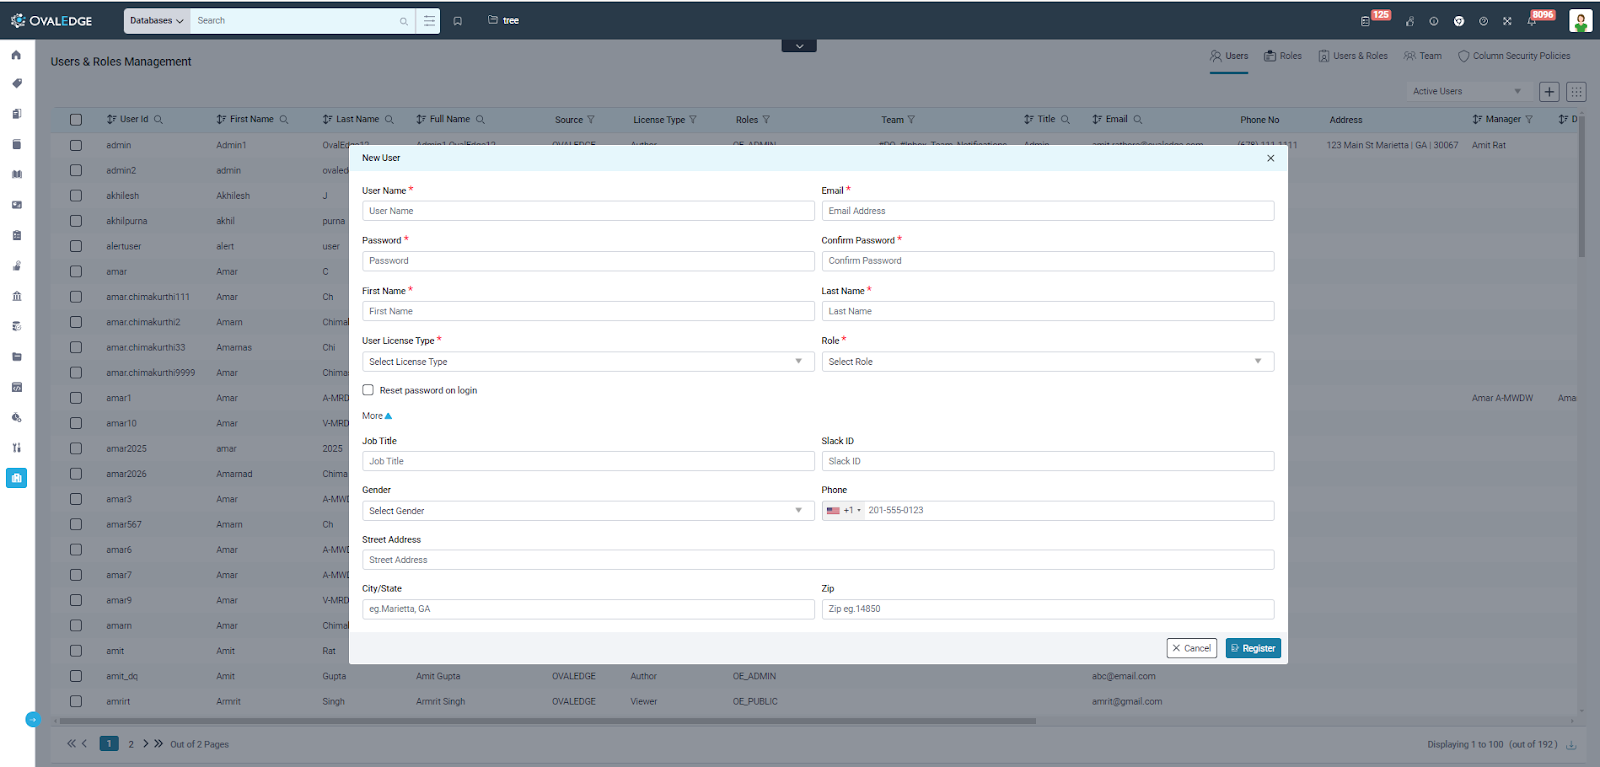
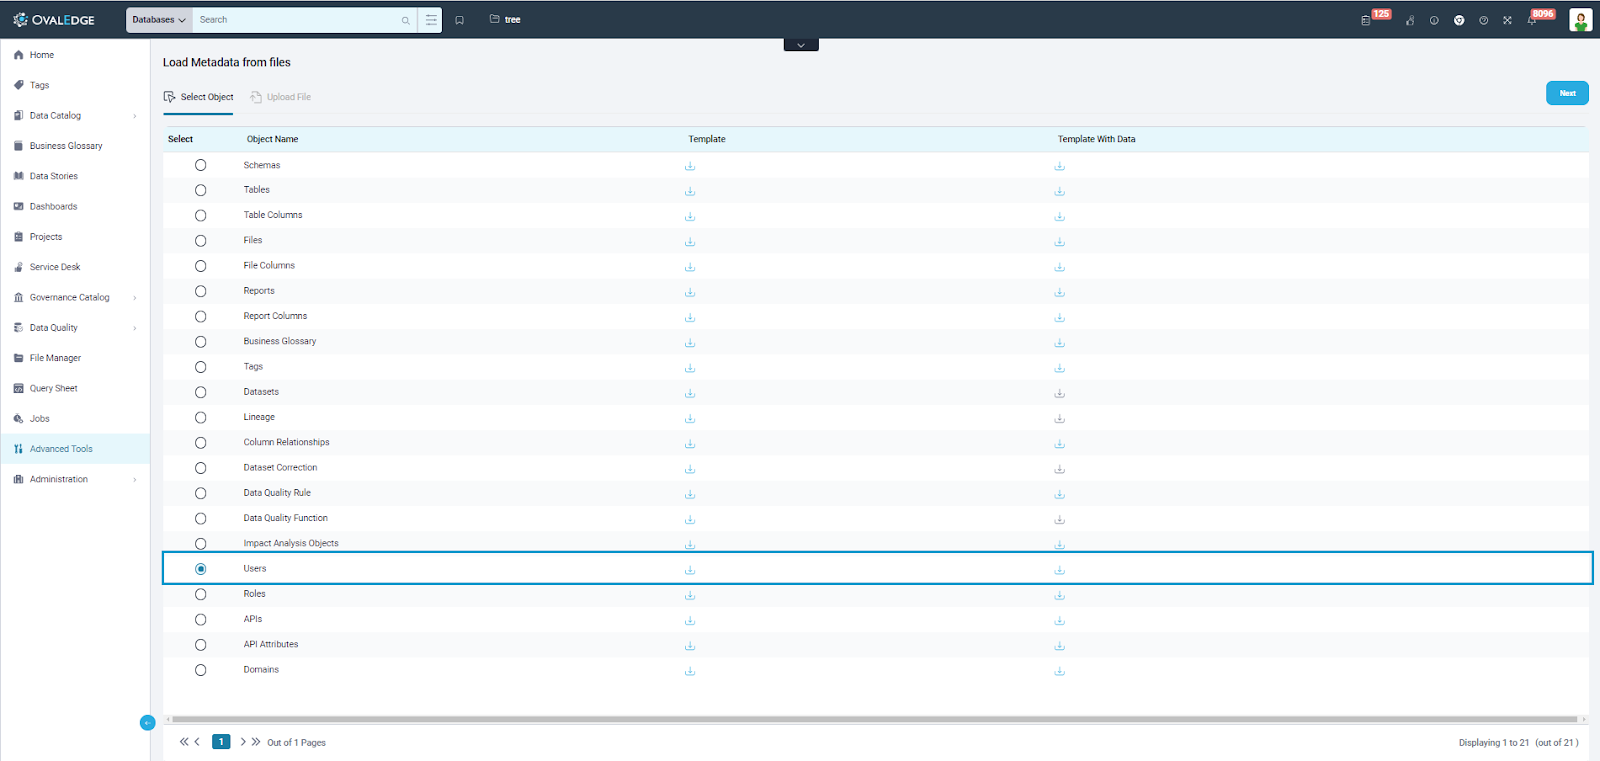
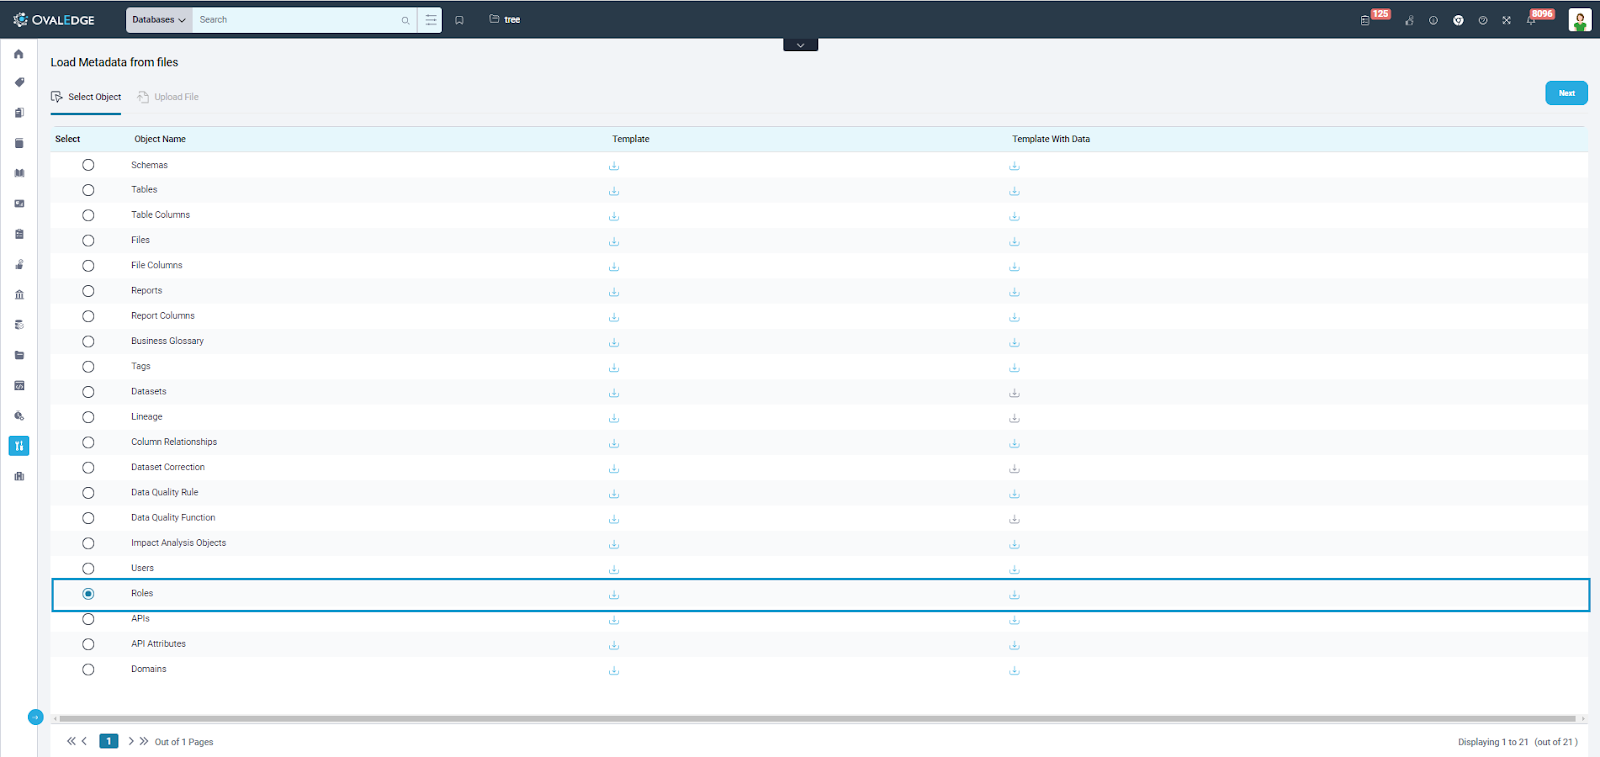
- Advanced Tools > Load Metadata from Files
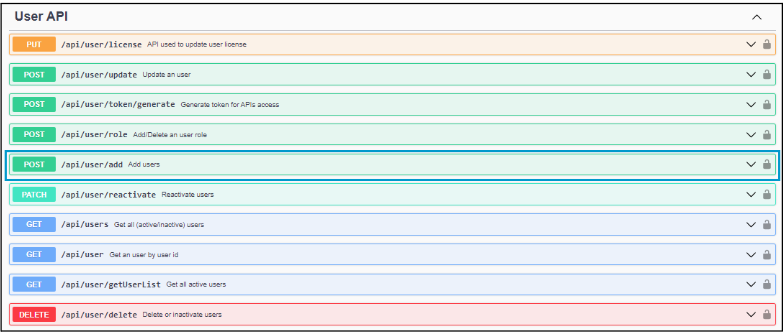
- Advanced Tools > OvalEdge APIs
- Importing users from Active Directory like Okta or Azure AD
Mandatory fields to create a user include:
- Valid Username
- First name and Last name
- Email address
- Password and Confirm password
- User’s License type
- A role created to associate with the user
Edit Users
Among the existing users, specific sorting, filtering, and search operations can be executed on the columns available. User details such as First name, Last name, Title, Phone number, Email, Street address, City/State, Zip, and Slack ID can be edited by clicking the edit icon Additionally, the following are the operations that can be performed through the 9 dots icon.
-
Delete/Deactivate User
A Users & Roles admin can either delete or deactivate an existing user. A deactivated user will be displayed as an inactive user. Before deleting or deactivating a user, transferring user responsibilities to another user with a similar or higher license type is essential.

-
Reactivate a User
Deactivated users are listed as inactive users and can be accessed through the Active/Inactive users dropdown in the Users tab. The Users & Roles admin has the authority to reactivate such inactive users using the 9-dots menu. A user reactivated will be revoked of all the roles and responsibilities present, and only the default OvalEdge public role defined (defined in the following system setting, “ovaledge.role.public”) will be assigned to the user.

-
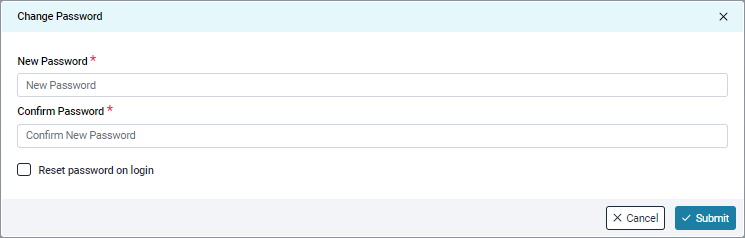
Change Password
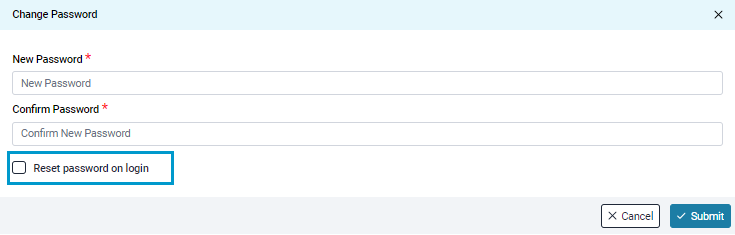
The Users & Roles admin can change a user's existing password by selecting "Change Password" in the 9-dots menu. To reset the password, the current and new passwords must be provided. The Password should contain at least one uppercase letter, one lowercase letter, one number(0-9), and one special character (@,#,$,%,^,&,-,+,=,(,)) and it should be at least 12 characters long, and a maximum of 16 characters are allowed. Once the user has provided this information, the system will verify the user and the password will be reset.
-
Reset Password on Login
The Users & Roles admin has the option to configure a setting where a new user, upon login, will receive a prompt to set a new password. The user is then required to use this new password for subsequent logins.
-
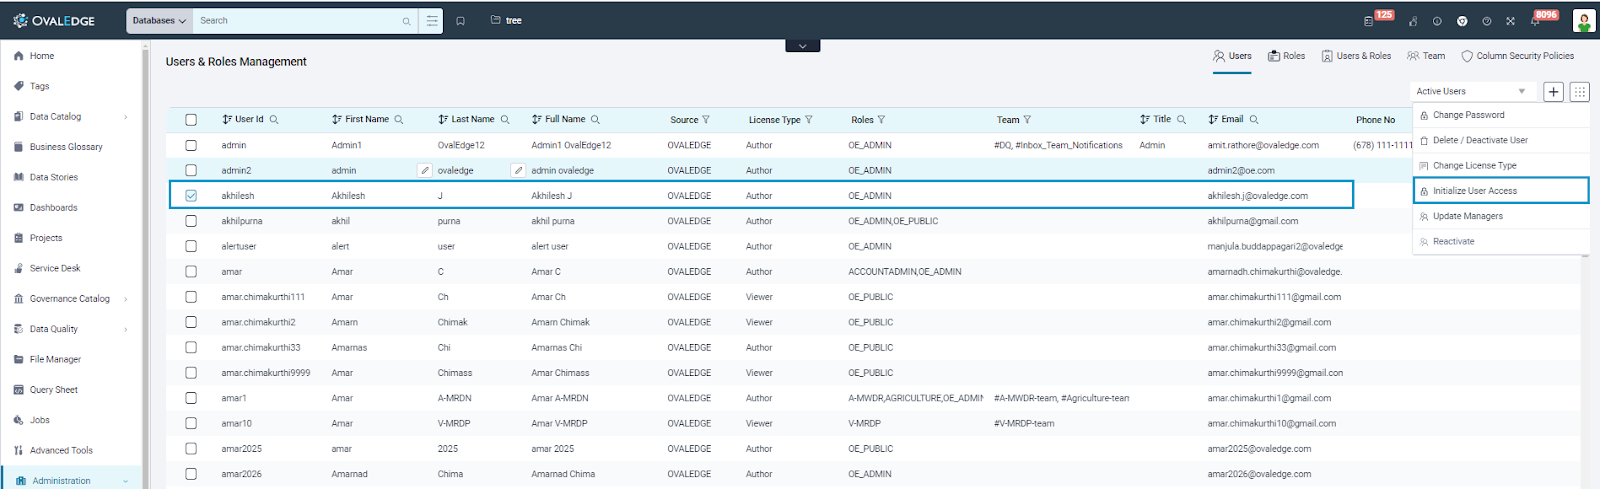
Initialize User Access
Initializing user access initiates a job that establishes all the necessary associations for a user. Failure to complete this process may result in the user experiencing a loading status for an extended period during the first login.
-
Change License Type
Users & roles admins can modify a User's License type from the 9 dots menu. Downgrading from Author to Viewer is possible if the user has no linked data. However, if there is associated data, the association must be removed before the downgrade. Regardless of data association, a User can be upgraded from a Viewer to an Author license.

Roles Tab
Roles allow admin users to create and manage new roles by assigning specific Metadata and Data permissions based on the License Type applied to each role.
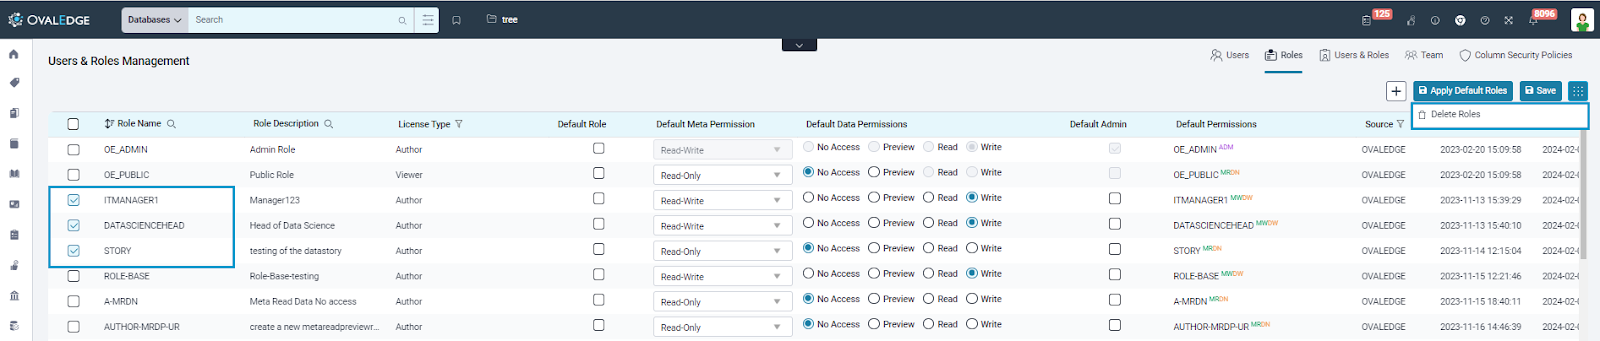
View Roles
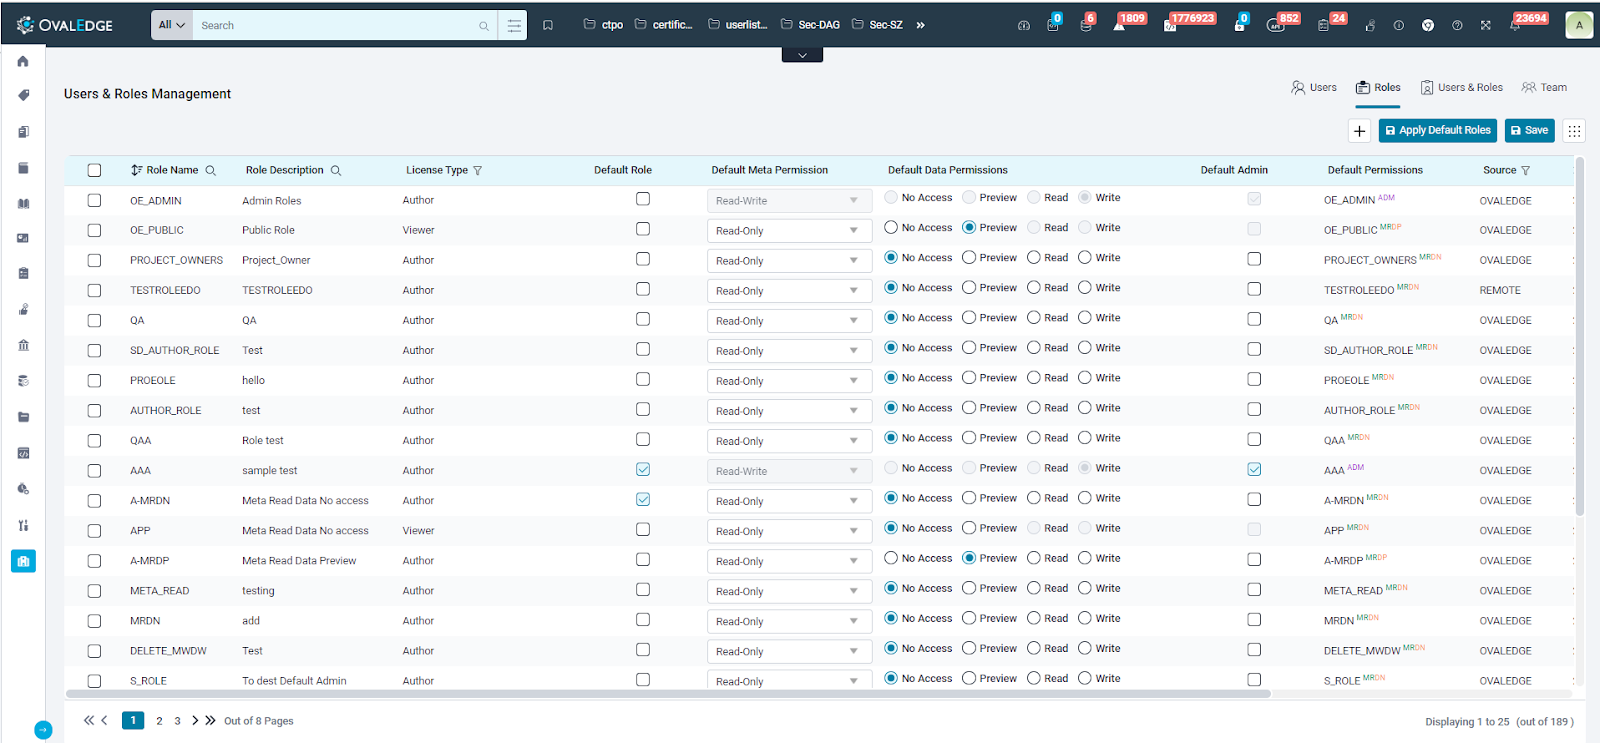
The Roles Tab displays a comprehensive list of all the roles currently existing in OvalEdge. This tab is exclusively visible and accessible to the Users & Roles Admin role in OvalEdge (“oe.user&role.admin”). In addition to the Role Name, various additional details are presented, including:
- Role Description: Describes the purpose of the role.
- User License Type: Specifies the allowed association with users of similar or lower license types.
- Default Role: Designates a role with predefined Meta and Data permissions for validated and crawled connectors.
- Default Meta Permissions: Reveals Metadata permissions, typically set as Meta Read-Only by default.
- Default Data Permissions: Highlights Data permissions, usually set as Data No-Access by default.
- Default Admin: Indicates default administrative privileges.
- Default Permissions: Displays default Metadata and Data Permissions.
- Source: Shows the source through which the role was created in OvalEdge.
- Created Date: Presents the timestamp of role creation.
- Last Updated Date: Shows the timestamp of the role's last update in OvalEdge.
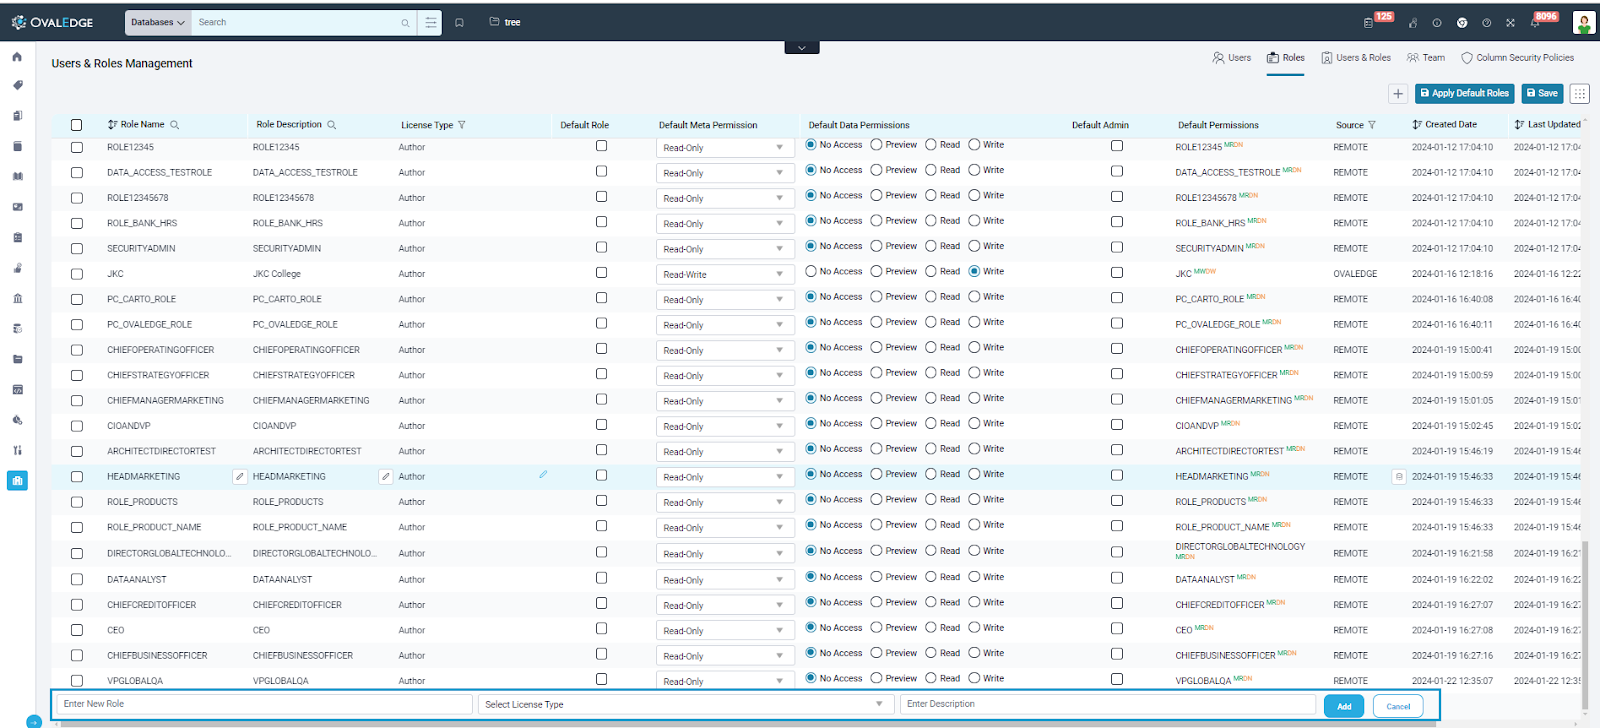
Add Roles
Creating a new role in OvalEdge is a task exclusively reserved for the Users & Roles Admin, and it can be accomplished through various methods:
- OvalEdge’s Roles Tab
- Advanced Tools > Load Metadata from Files
- Advanced Tools > OvalEdge APIs (Method: POST API: /api/security/role/add)

- Roles created and present in Active Directories (like Okta, Azure AD)
To create a role, certain mandatory fields need to be filled:
- Valid Role Name: The role name must be unique, regardless of the user license type.
- Selecting a Role’s User License Type: This defines the role/roles that can be associated with a user. For instance, if it is a Viewer user, only the Viewer license type role can be tagged, and if it is an Author user, roles of both Author and Viewer license types can be tagged based on organizational needs.
- Description of a Role: A brief description outlining the role's purpose or function.
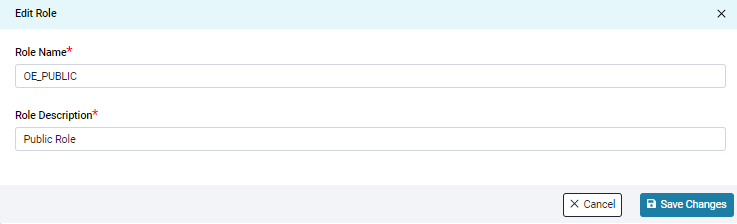
Edit Roles
Existing roles in OvalEdge offer flexibility for sorting, filtering, and searching based on various criteria. Roles can be sorted using Role Names, Created Date, and Last Updated Date. Searching can be done using Role Name and Role Description. Additionally, specific fields like the Role’s User License Type and the Source through which the role was created can be used for filtering.
Inline editing allows modification of the role’s Name, Description, User License Type, Metadata, and Data Permissions. The Roles Tab also facilitates additional operations, enhancing the role management process.
-
Save Default
If an organization wants specific roles, with defined metadata and data permissions, to have consistent permissions across all objects from various data sources cataloged in OvalEdge, they can achieve this by enabling the "Default role" checkbox for a role and clicking save. This action ensures that the specified role automatically receives the pre-defined permissions on objects during the crawling and cataloging process. This approach minimizes the necessity of separately defining permissions for each object, providing a more streamlined and efficient permission management system.

-
Declare a Role as Default Admin
If an organization wants specific roles to function as administrators for all data objects cataloged in OvalEdge across various data sources, they can achieve this by selecting the "Default Admin" and "Default role" checkboxes. Upon clicking save, the chosen roles will be designated administrators for all future data objects crawled by default. This configuration streamlines the administrative control over data objects, ensuring that the specified roles automatically possess administrative privileges without requiring manual adjustments.

-
Apply Default Roles
If an organization wants changes made to a role's metadata or data permissions to be reflected across all crawled data objects, they can select the specific role and click "Apply Default Roles." This action initiates a job that consistently applies the modified role settings across all data objects crawled, ensuring uniformity in metadata and data permissions throughout the system.

-
Delete Single Role/Delete Roles in Bulk
Actions such as deleting roles in the Roles Tab can be performed in-line or through the 9 dots menu. The OE_ADMIN role is set as the default admin, and deletion of this role is not permitted.
Deletion can also be carried out through Load Metadata from Files or by utilizing Roles Templates (with or without data templates), specifying the Input Action as "Delete." OvalEdge APIs provide another method for role deletion using the endpoint (/api/security/roles/delete, Method: POST).
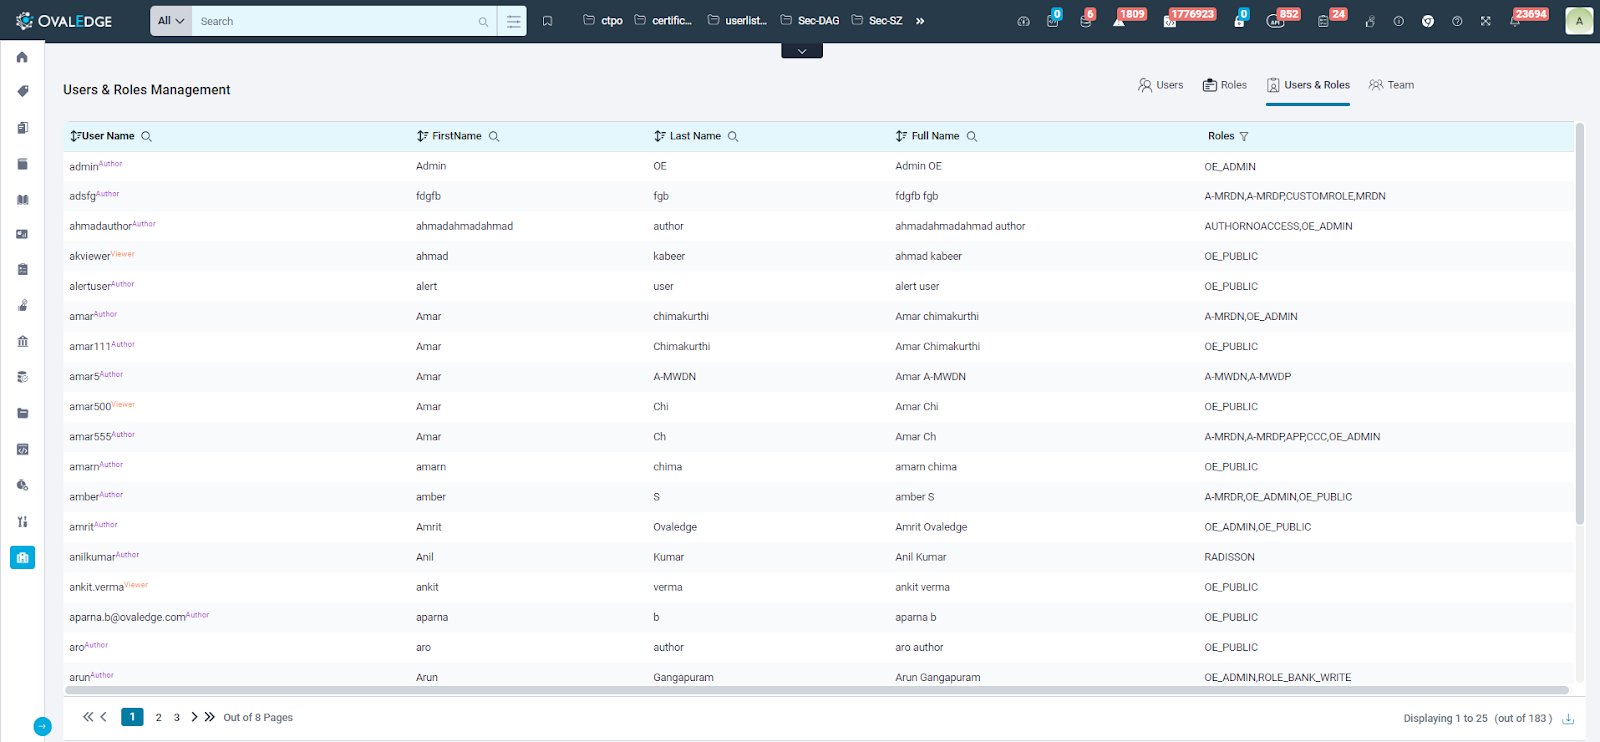
Users & Roles Tab
The Users and Roles tab lists all the users created in the application, including details such as Login, First Name, Last Name, Full Name, and Roles. It helps admin users to add or remove roles assigned to users. It allows administrators to analyze the number of users available with their user types and associated roles with the permissions.
Team Tab
The Team tab allows admin users to group multiple users to govern data objects effectively or manage service requests. Users can be members of multiple teams, and a team can be assigned to a Governance Role user, such as a steward or owner, for any data object. Once a team is assigned to a task, its members can share responsibilities and collectively carry out the assigned task.
It is important to note that only users with an author license type are eligible to be part of a team. This restriction ensures team members have the necessary privileges and capabilities to contribute effectively to collaborative tasks within OvalEdge.
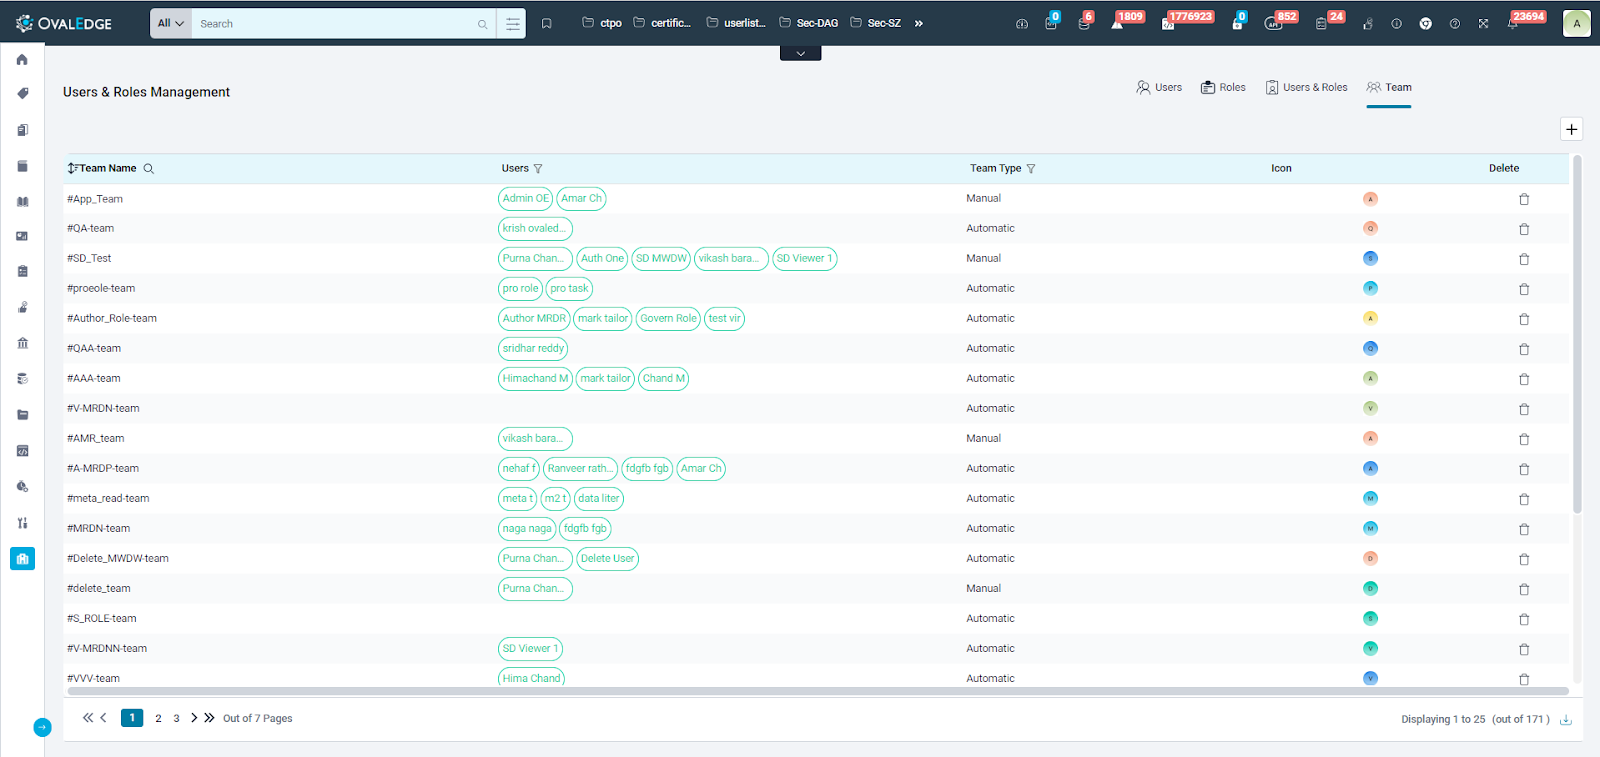
Only the Users & Roles Admin has the capability to:
- Create a Team
- Modify a Team’s Name
- Edit the Users who can be part of a Team
- Edit a Team’s Image (Icon)
- Delete a Team