Looker is an analytics and business intelligence platform that enables organizations to investigate and analyze data from different sources. The platform features a reporting tool that enables you to generate, modify, and distribute reports within the organization.
Various report types are available, including tables and dashboards, which provide a visually engaging and informative representation of complex data sets. This feature makes it easier to identify trends, patterns, and insights from the data.
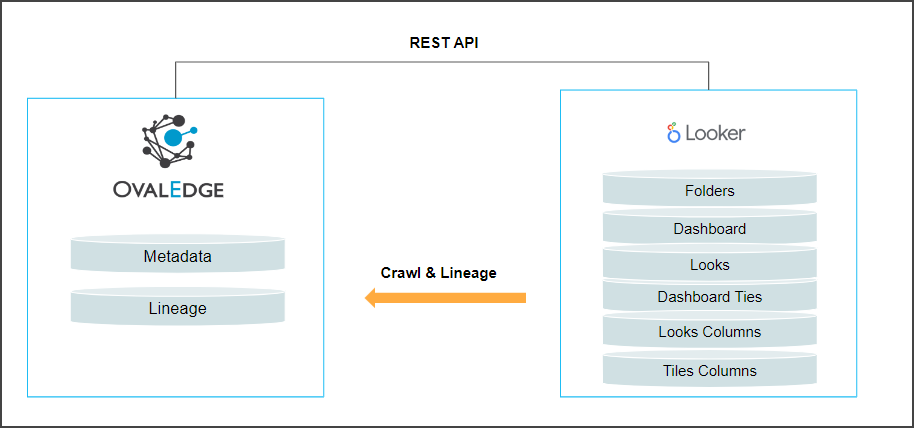
By using REST APIs, OvalEdge allows you to connect to the Looker data source and helps you to crawl data objects such as Folders, Dashboards, Looks, Dashboard Tiles, Looks Columns, Tile Columns, and build lineage.
Connector Capabilities
The Looker connector supports the following data objects:
|
Functionality |
Description |
|
Crawler |
Folders, Dashboards, Looks, Dashboard Tiles, Looks Columns, and Tile Columns |
|
Lineage |
Report Lineage, ReportColumn lineage, and Data source |
Prerequisites
To establish a Looker connection, the following prerequisites are required:
- Set Up API Key
- User Permissions
- Establish Environment Variables (Optional)
Set up API Key
To connect with Looker's data source, you can obtain a REST API key from the Looker website.
|
API |
Version |
|
Rest API |
4.1 |
Service Account and Permissions
The following are the minimum privileges required for you to crawl a connection:
|
Operation |
Minimum Access Permission |
|
Connector Validation |
Read Permission |
|
Crawling |
View Permission |
Note: By utilizing Looker's source code information, you can identify the data sources used in a report and establish connections between these data sources and the source tables in Looks.
Establish Environment Variables (Optional)
The Environment Names allow users to select the environment configured for the specific connector from the dropdown list in the Manage Connection pop-up window.
You may consider crawling the same schema in both stage and production environments for consistency. Additionally, crawling a temporary environment can be useful for schema comparisons, which can later be deleted, especially during application upgrade assistance. The typical environments for crawling are PROD, STG, or Temporary.
Steps to Configure the Environment
- Log into the OvalEdge application.
- Navigate to Administration > System Settings and select the Connector tab.
- Find the Key name “connector. environment”.
- Enter the desired environment values (UAT, QA, and PROD) in the value column.
- Click ✔ to save.
After acquiring all the required API keys, user permissions, and environment variables, you can proceed to establish a connection from the OvalEdge application.
Establish a connection
To set up a Looker Connection, provide the necessary information in the Manage Connector pop-up window by completing the required fields with relevant details.
- Log into the OvalEdge application
- In the left menu, click on the Administration module name, and click on the Connectors sub-module name. The Connectors Information page is displayed.
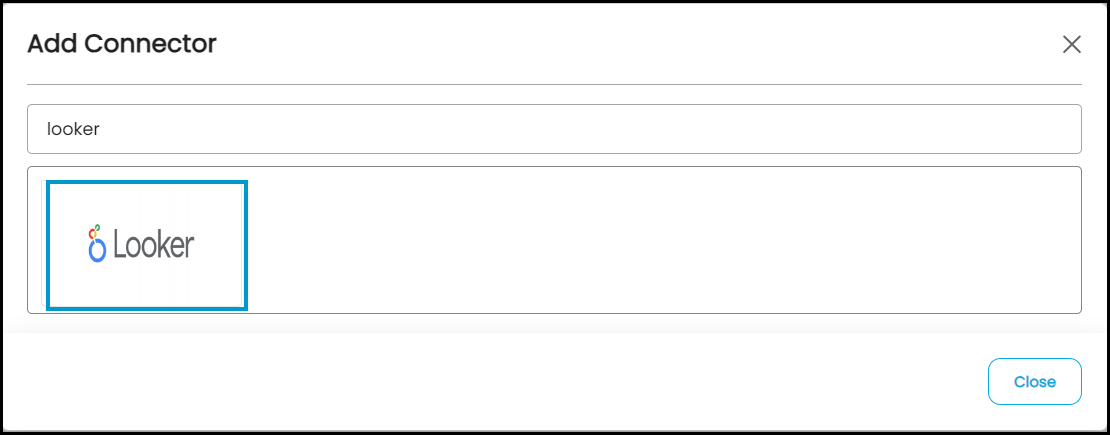
- Click on + New Connector. The Add Connector pop-up window is displayed.
- Select the connection type as Looker. The Add Connector with Looker details is displayed.
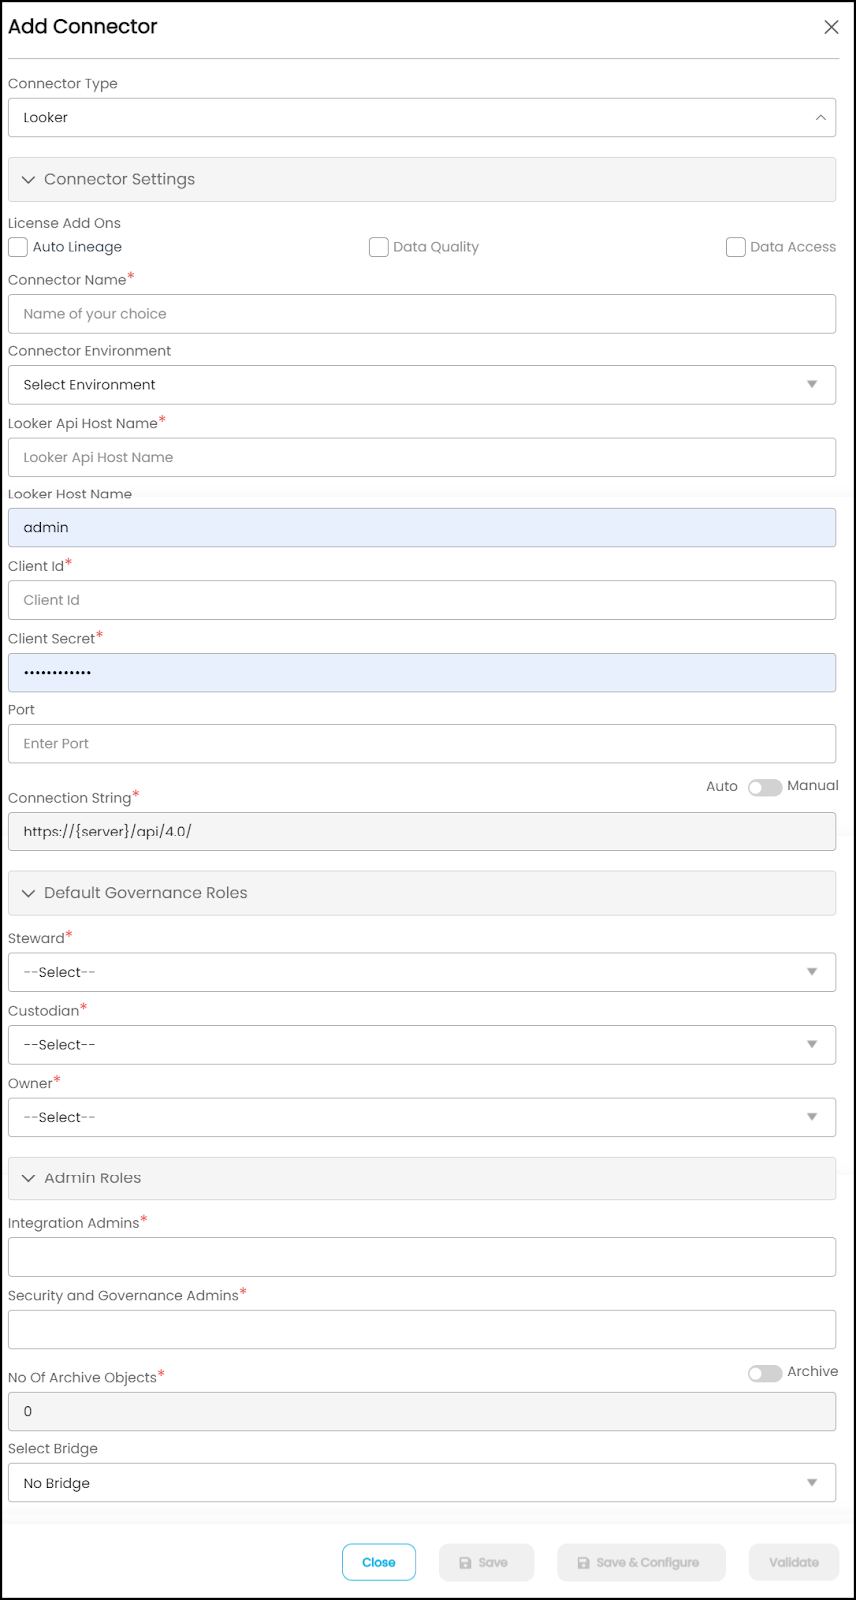
Note: The asterisk (*) denotes mandatory fields required for establishing a connection.
Fields
Details
Connector Type
The selected connection type ‘Looker’ is displayed by default. If required, the dropdown menu allows you to change the connector type and based on the selection of the connection type, the fields associated with the selected connection type are displayed.
License Add Ons
All the connectors will have a Base Connector License by default that allows you to crawl and profile to obtain the metadata and statistical information from a data source.
(i) Auto Lineage: Connectors with Auto Lineage licenses are capable of creating a lineage that shows data movement of selected database and schema-level objects.
Connector Name*
Enter a connection name for the Looker connector.
You can specify a name to easily identify it on the OvalEdge Connector page.
Example: looker_db
Connector Environment
It allows you to select the environment configured for the connector from the dropdown list.
The purpose of the environment field is to help you to understand that the new connector is established in an environment available at the Production, and QA.
Note: This was set up in the configuration in the above prerequisite steps.
Looker API Host Name*
Enter the Looker Server URL https://ovaledge.looker.com/)
Looker admin team to provide it.
Looker Host Name
Enter the Looker Hostname
(test@ovaledge.com)
Looker admin team to provide it.
Client Id*
Enter the Client Id.(2SZyGcBZ9XXXXXXXXXXX)
Client ID is an Identifier ID generated after the app is registered in Looker.
Looker admin team to provide it.
Client Secret*
Enter the Client Secret. (Y6nztgmXthXXXXXXXXXXXX)
The Secret is known only to the application authorization server.
Looker admin team to provide it.
Port
Enter the port number of the Looker server.
Connection String*
Set the Connection string toggle button to automatic to get the details automatically from the credentials provided.
https://{server}/api/4.1 or you can manually enter the string.
Default Governance Roles*
You can select a specific user or a team from the governance roles (Steward, Custodian, Owner) that get assigned for managing the data asset.
Note: The drop-down list displays all the configurable roles (single user or a team) as per the configurations made in the OvalEdge Security > Governance Roles section.
Admin Roles*
- Integration Admins: To add Integration Admin Roles, search for or select one or more roles from the Integration Admin options, and then click on the Apply button.
The responsibility of the Integration Admin includes configuring crawling and profiling settings for the connector, as well as deleting connectors, schemas, or data objects. - Security and Governance Admins: To add Security and Governance Admin roles, search for or select one or more roles from the list, and then click on the Apply button.
The security and Governance Admin is responsible for:
- Configure role permissions for the connector and its associated data objects.
- Add admins to set permissions for roles on the connector and its associated data objects.
- Update governance roles.
- Create custom fields.
- Develop Service Request templates for the connector.
- Create Approval workflows for the templates.
No of archive objects*
It is the number of last modifications made in the metadata data of a dataset at Remote/source. By default, the number of archive objects is set to disable mode.
Click on the Archive toggle button and enter the number of objects you wish to archive.For example, the connection is crawled if you update the count as 4. It will provide the last 4 changes that occurred in the remote/source of the connector. You can observe these changes in the ‘version’ column of the ‘Metadata Changes’ module.
Select Bridge
The Bridge component (can also be referred to as Site to Site communication) is used as a Tunnel to Transfer Data from the Client Hosted Cloud/Client On-Premises data Center, with the Handshake between the Bridge Server and Client established with Security Tool Kit (these differ from client to client. This is Generated based on the IP address/DNS..etc).
Once a bridge has been set up, it will be displayed in a dropdown menu for you to select the desired Bridge ID.
If the bridge is not configured, you can select the "NO BRIDGE" option.
For more information, refer to Bridge Overview
- Integration Admins: To add Integration Admin Roles, search for or select one or more roles from the Integration Admin options, and then click on the Apply button.
- After filling in all the connection details, select the appropriate button based on your preferences.
- Validate: Click on the Validate button to verify the connection details. This ensures that the provided information is accurate and enables successful connection establishment.
- Save: Click on the Save button to store the connection details. Once saved, the connection will be added to the Connectors home page for easy access.
- Save & Configure: For certain Connectors that require additional configuration settings. Click on the Save & Configure button. This will open the Connection Settings pop-up window, allowing you to configure the necessary settings before saving the connection.
- Once the connection is validated and saved, it will be displayed on the Connectors home page.
Note: You can save the connection details first, or you can validate the connection first and then save it.
Connection Validation Errors
|
Sl.No |
Error Messages(s) |
Descriptions |
|
1 |
Signing Error- Error signing in to Looker Server |
In case of Invalid ClientID/ ClientSecret |
|
2 |
Error while retrieving Looks and dashboards from Looker |
In case the user doesn't have proper permissions to get Looks and Dashboards. |
Note: If you have any issues creating a connection, please contact your assigned OvalEdge Customer Success Management (CSM) team.
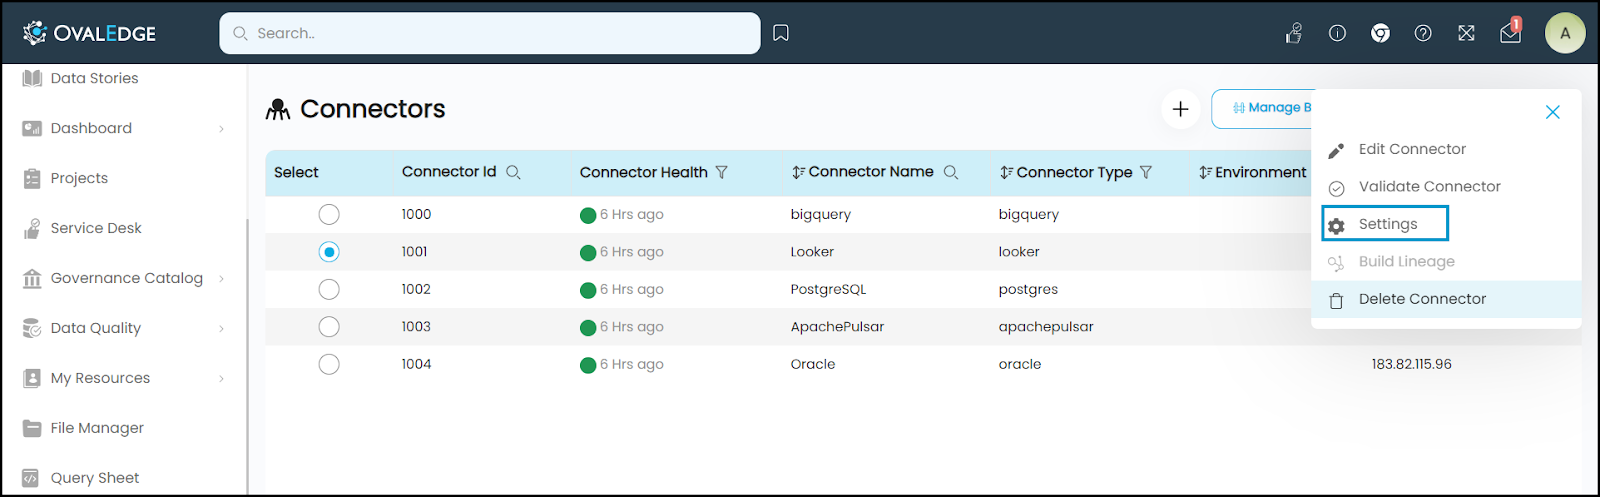
Connector Settings
Once the connection is established successfully, various settings are provided to retrieve and display the information from the data source. The connection settings include Crawler, Access Instruction, Business Glossary Settings, Lineage, and Notification.
To view the Connector Settings page,
- Go to the Connectors page.
- From the 9- dots select the Settings option.
- The Connector Settings page is displayed where you can view all the connector setting options.
- Click on Save Changes. All the settings will be applied to the metadata.
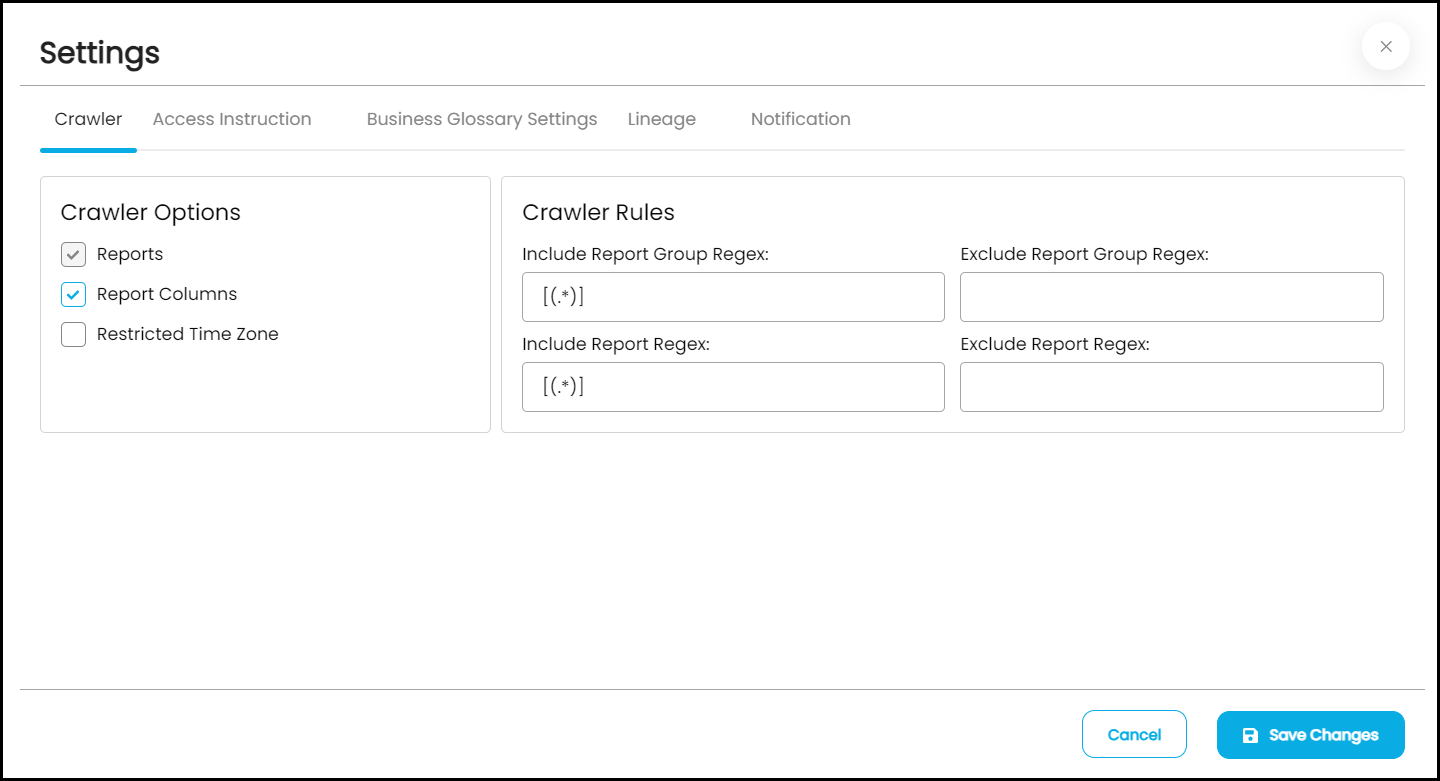
The following is a list of connection settings along with their corresponding descriptions:
|
Connection Settings |
Description |
|---|---|
|
Crawler |
Crawler setting allows you to set the crawling configuration that will collect the metadata and display it in the data catalog. Crawler Settings include (i) Crawler Options
(ii) Crawler Rules |
|
Access Instruction |
Access Instruction allows the data owner to instruct others on using the objects in the application. |
|
Business Glossary Settings |
The Business Glossary setting provides flexibility and control over how they view and manage term association within the context of a business glossary at the connector level. To change the display of Managed Data Association options, you can enter "Y" or "N" in the respective position of the configuration string.
|
|
Lineage |
The lineage settings allow you to configure multiple dialects (by selecting Source Server Type for lineage) and connection priority lists to pick the tables to build lineage. |
|
Notification |
The Send Metadata Changes Notifications option is used to set the change notification about the metadata changes of the data objects.
Context URL By utilizing the Context URL feature in the OvalEdge Browser Extension, you can map OvalEdge to specific URL addresses through the crawler settings. This allows the extension to recognize the site and provide metadata results from the OvalEdge catalog, even when the plugin is used outside of the OvalEdge application. The Context URL feature is only applicable to the Report connection type. For more information, refer to the Connector Settings Article. |
Note: For more information, refer to the Connector Settings.
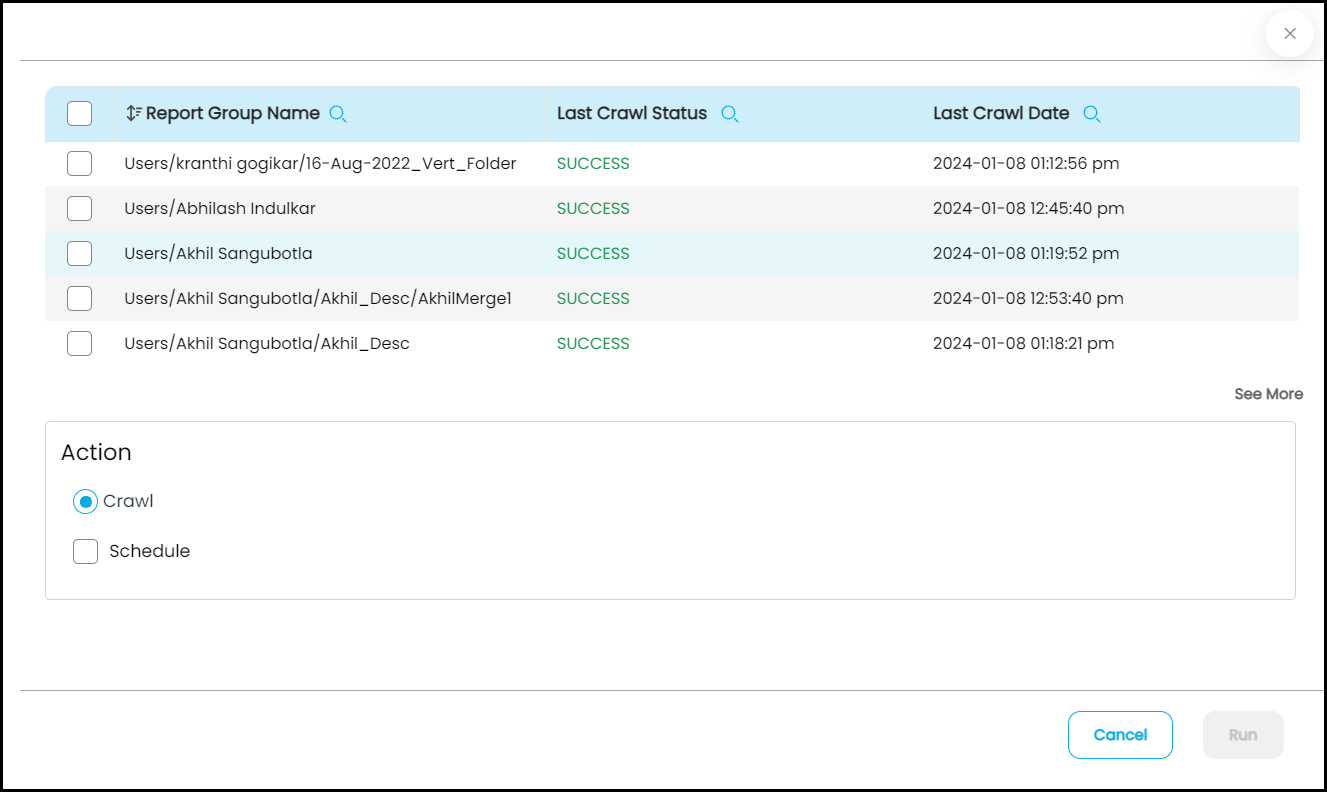
Crawling of Schema(s)
A Crawl/Profile option allows you to select the specific schemas for the following operations: Crawl and Schedule. The defined run date and time are displayed to set for any scheduled crawlers.
- Navigate to the Connectors page, and click the Crawl/Profile button.
- Select the required Schema(s).
- The below list of actions is displayed in the Action section.
- Crawl: It allows the crawling of the metadata of the selected schemas.
- Schedule: Connectors can also be scheduled for crawling in advance to run at prescribed times and selected intervals.
Note: For more information on Scheduling, refer to Scheduling Connector.
- Click on the Run button that gathers all metadata from the connected source into the OvalEdge Data Catalog.