OvalEdge Project is a feature available for all the end-users within an organization to manage and organize data objects without the need to have an admin or a tag role. Projects are used by a small group of users working on a similar task to collaborate on their data objects in a synchronized manner.
You do not need administrator permissions to create new projects and you can add multiple data objects from different Schemas/Files/Report Groups with appropriate notes and assign them to preferred users.
For adding any content to your project you need to select a default project.
Create a new Project
To create a new project
- Click on the
Projects module from the left menu. The Projects home page with the list of all the projects existing in the system is displayed.
- Click on the
button and enter a project name and title that explains what the project is and click on the
button. The new project is created and displayed on the Projects home page.

Edit an existing Project
- To edit an existing project, click on the
Projects module from the left menu. The Projects home page with the list of all the projects existing in the system is displayed.
- Select the project name and project title which needs to be edited and click on the
icon and modify the existing project name and project title.
Users who have the access to view the project are only eligible to edit the project name and project title.

Delete an existing Projects
To edit an existing project
- Click on the
Projects module from the left menu. The Projects home page with the list of all the projects existing in the system is displayed.
- Select the Projects which need to be deleted using the checkboxes beside the project name and click on the
nine dots icon and select the Delete Project option. The Delete Project confirmation pop-up window with Cancel and Ok buttons are displayed.
- Click on the Ok button, the projects selected will be deleted from the system.
Delete all Projects
To delete all the projects existing on the Projects page.
- Click on the checkbox at the project data grid header, all the projects existing on the Projects page will be selected.
- Click on the
nine dots icon and select the Delete Project option. The Delete Project confirmation pop-up window with Cancel and Ok buttons are displayed.
- Click on the Ok button, the projects selected will be deleted from the system.
Only the user who has created a project can delete his project. Invited users do not have the right to delete other user's projects.
Once a project gets removed, no members of the user group to the project can further access that project.
How to use Projects
The multiple Data Objects (Databases/Tables/Table Columns/Files/File Columns/Reports/Reports Columns/Queries) and Data Stories can be added to the project and assign to preferred users. Here the Data Objects and Data Stories can be added to the new project or an existing project. For adding Data Objects and Data Stories to the project you need to select that particular project as the default project.
Data and Metadata access on the Data Objects depend on the user role and permissions.
Adding Data Objects to the Project
To add Data Objects to the Project.
-
Initially from the Projects module, select the particular project for which the Data Objects like Databases/Tables/Table Columns/Files/File Columns/Reports/Reports Columns/Queries needs to be added as the default project.
-
Navigate to the Data Catalog module, click on the particular Data Objects (Databases/Tables/Table Columns/Files/File Columns/Reports/Reports Columns/Queries) tab. The selected Data Object page is displayed with all the objects existing in the system.
-
Select the object which needs to be added to the default project and in the Project Status column click on the
icon, the selected data object will be added to the default project, and the Project Status column is updated with the
checkmark icon.
To add multiple add data objects to the default Project
-
Select the objects which need to be added to the default project using the checkboxes beside the object name and click on the
nine dots icon and select the Add to Project option. The selected objects are added to the default projects and the
checkmark icon is displayed under the Project Status column.
Example:
To add Database Object to the default Project
-
Navigate to the Data Catalog module and click on the Databases tab. The databases existing in the system are displayed on the Databases page.
- Select the Database which needs to be added to the default project and in the Project Status column and click on the
checkmark icon.

Adding Data Stories to the Project
To add Data Stories to the project.
- Initially from the Projects module, select the particular project for which the Data Stories needs to be added as the default project.
- Navigate to the Data Stories module, Select the Parent or Child Data Story name which needs to be added to the project, and click on the
icon beside the Parent or Child Data Story name the “Add to project” pop-up window is displayed with the default project name.
- Click on the
icon and enter notes specific to the project and click on the
button, the selected Parent or Child Data Story will be added to the default project.
If the particular Data Story is already added to the project, then the checkmark symbol is displayed beside the Data Story name.
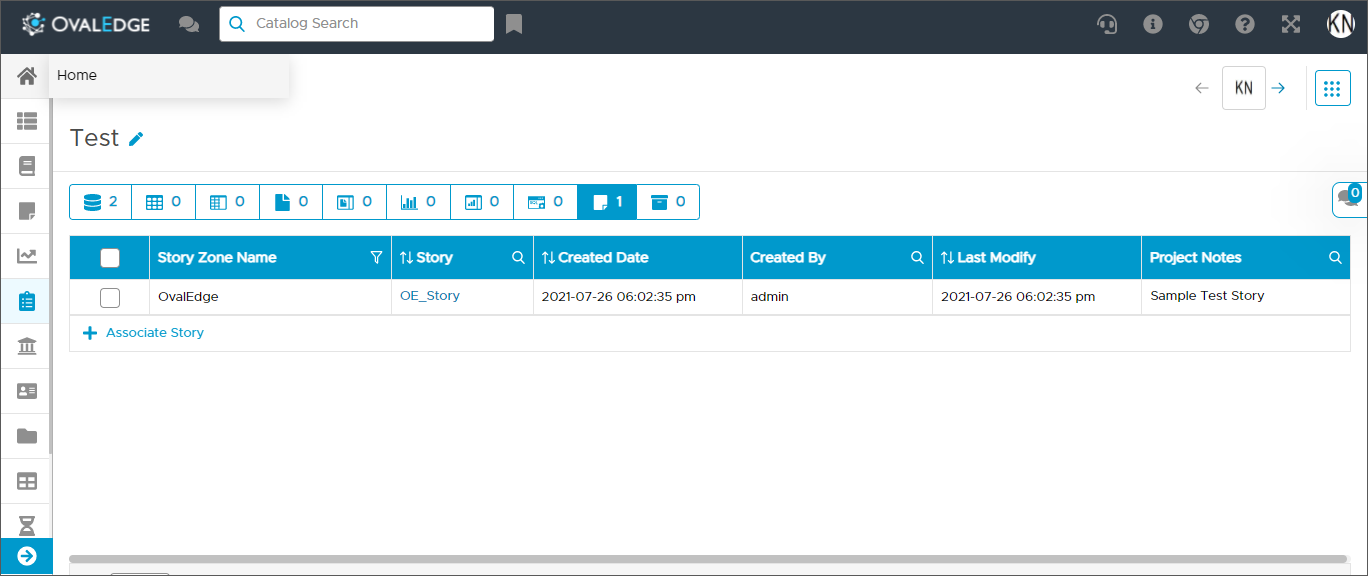
To verify the selected Parent or Child Data Story added to the Default Project or not.
- Navigate to the Projects, the Project main page with the list of all existing projects is displayed in the projects data grid.
- In the projects data grid, click on the Project Name under which the parent or child data story is added. The selected project details page with the Databases, Tables, Table Columns, Files, File Columns, Reports, Report Column, Queries, Stories, References information is displayed.
- In the project details page, click on the Stories icon. The Parent or Child Data Story added to the project is displayed.
Inviting users to the Project
To invite any user in the organization to work on the project.
- Click on the
Projects module from the left menu. The Projects home page with the list of all the projects existing in the system is displayed.
- Click on the Project name, the project details page with the Databases, Tables, Table Columns, Files, File Columns, Reports, Report Column, Queries, Stories, References information is displayed.
- Select the particular Data Object which needs to be shared with the desired Users using the checkboxes beside the Data Object name and click on the
nine dots icon and select the Invite User option. The Invite User pop-up window is displayed, select the desired Users who need to be assigned to the project, and click on the
button. The selected users are assigned to the particular project by sending a notification.

Invited project users can collaborate with the notes/messages, by using the collaboration messages icon
present on the top right end of the screen.
Full profile and calculate relationships
The Full profile and calculate relationships are used to build relationships and calculate the scores among data objects that are added within the project. The relationships are built among the tables to analyze the strength of the relationship between the two data assets.
For calculating the relationships, you need at least 2 or more tables that are associated with the project. The tables are then analyzed by considering the top 50 values of each table column, relationships are built and scores are calculated.
As the feature starts to build relationships and calculates the score, an Advanced Job is triggered with the name ‘Project Level Relationships Building’ and while it is running, you can check the logs for understanding/progress under the Jobs section.
Upon successful completion, the relationships along with scores are established and can be accessed under the Relationships column details.
To full profile and calculate relationships.
- Click on the
Projects module from the left menu. The Projects home page with the list of all the projects existing in the system is displayed.
- Select the Project, the Project Details page with the Databases/Tables/Table Columns/Files/File Columns/Reports/Reports Columns/Stories/Queries are displayed.
- Click on the Tables tab, all the tables included for the selected project are displayed. Select the tables which need to be full profile and calculate relationships using the checkboxes beside the table names and click on the
nine dots icon and select the Full profile and calculate relationships option. The success message with job scheduled for Full profile and calculate relationships is displayed and the scores are been established and displayed under the Entity Relationships column details.

See this article Security to know more about Projects Security.