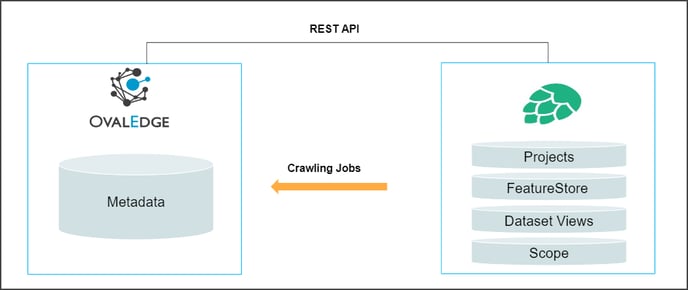
Hopsworks is the most compelling feature platform for designing and operating feature pipelines, training pipelines, and inference pipelines. It runs out of the box with existing pipelines, so users do not have to redesign it to work with Hopsworks.
OvalEdge uses Rest API to connect to the Hopsworks instance.
Connector Capabilities
The following is the list of data objects supported by the Hopsworks connector.
|
Functionality |
Description |
| Crawler | Tables (Feature Groups) Columns (Features) Views (Feature Views) |
| Profiler | It supports lineage between feature groups and feature views. |
Prerequisites
The following are the prerequisites required for establishing a connection between the connector and the OvalEdge application.
- Set up API Key
- Set up a Service account with permissions
- Configure environment variables (Optional)
API Details
OvalEdge uses REST API to connect to Hopsworks. API Key is needed to connect to Hopsworks. For more information, refer to the section How to Generate the API Key?
Service Account with Minimum Permissions
The following are the minimum privileges required for a service account user to crawl and profile the data source.
|
Operation |
Minimum Access Permission |
|---|---|
|
Connection Validation |
Project scopes |
|
Crawling |
The project, Featurestore, Dataset_View scopes |
Establish Environment Variables (Optional)
This section describes the settings or instructions that users should be aware of prior to establishing a connection. If your environments have been configured, skip this step.
Configure Environment Names
The Environment Names allow users to select the environment configured for the specific connector from the dropdown list in the Add Connector pop-up window.You might want to consider crawling the same schema in both stage and production environments for consistency. The typical environments for crawling are PROD, STG, or Temporary, and may also include QA or other environments. Additionally, crawling a temporary environment can be useful for schema comparisons, which can later be deleted, especially during application upgrade assistance.
Steps to Configure the Environment
- Navigate to Administration | Configuration.
- Select the Connector tab.
- Find the Key name “connector.environment”.
- Enter the desired environment values (STG or PROD) in the value column.
- Click ✔ to save.
Establish a connection
To establish a Hopsworks Connection:
- Log into the OvalEdge application
- In the left menu, click on the Administration module name, and click on the Connectors sub-module name. The Connectors Information page is displayed.
- Click on + New Connector. The Add Connector pop-up window is displayed.
- Select the connection type as Hospworks. The Add Connector with Hospworks-specific details is displayed.
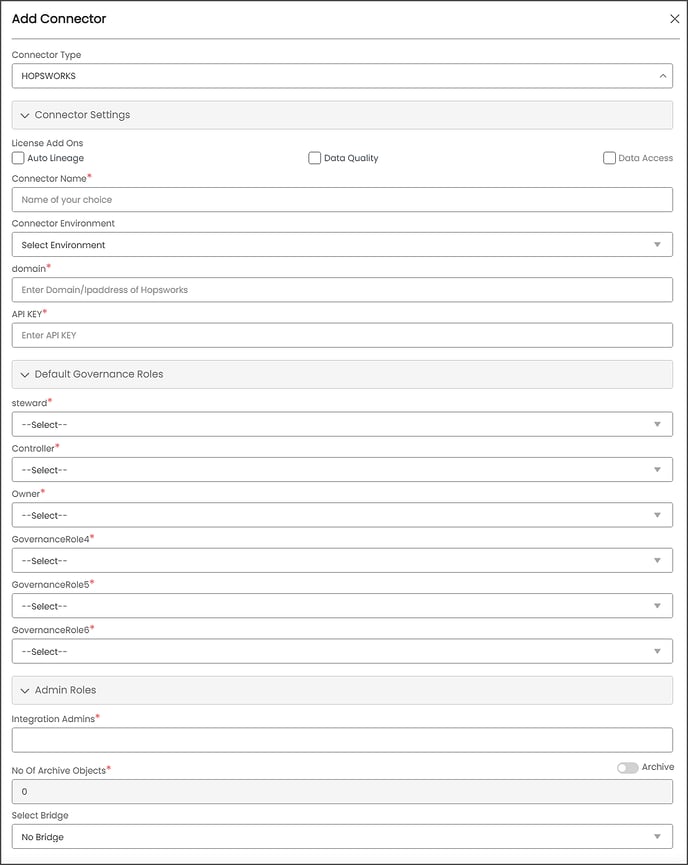
Fields
Details
Connection Type*
By default, the selected connection type ‘Hopsworks’ is displayed.
License Types*
All the connectors will have a Base Connector License by default that allows you to crawl and profile to obtain the metadata and statistical information from a datasource.
OvalEdge supports various License Add-Ons based on the connector’s functionality requirements.
- Select the Auto Lineage Add-On license that enables the automatic construction of the Lineage of data objects for a connector with the Lineage feature.
- Select the Data Quality Add-On license to identify, report, and resolve the data quality issues for a connector whose data supports data quality, using DQ Rules/functions, Anomaly detection, Reports, and more.
- Select the Data Access Add-On license that will enforce connector access via OvalEdge with Remote Data Access Management (RDAM) feature enabled.
Connection Name*
Enter a Connection name for Hopsworks. Users can specify a connection name to identify the Hopsworks connection in OvalEdge.
Example:hopsworks_db
Environment
The environment dropdown menu allows you to select the environment configured for the connector from the dropdown list. For example, PROD, or STG (based on the configured items in the OvalEdge configuration for the connector.environment).
The purpose of the environment field is to help you identify which connector is connecting what type of system environment (Production, STG, or QA).Note: This was set up in the configuration in the above prerequisites steps
Domain*
The hostname of the Hopsworks instance
API Key*
API Key generated under account settings
No of archive objects*
It is the number of last modifications made in the metadata data of a dataset at the Remote/source system. By default, the number of archive objects is set to disable mode. Click on the Archive toggle button and enter the number of objects you wish to archive.
For example, if a user updates the count as four, then the connection is crawled. It will provide the last four changes that occurred in the remote/source of the connector. You can observe these changes in the ‘version’ column of the ‘Metadata Changes’ module.
Default Governance Roles*
The admin will select a specific user or a team from the governance roles (Steward, Custodian, Owner) that get assigned to the data asset.
The dropdown list displays all the configurable roles (single user or a team) as per the configurations made in the OvalEdge Security > Governance Roles.
Admin Roles Select the required admin roles for this connector.
- To add Integration Admin Roles, search for or select one or more roles from the Integration Admin options, and then click on the Apply button.
The responsibility of the Integration Admin includes configuring crawling and profiling settings for the connector, as well as deleting connectors, schemas, or data objects. - To add Security and Governance Admin roles, search for or select one or more roles from the list, and then click on the Apply button.
The security and Governance Admin is responsible for:- Configure role permissions for the connector and its associated data objects.
- Add admins to set permissions for roles on the connector and its associated data objects.
- Update governance roles.
- Create custom fields.
- Develop Service Request templates for the connector.
- Create Approval workflows for the templates.
Select Bridge
With the OvalEdge Bridge component, any cloud-hosted server can connect with any on-premise or public cloud data sources without modifying firewall rules. A bridge provides real-time control, making managing data movement between source and destination easy. For more information, refer to Bridge Overview.
- Click on the Valid button to validate the connection details.
- Click on the Save button to save the connection. Alternatively, the user can also directly click on the Save & Configure button that displays the Connection Settings pop-up window to configure the settings for the selected Connector. The Save & Configure button is displayed only for the Connectors for which the settings configuration is required.
Note: * (asterisk) indicates the mandatory field required to create a connection. Once the connection is validated and saved, it will be displayed on the Connectors home page.
Note: It's up to your wish to save the connection details first and then validate them, or to validate the connection first and then save it
Connection Validation Errors
|
S. No |
Error Message(s) |
Description |
|
1 |
401 Unauthorized |
API key not found (This will occur when APIKey is invalid). |
Note: If you have any issues creating a connection, please contact your assigned OvalEdge Customer Success Management (CSM) team.
Connector Settings
Once the connection is established successfully, crawler settings are provided to retrieve and display the information from the data source.
|
Connection Settings |
Description |
|
Crawler |
Crawler settings are configured to connect to a data source and collect and catalog all the data elements in the form of metadata. Check out the crawler options to set the crawler's behavior in the Crawler Settings. |
Note: For more information on Scheduling, refer to Connector Settings
The Crawling of Schema(s)
The user can use the Crawl/Profile option, which allows the user to select the specific schemas that need to be crawled, profiled, or unprofiled. For any scheduled crawlers and profilers, the defined run date and time are displayed to set.
- Navigate to the Connectors page, and click Crawl/Profile option.
- It allows the user to select the specific schemas for the following operations: crawl, profile, crawl & profile, or profile unprofiled.
- Click on the Run button that gathers all metadata from the connected source into OvalEdge Data Catalog.
Note: For more information on Scheduling, refer to Scheduling Connector
Additional Information
How to generate the API Key?
- Login to the HopsWorks instance.
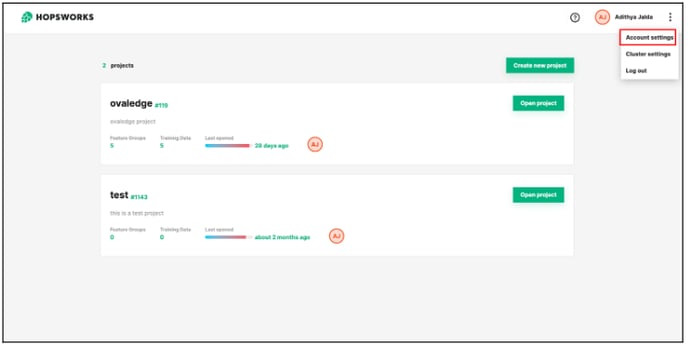
- Click on Account settings under the top-right menu.
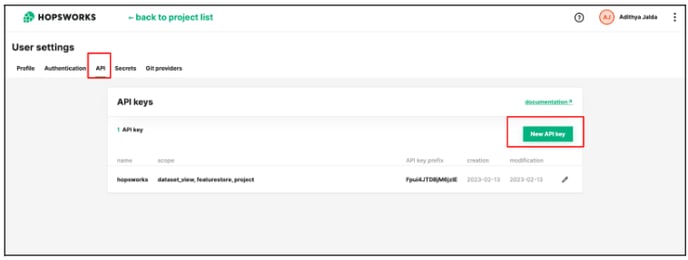
- Navigate to the API tab and click on the new API key.
- Name the API under the Name label.
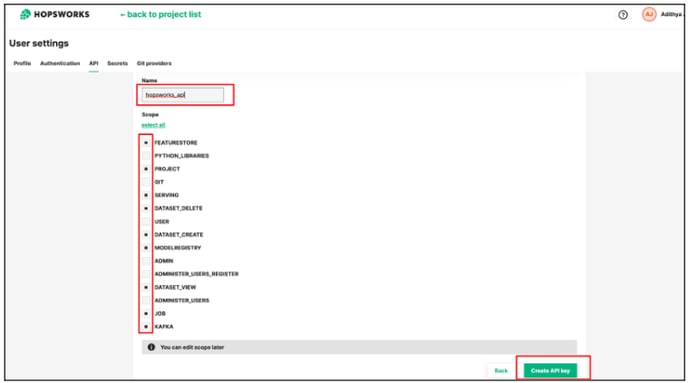
- Select the scopes for the API access.
- Click on Create API Key button to create a new API key.
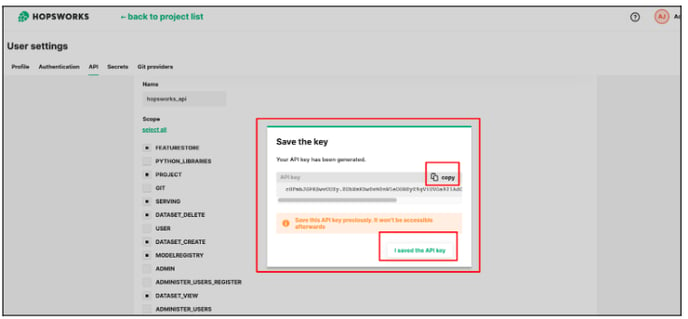
- A dialog box will appear, copy the key and save it.
- Click on the saved API key button.
Copyright © 2023, OvalEdge LLC, Peachtree Corners GA USA