Apache Pulsar is an all-in-one messaging and streaming platform. Messages can be consumed and acknowledged individually or consumed as streams with less than 10ms of latency. Its layered architecture allows rapid scaling across hundreds of nodes, without data reshuffling.
OvalEdge, on the other hand, offers a user-friendly interface that enables connectivity to Apache Pulsar and supports a wide range of standard operations. It integrates with Apache Pulsar using REST APIs, which allows for tasks such as crawling topics and profiling messages.

Prerequisites
The following are prerequisites for connecting to the Apache Pulsar:
Drivers
The APIs/ drivers used by the connector are given below:
|
Sl.No |
Driver / API |
Version |
Details |
|---|---|---|---|
|
1 |
API |
Okhttp client's Latest version is 4.10.0 |
https://mvnrepository.com/artifact/com.squareup.okhttp3/okhttp/4.10.0 |
Service Account Permissions
An admin/service account for crawling and building lineage. The minimum privileges required are
|
Operation |
Access Permission |
|---|---|
|
Crawling |
Read access to the given cluster. |
|
Profiling |
Read access to the topic messages(Tables). |
Configuring Environment Variables (Optional)
Configuring environment names enables you to select the appropriate environment from the drop-down list when adding a connector. This allows for consistent crawling of schemas across different environments, such as production (PROD), staging (STG), or temporary environments. It also facilitates schema comparisons and assists in application upgrades by providing a temporary environment that can be later deleted if needed.
Before establishing a connection, it is important to configure the environment names for the specific connector. If your environments have been configured, skip this step.
- Go to Administration > System Settings.
- Select the Connector tab and find the Key name "connector.environment".
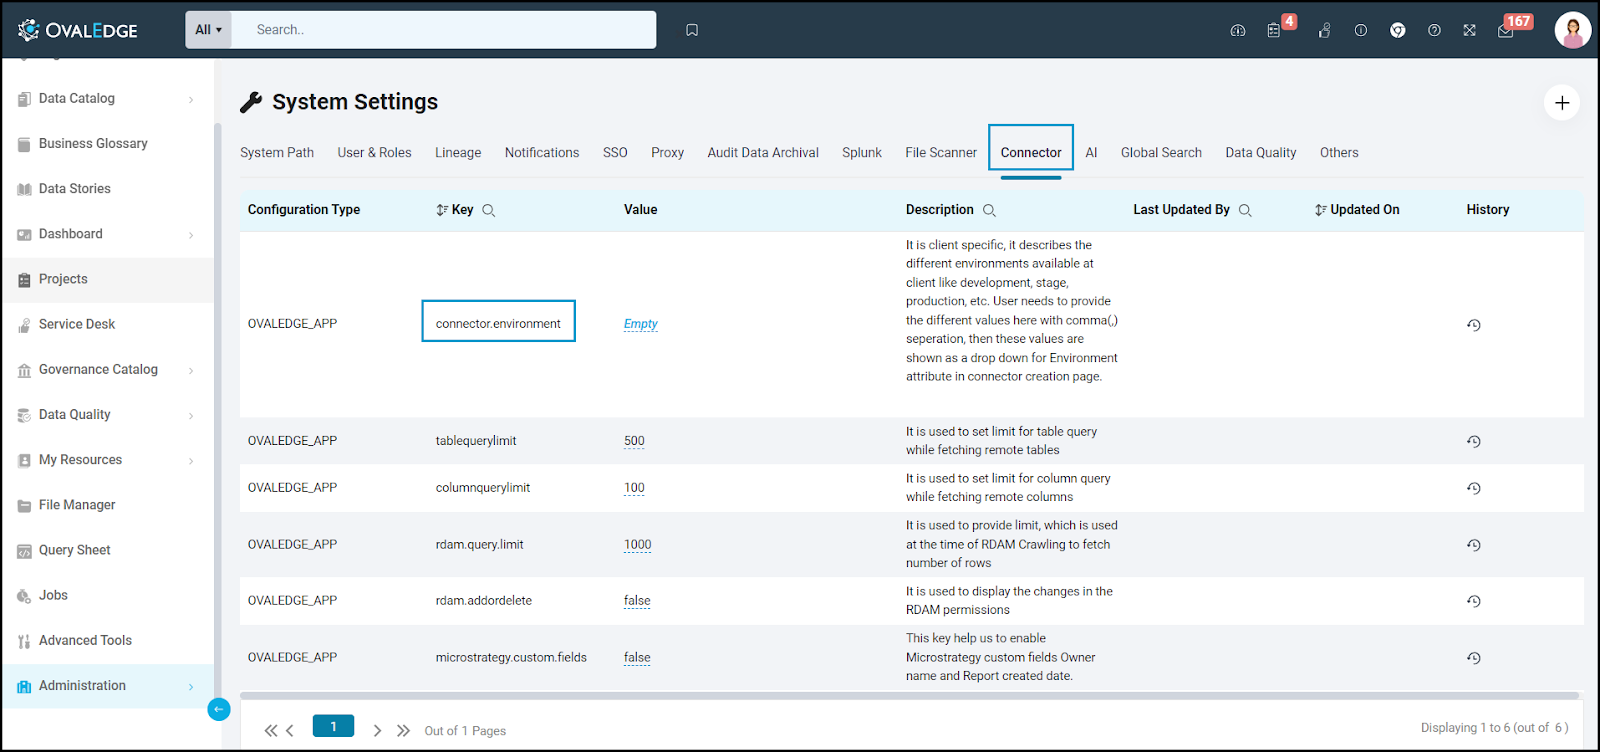
- Enter the desired environment values (e.g., PROD, STG) in the value column.
- Click on the checkmark ✔ icon to save the configuration.
Connector Capabilities
The connector capabilities are shown below:
Crawling
|
Feature |
Supported Objects |
Remarks |
|---|---|---|
|
Crawling |
Tables (Topic in Apache Pulsar) |
- |
Profiling
|
Feature |
Supported Objects |
Remarks |
|---|---|---|
|
Profiling |
Columns, Rows |
Min, Max, Null Count, Distinct, Top 50 values |
Establish a Connection
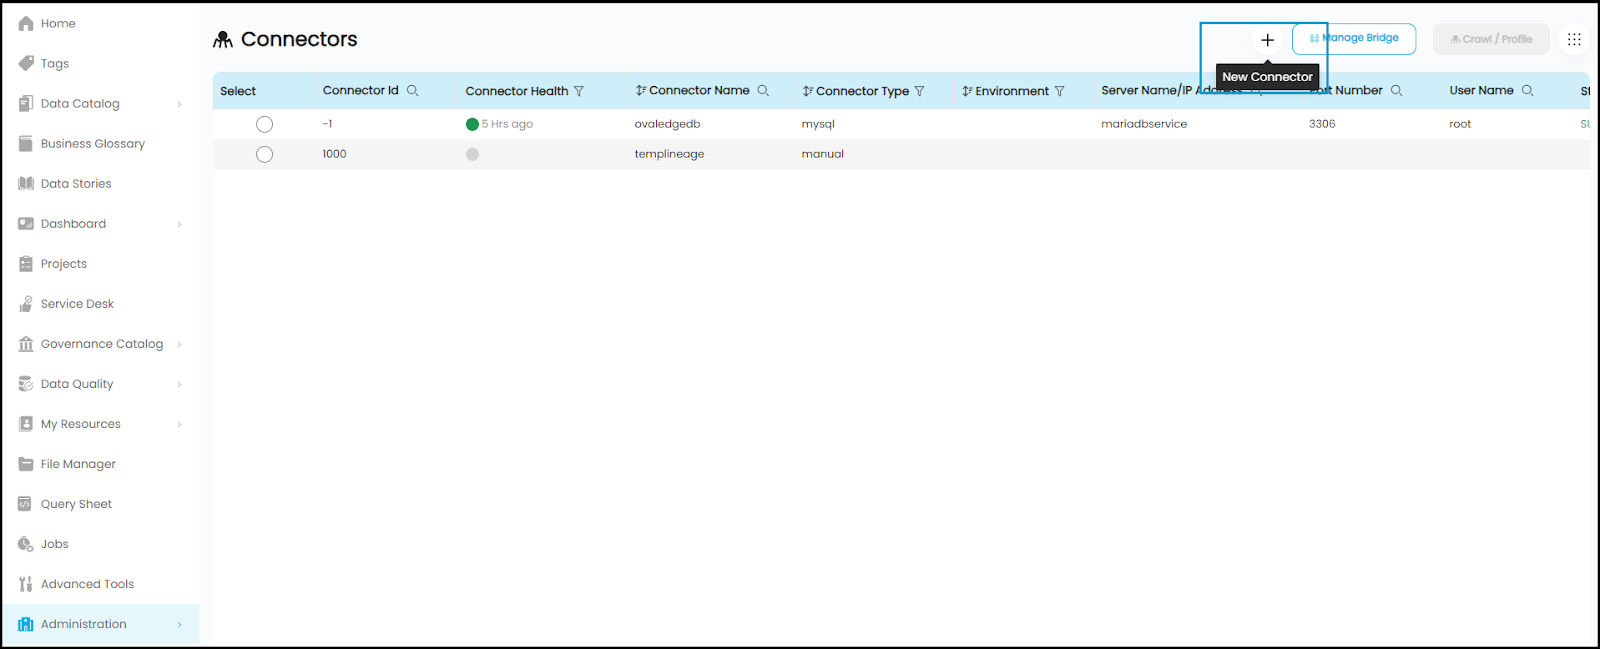
To connect to the Apache Pulsar using the OvalEdge application, complete the following steps:
- Log in to the OvalEdge application.
- Navigate to Administration > Connectors.
- Click on the + (New Connector) icon, and the Add Connection with Search Connector pop-up window is displayed.
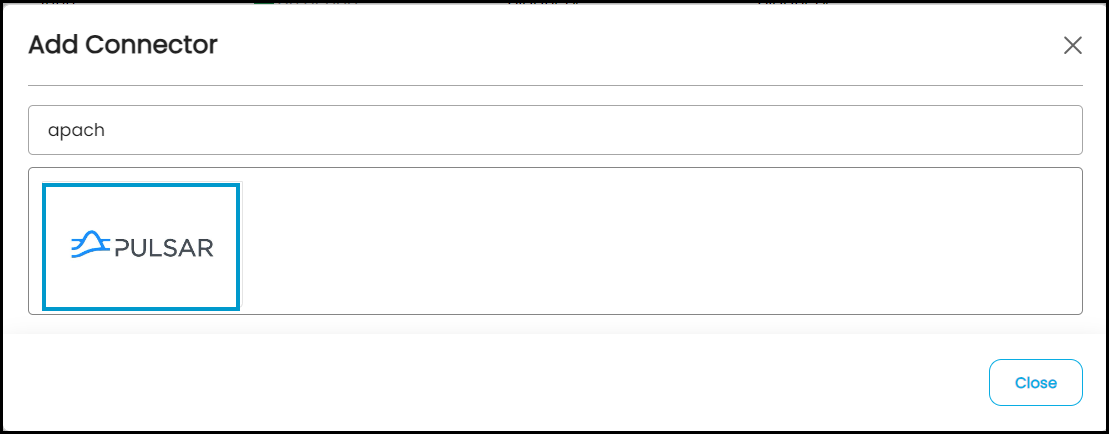
- Add Connector pop-up window is displayed where you can search for the Apache Pulsar connector.
- The Add Connector with Connector Type specific details pop-up window is displayed. Enter the relevant information to configure the Apache Pulsar connection.
Note: The asterisk (*) denotes mandatory fields required for establishing a connection.
Field Name
Description Connector Type
It allows you to select the connector from the drop-down list. By default, 'Apache Pulsar' is displayed as the selected connector type.
Connector Settings
License Add Ons
All the connectors will have a Base Connector License by default that allows you to crawl and profile to obtain the metadata and statistical information from a data source.
Connector Name*
Provide a connector name for the Apache Pulsar database in OvalEdge. This name will serve as a reference for identifying the Apache Pulsar database connection.
Example: “Apache Pulsar_Connection_test"
Connector Environment
The Connector Environment drop-down list allows you to select the environment configured for the connector from the drop-down list.
For example, PROD, or STG (based on the configured items in the OvalEdge configuration for the connector.environment).
The purpose of the environment field is to help you identify which connector is connecting what type of system environment (Production, STG, or QA).
Note: The steps to set up environment variables are explained in the prerequisite section.
Broker URL*
Enter the server IP address of Apache Pulsar.
Example: 1xx.xx.11x.xx
Cluster Name*
Enter the name of the Apache Pulsar Cluster.
Example: clusterName = standalone
Port*
Enter the port number of your Apache Pulsar server
Username*
Enter the service account username
Password*
Enter the service account password
Default Governance Roles
Steward*
Select the Steward from the drop-down options.
Custodian*
Select the Custodian from the drop-down options.
Owner*
Select the Owner from the drop-down options.
Governance Roles 4, 5, 6*
Select the respective user from the drop-down options.
Note: The drop-down list displays all the configurable roles (single user or a team) as per the configurations made in the OvalEdge Security > Governance Roles section.
Admin Roles
Integration Admins*
To add Integration Admin Roles, search for or select one or more roles from the Integration Admin options, and then click on the Apply button.
The responsibility of the Integration Admin includes configuring crawling and profiling settings for the connector, as well as deleting connectors, schemas, or data objects.Security and Governance Admins*
To add Security and Governance Admin roles, search for or select one or more roles from the list, and then click on the Apply button.
The security and Governance Admin is responsible for:- Configure role permissions for the connector and its associated data objects.
- Add admins to set permissions for roles on the connector and its associated data objects.
- Update governance roles.
- Create custom fields.
- Develop Service Request templates for the connector.
- Create Approval workflows for the templates.
Select Bridge
With the OvalEdge Bridge component, any cloud-hosted server can connect with any on-premise or public cloud data sources without modifying firewall rules. A bridge provides real-time control that makes it easy to manage data movement between any source and destination. For more information, refer to Bridge Overview.
For more information, refer to Bridge Overview
- After filling in all the connection details, select the appropriate button based on your preferences.
- Validate: Click on the Validate button to verify the connection details. This ensures that the provided information is accurate and enables successful connection establishment.
- Save: Click on the Save button to store the connection details. Once saved, the connection will be added to the Connectors home page for easy access.
- Save & Configure: For certain Connectors that require additional configuration settings. Click on the Save & Configure button. This will open the Connection Settings pop-up window, allowing you to configure the necessary settings before saving the connection.
- Once the connection is validated and saved, it will be displayed on the Connectors home page.
Note: You can either save the connection details first, or you can validate the connection first and then save it.
Error Validation Details
|
S.No |
Error Message(s) |
Description |
|
1 |
Failed to establish a connection, Please check the credentials. |
Invalid input details. |
Note: If you have any issues creating a connection, please contact your assigned OvalEdge Customer Success Management (CSM) team.
Connector Settings
Once the connection is established successfully, various settings are provided to fetch and analyze the information from the data source.
The connection settings include Crawler, Profiler, Access Instruction, Business Glossary Settings, and Notification.
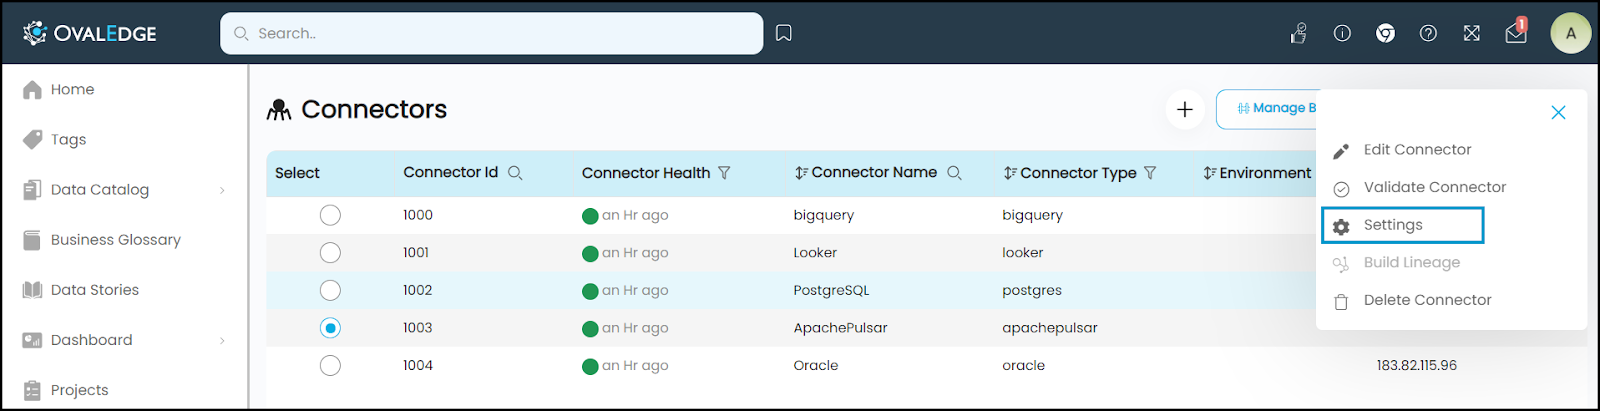
To view the Connector Settings page,
- Go to the Connectors page.
- From the 9- dots select the Settings option.
- The Connector Settings page is displayed where you can view all the connector setting options.
- Click on Save Changes. All the settings will be applied to the metadata.
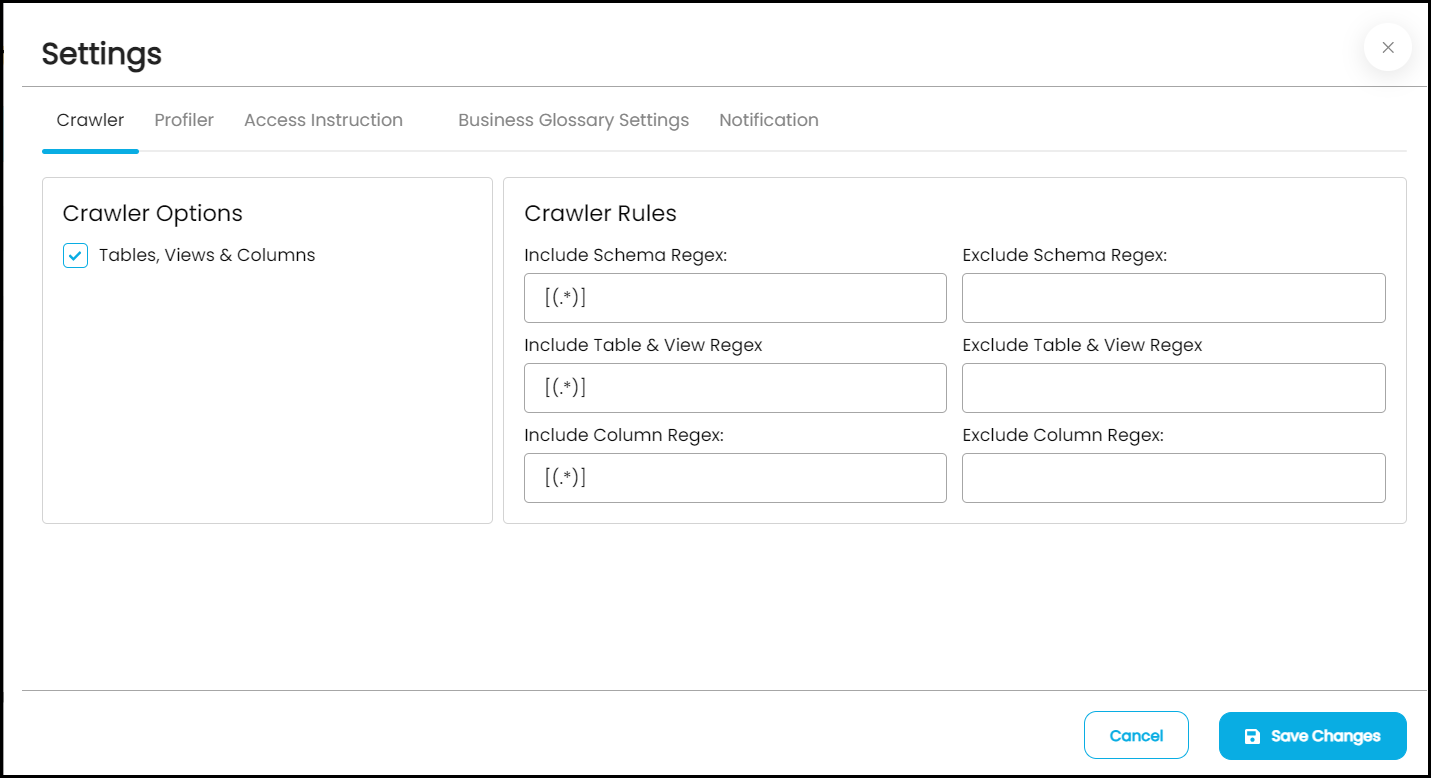
The following is a list of connection settings along with their corresponding descriptions:
|
Connection Settings |
Description |
|
Crawler |
Crawler settings are configured to connect to a data source and collect and catalog all the data elements in the form of metadata. |
|
Profiler |
The process of gathering statistics and informative summaries about the connected data source(s). Statistics can help assess the quality of data sources before using them for analysis. Profiling is always optional; crawling can be run without profiling. |
|
Access Instruction |
Access Instruction allows the data owner to instruct others on using the objects in the application. |
|
Business Glossary Settings |
The Business Glossary Setting provides flexibility and control over how they view and manage term association within the context of a business glossary at the connector level. |
|
Notification |
The Enable/Disable Metadata Change Notifications option is used to set the change notification about the metadata changes of the data objects.
|
Note: For more information, refer to the Connector Settings.
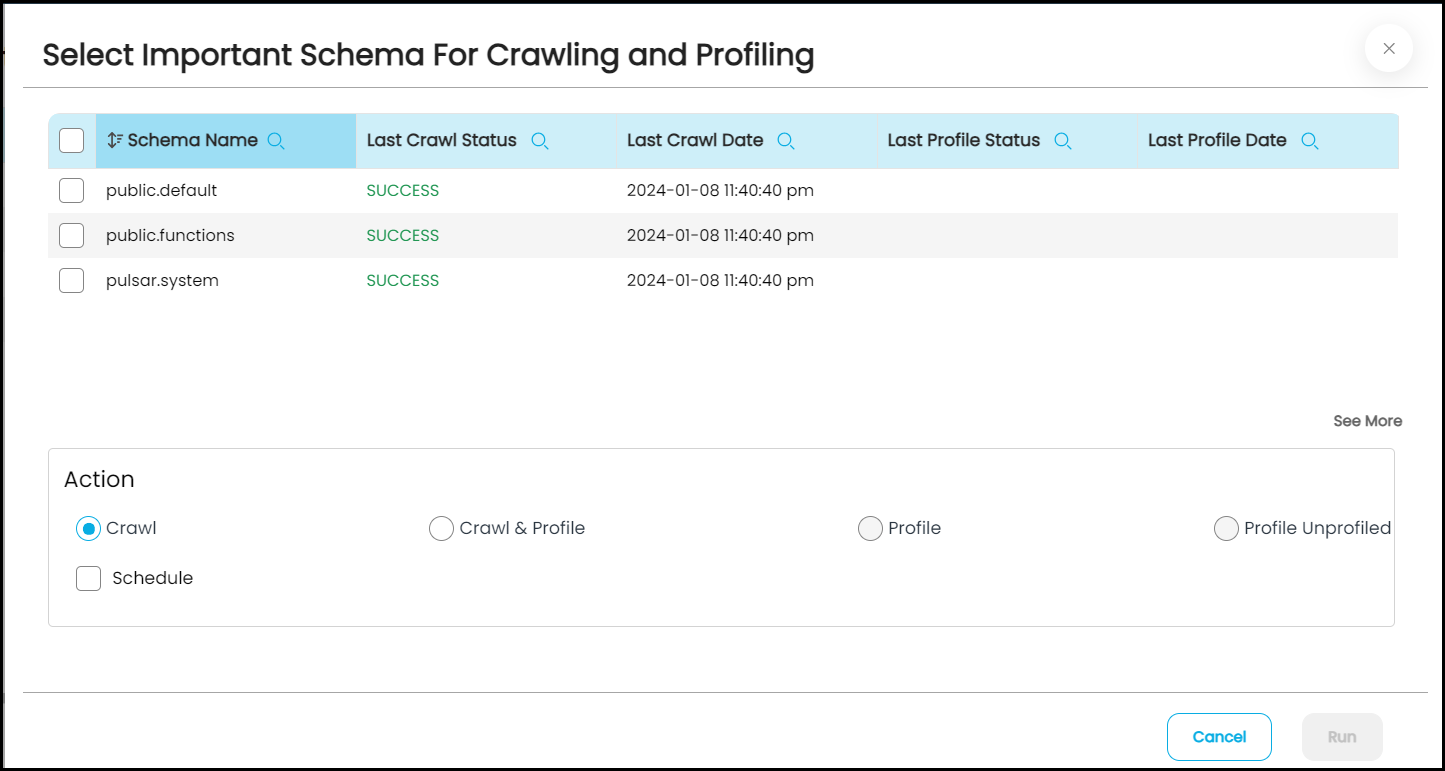
Crawling of Schema(s)
A Crawl/Profile option allows you to select the specific schemas for the following operations: Crawl, Crawl & Profile, Profile, or Profile Unprofiled. The defined run date and time are displayed to set for any scheduled crawlers and profilers.
- Navigate to the Connectors page, and click the Crawl/Profile button.
Select Important Schema For Crawling and Profiling pop-up window is displayed. - Select the required Schema(s).
- The below list of actions is displayed in the Action section.
- Crawl: It allows the crawling of the metadata of the selected schemas.
- Crawl & Profile: It allows crawling the metadata of the selected schemas and profiles the sample data.
- Profile: It allows the collection of table column statistics.
- Profile Unprofiled: It allows the profiling of data that has not been profiled.
- Schedule: Connectors can also be scheduled for crawling and/or profiling in advance to run at prescribed times and selected intervals.
Note: For more information on Scheduling, refer to Scheduling Connector.
- Click on the Run button that gathers all metadata from the connected source into the OvalEdge Data Catalog.