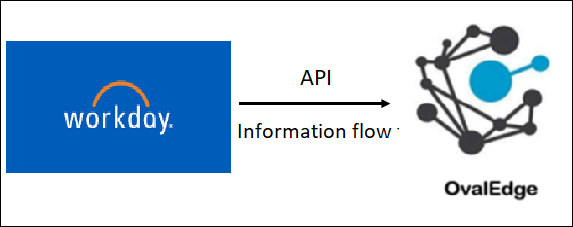
An out-of-the-box connector is available for Data Workday Connector, which supports crawling and profiling. The Workday HCM software platform combines a wide range of HR functions into a single system. The software comprises a wide variety of features, such as payroll, time tracking, compensation, and workforce planning.
Connector Capabilities
The connectivity to the Workday connector is performed via the API, and the versions
used by the API are given below:
|
API |
Version |
Details |
|
API |
V1 |
https://community.workday.com/sites/default/files/file-hosting/restapi/index.html |
Technical Specification
Crawling:
|
Feature |
Supported Objects |
Remarks |
|---|---|---|
|
Crawling |
Tables |
- |
|
Table Columns |
- |
|
|
Column Relationship |
- |
Profiling:
|
Feature |
Supported Objects |
Remarks |
|---|---|---|
|
Table Profiling |
Row count, Columns count, View sample data |
- |
|
Column Profiling |
Min, Max, Null count, distinct, top 50 values |
- |
|
Full Profiling |
- |
Not Supported |
|
Sample Profiling |
- |
Supported |
Connection Details
Prerequisites
It is required to place swagger API files in the local NFS path.
User Permissions
The following are the minimum permissions required for OvalEdge to validate the Workday connection.
|
Permission: READ (Meta Read and Data Read) Roles: Crawler Admin Super User: OE ADMIN |
The minimum privileges required for a user at the source system are:
|
Operation |
Access Permission |
|
Connection validate |
READ |
|
Crawl schemas |
READ |
|
Crawl tables |
READ |
|
Profile schemas, tables |
READ |
Note: The user should have minimum read permissions on the local NFS file.
Navigate to Configuration > Users & Roles for roles and permission.
Manage Connection
To connect to Workday using the OvalEdge application, complete the following steps.
- Log in to the OvalEdge application
- Navigate to Administration > Connectors module.
- Click on the + icon, and the Manage Connection with Search Connector pop-up window is displayed.
- Select the connection type as Workday. The Manage Connection pop-up window is displayed.
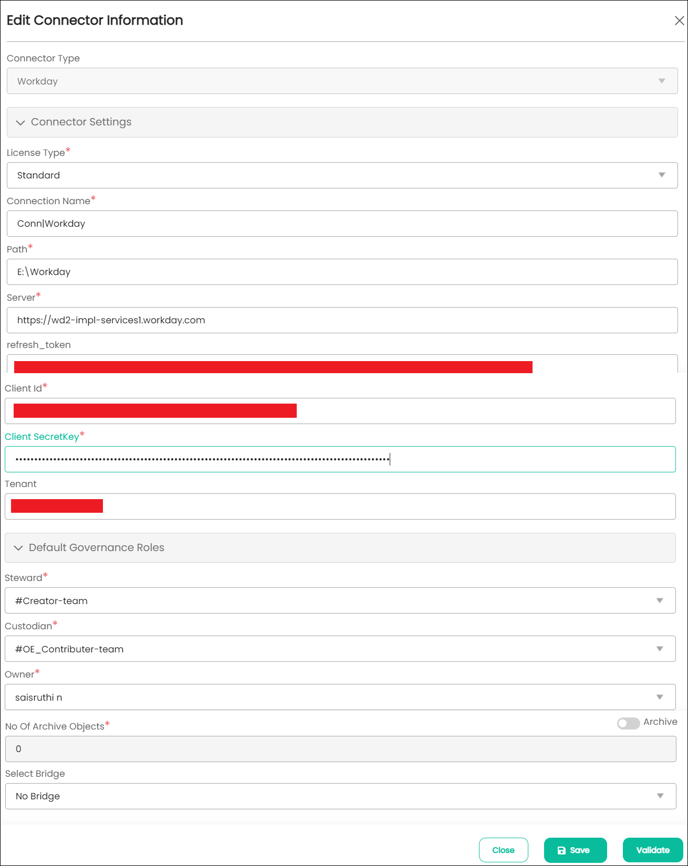
5. The following are the field attributes required for the connection of Workday.
|
Field Name |
Description |
|---|---|
|
Connector Type* |
By default, the selected connection type is displayed as Workday. |
|
License Type* |
Select the license type as standard. License Type: In a license type, the permissions are specified based on the requirements of the customer. User has option to select the license type as Standard or Auto Lineage. The connector license is categorized into:
(i) Standard: The standard connectors may not have Auto Lineage functionality. It will not build the lineage for the selected database. (ii) Auto Lineage: Additionally, auto lineage connectors have Auto Lineage functionality. It will build the lineage for the selected database. See, License Types for more information. |
|
Connection Name* |
The connection name specified in the Connection Name textbox will be a reference to the Workday database connection in the OvalEdge application. Enter the name of the connection Example: Workday_accountsdb |
|
Path* |
Enter the path of the NFS file connection. |
|
Server* |
Enter the fully qualified server name or IP address related to the Workday database Example: https://wd2-impl-servicesxyz.workday.com |
|
Refresh token* |
12bu8zp39c5us21koelnlvlxpfw4tp |
|
Client ID* |
Enter the client ID Example: MTZiNWRmYjUtxxxxxxxxxxxxxxxx |
|
Client Secret Key* |
Enter the secret key. |
|
Tenant |
Enter Tenant ID. |
|
Default Governance Roles* |
The admin will select a specific user or a team from the governance roles (Steward, Custodian, Owner) that get assigned to the data asset. The dropdown list displays all the configured users (single user or a team) as per the configurations made in the Security > Governance Roles page. |
|
No. of archive objects* |
By default, the number of archive objects is set to disable mode. Click on the Archive toggle button and enter the number of objects you wish to archive. No. of archive objects: It is the count of the number of last modifications made in the metadata data of a Remote/source. For example, if you update the count as 4 in the ‘No. of archive object’ field, and then the connection is crawled. It will provide the last 4 changes that occurred in the remote/source of the connector. You can observe these changes in the ‘version’ column of the ‘Metadata Changes’ module. |
|
Select Bridge |
The Bridge ID will be shown in the Bridge dropdown menu when bridges are configured and added, or it will be displayed as "NO BRIDGE". Bridge: To collect data from both on-premises and cloud sources, data administrators need to configure the Cloud Bridge by specifying a data source connection and unique parameters. |
Note: * (asterisk) indicates the mandatory field required to establish a connection.
6. You can click on the Save button to establish the connection. (OR)
7. You can also directly click on the Save & Configure button to configure and set up the connection. It will display the connection settings pop-up window to configure the connection.
Note: The Save & Configure button is displayed only for the Connectors for which the settings configuration is required.
8. Click on the Validate button once the entered connection details are validated.Note: It is up to the user’s wish whether to save the connection details first or validate the connection first and then save it.
Error Validation Details
|
Error Message(s) |
Description |
|
Failed to establish a connection; please check the credentials. |
In case of invalid Client ID, Client Secret, Tenant ID, and Refresh Token |
Connection Settings
Once the connection is established successfully, there are various settings provided to fetch and analyze the information from the data source. The connection setting includes Crawler, Profiler, Remote Access, Access Instruction, Lineage, and Others. Based on the connector selected, the option on the setting page will differ.
To configure the connector settings, select the Workday Connection Name from the Crawler Information page and click on the Nine dots option and select the Settings options. The Connection Settings pop-up window is displayed.
Crawler
Crawler setting will help to get the information of the data source based on the crawler setting provided. Crawler setting has various settings options, including Crawler options and Crawler Rules.
|
Crawler Settings |
Descriptions |
|---|---|
|
Crawler options |
|
|
Crawler Rules |
Include Regex: Enter the specific schema, table, views, and column names that start with, end with, or have middle characters that are included for crawling. |
|
Exclude Regex: Enter the specific schema, table, views, and column names that start with, end with, or have middle characters that are excluded for crawling. |
Profiler
The process of gathering statistics and informative summaries about the connected data source(s). Statistics can help assess the data source's quality before using it in an analysis. Profiling is always optional; crawling can be run without also profiling. However, if profiling is desired, there are a few options to profile the metadata/data. It includes
Profiler options:
|
Profiler Options |
Details |
|
Tables and Columns |
Select the checkbox to profile the tables and columns that are existing in the Workday database into the OvalEdge. Note: By default, the checkbox for Tables and Columns is selected. |
|
Views and Columns |
Select the checkbox to profile the views and columns that are existing in the Workday database in the OvalEdge. Note: By default, the checkbox for Views and Columns is selected. |
Profiler Rule: The Profile rules provide the user with more refined results. The rules are written via basic regular expressions against the data source.
|
Profiler Rules |
Details |
|
Profile Rules: Include Regex |
Enter the specific table, view, and column names that start with, end with, or have middle characters that are included for profiling. |
|
Profile Rules: Exclude Regex |
Enter the specific table, view, and column names that start with, end with, or have middle characters that are excluded for profiling. |
Profiler Settings:
The attributes are as follows,
|
Parameters |
Description |
|---|---|
|
Order |
Order number is a sequence in which the profiling is done. |
|
Day |
The day of the week in which profiling is set to run. |
|
Start/End Time |
The start and end time that profiling is set to perform. |
|
Number of Threads |
A thread is a process where a query is executed on a database to do single or multiple tasks. The number of threads determines the number of parallel queries that are executed on the data source. |
|
Profile Type |
There are four main types of data profiling.
The profiling is performed based on a given Sample Profile Size. The data on columns (like Min, Max, Distinct, Null Count, etc.) will be different compared to full profiles as we calculate them only on sample size. To execute a sample profile, select the profile type as “Sample” and enter a sample profile size(count of records to be profiled).
Note: A profile type set to “Auto” will always depend on the Rowcount limit when the row count constraint must be set as “True”.
|
|
Row Count Constraint |
The Row Count Constraint option is applicable only when the Profile Type is selected as Auto.
If the Row Constraint checkbox is selected (Set as True) and if the configured Rowcount Limit (1000) is greater than the total Table Row Count (100) then the query is executed without considering the count mentioned in the Rowcount Limit. |
|
Row Count Limit |
Enter the maximum number of rows that should be considered for profiling. |
|
Sample Data Count |
Enter the total number of rows to see within the table data page in the Catalog. |
|
Sample Profile Size |
Select this option for considering the total number of rows in profiling. |
|
Query Timeout |
Enter the number of seconds for the query to run on the remote database before it times out. |
Remote Access
The Remote Access (Data Access Authorization) is to ensure that the right user is accessing the query sheet and queries in the data catalog. Here, the system validates the user credentials and allows that user to access the query sheet and queries in the data catalog.
- OvalEdge follows OvalEdge data permissions: When this option is selected, the OvalEdge application uses a service account used for create the connection in the
- Query Sheet page
- Data Catalog > Table > Data page and
- Data Catalog > Code page to fetch the required data.
- OvalEdge follows Remote system permissions: When this option is selected, then the users are prompted to enter the remote data source credentials in the
- Query Sheet page,
- Data Catalog > Table > Data
- Data Catalog > Query
The submitted credentials are used to establish the connection to fetch the required data. These credentials will be cached and cleared after 7 days of inactivity.
Query Policies
The Query Policies in the Crawler setting are used to provide the right access to the Query sheet functions (Join, Union, SUM, or aggregate functions). You can specify the desired roles and permission to deny the usage of the query sheet function. A role that has been denied policy permission will not have access to those functions in the Query Sheet.
- Click on the Query Policies tab, the data grid with existing Policies details with Role, Query Type, Access Type, and Delete columns are displayed.
- To include new query policies, click on the +Add Query Policy button.
- Select the desired Role, Query Type, and Access Type from the respective dropdowns and click on the Save Changes button
Example: If the user selects the Role as “OE_HRADMIN”, Query Type as “JOIN” and the Access Type as “DENY”, then the users associated with the OE_HRADMIN privileges are restricted to use the JOIN function in the Query Sheet page.
Access Instruction
It allows the admin user to write the instructions and guide the business user to crawl the data source. Instructions are nothing, but some related information about the data source connection can be provided here. It could have the information resources like links, Images, or Videos that help business users of that particular data source connection.
For example: When an admin user saves the access instructions and crawls the schema, the saved instruction will appear in the data catalog after clicking on the schema. It's just providing info or guidelines on a specific schema.
- You can provide the instruction in Connectors > Setting page
- Click on the Access Instruction tab
- Enter the instructions
- Click the Save Changes button. Once you add the access instruction for a specific connection in the crawler settings, it will appear in the connection hierarchy like a database.