What are Virtual Objects?
Virtual Objects are temporary data objects that OvalEdge users can create to govern the request process for new data assets that may be used in the external construction of data pipelines/models. This feature enables users to create a table with table columns and reports with report columns, without including tangible data in the rows or columns. The skeletal structure of the data object is generated in OvalEdge and is not accessible in the Data Source. The user can manipulate the metadata of the object within the application by adding relevant descriptions, assigning appropriate tags or terms, and manually constructing lineage.
Importance of Virtual Objects
Virtual objects simplify the management, exploration, incorporation, and representation of a data object when the object structure is in a certain state. Virtual objects have a significant role in data management and modeling by enabling data engineers, analysts, and scientists to create relevant data objects using OvalEdge, without depending on a Database Administrator to create the object from the source. Essentially, OvalEdge facilitates the organization and utilization of data objects and metadata before the physical existence of the data object itself.
Origin of Objects in OvalEdge
Different origins of objects that are prevalent in OvalEdge. This origin primarily indicates the source from which these data objects originate. Specifically, it can be divided into four types:
-
Crawl
The 'Crawl' origin is designated for objects that already exist within the Data Sources and are subsequently crawled into the OvalEdge application via the Connectors. These objects are clearly defined and contain relevant physical data and attributes. For example, a crawled table would comprise columns and rows with significant data entries. OvalEdge, utilizing its Connectors, parses the metadata and presents crawling and profiling statistics within the application.
-
Virtual
The 'Virtual' origin is assigned to Virtual Objects generated within the OvalEdge application, as previously described in the Introduction. These Virtual Objects solely exist within the OvalEdge application and are not accessible in the Data Source of the Connector to which they are linked. They can be transformed into Crawl Objects containing physical data once they are incorporated into the Data Source and subsequently re-crawled.
-
Manual
OvalEdge offers the capability to establish a Manual Connector, which essentially refers to a connector not inherently linked to any specific Data Source. Users can incorporate tables and table columns without any physical data into this connector using the Data Catalog or through other bulk functionalities such as Load Metadata from File and OvalEdge APIs. The origin of these objects is designated as Manual.
- The key distinction between Virtual and Manual Objects lies in the fact that Manual objects are associated with a Manual Connector, which cannot undergo crawling or be added to an actual Data Source, such as an RDBMS. Conversely, Virtual Objects are transient objects generated within OvalEdge but have the potential to be appended to a Data Source and transformed into Crawled Objects containing physical data.
-
Temp
To construct lineage in OvalEdge, the related objects must demonstrate Data Movement. When the original associated objects are unavailable, temporary associations are established to construct lineage. These temporary data objects are referred to as Temp Objects and are classified under the Temp Origin. While these objects do not contain any tangible data, they facilitate a clear visualization of the lineage process. Subsequently, following the crawling of the original objects, the Temp objects are merged with the original ones.
Accessing Virtual Objects
Virtual Objects can be created, viewed, edited, and deleted with the Data Catalog. They can be managed through the ‘Manage Table’ icon for Tables and the ‘Manage Report’ icon for Reports. To view the objects in the Data Catalog, we have a separate out-of-the-box view, catered specifically to showcase Virtual Objects.
Navigating Objects in Data Catalog
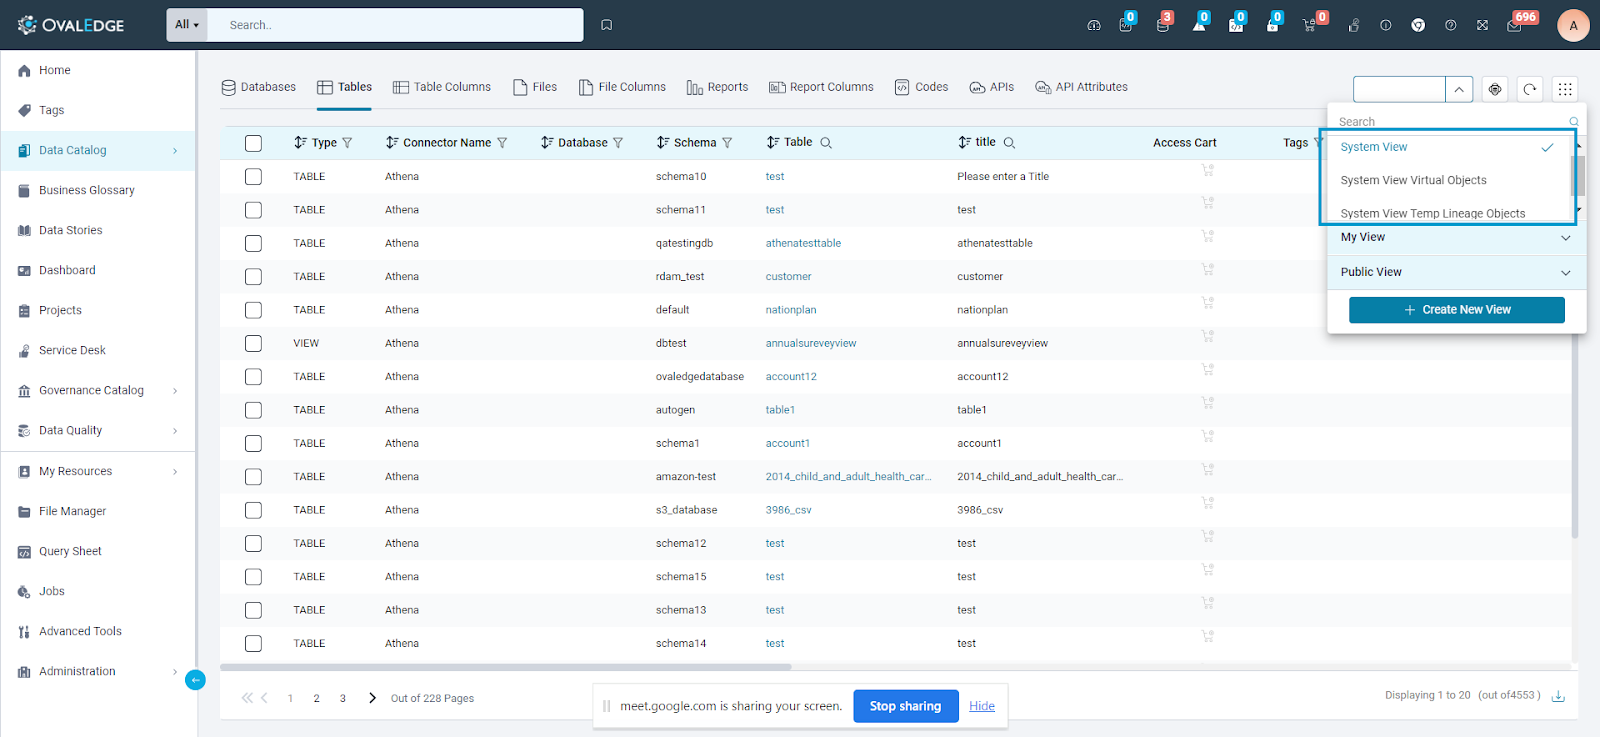
All OvalEdge Users can view objects of all origins in the Data Catalog. To have a modular view of these objects, the Data Catalog provides different out-of-the-box views to all users.
-
System View
Within the System View, users can access all the objects stemming from Crawl and Manual origins. By employing the filter associated with the Origin Column in the List View, users can easily sort and display objects based on their Crawl or Manual origin.

-
Virtual View
The Virtual View exclusively presents Virtual Objects and excludes any Crawled objects. This distinction is reflected in the Origin Column within the List View, where all objects are categorized as Virtual.
-
Temp View
The Temp View, similar to the Virtual View, solely showcases Temp Objects. This distinction is also evident in the Origin Column within the List View, where all objects are classified as Temp.
In addition to the differentiation in the List Page Views, Virtual Objects are identifiable by a dedicated Virtual Object icon on their respective Summary Pages, distinguishing them from objects of other origins.
Security around Virtual Objects
The permissions governing Virtual Objects, including Table, Table Column, Report, and Report Column, depend on the OvalEdge License Type and Role Type.
- Users with Author Licenses possessing Meta Write access are empowered to create, modify, and remove virtual objects.
- On the other hand, users with Viewer Licenses having Meta Read access can view these virtual objects but are unable to make any alterations.
- All other permissions about the access, viewing, and management of metadata concerning Virtual Objects are determined by the default permissions set up for Users and Roles.
Managing Virtual Objects
There are 4 major actions that users with an Author License and Meta-Write permission can perform around Virtual Table, Virtual Table Column, Virtual Report, or Virtual Report Column:
- Create
- Edit
- Delete
- Convert
1. Create Virtual Objects
Users can create 4 types of Virtual Objects: Tables, Table Columns, Reports, and Report Columns.
-
Creating Tables & Table Columns
Users can create Tables and Table Columns using the ‘Manage Table’ icon that is available to them across the Data Catalog, viz., Table List Page, and Database Summary Page.
-
- Table List Page
Author Users initiate the creation of a Virtual Table by selecting the 'Manage Table' icon adjacent to the Reset icon on the Table List Page.
Upon clicking, a pop-up window will appear, prompting the user to complete specific fields necessary for the creation of a table and its corresponding table columns.
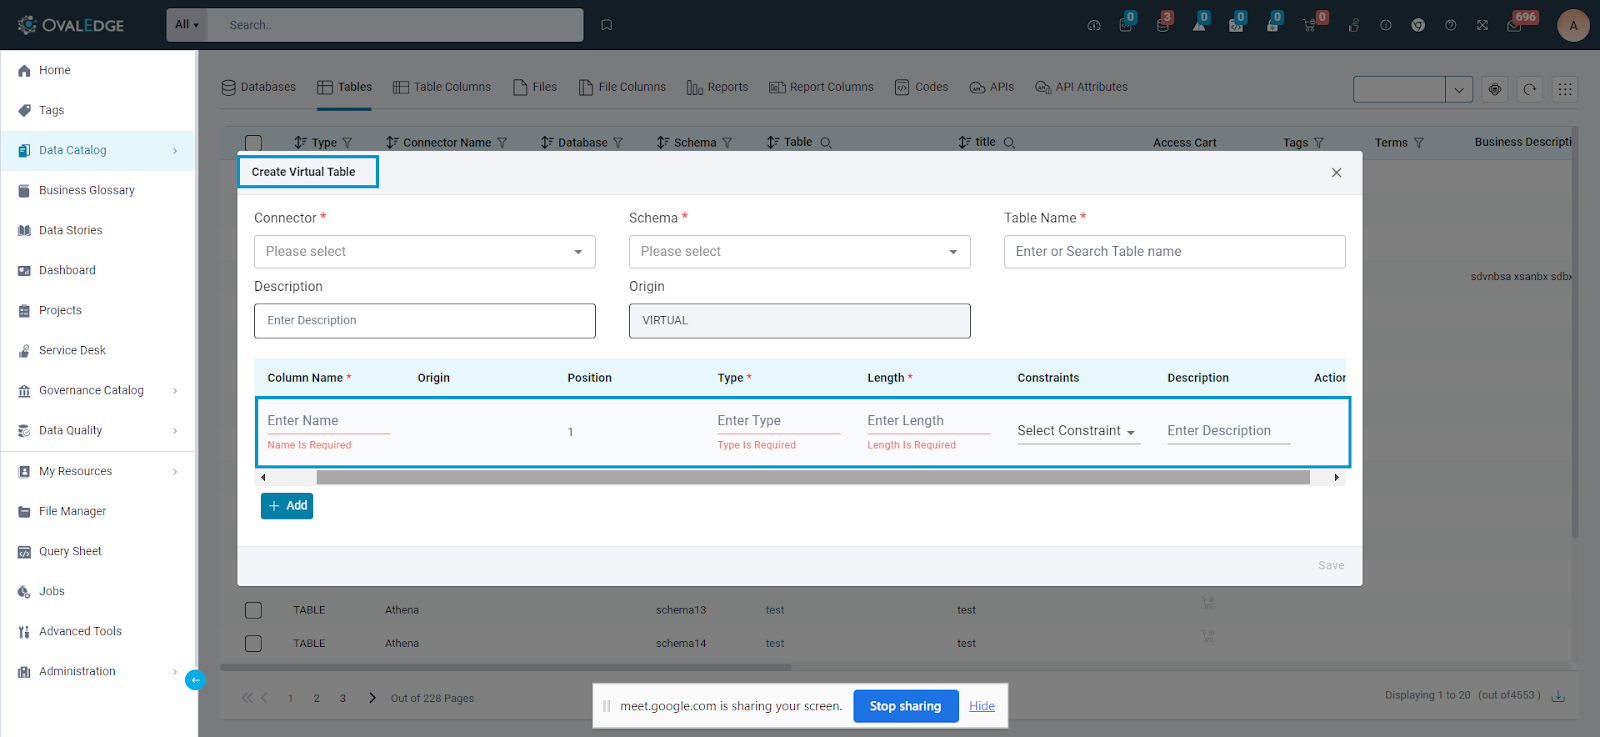
For the Table, the user will be able to view the following fields:
|
Fields |
Mandatory |
Use |
|
Connector |
Yes |
The user has to choose an existing crawled connector available in the application. |
|
Schema |
Yes |
The user has to choose an existing Schema inside that Connector where they want to create the table. |
|
Table Name |
Yes |
The user needs to input a table name for the table they want to create. Note: They can also choose an existing table if they want to create a Virtual Table Column for it. |
|
Description |
No |
The user can input a Description for the Table, which can be relevant for a Source Description later during the conversion of the table. |
|
Origin |
- |
The Origin of the table is auto-populated according to the table name given or the table chosen. If the user creates a new table, it will be of Virtual origin. If an existing table is chosen for the creation of Table Columns inside it, it can be Crawl or Manual as well. |
Notes:
-
-
- Manual Tables can be created through the same process by just choosing the Manual Connector available in the application.
- In the same pop-up, we have the option to create multiple virtual table columns corresponding to that table. Similar to the table, users have to fill in some relevant details for the Table Columns as well. Using the ‘Add’ button, users can create as many columns as they want for that table.
-
Users are not permitted to create duplicate tables in a Schema.
|
Fields |
Mandatory |
Use |
|
Column Name |
Yes |
The user needs to input a table column name for the table they want to create. |
|
Origin |
- |
The Origin of the table column is auto-populated accordingly. |
|
Position |
- |
The Position indicates the position of the table column in the table. User can change the position among virtual columns using the Drag and Drop provided. |
|
Type |
Yes |
The Type indicates the data type or values the column holds. Some common data types OvalEdge supports are Integer, Date, String, and Float. |
|
Length |
Yes |
The Length of the column indicates the size of the column (in bytes). |
|
Constraints |
Yes |
The constraints display the nullability of the column. If the column is allowed to have Null values, the user can choose ‘NULL’ and if not, then ‘NOT NULL’. |
|
Description |
No |
The user can input a Description for the Table Column, which can be relevant for a Source Description later during the conversion of the same. |
Notes:
-
-
- For an already existing Crawl table or Virtual table with columns, all details will be auto-populated in the pop-up. The user can create additional columns corresponding to the table using the ‘Add’ button.
- For Manual tables, the user can create new Manual columns in addition to the existing ones.
- Users are not permitted to create duplicate table columns in a Table.
-
-
- Database Summary Page
Users are also able to create Virtual Tables and corresponding Table Columns directly from any Database Summary Page. On the Summary Page, located beside the Nine Dots, a corresponding 'Manage Table' icon is present. Clicking on this icon will lead the user to the same pop-up window for the creation of a virtual table. In this scenario, the Connector and Database fields will be unmodifiable and will automatically display the Database that the user has selected. The remaining steps of the process will be identical to the procedure outlined earlier.
-
Creating Reports & Report Columns
Users can create Reports and Report Columns using the ‘Manage Table’ icon that is available to them in the Report List Page of the Data Catalog.
Author Users with Meta-Write permission initiate the creation of a Virtual Report by selecting the 'Manage Report' icon adjacent to the Reset icon on the Report List Page. Upon clicking, a pop-up window will appear, prompting the user to complete specific fields necessary for the creation of a report and its corresponding report columns.
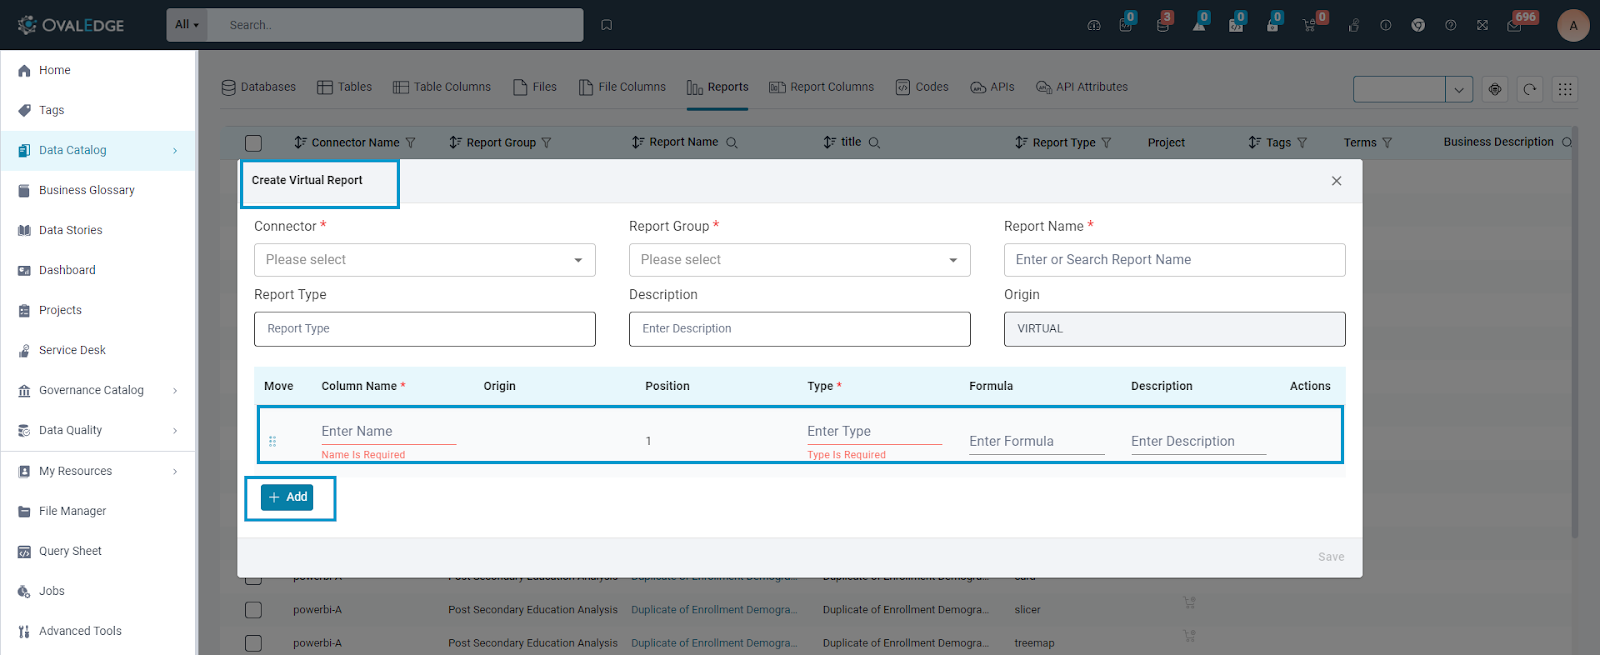
For the Report, the user will be able to view the following fields:
|
Fields |
Mandatory |
Use |
|
Connector |
Yes |
The user has to choose an existing crawled report connector available in the application. |
|
Report Group |
Yes |
The user has to choose an existing Report Group inside that Connector where they want to create the report. |
|
Report Name |
Yes |
The user needs to input a report name for the report they want to create. Note: They can also choose an existing report if they want to create a Virtual Report Column for it. |
|
Report Type |
No |
The Report Type indicates the different types of reports that are available to different Reporting Tools. An example would be a Dashboard of the Tableau Connector. |
|
Description |
No |
The user can input a Description for the Report, which can be relevant for a Source Description later during the conversion of the Report. |
|
Origin |
- |
The Origin of the Report is auto-populated according to the report name given or the report chosen. If the user creates a new report, it will be of Virtual origin. If an existing report is chosen for the creation of Report Columns inside it, it will be of Crawl Origin. |
Note:
-
- In the same pop-up, the option to create multiple virtual report columns corresponding to that table. Similar to the Report, users have to fill in some relevant details for the Report Columns as well. Using the ‘Add’ button, users can create as many columns as they want for that report.
Users are not permitted to create duplicate Reports in a Report Group.
|
Fields |
Mandatory |
Use |
|
Column Name |
Yes |
The user needs to input a report column name for the report they want to create. |
|
Origin |
- |
The Origin of the Report column is auto-populated accordingly. |
|
Position |
- |
The Position indicates the position of the report column in the report. Users can change the position among virtual columns using the Drag and Drop provided. |
|
Type |
Yes |
The Type indicates the data type or values the column holds. Some common data types OvalEdge supports are Integer, Date, String, and Float. |
|
Report |
No |
It shows the Formula that will be used in the Report. |
|
Description |
No |
The user can input a Description for the Report Column, which can be relevant for a Source Description later during the conversion of the same. |
Notes:
-
- For an already existing Crawl or Virtual Report with columns, all details will be auto-populated in the pop-up. The user can create additional columns corresponding to the report using the ‘Add’ button.
- Users are not permitted to create duplicate Report Columns in a Report.
2. Edit Virtual Objects
Author Users with MW permission can edit Virtual Objects using the same Manage pop-up that allows them to create them.
- Editing Tables & Table Columns
The Virtual Table and Table Columns can be edited through the ‘Manage Table’ icon which is available on multiple pages across the Data Catalog:
Table List Page: Click the ‘Manage Table’ icon, and a drop-down that has the ‘Edit’ icon will appear. By selecting a table, the user can edit the table details as well as the column details corresponding to it.
-
- For a Virtual Table, the user cannot edit the chosen Connector and Schema. They can edit the Table Name as well as the Description. Column Name, Type, Length, Constraint, and Description of the Virtual Table Columns can be edited as well.
- For a Crawl Table, the user cannot edit any Table or Column details that are parsed from the remote Data Source. They should only be able to edit the attributes of the Virtual Columns corresponding to them.
Notes:
-
- Users can edit the attributes of Manual Tables and Columns corresponding to them.
-
- Users cannot select multiple tables to edit in one go.
Summary Pages: Similarly, Author Users can edit the virtual tables and their corresponding virtual columns through 3 other Pages, where the ‘Manage Table’ icon is available:
-
- Database Summary Page
- Table Summary Page
- Table Column Summary Page
- Editing Reports & Report Columns
The Virtual Report and Report Columns can be edited through the ‘Manage Report’ icon which is available on multiple pages across the Data Catalog:
Report List Page: On clicking the ‘Manage Report’ icon, the users have a drop-down that has the ‘Edit’ icon. By selecting a report, the users can edit the report details as well as column details corresponding to it.
-
- For a Report Table, the user cannot edit the chosen Connector and Report Group. They can edit the Report Name as well as the Report Type and Description. Column Name, Type, Formula, and Description of the Virtual Report Columns can be edited as well.
- For a Crawl Report, the user cannot edit any Report or Column details that are parsed from the remote Data Source. They can only edit the attributes of the Virtual Columns corresponding to them.
Note: Users cannot select multiple reports to edit in one go.
Summary Pages: Similarly, Author Users can edit the virtual reports and their corresponding virtual columns through two other pages, where the ‘Manage Report’ icon is available:
-
- Report Summary Page
- Report Column Summary Page
3. Delete Virtual Objects
- Author Users can remove virtual objects from the OvalEdge application if these objects are no longer relevant and are not intended for addition to the Remote Source.
- Users have the option to delete Virtual Tables and Virtual Reports by selecting them from the List Pages and utilizing the 'Delete' function available through the 'Manage Table' and 'Manage Report' icons. Concurrently, the Virtual Columns associated with the selected Tables and Reports are also deleted.
Moreover, users can individually delete virtual columns from the 'Manage Table' and 'Manage Report' pop-ups by clicking on the designated trash button located beside the specific column details.
4. Converting Virtual Objects into Data Source Objects
The ultimate aim of Virtual Objects is to be transformed into Data Source Objects containing relevant data. This transition can be achieved manually by the Database Administrator, who needs to add the virtual object into the Data Source using the identical name. Following this, the administrator can initiate a re-crawl of the connector directly from OvalEdge. This process applies to both tables and reports, including the individual columns nested within them.
Following the re-crawl, users will have visibility into all crawled and profiled statistics ( if profiling was conducted) of the object since there will now be associated data. Additionally, the object's origin of the objects will transition from Virtual to Crawl, signifying the conversion from a virtual state to a crawled-from-data-source state.
Converting Virtual Objects into Data Source Objects is a critical step in integrating virtual data with the actual, tangible data residing in the system. By aligning the virtual and physical datasets, organizations can ensure the seamless flow of information and enable efficient data management practices.
Impacted Areas of Virtual Objects
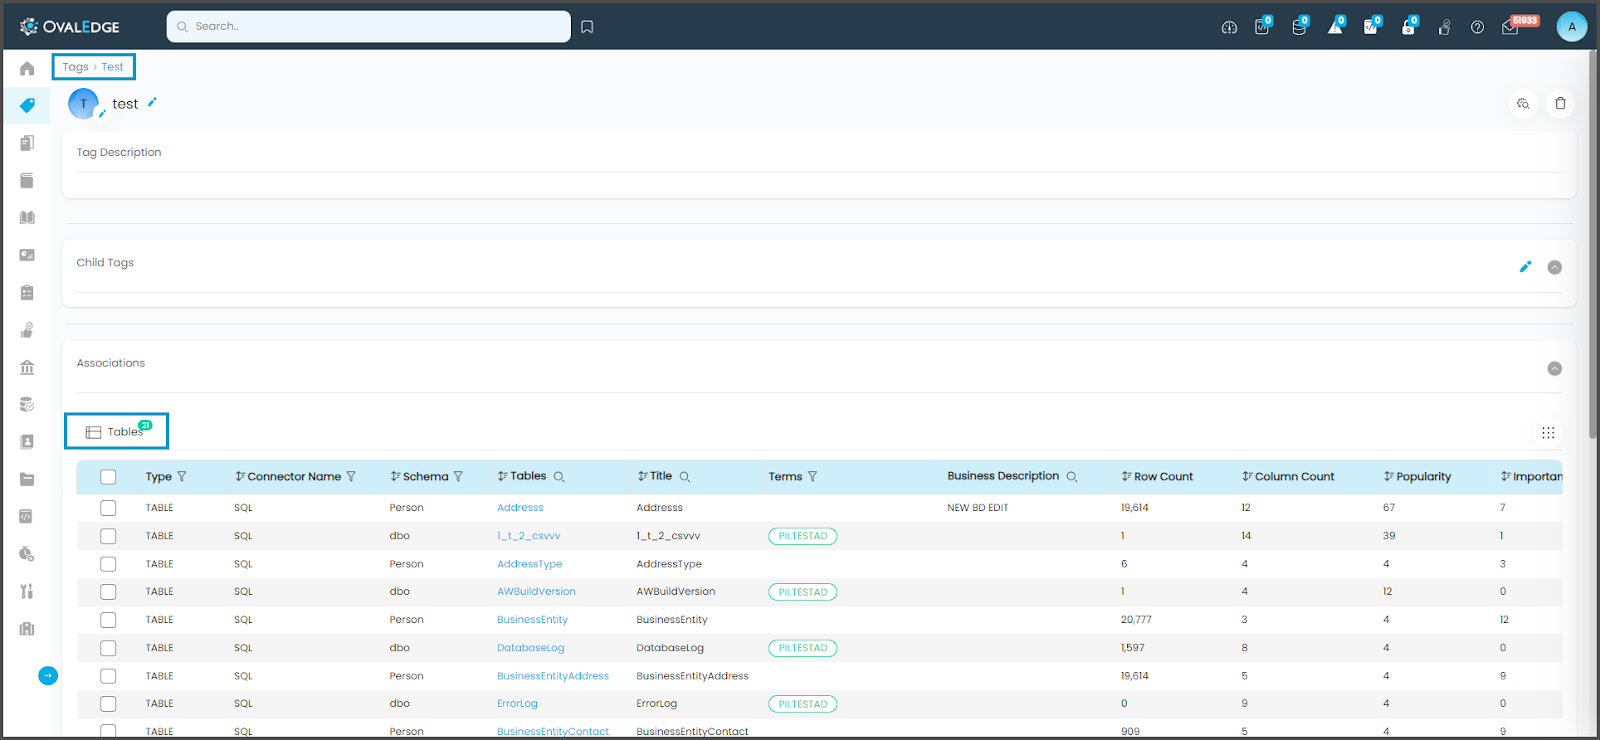
Tags - Users can assign tags to Virtual Objects, and these tagged Virtual Objects will be visible on the Tags Summary page.
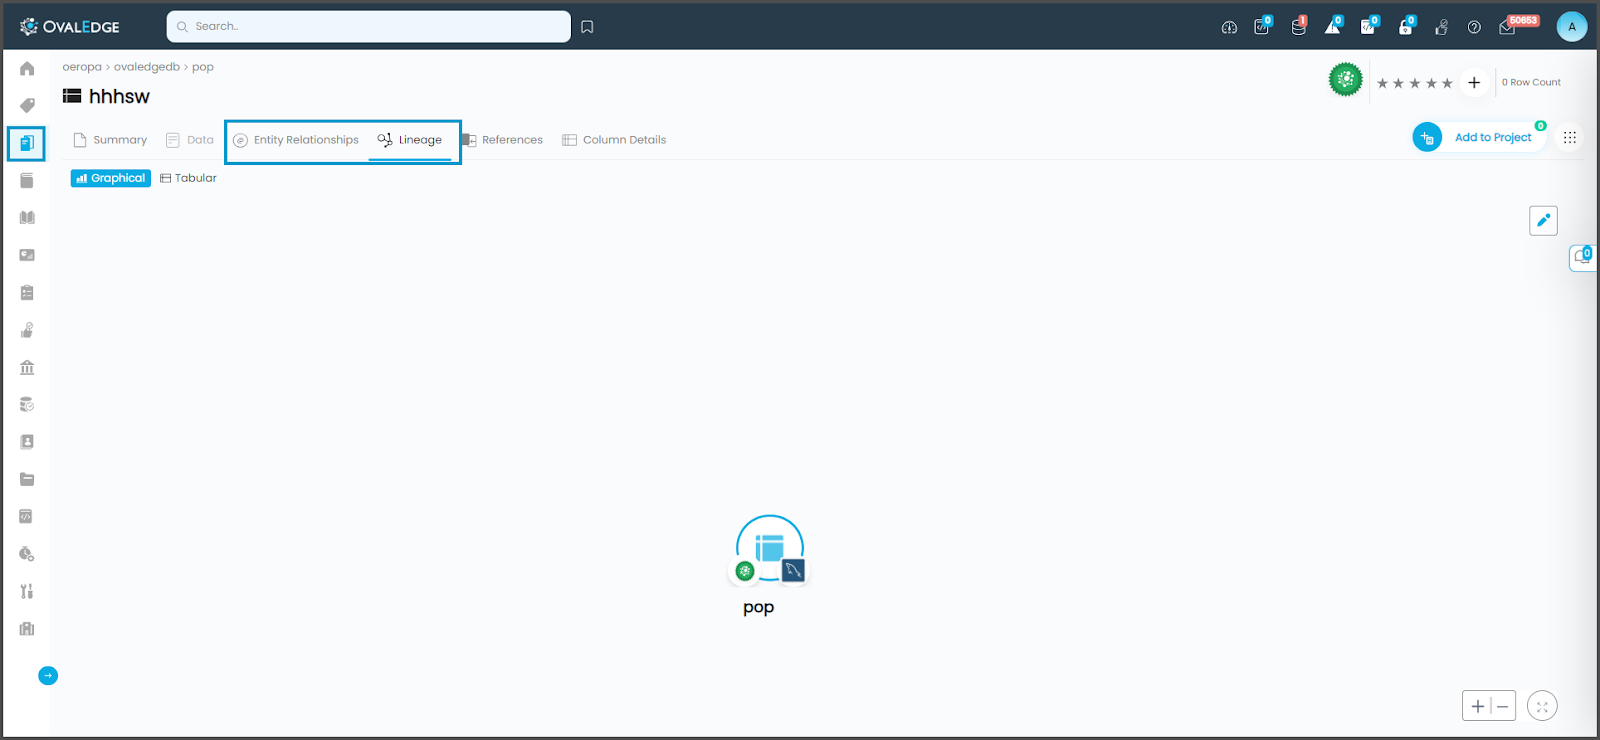
Data Catalog - Users have the ability to view the lineage and entity relationships (only for tables) for Virtual Objects.
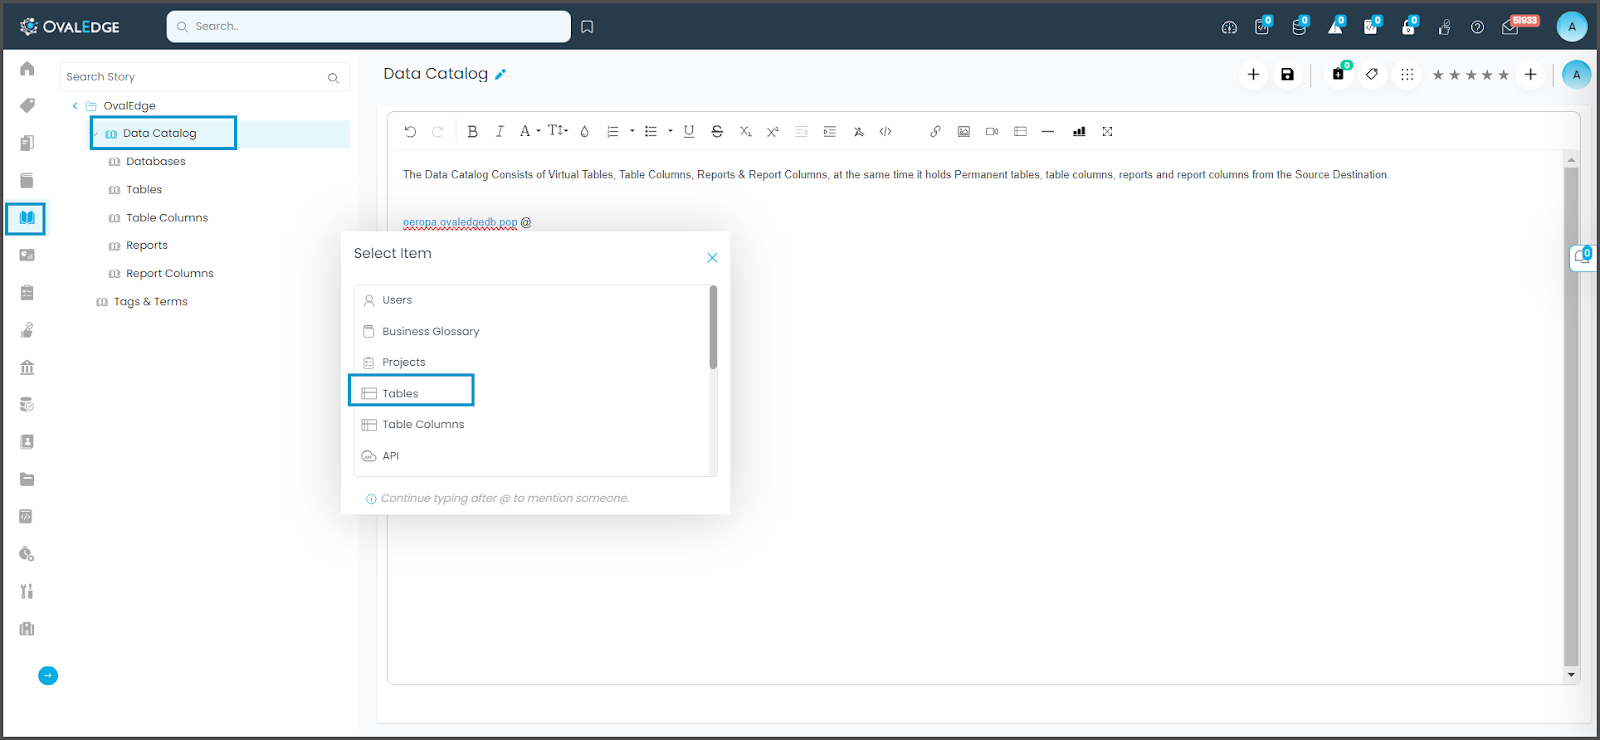
Data Stories - Users can reference Virtual Objects in a Data Story by using the '@' symbol to access tables or reports.
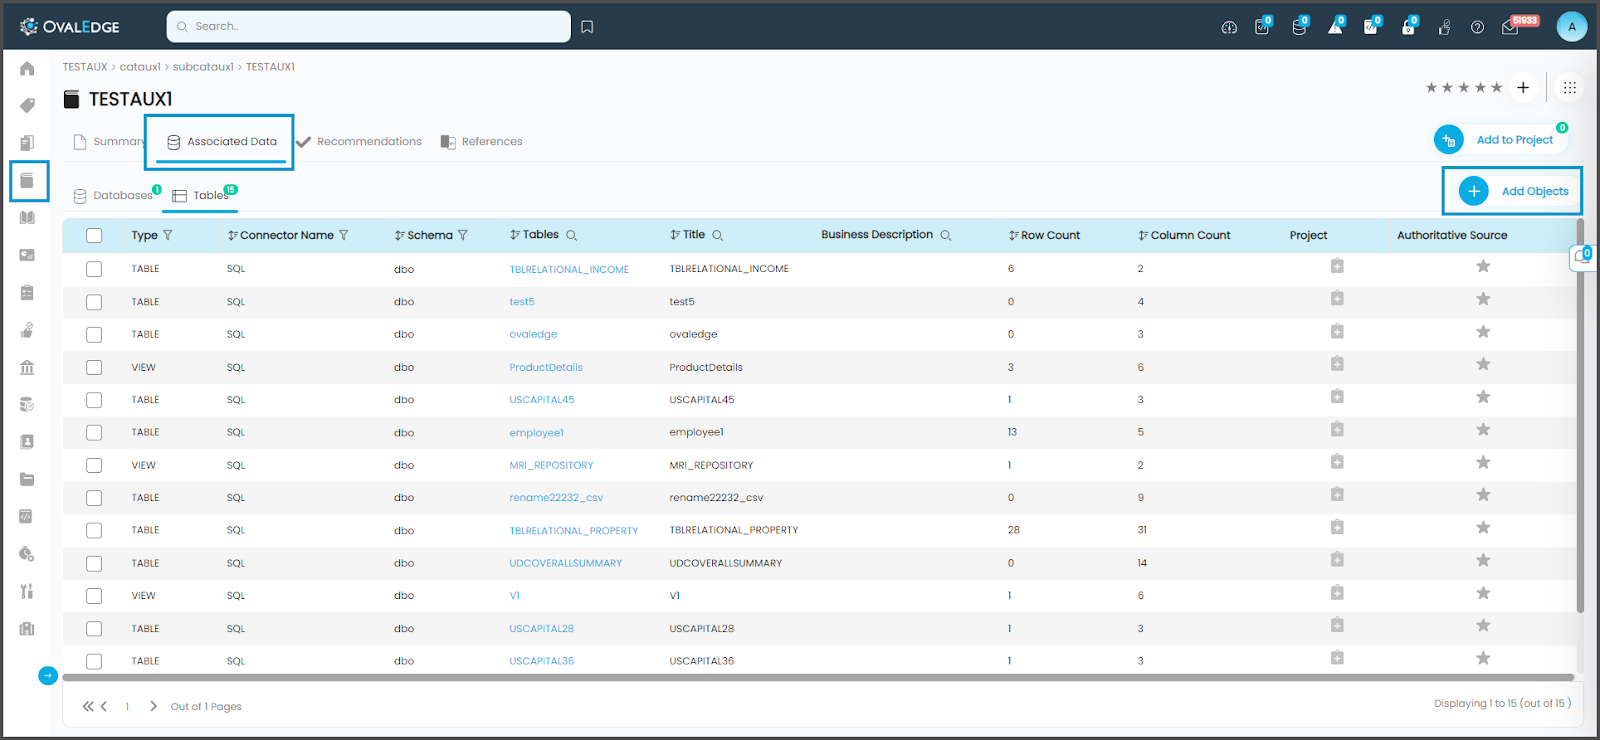
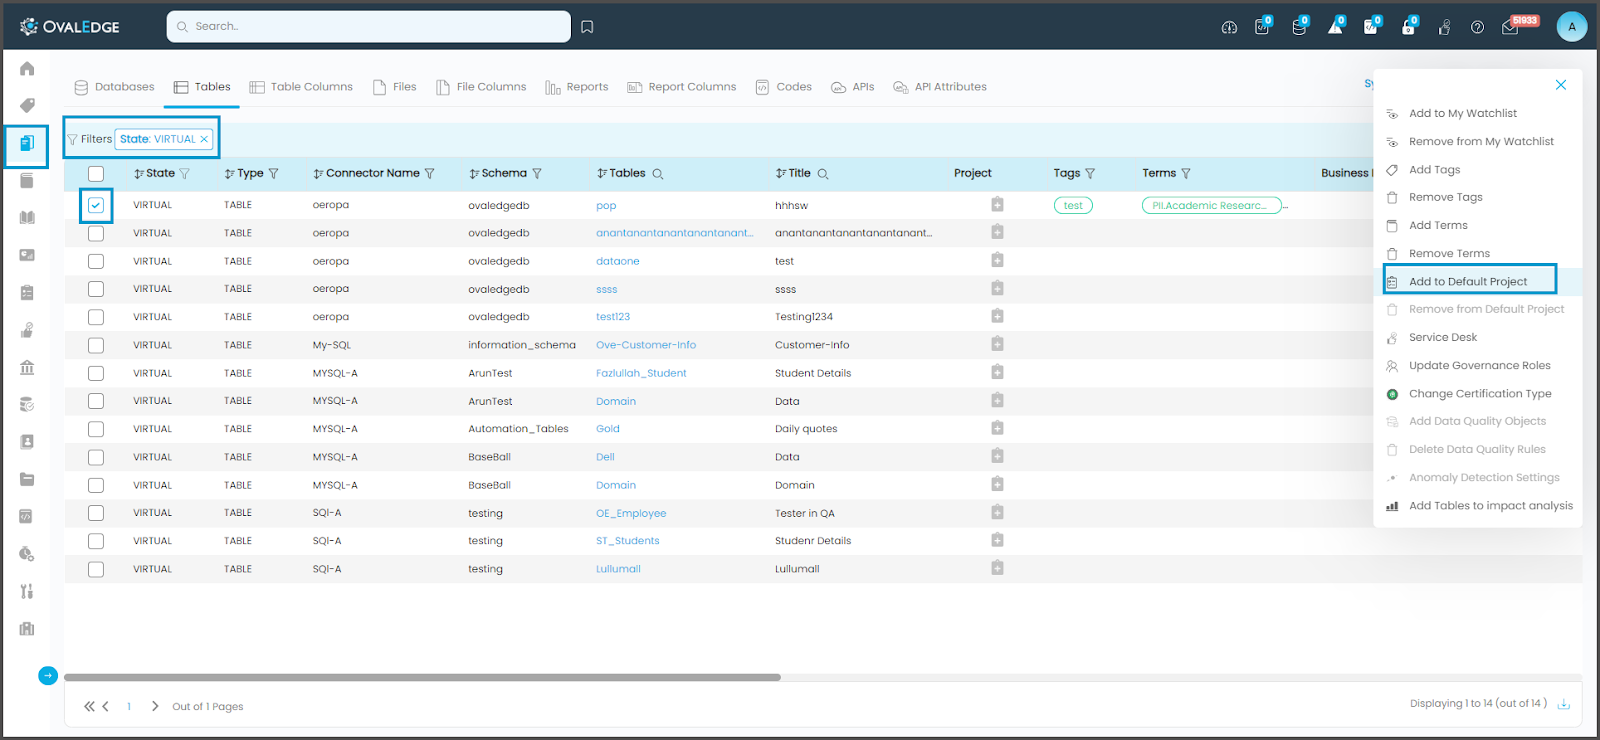
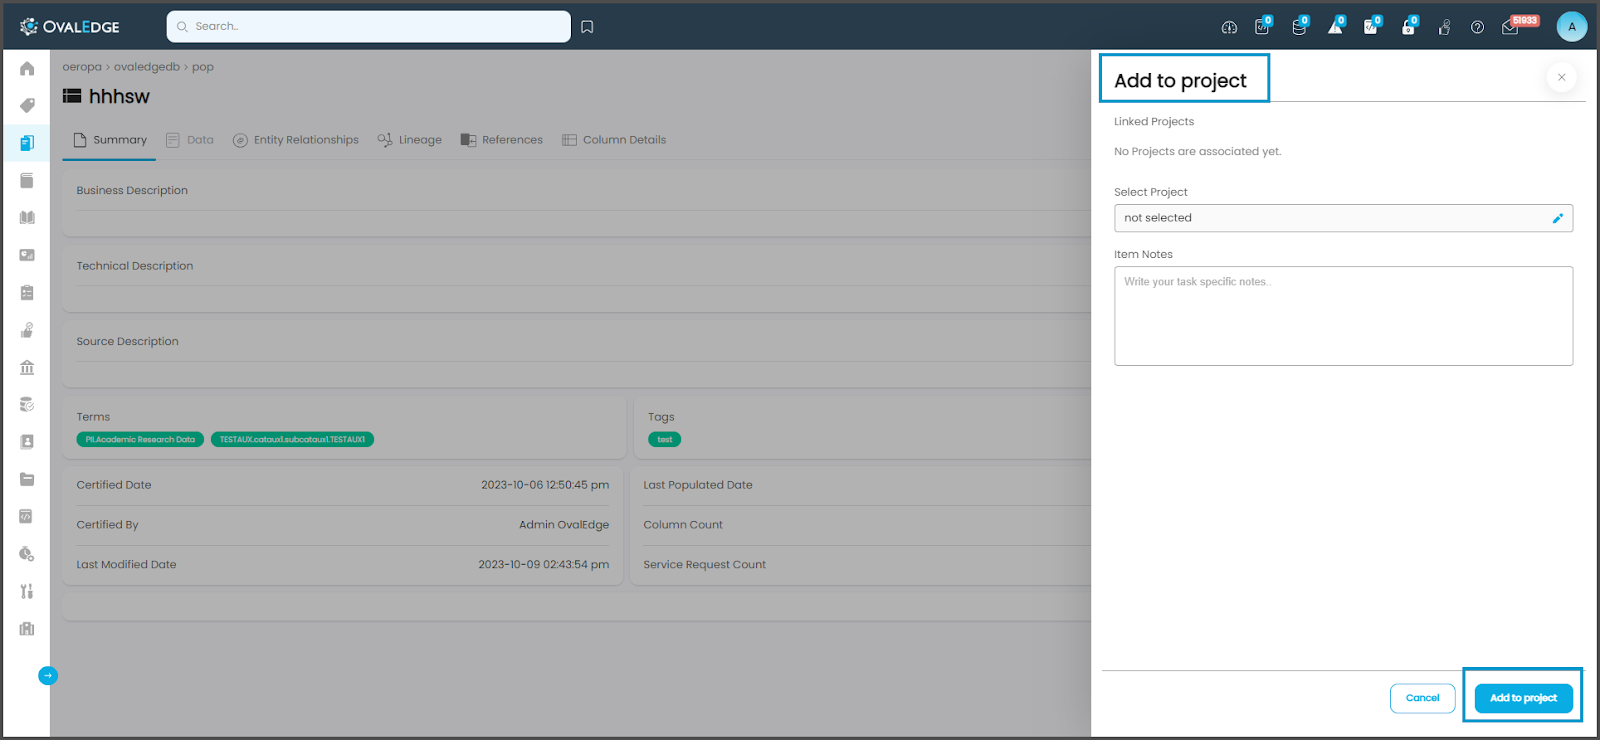
Projects - Users can assign a Virtual Object to Projects. They can navigate to the Data Catalog > Tables / Reports, select any instance click on 9- dots, and click on Add to Default project option from the list.
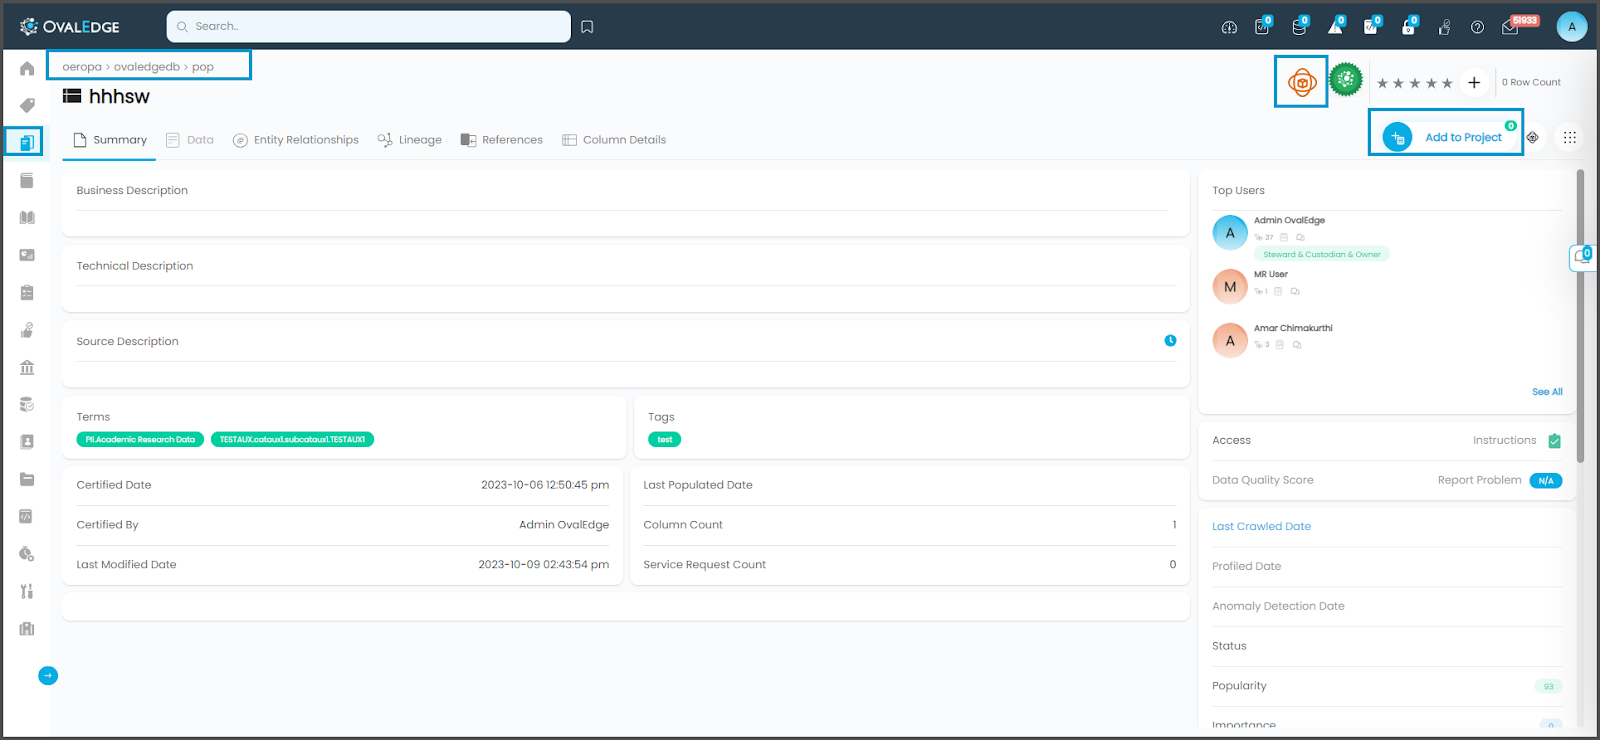
Users can go into the desired virtual object instance and click on the Add to Project button at the top right corner.
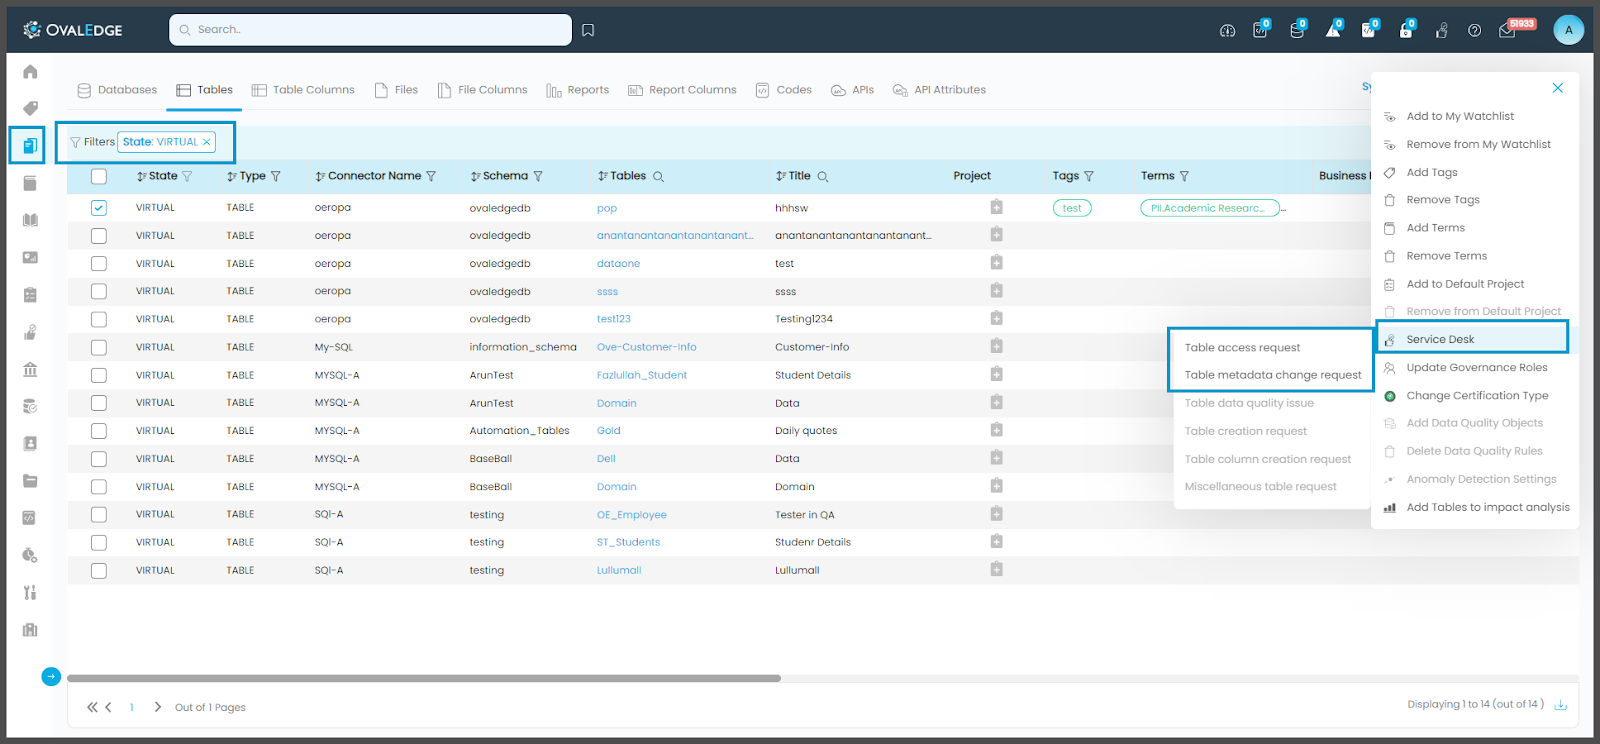
Service Desk - Users can request access to Virtual objects or initiate Metadata change requests by navigating to Data Catalog > Tables / Reports. They can select the desired Virtual Table / Virtual Report, and then click on the nine dots option. From there, they can choose the 'Service Desk' option.
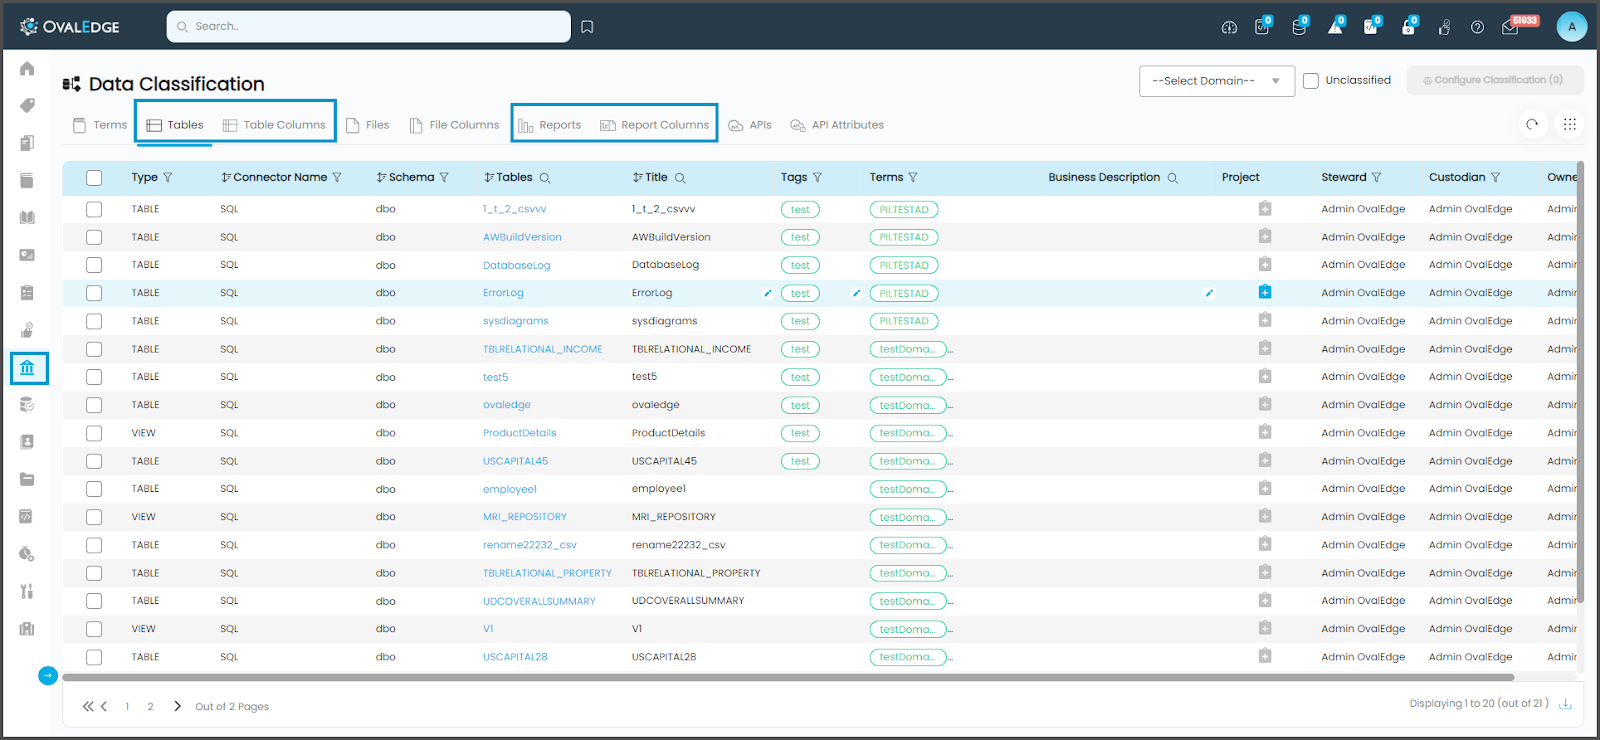
Data Classification - Users with Meta Write permission can classify the Virtual Objects into different levels or groups based on their attributes, such as sensitivity, importance, or purpose. Data can be classified into various categories or levels, often ranging from highly sensitive or confidential to public or non-sensitive data.
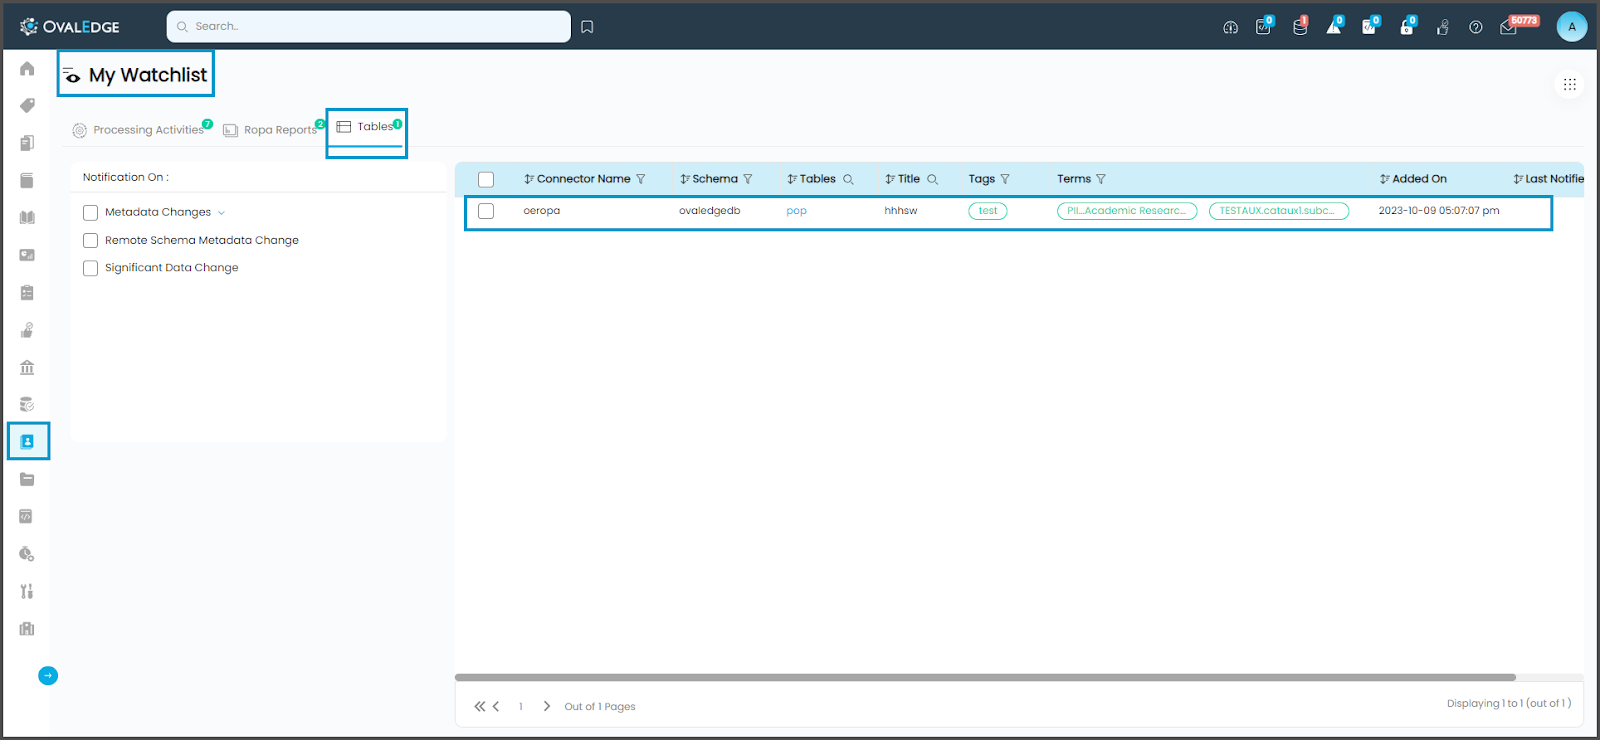
My Watchlist - Users can include Virtual Tables or Reports in their watchlist by clicking on the nine dots and selecting the 'Add to My Watchlist' option from the menu.
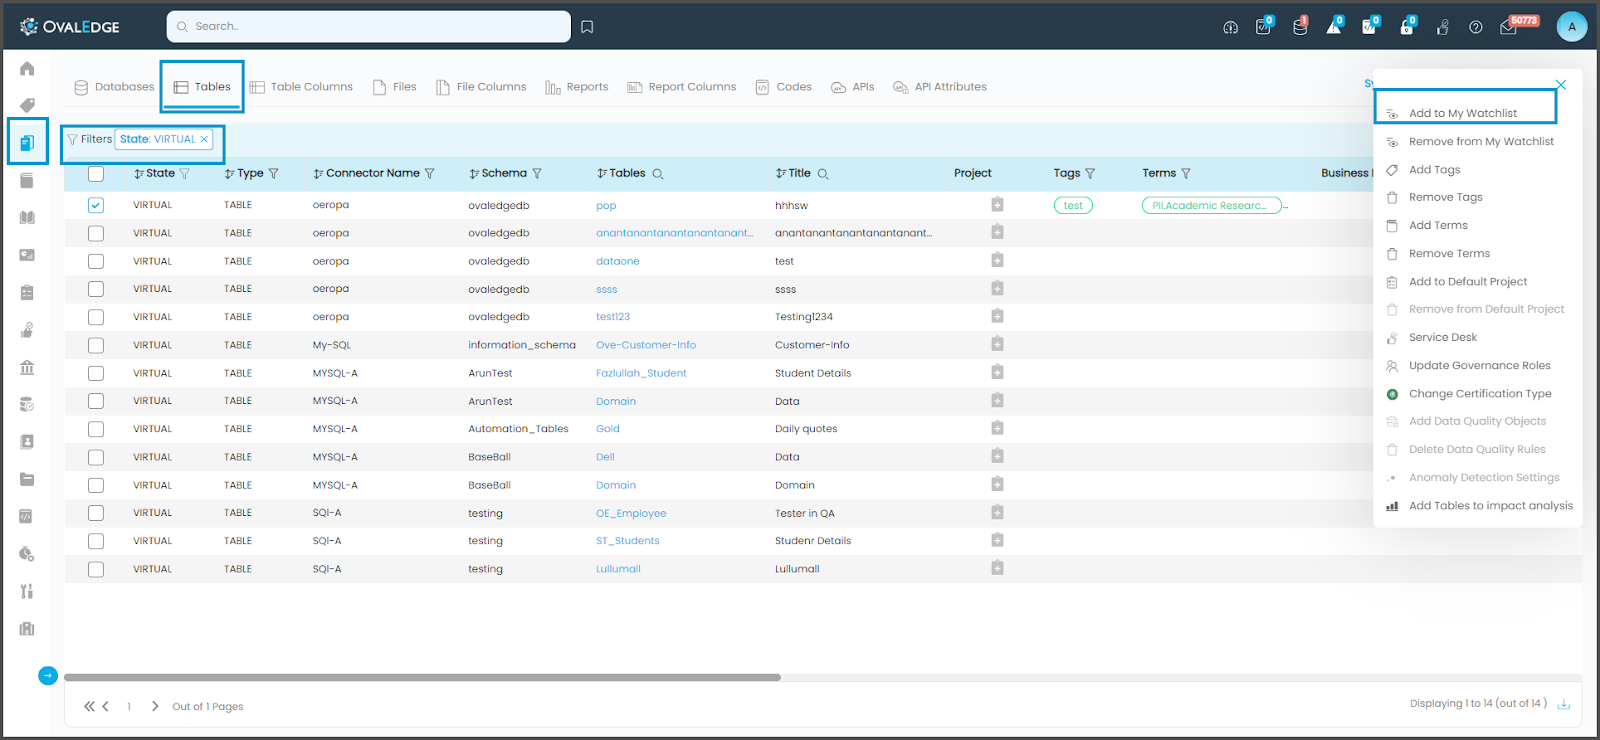
These added Virtual Objects will appear in My Resources > My Watchlist.
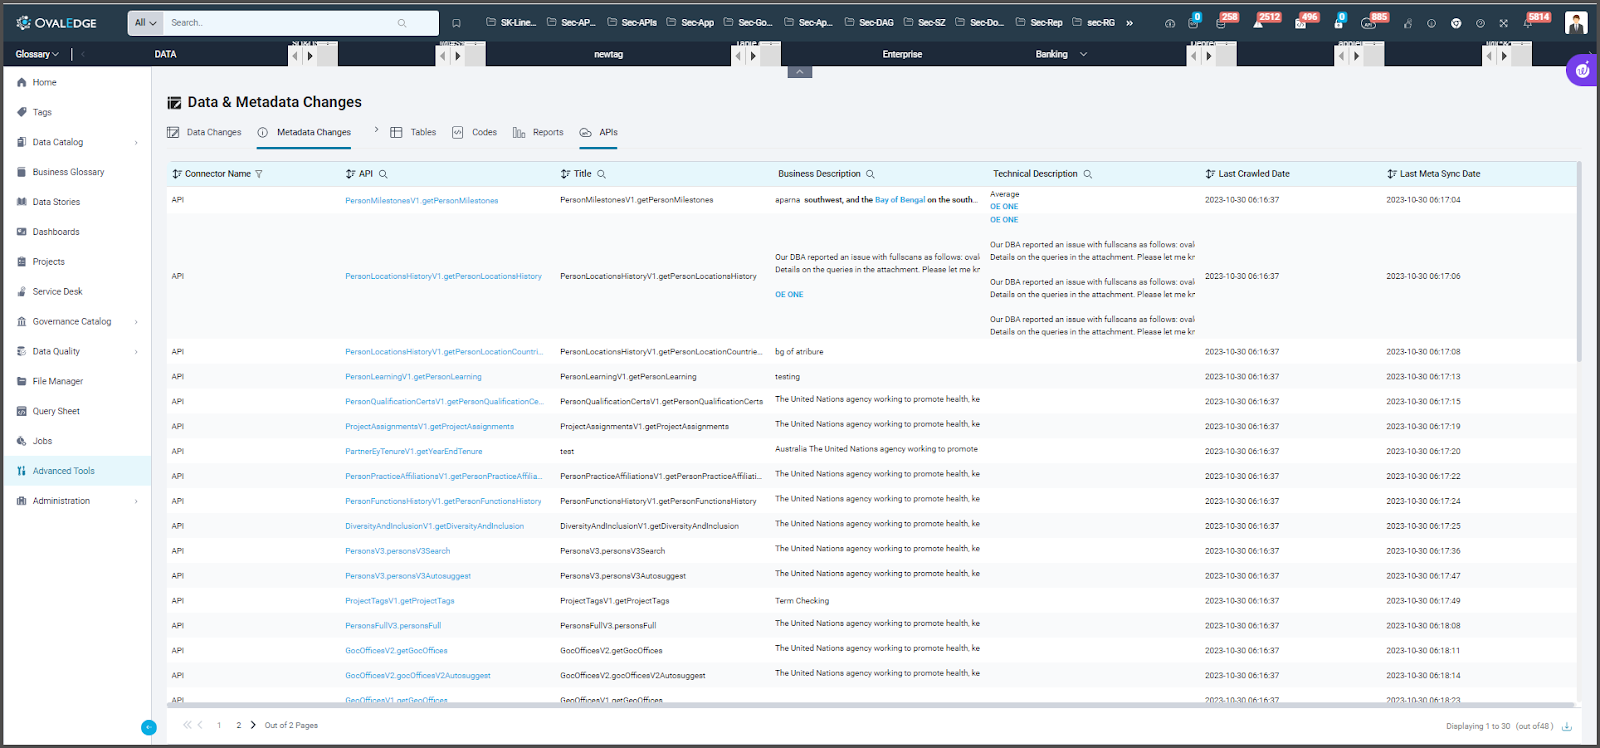
Metadata Changes - Within the Advanced Tools, specifically under Data & Metadata Changes, users can exclusively view metadata alterations made to Virtual Tables or Virtual Reports.
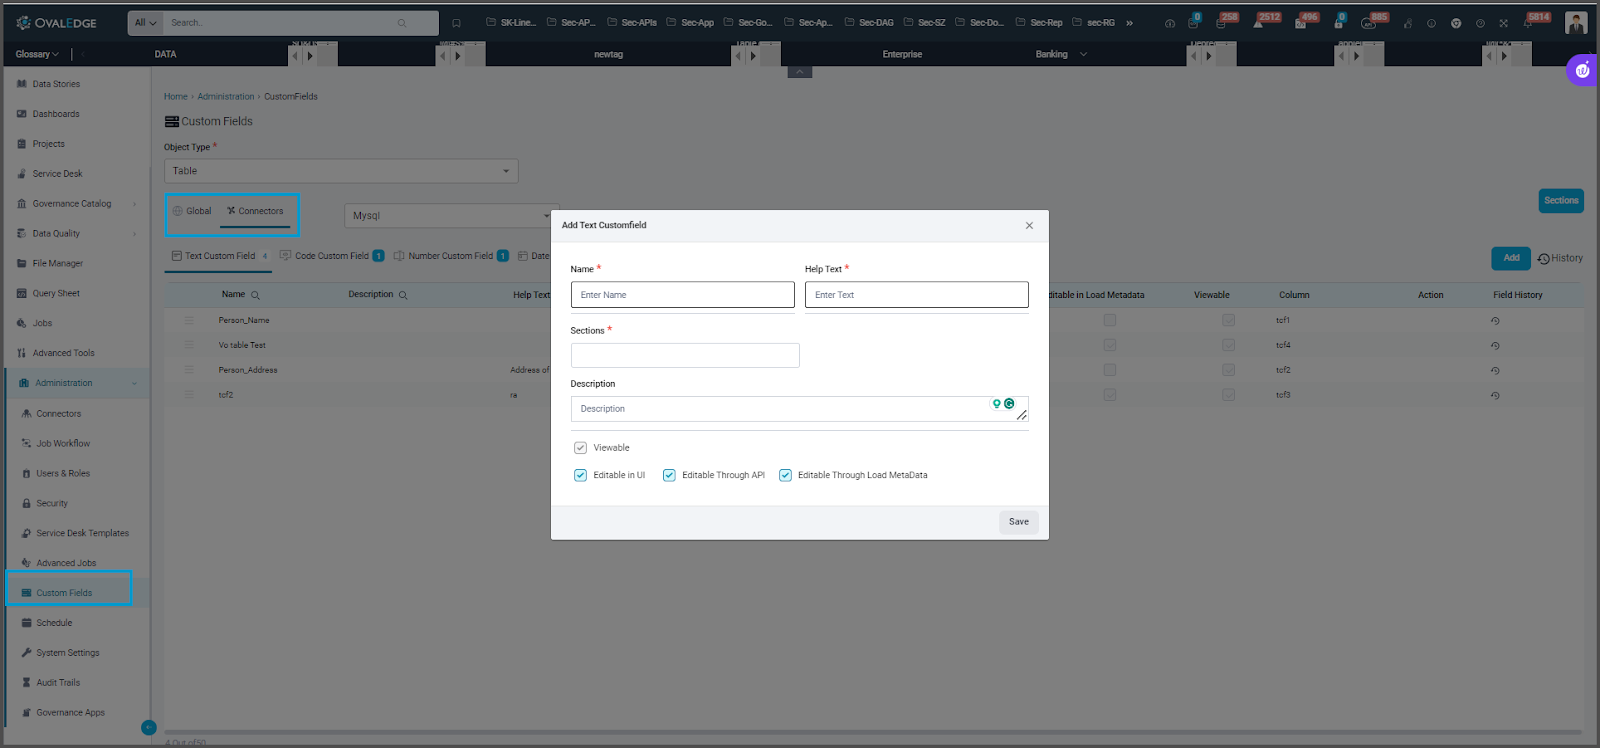
Custom Fields - Admins can introduce custom fields in their selected Virtual object section, specifying the necessary connector. When defining a text field, they have the option to designate it as either editable or viewable. These custom fields will subsequently be reflected in the Data Catalog > Updated Virtual Object Summary page.
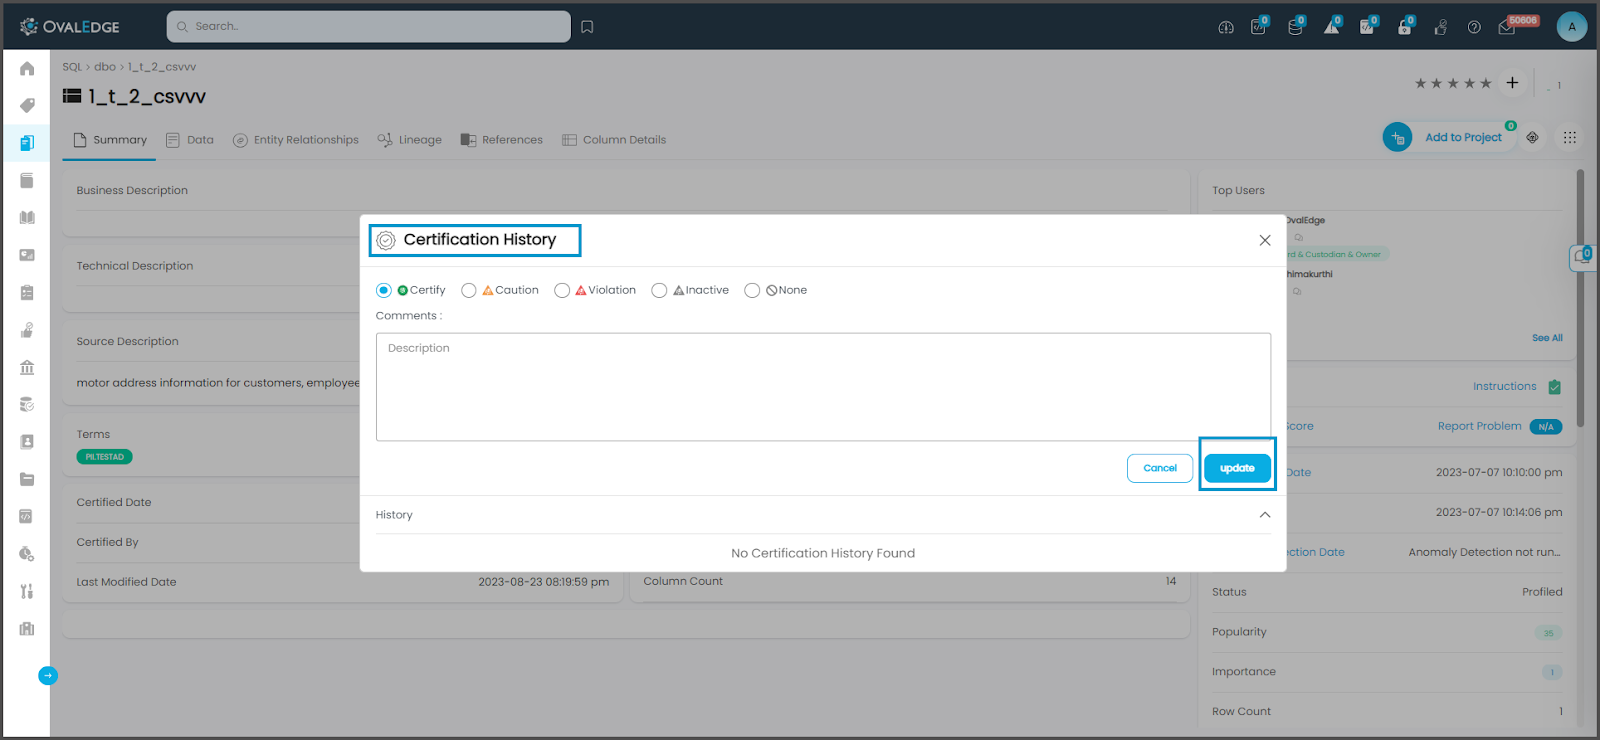
Certification - Users can certify Virtual Tables, Table Columns, Reports, and Report Columns, and even attach a certification icon.
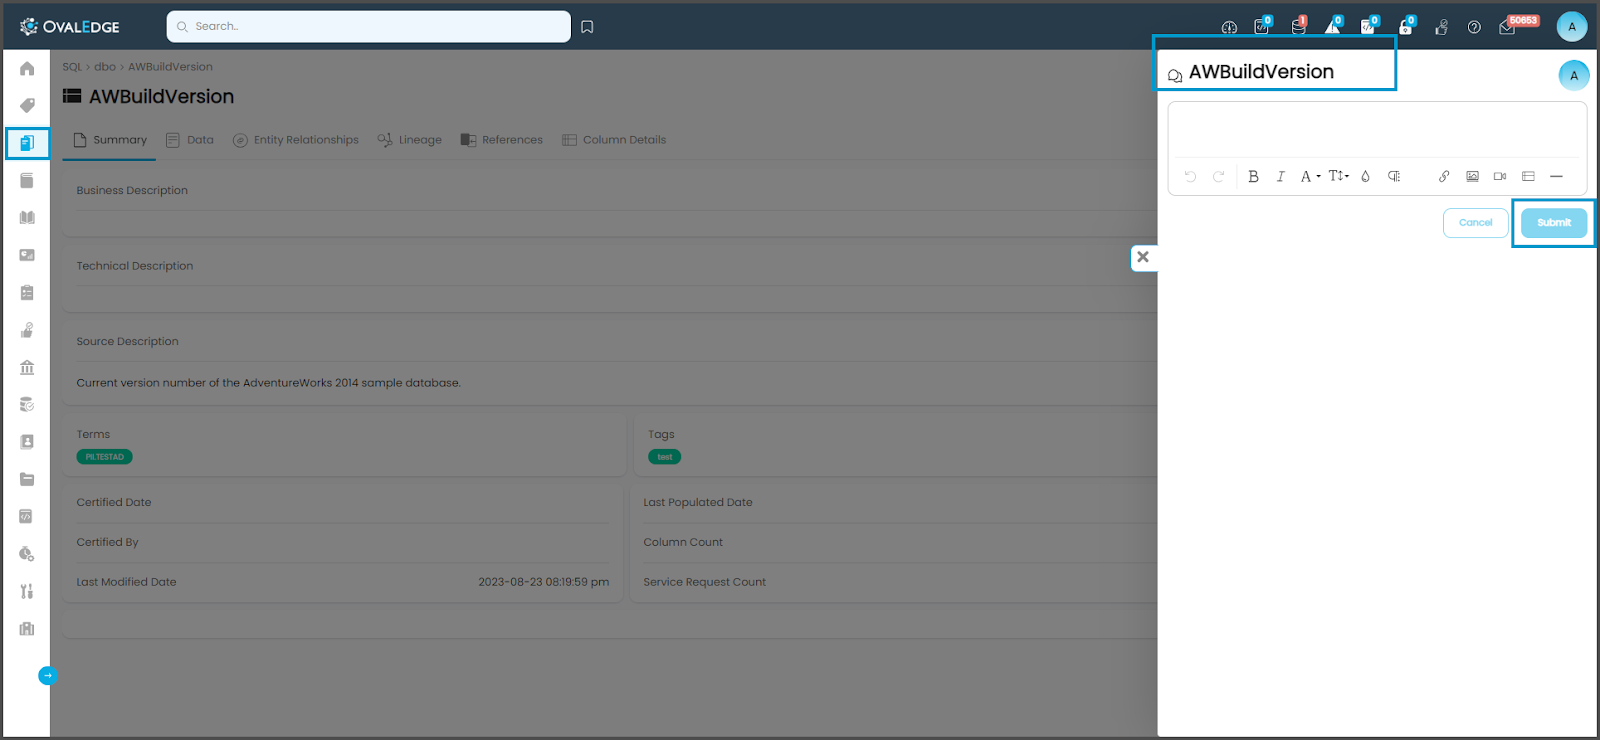
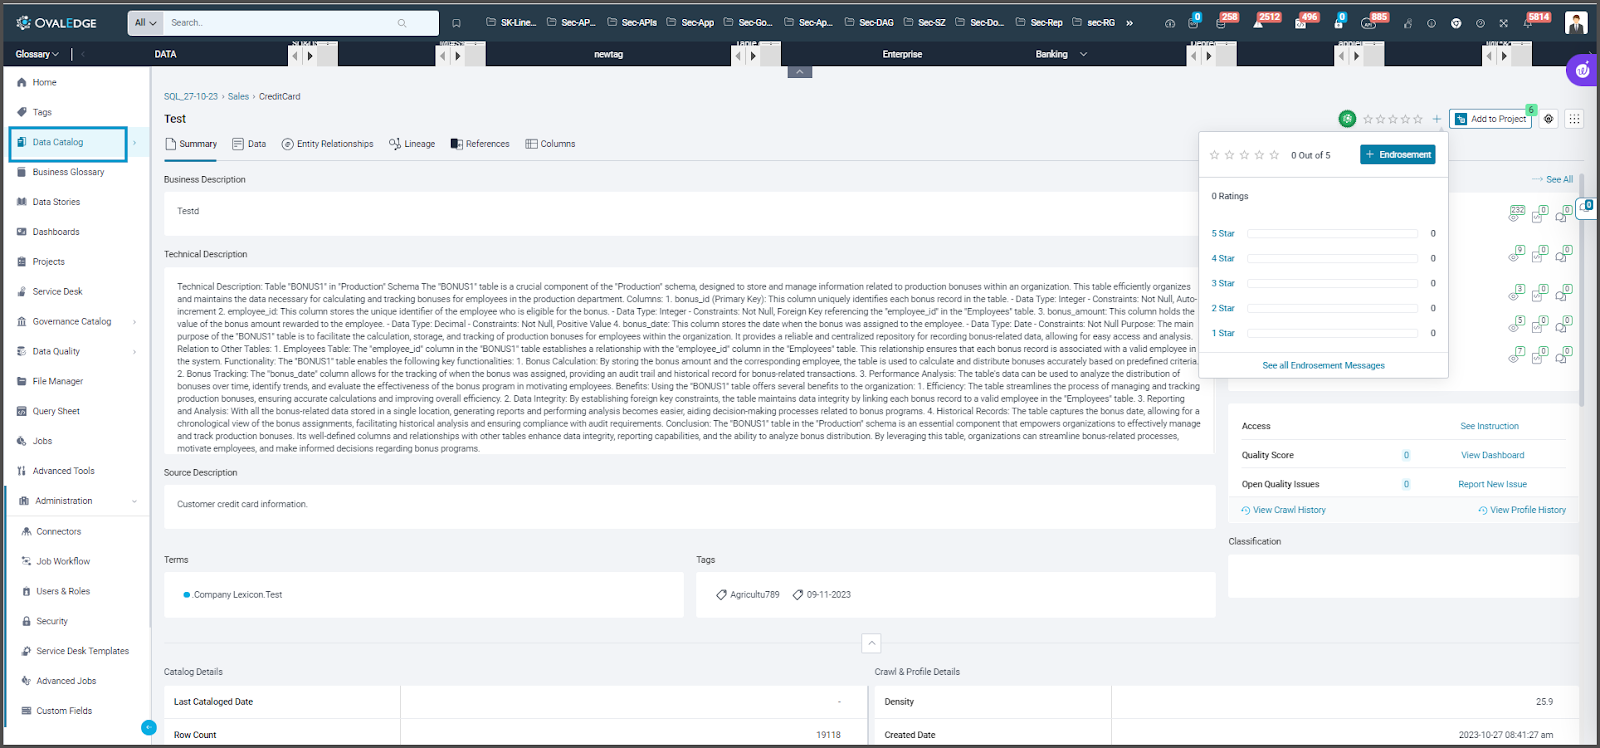
Endorsement - Users can establish credibility and trust by assigning endorsement ratings, and providing endorsement messages.
Collaboration Message - Users holding Author or Viewer licenses can utilize the collaboration messaging feature to communicate with either teams or individuals.