Users & Roles is an administrative tool that allows users to create and modify user information within an organization. Every user can be associated with one or more user roles. However, each user role will have only one metadata and data permission on a data element.
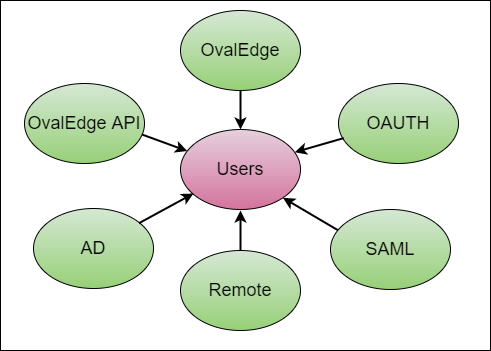
The Users and Roles provide the information regarding the types of Users, different sources where the users can be onboarded to OvalEdge.
User License Type
There are two types of users available in the OvalEdge application. Each user role created in OvalEdge is associated with one license type as follows:
- Author & Analytical User - A user role created with Author & Analytical license can either have metadata read or write permission. Along with the metadata access, users can be given either Data No access/Data Preview/Data Read/ Data write access.
- Business User - A user role created with a business user license can have only Metadata Read permission. A business user can be given either Data No access/ Data Preview/ Data Read/ Data Write access.
|
License Type |
Allowed Permissions |
|
Author & Analytical |
MRDN, MRDP, MRDR, MRDW, MWDN, MWDP, MWDR, MWDW |
|
Business User |
MRDN, MRDP, MRDR, MRDW |
Sources of User
There are multiple sources, where users can log in and onboard to the OvalEdge application. The Sources can be OvalEdge, AD, SAML, Oauth, Remote, and OvalEdge API.
The Users and Roles Management is dived into multiple pages, such as Users, Roles, Users & Roles, Team, Policies, Remote Users, Remote Roles, and Remote Policies.
- Users: This module gives detailed information about all the Users created in the OvalEdge application, and also allows you to create a new user.
- Roles: This module gives an overview of the Roles available within the application, and also allows you to create a new role.
- Users & Roles: This module gives an overview of the Users created within the application along with their first name, last name, and the roles assigned to them.
- Team: This module gives an overview of the Teams created within the application, and also allows you to create a new team.
- Policies: This module gives an overview of the masking policies created within the OvalEdge application.
- Remote Users: This module gives an overview of the remote users available in the source system for the RDAM connections. You are also allowed to create a new user in the Source system when OvalEdge is a master.
- Remote Roles: This module gives an overview of the remote roles available in the source system for the RDAM connections. You are also allowed to create a new user role in the Source system when OvalEdge is a master.
- Remote Policies: This module gives an overview of the remote roles available in the source system for the RDAM connections.
Note: In the Users & Roles Management the user actions (Example: add user, add roles, change password, etc) are enabled for the Admin Users, and disabled for the Public users. The public user will be able to view the available information. The Roles tab displayed in the application is only for the Admin user, not for the public users.
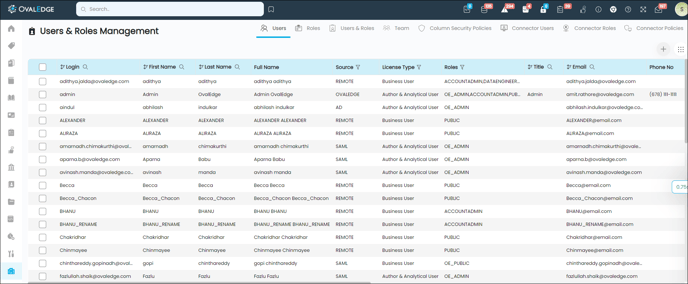
Users
The Users & Roles- Users summarize the User information created within the OvalEdge application.
You can find the information related to the created Users mentioned below:
|
Field |
Description |
|
Login |
Displays the user name provided while creating a new user. |
|
First Name |
Displays the first name of the User. |
|
Last Name |
Displays the Last name of the User. |
|
Full Name |
Displays the Full Name of the User. |
|
Source |
Displays the platform where the User is created. |
|
License Type |
Displays the License type provided to the User (Business/Author & Analytical). |
|
Roles |
Displays the roles which are assigned to the user. |
|
Title |
Displays the title given to the User. |
|
|
Displays the email Id of the Users. |
|
Phone No |
Displays the Phone number of the users. |
|
Address |
Displays the address of the Users. |
|
Manager |
Displays the name of the Data Owner, who maintains the data. |
|
Data Governance Manager |
Displays the name of the Data Governance Manager, who sets up the policies, set up access management, and standards for data. |
|
Data Control Manager |
Displays the name of the Data Control Manager, who controls how the data is processed, stored, etc. |
|
Slack Id |
Displays the Slack Id of the user so that you can search for the person using the Slack Id if required. |
|
Created Date |
Displays the date, on which the user is created in the OvalEdge application. |
|
Last Updated Date |
Displays the date when the user has modified/updated the user’s information in the OvalEdge application. |
|
User Access Initialized |
Displays Yes for the users who can raise user access on the Data Objects, and No for the user who can’t raise user access. |
User Actions
Adding a New User
You can create a new user in the OvalEdge application using the + icon available on the Users & Roles - Users page.
To create a new user:
- Navigate to Administration > Users & Roles.
- Click on the + icon, to view the New User pop-up.
- In the New User pop-up, provide the required details such as User Name, Email, Password, First Name, Last Name, User License Type, Role, etc, and click on the Register button. The Register New User pop-up window will be displayed with yes, and no buttons.
Note:- The fields with an asterisk mark are mandatory fields.
- The Password should contain at least one UpperCase, LowerCase, Number(0-9), and Special Character(@,#,$,%,^,&,-,+,=,(,)) with a minimum of 12 and a maximum of 16 characters.
- Click on no, if you don’t want to add the user. When you click on no, it will navigate to the New User pop-up window with an alert message ‘User not added’.
- Click on yes if you want to add the user, and it will automatically redirect to the Users & Roles.

Note: The Users and Roles also allow you to add the governance roles (Manager, Data Governance Manager, Data Control Manager) to the User, using the edit icon enabled on each governance role column.
You can add or edit the governance roles using the edit icon enabled in each column.
The User information is editable and you can update it using the edit icon available in the Login column.
Additional User Actions
The Nine dots icon is enabled on the Users & Roles - Users page to perform the below actions:
Change Password
You can change the User password using this feature.
To change the password of the User:
- Select the check box for the User.
- Click on the Nine dots, and select the change password option. The change password pop-up window will be displayed.
- Enter the new password and re-enter the new password in the confirm password bar. Click on Submit to display a confirmation pop-up window with yes, and no buttons.
- Click on yes, if you want to change the password, or else click no, if you want to continue with the old password. When you click on yes, a successful message will be displayed.
Delete User
The Delete User Nine dots option allows you to delete a user/ make a user inactive.
When a User is no longer required in the application, then you can delete the User. However, if the user is not required in the application now, but may be required in the future, in this case, you can make the inactive, and activate it when required.
To Delete/ deactivate a User
- Select the check box for the user.
- Click on the Nine dots, and select the Delete User option. The Transfer User Roles and Responsibilities pop-up window will be displayed.
- In the Transfer User Roles and Responsibilities pop-up window, select the user from the drop-down menu to transfer the responsibilities, the user is having on the data objects.
Example: You want to delete the user Andrea from the application, and you are the owner of a data object. In the Transfer User Roles and Responsibilities pop-up window, if you select the user Gorge, then the ownership will be transferred to Gorge.
Note: Using the toggle button available on the Transfer User Roles and Responsibilities pop-up window, you can change the status of the User to Inactive.
- Click on Submit button. A successful job submission message will be displayed on the screen.
Note: A job will be initiated to delete the user, and once the status of the job is changed to success, the User will be removed from the Users & Roles.
Change License Type
You can change the User License Type of a user using this feature.
To change the license type:
- Select the check box for the user.
- Click on the Nine dots, and select the Change License Type option. The Change License Type pop-up window will be displayed.
- Select the license type from the drop-down menu.
- Click on the submit button, and the License updated successfully message will be displayed on the screen.
Initialize User Access
In case of any change in the roles assigned to the user, to initiate access on that Data Object associated with the Roles, to initiate the user access on those data objects you can use the Initialize user access option from the nine dots icon.
Example: Andrea, an OvalEdge user, was assigned with OE_Admin roles, and now Andrea is assigned with OE_Public role. In the application, it takes some time to get access to the Data Objects allowed for OE_Public users. When you select the user and select the Initialize user access option from the nine dots icon, you will get a notification in your inbox, when the access is updated for the user.
Update Manager
To update the manager of a user:
- Select the check box for the user.
- Click on Update Managers from the Nine dots option. The Update Manager pop-up window will be displayed.
- Select the Manager, Data Governance Manager, and Data Control Manager from the drop-down menu.
- Click on the save button to view the updated details in the respective columns.
Roles
The Roles are defined as the set of rights, and permissions the user is having to access a data object.
The Users & Roles Management > Roles module displays the following information:
|
Field |
Description |
|
Role Name |
Displays the name of the Role. |
|
Role Description |
Displays the description of the Role. |
|
User License Type |
Displays the User License associated with the Role. |
|
Default Role |
If you want to make a role as default, you need to enable the default role check box. |
|
Default Meta Permission |
Displays the default Meta Permissions associated with the role. |
|
Default Data Permission |
Displays the default Data Permissions associated with the role. You can change the permissions using the radio button. |
|
Default Admin |
If the default admin check box will be enabled, then the particular role will be assigned to the admin. |
|
Default Permission |
Displays the default permission available to the role. |
|
Source |
Displays the platform where the Role is created. |
|
Created Date |
Displays the date when the role was recently created. |
|
Last Updated Date |
Displays the date when the role was recently modified. |
|
Delete Role |
The delete icon can be used to delete the user role. |
There are 2 types of Roles defined within the OvalEdge application.
- System Defined Roles
- Customized Roles
System Defined Roles
In The OvalEdge application you can find two types of system-defined roles.
- OE_ADMIN
- OE_PUBLIC
The user who is having OE_ADMIN Role is an Administrator of the entire application. He has access to the entire OvalEdge application. He is a Super User. OvalEdge does not allow you to delete this Role. Whereas there is another role that comes by default called OE_PUBLIC. This Role is assigned to Self-registered users. All self-registered users will have a Meta Read and a Data No Access permission by default. Admin can decide to modify the meta and data permission on this Role.
Customized Roles
The following configurations can be mapped to a user role for managing tag creation and crawling activities at OvalEdge.
- ovaledge.tag. Role
- ovaledge. crawler.role
Note: You can configure any user role name defined in the application (system-defined or custom user role).
Note: You can configure any user role name defined in the application (system-defined or custom user role).
Example: The user assigned with the TAG_ADMIN role can Create Tags. The administrator can view this setting under Administration > Configuration.
The user with the CRAWLER_ADMIN role can crawl new data sources. The administrator can view this setting under Administration > Configuration.
After the changes are made, the new configurations automatically reload.
Managing User Roles
Users and Roles are two components of OvalEdge. The user will be assigned to a specific role. And the role will have metadata and data permissions. Metadata permissions would help the user to make changes in the metadata on the overlays platform, while data permissions would allow the user to check for a sample of reports or do a query on a query sheet.
Users need a role and metadata, and data permissions to access data objects and perform tasks. For example, to design a database, you need the “Data Architect” role with Metadata to read and write permissions. To analyze the data with Business intelligence tools, you need an “Analyst” role with Metadata read and Data read permission.
Users can access each data object, depending on their user role and the permissions set on these data objects.
Security Manage Roles
A user should get the license type based on the role's license type.
- If OE_PUBLIC has a “Business User” license type, the new users should get the same license type as “Business user”
- If OE_PUBLIC has “Author & Analytical User” license type. the new users should get the same license type as “Author & Analytical User”
The following is the hierarchy of the license type from highest to lowest in OvalEdge Author & Analytical user >Business User.
You can perform multiple operations on the Users & Roles page with respect to the Users, Roles, Users & Roles, Team, Policies, Remote Users, Remote Roles, and Remote Policies.
Note: The license type of any role can be upgraded at any point but cannot be degraded after assigning it to the data objects. That means a user role created as a license type “Author & Analytical” with MetaRead and Data Read, can be upgraded to a Business User license.
User Actions
Add New Role
The Add New Role feature allows you to add a new role. A + icon is enabled on the Users & Roles management > Roles page to add a new role.
To add a new role,
- Click on the + icon, to view the in-line pop-up window.
- Enter the New Role Name, Select the User License Type from the drop-down menu, and also enter a description for the role.
- Click on the Add button to add the new role.
Apply Default Roles
The Apply Default Roles button allows you to apply the selected Role to all the Data Objects available in the application.
You can click on the check box to select a Role and then click on the Apply Default Role button to apply the selected role to all the Data Objects.
Save Default
The Save Default button is used to save the changes made on the Users & Roles management > Roles page.
After making any changes on the Roles page, you need to click on the Save Default button to save the changes.
Delete Roles
You can delete a User Role using the Nine Dots icon.
To delete a User Role,
- Click on the check box to select a Role.
- Click on the Nine dots > Delete Roles, which will display a confirmation message.
- Click on the Delete button if you want to delete the role, and a successful job completion message will appear on the screen.
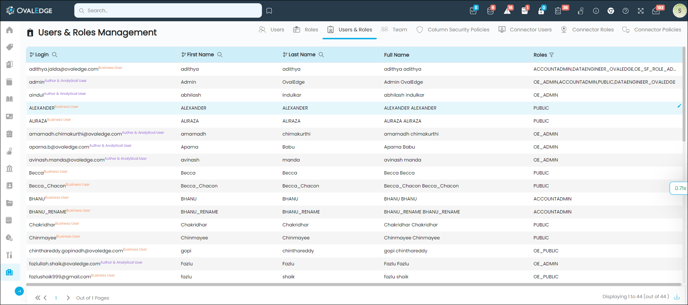
Users & Roles
The Users and Roles, in this administrator, provide the summary of the created users, along with the First Name, Last Name, User Full Name, and Roles assigned to the user. The user Name has a superscript to indicate the user license type.
User Actions
The Users & Roles allows you to edit the roles assigned to the users using the edit icon available in the Available Roles column. The edit icon will be displayed when you hover over the Available Roles.
To edit the roles:
- Click on the edit icon. The Roles pop-up window will be displayed. The left pane of the Roles pop-up window displays the available roles, and the right pane displays the role assigned to the user.
- On the left pane, click on the + icon available against the Role you want to assign to the user.
- If you want to remove the assigned roles, click on the - icon available against the assigned role on the right pane.
- Click on the X icon to close the Roles pop-up window. The assigned roles will be displayed on the Available Roles column.
Team
This module gives an overview of the Team Name, Users, and Icon.
The Users & Roles- Team module allows you to create a Team, and assign users to the Team.
|
Field |
Description |
|
Team Name |
Displays the name of the Teams created in the application. |
|
Users |
Displays the Users assigned to the Team. |
|
Team Type |
Displays the mode used to create a team. (Manual/automatic) Note: When a team is created using the advanced job, then the team type is automatic, and when the team is created using the Create Team option (+), then the team type will be manual |
|
Icon |
Displays the Image assigned to the Team. |
|
Delete |
Displays the Delete icon to delete a Team. |
User Actions
Create Team
A + icon is enabled on the Users & Roles Management > Team Module, to create a Team.
To create a Team:
- Go to Administration > Users & Roles > Team.
- Click on the + icon, to display the Create Team pop-up.
- Enter the Team name and click on the Save button.
Note: Space is not allowed in the Team name, it should be a single word.
Edit Team
There is an edit icon on the Team Name, Users, and Icon column, to edit the Team name, to add/remove users and update the Icon assigned to the Team.
To add or edit Users to the Team:
- Click on the edit icon available in the Users column to display the Users Pop-up.
Note: The Edit icon will be displayed when you hover on the Users Column. - The left pane of the pop-up displays all the available Users within the application and the right pane displays the assigned Users to the Team. Click on the + icon available against the Users (on the left pane) and the added User will be displayed on the right pane.
- If you want to remove one User from the Team, click on the - icon available against the User (on the right pane).
- Click on the X icon which will display the updated roles on the Users & Roles Management page.
Delete a Team
You can find a Delete icon enabled on the Delete column against each Team. Using this delete icon you can delete a particular Team if the Team is not in use.
Policies
OvalEdge policies specify the masking rules and schemes that are applied to table columns to safeguard confidential information.
The Users & Roles - Policies allow you to view the masking policies created within the OvalEdge application.
When a Table column is secured in the Security > Table Column security tab using a making scheme, a new Policy is created in the OvalEdge application. That policy can be viewed in the Users & Roles > Policies tab.

|
Field |
Description |
|
Policy |
Displays the Policy Name. Example: OE_1002_maskalphanumeric_1_admin_mounika - Here OE represents OvalEdge, 1002 - policy ID, maskalphanumeric is the scheme name, 1 is the allowed roles ID, and mounika is the allowed user name. |
|
Policy Scheme |
Displays the Name of the masking Scheme applied to the Policy. Example: Mask Alphanumeric Characters with xxxxxx, Mask All Characters with xxxxxx, etc. |
|
Allowed Roles |
Displays the Roles, allowed to view the unmasked data. At the time of creating a masking policy, it is possible to add more roles who are authorized to view the data. |
|
Allowed Users |
Displays the Users, allowed to view the unmasked data. At the time of creating a masking policy, it is possible to add more Users who are authorized to view the data. |
|
Created Date |
Displays the date when the masking policy was created. |
The Users & Roles Management > Policies tab allows you to search the Policy using the search icon available on the Policy Column and to filter the Policy Scheme, Allowed Roles, and Allowed Users using the filter icon.
Connector Users
The Remote Users tab summarizes the information about the Users available in the source system only for the RDAM connections when OvalEdge is a master and Remote is a master. You are allowed to edit the Remote user name, Remote roles, add a remote User, change the password, and delete a remote user when OvalEdge is the master. When Remote (snowflake/S3) is a master, you can only view the fetched User information.
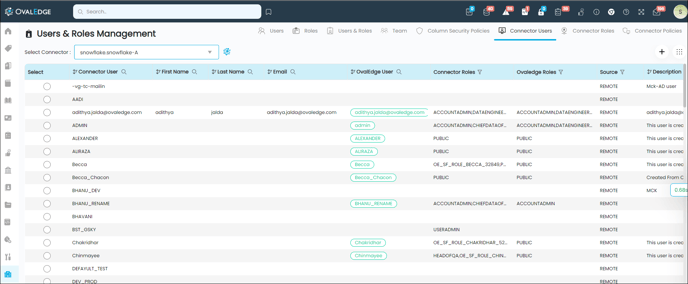
You could view the information regarding the remote users as mentioned below
|
Field |
Description |
|
Connector Users |
Displays the User Name of the Remote User |
|
First Name |
Displays the First Name of the Remote User |
|
Last Name |
Displays the Last Name of the Remote User |
|
|
Displays the Email Id of the Remote User |
|
OvalEdge User |
Displays the name of the OvalEdge who has created the Remote User. |
|
Connector Roles |
Displays the Remote Roles assigned to the Remote User. |
|
OvalEdge Roles |
Displays the OvalEdge Roles assigned to the Remote User. |
|
Source |
Displays the platform, where the User is created, i.e- source. |
|
Description |
Displays the additional information regarding the User. |
User Actions
There are various user actions (adding a new remote user, changing the password of an existing user, and Deleting a user) a user can perform on the Remote Users, only when OvalEdge is a master.
Add Remote User
You can create a new user in the source using this Add Remote User option.
To add a remote user:
- Click on the + icon available on the Remote Users. The Add Remote User pop-up window will be displayed.
- Enter the required information, such as Remote User Name, Password, description, and also select the remote role from the drop-down menu.
- Click on the Add User button. The newly added remote user will be displayed on the Remote Users tab.
Change Password
Admin users are allowed to change the password of the user.
To change the password:
- Select the radio button for the user.
- Click on the Nine dots > Change Password. The Change Password pop-up window will be displayed.
- On the Change Password pop-up window enter the new password, and reenter the new password on the confirm password tab.
- Click on the submit button to save the new password.
Delete User
You can also delete a user using the delete user option from the nine dots.
To delete a user:
- Select the radio button for the user.
- Click on the Nine dots > Delete User. The user will be disappeared from the main screen.
Edit Remote User
There is an edit icon available on the Remote User column to edit the remote user.
To edit the remote user:
- Click on the edit icon available on the Remote User column. The Edit Remote User pop-up window will be displayed.
- On the Edit Remote User pop-up window, you can change the remote user name and description.
- Click on the Save Changes button to save the details.
Edit Remote Roles
The remote roles assigned to the remote users can be changes using the edit icon available on the remote roles column.
To edit the remote role:
- Click on the edit icon available on the Remote Roles column. The Remote User role pop-up window will be displayed.
The left pane of the remote user role pop-up window displays the available remote roles, and the right pane displays the assigned remote roles. - On the left pane, click on the + icon available against the remote role you want to assign to the user.
- If you want to remove the assigned remote role, click on the - icon available against the assigned role on the right pane.
- Click on the X icon to close the Remote User Roles pop-up window. The updated roles will be displayed on the Remote Roles column.
Connector Roles
The Remote Roles summarizes the information regarding the Roles available in the source system only for the RDAM connections when OvalEdge is a master and Remote is a master. You are allowed to edit the Remote Roles, add a remote role, and delete the roles when OvalEdge is the master. When Remote (snowflake/S3) is a master, you can only view the fetched User information.

You could view the information regarding the remote users as mention below
|
Field |
Description |
|
Remote Role |
Displays the Name of the Remote Role. |
|
OvalEdge Role |
Displays the assigned OvalEdge role to the Remote Role. |
|
Role Type |
Displays the type of role, example: System/custom |
|
Description |
Displays the description of the Roles. |
|
Privilege |
Displays the privileges the remote role is assigned with. |
User Actions
There are various user actions (adding a new remote role, and Deleting a role) a user can perform on the Remote Roles, only when OvalEdge is a master.
Add Remote Role
The add remote role allows you to add a new role in the remote database.
To add a remote role:
- Click on the + icon available on the remote roles. The Add Remote Role pop-up window will be displayed.
- Enter the Remote Role name, Description for the role, and select a privilege.
- Click on the Add Role button. The new role will be displayed on the Remote Roles.
Delete Role
You can delete a remote role using the Nine dots icon.
To delete a role:
- Select the radio button for the role.
- Click on the Nine dots > Delete role. The role will be deleted and disappeared from the main screen.
Edit Privilege
An edit icon is available on the privilege column to edit the privileges assigned to the remote role.
To edit the privilege:
- Click on the edit icon on the privilege column. (The edit icon will be viewed after hovering over the privilege column). The Remote Role Privileges pop-up window will be displayed.
The left pane of the Privileges pop-up window displays the available roles, and the right pane displays the assigned roles. - On the left pane, click on the + icon available against the Role you want to assign to the user.
- If you want to remove the assigned roles, click on the - icon available against the assigned role on the right pane.
- Click on the X icon to close the Roles pop-up window. The updated roles will be displayed on the Privilege's column.
Connector Policies
The Remote Policies summarizes the information regarding the Policies created in the source system. After adding the query Policy to the Administration > Crawler > setting > Remote Access page, the policy will be displayed on the Administration > User & Roles > Policies page.
In the Crawler setting page, click on the check box to select the policy, and then crawl the database to fetch the remote policies to the OvalEdge.
Note: The policies page will display the policies for the RDAM connections.
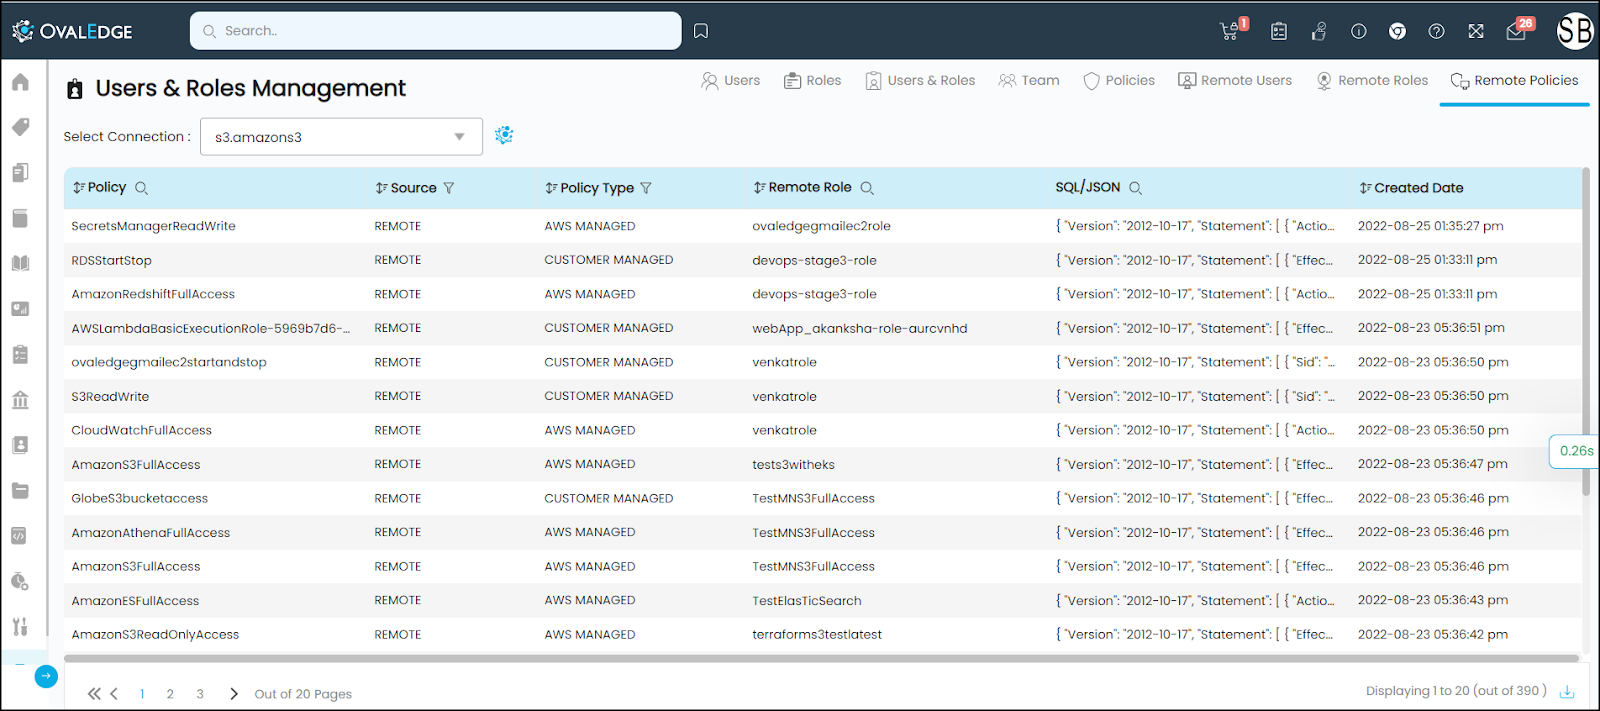
You could view the below information for the remote policies as mentioned below:
|
Field |
Description |
|
Policy |
Displays the Policy Name |
|
Source |
Displays the platform where the policy is created. (Example: Remote) |
|
Policy Type |
Displays the category of the Policy |
|
Remote Roles |
Displays the Remote Roles, allowed to view the unmasked data. |
|
SQL/JSON |
Displays the query which is used while creating the policy |
|
Created Date |
Displays the date on which the Policy was created in the source system. |
Copyright © 2019, OvalEdge LLC, Peachtree Corners GA USA