Tags help to group catalog objects logically for managing and allowing the discovery of related data objects. You can label data objects using Tags to group or classify objects more flexibly. Tags can be assigned to data objects such as Databases, Tables, Table Columns, Files, File Columns, Reports, Report Columns, Business Terms, Data Stories, Queries, and Data Quality Rules.
Tags can be organized into hierarchies to logically group Tags and easily drill down or up from one level to another level. Parent-Child relationships establish the hierarchy to specify different groupings within the same Tag class. For example, you can create a Parent Tag ‘Banking’ and create different Child Tags under Banking, such as Child Tag 1 - Loans, and Child Tag 2 - Mutual Funds. You can further create subordinate child tags under the Child Tags.
- Parent Tags are the root tags from which multiple child tags are created. A Parent Tag can have multiple child tags created under it.
- Tags that are a subset of Parent Tags are known as Child tags. They are created inside a Parent Tag. A Child Tag can have multiple subordinate child tags under it.
- Multiple Tags can be applied to multiple data objects.
You can configure the Configuration settings to show the Parent Tag - Child Tags - subordinate tags in a hierarchy from the Administration > Configuration > Others > Tags key > set to True.
Types of Tags
There are two types of Tags in OvalEdge. General Tags and Data Asset Groups (DAG Tags). Tags and DAGs are two different elements with different functionalities. Tags help to group objects using Tag labels, while DAG Tags help apply a set of configured Governance Role users to the data objects.
The Tags are further divided into two types: Assignable Tags and Non-Assignable Tags.
Assignable Tags
They are default Tags that are used to group catalog objects logically.
Non-assignable Tags
Non-assignable Tags are used to create a hierarchy and are not used to group data. It helps to deactivate a Tag and cannot be associated with data objects. It removes all the associations made to the data assets once set to Non-Assignable mode.
Data Asset Groups
DAG - helps to control and override the existing Governance Role users on data objects with the DAG-defined Governance Role users. The DAGs created in Administration > Security > Data Asset Groups are displayed in the Tags Tree View hierarchy. Also, the Add Tags pop-window displays the DAGs created in the list with a superscript denoting the same.
Tags Permissions
|
Actions |
Admin/Steward |
Configured Roles |
Other Users |
|
|
Create New Tag |
Yes |
Yes |
No |
|
|
Edit Tag Details |
Yes |
Yes |
No |
|
|
Associate Tag to the data object(s) |
Yes |
Yes |
Yes |
|
|
Delete Tag |
Yes |
Yes |
No |
|
Note: The configured Role(s) set in Administration > Configurations > Users & Roles > Key > ovaledge.tag.role > the Role(s) designated can create, edit and delete tags. For example, if OE_PUBLIC is selected, then all the users assigned to the role can create, edit and delete tags.
Viewing Tags
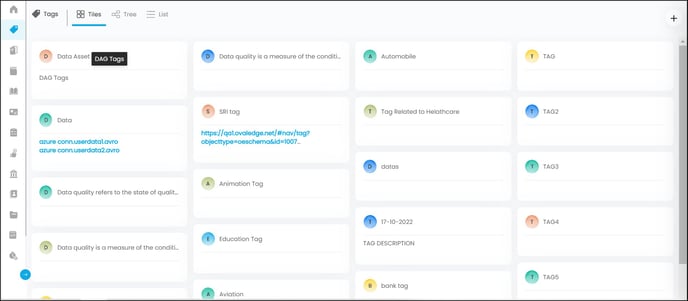
Tile View
It displays the tags in separate tiles. In the Tiles view, the user has the flexibility to drag and drop the frequently used tags on the top.
Tree view
As the name implies, the Tree view organizes all the Tags created in a hierarchical way (Parent-Child- subordinates). It displays Tags with Parent-Child-subordinate relationships for easy understanding.
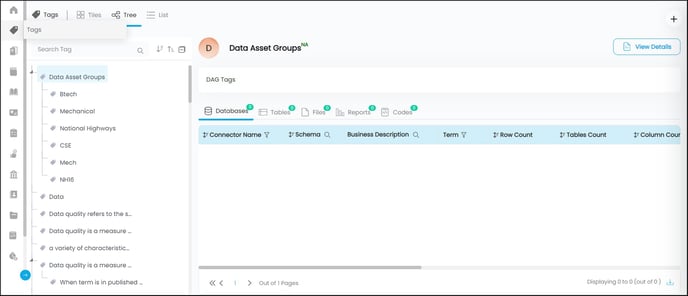
- A + Add Tag icon is enabled in the top right corner to add more Tags.
- You can use the search filter enabled in the left panel to search for the Tags, sort the list alphabetically, and use Collapse/Expand the list to view only Parent Tags or Parent-Child Tags.
- The Tags are clickable - Select a Tag to view brief insights on the Tag in the right panel. The selected Tag associations with various data assets in the application are clearly displayed in the grid.
- The View Details button navigates you to the Tag Details Page.
You can configure the Configuration settings to show the Tags (Parent) -Child Tags - subordinate tags in a hierarchy from the Administration > Configuration > Others > tag.show.hierarchy > set to True.
List View
The List View displays the details of all the existing Tags in a grid. When you click on a Tag name you will be navigated to the Tag detailed page.
|
Tags Grid |
Description |
|
|
The Add Tag icon is enabled in the top right corner to create new Tags. |
|
|
Click to see Delete Tag option. You can delete a selected Tag(s) after a confirmation message. |
|
Name |
Displays the Name of the Tag. |
|
Parent Tag |
Displays the Parent Tag name |
|
Child Tags count |
Displays the count of Child Tags created under a Parent Tag. |
|
Tag Type |
Displays whether the Tag is Non-Assignable Tags/Data Asset Group/ Tags. |
|
Created By |
Displays the user name who created the Tag. |
|
Created On |
Display the date and time on which the Tag is created. |
Creating Parent Tags
- Go to Tags > A + Add Tag icon is enabled in the top right corner to add more Tags.
- Click the icon to see an Add Tag pop-up displayed.
- Enter the Tag name in the field.
- Click on the Save button and the tag gets saved to the grid.
Note:
- Parent Tag should be unique. The system does not allow the creation of multiple Parent tags with the same name.
- Tag names are Case Sensitive.
Creating Child Tags
- Go to Tags > select a Parent Tag from the Tree or List view.
- Click the View Details button to navigate to the selected Tag details.
- In the Child Tags field, hover onto the field to see an edit icon.
- Click the edit icon to see an Edit Tag pop-up displaying the existing Tags in the left panel.
- In the right panel, the + New is enabled.
- Click the + New button to create a Child Tag under the selected Parent Tag.
- Enter the Tag name in the field.
- Click the Save button.
Note: The accordions are provided in the pop-up window to expand and view the Parent Tags and Child Tags associated with the Current Tag.

Deleting a Parent / Child tag
- Go to Tags > select and click on a Parent or Child Tag from the Tree or List View.
- Select the View Details button to navigate to the Tag Detailed page.
- A Delete Tag icon is enabled in the top right corner.
- Click to delete the Tag after a confirmation message.
- Once the Tag is deleted, the data objects associated with the Tag also get removed.
Note: If a Parent Tag is deleted, the associations with the data objects also get removed. However, the child Tag created under the Parent Tags becomes the Parent Tag. For Example:
- If A is a Parent Tag.
- AA, BB are the child tags.
- AAA, BBB, CCC are the sub child tags for AA
- DDD, EEE, FFF are the sub child tags for BB.
If the Parent Tag A is deleted, then AA and BB become individual Parent Tags where Parent Tag AA gets AAA, BBB, CCC as child Tags and Parent Tag BB gets DDD, EEE, FFF as child tags.
Tag Details
The Tags Detailed page displays all the information related to the Tag Name, Description, Child Tags, and its associations with different data assets in the application.
The user roles selected in the Administration > Configuration > Users & Roles > Key - Tags > selected Roles are enabled to create/edit/update tags.
Tag Title
The Tag title is displayed at the Top. It is an editable field where you can give a new name to the Tag.
Tag Description
It provides a more elaborative description of the Tag to include aspects, facts, and additional information. The description field is editable. Hover on to the field to see an edit icon.
Click on the edit icon to see a text field to edit/update the detailed description. You can include images, links, videos, or tables, apply basic formatting to the text, and also add object references using @ annotation.
A History button helps you view all the logs of changes made to the Detailed Description with an easy download option.
Child Tags
Displays the child Tags created under the Tag. The hierarchy is shown if multiple child-subordinate child tags are created under one parent tag.
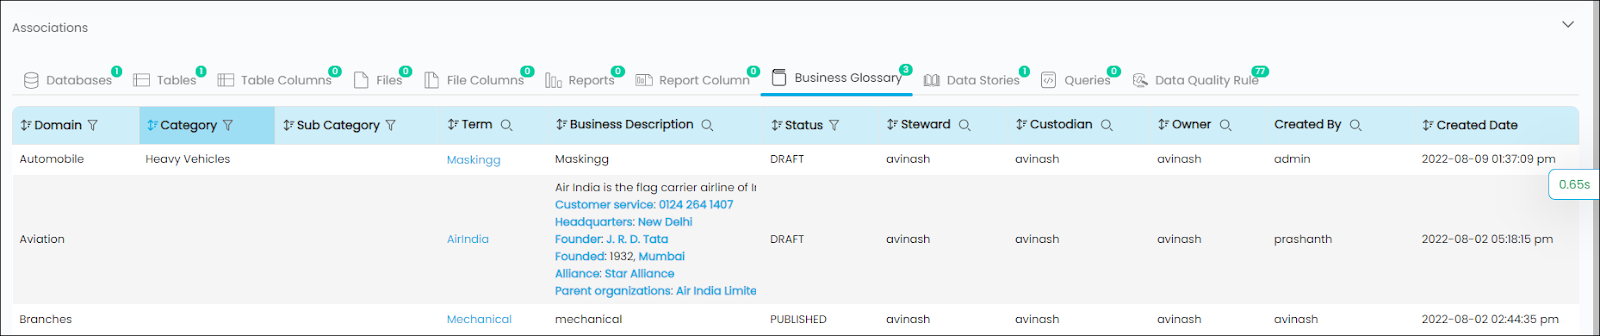
Associations
The Tag associations with various data assets in the application are clearly displayed under respective object type tabs for Databases / Tables /Table Columns, Files / File Columns /Reports/Report Columns/Business Glossary/Data Stories/Queries/Data Quality Rules.
Additional information
It displays the additional fields in a list. Additional fields provide more details about the Tags.
Non-Assignable Tag
It helps to deactivate a Tag and cannot be associated with data objects. It removes all the associations made to the data assets once set to Non-Assignable mode. You get a confirmation message when toggled, click on the Yes button.
Configure Search Keywords
Configure Search Keywords help to map relevant search keywords to the cataloged objects. It helps the end-users to search for the data they are looking for effectively. You need to know and identify the search keywords the end users might use to search for the data objects.
- You can add any Search Keyword to the object from the detailed Object page
- Click on the nine dots icon
- In the Configure Search Keywords pop-up window, click on the Add the keyword button.
- Enter the keyword in the text field provided.
- Click on the Save button, and the keyword gets added to the Search Keyword grid.
- You can enable/disable the search keyword using the toggle.
- You can delete the search keyword using the Delete icon.
- Search Keywords with a minimum score of 3 are considered for the Elastic search.
- If the admin user configures the keyword, then the score is recorded as 3.
- If the non-admin user adds the keyword, the score is recorded as 1.
- If the admin user votes the keyword, the score gets additional three points added to it.
- If the non-admin user votes the keyword, the score gets an additional 1 point added to it.
Copyright © 2019, OvalEdge LLC, Peachtree Corners GA USA