OvalEdge is a data catalog that creates a comprehensive catalog for all the data sources in an organization. OvalEdge is a web-based application and provides role-based access to various users of the application.
OvalEdge supports a variety of authentication mechanisms like plain old Username and Password, OKTA, Active Directory.
OKTA
- It's an enterprise-grade, identity management service, built for the cloud, but compatible with many on-premises applications. With Okta, IT can manage any employee's access to any application or device.
- Okta features include Provisioning, Single Sign-On (SSO), Active Directory (AD) and LDAP integration, the centralized de-provisioning of users, multi-factor authentication (MFA), mobile identity management, and flexible policies for organization security and control.
- For OKTA, OvalEdge uses SAML 2.0 protocol for Single Sign-On into the application. You can use OKTA either for authentication or authentication and authorization.
SAML 2.0 Introduction
Security Assertion Markup Language (SAML) is an open standard that allows identity providers (IdP) to pass authorization credentials to service providers (SP). The idea is to use one set of credentials to log in to many different websites.
SAML 2.0 Terminologies
- Assertion – XML passed between the Service provider and identity provider.
- Assertion Consumer Services (ACS) – Target resources within the SP to where the IDP sends the SAML 2.0 response assertion to.
- Attribute – Unique information about a user that is passed within an assertion.
- Identity Provider (IdP) – A trusted entity providing authentication services to the SP on behalf of the user principal.
- Issuer – A unique string that must match in both the IdP and SP.
- SAML 2.0 Request – An assertion that the SP passes to the IdP to request a user to be authenticated.
- SAML 2.0 Response – An assertion that the IDP passes to the SP for an authenticated user.
- Service Provider – The web application that the user wants to access.
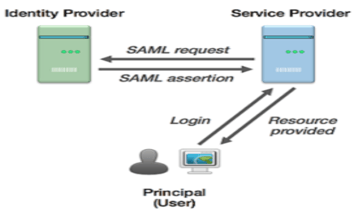
SAML 2.0 Authentication
- In the first step of SAML 2.0 Authentication, the user tries to access the application/ web service (Service provider). The service provider verifies if the user is already authenticated within the system.
If the user is already authenticated, content can be made available directly to the user. Else, if the user is not authenticated, the service provider starts the authentication process.
- The service provider determines the identity provider and redirects user requests to that provider i.e. single sign-on service.
- In the third step of SAML 2.0 authentication, the user browser sends an authentication request to the SSO service.
- The SSO service returns a request which includes the authentication information needed by the service provider in a SAML 2.0 Response parameter.
- The SAML 2.0 Response parameter is passed on to the service provider.
- The service provider processes this response and allows the user to log in and informs where the user-requested resource is.
- Users can now request the resource he wants.
- The resource is finally returned.
Configuring Okta SSO
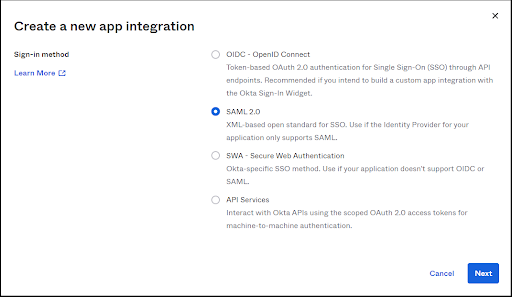
For OKTA integration, OvalEdge needs to be configured using SAML 2.0 authentication.- Login to OKTA, In Applications, click on Create App Integration.
- Use SAML 2.0
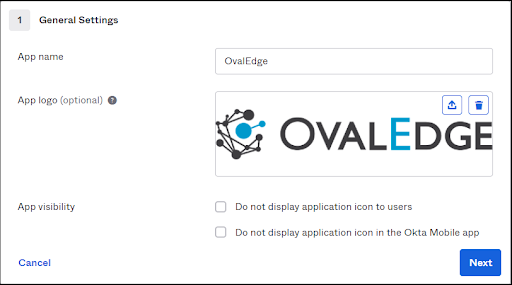
- Give the name as OvalEdge and upload the OvalEdge logo
- Now configure the SAML Settings
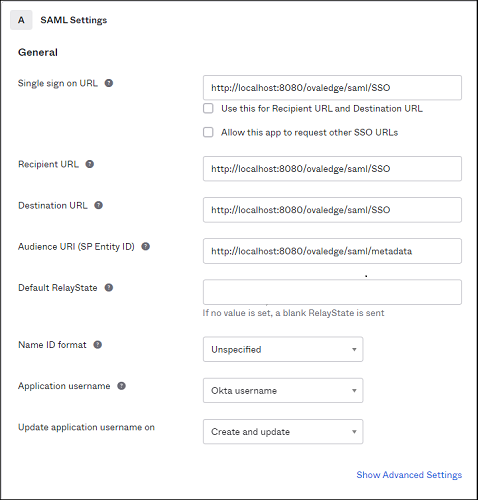
- Single Sign-on URL: This should be the URL of your load balancer followed by {context}/saml/SSO
Note: It should be SSL enabled. - Receipt URL and Destination URL: They should be the Load Balancer DNS or Domain URL but with HTTP
- Audience URI (SP Entity ID): Please ensure that you have port 8080 followed by {context}/saml/metadata
Mapping of OKTA fields to OvalEdge
- Use the following for mapping the attributes:
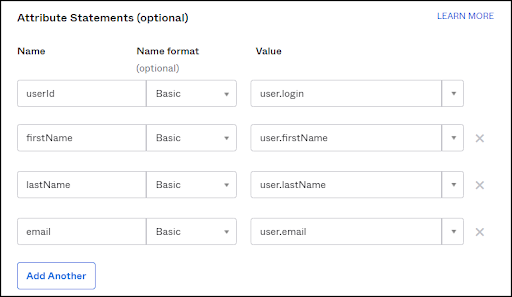
Please ensure that there is no typo on the following terms:
userId, firstName, lastName, email
- Mapping the roles will be used to match against the Okta GroupName values and OvalEdge manage roles.
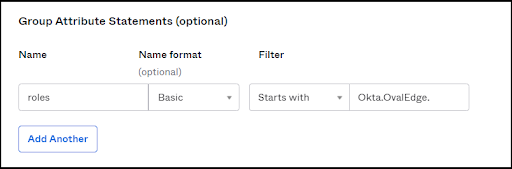
This Prefix must be configured in the OvalEdge Configuration as saml.role.prefix value.

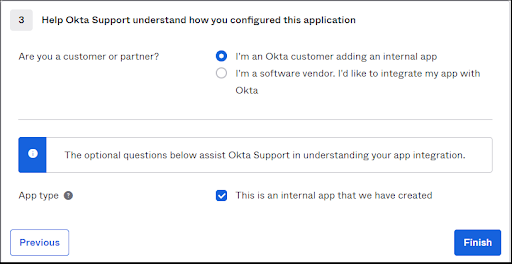
- Finish the configuration.
Group Management in OKTA
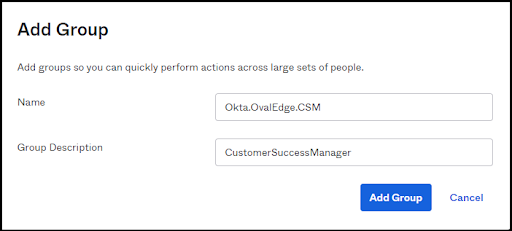
- The Groups which we have created are displayed as shown below:
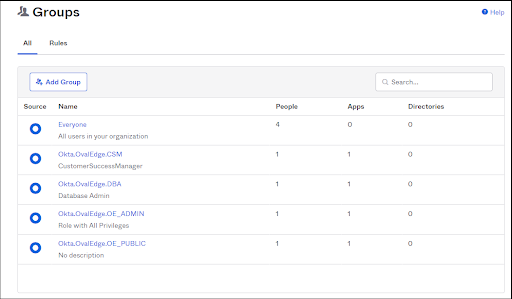
Note: When we are adding Groups in OKTA, Prefix must be added before group name.
- If the user is not assigned to any of the groups then the user will get OE_ PUBLIC role by default.
Role Management
The most preferred way of role management is to manage the user and roles management in OKTA. In OE Application create the following Manage roles by mapping to OKTA Groups.
For Example: Manage roles in OKTA group and OvalEdge application are given below:
| OKTA Group | OvalEdge Application |
| Okta.OvalEdge.CSM | CSM |
| Okta.OvalEdge.OE_ADMIN | OE_ADMIN |
| Okta.OvalEdge.OE_PUBLIC | OE_PUBLIC |
| Okta.OvalEdge.OE_XXXXX | OE_XXXXX |
| Okta.OvalEdge.OE_YYYYY | OE_YYYYY |
The only suffix will be created in the OvalEdge application.
Note: The permission of these roles will be managed in OvalEdge however user/ role management would be done in OKTA. You can use your own naming convention but you have to configure the same in OvalEdge.
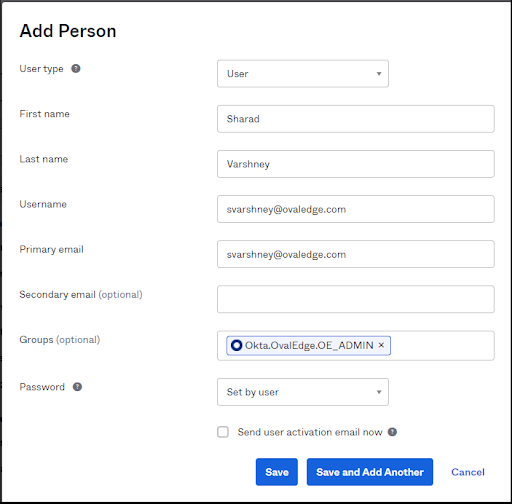
Adding people to the OKTA
We can add users by providing the following information:
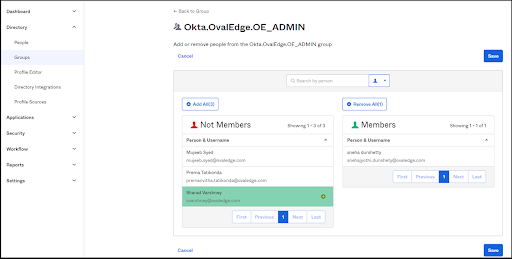
Assign the user to roles
Roles can be assigned to the users as shown below:
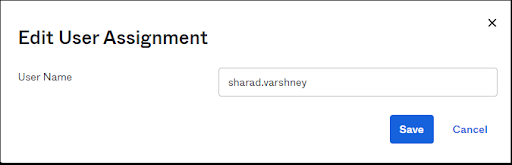
- The application username can be changed by the edit icon.
OvalEdge Configuration
A. On Windows
Open the oasis.properties file located under the Apache Tomcat’s webapps/ovaledge/WEB-INF/classes folder and edit the samlHTTPMetadataProvider, entityBaseURL (Web URL), related envs and save it.
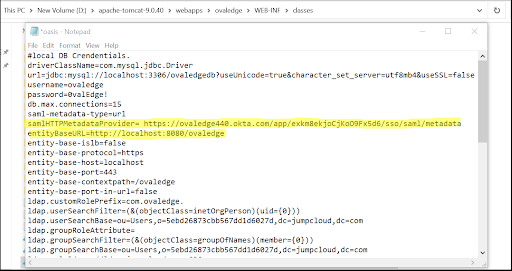
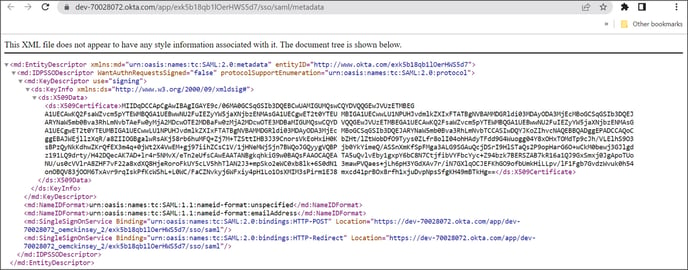
This would be fetched under the OKTA – Created Application’s Sign On Tab - Identity Provider Metadata URL.
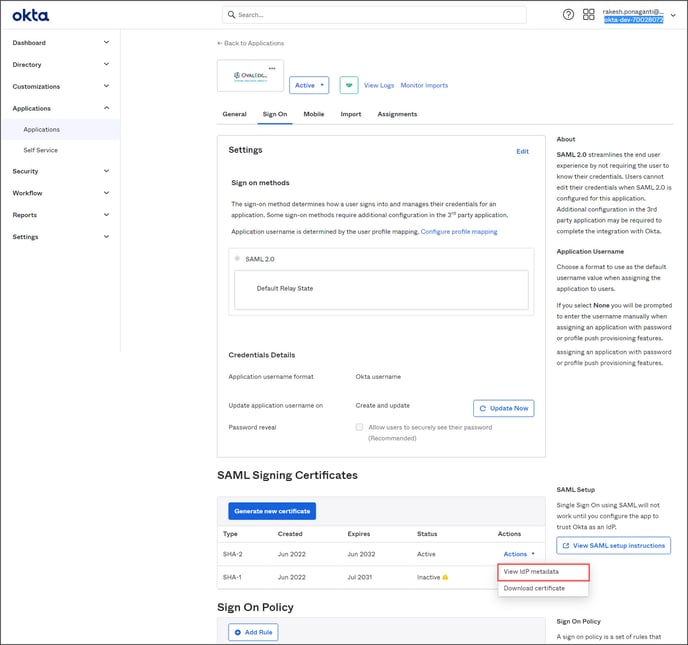 Click on View IdP metadata, and the XML file is displayed.
OVALEDGE_SECURITY_TYPE: Ovaledge Security Type needs to be of type saml
set CATALINA_OPTS="-DOVALEDGE_SECURITY_TYPE=saml"
Note: Configure setenv.bat file with this command in Apache tomcat bin
- Use setenv.bat (if doesn’t exist, create one) located under the bin folder of the tomcat to pass the security type as saml.

If configured with a service account:
Open Service’s properties, Under the Java tab, Add the following environment variable in the java options. Apply, save and restart the tomcat.
-DOVALEDGE_SECURITY_TYPE=saml

- Change the Security type to db mode if you don’t want to have SAML Authentication.
-DOVALEDGE_SECURITY_TYPE=db
B. On Linux
Open the oasis.properties file located under the Apache Tomcat’s webapps/ovaledge/WEB-INF/classes directory and edit the samlHTTPMetadataProvider, entityBaseURL (Web URL), related environments and save it.

- Use setenv.sh (if doesn’t exist, create one) located under bin directory of the tomcat to pass the security type as saml.

export CATALINA_OPTS="-DOVALEDGE_SECURITY_TYPE=saml"
- Start the Tomcat Server.
C. On Containerized Platform
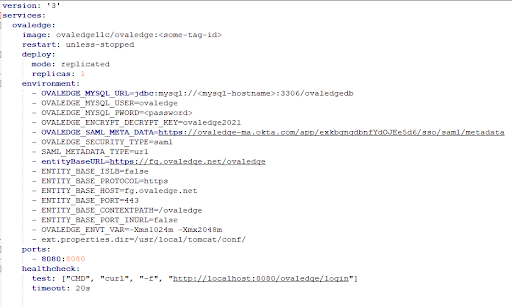
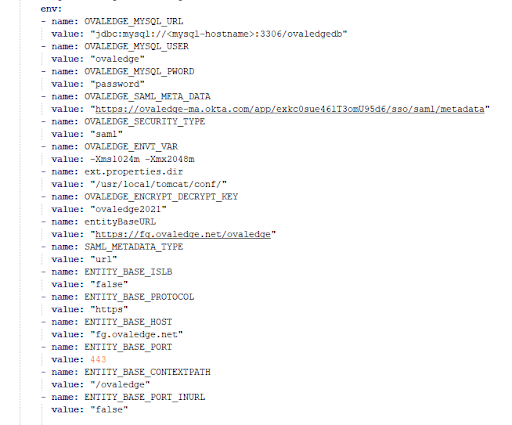
Pass the following Environmental Variables in YAML and run the Docker Container.
OVALEDGE_SAML_META_DATA= IdP Metadata URL

OVALEDGE_SECURITY_TYPE=saml  #keep db to switch into DB auth mode

SAML_METADATA_TYPE=url

entityBaseURL=https://fg.ovaledge.net/ovaledge #web URL to access the application

ENTITY_BASE_ISLB=false  #give true if ovaledge is having external load balancer DNS

ENTITY_BASE_PROTOCOL=https

ENTITY_BASE_HOST=fg.ovaledge.net

ENTITY_BASE_PORT=443

ENTITY_BASE_CONTEXTPATH=/ovaledge

ENTITY_BASE_PORT_INURL=false
D. On Orchestration Platform
Pass the following Environmental Variables in YAML and Create the Kubernetes Deployment.
OVALEDGE_SAML_META_DATA= IdP Metadata URL

OVALEDGE_SECURITY_TYPE=saml  #keep db to switch into DB auth mode

SAML_METADATA_TYPE=url

entityBaseURL=https://fg.ovaledge.net/ovaledge

ENTITY_BASE_ISLB=false  #give true if ovaledge is having external load balancer DNS

ENTITY_BASE_PROTOCOL=https

ENTITY_BASE_HOST=fg.ovaledge.net

ENTITY_BASE_PORT=443

ENTITY_BASE_CONTEXTPATH=/ovaledge

ENTITY_BASE_PORT_INURL=false
Helm Chart Update
- Take the Identity Provider metadata URL from the OKTA portal, refer the below screenshot
- Open the values.yaml file and add the following environment variables under dbdetails tag
- OVALEDGE_SAML_META_DATA: <IdP Metadata URL>
- OVALEDGE_SECURITY_TYPE: saml
- SAML_METADATA_TYPE: url
- entityBaseURL: https://<domain>
- ENTITY_BASE_ISLB: true
- ENTITY_BASE_PROTOCOL: https
- ENTITY_BASE_HOST: <domain>
- ENTITY_BASE_PORT: 443
- ENTITY_BASE_CONTEXTPATH: /
- ENTITY_BASE_PORT_INURL: false
- Save the values.yaml file and re-install the OvalEdge helm chart

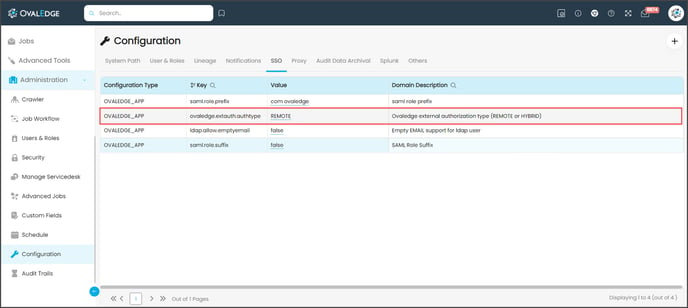
Testing the Roles with REMOTE and HYBRID SAML 2.0 Type
- With Hybrid, The Directory Users would get the role from the OvalEdge Application.
- With Remote, The Directory Users would get the role from OKTA.
For the first time, User logged in with Admin Role can go to Configuration and specify the Job Parameter.
OvalEdge SAML 2.0 Type as HYBRID
 Update them and Reload the Configuration.
New Users logged in with the domain would get the initial role as OE_PUBLIC, as the roles are coming in through the application.
For REMOTE SAML 2.0 Type
- Change the OvalEdge SAML 2.0 Type to REMOTE from HYBRID in the “Configuration” through the admin user and click on “Reload the Configuration”.
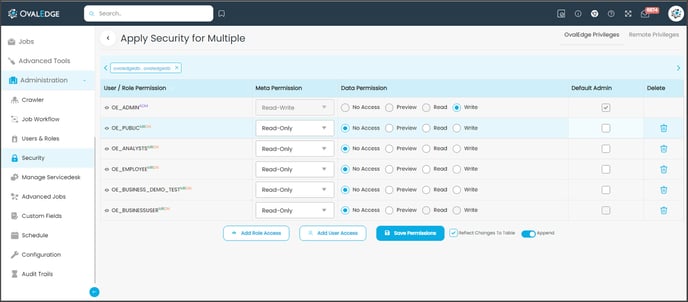
- Admin users can customize the Roles by clicking on Manage Roles under Security Tab.
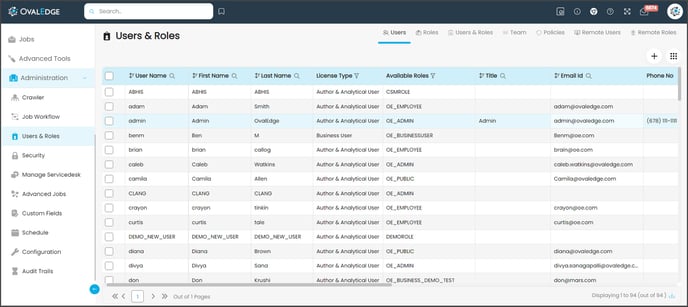
- After adding the roles, it would appear for logged in users in User Manager’s Users and Roles as shown below:
Now you have connected your OKTA with the Ovaledge application.
Copyright © 2019, OvalEdge LLC, Peachtree Corners GA USA