Overview
The Remote Data Access Management (RDAM) feature is introduced to access desired tables and reports from the remote systems. This article describes the process of connecting to a remote system through the OvalEdge application and adding a new connection to a data source and displaying the data on the OvalEdge dashboard.
- Using RDAM, users can provide access to remote systems from the OvalEdge. Here, the RDAM shows the access provided on each dataset to the user or role.
- OvalEdge can sync the access of datasets from remote with OvalEdge Access.
- The RDAM features allow the users to manage the data access security of Snowflake connectors from OvalEdge.
- Supports management of Users, Roles, Permissions, and Policies and helps synchronize and enforce them from the OvalEdge platform.
Additionally, using OvalEdge Remote Data Access Management, users can sync the access of datasets from the remote location. It supports the management of Users, Roles, and Permissions that helps synchronize and enforce them from the OvalEdge platform.
Snowflake Entity Privileges
The Snowflake is a role-based access privileges model having limitations corresponding to entity privileges and it consists of
- Objects: An object entity to which access can be provided. Unless privileges are provided, access will be denied.
- Role: A role entity to which privileges can be provided. Roles can be in turn, assigned to users.
- Privilege: It is a type of access to an object entity.
Snowflake Access Privilege Limitations
|
Object(s) |
Snowflake |
OvalEdge |
Access Privileges Description |
|
ACCOUNT |
Supported |
Not Supported |
Displaying the ACCOUNT privileges in Users & Roles Roles > Remote Roles tab in OvalEdge corresponding on roles. |
|
WAREHOUSE |
Supported |
Not Supported |
- |
|
DATABASES |
Supported |
Supported |
Database and its privileges can be fetched from Snowflake corresponding to roles and operate in the OvalEdge platform. |
|
SCHEMAS |
Supported |
Supported |
Schema and its privileges can be fetched from Snowflake corresponding to roles and operate in the OvalEdge platform. |
|
TABLES |
Supported |
Supported |
Tables and their privileges can be fetched from Snowflake corresponding to roles and operate in the OvalEdge platform. |
|
ROLES AND USERS |
Supported |
Supported |
Roles and Users can be fetched from Snowflake and operated in OvalEdge. Account privileges are made as roles privileges in OvalEdge. |
|
Tags |
Supported |
Not Supported |
OvalEdge does not fetch tags from Snowflake |
|
POLICIES |
Supported |
Supported |
Dynamic Data Masking and Row Access Policies are supported. |
|
STORED PROCEDURES & USER-DEFINED FUNCTION |
Supported |
Supported |
It can be only Fetched from Snowflake, but its privileges cannot be operated in OvalEdge |
RDAM Connectivity
RDAM provides different modes of access management. The flowcharts depicted below are for the OvalEdge RDAM with a Snowflake connector supported with role-based access.
1. Initial Sync (None)
The RDAM initial synchronization process pulls Users, Roles, and Masking Policies information from the Remote System (Snowflake) into the OvalEdge application on a schedule or on-demand basis.
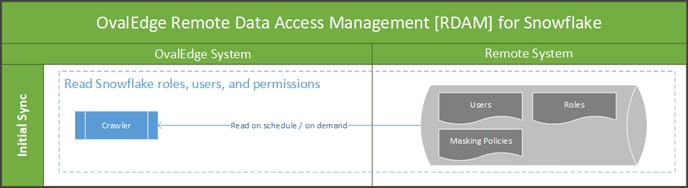 To achieve this, login to the OvalEdge application, CrawIer Setting page, and in the Remote Access tab, when the user selects the RDAM as 'None' option and crawls any schema, all the users, roles and their corresponding permissions existing in the remote source system are fetched and displayed in the OvalEdge's remote roles page under Users & Roles.
2. Remote is master
The RDAM' Remote is master' mode is used to govern data access in the OvalEdge application through remote system security.
- In this mode, access to remote system metadata and data in the OvalEdge platform is governed by the data access settings defined in the remote system. The changes in settings made are synchronized into the OvalEdge platform frequently or as per the defined schedule.
- If any of the Users, Roles, and Permissions are updated in the Remote System, then that information is automatically updated in the OvalEdge application on a schedule or on-demand basis. Here the OvalEdge application syncs the Users, Roles, and Permissions, from the Remote System into OvalEdge for the crawled Schema.
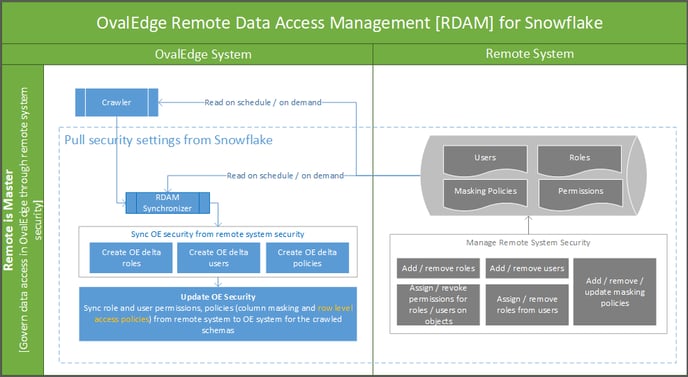 To achieve this, login to the OvalEdge application, CrawIer Setting page, and in the Remote Access tab, when the user selects a Remote system as the master option and crawls any schema, then all the users and roles available in remote source pertaining to that selected schema connection are displayed in the Remote Roles page.
- The user permission available on that Schema will also be reflected in the Users & Roles and Security screens when crawling. Users will be able to log in with that user's default password; if required, the user can change their password from the Users & Roles page.
Note: The Remote Permissions will be synced to the OvalEdge. - Once a user logs into the application, it displays the corresponding data catalog - schemas and tables based on the permission assigned from the OvalEdge based on permissions synced from the Remote system to OvalEdge.
- When the Remote is Master option is selected, the admin users cannot create, update or delete the Remote users or Remote roles from the OvalEdge application.
- When the Remote is Master option is selected, the admin users cannot add, update or delete any Remote users or Remote roles in the Security | Remote Privileges page of the crawled schemas/Tables.
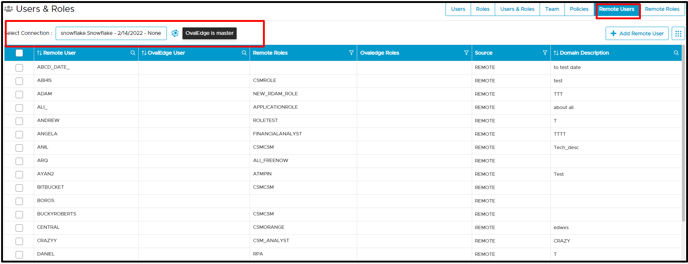
3. OvalEdge is master
The RDAM' OvalEdge is Master' process is used to govern data access on the Remote System using OvalEdge Security. At the time of crawling the user permission available on that schema will be reflected in the ‘Users & Roles’ and Security screen. Users will be able to log in with that user's default password, if required the user can change their password from the Users & Roles page.
Now, the new users and roles can be added, existing can be edited, or deleted within the OvalEdge and sync them to the Remote System. Here, the permissions of crawled schemas and tables can also be added, edited, deleted, and synced to the Remote system.
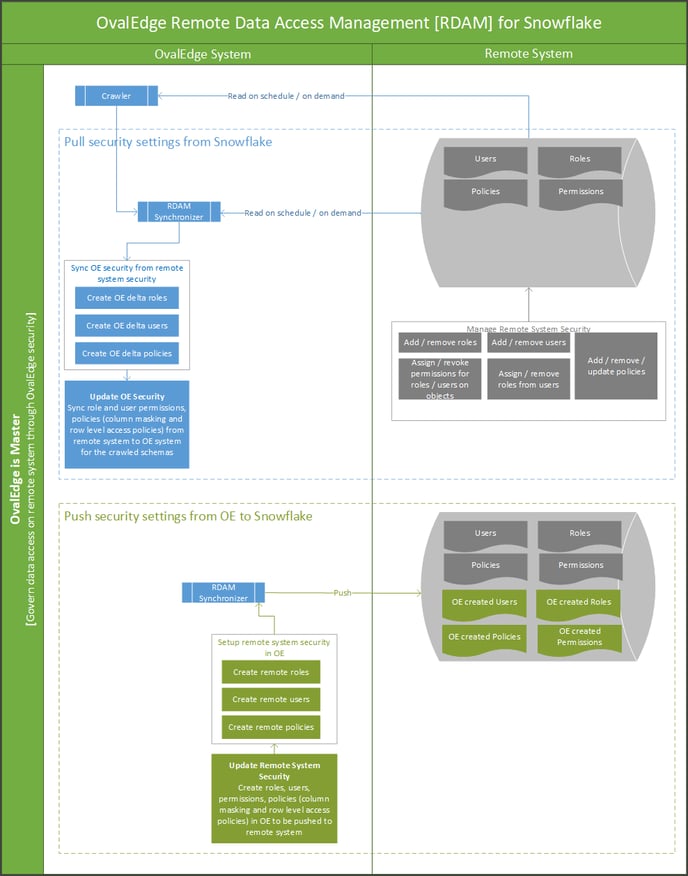 To achieve this, login to the OvalEdge application, CrawIer Setting page, and in the Remote Access tab, when the user selects a Remote system as the OvalEdge option and crawls any schema. The user can use the existing Users and Roles or create new Users and Roles and then assign them.
- When the OvalEdge is Master option is selected, we can create, update or delete the remote users and roles within the OvalEdge(under Users & Roles). This will immediately sync to the Remote Source System.
- Using the Remote Roles and Users, we can assign remote privileges to Schema and Table, which will be immediately synced to the Remote Source System.
Note: For all the three types of remote connection in the Crawler > Settings page, it is mandatory to select the check box of [Users, Roles, Policies, & Permission] to retrieve all users and roles with its policy and permission. Snowflake remote connector supports applying privileges and policy at role level only.
How to Setup RDAM Connectivity
Setup - Initial Sync (None)
By default, RDAM connection is set to "None"
- Navigate to Administration > Crawler > Crawler page.
- Select the RDAM connection (Snowflake) and click on the Settings button using the 9-dots option.
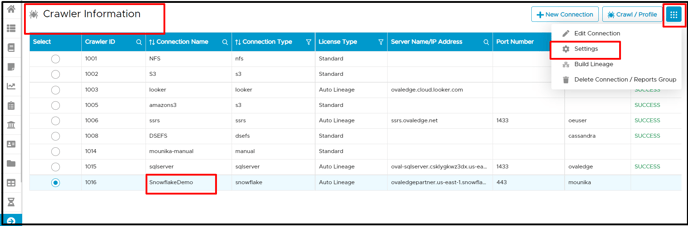
- In the crawler tab of the settings page, it is mandatory to select the check box of [Users, Roles, Policies, & Permission] to retrieve all users and roles with its policy and permission.

- Click on the Remote Access tab.
- In the Remote Data Access Management, the default option is set as "none".
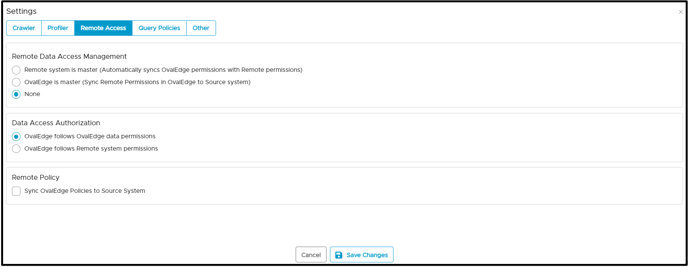
- Click on the Save Changes button to save the RDAM setting.
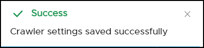
- The user needs to once again select the connection and click on the Crawl/Profile button.
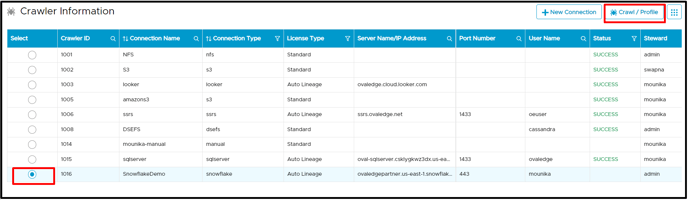
- Select the Schema and click on Crawl (or any other option).
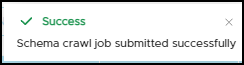
- Click on the Run button. When a user clicks on the run button, the crawl/profile process is completed, and then all the remote roles and remote users are displayed on the Users & Roles > Remote Users & Remote Roles page. Users can verify the same in job logs as well.
- Click on the Users & Roles Remote Users tab select a connection from the dropdown menu to view users from the remote connection along with the allowed roles.

- Similarly, click on the Remote Roles tab select a connection from the dropdown menu to view remote roles with their privileges, role type, and permissions.
Setup - Remote is a Master
To set up a connection when the remote system is a master,
- Navigate to Administration >Crawler > Crawler page.
- Click on the
button, a user may select a type of remote connection (for example, Snowflake) required from the pop-up window.
- Enter specific authentication credentials in relation to that data source.
- When the remote connection is established, select a snowflake connection and click on the Settings button using the 9-dots option.

- In the crawler tab of the settings page, it is mandatory to select the check box of [Users, Roles, Policies, & Permission] to retrieve all users and roles with their policy and permission.
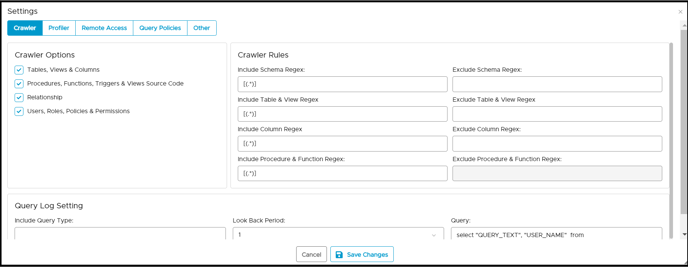
- Click on the Remote Access tab.
- In the Remote Data Access Management, select the "Remote system is master" option.
Note: Users may select the checkbox to sync the roles and users of the OvalEdge application and remote source.

- Click on the Save Changes button. Success notification of crawling setting saved and displayed.
- Now once again, select the connection click on the Crawl/Profile button.
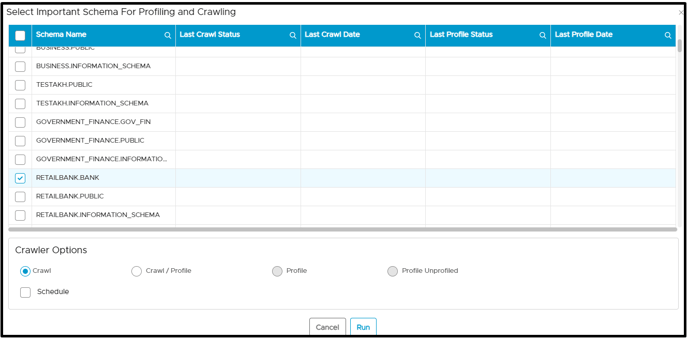
- Select the Schema and click on Crawl (or any other option)
- Click on the Run button. Now once again, select the connection click on Crawl/Profile. It gives a success alert.
Managing Users & Roles
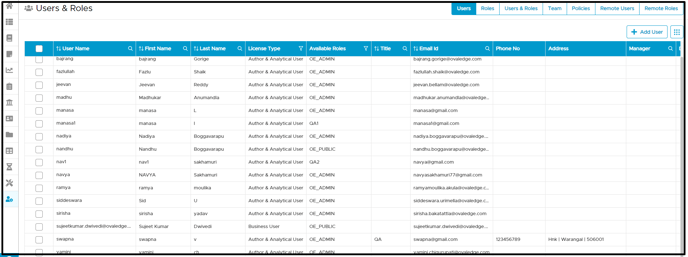
Users can navigate to User & Roles - Users Tab and Roles Tab to view the remote user and remote roles of that crawled Schema (Permitted Users & Roles on that Schema) along with OvalEdge users and OvalEdge roles.
Users tab
- The user who belongs to the remote connection can log in to the application with that user's default password; then the user can change it on the first login.
- Users tab displays the details of Login, First Name, Last Name, Title, Email Id, Phone, and Address. Any missed email id is represented with a dummy email ID.
- The user is given a License type as 'Author & Analytical User.' When the remote connection is synchronized, it is also possible that users get assigned to one more of the OvalEdge roles to that Schema or tables of that connection along with the remote privileged role.
For example, a QA role is assigned to John and Smith from a remote source. There is an HR role assigned to Alex from the remote source, but the user Alex already exists in the application with OvalEdge role OE_PUBLIC; therefore, Alex has roles of HR, OE_PUBLIC. This shows that Alex is synced with remote and has been updated with HR, OE_PUBLIC roles for users.
Roles tab
The roles added from the remote connection are displayed as it is assigned with the meta permission and data permission, and the User license type is Author & Analytical User.

For example, the TEST role is having Author & Analytic license with the read-write permissions and write default data permission.
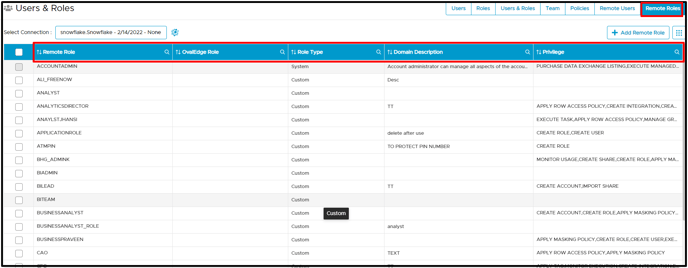
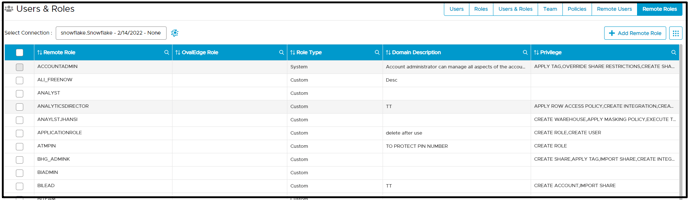
Remote Roles
Remote Roles display the newly created remote roles, Corresponding OvalEdge roles, Role Type, and permission available to users who have privileges on the Schema or table. The Add Remote Role button is disabled, and users cannot add remote roles.
For example, the remote role (ACCOUNTADMIN) has privileges to APPLY TAG, CREATE ROLE

System roles display the default role remote system and cannot be edited into OvalEdge
Note: User cannot perform following activities in Remote roles tab:
- Cannot Add Roles Access
- Cannot Delete Roles Access
- Cannot Change the Data Permissions
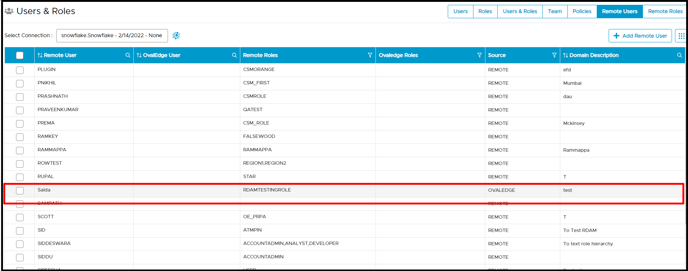
Remote Users
Remote Users display all remote users with associated remote roles, sources, and users who have permission and access to the Schema or table. Here, the Add Remote User button is disabled, and users cannot add remote users. For example, MAHESH is the remote user with the ACCOUNT ADMIN, OE ADMIN, and TAG_ADMIN allowed remote roles

Note: User cannot perform following activities in Remote users tab:
- Cannot Add Remote User
- Cannot Delete Remote User
- Cannot Update Remote user
- Cannot Change password
- Cannot Update Roles
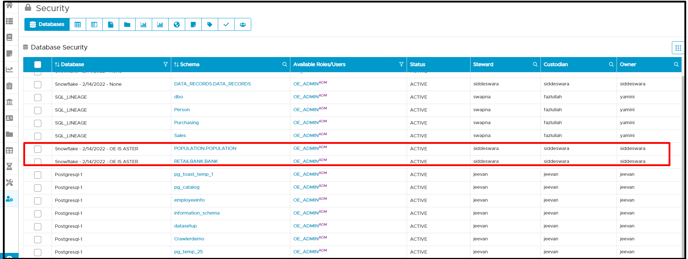
Managing Security
Generally, in the security page, the remote connection will inherit the permission set in the remote database. Users can click on the edit icon in the available roles. It will display the OvalEdge privileges for Users and Roles. Here, roles with their remote source schema and table permission and privileges are displayed.
OvalEdge Privileges
Users with OvalEdge privilege can perform the following actions:
- Add Role/User Access.
- Delete Role/User Access.
- Change the License type.
- Change the Metadata/Data Permissions.
- Apply default admin.

Remote Privileges
Users with remote privilege cannot perform the following actions:
- Add Role/User Access.
- Delete Role/User Access.
- Change the Data Permissions
 Setup - OvalEdge is a Master
To set up a connection when OvalEdge is a master,
- Navigate to Administration > Crawler page.
- Click on the
- Enter specific authentication credentials in relation to that data source.
- When the remote connection is established, select a snowflake connection, click on the Settings button using the 9-dots options.
- In the crawler tab of the settings page, it is mandatory to select the check box of [Users, Roles, Policies, & Permission] to retrieve all users and roles with its policy and permission.
- Click on the Remote Access tab.
- In the Remote Data Access Management, select the option as the 'OvalEdge is a master'.
- Click on the Save Changes button. Success notification of crawling setting saved and displayed
Managing Users & Roles
In the Users & Roles page, select a connection from the dropdown list, it will display the connection as 'OvalEdge is master'. Click on remote roles to view the remote users, roles, and source of that crawled connection. It fetches all remote roles in the OvalEdge application.
To add remote roles when the OvalEdge is master
- Navigate to Administration > Users & Roles.
- Click on the Remote Roles tab select the connection. Besides the connection, it displays the logo of
OvalEdge that confirms that OvalEdge is a master.
- Click on the +Add Remote Roles button enter all the necessary information in the form. For example, a new role called OE_DBA can be added with the possibility of privileges listed to choose from. The user can select one or more privileges to assign to the roles.
- Click on the Add Role button to create a new role. It displays the roles created showing the synchronization process with remote connection.
 Note:
Note:
- The user can click the edit icon to update or edit details of Remote Roles
- The user can click the edit icon to add more privileges or remove privileges applied.
- The user can click on 9-dots to delete remote roles when no longer required.
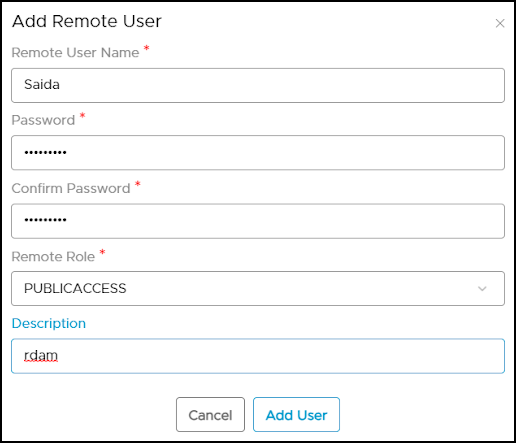
To add a remote user when OvalEdge is master
- Navigate to Administration > Users & Roles.
- Click on the Remote Users tab select the connection. Besides the connection, it displays the logo of
- Click on the +Add Remote User button to enter all the necessary information in the form. Click on the Add User button.
- Click on the Add User button, and the new remote user is being added to the remote connection.
Initially, it will show that sync icon that indicates the backend process of synchronization with remote connection policies and permission available on that Schema or table. When the syncing is failed, it alerts upon the sync's failure. Also, the source is displayed as Ovaledge.
Note:
- The user can click the edit icon to update or edit the details of Remote users.
- The user can click the edit icon to add or update remote roles.
- The user can click on 9-dots to change the password if required.
- The user can click on 9-dots to delete remote users when no longer required.
Managing Security
In the security page, by default meta permission will be Read-Only assigned to the user roles; however in the case of OvalEdge is a master, the user has OvalEdge privileges, remote privileges to assign on user or role permissions. It shows the object privileges of the roles that have permission on Schema; those roles are added.
Remote Privileges
In the Remote Privileges, the user can apply security of role access and permissions within the remote source only; it will not get to the OvalEdge privileges. Once the roles are added, they will sync to a remote source. Remote privileges added are not associated with the object in OvalEdge. When remote roles are added in the security module, it will sync to the source. In the Remote Privilege tab, roles having object privileges having permissions on the Schema are displayed.

- The user can click on the edit icon to add permission from the dropdown list or easily can remove the permissions which were applied before.
- The user can click on the delete icon to delete the permission assigned to the roles.
Data Access Authorisation
The new feature Remote Access (Data Access Authorization) is included in the crawler specific connector settings, so that users in OvalEdge can use their remote credentials to access/query the data in Querysheet, DataCatalog Queries, and Table Data instead of using Service Account credentials that are used at connection setup.
- OvalEdge follows OvalEdge data permissions: When this option is selected, the OvalEdge application uses the service account credentials to query the data in the Query Sheet page, Data Catalog > Table > Data page, and Data Catalog > Query page to fetch the required data.
- OvalEdge follows Remote system permissions: When this option is selected, then the users are prompted to enter their remote data source credentials in the Query Sheet page, Data Catalog > Table > Data page, and Data Catalog > Query page, and the submitted credentials are used to establish the connection to fetch the required data. Here, these credentials will be cached and cleared after 7 days of inactivity.
Example: When the Remote system permissions option is selected, and the user navigates to the Query Sheet or Data Catalog Queries and selects the Connection (Database), then the Enter User Credentials pop-up window with the Username and Password is displayed, where the user needs to provide the remote data source credentials for accessing the Database.
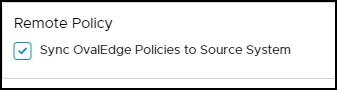
Remote Policy Management
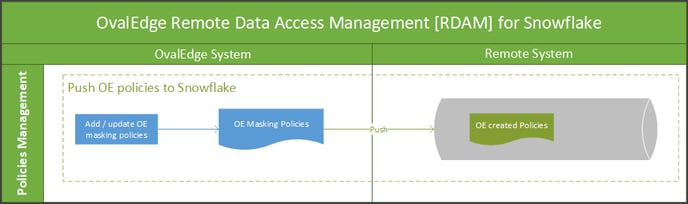 Sync OvalEdge policy with Remote: Users can select the check box to assign the OvalEdge policy with the remote. When this option is selected, this enables various predefined OvalEdge policy schemes to be applied on the remote connection.
There are five masking schemes defined and can be assigned to the table or column of remote connection.
- Mask Alphanumeric with xxxxxxxxx
- Mask AllChars with xxxx
- Show Last 4 characters
- Show First 4 characters
- Show Blank
Note:
- Typically for Snowflake remote connection, policy schemes for data types of remote objects such as TimeStamp and Number data type cannot be masked.
- Refer to how the column level security is enabled in the security module to know how to restrict and mask a column. If any failure or success on objects policies (Success /Failure and update and delete) are displayed in the Audit Trails.
- The allowed user roles are available only when a user chooses to restrict a column. Functionally, users choose to either Mask or Restrict the column data.
Object Tagging & Access History - Advanced Job
In the OvalEdge application, specific tasks are achieved using Advanced Jobs to get the desired results. The Advanced job feature enables the user to undertake tasks that cannot be accomplished using a traditional job.
For Snowflake, the following advanced jobs are created to sync Snowflake tagging and access history. Here these jobs are automatically executed based on the predefined schedule time intervals.
| Advanced Job | Type | Description |
| Object Tagging | OBJECT_TAGGING | This Job will sync Classification and Custom Fields defined on Snowflake objects in OvalEdge to Source System(Snowflake). A new Tag(if not exist) will be created and assigned Schemas, Tables, and Table Columns in Snowflake. |
| Object Access History | OBJECT_ACCESS_HISTORY | This job will sync object access history from Snowflake to the OvalEdge application. |
The below sample screenshot depicts the Advanced Jobs ‘Object Tagging’ and ‘Object Access History’ associated with the Snowflake.

Object Tagging
Tags are used to classify the data asset in the system. In the Snowflake, the tag created can be assigned in the form of a Key & Value pattern. The advanced job is created in OvalEdge to support the Snowflake tags.
The Object Tagging advanced job is accomplished using:
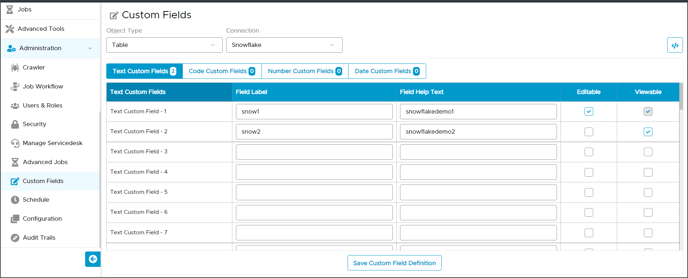
Custom Fields: Custom fields definition in OvalEdge is used to set up Tags of Snowflake. The Advanced Job will read all the custom field definitions of Snowflake Schemas, Tables, and Table Columns and create tags in the snowflake. Now, these tags will be set on Schemas, Tables, and Column using the custom field values.
For example, users can set up the tags using a custom field definition, as shown in the screenshot below.
Data Classification: It is used to classify the data asset at the column level and tag the objects. Here the system will read all the classified snowflake columns and it will create a tag in the snowflake with the classification name.
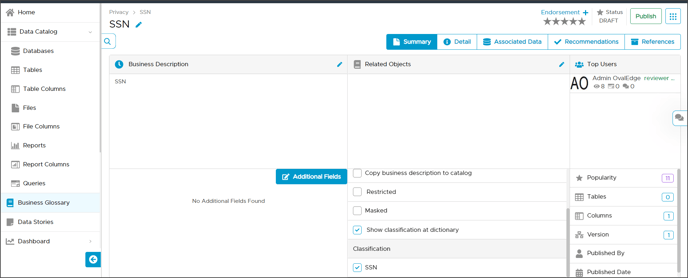
For example, Data classification is created with ‘SSN’ at the column level. Now the Advanced Job will create a Tag SSN in snowflake and assign this Tag to all snowflake columns for which this Tag is associated.
Object Access History
Object Access History is used to display the count from both systems (OvalEdge & Snowflake). The Object Access History advanced job is implemented to retrieve the User Query counts from Snowflake to OvalEdge. It will display the total count of the table on which the query is executed and whether it is from a source or remote system.
To view the count, the user can navigate to the OvalEdge Table’s summary page → Top Users.

On the Table Summary page, when the users click on the Top User link, the detailed page is displayed with the details of object access history. For example, for table ‘Ovaledgepartner,’ the user can see the total count is ‘20’.

Copyright © 2019, OvalEdge LLC, Peachtree Corners GA USA