Service Desk Templates
The Service Desk templates fulfill the dual role of generating Service Requests and delineating the format for each request. These templates are categorized into two groups: System templates and Custom templates. You can find all Service Desk templates showcased on the dedicated templates page. The different columns in the Service Desk Templates page are:

|
Field |
Description |
Sort |
Search |
Filter |
|
ID |
Template Id |
Yes |
No |
No |
|
Name |
Name of the template - System or Custom |
Yes |
Yes |
No |
|
Description |
Description of the template. Either System generated or custom-entered |
Yes |
Yes |
No |
|
Request Type |
Request Type of the template |
Yes |
Yes |
No |
|
Object Type |
Object Type of the template |
Yes |
Yes |
No |
|
Connector Type |
Connector Type of the template, if any |
No |
Yes |
No |
|
Connector Name |
Chosen connector name of the template, if any |
No |
Yes |
No |
|
Domain |
Chosen Domain Name of the template, if any |
Yes |
Yes |
No |
|
Template type |
System or Custom template |
No |
No |
Yes |
|
Approval Workflow |
Workflow that has been assigned to the template |
Yes |
Yes |
No |
|
Mapper |
External Integrations mapped to the template fields, if any |
No |
No |
No |
|
Status |
Whether the template is in Draft State or Published State |
Yes |
No |
Yes |
|
Activation |
Whether the template is Active or Inactive |
Yes |
No |
Yes |
|
Created By |
Displays the person who created the template |
Yes |
No |
Yes |
|
Created On |
Displays the time of creation of the template |
Yes |
No |
No |
|
Updated By |
Displays the person who last updated the template |
Yes |
No |
Yes |
|
Updated On |
Displays the last updated time of the template |
Yes |
No |
No |
Users with an Author License can view all the templates and perform sort functionalities on the Service Desk Templates page.
Adding details for External Integrations
On the Service Desk Templates page, details of external Integrations can be added/edited through the Integrations. Currently, OvalEdge supports three external integrations either for approval or for request tracking - JIRA, Service Now, and Azure DevOps.
In the absence of integration information, it is indicated beneath the selected Integration as "No Integration Info." Users have the option to click on "Add New Integration" to input the necessary details about the integration.
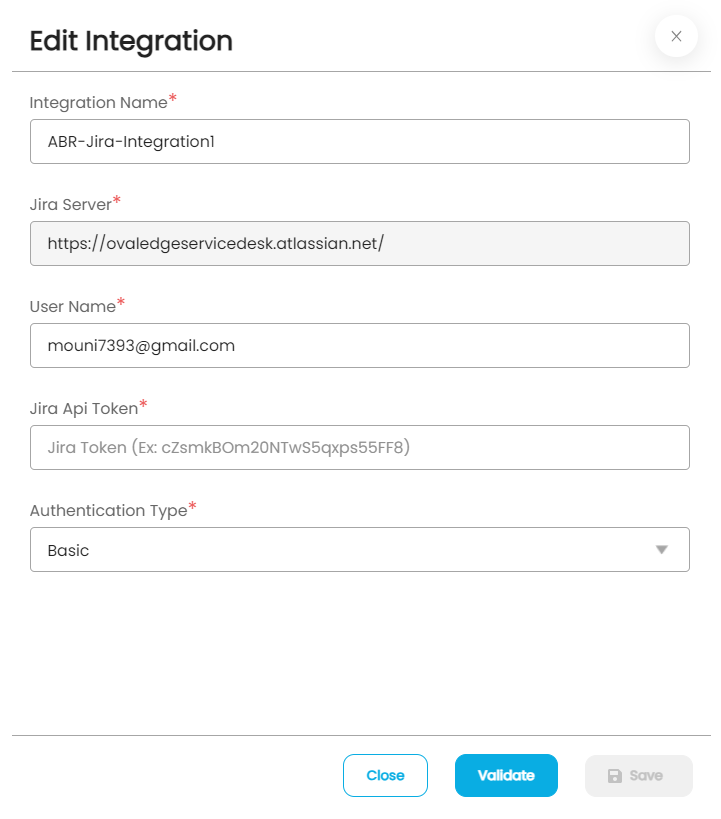
Adding/Editing JIRA Integration
Completion of the JIRA integration requires mandatory input for all specified details. The required fields for entry include:
-
- Integration Name
- JIRA Server
- User Name
- JIRA API token
- Authentication Type - Basic / Bearer
- Version - Cloud / On Premise>8.4
While editing the JIRA integration, everything other than the JIRA server can be edited.
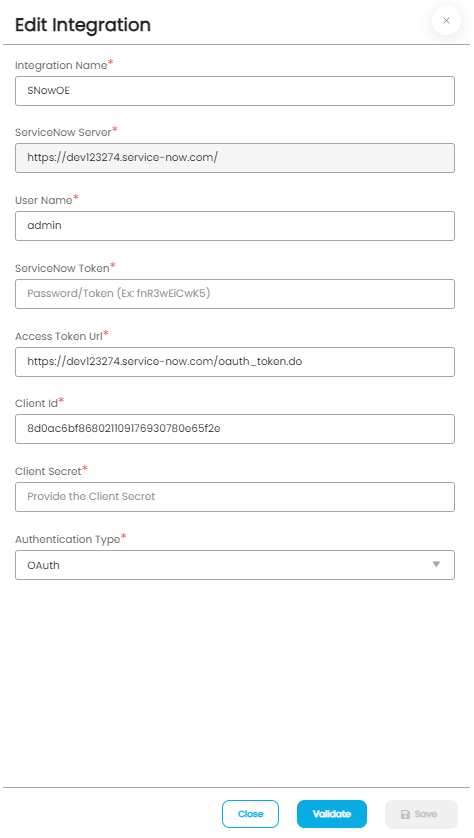
Adding/Editing ServiceNow Integration
Completing the ServiceNow integration necessitates the mandatory input of specific details. The requisite fields include
-
- Integration Name
- ServiceNow Server
- User Name
- ServiceNow token
- Authentication Type - Basic / Bearer / Oauth
While editing the ServiceNow integration, everything other than the ServiceNow server can be edited.
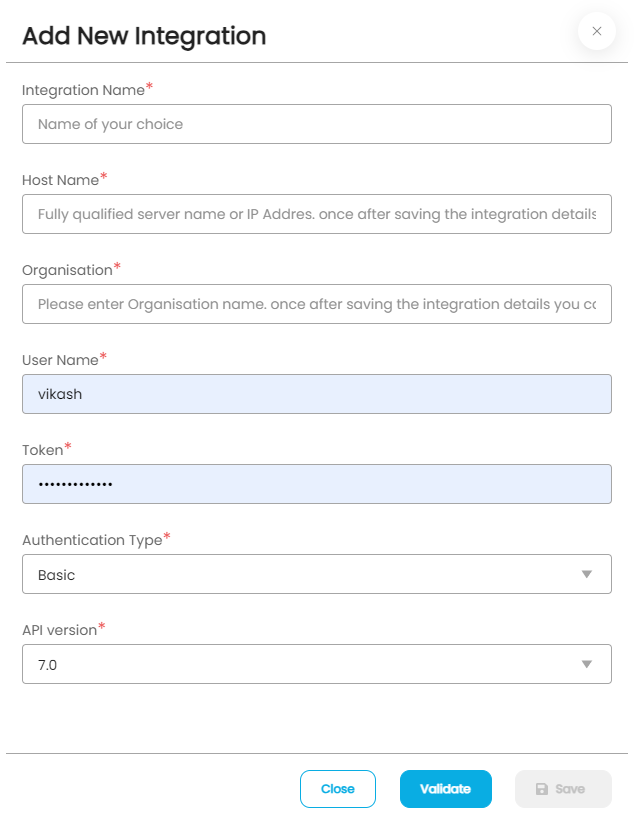
Adding/Editing Azure DevOps Integration
For the incorporation of Azure DevOps integration, it is essential to input mandatory details. The required fields for entry are
-
- Integration Name
- Host Name
- Organization
- User Name
- Token
- Authentication Type - Basic / Bearer
- API version - 7.0 / 7.0 preview / 6.0 / 6.0 preview / 7.1 preview
While editing the Azure DevOps integration, everything other than the Host Name and Organization can be edited.
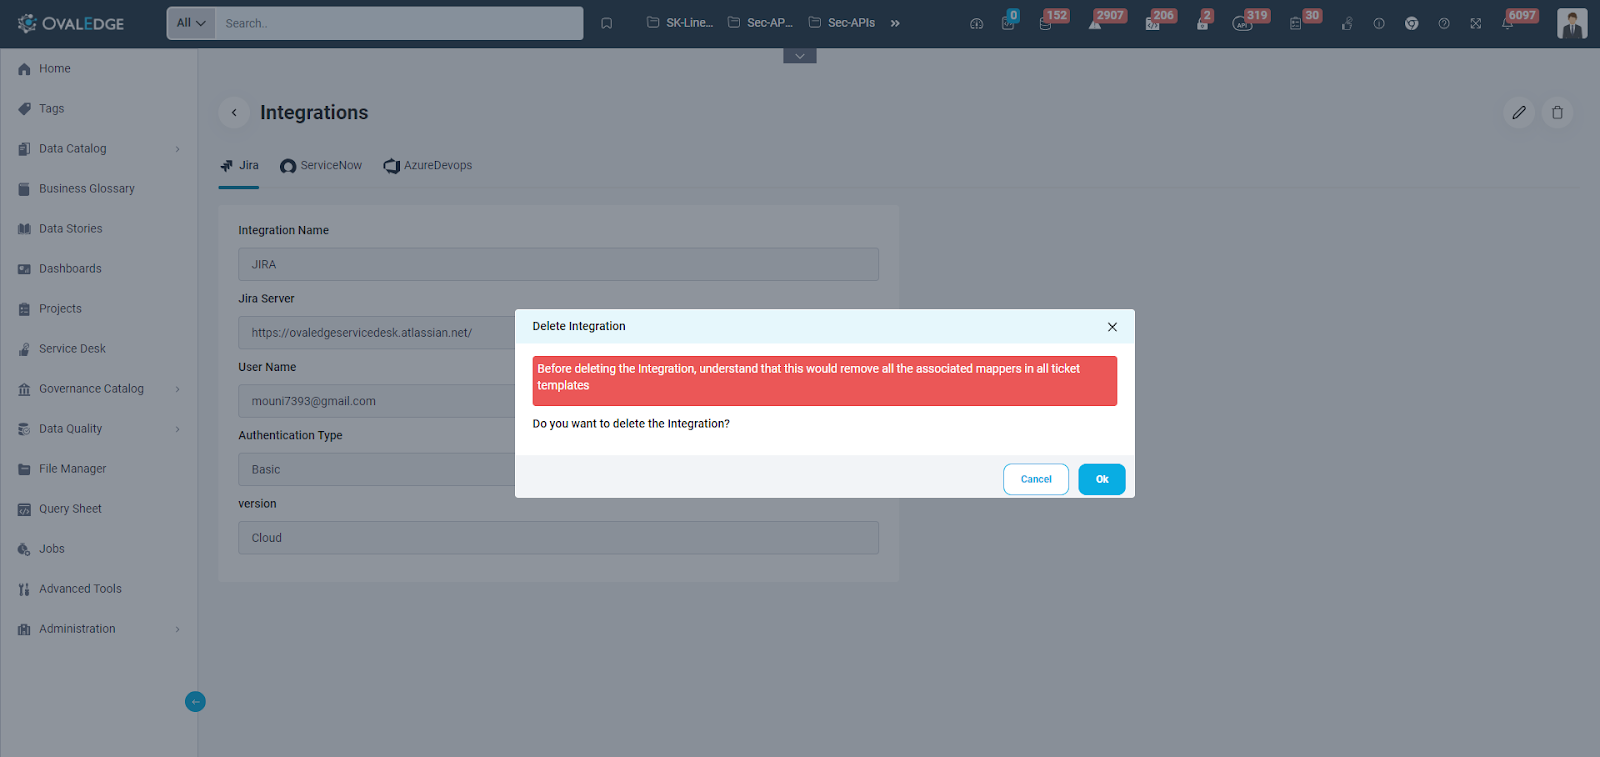
Deleting an Integration
When initiating the deletion of an Integration, an error message appears, requiring approval before proceeding with the deletion. Once the Integration is successfully removed, all associated mappers linked to the Integration will also be deleted. Subsequent reintegration mandates the mapping and configuration of integrations afresh for service desk templates.
System Templates
While all users with Author licenses can view Service Desk Templates, only System Admins, Connectors, or Domain Security Governance Admins (SGA) possess the authority to modify these templates. Other Author Licensed users are restricted from making direct changes to System Templates; however, they retain the capability to adjust Integrations, edit the Approval Workflow, and toggle the status between Inactive and Active. Additionally, System Templates can be cloned as Custom Templates, providing a foundation for customized requests.
Custom templates
System Admin users can create, modify, or remove Custom templates.
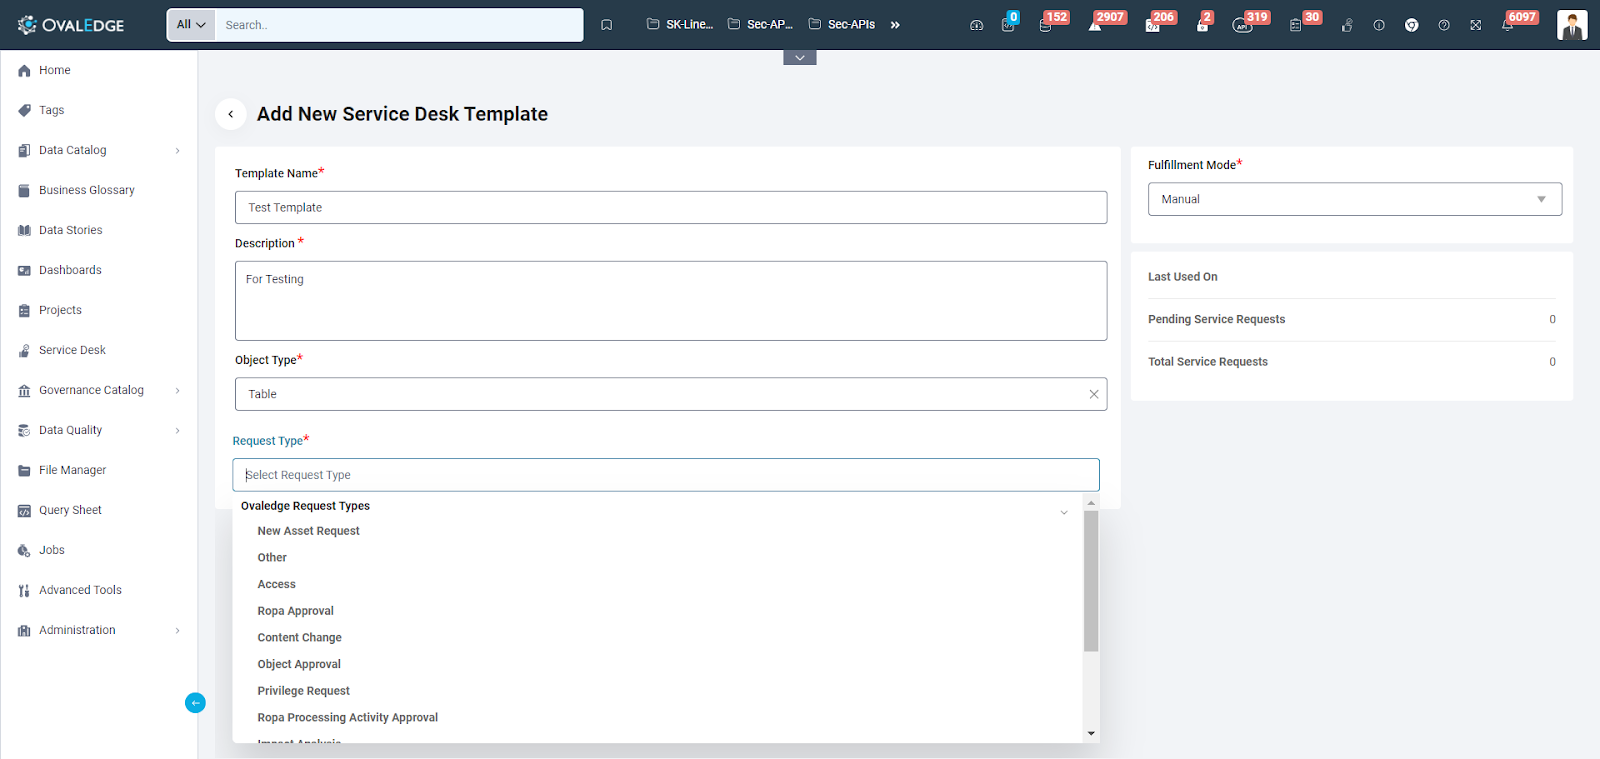
Creation of Custom Templates
When a user initiates the creation of a Custom template, the initial steps involve specifying the template name and description to provide context. Subsequently, the user must select the Object type for the template from a range of available options. These Object types include:
- Data Catalog
- Schema
- Table
- Table Column
- File
- File Folder
- File Column
- Report
- Report Column
- Code
- Governance Catalog
- Business Glossary Term
- Global Domain
- ROPA Report
- Other
- Project
- Tag
- License Type
- Role
- Team
- None
- The selection of the Object Type determines the context of the template. In cases where Object Type - None is chosen, this indicates the creation of Service Requests for Objects not associated with the predefined Object Types.

- Once the Object Type has been selected, the user can proceed to choose the Request Type for the Template. Among the available Request Types are the following options:
- New Asset Request
- Access
- ROPA Approval
- Content Change
- Object Approval
- Privilege Request
- ROPA Processing Activity Approval
- Impact Analysis
- Crawl/Profile
- Build Lineage
- Data Quality Issue
- Change Term Structure
- Other
- By specifying the Request Type, the user tailors the service desk template to a particular type of request. In cases where the Request Type - Other is chosen, it is used for crafting service requests with custom request types, offering flexibility for unique requirements.
- If the chosen Object type belongs to the Data Catalog category, the user is required to select a connector type following the request type. The ability to create templates for specific connectors is contingent on the user's permissions. System Admins possess the authority to create templates for all connectors. Once the connector type is chosen, the user proceeds to designate the connector name for the selected connector type.
Notes: The Connector Admin can generate custom templates for connectors over which they hold administrative privileges.
- In scenarios where a governance catalog type is selected, after the request type, the user is prompted to choose a Domain. Similar to the connector situation, the user's ability to create templates for specific Domains depends on their permissions, with System Admins having the capability to create templates for all Domains. Subsequently, the user specifies the Category, if applicable, and further refines the template by designating a Sub-category, if applicable.
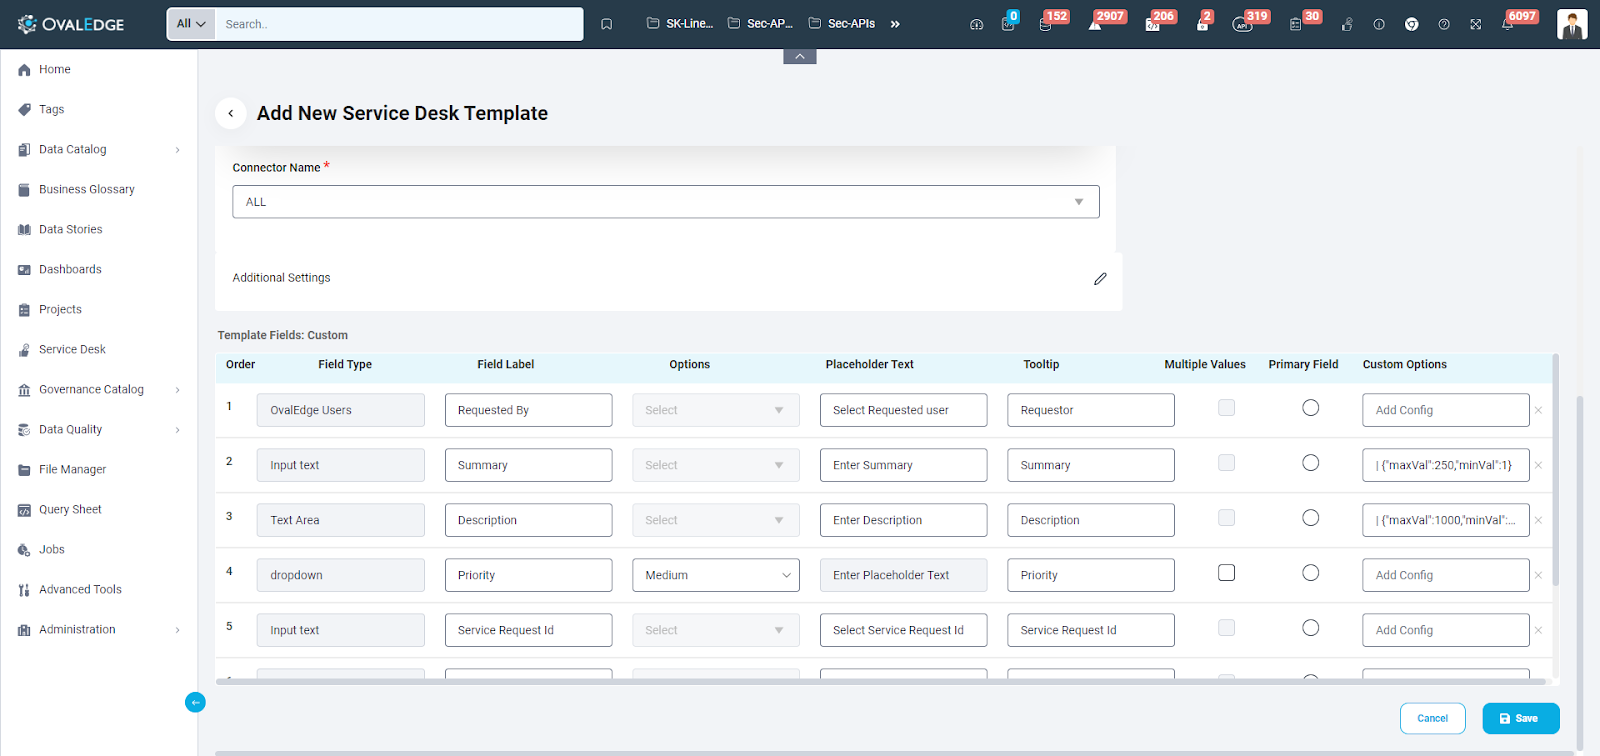
Template Fields
After entering the Connector or Domain details (in the case of Object Type - Others, after choosing request type), Additional Settings and template fields can be configured.
- The mandatory fields for any service request are:
- Requested By
- Summary
- Description
- Priority
- Service Request Id
- Service Request Link
- Selected object type as the primary field.
- All template fields have these details associated with them in the template:
|
Field |
Field Description |
|
Order |
Order refers to the sequence of the template field within the template. As previously mentioned, mandatory fields are presented in a predefined order. When introducing a new field, it will be assigned the next consecutive number in the sequence. |
|
Field type |
Multiple field types are available for choosing:
|
|
Field Label |
Users can modify the name or label of a field according to their preferences. |
|
Options |
Options become visible when the field type "Dropdown" or "Checkbox" is selected, allowing users to define choices within these fields. |
|
Placeholder Text |
Users can customize the placeholder text for all field types except "Dropdown" and "Checkbox," providing additional context or instructions. |
|
Tooltip |
Users can edit the tooltip description to offer additional guidance or information about a specific field. |
|
Multiple Values |
Enabling multiple values allows the user to select more than one value in the service request when applicable. |
|
Primary Field |
Only fields associated with Object types can be designated as primary fields. In the context of the Approval workflow, governance roles can be assigned as approvers based on the primary field. However, if an Object type such as Projects or tags, which lack governance roles, is chosen as the primary field, the default approver becomes OE_Admin. |
|
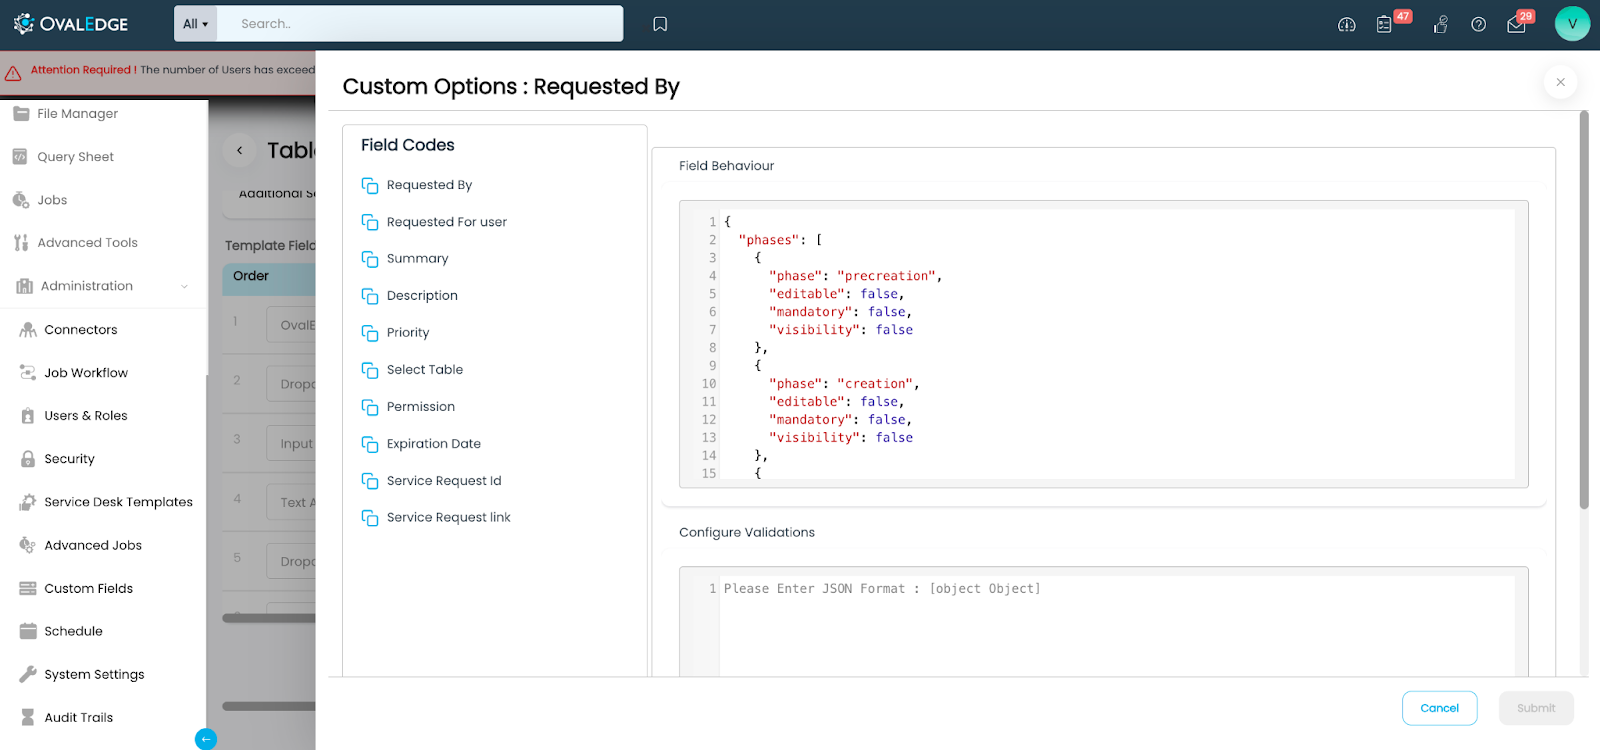
Custom Options |
Users can configure when a field type should appear during different phases of the Service Request cycle. This customization is achieved through the use of a JSON editor. The various phases in the Service Request cycle include:
|
It is important to note that mandatory fields cannot be customized, and as a result, the custom options cannot be altered. However, for newly added fields, users can configure custom options based on their specific requirements.
JSON editor of Custom options:
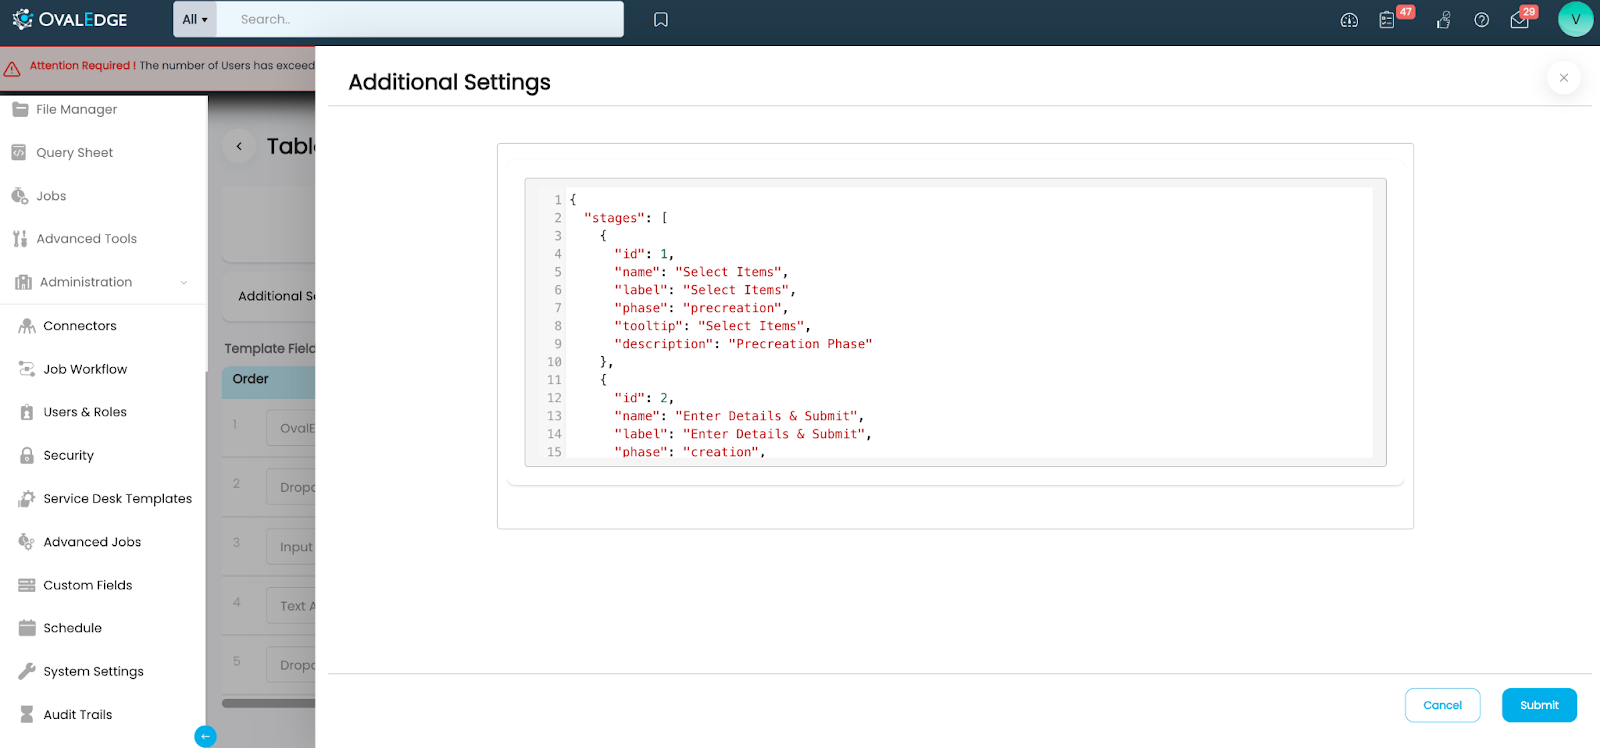
Additional Settings can be utilized to configure the heading and tooltip for each phase of a service request. These configurations can be edited through the JSON editor.
Note: Only the Label and tooltip can be changed through this configuration.
JSON editor of Additional Settings:
Fulfillment
There are two possible fulfillment methods for a Service request:
- Manual Fulfillment: In cases where a service request is set for manual fulfillment, the approver(s) are responsible for making the requested changes manually, as per the requestor's instructions.
- Automatic Fulfillment: Service Requests configured for automatic fulfillment will execute the requested changes automatically, without the need for human intervention. These automated fulfillment processes are logged as Job logs.
It is worth noting that the availability of fulfillment options for Automatic fulfillment depends on specific combinations of Request type and Object type. The relevant options from the Fulfillment Job details are presented in a dropdown menu based on the chosen Request Type and Object Type.
|
Automated Fulfillment |
|
|
Request Type |
Object Type |
|
1) New Asset Request 2) Access Request 3) Content Change 4) Object Approval 5) Privilege Request 6) Change Term Structure |
Data Catalog: 1) Schema 2) Table 3) Table Column 4) File 5) FileFolder 6) File Column 7) Report 8) Report Column 9) Code Others: 1) Project 2) Tag 3) License Type 4) Role 5) Team Governance Catalog: 1) Global Domain 2) Business Glossary 3) ROPA Report |
Bring Your Own Fulfillment (BYOF)
Automatic fulfillments refer to fulfillment options that are automatically generated by the system. However, System Admins can introduce custom fulfillment jobs to fulfill intricate and tailored requirements. Service Desk templates make use of an open framework that allows users to create their classes using OvalEdge's framework.
- To set up custom fulfillments, users must configure them for specific criteria such as request type, object type, connector type/domain type, and connector ID/domain id. Once custom fulfillments are added to the system, they can be accessed in the Fulfillment job details.
- It is important to note that system-generated fulfillment jobs do not support partial fulfillment at the approver level. If partial fulfillments are needed at the approver level, users must create their custom fulfillment jobs.
- For instance, consider a content change request for tables with four approvers. Using custom fulfillment jobs, specific changes can be made as each approver approves the request:
- When the first approver approves, the business description is modified.
- When the second approver approves, the technical description is updated.
- When the third approver approves, associated tags and terms are adjusted.
- When the final approver approves, custom fields are altered.
Integrations
External integration tools like JIRA, Service Now, and Azure DevOps can serve a dual purpose in the workflow. These integration tools can be approvers for service requests or be utilized to track these requests from OvalEdge within the respective external tool.
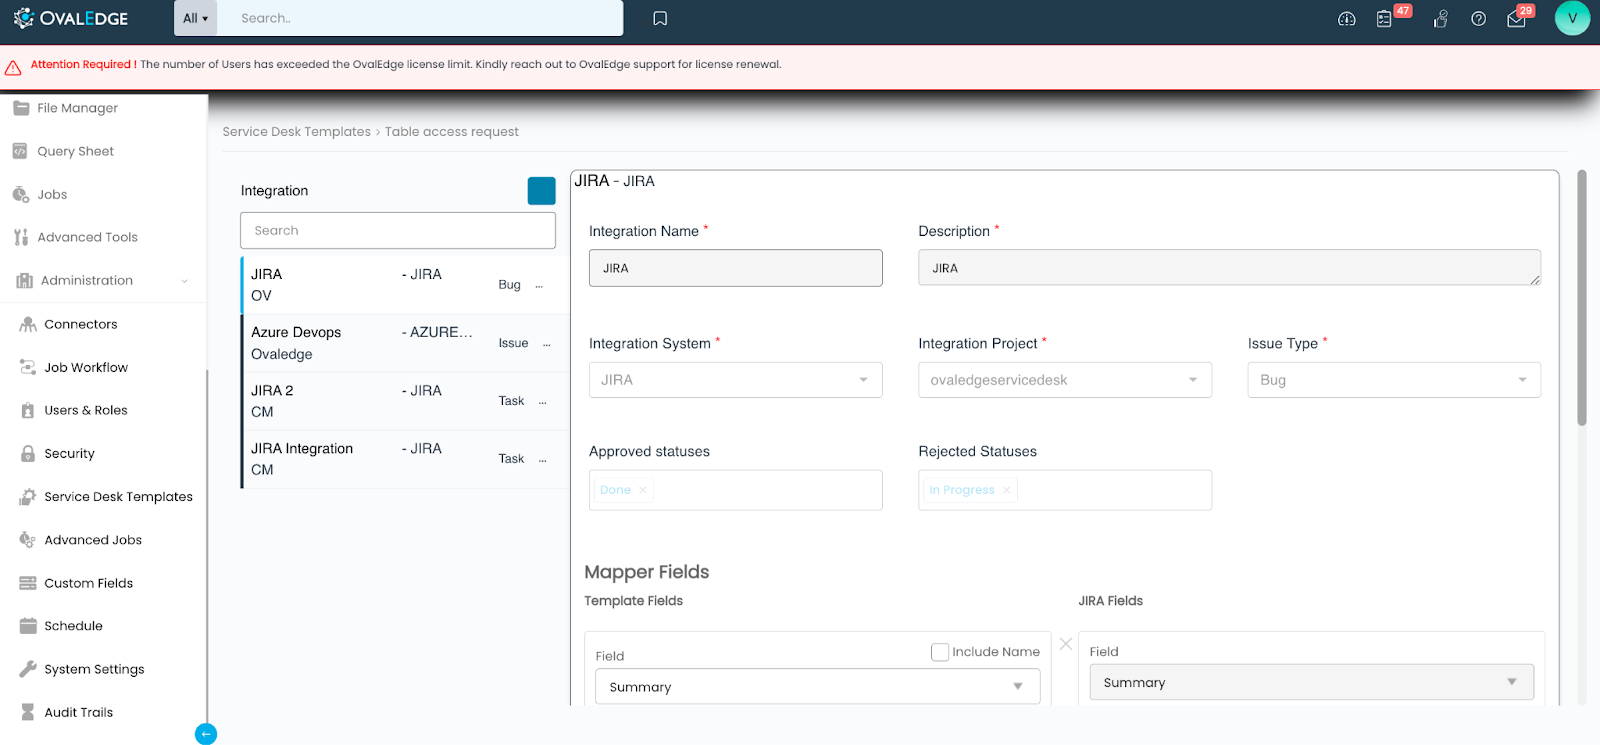
- When configuring an integration system, users have the flexibility to specify the type of issue that will be generated in the Integration tool. To add an integration to a template, certain mandatory fields must be addressed:
- Integration Name
- Description
- Integration System
- Integration Project
- Issue type
- In cases where Integration is used as an approver, users need to map the Approved Status and Reject Status from the Integration tool to OvalEdge. For instance, if JIRA is chosen as the Integration System, the Approved status can be mapped as "Done," and the Rejected Status can be mapped as "In Progress" or "On-Hold." It is crucial to note that the status entered here is case-sensitive and must exactly match the wording used in the External Integration tool.
- After establishing these particulars, Template fields within the service desk template can be linked to the corresponding fields in the Integration tool. For example, if JIRA is selected as the Integration System, the Template Field "Summary" can be mapped to the JIRA field with the same name. This means that the Summary entered in the Service request will generate a ticket in JIRA with an identical Summary. A ticket is created in the External tool when the service request enters the approval stage and the Approve is the External Integration tool.
- Integrations can be configured for System templates as well.
A sample Integration configuration:
Workflow
Workflows at Service Desk Template
Workflows designate approvers for a service desk template. Every service desk template offers the choice of either creating a new workflow or employing an existing one to approve Service Requests.
- When opting for a new workflow, it is necessary to create one by providing a name and description for the workflow before proceeding to select the actors for approving the request. When a new workflow is created at the template level, the Scope of the workflow can only be Template.
- After selecting the scope, users have to enter the description, which is mandatory. After entering the description, users have to add actors to the workflow. If the user wants only one Actor for the workflow, they can enter details in the “Final Action By” field. If users want multiple actors in the workflow, they can add multiple actions with multiple actors.
- The user has to choose an Action from the dropdown and the corresponding Status is auto-filled. The available Actions and the corresponding Statuses are:
- Analyze, Analyzed
- Approve in Azure DevOps, Approved in Azure DevOps
- Approve in JIRA, Approved in JIRA
- Approve in ServiceNow, Approved in ServiceNow
- Check Authorization, Authorized
- Check Feasibility, Feasibility Checked
- Check Permission, Has Permissions
- Discuss, Discussed
- Final Approval, Final Approved
- Give Feedback, Feedback Given
- Review, Reviewed
- Schedule, Scheduled
- Test, Tested
- Validate, Validated
- Verify, Verified
- After the Action is chosen, the Actor has to be chosen. The types of actors that can be added are:
- Roles
- Teams
- External Integrations
- User
- Governance Roles
- User Data Control Manager
- User Data Governance Manager
- User Manager
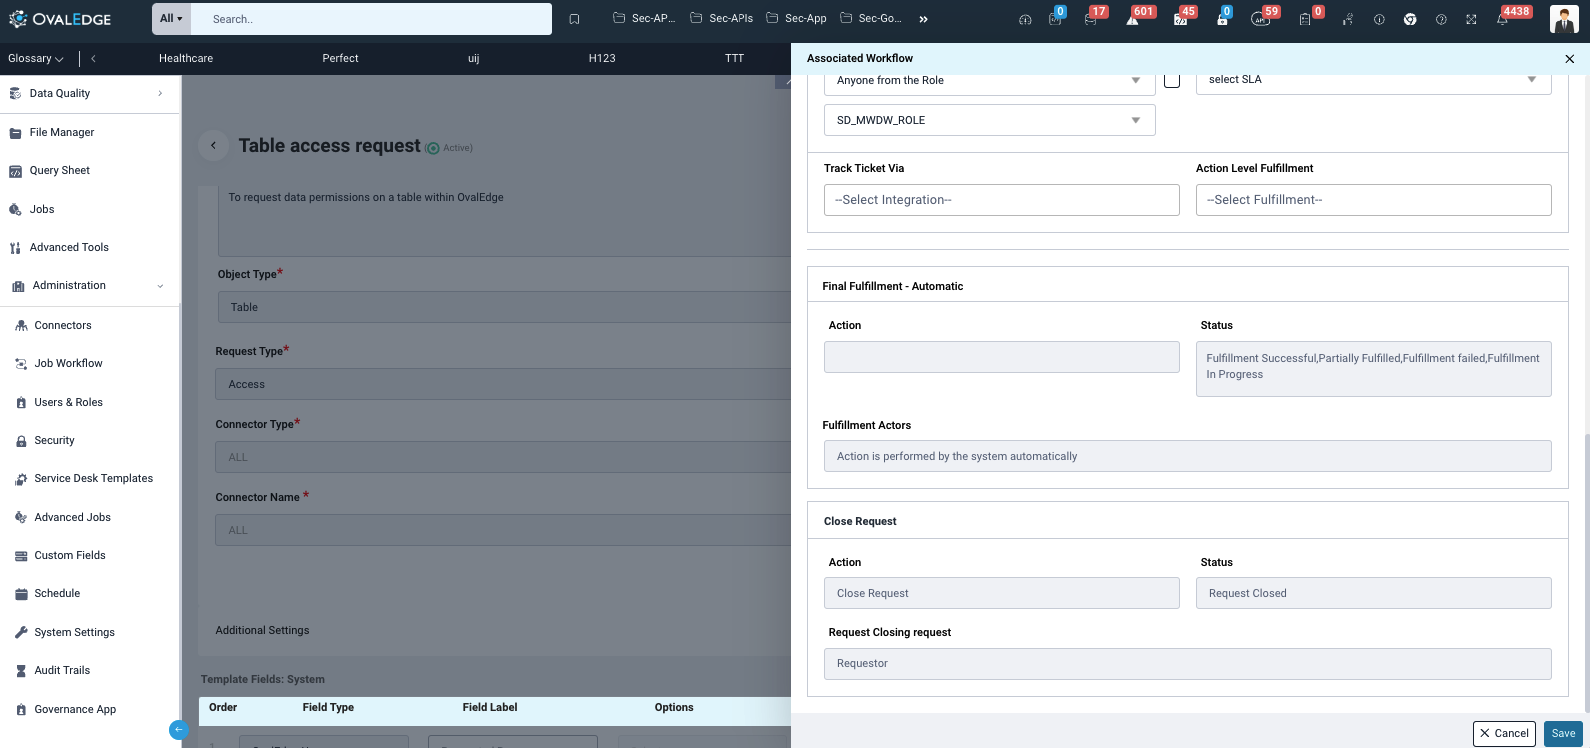
- Once an actor has been designated, it becomes possible to configure a Service Level Agreement (SLA) for that actor. Including an SLA is an optional step; if selected, the actor will receive notifications in case the SLA's specified timeline is breached.
- If there is a need to monitor a service request via an External Integration tool, users have the option to select the Integration type from a Dropdown menu.
- Furthermore, it is worth noting that a request can also undergo auto-fulfillment at an Approver level, provided that the request type and object type combination permits auto-fulfillment. This can be done by choosing the Fulfillment option at the “Action level Fulfillment” dropdown. For instance, if a workflow involves three actors and auto-fulfillment is designated for the second actor, the requested changes from the requestor will be executed after approval by the second actor, regardless of the third approver's action.
- After all the Actions/Actors in the workflow, users can view the Fulfillment, Close Request’s Action, Status, and the Actors for the corresponding stages. If the Fulfillment chosen was Automatic for the template, there is no action but only Status displayed. If the Fulfillment chosen was Manual, there are two Actions and corresponding statutes for those Actions. The Final Fulfillment and Close Request information is available only for information purposes in the workflow. It cannot be edited and it will not be viewable in Workflow in the Security module.
- The process of workflow in a service request is clearly explained in the document: Deep Dive - Service Desk
- Typically, a service request remains open until it garners approval from all designated actors. However, if the admin supersede feature is activated in the System Settings, a service request can be closed upon approval from the System Admin, bypassing the need for approval from all other approvers.
- It is important to note that the admin supersede feature does not apply if one of the actors in the workflow is an external integration tool. The supersede will work for all other actors other than the external integration actor.
- If an existing workflow is selected, the user has the option to utilize the workflow without alterations or make revisions to it and subsequently save the modified workflow. It's important to keep in mind that any modifications made to the details of an existing workflow will have a universal impact, affecting all templates that are associated with the chosen workflow. Only workflows with Scope as “Template” can be modified. Workflows with Scope “Global” cannot be modified at the template level.
Accessing Workflow from Security
Details of all Workflows can be found in Security. Author Licensed users can view all the Workflows but cannot create/edit/delete them. Only the System Admin users or Connector/Domain SGA users can create/edit/delete Workflows.
- The different columns in the Workflow page are
-
- ID
- Approval Workflow
- Description
- Scope
- Template Type
- Service Request templates count
- Created By
- Created On
- Updated By
- Updated On
- Users cannot edit Workflows with scope as Template and can only view them from this page. Only workflows with scope as Global can be edited from this page.
- Even though Template scope workflows can be viewed, details such as Fulfillment, Close Request, and External integration information cannot be viewed from this page. Those can only be accessed at the Template level.
- When users create Workflows from this page, it can only have the scope “Global”. Workflows can only be deleted from this page. System Workflows cannot be deleted and Custom workflows that are associated with any template cannot be deleted as well.
- Workflows can be configured for System templates as well. After a Workflow is added, it can be edited or changed at any time by the users who have permissions. Workflows can be changed even if the template is in an Active state.
A sample workflow:

Editing/ Deleting Templates
Status of Template
For Custom templates that are created from scratch, once all the required details have been incorporated into the template, it becomes feasible to transition the template's status from "Draft" to "Published." In the "Published" state, the template becomes immutable, except for the capacity to modify Integrations or Approval Workflow.
- It is essential to note that only templates in the "Published" state are eligible to be moved into the "Active" state. If a template shares identical components, such as Request Type, Object Type, and Connector/Domain type, with another template that is already in the "Active" state, it cannot be converted into an "Active" template.
- Additionally, once a service request is generated using a custom template, that template is barred from reverting to the "Draft" state or being deleted.
System Settings
- Key: servicedesk.template.fields.limit
Specify the maximum number of fields that a service desk template can have. The default value is 20 and the maximum value that can be entered is 50.
- Key: servicedesk.template.approvalworkflow.limit
Specify the maximum number of actors in the workflow for a service desk template. The default value is 10 and the maximum value is 20.
- Key: servicedesk.approvalworkflow.team.role.limit
Specify the maximum number of users in the team/role to approve the request if all users. The default value is 5 and the maximum value is 20.