Service Desk Templates is a centralized place to create and configure service request templates. You can create new custom templates by adding a set of fields, steps, and stages to log new service requests and improve workflow.
- To create multiple custom templates.
- To configure workflow (configured approvers) can be configured for the created template.
- Integrate a Template with external Jira/ServiceNow tools to centralize the request management for easy managing and tracking of the status of all requests raised from the application.
Walk Through to Service Desk Template Interface:

|
Service Desk Templates Grid |
Description |
|
|
To integrate service request templates with Jira/ServiceNow Tools. |
|
|
To add a new Service Request Template. |
|
|
Nine dots icon to delete selected custom Templates. |
|
Id |
Displays the Service Request Template Id. |
|
Name |
Displays the name of the Template. |
|
Domain Description |
Displays the Domain Description defined in the Template. |
|
Request Type |
Displays whether the request is for Access/ Content Change / Report Data Quality issue or others. |
|
Object Name |
Displays the Object Type for which the Template is created |
|
Connection Type |
Displays the connection type. |
|
Connection Name |
Displays the name of the connection. |
|
Global Domain |
Displays whether Global connection is selected or not. |
|
Template Type |
Displays whether the Service Request Template is System or Custom defined. |
|
Approval Workflow Type |
Displays the service request type. |
|
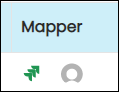
Mapper |
Displays the Jira/ServiceNow integrations. To map the custom fields of the Service Request Template with the Jira/ ServiceNow custom fields. The green highlighting displays on Jira or ServiceNow icons represent that the template is synched with the Jira/ServiceNow tool. |
|
Status |
Displays the status of the Template, whether Published or Draft. However, by default, the system-defined template will be in ‘Published’ status and cannot be changed to Draft status. |
|
Activation |
Displays whether the Approval is in Active or Inactive status. The custom or system template can be in an ‘Inactive’ mode whenever it is no longer necessary and needs to hide from the list. |
|
Created By |
Displays the name of the user who created the Template. |
|
Created On |
Displays the Date & Time on which the template was created. |
|
Updated by |
Displays the name of the user who made recent changes to the template. |
|
Updated on |
Displays the Date & Time on which the last changes were made. |

Below are the different types of System-defined Service Request Types
|
Request Type |
Data Objects |
Description |
Default Approver |
|---|---|---|---|
|
Access |
Schema/Tables/Reports/ Global Domain. |
To request access permissions on data objects |
Owner |
|
Content Change |
Table/ Table Column/ File / Report/ Business Glossary objects. |
To request edit permissions on metadata of the data objects |
Steward |
|
Data Quality |
Table / Table Column / File / File Column/ Report / Business Glossary/URL/ Query. |
To notify configured approver to verify the data quality of a data object |
Steward |
|
Crawl / Profile |
New or existing database/ new schema in an existing database |
To request configured approver to crawl or profile a database. |
Steward |
|
New Asset Request |
Table/ Table Column / Report /Business Glossary at the data source. |
To request the configured approver to create a new data object like a Table or Table Column at the data source. |
Owner |
|
Build Lineage |
Lineage between different data objects. |
To request configured approvers to build a Lineage between the objects. |
Steward |
|
External Access |
External applications. |
To request the configured approver for access permissions on external (on-cloud) applications. |
Owner |
|
Others |
Tables / Table Column / Files/ Report / Business Glossary / Project. |
To notify configured approvers of any additional changes required on the data objects. |
Steward |
|
External |
|||
|
RDAM OracleAccess |
Owner |
Tables |
RDAM OracleAccess |
|
Snowflake Access |
Owner |
Tables |
Snowflake Access |
|
Custom-Defined Templates - Multiple custom-defined service request templates can be created based on the requirement. |
|||
Creating a new Custom Template
- Go to Administration > Service Desk templates
- A + icon is enabled in the top right to add a new Service Request Template.
- Click the +icon, and the Add New Service Request Template window is displayed.
- Requested By (for all templates ) and Requested For (only for access request templates) are enabled. Requested By: To enter the user name who is raising the request. Requested By: to raise a request on behalf of other users.
- Request Type: Select the Request Type from the drop-down options displaying the different Request Types.
- Fulfillment Mode: Select the Fulfillment Mode as Manual or Automated.
- Select Object Type: Select the Object Type from the drop-down list containing Data Catalog and Governance Catalog objects (Data Catalog Table/File/Business Glossary).
- Connection Type: Select the Connection Type from the drop-down options.
- Connection Name: Select the Connection Name from the drop-down options.
- Name: Enter the Template Name in the field provided.
Note: A service request template name must be unique. - Description: Provide additional details about the Template.
- Fields and Field Types: The Request By, Summary, Description, and Priority are the default fields - enter the details in respective fields. Click the +Add button enabled in the bottom left helps to add more additional fields to the template as per your requirement. The different Fields Types you can include in the template are explained in the table below.
- Click on the Save button, and the Template gets saved and added to the Template Fields Custom data grid. The grid displays the system-defined and custom-defined Templates in a list.

Adding Fields to the Template
|
Field |
Description |
|
Order |
Displays the order of the field |
|
Field Type |
Displays the Type of field. Multiple Field Types can be selected from the dropdown list.
Note: A minimum of 3 fields and a maximum of 20 fields are required to create a new custom template. |
|
Field Label |
Displays the name or title given to the field. |
|
Options |
Displays options ( if any exist) for the selected field type |
|
Default Option |
Set selected options as default values. |
|
Placeholder Text |
Enter the details in the field provided. |
|
Tooltip |
Users can define the tooltip content for the selected field type. |
|
Allow Multiple values |
Select Allow Multiple Values checkbox to add multiple values to the field. |
|
Is Mandatory |
Select the checkbox to make the selected field type mandatory for the users to raise the service request |
|
Field Visibility |
It can be set at three levels: Creation / Approval/ Creation & Approval.
|
The following are the different types of fields you can add to the template. The field options have dependencies, based on the selected data object (Table, File, Report) the drop-down options are displayed.
| Field Type | Description |
|
Additional Fields |
Select to add more fields to the template. |
|
Business Description |
Select to add a Business Description field to the template. |
|
Business Glossary |
Select to add a Business Glossary (Term) field to the template. |
|
Checkbox |
Select to add a list of options enabled with checkboxes. You can set a selected option as Default Value. |
|
Database |
Select to add a Database to the template. |
|
Dates |
Select to add a list of date options enabled with checkboxes. You can set a selected option as Default Value. |
|
Dropdown |
For the Dropdown field type, the options for API, Custom List, Database, and JSON are customizable and can be fetched to display in the drop-down options. You can set a selected option as Default Value. |
|
File |
Select to add a File to the template. |
|
File Column |
Select to add a File Column to the template. |
|
File Folder |
Select to add a File Folder to the template. |
|
Global Domain |
Select to add the Global Domain field to the template. |
|
Input Text |
Select to add a list of options enabled with checkboxes. You can set a selected option as Default Value. |
|
New Business Glossary Name |
Select to add New Business Glossary Name to the template. |
|
New Report Name |
Select to add a New Report Name to the template. |
|
New Table Column Name |
Select to add a New Table Column Name to the template. |
|
New URL |
Select to add a URL to the template. |
|
OvalEdge Author & Analytical Roles |
It displays all the users with OvalEdge Author & Analytical Roles in the application. You can select the User/Role you wish to add to the Template. |
|
OvalEdge Business User Roles |
It displays all the users with OvalEdge Business User/Role in the application. You can select the User/Role you wish to add to the Template. |
|
OvalEdge Roles |
It displays all the user roles in the application. You can select the Role you wish to add to the Template. |
|
Teams |
It displays all the Teams in the application. You can select the Team you wish to add to the Template. |
|
OvalEdge Users |
It displays all the users in the application. You can select the User/Role you wish to add to the Template. |
|
Product |
Select to add the selected Product to the template. |
|
Project |
Select to add the selected Project to the template. |
|
Query |
Select to add the selected Queryto the template. |
|
Radio Button |
Select to add a list of options enabled with Radio buttons. You can set a selected option as Default Value. |
|
Report |
Select to add the selected Report to the template. |
|
Report Column |
Select to add the selected Report Column to the template. |
|
Report Group |
Select to add the selected Report Group to the template. |
|
S3 Privileges |
It displays the privileges based on the connection (S3) and the user. |
|
S3 Roles |
It displays the Roles based on the connection (S3) and user. |
|
Schedule |
User can schedule |
|
Schema |
Select to add the selected Schema to the template. |
|
Snowflake Privileges |
It displays the privileges based on the connection (Snowflake) and user. |
|
Table |
Select to add the selected Table to the template. |
|
Table Column |
Select to add the selected Table Column to the template. |
|
Tags |
Select to add the selected Tags to the template. |
|
Tags |
Select to add the selected Tags to the template. |
|
Technical Description |
Select to add the Technical Description to the template. |
|
Terms |
Select to add the Terms to the template. |
|
Text Area |
Select to add text to the template. |
|
User Snowflake Roles |
It displays the Roles based on connection (Snowflake) and user. |
Dropdown Option
For the Dropdown field type, the options for API, Custom List, Database, and JSON are customizable and can be fetched to display in the drop-down options.
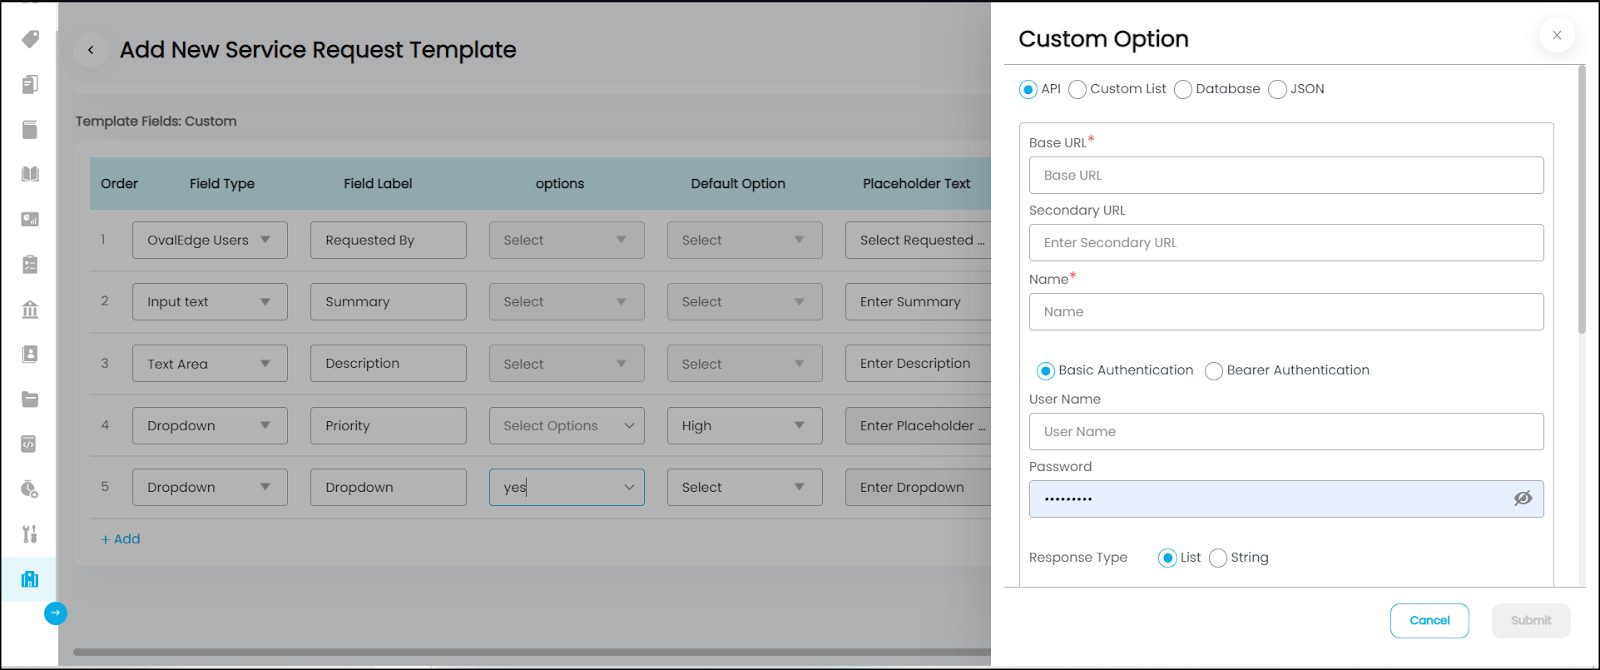
API Fields
API Field options can be inherited from the external instances. A request can be initialized using the instance URL. In that case, the options are inherited from the provided URL instance.
Base URL: The URL of the resource which is being fetched is placed here.
Secondary URL: If the URL has the host of another site, the URL of that site is placed here.
Basic Authentication: The basic User Name and Password credentials are used to authenticate the user identity.
Bearer Authentication
You can enter the auth details to fetch the API drop-down options from the Base URL.
- Bearer Token: Enter the bearer token cryptic string in the field provided.
- Bearer Token URL: Enter the Bear Token URL link in the field provided. It is a mandatory field.
- Bearer Token Key: Enter the Bearer Token Key in the field provided.
List or String
You can select the response type as List or String. If List is selected then the following fields to be entered to fetch the selected parameter drop-down options from the Base URL.
- Response Key: Enter the Response Key
- ResponseType Id: Enter the ResponseType Id.
- ResponseType Name: Enter the Response Type.
- ResponseType Description: Enter the Response Description.
- Description: Enter the description.
String - If the response type is selected as String, then a single string value is fetched and displayed as drop-down option.
Add Header - It helps to fetch the exact parameter from the API, if multiple parameters are included in the Base URL.
- Enter the key and value provided by the user.
Custom List
It helps to add the desired options manually. Clicking upon the Add New Item button, a field is enabled. Enter the option you wish to add in the field. Multiple options can be created. Click Validate to save the options. A delete icon is provided for each custom field option added to delete the options you wish to delete.
Database
It allows fetching options from a desired cataloged query to be included in the template. The Query can be selected from the drop-down and once validated the options in the Query are added to the template Drop-down options list.
JSON
This is similar to the API custom field integration method, here the JSON format is used to fetch the desired API option details.
Fulfillment Mode
The purpose of the request fulfillment is to manage all service requests raised by the users throughout the request lifecycle.
In OvalEdge, there are two types of Fulfillment flows:
- Manual
- Automated
- Advanced Job
- System-defined class.
The different Fulfillment Request Statuses are explained below:
|
Status |
Description |
|
Pending Approval |
As soon as a Service Request is raised, the Service Request gets the Pending Approval status. The Configured approvers need to take action on the requisition. |
|
Resolved/Rejected |
The service request status is Resolved when the configured approver(s) approves the request. The Service Request is Rejected when the configured approver(s) rejected the request. |
|
Fulfillment Processing |
Requests raised by the users are processed in this stage, and the order fulfillment begins. For Example: If Data Access permission is requested, then the Owner is notified of the same, and the owner works on assigning the access permissions to the requested users. |
|
Partially Fulfilled |
The status is shown when the request is fulfilled for some but not all parts of the request. |
|
Fulfillment Successful |
The status is shown when the request is completely fulfilled. |
|
Fulfillment Failed - |
A Fulfillment Failed status indicates that the request was declined or not processed. |
Editing a Custom Template
You can edit the Custom defined templates, however, the System defined templates cannot be edited. The Template Type column in the grid shows whether the Service Request Template is System or Custom defined.
- Go to Administration > Manage Service Desk main page.
- Select the Custom Temple you wish to edit and go to the Name column field in the grid.
- Click on the Template Name, and you will be navigated to the Edit Service Request Template window.
- You can edit the fields you wish to edit.
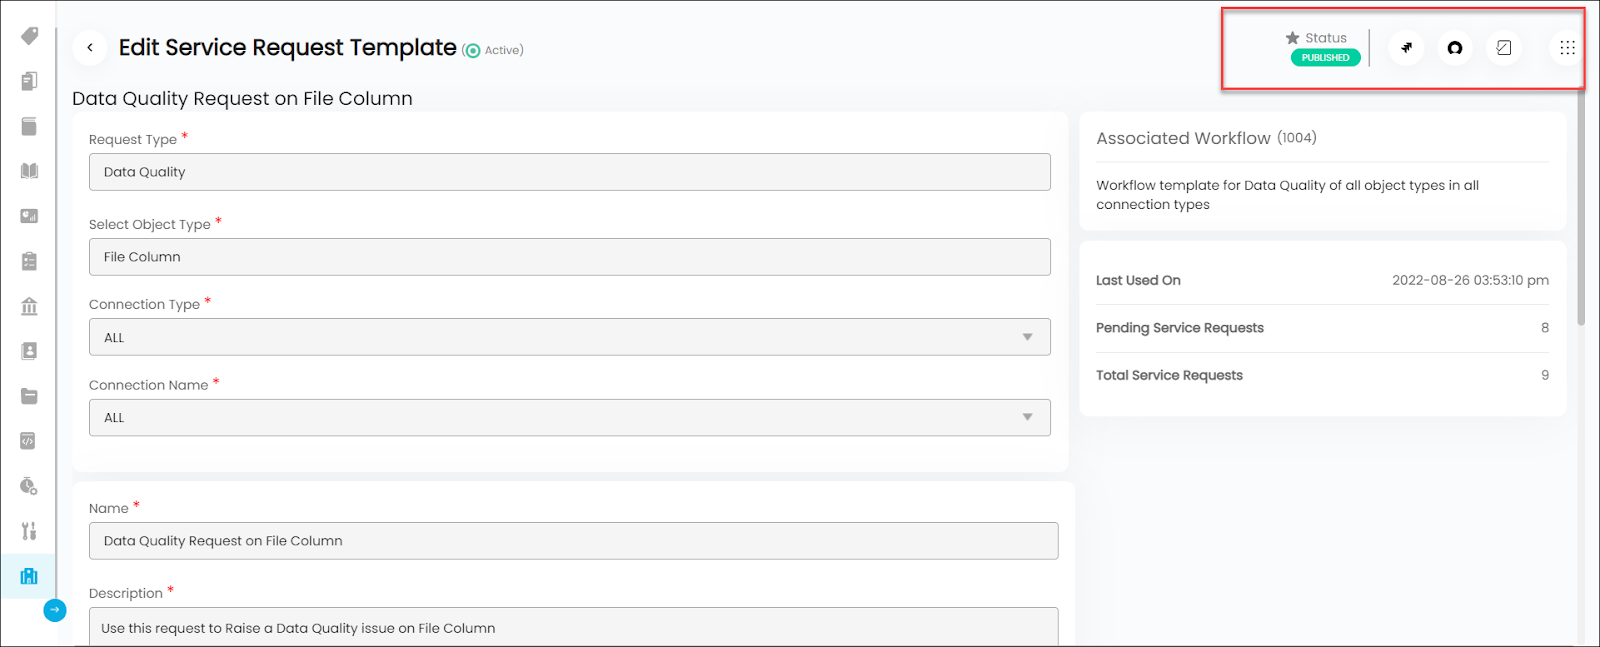
Template action edit icons
|
Icons |
Functionality |
|
Status |
Displays whether the Template is in Published/Draft status. The Templates in Published status cannot be edited. You need to Draft the template to make changes to the fields or configure the workflow. |
|
Jira |
It helps map the template with the Jira tool. You need to have Jira integrated into the application. |
|
ServiceNow |
It helps map the template with the ServiceNow tool. You need to have ServiceNow integrated into the application. |
|
Approval Workflows |
It helps set up New Workflow or Existing Workflow that are existing in the application (Administration > Security > Approval Workflow). |
|
Nine Dots |
|
|
Last Used on |
Displays the Date & Time on which the template is updated or used. |
|
Pending Service Requests |
Displays the number of service requests that are awaiting to be fulfilled using the Template. |
|
Total Service Requests |
Displays the total number of service requests that are raised using the Template. |
Associating an Approval Workflow
The Approval Workflow associated with the Template can be configured or updated with New Workflow or Existing Workflows existing in the application (Administration > Security > Approval Workflow).

New Workflow
You can create a new workflow and assign a whole new set of approver(s) without having to navigate to Administration > Security > Approval Workflow. The workflow thus created gets associated with the Template whenever a service request is raised using this template.
Existing Workflow
You can update, edit or configure the existing approver(s) without having to navigate to Administration > Security > Approval Workflow. The workflow thus created gets associated with the Template whenever a service request is raised using this template.
Publishing a Template
The template created should be Published for the users to find the template Service Request template drop-down while raising a service request. The Published template gets displayed in the Governance Catalog > Service Desk > + icon (New Service Request) > Service Request template drop-down.
To move a draft template to published,
- Select a custom template from the Administration > Service Request Templates grid.
- A window displays the pre-defined template fields and information.
- Select the Nine Dots icon to see the Publish option.
- Select the Publish option and the template is made available for the users to raise a service request.
Deleting a Custom Template
You can delete the Custom defined templates - however, the System defined templates cannot be deleted. The Template Type in the grid shows whether the Service Request Template is System or Custom defined.
- Go to Administration > Manage Service Desk main page.
- Select the Template(s) you want to delete.
- Click on the Nine Dots icon to see the Delete icon option.
- The selected Service Request Template gets deleted after a confirmation message.
Note: Users with Admin role can only delete the Custom Field. However, if a service request ticket (open status) is raised or mapped to the template, then the template cannot be deleted. However, the custom field templates for closed tickets can be deleted.
Integrating to Jira/ServiceNow
OvalEdge Service Desk supports integrations with the below-mentioned services:
- Jira
- ServiceNow.
- The scope of integration is to establish a connection between OvalEdge’s Service Desk and Jira/ServiceNow.
- Once the Integration is made Jira/ServiceNow, the OvalEdge’s Service Desk Template fields are mapped with the Jira/ServiceNow using the Mapper field to set the Template fields.
- The Service Request in the application gets synched with the External tools Jira/ServiceNow once a Service Request gets approved at the Approved By stage set in Administration > Security > Approval Workflow.
- The Comments made by the approvers (Approved/ Pending Request / Rejected) are pushed to the external system ticket as the ticket moves through the different approval stages.
- The External Jira/ServiceNow ticket status (New/ In Progress / Resolved) can be viewed in Governance Catalog > Service Desk > click on the selected service request Id/Name > Approval Desk page.
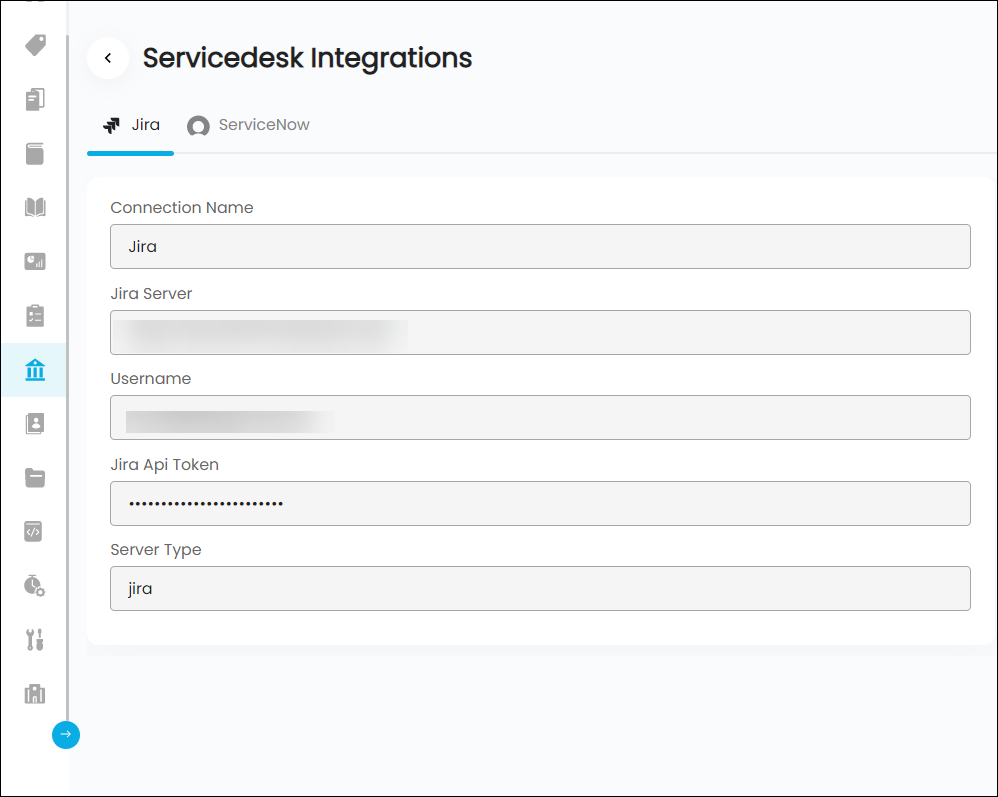
To integrate with Jira
- Click on the ServiceDesk Integration button enabled in the top right to navigate to the ServiceDesk Integrations page with a choice to select Jira or ServiceNow.
- In the selected Jira/ ServiceNow integration page, to add the new connection details, click on the +icon.
- An Add a New Connection pop-up is displayed.
- Enter the following details in the fields.
- Connection Name - Enter the Name of your choice for the connection.
- Server - Enter the Instance URL.
- User Name - Enter the Authorized email Id associated with the Jira/ServiceNow account.
- API Token - Enter Jira/ServiceNow account password.
- Server Type - Select the Jira/ServiceNow.
- Click on the Validate button and then Save the connection.
- The OvalEdge’s service request template gets integrated with Jira/ServiceNow.
- You can now push and manage the Service Requests raised to the Jira/ServiceNow once mapping is done.
Mapping Fields
Once Service Integration is integrated with OvalEdge with valid credentials. Mapper forms the bridge to push all the Service Requests raised using a specific Service Request Template in the OvalEdge to the selected Jira or ServiceNow instance. The Mapper functionality helps you to configure the custom fields of the template.
- In the Mapper column field, select from the Jira and ServiceNow icon options, which takes you to the Edit: Mapping to Jira window or Edit: Mapping to ServiceNow window as shown in the image below.
- The Project Name and Issue Type displays the names of all the projects and Issue Types saved in the external Jira/ServiceNow system.
- Select the Project Name and Type fields from the drop-down options list.
- The Summary, Description and Priority fields are by default mandatory fields.
- Click on the +Add Mapping button to add more fields and an additional fields set is displayed to map between the Template and external template fields. However, you can give a different name to the fields to view in the external system. For example: Expiration field in the OvalEdge can have a Due Date field selected and viewable in the external system as shown in the image below.
- Click on the Save button and the Jira or ServiceNow icons in the Mapper field gets highlighted in green.
Note: Each Service Request Template can be mapped to either Jira or ServiceNow.

External Service Request
1. You can view the external Jira/ServiceNow service request details by navigating to Governance Catalog > Service Desk.
Note: For the service request ticket to appear in the external service desk, the Approver Level to which approvers are configured must approve the ticket to sync with the external system.
2. Click on a preferred service desk Request Id or Request Name to navigate to the Approval Desk page, where the complete details of the ticket are shown along with the external Jira/Service Now ticket ID.
- Click on the External ticket ID to view the full details of the ticket.
- If ticket creation fails in an external system, you can see the Repost option. To repost, click on the Repost button, then it will retry to push the ticket to Jira/ ServiceNow.
- The Comments made by the approvers (Approved/ Pending Request / Rejected) are pushed to the external system ticket as the ticket moves through the different approval stages.
- Also, the External Jira/ServiceNow ticket status whether New/ In Progress / Resolved can be viewed Governance Catalog > Service Desk > selected service request page.
- A service ticket created in Jira is shown in the image below. The OvalEdge Ticket Id is displayed in the ticket, clicking upon which you get navigated to the Approval Desk page.
Copyright © 2019, OvalEdge LLC, Peachtree Corners GA USA