The Service Desk serves as an interface between the application users and the business owners to communicate, collaborate and handle a variety of requests to keep operations running smoothly. It facilitates users to raise a service request, manage and track the entire lifecycle of the service requests from the moment a service request is raised to the fulfillment of the request.
The following are the main functionalities of the Service Desk:
- To raise a service request for Access, Request Content Change, Report Data Quality, or raise issues on data assets using the predefined system and custom Templates created in Administration > Manage Service Desk.
- View the created Service Requests tickets in the respective tabs:
- Waiting My Approval - Displays all the requests that need to be approved by the logged-in user.
- My Created Requests - Displays the requests raised by the logged-in user.
- All Requests - Displays all requests approved and raised by the logged-in user
Below listed are the different types of system-defined Service Request Templates designed for specific data Object types:
|
Request Type |
Default Approver |
Data Object Type |
|---|---|---|
|
Request Access |
Owner |
To request access permissions on Schema, Table, Report, and Global Domain. |
|
Request Content Change |
Steward |
To request edit permissions on metadata of the data objects that include Tables/Table columns / Files/Reports/Business Glossary. |
|
Report Data Quality issue |
Steward |
To notify configured approver to verify the data quality of data objects that include Tables/Table columns/ Files/ File Columns/Reports/ Business Glossary/URL/Queries. |
|
Crawl / Profile |
Steward |
To request configured approver to crawl or profile a database. |
|
Build Lineage Request |
Steward |
To request configured approvers to build a Lineage between the objects. |
|
New Asset Request |
Owner |
To request a new data object creation in the application to create a new table/Table Column/Report/Business Glossary (Terms) |
|
Others |
Steward |
To notify configured approvers of any concerns or issues. Table/Table Column/ Report/ File/ Business Glossary/Project/etc. |
|
External Access |
||
|
RDAM OracleAccess |
Owner |
Tables |
|
Snowflake Access |
Owner |
Tables |
|
Custom-Defined Templates - Multiple custom-defined service request templates can be created based on the requirement. |
||
Service Desk Access Permissions
|
Raise Service Request |
||
|
Actions |
Meta -Read Users |
Meta-Write users |
|
Raise Request |
Yes |
Yes |
|
Approve Service Request |
||
|
Actions |
Admin users |
Configured Approvers |
|
Approve Request |
Case 1: Configuration set to ‘True’ then approval of OE_Admin approves the SR get approved even if multiple approvers are assigned to the workflow. Case 2: Configuration set to ‘False’ then approval of OE Admin and other configured approvers assigned is needed to approve the request. |
Configured approvers can be:
|
|
Reopen Service Request |
||
User roles with minimum Meta Read and Data No Access (MRDN) for corresponding data objects can raise any of the above requests to get more control over the data object to either Preview/ Read/ Write.
Service Desk
The Grid displays the following fields:
|
Name |
Description |
|
Request Id |
Displays the Service Request Id. It is a clickable field; clicking upon which navigates you to the Approval Desk - Service Request Template to view the complete details of the request (Status/Approval Flow configured Roles) - which also provides the details of the external service integration request Id (Jira/Service Now) if any mapped to the request. |
|
Summary |
Displays the description of the request being raised. clicking upon which navigates you to the Approval Desk - Service Request Template to view the complete details of the request (Status/Approval Flow configured Roles) - which also provides the details of the external service integration request Id (Jira/Service Now) if any mapped to the request. |
|
Request Type |
Displays the Request Type whether Request Access / Request Content Change / Report Data Quality issue and others. |
|
Object Name |
Displays the data object on which the request is raised. |
|
Status |
Displays the Approval Status of the Service Request whether Pending Approval / Resolved / Approved / Rejected / Reopened / Closed. |
|
Requested By |
Displays the user name who raised the Service request. |
|
Age |
Displays the total time of the service request since its inception hours-minutes-seconds |
|
Next Approver |
Displays the next approver name who needs to approve the Service Request. |
|
Pending Since |
Displays the time taken by the next approver in line to approve the service request. |
|
Previous Approver |
Displays the previous approver name who has approved the service request. |
|
Created On |
Displays the Date on which the Service Request is created. |
Processing a Service Request for End-Users
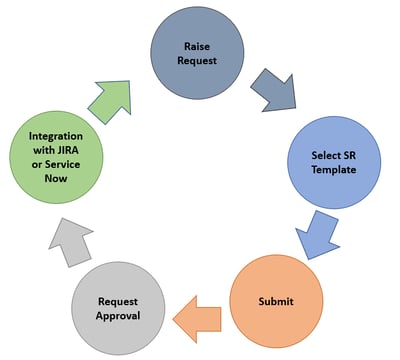
- Raise Request - You can raise a request from multiple locations across the application such as (not limited to) Governance Catalog, Data Catalog, Business Glossary, or Access Cart project.
- Select a Service Request Template (Create customized Templates) - Select the service request from the system-defined or Custom Templates. You can create a customized template from the Administration > Manage Service Desk based on Connection Type, Request Type, and Object Type.
- Enter the details to submit the request - Based on the selected request type the fields are displayed. Enter all the mandatory fields and click on the Submit button. A Service Ticket is raised and sent to the configured approvers for Approval.
- Request Approval - An approval is sent to the default Owner, Steward, or configured approvers. The OE_ADMIN can configure an Approval Workflow for each type of service request independently.
- Integrate Service Request to external tools Jira/ServiceNow - You can integrate the Service Desk with external Jira/ServiceNow tools (Administration > Manage Service Desk) to centralize the request management for easy managing and tracking of the status of all requests.
Raising a Service Request
- Go to Governance Catalog > Service Desk.
- Click the + icon New Service Request enabled in the top right.
- A New Service Request pop-up window is displayed.
- Select the Template from the drop-down list. The drop-down displays all the Service Request Templates created in Administration > Manage Service Desk where multiple templates are created based on the Connection Type, Object Type, and Request Type.
- The Select Objects field is displayed with a drop-down and search bar to select a specific Table on which access is required. Select the data object(s) and click on the Apply button.
- Select the Continue button and a service request template pop-up window is displayed.
- Enter the mandatory fields and click the Submit button to create a Service Request.


Service Request Types
The service request template fields differ based on the request type. This section is intended to provide brief insights on raising requests based on different request types.
Request Access on data objects
Data Access Request helps users to raise permission to access data objects in the application. However, it does not let you edit or update the data object.
To raise an Access request,
- Go to Governance Catalog > Service Desk.
- Click the + icon New Service Request enabled in the top right.
- A New Service Request pop-up window is displayed.
- Select the Access Request Template from the drop-down list. The drop-down displays all the Service Request Templates created in Administration > Manage Service Desk.
- The Select Objects field is displayed with a drop-down and search bar to select a specific Table on which access is required. Select the data object(s) and click on the Apply button.
- Click on the Continue button. A Service Request Template pop-up window is displayed with relevant fields.
- Enter all the mandatory fields (in red asterisk):
- Requested For: Displays the data objects selected.
- Summary: Enter a short note on why the service request is being raised.
- Description: Enter a detailed description of the request.
- Priority: Set the request Priority to Low /Medium/High.
- Select Object: Select the Data object (Table/ File/ Reports) from the drop-down list on which the user needs the selected data permissions. The Data object is by default displayed if the request is raised directly from the Data Object’s page.
- Permission: Select the permission type from the drop-down options whether to Data Preview / Data Read / Data Write.
- Expiration Date: Select the days from the calendar until which the Permissions are enabled.
- Click on the Next/Previous button to enter the service request details of the next or previous set of service requests grouped based on connection type and configured approvers.
- Once after entering the required details, click on the Request Access button. A new service desk ticket (Request ID) is sent to the configured approver(s) for the Approval of the request.

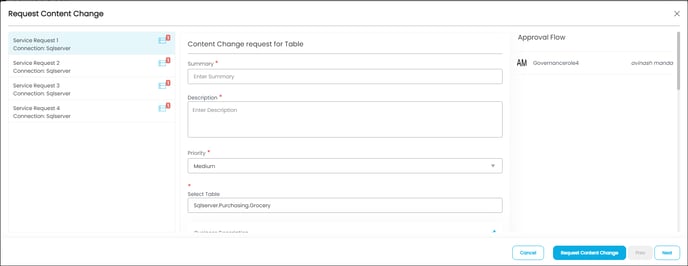
Request Content Change
The Request Content change helps view the asset contents, edit values, and modify asset properties.
To request the content change
- Go to Governance Catalog > Service Desk.
- Click the + icon New Service Request enabled in the top right.
- A New Service Request pop-up window is displayed.
- Select the Content Request Template from the drop-down list. The drop-down displays all the Service Request Templates created in Administration > Manage Service Desk.
- The Select Objects field is displayed with a drop-down and search bar to select a specific Table on which access is required. Select the data object(s) and click on the Apply button.
- Click on the Continue button. A Service Request Template pop-up window is displayed with relevant fields.
- Enter all the mandatory fields (in red asterisk):
- Summary: Enter a short note on why the service request is being raised.
- Description: Enter a detailed description of the request.
- Priority: Set the request Priority to Low /Medium/High.
- Select Object: Select the Data object (Table/ File/ Reports) from the drop-down list on which the user needs the selected data permissions. The Data object is by default displayed if the request is raised directly from the Data Object’s page.
- Business Description: Click the edit icon to edit/update the Business description of the selected Object(s).
- Technical Description: Click the edit icon to edit/update the Technical description of the selected Object(s).
- Associated Tags: Click the +icon to add Tags to the selected object(s).
- Associated Terms: Click the +icon to add Terms to the selected object(s).
- Additional Fields: Click on the edit icon to edit Additional field information.
- Click on the Next/Previous button to enter the service request details of the next or previous set of service requests grouped based on connection type and configured approvers.
- Click on the Request Content Change button. A New Service desk ticket (Request ID) is created and is sent to the approver for the Approval of the request. Once approved, the changes made to the metadata of the data objects get updated with changes made.
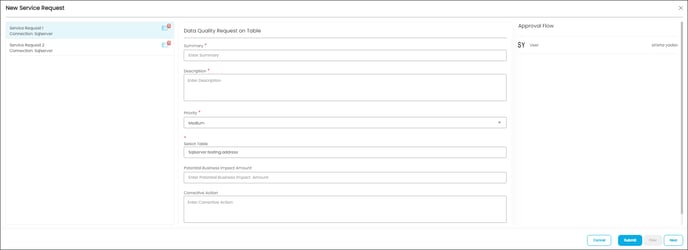
Report Data Quality Issue
You can raise a Service Request if you have any concerns with the data quality such as Duplications, incomplete data, Inconsistent formats, and Null values in the Table Columns of a Table / File / Report / Business Glossary Term.
To request the Report Data Quality Issue
- Go to Governance Catalog > Service Desk.
- Click the + icon New Service Request enabled in the top right.
- A New Service Request pop-up window is displayed.
- Select the Report Data Quality Template from the drop-down list. The drop-down displays all the Service Request Templates created in Administration > Manage Service Desk.
- The Select Objects field is displayed with a drop-down and search bar to select a specific Table on which access is required. Select the data object(s) and click on the Apply button.
- Click on the Continue button. A Service Request Template pop-up window is displayed with relevant fields.
- Enter all the mandatory fields (in red asterisk).
- Summary: Enter a short note on why the service request has been raised.
- Description: Enter a detailed description of the request.
- Priority: Set the request Priority to Low /Medium/High.
- Select Object: Select the Data object (Table/ File/ Reports) from the drop-down list on which the user needs the selected data permissions. The Data object is by default displayed if the request is raised directly from the Data Object’s page.
- Potential Business Impact Amount: Enter the percentage of the impact the specific object has on other objects like the Lineage relationships and Impact Analysis. Example: 70%, 50%.
- Corrective Action: Enter the corrective measures to be taken to resolve the data quality issue on the objects.
- Click on the Next/Previous button to enter the service request details of the next or previous set of service requests grouped based on connection type and configured approvers.
- Click on the Submit button. A New Service desk ticket (Request ID) is created and is sent to the approver for the Approval of the request.
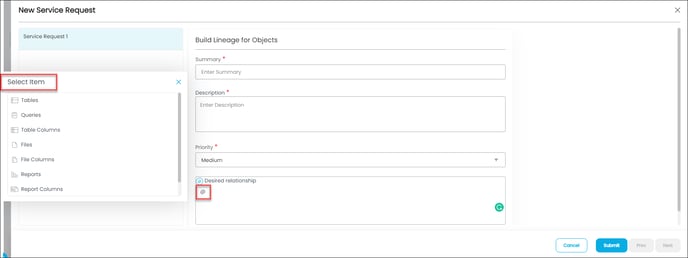
Build Lineage Request
You can raise a request to build the lineage for multiple data objects. Once approved, the approver builds the lineage manually.
To request the Build Lineage from Governance Catalog:
- Go to Governance Catalog > Service Desk.
- Click on the New Service Request button enabled in the top right.
- A New Service Request pop-up window is displayed.
- Select the Build Lineage for objects from the drop-down list. The drop-down displays all the Service Request Templates created in Administration > Manage Service Desk.
- Click on the Continue button. A Service Request Template pop-up window is displayed with relevant fields.
- Enter all the mandatory fields (in red asterisk).
- Summary: Enter a short note on why the service request has been raised.
- Description: Enter a detailed description of the request including the data object and permissions required.
- Priority: Set the request Priority to High / Highest / Low / Lowest /Medium.
- Select Object: Select the Data object (Table/ File/ Reports) from the drop-down list on which the user needs the selected data permissions. The Data object is by default displayed if the request is raised directly from the Data Object’s page.
- Desired Relationship: By using the @ symbol, you can select the desired object to which lineage has to be built. Select the data object item from the pop-up. For the selected object type, relevant objects are displayed in the drop-down. Select the desired object from the drop-down list.
- Click on the Next/Previous button to enter the service request details of the next or previous set of service requests grouped based on connection type and configured approvers.
- Once after entering the details, click on the Submit button. A New Service desk ticket (Request ID) is created and is sent to the approver for the Approval of the request.
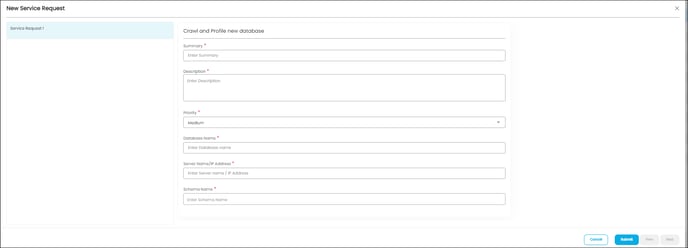
Crawl/Profile Request
Crawl/profile helps update the database or metadata associated with the data objects. You can update the existing database or crawl new connections.
To request the Crawl / Profile from Governance Catalog:
- Go to Governance Catalog > Service Desk.
- Click on the New Service Request button enabled in the top right.
- A New Service Request pop-up window is displayed.
- Select the Crawl/Profile new database from the drop-down list. The drop-down displays all the Service Request Templates created in Administration > Manage Service Desk.
- Click on the Continue button. A Service Request Template pop-up window is displayed with relevant fields.
- Enter all the mandatory fields (in red asterisk).
- Summary: Enter a short note on why the service request has been raised.
- Description: Enter a detailed description of the request including the data object and permissions required.
- Priority: Set the Priority to High / Highest / Low / Lowest /Medium.
-
- Database Name: Enter the Database Name from the existing database or enter the new Database Name for new connections.
- Server Name/IP Address: Enter the URL/IP address of the desired connection.
- Select Schema: Select the schema from the existing database or enter the new schema name for new connections.
8. Once after entering the details, click on the Submit button. A New Service desk ticket (Request ID) is created and is sent to the approver for the Approval of the request.
New Asset Creation Request
You can raise a request to create a new Table/Table Column/Report/Business Glossary (Terms). Upon approval from the configured approver(s) or admin the data object or Term is created.
To request the Crawl / Profile,
- Go to Governance Catalog > Service Desk.
- Click the + icon New Service Request enabled in the top right.
- A New Service Request pop-up window is displayed.
- Select the Business Term Creation from the drop-down list. The drop-down displays all the Service Request Templates created in Administration > Manage Service Desk.
- Click on the Continue button. A Service Request Template pop-up window is displayed with relevant fields.
- Enter all the mandatory fields (in red asterisk).
- Summary: Enter a short note on why the service request has been raised.
- Description: Enter a detailed description of the request.
- Priority: Set the Priority to Low /Medium/High.
- Select Domain: Select a Domain from the drop-down options.
- Business Glossary Name: Enter the Term name in the field.
- Business Description: Enter the Business Description in the field provided.
- Associated Tags: Click the + icon to associate tags to the Term.
- Additional Fields: Click the edit icon to edit/update the additional field details.
- Click on the Next/Previous button to enter the service request details of the next or previous set of service requests grouped based on connection type and configured approvers.
- Once after entering the details, click on the Submit button. A New Service desk ticket (Request ID) is created and is sent to the configured approver(s) for the Approval of the request.
Others Request
A Request can be raised on any concerns or issues you have with a data object or on the application.
To request the New Asset from Governance Catalog:
- Go to Governance Catalog > Service Desk.
- Click the + icon New Service Request enabled in the top right.
- A New Service Request pop-up window is displayed.
- Select the Others Request from the drop-down list. The drop-down displays all the Service Request Templates created in Administration > Manage Service Desk.
- Click on the Continue button. A Service Request Template pop-up window is displayed with relevant fields.
- Enter all the mandatory fields (in red asterisk).
- Summary: Enter a short note on why the service request has been raised.
- Description: Enter a detailed description of the request.
- Priority: Set the Priority to Low /Medium/High.
- Request Name: Enter the name of the request.
- Click on the Next/Previous button to enter the service request details of the next or previous set of service requests grouped based on connection type and configured approvers.
- Once after entering the details, click on the Submit button. A New Service desk ticket (Request ID) is created and is sent to the configured approver(s) for the Approval of the request.
Raising External Access Requests for APIs
To raise access requests on APIs, the New External Request Template must be configured from the Administration > Configurations. In the configurations page > Others tab> search Key - servicedesk.custom.templateid and set the value as 1035.
- Once the data objects are added to the My Access Cart Project, clicking upon the My Access Cart icon in the header, you will be navigated to the My Access Cart Page.
- In the My Access Cart Page, the data objects to which access permission is needed are grouped based on SR Template Id, Connection type, Object Type, Object Id, and Configured approvers (Owner, Steward, Custodian, Governance Roles.
Note: Approvers for Access-Request are generally Data Owners of the object. OE_ADMINS can configure an approval workflow from the Administration > Security > Approve Workflow module.
- The grouped Tables can be expanded to select/deselect the attributes (Table Columns) on which you need access permissions.
- Enter the details in the fields provided:
- Request Persona: Enter the request type.
- Request Purpose: Enter why the request is being raised.
- Request Resource: Enter the resource name.
- Request Product: Enter the product details.
- Request environment: Enter the connector environment details.
- Request Reason: Enter the reason of the request.
- Product Id: Enter the Id of the product.
- Okta Client Id: Enter the Okta client Id.
- Application Name: Enter the name of the application.
- Upon entering the details, clicking upon the Request Access button, an SR Template is raised for multiple selected objects.
- Once SR is approved, a payload on selected template fields and attributes is created and can be viewed. Once the Tempath is set in Configurations > System Path > ovaledge.temppath, you can view the selected attributes of the Service Request.
Approving a Service Request
Once a new Service Desk request ticket is generated, the configured approver(s) are notified. The Waiting My Approval tab displays the approvals pending to be approved. You can click on the ticket Id or Summary to navigate to the Approval Desk page to Approve/Reject the request.
- Click on the Request Id or Summary fields in the Waiting My Approval tab, which takes you to the Approval Desk Template.
- Requester Details that include the Name, Date & Time on which the service request is created details are displayed at the top.
- Request details - Request Type / Request By / Object Details / Summary / Description / Priority / Comments are displayed.
- Status of the request.
- Pending Approval - (Initial status) once a request is raised, the ticket gets Pending Approval status.
- Approved - When the ticket gets approved by the approver(s).
- Resolved - When the final approver approves the ticket - the status changes to Resolved.
- Closed - When the ticket creator closes the ticket - the status gets updated as closed.
- Expired - When the ticket reaches the due date specified while creating the service request.
- Fulfillment Success - When the service request successfully gets approved by the configured approvers and the request gets fulfilled.
- Reopened - Request is reopened because the issue was not fixed or recurred.
- Configured Approver(s) are displayed in the right panel
- Case 1: If a single user is set as Approver to the Service request, then upon selecting the Approve or Reject buttons, the request gets approved or rejected.
- Case 2: If multiple approvers are set to the Service Request, all the approvers are sent the notifications.
- The OE Admin role as an approver can be flexibly used in the Approval Workflow process from the Administration > Configurations > Others tab > to set up the configuration to either True or False. If the configuration is set to True, then the approval of OE Admin approves the Service Request gets approved even if multiple approvers are assigned to the Approval Workflow. If the configuration is set to False, then the approval of OE Admin and approval of other multiple approvers assigned to the Approval Workflow is needed to approve the request.
- If the Service Request is raised and processed according to the Approval workflow and if any user rejects the request, then a Reopen button is provided for the creator of the Service Request to reopen the service request with the same ID.
- The owner of the ticket can edit the service request template details and the approval workflow.
Raising Bulk Service Request from My Access Cart
Please refer to Access Cart for more information.
Raising a Service Request from Data Catalog
You can raise a Service Request on a data object from the Data Catalog module by following the steps mentioned below.
- Go to the Data Catalog module.
- Select an object (such as Table/Files)
- In the Object detailed page, click on the Nine Dots
icon.
- Select the Service Request option to see Request Access / Request Content Change / Report Quality issue options.
- Select the appropriate option to navigate to the selected Service Request Template.
- Enter the fields and click the Submit button to create a Service Request.
- Additionally, you can add multiple data objects to the Access Cart by clicking on the cart button in the Projects field column in the grid. The Access Cart should be set as the default project. The Access request can be raised on multiple data objects, and connections in a single go.


Raising a Service Request from Business Glossary
You can raise a Service Request on a Terms from Business Glossary by following the steps mentioned below.
- Go to the Business Glossary.
- Select a Term.
- Click on the Nine Dots
- Select the Service Request option to see Request Content Change / Report Quality issue options.
- Select the appropriate option to navigate to the selected Service Request Template.
- Enter the fields and click the Submit button to create a Service Request.

- Copyright © 2019, OvalEdge LLC, Peachtree Corners GA USA