This article helps you to understand how security is applied on different assets (Tables, Files, Reports) in the OvalEdge application and on different modules of the application.
It explains the different levels of permissions available for Business and Analytical users and what permissions you might need to access the data objects. It provides the details of setting up Domains (Categories & Classifications), DAGs, and Governance Roles and includes information that explains how to configure approval workflow for Service Request templates.
Security Overview
Security refers to the process of managing data assets through access control to minimize misuse of data and associated business risks. Access control is the fundamental component of data security - the ultimate goal of access control is to regulate and manage the number of authorized users interacting with important or highly classified information.
In OvalEdge, Access Control is applied at two levels:
- Role
- Individual Users
You can assign different levels of access permissions to access Metadata or Data of the data object.
Role based Access: Role-based access grants access to data assets (Meta Data or Data) based on defined business functions or job designation. Every employee in the organization is given a role, and multiple users are assigned to a specific role based on the organization's needs.
Thus, a core group of users is collectively given access to specific data assets in the application. The different User Roles are assigned with different levels of Metadata - Read Only / Read - Write and Data permissions, i.e., No Access / Preview /Read / Write to access the data asset.
A user can be assigned multiple roles.
Individual User Access: Individual users are given access to data assets based on different levels of Metadata (Read Only / Read - Write) and Data permissions i.e., No Access / Preview / Read / Write.
Note: The OE_ADMIN users have overall rights to configure users and user roles to provide the right access to manage them.
The Default Admin checkbox enabled in the Available User/Roles > Add Roles pop-up helps to set a user or Role as a Default Admin. Once set, the User or Role gets the admin authorities to manage users and their permissions on corresponding data assets.
Available Privileges
Users can perform different types of tasks based on the License Type assigned to the Role or User Profile.
Business Users
It applies basic privileges to the users: Read-Only metadata access; No Access / Preview / Read / Write for Data.
Author & Analytical Users
It applies Admin level Privileges to the users: Read Only & Read-Write access to Metadata and No Access / Preview / Read / Write access can be given to the user.
Note: Refer to Administration > Users and Roles > on how to add new Roles / Users to the application.

Data Permissions
|
Data Permissions |
Permissions |
|
No Access |
To restrict access to the data object. |
|
Preview |
Databases/Tables: Grants the ability to view the Metadata and Data of a data object. Lineage/Relationships: Grants the ability to view the Lineage but cannot edit the Lineage manually. Files/Folders: Grants ability to view the Metadata details. Queries: Grants the ability to view existing queries and charts but cannot execute queries. Reports: Grants ability to view the Metadata. |
|
Read |
Admin allowed permissions. Databases/Tables: Grants ability to view to create Tables and download data, but cannot edit/Update. Lineage/Relationships: Grants ability to view the Lineage but cannot edit the Lineage manually. Files/Folders: Grants ability to view the Metadata details. Queries: Grants ability to view to access Query Sheets to run Queries. Users can perform only SELECT statements. Reports: Grants ability to view the Reports. |
|
Write |
To edit the data objects. Databases/ Tables: Grants ability to edit/Write/Update table contents using Query Sheet. Queries: Grants ability to execute and write queries to INSERT/UPDATE/DELETE data. Reports: Grants ability to create new reports using Query Sheets. Files/Folders: Grants ability to Add/Edit/Delete a File using Query Sheet. |
Metadata Permissions
|
Meta Permission Type |
Access Privileges |
|
READ ONLY |
Data Objects: Grants ability to view the metadata of the data objects (Tables/Files/Reports). Terms: Grants the ability to view the existing Terms under a Domain. DAG: Grants the ability to view the existing DAGs under a Domain. |
|
READ_WRITE |
Data Objects: Grants the ability to view or edit the metadata of the data objects (Tables/Files/Reports). Term: Grants ability to Suggest a Term (Create new Term) /edit or delete the Term details/associate Terms to data objects. DAG: Grants ability to create new DAG Tags / can edit or delete the DAG details / can associate DAGS to data objects. |
Access control on different data assets
The following table describes the specific privileges available for each type of object on which Security can be configured.
|
Security |
Access level |
Meta Permissions |
Data Permission |
|
Databases |
Role/User |
Yes |
Yes |
|
Tables |
Role /User |
Yes |
Yes |
|
Table Columns |
Role |
Yes |
Yes |
|
Folders |
Role/User |
Yes |
Yes |
|
Report Groups |
Role |
Yes |
Yes |
|
Reports |
Role |
Yes |
Yes |
|
Applications |
Role |
Yes |
Yes |
|
Domains |
Role |
Yes |
Not Applicable |
|
Story Zone |
Role |
Yes |
Not Applicable |
|
Data Asset Group |
Role |
Yes |
Yes |
|
Approval Workflow |
Role |
Yes |
Yes |
|
Governance Roles |
Role |
Yes |
Yes |
Permissions
Here is the list of superscripts added to the Roles displaying the permissions assigned.
|
Superscript of the Role/User |
Permissions Assigned |
|
ADM |
Admin (Top-level permissions) |
|
MRDN |
Meta Read Data No Access |
|
MRDP |
Meta Read Data Preview |
|
MRDR |
Meta Read Data Read |
|
MRDW |
Meta Read Data Write |
|
MWDN |
Meta Write Data No Access |
|
MWDP |
Meta Write Data Preview |
|
MWDR |
Meta Write Data Read |
|
MWDW |
Meta Write Data Write |
Security on Data Assets
Security on data assets is all about securing objects using the access control mechanism. The access control permits the admin user to grant privileges to Roles or Individual users to access the data objects using different levels of Metadata (Read-Only & Read-Write) and Data permissions, i.e., No Access / Preview /Read / Write.
Below mentioned are the different data objects on which access control can be enabled:
- Databases Security
- Tables Security
- Table Columns Security
- Folders Security
- Report Groups Security
- Reports Security
Assigning Permissions to Roles/Users
Data or Metadata access permissions can be assigned to individual user or roles based on the License Type configured while creating the user profile or Role.
- Selecting Business User applies Non-Admin privileges where Read-Only metadata access and No Access / Preview /Read /Write to Data can be enabled.
- Selecting User or Analytical/ Author user the Admin level Privileges (Read-Write and No Access / Preview / Read / Write access can be given to the user.
To assign permissions to a user/role,
- Go to Administration > Security.
- Select the data assets on which you want to update users/roles (Database, Table, Report, File).
- In the grid, hover on the Permissions column to see an edit icon.
- Click on the edit icon to see an Apply Security pop-up window to add Roles/Users to access the selected Table.
To add Roles,
- Click the Add Role Access button to see expanded drop-down fields.
- Select the License Type - Business User or Analytical/ Author - based on which the Roles configured for the selected License Type are displayed in the Roles drop-down.
- Select Roles from the drop-down list.
- Based on the License Type selection respective Metadata and Data Access permissions are displayed in the drop-down.
- Click on the Save Permissions button to save the access permissions assigned to the Role.
To add Users,
- Click the Add User Access button to add one or more individual users to access the database.
- Select the License Type - Business User or Analytical/ Author - based on which the Users configured for the selected License Type are displayed in the Users drop-down.
- Select Roles from the drop-down list.
- Based on the License Type selection, respective Metadata and Data Access permissions are displayed in the drop-down.
- Click on Save the access permissions assigned to the Role.
- Click on the Delete icon to delete the added Role/User.
Updating Permissions on multiple data assets in bulk
Assigning permissions for each data object individually can be complex and time-consuming. Update Roles helps to bulk update and assign permissions on multiple data objects (Table, Files, Reports).
- Go to Administration > Security > select a data object type tab (Database, Table, File).
- Select the data objects(s) from the grid on which you wish to update the Roles.
- Click on the Select all checkbox enabled at the top to update Roles on all the data objects in a click. Or select multiple data assets from the grid.
- Once selecting, click on the Nine Dots icon to select the Update Roles option. An Apply Security on multiple data assets pop-up is displayed.
- You can add Roles/Users by assigning different levels of Metadata and Data permissions based on configured License Type.
- Admin level privileges are granted to a role (users) if the Default Admin checkbox is selected. The Default Admin checkbox is enabled only for Author & Analytical License type user roles.
- Delete a user or Role which deletes the applied access privileges.
- Click on the Ok button to save the permissions.
Updating Governance Roles on data assets
The Governance Roles assigned to specific object types at the time of crawling can be updated to preferred users using the Update Governance Roles. It helps bulk update the Steward / Custodian / Owner / Gov 4,5,6 users on a specific data object type in a single click.
To bulk update Governance Role on selected data objects.
- Go to Administration > Security > select a data object type tab.
- Select the data object(s) from the grid on which you wish to update the governance roles.
- Click on the Select all checkbox enabled at the top to update all the data objects in the application
- Click on the Nine Dots icon to select the Update Governance Roles option.
- An Update Governance Roles pop-up is displayed.
- Select the Steward / Custodian /Owner users from the drop-down options.
- Select Cascade to hierarchy checkbox to apply the Governance Roles to a data object and associated data objects overriding the existing Governance Roles. For Example: If Governance Roles are updated on a Table, then selecting the Cascade to hierarchy applies the Governance Roles to associated Table Columns.
- Click on the Save button, and the Governance Roles get updated.
Available Users
The Available Roles/Users are the exclusive user roles who can access the data object with different access permissions assigned to them.
Updating Governance Roles
The Governance Roles assigned to specific object types at the time of crawling can be updated to preferred users using the Update Governance Roles. It helps bulk update the Steward / Custodian / Owner / Gov 4,5,6 users on a specific data object type in a single click.
To bulk update Governance Role on selected data objects.
- Go to Administration > Security > select a data object type tab.
- Select the data object(s) from the grid on which you wish to update the governance roles.
- Click on the Select all checkbox enabled at the top to update all the data objects in the application
- Click on the Nine Dots icon to select the Update Governance Roles option.
- An Update Governance Roles pop-up is displayed.
- Select the Steward / Custodian /Owner users from the drop-down options.
- Select Cascade to hierarchy checkbox to apply the Governance Roles to a data object and associated data objects overriding the existing Governance Roles. For Example: If Governance Roles are updated on a Table, then selecting the Cascade to hierarchy applies the Governance Roles to associated Table Columns.
- Click on the Save button, and the Governance Roles get updated.

Databases Security
Database Security is all about securing the data within the Table(s) using the access control mechanism. The access control permits the admin user to grant privileges to Roles/Users to access the Tables using different levels of Metadata (Read-Only or Read-Write) and Data permissions, i.e., No Access / Preview /Read / Write.
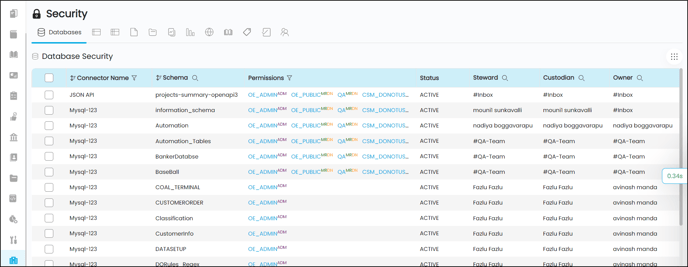
The Database security grid displays the below-mentioned columns:
|
Grid Columns |
Description |
|
Connector Name |
Displays the name of the Database |
|
Schema |
Displays the name of the Schema |
|
Permissions |
Displays the users/roles who have access to the Database. Click on the edit icon to see a pop-up window where you can add/update/delete user or roles and their permissions. |
|
Status |
Displays whether Active/Inactive. |
|
Steward |
Displays the name of the Steward. It is an editable field. Click on the Edit icon to update the Steward. |
|
Custodian |
Displays the name of the Custodian. It is an editable field. Click on the Edit icon to update the Custodian. |
|
Owner |
Displays the name of the Custodian. It is an editable field. Click on the Edit icon to update the Custodian. |
|
Governance Role 4/5/6 |
Displays the Gov Role 4,5,6 users. It is an editable field. Click on the Edit icon to update the Custodian. |
Note:
- To assign permissions to an user/role, refer to Assigning Permissions to Roles/Users.
- To update permissions on multiple data assets in bulk refer to Updating Permissions on multiple data assets in bulk.
- To update Governance Roles on data assets refer to Updating Governance Roles on data assets.
Tables Security
Tables Security is all about securing the data within the Table(s) using the access control mechanism. The access control permits the admin user to grant privileges to Roles/Users to access the Tables using different levels of Metadata (Read-Only or Read-Write) and Data permissions, i.e., No Access / Preview /Read / Write.
The Tables security grid displays the below mentioned columns:
|
Tables Security |
Description |
|
Type |
Displays the Table Type whether Table / View / API / Materialized_View. |
|
Connector Name |
Displays the name of the connector. |
|
Schema |
Displays the name of the Schema |
|
Table |
Displays the name of the Table. |
|
Permissions |
Displays the users/roles who have access to the Database. Click on the edit icon to see a pop-up window where you can add/update/delete user or roles and their permissions. |
|
Column Security |
The Column Security checkbox should be selected at the Table level to enable the Mask Column or Restrict Column at the Table column level. |
|
Steward |
Displays the name of the Steward. It is an editable field. Click on the Edit icon to update the Steward. |
|
Custodian |
Displays the name of the Custodian. It is an editable field. Click on the Edit icon to update the Custodian. |
|
Owner |
Displays the name of the Custodian. It is an editable field. Click on the Edit icon to update the Custodian. |
|
Governance Role 4/5/6 |
Displays the Gov Role 4,5,6 users. It is an editable field. Click on the Edit icon to update the Custodian. |
Note
- To assign permissions to an user/role, refer to Assigning Permissions to Roles/Users.
- To update permissions on multiple data assets in bulk refer to Updating Permissions on multiple data assets in bulk.
- To update Governance Roles on data assets refer to Updating Governance Roles on data assets.
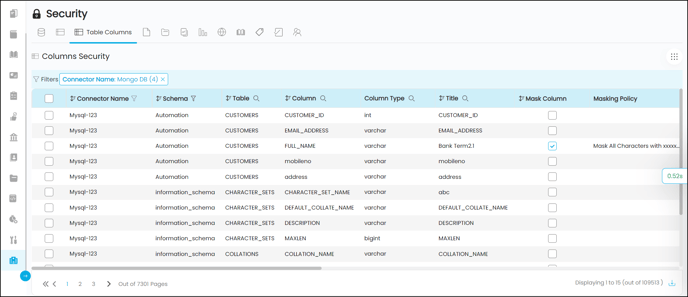
Column Security
Columns security is all about securing the data within a Table column. The Roles/Users assigned with the Access control permissions at the Table level have the same access permissions on Table columns. To further enhance the security features at the column level - Masking or Restrictions can be applied to protect sensitive data from unauthorized users while allowing authorized users to access sensitive data.
To enable the Mask Column or Restrict Column at the Table column level, the Table - Column Security checkbox should be selected at the Table level.
- Masking replaces the column data with characters and numbers, null values, or xxxxx patterns to hide the original content. When the Masking checkbox is selected, the Mask Policy field by default masks the content with Mask alphanumeric characters with xxxx policy. There are different masking policy options users can select to mask sensitive data from all the users except for the Allowed Roles and users.
- Restriction - The restriction is a selective access control applied to columns having sensitive and confidential data (PII data). When the Restricted checkbox is selected at the table column, the entire column becomes invisible or inaccessible to the users except for the allowed Roles and users.
|
Columns Security |
Description |
|
Connector Name |
Displays the name of the connector |
|
Schema |
Displays the name of the Schema |
|
Table |
Displays the name of the Table. |
|
Column |
Displays the name of the Table Column. |
|
Column Type |
Displays the type of data a specific Table column holds. Some common data types OvalEdge supports are Integer, Date, String or Float. |
|
Title |
Displays the column Title. |
|
Mask Column |
Displays whether the column is enabled with masking or not. When the Masking checkbox is selected, specific areas of the column data get replaced with characters and numbers or null values or xxxxx patterns to hide the original content. |
|
Masking Policy |
Displays the masking policy applied whether Mask alphanumeric characters with xxxx / Mask all characters with xxxxxx / Show last 4 characters / Show first 4 characters / Show blank is applied. |
|
Restrict Column |
Displays whether the column is restricted or not. When the Restricted checkbox is selected, the entire column gets invisible or inaccessible to the users except for the Admin and selected Available Roles/users. |
|
Permissions |
Displays the permitted roles/users configured at the table level. Click the edit icon to see a pop-up to add/update/delete roles/users and permissions. |
|
Popularity |
Displays the number of times the users interacted with this data object by viewing, endorsing, commenting, adding tags, or by querying the data object. |
|
Importance |
Displays how vital this data object is across the organization on a scale from 0-100 based on the number of relationships and the strength that it has with other data objects. The importance score of a data object depends on the lineage and profiling actions. |
|
Column Position |
Displays the order of the column in the Table. |
|
Steward |
Displays the name of the Steward. It is an editable field. Click on the Edit icon to update the Steward. |
|
Custodian |
Displays the name of the Custodian. It is an editable field. Click on the Edit icon to update the Custodian. |
|
Owner |
Displays the name of the Custodian. It is an editable field. Click on the Edit icon to update the Custodian. |
|
Governance Role 4/5/6 |
Displays the Gov Role 4,5,6 users. It is an editable field. Click on the Edit icon to update the Custodian. |
If you do not have Table security enabled, you will get the following notification while enabling Column-level security. 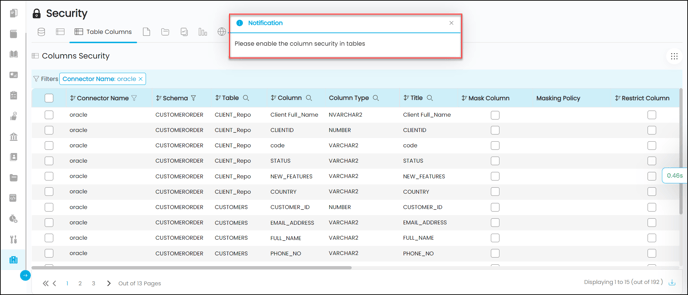
Masking a Column
Masking can be applied to Column level objects.
- Go to Administration > Security > Table Columns.
- Select a Table Column you want to mask.
Note: To enable the Mask Column at the Table column level, select the Column Security checkbox at the Table level. - Select and enable the Mask Column checkbox.
- Once enabled, the Mask Policy field gets added to the grid and automatically applies the Mask alphanumeric characters with xxxx policy.
- In the Masking Policy field, click on the edit icon to see an Assign Masking Policy pop-up. Select from the Masking Scheme drop-down options listed below:
- Mask alphanumeric characters with xxxx
- Mask all characters with xxxxxx
- Show last 4 characters
- Show first 4 characters
- Show blank
- Click on the Assign Policy and the column gets masked.


Restricting a Column
The Restriction is a selective access control applied to columns having sensitive and confidential data (PII data). When the Restrict column checkbox is selected, the entire column becomes invisible or inaccessible to the users except for the allowed Roles and users.
- Go to Administration > Security > Table Columns.
- Select a Table Column you want to Restrict. To enable Restrict Column at the Table column level, select the Column Security checkbox at the Table level.
- Select and enable the Restrict Column checkbox.
- The column disappears from the table view except for the OE_ADMIN users and the authorized users/roles who are given permission.
Assigning Roles to access Restricted columns
Permissions are given to exclusive roles who can access the data of the data assets without any restriction applied.
- Go to Administration > Security > Table Columns.
- Select a Table Column you want to Restrict and hover over the Permissions column field to see an edit icon.
- Click on the edit icon to see the Add Roles pop-up displaying the available roles in the application.
- Click on the + icon next to the Role name to add the Roles to the right assigned roles Panel. All the users associated with the Role can now access the Column without restriction.

To disable a column-level security
- Go to Administration > Security > Table Columns.
- Select a Table Column you want to disable restriction or masking.
- Deselect the checkmark on the selected column under Restrict Column or Mask Column.
Folders Security
Folders security is all about securing the data on individual folders in the data lake. The access control permits the admin user to grant privileges to User Roles and Individual users to access the Folder objects using different levels of metadata (Read-Only & Read-Write) data permissions, i.e., No Access / Preview /Read / Write.
The different file folders from various cataloged connectors are displayed in the grid.
|
Folders Security |
Description |
|
Add New Folder + icon |
It is enabled in the top right to add a New Folder. |
|
Delete icon |
It helps delete selected Folder(s). |
|
Connection Name |
Displays the name of the connection. |
|
Folder |
Displays the Folder Name. |
|
Permissions |
Displays the users /roles who have access to the Folders. Click on the edit icon to see a pop-up window where you can add / update / delete - roles/users and their permissions. |
|
Steward |
Displays the name of the Steward. |
|
Custodian |
Displays the name of the Custodian. |
|
Owner |
Displays the name of the Owner. |
|
Governance Role 4/5/6 |
Displays the Gov Role 4,5,6 users. It is an editable field. Click on the Edit icon to update the Custodian. |
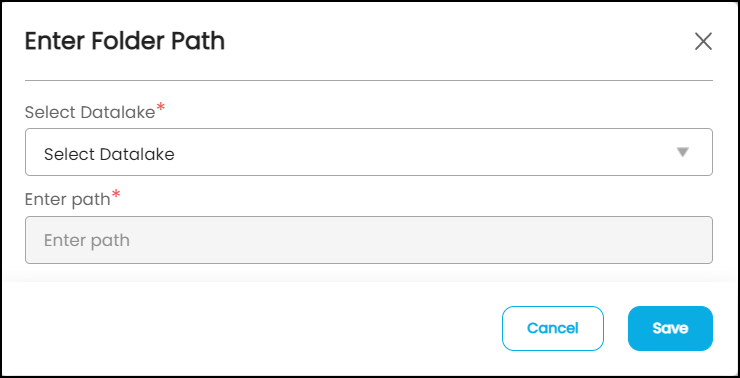
Adding New Folders
To create a new folder in security, first, you need to create an NFS or other data lake connection from Administration >> Crawler.
- Go to Administration > Security > Folders security.
- Click on the + icon to Add a New Folder.
- An Add a New Folder pop-up displays on the screen.
- Select a Data lake (ETL Connector) from the drop-down options.
- Enter the directory path where the file is located.
Note: The path information is found by navigating to the file and folder in the File Manager tab. - Click on the Save button, and a new Folder is created.
Deleting Folder
If you want to delete the folder, select the checkbox for the folder in the grid and click the Delete icon enabled in the top right.
To Get the file/ folder path
- Select the File Manager feature in the object explorer.
- Click on the connection name to select the data lake where the file and folder reside.
- Choose and click on the file and folder to restrict access.
- Copy the path of the application from the URL (everything after the # symbol in the URL).
Note:
- To assign permissions to an user/role, refer to Assigning Permissions to Roles/Users.
- To update permissions on multiple data assets in bulk refer to Updating Permissions on multiple data assets in bulk.
- To update Governance Roles on data assets refer to Updating Governance Roles on data assets.
Report Groups & Reports security
The Report group is a group of Reports. Multiple Charts and dashboards can be grouped under a single Report group to easily manage its security permissions. Reports Group Security helps assign access permissions to selected Roles. It includes information about roles who have different access permissions on the Report Group. When you grant access to a Role, then all the users in this Role will be able to access the reports based on the permissions assigned. The user role permissions on a particular Reports Group are inherited and displayed in related child reports within that group.
The grid displays:
|
Reports Group Security |
Description |
|
Add New Reports Group + icon |
It is enabled in the top right to add a New Report Group. |
|
Delete icon |
It helps delete selected Report(s). |
|
Connection Name |
Displays the name of the connection. |
|
Report Group |
Displays the Report Group name. |
|
Report Group Description |
Displays the Report Group description. |
|
Report Group Type |
Displays whether the Reports are |
|
Available Roles |
Displays the user roles who are permitted to access the Application without any Restrictions - It is an editable field; hover on to a specific field to see an edit icon. Click the edit to navigate to the Apply Security pop-up to add the user roles and configure the meta/data permissions. |
|
Permissions |
Displays the authorized roles who have access to the Reports. Click on the edit icon to see a pop-up window where you can add/update/delete roles and their permissions. |
|
Steward |
Displays the name of the Steward. |
|
Custodian |
Displays the name of the Custodian. |
|
Owner |
Displays the name of the Owner. |
|
Governance Role 4/5/6 |
Displays the Gov Role 4,5,6 users. It is an editable field. Click on the Edit icon to update the Custodian. |
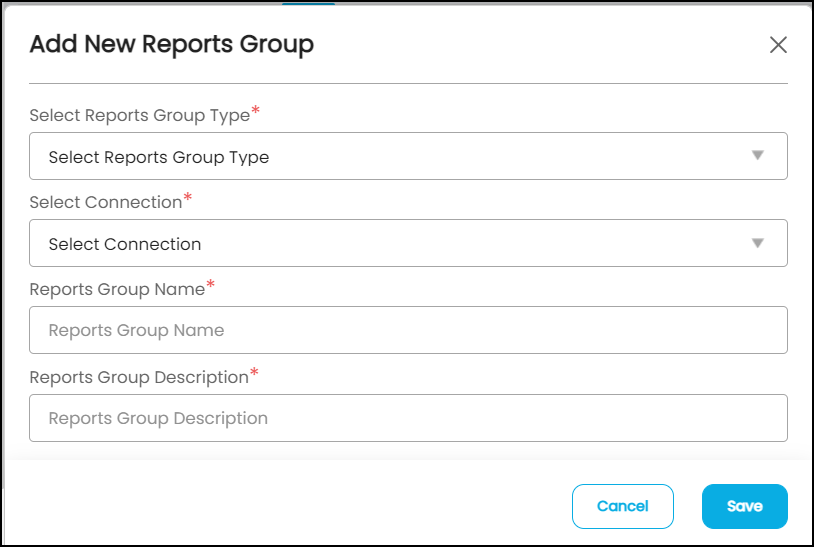
Creating New Report Groups in OvalEdge
- Go to Administration > Security >Reports Group security.
- Click on the +Add New Reports Group icon enabled in the top right.
- An Add a New Reports Group pop-up displays on the screen.
- Select Reports Group Type / Connection from the drop-down options.
Note: The connection is the database name associated with the report. Choose from the drop-down list. - Enter Group Name / Group Description in the text fields provided.
- Click the Save button, and a new Report Group is created.
Delete Report
Administrators can Delete a Report by selecting the checkbox for the appropriate Report and by clicking on the Delete button enabled in the top right.
Note1: To assign permissions to an user/role, refer to Assigning Permissions to Roles/Users.
Note2: To update permissions on multiple data assets in bulk refer to Updating Permissions on multiple data assets in bulk.
Note3: To update Governance Roles on data assets refer to Updating Governance Roles on data assets.
Applications Security
Application security is all about the security measures integrated at the application interface level where the right users are given the right access to the right applications and modules. The OvalEdge administrator has the rights to block certain application modules and sub modules.
The Applications Security grid displays the below-mentioned columns.
|
Applications Security |
Description |
|
Application Name |
Displays the name of the application module or sub-module. |
|
Application Path |
Displays the path of the application from the URL(everything after the # symbol in the URL). Example: Data Story feature tab access, Enter /#nav/story. |
|
Business User Permissions |
Enable/disable access to the Business User License type. |
|
Role Based Permissions |
Enable/disable access to users based on Roles. |
|
Permissions |
Displays the user roles who are permitted to access the selected module or submodule - It is an editable field; hover on to a specific field to see an edit icon. Click the edit to navigate to the Apply Security pop-up to provide access to roles. |
|
Modified By |
Displays the admin user by default. |
|
Modified On |
Displays the Data & Time on which the last updates are made. |
Applying security on the application modules
The access for different modules and sub-module can be provided in two ways:
- Business User Permissions - by enabling the toggle button all the users/roles assigned with Business User License type can access the module or submodule.
- Role Based Permissions - by enabling the toggle button, the roles added to Permissions can access the module or sub-module.
- you can assign the Metadata and Data access permissions on the authorized Roles using the Nine Dots icon > Update Roles option.
- To update/add roles on multiple application modules and sub modules, click on the Nine Dots, and select Update Roles.
- You can enable/disable Role Permissions in bulk on selected modules or sub modules by selecting the Enable Application or Disable Application option from the Nine Dots option.
- You can enable/disable Business License permissions in bulk on selected modules or sub modules by selecting the Enable License Permission or Disable License Permission option from the Nine Dots option.
Assigning Application access permissions to Roles:
OvalEdge provides options to limit access to the application modules for unauthorized users. To apply security on a specific application module follow the below instructions.
- Go to Administration > Security > Applications Security.
- Select a module or submodule on which you want to authorize Roles to access the module/submodule.
- Hover on to the Permissions column field in the grid to see an edit icon. Click on the edit icon to see an Add Roles pop-up. All the existing roles in the application are displayed in the left panel, and the assigned Roles are added to the right panel.
- Click on the +icon provided next to the Role to add a specific Role to access the application module.
- Additionally, you can assign the Metadata and Data access permissions on the Roles using the Nine Dots icon > Update Roles option.
- An Apply security pop displays all the existing Roles in the application and their default permissions.
- Select the checkbox
to select the role.
- You can update and apply the required Metadata and Data Permissions from the options.
- Admin level privileges are granted to a role (users) if the Default Admin checkbox is selected. The Default Admin checkbox is enabled only for Author & Analytical License type user roles.
- Upon setting the Roles and Permissions, click the Ok button.


Removing Security on Application module
- Go to Administration > Security > Applications Security.
- Select Applications(s) or click the select all checkbox to select all the application modules.
- Click on the nine dots icon to select the disable option.
- To remove security on a single module or submodule, drag the toggle bar module to Disable security against the selected module in the application.
Domains Security
Access control allows the admin user to grant different privileges to selected roles within a domain. Different levels of Meta permissions i.e. Read-only or Read-Write are assigned to users based on their role in the organization.
- The Domain Security is facilitated to control user access on selected domains. Access control allows the admin to provide Metadata Permissions ( Read-Only or Read-Write) on a specific domain.
- It helps to create new Domain, Classifications, Categories/Sub Categories with configured Steward, Custodian, and Owner to each domain.
Understanding Domain
A domain is the highest level of organization for your data. Domains are created to organize data assets using Terms. Each domain can have its own hierarchy of Categories/Sub-Categories/Classifications independent of structures in other domains. It helps classify all your business glossary terms and associated data objects. They play a very important role in setting up Terms, Tags, Data Stories, Data Quality Rules, and Governance Policies.
|
Domain Security |
Description |
| Icon |
To add a new Domain to the grid. |
|
Delete icon |
To delete a domain and associations from the application. |
|
Domain |
Displays the name of the Domain. |
|
Domain Description |
Displays the description added to the Domain. |
|
Steward |
Displays the name of the Steward configured to the Domain. |
|
Custodian |
Displays the name of the Custodian configured to the Domain. |
|
Owner |
Displays the name of the Owner configured to the Domain. |
|
Permissions |
Displays the authorized roles configured to access the Domain. Hover over the field and click on the edit icon to add/update/delete - Roles and their permissions. |
User Actionable Items
|
Actionable Items |
Description |
|
Update Roles |
To update the User Roles and assigned permissions. |
|
Update Governance Roles |
To update the Steward / Custodian / Owner / Gov 4,5,6 users. |
|
Configure Classification |
To create and edit new classifications under a Domain. |
|
Configure Categories |
To create and edit new categories and sub categories under a Domain. |
|
Default Data Association Preferences |
To configure the default data association preferences for each Domain which are by default inherited to all the Terms created under that Domain and also carry forwarded to data objects associated with the Term. |
Creating a new domain
- Go to Administration > Security > Domain Security tab.
- Click on the + Add Domain icon enabled in the top right.
- An Add Domain pop-up is displayed.
- Enter the Domain Name, and Domain Description in the fields provided.
- Select the Governance Roles (Steward/Custodian/Owner) from the drop-down options.
- Select the Auxiliary Domain checkbox and the domain is considered as an Auxiliary domain. Terms created under Auxiliary Domain are referred to as Auxiliary Terms. Multiple Auxiliary Terms can be applied to a data object unlike the general Terms where a single Term can only be assigned to a specific data object.
- Click on the Save button to see a new Domain line item in the grid.

Configure Classification
Data Classification helps you group the data based on predefined criteria like confidentiality, privacy, data sensitivity, or compliance regulations. Any data asset in the application can be thus classified to have a level of security on who can access it and view all the data associated with the Term classification for better analysis and decision making.
Classifications can be configured for one domain at a time.
- Go to Administration > Security > Domain Security.
- Select a domain to which you want to configure classifications.
- Click on the Nine dots icon to select the Configure Classification option.
- A Configure Classification pop-up is displayed.
- Enter the Classification Name in the field provided.
- Select the Default checkbox to apply the Classification by default to the Terms created or associated with the domain.
- Click on the Save button to save the classification.
- Thus, multiple classifications can be created for a domain based on requirements.

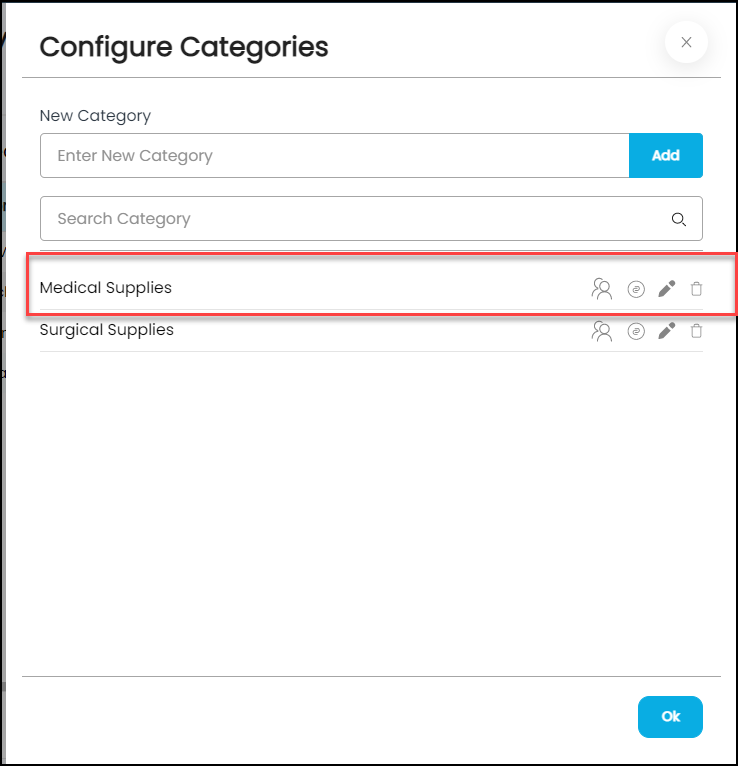
Configure Categories and Subcategories
Data Categorization is all about segregating data into different categories and sub-categories which are similar to each other. Thus, for the selected domain, the configured categories are displayed.
- Go to Administration > Security > Domain Security..
- Select a domain to which you want to Configure Categories. A Configure Categories pop-up window is displayed.
- Enter the New Category name in the field provided.
- Click on the Add button. The Category gets added to the domain and is displayed in the pop-up with additional configurations enabled - Responsibilities/Sub Categories/Edit/Delete.
- You can enter another New Category Name in the field provided and click on the Add button.
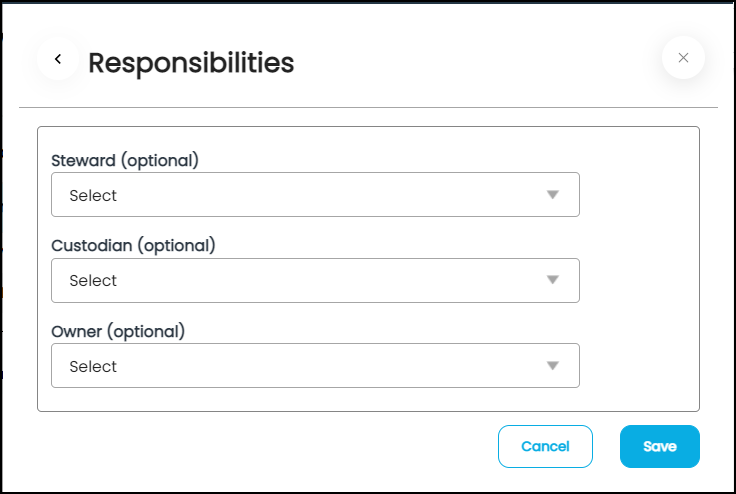
- Click on the Responsibilities icon to see a Responsibilities pop-up to select the Steward / Custodian / Owner users from the drop-down. Click the Save button to update the users.
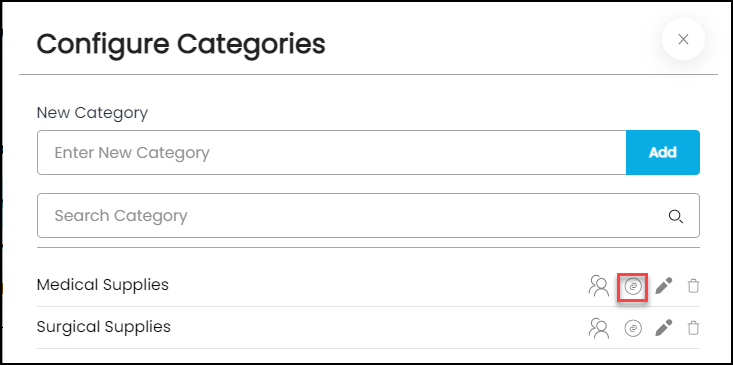
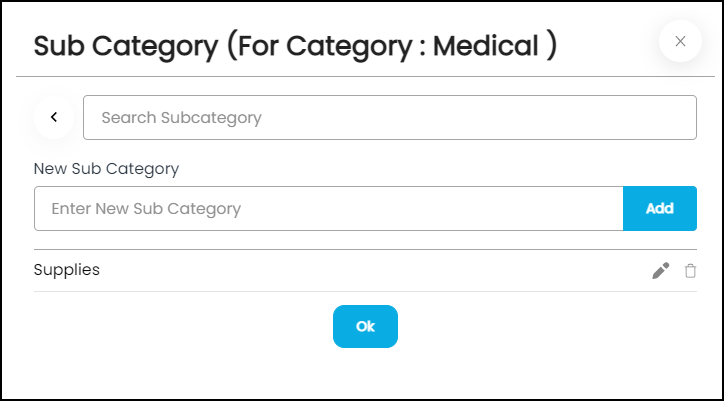
- Click on the Sub Category icon to see a Sub Category pop-up. There is a search field provided to search for the sub categories from the existing options. To add a new Sub Category enter the New Sub Category name in the field provided. Click on Add button, and the subcategory gets added to the Category with edit and delete icons enabled.
- Click on the Edit icon to change or update the Category name.
- Click on the Delete icon to remove the category from the domain.


Assigning Roles and Permissions on Domains
The functionality helps to add new User Roles that can access the selected domain.
- Go to Administration > Security > Domain Security.
- Select the Domain from the grid or click on the select all checkbox to select all the domains in the application.
- Click on the Nine dots icon to select the Update Roles option. An Apply security pop-up window with available Roles and Metadata permissions are displayed.
- You can select the Roles and update the Meta Permissions for the Role to access the selected domain.
- Upon setting the Roles and Permissions, click on the Ok button. The Recreate/Append toggle button is enabled in the bottom right. Select Append to update or add more Role/User permissions to the already existing Role/User permissions. Select Recreate to remove the existing Role/User permissions to add a new set of Roles/Users permissions.

Configure Data Association Preferences
The Default Data Association Preferences inherits the Domain properties to a Term created under a specific domain. You can select and configure the default data association preferences for each Domain which are by default inherited to all the Terms created under that Domain and also carry forwarded to data objects associated with the Term. The data objects can be configured and controlled using the Default Data Association Preferences.
- Go to Administration > Security > Domain Security.
- Select a domain. Click Nine dots to select the Default Data Association Preferences option. A pop-up window with the various Default Data Association Preferences options with checkboxes are displayed
- Check the Copy title to the Data Dictionary checkbox to add functionality when a Term is created under this domain. When a Term is created, the Copy Title to Catalog option automatically gets selected and the data objects having the same Term associated with it get the Title overridden with the Term title.
- Check Copy Business Description to catalog checkbox to add the functionality when a Term is created under this domain. When a Term is created, the Copy Business Description to Catalog automatically gets selected and the data objects having the same Term associated with it gets the Business Description overridden with the Business Description of the Term.
- Select the Restricted checkbox to associate the functionality when a Term is created under this domain - when a Term is created, the Restricted automatically gets selected - the data objects to which the term is applied, the entire column becomes invisible or inaccessible to the users.
- Select the Masked checkbox to associate the functionality when a Term is created under this domain - when a Term is created, the Masked option automatically gets selected - which replaces the column data with characters and numbers, null values, or xxxxx patterns to hide the original content.
- Select Show Classification at the dictionary - checkbox to by default associate the functionality when a Term is created under this domain - when a Term is created, the Show Classification at the dictionary option automatically gets selected - the classifications applied to the Terms get applied to the associated term-data objects.
- The selected options will be by default set to the new Terms created under the domain. Click the Save option to save the selection.

Deleting a Domain
- Go to Administration > Security > Domain Security.
- Select a domain.
- Click on the delete icon enabled in the top right.
- A confirmation message pops up for the confirmation. Click on the Ok button to Proceed.
- Deleting a domain deletes the Categories, Subcategories, Classifications , Terms and DAG’s created under the domain.
Deleting a Domain Category or Sub Category
- Go to Administration > Security > Domain Security.
- Select the domain under which the Category or Sub Category is created.
- Click on the Nine Dots icon and select Configure Categories option.
- Click on the delete icon placed next to the created Category or Sub Category.
Story Zone
Story Zone security is all about securing and protecting the Data Stories from unauthorized users. Access control allows the admin user to grant privileges to specific roles to access Data Stories. Different levels of Meta permissions i.e. Read-only or Read-Write are assigned to users based on their role in the organization. Additionally new Data Stories can be created.
The grid displays:
|
Story Zone Security |
Description |
| Icon |
To add a new Story Zone. |
|
Delete icon |
To delete Story Zone(s). |
|
Story Zone Name |
Displays the name of the Story Zone. |
|
Story Zone Description |
Displays the description added of the Story Zone. |
|
Permissions |
Displays the authorized roles configured to access the Story Zone with different levels of permissions applied. Hover over the field and click on the edit icon to add/update/delete - Roles and their permissions. |
Creating a new Story Zone
- Go to Administration > Security > Story Zone Security.
- Click on the + icon Add New Story Zone icon to see a pop-up.
- Enter the Story Zone name and Description in the fields provided.
- Click the Save button, and the story gets added to the grid and is reflected in the Data Stories module.

Assigning Roles and Permissions on Story Zone(s)
- Go to Administration > Security > Story Zone Security.
- Select the Story Zone(s) from the grid or click on the select all checkbox to select all the Folders in the application.
- Click on the Nine dots icon to select the Update Roles option.
- An Apply security pop displays the created Roles in the drop-down list.
- You can select the Roles and update the Meta Permissions for the Role to access the selected Story Zone.
- Upon setting the Roles and Permissions, click the Ok button.
- The Recreate/Append toggle button is enabled in the bottom right. Select Append to update or add more Role/User permissions to the already existing Role/User permissions. Select Recreate to remove the existing Role/User permissions to add a new set of Roles/Users permissions.
Deleting a Story Zone
- Go to Administration > Security > Story Zone Security.
- Select Story Zone(s) from the grid.
- Click on the delete icon enabled in the top right.
- A confirmation message pop-up window is displayed for the confirmation. Click Ok to Proceed.
DAG Tag Security
DAG Tag Security helps to manage the permissions to access/edit the data objects associated with the DAG. The access control permits the admin user to grant privileges to user roles on each DAG and associated data object. Based on the needs of the user role in the organization, different levels of Metadata and Data permissions, i.e., Meta-Read / Meta-Write are assigned to the allowed users.
What is Data Asset Group (DAG)?
Data Asset Group (DAG) is a way to manage the security, ownership, and stewardship of data objects at the functional level. When a data source is initially crawled by the OE_Admin user, the Steward, Owner, Custodian, and Gov Roles 4,5,6 are defined. DAG Tags are thus used to override the existing Governance Roles of the data objects.
For Example: If a Database is crawled and the Governance Roles are defined with Owner - Jack, Steward - Jill, and Custodian - Jade at the crawler settings. Then all the data objects in the database will inherit the same Governance Roles defined. If a DAG with Governance Roles Owner - Robert, Steward - Bob, Custodian - Kane is applied to a data object, then the Governance Roles of the data object get overridden with the DAG governance roles.
- The DAG TAGS can only be created by a user with the ADMIN role.
- OE_ADMIN users can manage User Roles accessing the DAG Tags.
- The DAG Tags are associated with data objects to enable controlled access.
- You cannot assign more than one DAG to a data object. However, multiple data objects can have the same single DAG applied to them.
Creating a New DAG
A DAG Tag is created under a specific Domain.
- Go to Administration > Security > DAG Security.
- Click on the Add Data Asset Group + icon enabled in the top right. An Add Data Asset pop-up is displayed.
- Select a Domain from the drop-down options under which you want to create a DAG.
- Enter the name of the DAG in the field provided.
- Enter the Description of the Dag in the field provided.
- Select the Steward/Custodian/Owner/Gov 4,5,6/Author from the drop-down options.
- Click on the Save button, and the newly created DAG gets added to the DAG Security grid.

Note:
- The Mange checkboxes against the Governance Roles should be selected while creating a DAG to override and apply the Governance Role users to the data objects.
- The Manage Security checkbox should be selected while creating a DAG to apply the access permissions (selected user roles) across the data objects wherever the DAG is applied.
Managing Roles and Permissions through DAG
The data objects assigned to DAG Tags are controlled and managed through predefined user roles (Owners, Stewards, Custodian, Governance Roles 4, 5 and 6 and authors). However, the data access to data objects depends on the granted data permissions. Only OE_ADMINS has the right to create a DAG Tag and manage roles and permissions on DAG tags. Additionally, the Owner of a DAG has the right to assign data objects to DAG tags.
Note: When a DAG Tag is applied to a data object, it affects the Owners, Stewards, Custodian, Governance Roles 4, 5 and 6 and Security groups based on the configuration of DAG. It also affects all the associated tables as well EXCEPT on some tables which might have direct DAG.
Assigning User Role access to DAGS
- Go to Administration > Security > DAG Tag Security.
- To add user role access to a single DAG Tag, you can directly click on the edit icon enabled in the Available Roles field in the grid. An Apply Security pop-up is displayed.
- All the User Roles created in the application are displayed in the pop-up with default roles set in Users & Roles module. Select the checkboxes to add the User Roles who can access the Reports and update the Metadata & Data Permissions for the added Roles.
- Click on the Ok button to save the User roles and Permissions.
Delete a DAG Tag
- Go to Administration > Security > DAG Tags Security.
- Select the DAG Tag(s) from the grid or click on the select all checkbox to select all the DAG Tags in the grid.
- Click on the Delete icon to delete the DAG(s) after a confirmation message pop-up.
- Click on the Yes button to delete the DAG(s).
- When you delete a DAG tag, all the data assets associated with the DAG tag are removed. The Governance Roles will get reverted back to the previously configured data object level Roles.
Edit a DAG Tag
- Go to Administration > Security > DAG Tags Security.
- Select a DAG Tag(s) from the grid.
- Click on the Edit icon to see a pop-up displaying the DAG Tag details.
- You can edit the DAG(s) details like DAG Name, description, Steward, Custodian, Owner, Gov 4,5,6, and Author, to manage the Roles and Security.
Assigning DAG to the data asset
DAG can be assigned to Database schemas, Tables, Files, Reports, and queries. DAGs can be assigned to the data objects through Tags. The DAG tags are displayed in the Tags pop-up along with Tags with a Superscript of DAG. To add a DAG Tag users can use the general Edit tag icons or options.
Go to Data Catalog > Data Object (Tables, Table Column, Files) > main page grid > Tags column > edit icon.
An Add pop-up opens on the screen displaying the DAG Tags first in the list followed by general Tags. DAG Tags are identified by a DAG superscript. Click the +icon to add the DAG Tag to the data object.

Approval Workflow
Approval Workflow helps businesses automate and streamline the service request processes. With approval workflows, businesses can ensure that service requests are reviewed and approved by the appropriate decision makers, while reducing the time and effort required to create and manage workflows.
The pre-configured workflows help reduce the time and effort required to create and manage workflows that can be customized to meet specific needs of the business.
Users with Admin rights can create new Workflows with multiple approval levels based on the scope of service request or service request type (Access, Content Change, Report data quality and others). This flexibility allows businesses to adapt their workflows as their needs change over time.
Approver Permissions
Decision makers in an approval workflow should have Author & Analytical license with minimum Meta Read privileges to take action on a service request. At least one of the approvers should have Meta Write privileges.
-
If the approval workflow includes multiple stages or involves a team of approvers, at least one of the approvers must have Meta Write privileges to approve the service request.
If a single approver is included in the workflow, that approver must have Meta Write permissions to approve service requests.
|
Approval Workflows Grid |
Description |
|
Add Workflow |
To add a new workflow. |
|
Nine Dots icon |
To delete a selected approval workflow. The custom workflows can be deleted only when no service request template is associated with the selected workflow or when the Service Request Templates Count column displays zero. The system-defined workflows cannot be deleted. |
|
Id |
Displays the Workflow Id. |
|
Name |
Displays the name of the Workflow. Hover over the name field to see an edit icon. Click the Edit icon to see a pop-up window displaying the configured approvers. You can make any new changes/updates to the workflow. |
|
Description |
Displays the Workflow details. |
|
Template Type |
Displays whether the Workflow is System or Custom type. |
|
Service Request Templates Count |
Displays the count of service requests raised using the Workflow. |
|
Created By |
Displays the user who created the Workflow. |
|
Created On |
Displays the Date & Time on which the Workflow is created. |
|
Updated By |
Displays the user name who made changes to the Workflow. |
|
Updated On |
Displays the Date & Time on which last changes are made to the Workflow. |

Approval workflow diagram
Creating a new Workflow
OvalEdge helps create multiple custom made workflow templates. Users with Admin rights can create a new Workflow to approve various types of service requests (Access/Content Change/Raise Quality Issue and more) raised by the users.
Step 1: A + icon is enabled in the top right, click on the +icon to to create a new custom workflow template. An Add Workflow pop-up appears on the screen.
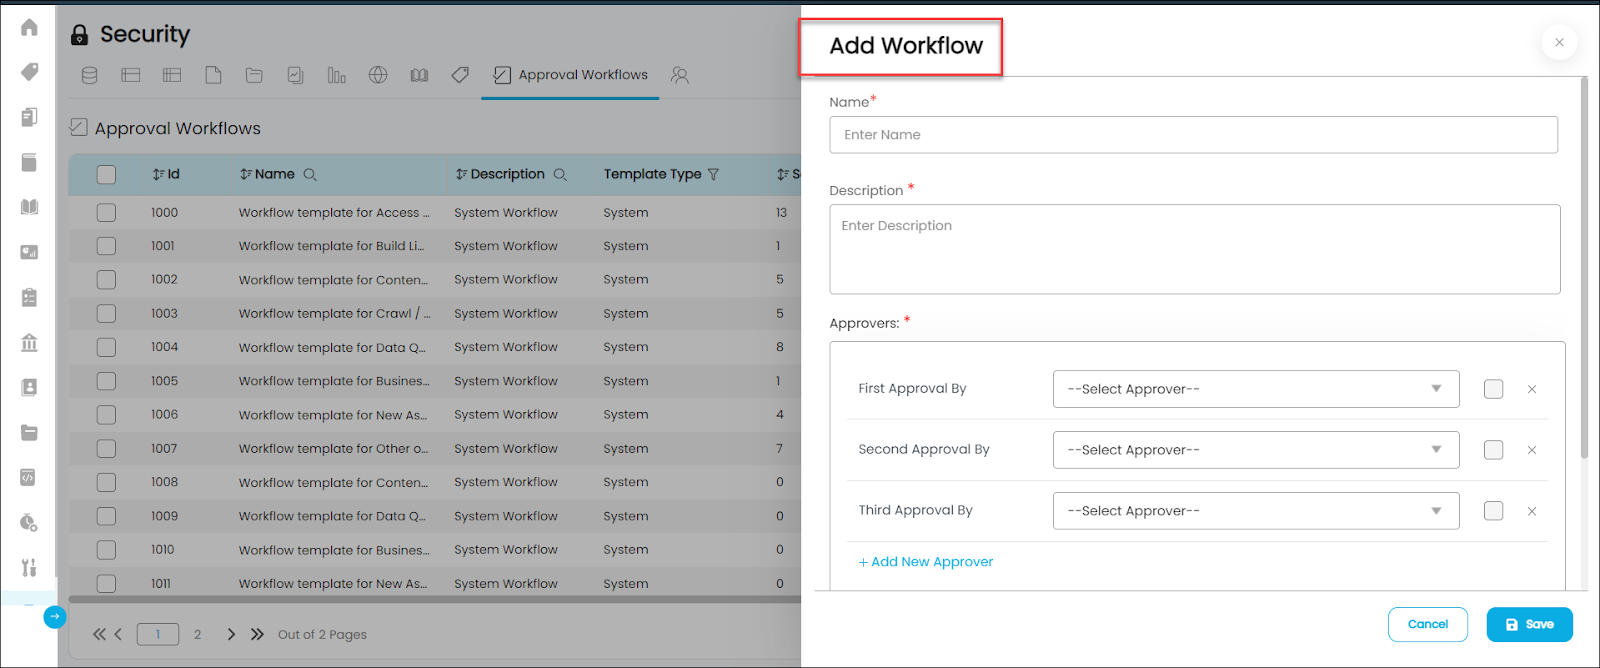
- Name: Enter the Name of the Workflow Template you wish to create.
- Description: Enter the description of the template.
Step 3: Setting Approvers
Approvers are the user(s) who are authorized to approve/reject a service request. Admin users can configure multiple levels of approval workflow based on the requirement. Thus multiple approver stages First / Second / Third Approvers, and more can be configured along with a Final Approver by clicking on the +Add New Role.
- Final Approved By: The Final Approver is the approver(s) who is ultimately responsible for approving or rejecting a service request.
- You can add more approvers to the workflow by selecting the +Add New Approver to add First / Second / Third and more levels of approvers to the workflow.
Single User
- If a single User is selected as New Approver, then the drop-down displays all the user names in the application. A single user (User / User Manager / User Data Governance Manager / User Data Control Manager) can be added to the list.
Anyone from the Role
- If Anyone from the Role option is selected as New Approver, then the drop-down displays all the user roles created in the application. As the name clearly implies, Approval/Rejection from one user member from the Role approves or rejects the Service Request.
Team
- Case1: If a Team is selected as a New Approver, then the drop-down displays the different Teams created in the application. A checkbox Check this if need approval from all the users in this role is enabled next to the Team field, selecting which needs approval from all the members in the Team. Once an approver in the Team approves a request, the request automatically moves to another user in the next line (Team). Once the final approver approves the request, the service request gets approved.
- Case 2: If the checkbox is not selected then approval/ rejection from any one member in the Team approves or rejects the approval of the Service Request.
Note: If one of the approvers rejects a service request immediately stops the approval process and the service request is marked as ‘Rejected’. A record of Approval/ Rejection can be viewed in the Governance Catalog > Service Desk > My Requests/ All Requests page.
Case 3: If the configurations set in Administration > Configuration > Others > Key - approvalflow.admin.supersede is set to False then, if the Admin user is one of the users set as a approver in a Team and the admin user approves a service request, the ticket gets into Resolved state. However, if the Configuration is set to True, then even if the admin user approves the ticket, the ticket is moved to the next in-line user till the end of the approval process.
- If any user rejects the ticket, then the ticket owner can Reopen the same ticket. The admin user can modify the approval workflow before the rejected ticket is reopened.
Step 4: Approval Workflow for External tool (JIRA/ServiceNow)
If the Service desk ticket in the OvalEdge application is mapped to an external system (Jira/ServiceNow) - then service request raised for a specific Request Type creates a new ticket in the external tool once the Approved By Level selected gets approved by the configured user.
- Upon selection, click the Save button to save the approval workflow.
- The configured approver(s) are notified when the Approval Workflow is initiated.
Deleting a Workflow
You can delete a custom workflow using the Nine dots icons only if the workflow is not associated with any service request template. The system defined Workflows cannot be deleted.
Governance Roles
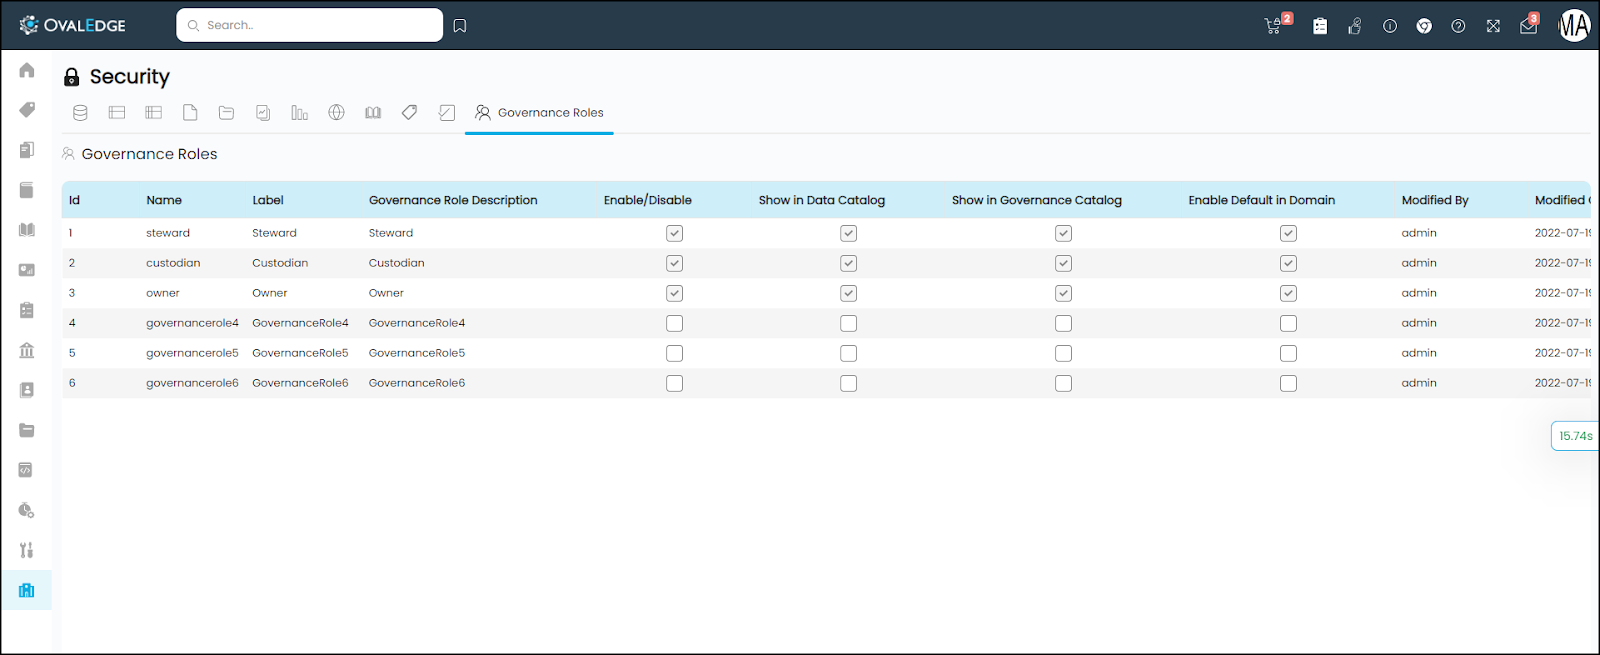
Governance Roles security helps to configure Governance Roles to appear in corresponding data catalog, Governance catalog modules, Domain, and the Approval workflow approval levels ) if any exists.
The Governance Roles - Owner, Steward, Custodian are by default selected to appear in respective modules. Users are given flexibility to enable/disable the Gov 4, Gov 5, Gov 6 roles to display in Data catalog / Data Governance / Domain. Also, the labels and Governance Role Descriptions can be edited and updated as per your organization standards and preferences.
The grid displays the below-mentioned fields:
|
Governance Roles fields and icon |
Description |
|
Id |
Display the Id of a governance role. |
|
Name |
Displays the name of the governance role, for example, Owner, Steward, and Custodian |
|
Label |
Displays the label or a name given to the Gov Role |
|
Domain Description |
Displays the description of the Role. |
|
Enable /Disable |
To Select the checkbox to enable or disable the display of this role in the application. |
|
Show in Data Catalog |
Select the checkbox to enable the display of this role in the Data Catalog module |
|
Show in Governance Catalog |
Select the checkbox to enable the display of this role in the Governance catalog module. |
|
Show in Enable Default in Domain |
Select the checkbox to set this role as default in the domain. |
Manage Governance roles
- Go to Administration > Security > Governance Roles.
- Click on the Edit icon to give a new label for the Governance role 4,5,6.
- Click on the Edit icon on the Governance Role Description to enter any description related to the Governance Roles. Click the Save button to save the details entered.
- Show in Data Catalog: Select the checkbox to enable the display of this role in the Data Catalog module Top users,
- Show in Governance Catalog: user can select the checkbox to enable the display of this role in the Governance catalog module.
- Show in Enable Default in Domain: user can select the checkbox to set this role as default in the domain.
Note: The governance role can be a single user or a team of users.
Copyright © 2019, OvalEdge LLC, Peachtree Corners GA USA