This document outlines the integration with the Salesforce connector, enabling streamlined metadata management through features such as crawling, profiling, data preview, querying, and manual lineage building. It also supports impact analysis and ensures secure authentication via Credential Manager.
Overview
Connector Capabilities
| Connector Category | RDBMS |
|
Connector Version |
Release6.3.x |
|
Releases Supported (Available from) |
Legacy connector |
|
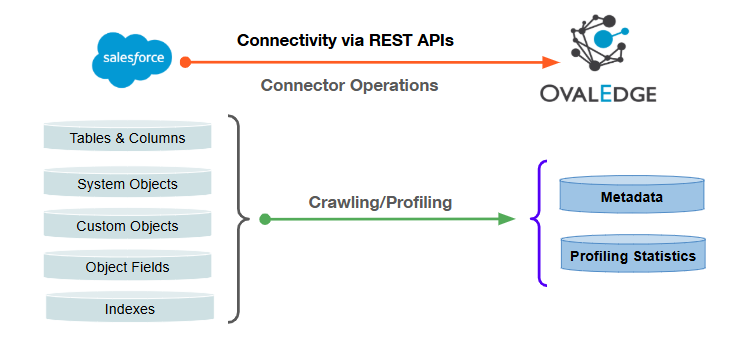
Connectivity [How the connection is established with RDBMS System] |
REST APIs |
|
Feature |
Availability |
|
| Crawling |
✅ |
|
| Delta Crawling |
❌ |
|
| Profiling |
✅ |
|
| Query Sheet |
✅ |
|
| Data Preview |
✅ |
|
| Auto Lineage |
❌ |
|
| Manual Lineage |
✅ |
|
| Secure Authentication via Credential Manager |
✅ |
|
| Data Quality |
❌ |
|
| DAM (Data Access Management) |
❌ |
|
| Bridge |
✅ |
|
Metadata Mapping
The following objects are crawled from Salesforce and mapped to the corresponding UI assets.
|
Salesforce Object |
Salesforce Attribute |
OvalEdge Attribute |
OvalEdge Category |
OvalEdge Type |
|
Objects (System & Custom) |
Object Name |
Table Name |
Tables |
Table |
|
Object Description |
Table comment |
Tables |
Tables |
|
|
Object Fields |
Field name |
Column Name |
Table Columns |
Columns |
|
Field type |
Data Type |
Table Columns |
Columns |
|
|
Field length |
Data Type Size |
Table Columns |
Columns |
|
|
Field Description |
Source Description |
Table Columns |
Columns |
|
|
Field name |
Title |
Table Columns |
Columns |
|
|
Indexes |
Index name |
Index |
Indexes |
Index |
|
If unique |
Yes /No |
Indexes |
Index |
Set up a Connection
Prerequisites
The following are the prerequisites to establish a connection:
Service Account User Permissions
It is recommended to use a separate service account to establish the connection to the data source, configured with the following minimum set of permissions.
👨💻Who can provide these permissions? These permissions are typically granted by the Salesforce administrator, as users may not have the required access to assign them independently.
|
Operations |
Sys Tables |
Permission |
|
Tables |
Objects |
Read |
|
Columns |
Object fields |
Read |
|
Indexes |
Indexed Fields |
Read |
For the Tables operation, the user must have API Enabled permission and read access to the objects to be crawled. These objects will appear as tables in the Application after crawling.
For the Columns & Indexes operation, the user must have read access to the object fields to be crawled. These fields will appear as table columns in the Application after crawling.
Connection Configuration Steps
Users are required to have the Connector Creator role in order to configure a new connection.
- Log into OvalEdge, go to Administration > Connectors, click + (New Connector), search for Salesforce, and complete the required parameters.
Note: Fields marked with an asterisk (*) are mandatory for establishing a connection.
Field Name
Description
Connector Type
By default, "Salesforce" is displayed as the selected connector type.
Connector Settings
Credential Manager*
Select the desired credentials manager from the drop-down list. Relevant parameters will be displayed based on the selection.
Supported Credential Managers:
- OE Credential Manager
- AWS Secrets Manager
- HashiCorp Vault
- Azure Key Vault
Authentication Type
The following two types of authentication are supported for Salesforce:
- Token Based
- JSON Web Token (JWT)
Connector Name*
Enter a unique name for the Salesforce connection (Example: "Salesforce_Prod").
Connector Environment
Select the environment (Example: PROD, STG) configured for the connector.
Username*
Enter the Salesforce username for the user account used for API access. It is usually in the format of an email (e.g., apiuser@xxxx.com).
Password*
Enter the password for the Salesforce user account used for API access.
Customer Key*
Also known as the Consumer Key. It is generated when a Connected App is created in Salesforce and is used to identify the client making the API request.
Customer Secret
Also known as the Consumer Secret. It is generated with the Connected App in Salesforce and is used along with the Customer Key to securely connect and authenticate the application.
Security token
A unique token generated by Salesforce for API access. Required when logging in from untrusted IP addresses. It must be appended to the password during login if the IP address is not whitelisted. Can be obtained using the "Reset My Security Token" option in Salesforce.
API version*
Enter the version of the Salesforce REST or SOAP API to be used (e.g., v59.0). This determines the available endpoints and features.
IS SANDBOX?*
Select Yes if the Salesforce environment is a sandbox (test environment), or No if it is a production environment. Sandbox environments usually have URLs like test.salesforce.com.
Keystore password*
Enter the password used to access the keystore file. This password protects the keystore and ensures secure access to the stored certificates and keys.
Note: This field appears only when the Authentication Type is set to JSON Web Token (JWT).
Alias name*
Enter the alias name used to identify the specific key entry within the keystore. Each key entry in the keystore is associated with a unique alias.
Note: This field appears only when the Authentication Type is set to JSON Web Token (JWT).
Keystore file path*
Provide the full path and file name of the Java Keystore (.jks) file. This file contains the security certificates and keys
required for establishing a secure SSL/TLS connection.
Note: This field appears only when the Authentication Type is set to JSON Web Token (JWT).
Default Governance Roles
Default Governance Roles*
Select the appropriate users or teams for each governance role from the drop-down list. All users configured in the security settings are available for selection.
Admin Roles
Admin Roles*
Select one or more users from the dropdown list for Integration Admin and Security & Governance Admin. All users configured in the security settings are available for selection.
Bridge
Select Bridge*
Select the bridge from the drop-down list.
The drop-down list displays all active bridges that have been configured. These bridges facilitate communication between data sources and the system without requiring changes to firewall rules.
- After entering all connection details, the following actions can be performed:
- Click Validate to verify the connection.
- Click Save to store the connection for future use.
- Click Save & Configure to apply additional settings before saving.
- The saved connection will appear on the Connectors home page.
Manage Connector Operations
Crawl/Profile
To perform crawl and profile operations, users must be assigned the Integration Admin role.
The Crawl/Profile button allows users to select one or more schemas for crawling and profiling.
- Navigate to the Connectors page and click Crawl/Profile.
- Select the schemas to be crawled.
- The Crawl option is selected by default. To perform both operations, select the Crawl & Profile radio button.
- Click Run to collect metadata from the connected source and load it into the Data Catalog.
- After a successful crawl, the information appears in the Data Catalog > Databases tab.
The Schedule checkbox allows automated crawling and profiling at defined intervals, from a minute to a year.
- Click the Schedule checkbox to enable the Select Period drop-down.
- Select a time period for the operation from the drop-down menu.
- Click Schedule to initiate metadata collection from the connected source.
- The system will automatically execute the selected operation (Crawl or Crawl & Profile) at the scheduled time.
Other Operations
The Connectors page provides a centralized view of all configured connectors, along with their health status.
Managing connectors includes:
- Connector Health: Displays the current status of each connector using a green icon for active connections and a red icon for inactive connections, helping to monitor the connectivity with data sources.
- Viewing: Click the Eye icon next to the connector name to view connector details, including databases, tables, columns, and codes.
Nine Dots Menu Options:
To view, edit, validate, build lineage, configure, or delete connectors, click on the Nine Dots menu.
- Edit Connector: Update and revalidate the data source.
- Validate Connector: Check the connection's integrity.
- Settings: Modify connector settings.
- Crawler: Configure data extraction.
- Profiler: Customize data profiling rules and methods.
- Query Policies: Define query execution rules based on roles.
- Access Instructions: Add notes on how data can be accessed.
- Business Glossary Settings: Manage term associations at the connector level.
- Others: Configure notification recipients for metadata changes.
- Delete Connector: Remove a connector with confirmation.
Copyright © 2025, OvalEdge LLC, Peachtree Corners GA USA