The purpose of the OvalEdge Query sheet tool is to access the data from the tables stored in the source connection. Query sheet has the ability to access, view, analyze and influence to query and view the cataloged relational database objects from any source. Query sheet provides multiple ways to discover the data:
(i) Auto SQL: The query sheet has a simple feature called Auto SQL, which is useful for users who have a basic level of knowledge of SQL and can use the functional toolbar; based on the functions selected, it will help build the query. It allows you to write your SQL query from scratch or build queries by filtering, aggregating functions, joins, and unions that can be applied to the dataset.
(ii)Advanced SQL: Using the Advanced SQL feature, users with SQL knowledge can construct complex queries. Once the query is constructed, it allows for execution and saving queries in history for future use. Saved queries can be cataloged and shared, and re-executed multiple times.

Layout of a Query Sheet
The Query Window is divided into the following sections:
- Object Explorer to select and view the contents of all the data objects like databases, schemas, and tables.
- A user interactive Function Menu Bar to fulfill query operations on the data with a single click.
- Query Editor Window to manually write queries and execute similar and advanced query operations on the connected data sources. You can access this window by pressing a shortcut key CTRL+Q.
- Result window to view the query results.

Difference between Auto SQL and Advanced SQL
|
Auto SQL |
Advanced SQL |
|
A novice user uses the Auto SQL feature to access and view the data from database objects |
An expertise SQL user uses the Advanced SQL feature to write the complex query. |
|
Auto SQL will have build function such as Filter, Sort, Union, Join and so on that can apply to the dataset and get the result accordingly. |
Advanced SQL allows you to construct and execute complex queries with SQL commands such as SELECT, INSERT, DELETE, UPDATE, DROP, and so on. |
|
These queries are not archived |
These queries are saved and available in Query History |
|
These queries are not cataloged |
These queries are cataloged so that it can be executed multiple times. |
|
These queries are not available in Data Catalog > Code tab |
These queries are available in Data Catalog > Code tab |
Access Permission
| Permissions | Description |
|
No Access |
To restrict access to the data object. |
| Preview | permission to view existing queries and charts but cannot execute queries. |
| Read | Grants permission to view to access Query Sheets to run Queries. Users can perform only SELECT statements. |
| Write | Grants permission to execute and write queries to INSERT/UPDATE/DELETE/DROP/TRUNCATE the tables |
User Permission
|
SQL Commands |
MRDN |
MRDP |
MRDR |
MRDW |
MWDN |
MWDP |
MWDR |
MWDW |
|
CREATE |
NO |
NO |
NO |
YES |
NO |
NO |
YES |
YES |
|
SELECT |
NO |
NO |
NO |
YES |
NO |
NO |
YES |
YES |
|
INSERT |
NO |
NO |
NO |
YES |
NO |
NO |
YES |
YES |
|
UPDATE |
NO |
NO |
NO |
YES |
NO |
NO |
YES |
YES |
|
DELETE |
NO |
NO |
NO |
YES |
NO |
NO |
YES |
YES |
|
DROP |
NO |
NO |
NO |
YES |
NO |
NO |
YES |
YES |
|
TRUNCATE |
NO |
NO |
NO |
YES |
NO |
NO |
YES |
YES |
Note: The minimum permission the end-user will need to access this module is a Metadata Read and Data Read on their user role.
- MRDN: Meta Read Data No Access
- MRDP: Meta Read Data Preview
- MRDR: Meta Read Data Read
- MRDW: Meta Read Data Write
- MWDN: Meta Write Data No Access
- MWDP: Meta Write Data Preview
- MWDR: Meta Write Data Read
- MWDW: Meta Write Data Write
Understanding Column-level Security on Query Sheets
The purpose of data masking and restricting is to limit exposure of sensitive data, preventing users who should not have access to the data from viewing it. The ADMIN user(s) can mask and restrict a particular column to a user role by using the Column security option when querying a data object that contains masked columns. All the unmasked and masked data are listed as a result. The data containing xxx’s identifies that the data is masked.
The restricted column is not available to view in the query results except for the user roles that are allowed to access. You cannot build and execute a query on a table with column-level security enabled. To execute a query, you must eliminate the security-enabled column and rerun the query.
Auto SQL
In Auto SQL, you can apply query operations in the shortcut ribbon. These queries are automatically generated.
- Navigate to Query sheet
- Select a database, schema, and table from the left side panel.
- For example, click on the Filter function. From the dropdown list select a column name.
- Click on the Apply button. It displays the records based on filter criteria given in the filter function.
Note:
- These built-in queries are appended to Advanced queries.
- Auto SQL queries are not editable.
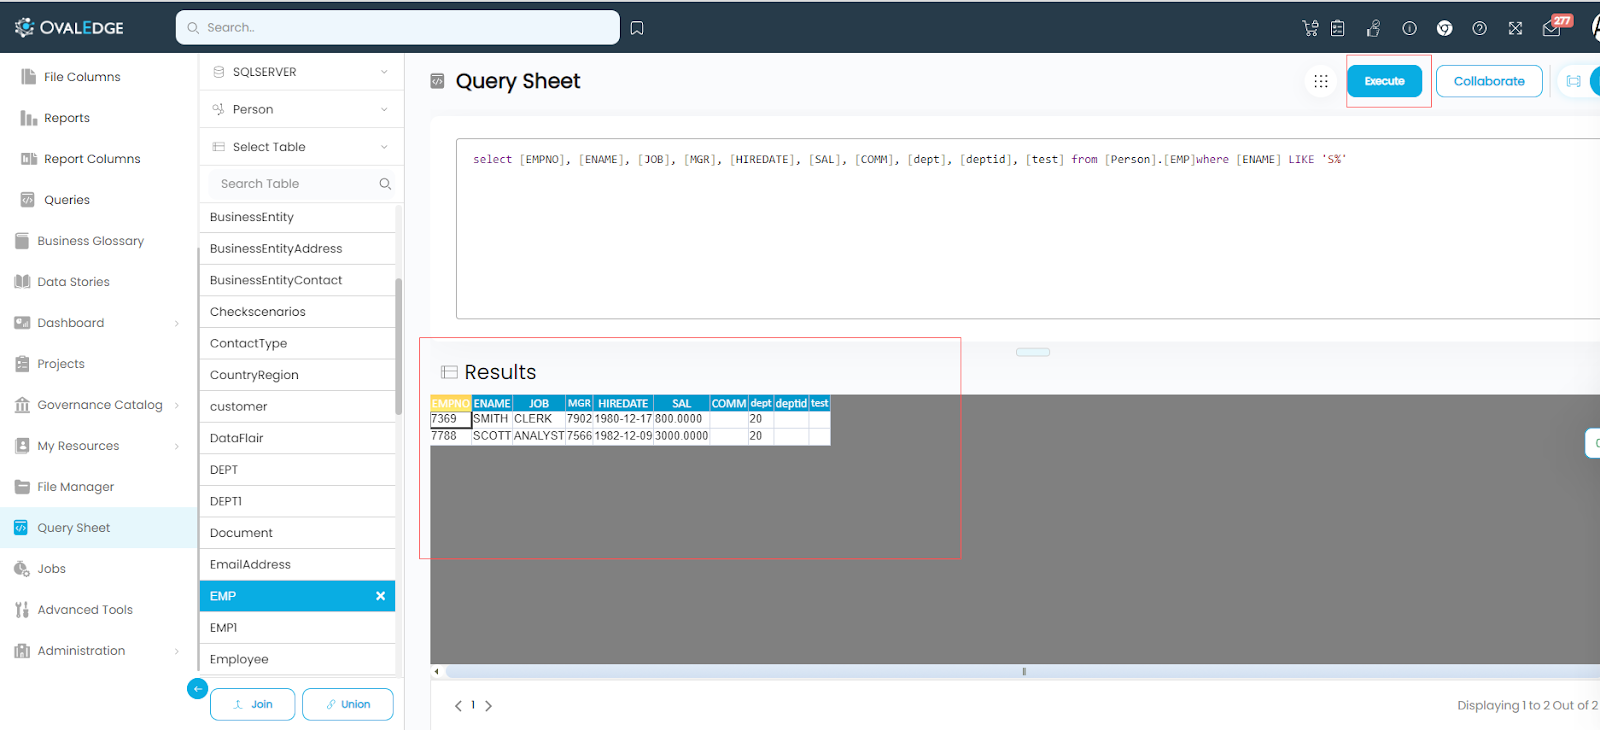
Advanced
In an advanced SQL, you can write queries in the query editor window to get the results. You can edit and execute the query in the query editor with the help of the Advanced tab.
- Navigate to Query sheet
- Select a database, schema, and table from the left side panel.
- Select the Advanced button. You can edit a query in the query editor.
- In the above example, the query has been modified to show the Employee Name (ENAME) records starting with the letter ‘S’; the result is displayed with two records with the employee name starting with S.
- Click on the Execute button, and the query will be processed accordingly.
Note:
- All the query operations (Filter, Data, and Jobs) are disabled in the Advanced tab.
- Execute button will record the history of queries executed in Queries - > Jobs -> Query History.
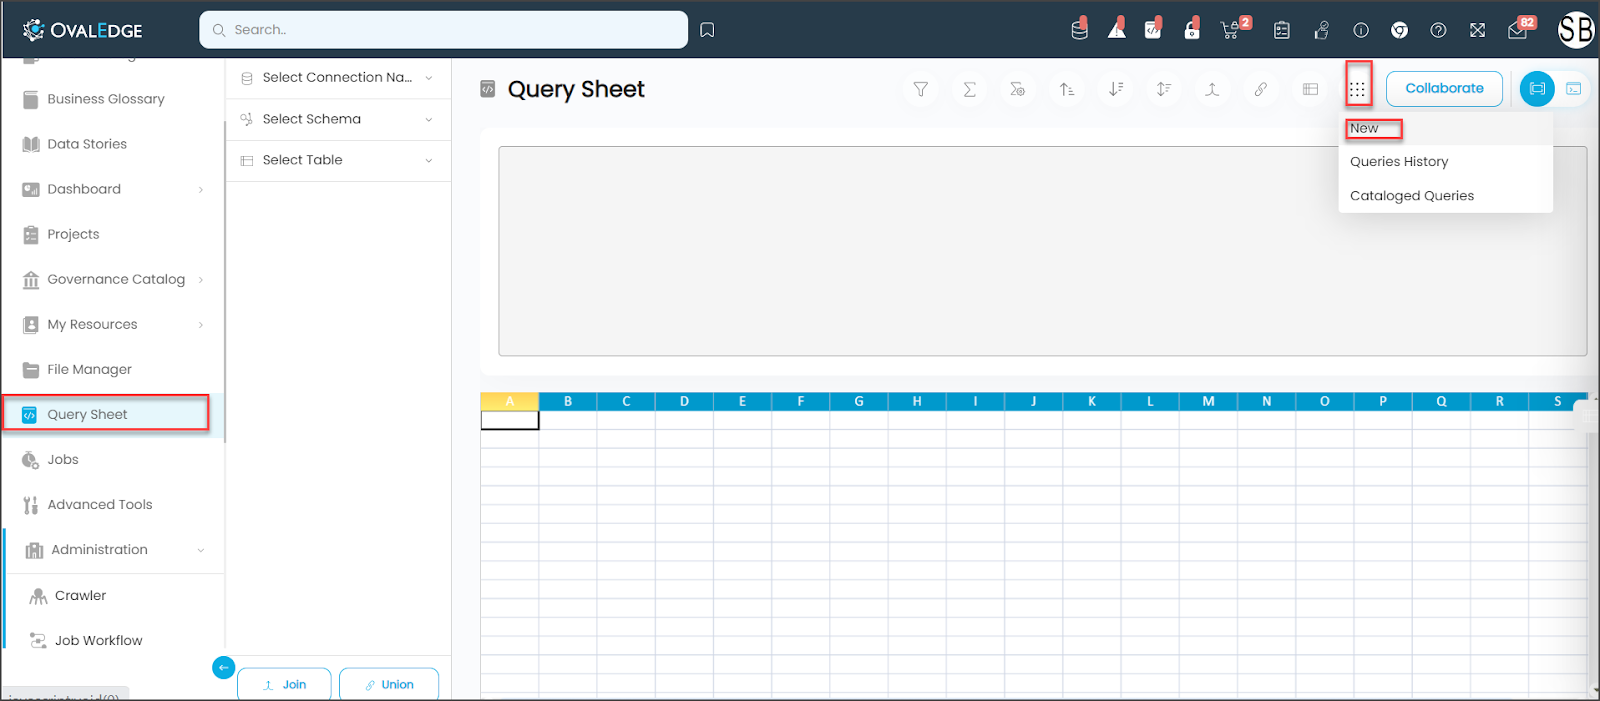
To create a new Query.
To create a new query, go to nine dots and select the new task.
- Navigate to Query Sheet > Nine dots
- Select the option New from the dropdown menu.
- The preview results of the selected table containing all the columns are displayed on the right.
- To display fewer columns, expand the arrow button on the right.
A toggle window with all the available columns in the selected table is displayed for selection. - Uncheck all the columns to hide them from view.
Query sheet Features
Build a Query
The OvalEdge Query sheet lists query operations that can be executed. All the query operations are available as easy-to-use visual shortcuts below the ribbon. It will help build the query. The query builder allows you to build queries by filtering, aggregating functions, joins, and unions with a single click. Further, if you want to enhance their queries further, they can edit and update the query. The menu bar helps to manage the data and perform data operations.

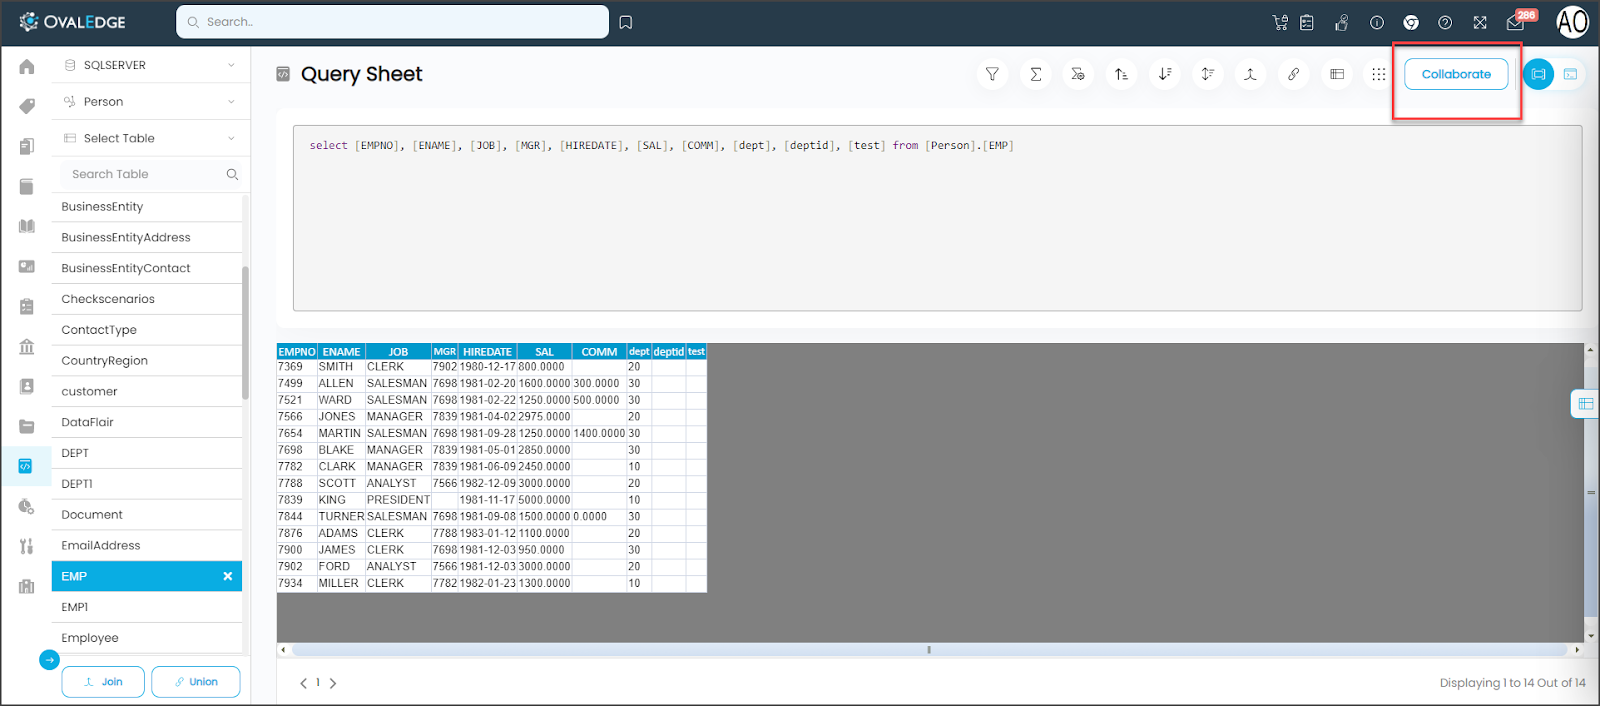
Collaborate
You can collaborate queries and share with other users when required.
- Navigate to Query sheet, Select a query
- Click on the Collaborate button
- Enter the name of the user who is supposed to receive the queries.
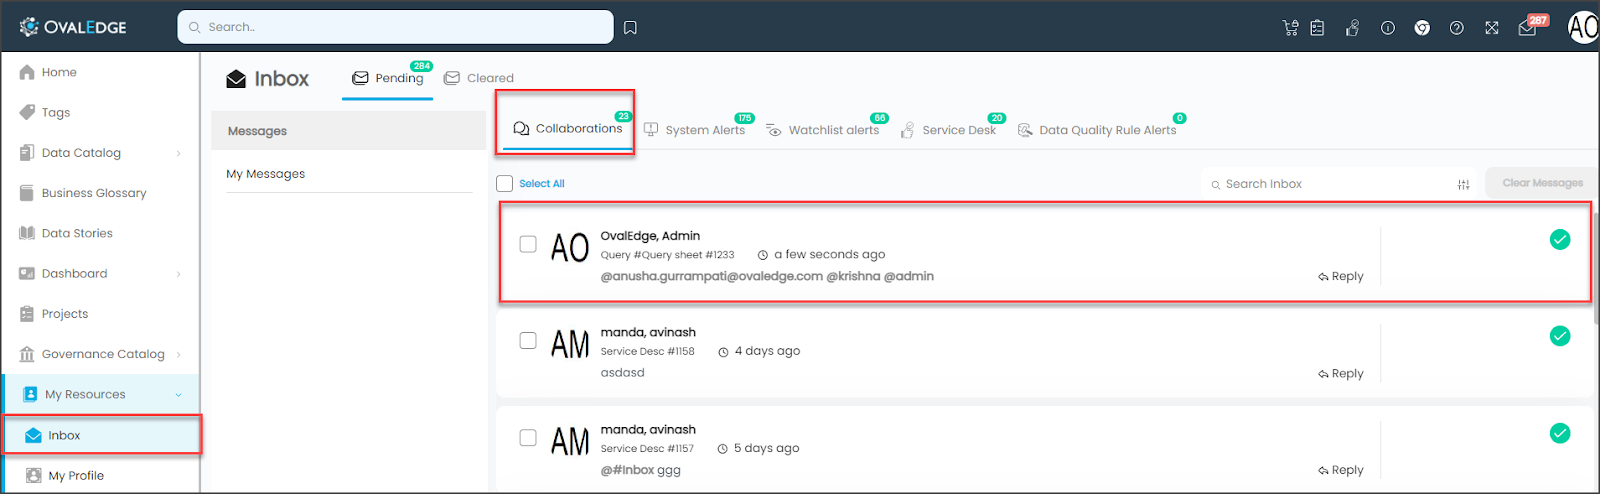
- Click on the submit button to notify the user mentioned in the inbox -> Collaboration.

Note:
- The queries that are collaborated will auto catalog in catalog query. You can once again open the cataloged queries to make any changes.
- The queries that are collaborated will also be available in the inbox notification.
- The queries that are collaborated will also be available in the data catalog - > queries tab, and you can build the query or take any action from there itself.
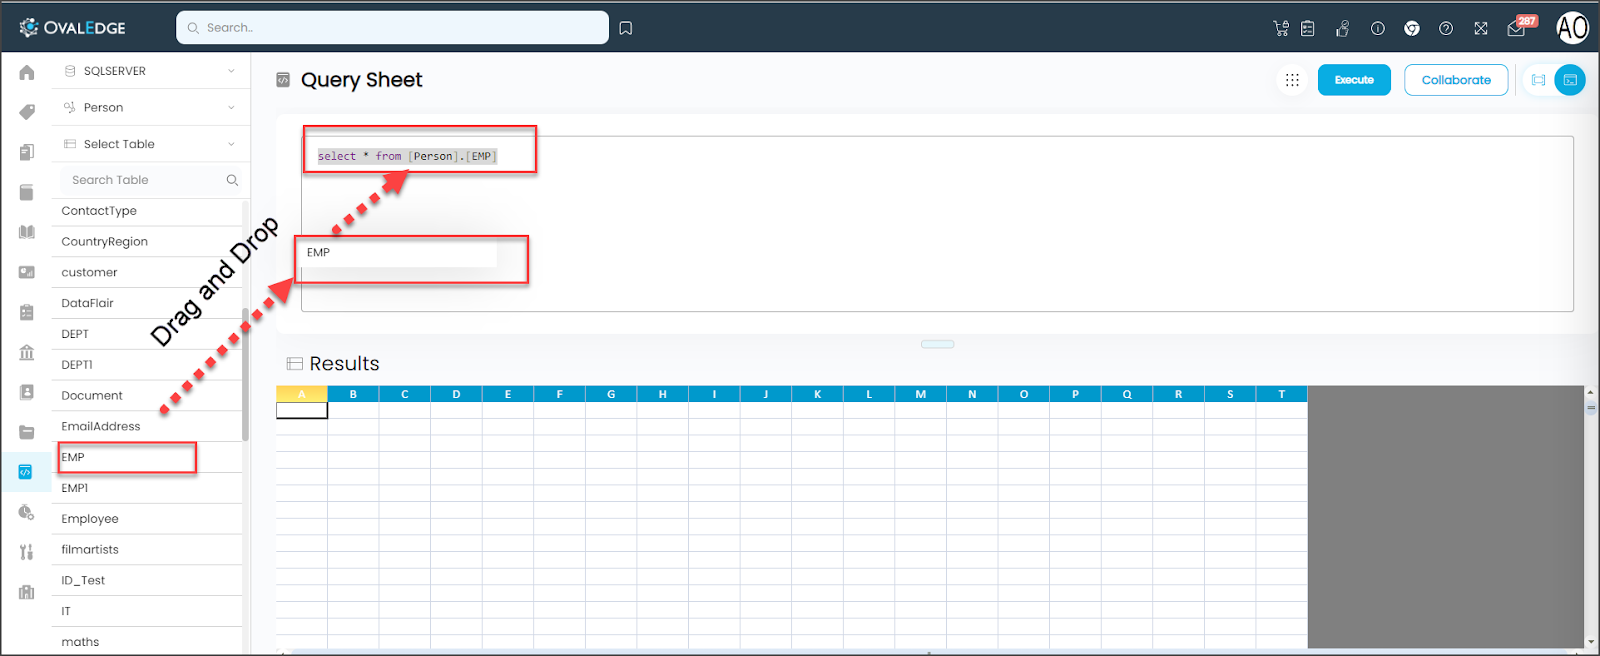
Drag and drop the Table
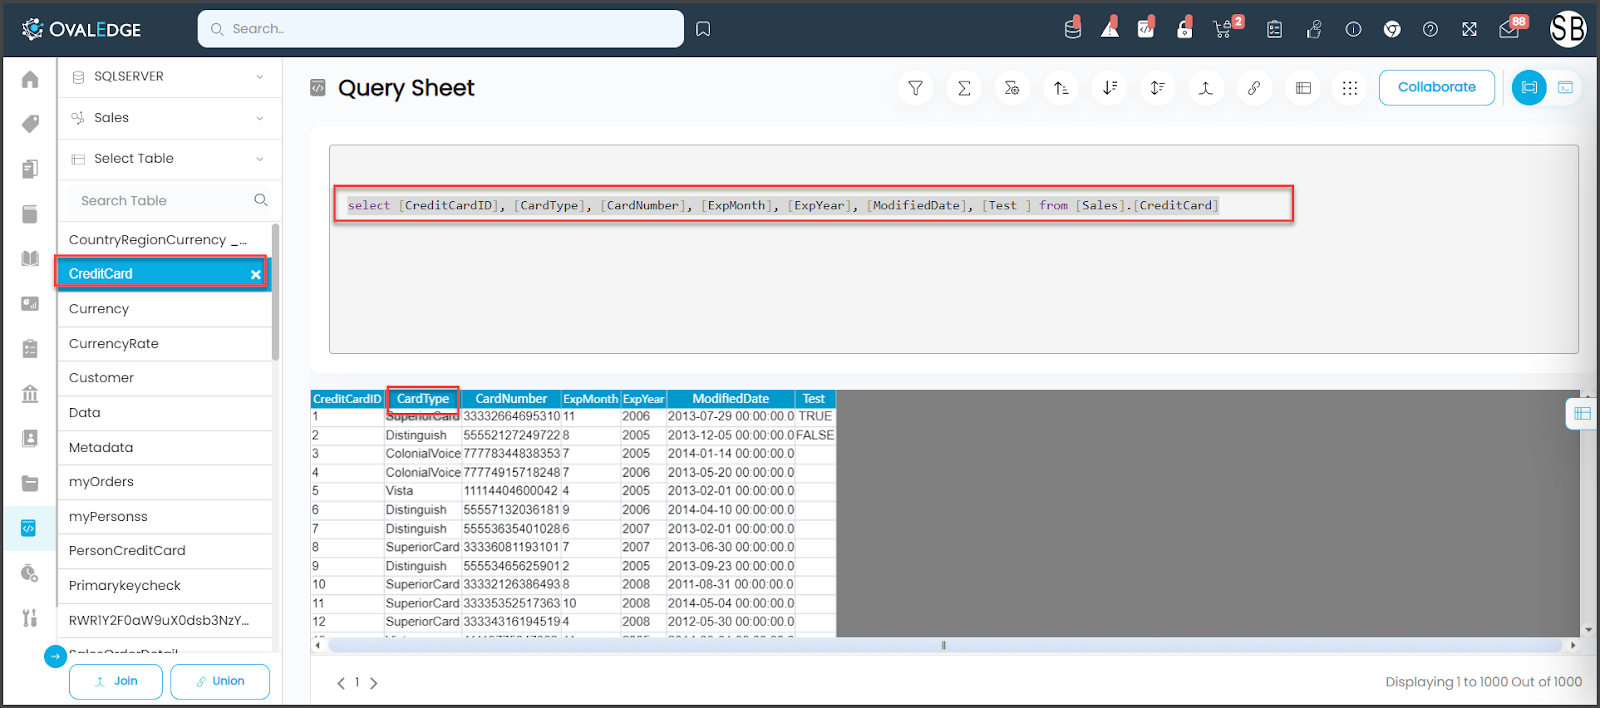
You can now just drag and drop the table into the query box. When you open the Query Sheet, you need to select the Database and Schema then the list of tables will be listed down. Drag your table from the list and drop it in the query box. It will display the script of that table as shown below:
System-defined Query Functions
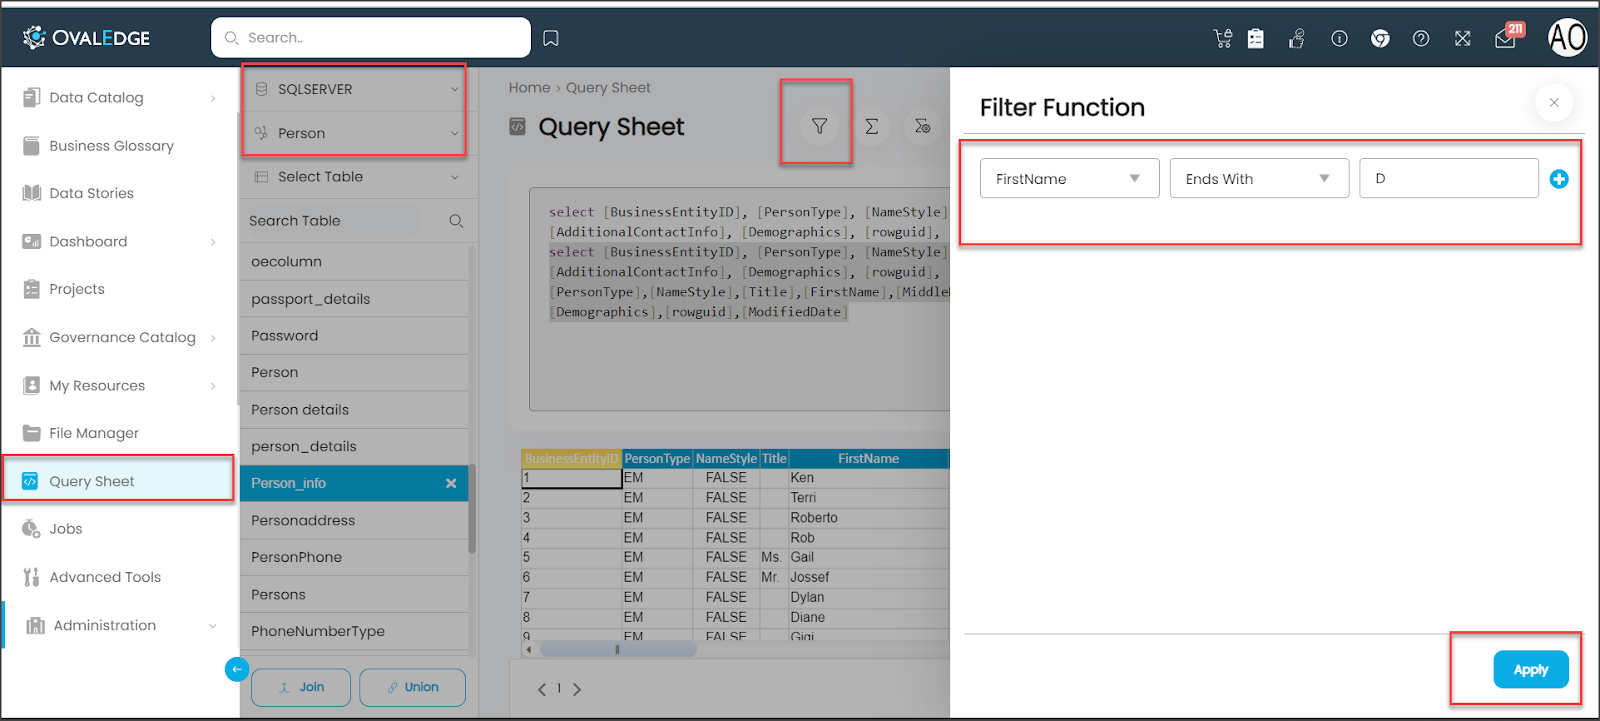
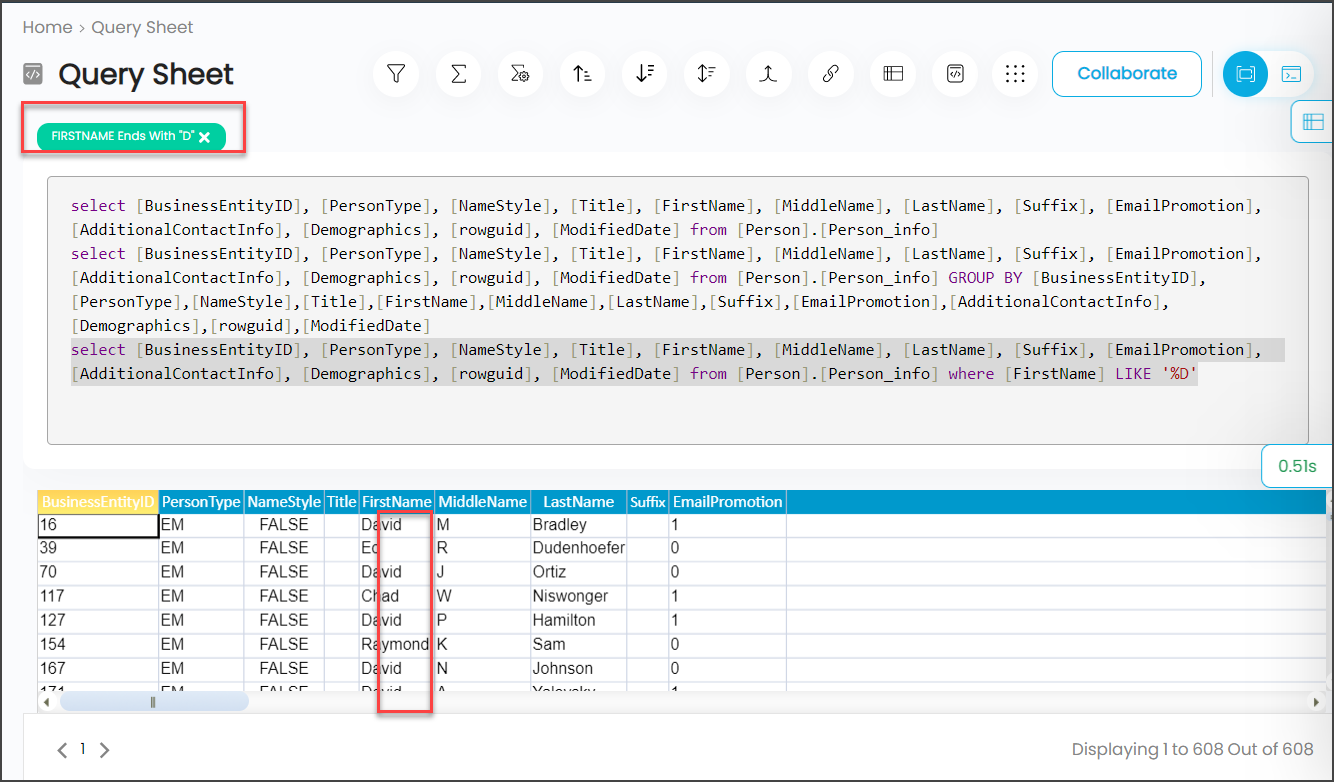
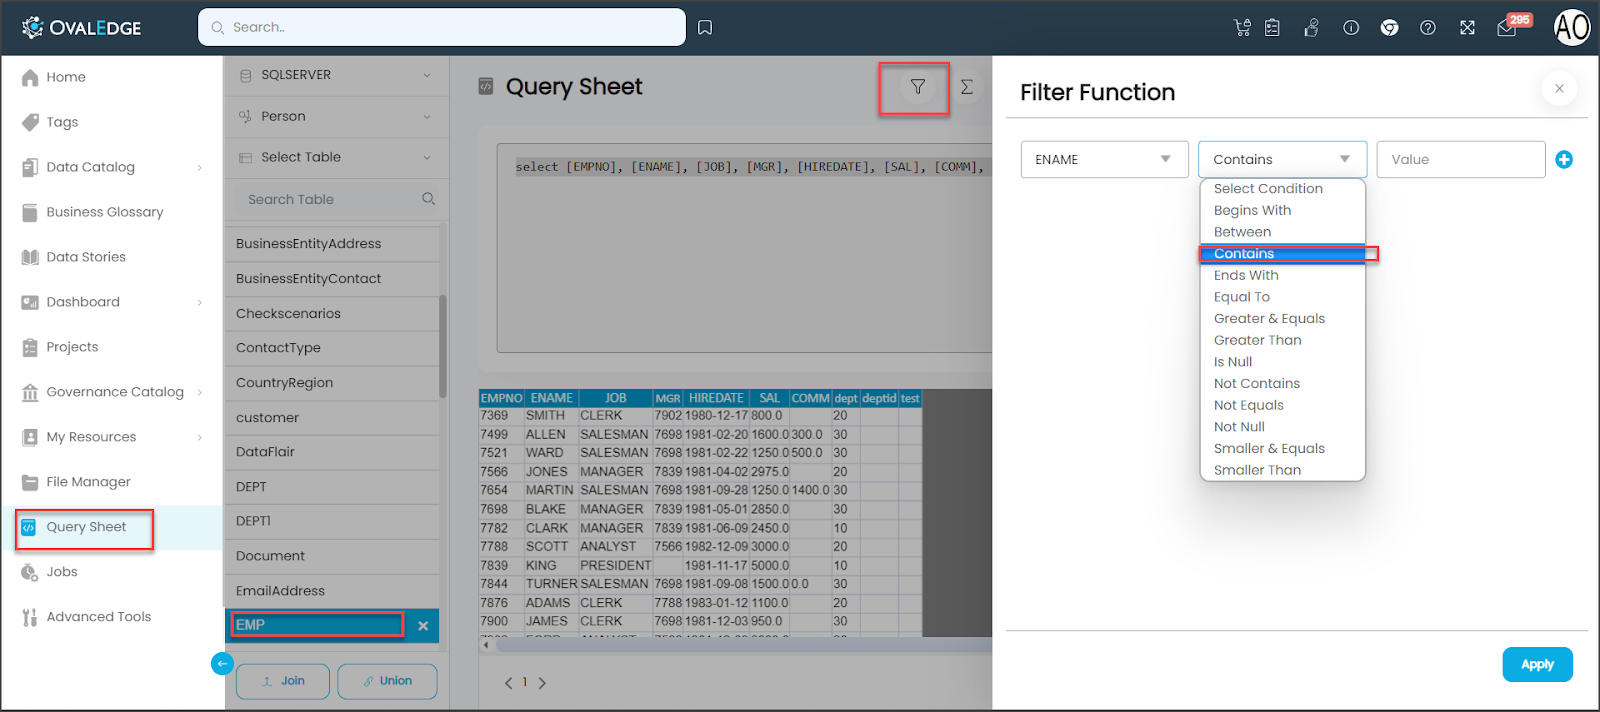
Filter Function
With data filters, you can select a subset of rows in the worksheet that meets the given criteria. They can, for example, copy rows of a table containing all the title names that contain the letters ‘ES’ into a new sheet simply using a filter.
To use the filter operation,
- Select a database name, schema name, and table name.
- The preview results of the selected table containing all the columns are displayed on the right.
- Click on the Filter icon. A pop-up window displays the Filtering criteria. Enter the filtering requirements.
- Click on Apply to get filtered results.
- The result is displayed for the filter function for the condition ENAME contains ‘ES’.

Aggregate Group By
This is a function where the values of multiple rows are grouped to form a single summary value. This is similar to “GROUP BY” in SQL queries.
To Group a column,
- Select a database name, schema name, and table name.
- The preview results of the selected table containing all the columns.
- Select the column that must be grouped.
- Select the Aggregate button. Alternatively, click the Aggregate/icon.
- The grouped values are displayed.
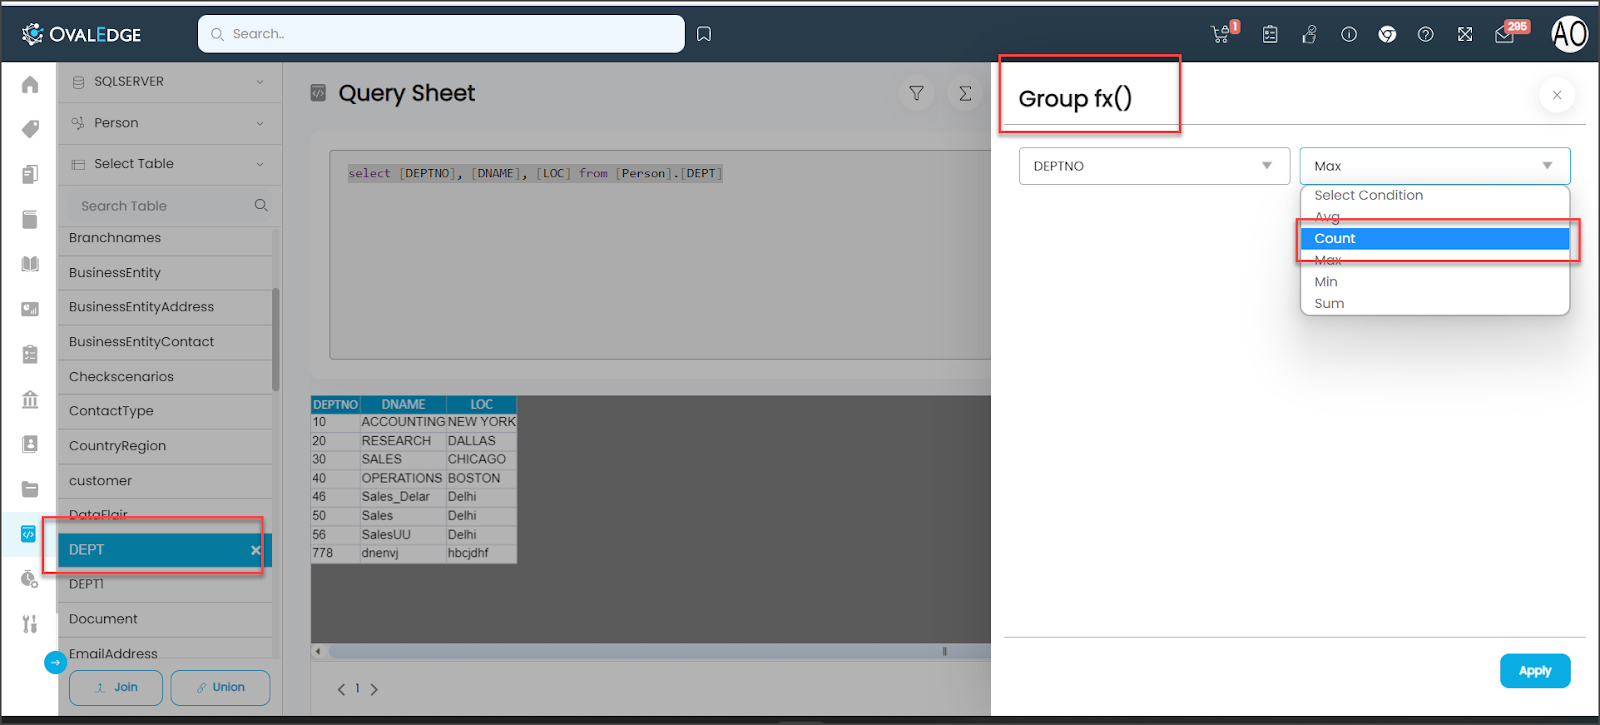
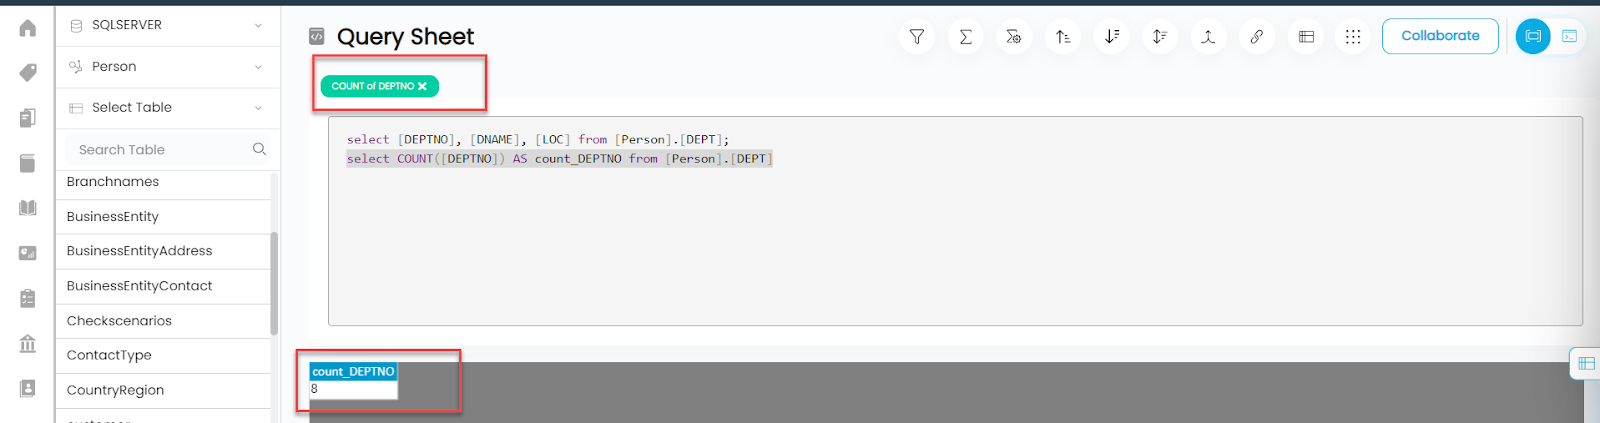
Aggregate Functions
Aggregate functions are used to calculate a set of grouped values and return a single value.
To use Aggregate functions,
- Select a database name, schema name, and table name.
- The preview results of the selected table containing all the columns.
- Click the Aggregate function
icon. A pop-up window displays the list of aggregate functions.
- Select the aggregate functions group fx() from the list, and click Apply.
- The aggregated values are displayed.
Note: Click on the X marks on the filter name to remove the applied filter.
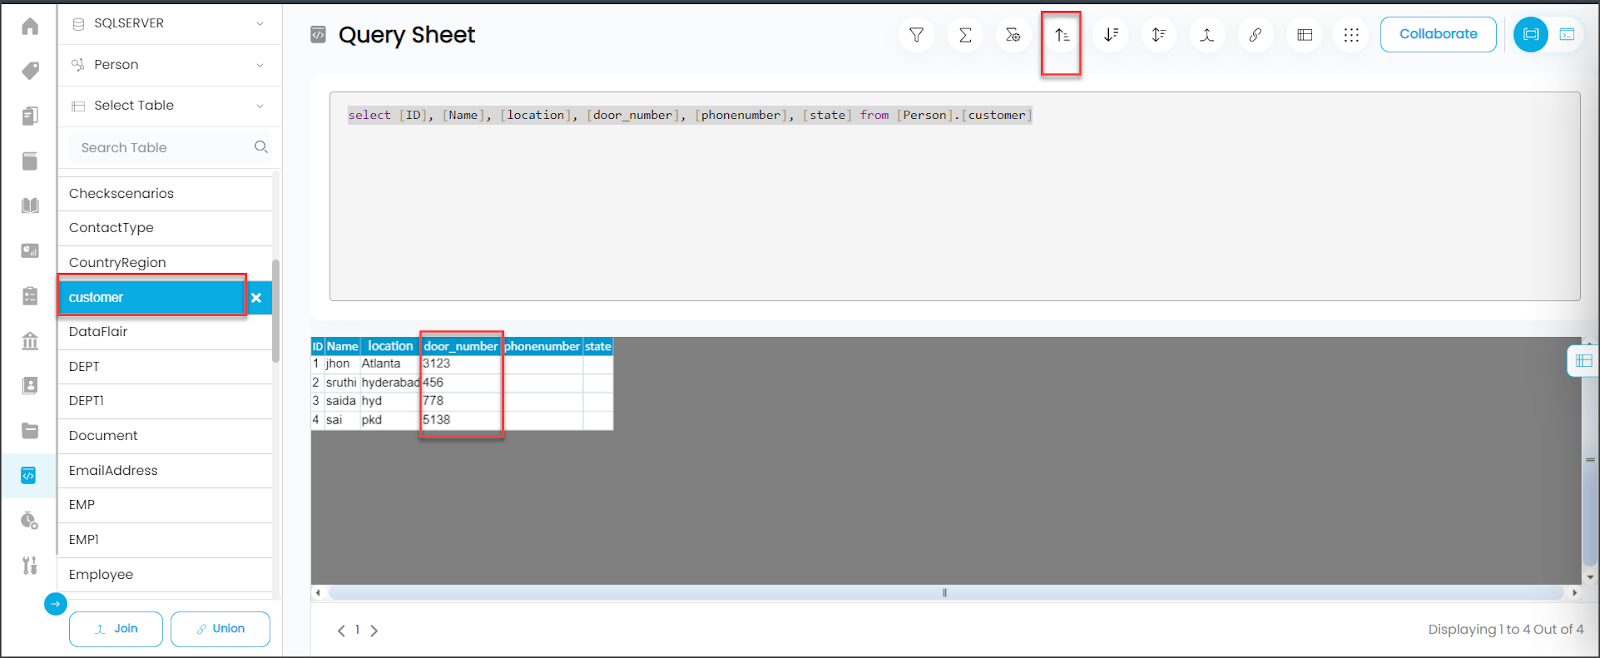
Sort
The Sort menu item allows you to sort a selection according to defined criteria. They can specify the order in which they want the output ordered.
To sort a column,
- Select a database name, schema name, and table name.
- The preview results of the selected table containing all the columns are displayed on the right.
- Select the column to do sorting on.
- Select the sort order (Ascending/Descending). Alternatively, click the Sort icon.
- The Sorted values are displayed in ascending order.
- Similarly, a sort icon for descending order is provided.
- You can click on the Original Sort icon to revert the sorted sequence.

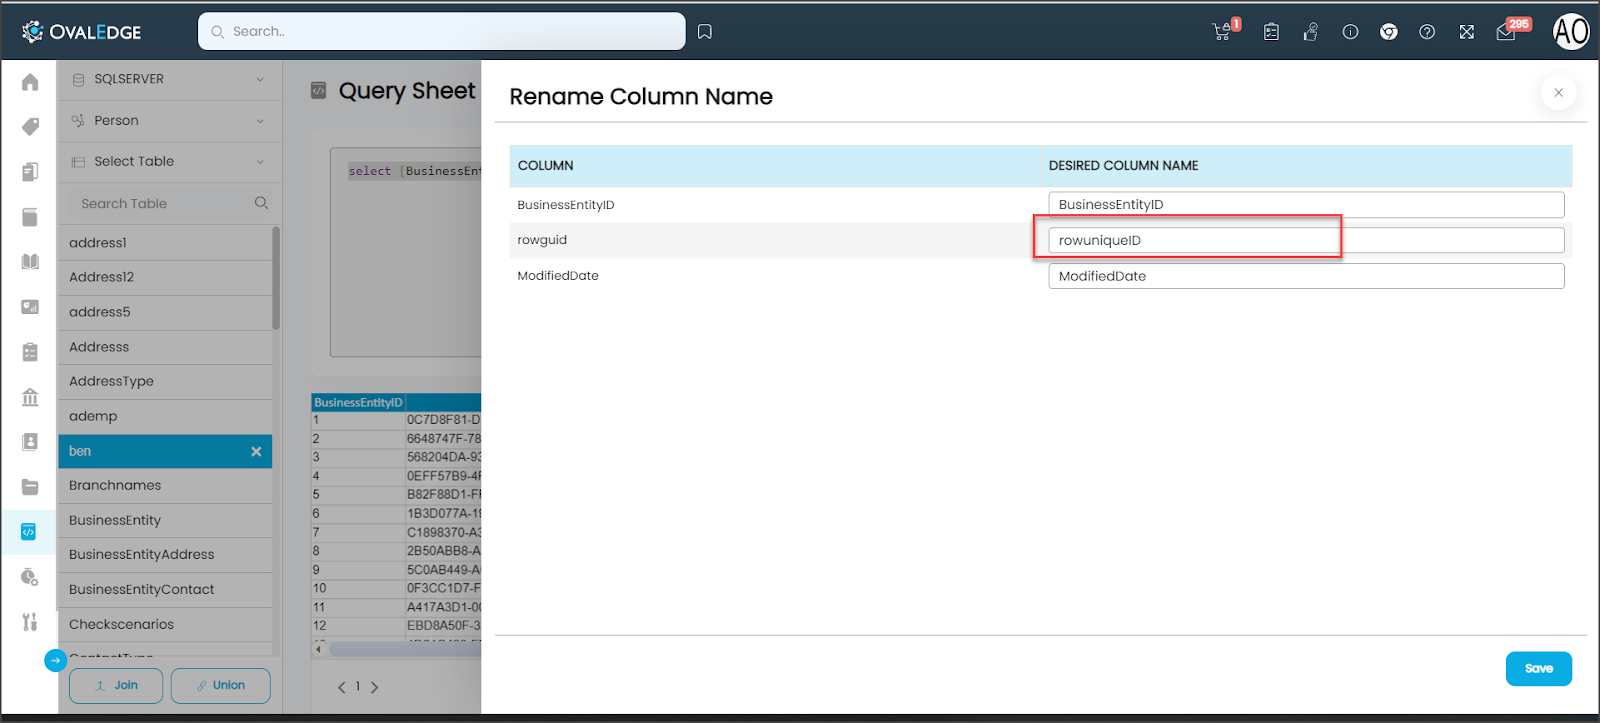
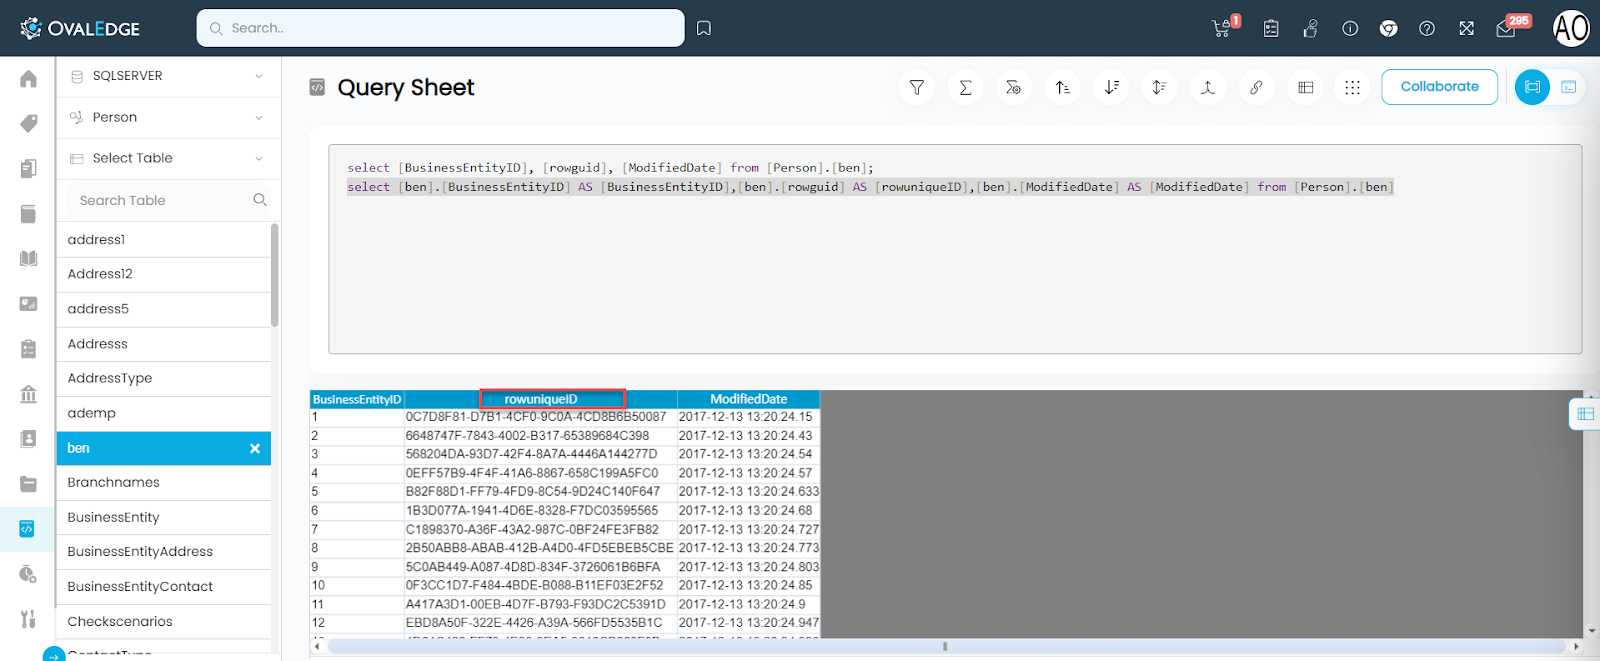
Rename Column Name
This feature helps you to rename a column name.
To rename the column name in a table,
- Select a database name, schema name, and table name.
- Click on the Rename Column Name icon. A pop-up window appears.
- Select the column to be renamed. Click Apply.
- Refresh the page and validate the table which has the changed column name.

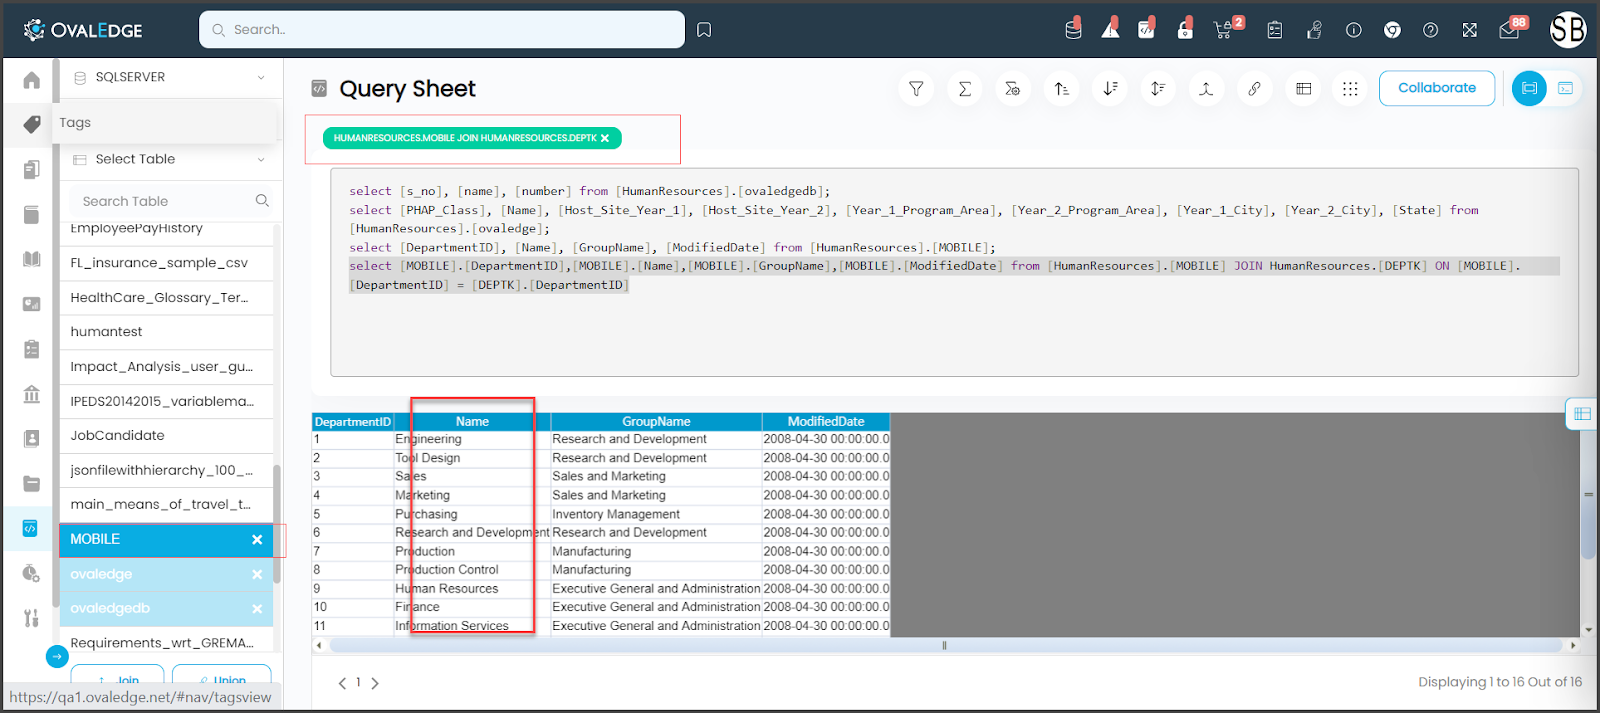
Joining Tables
OvalEdge uses machine learning algorithms to make strong recommendations for the users, and to make joins with other tables with matching columns. OvalEdge supports Inner Joins.
To create a Join using recommendations,
- Select a database name, schema name, and primary table name.
- Click the join button. Join popup window is displayed
- All table names within the same schema and database joined criteria are listed.
- Select a secondary table from the available table list to make a join.
The join scores are displayed next to each secondary table. A detailed list of all the columns within the selected secondary table is listed in the window below. - Select the window and Click Quick Preview Results.
An inner join is performed for the selected tables. Preview results include a sample size of 100 records.
To manually join two tables on a matching field,
This item enables manual inner joins or outer joins to join tables when two tables have been selected for the query.
- Select a database name, schema name, and table name.
- The preview results of the selected table containing all the columns are displayed.
- Click the join icon. A pop-up window displays the join criteria.
- Select the join criteria (the type of join, target database name, join table name, source primary key, and target primary key).
- Select the + button to input additional columns for joining.
- Click OK to execute the join.
Union Tables
The union combines data by appending rows of one table into the master table. For example, to add new Customer IDs from one table to a list of Customer IDs in the master table, ensure the union tables have the same number of fields(columns), field names, and field data type.
To create a Union using recommendations,
- Select a database name, schema name, and primary table name.
- Click the Union button.
- All table names within the same schema and database with Union criteria are listed.
- Select a secondary table from the available list to make a Union.
- Click on the Apply button. A query generated upon the selection criteria is executed.
To union two tables on a matching field manually,
This feature allows you to achieve Union on tables manually. A union of tables creates a single table containing all tables' rows, with several null values.
- Select a database name, schema name, and table name.
- The preview results of the selected table containing all the columns are displayed.
- Click the union icon. A pop-up window displays the union criteria.
- Select the union criteria.
- Click Apply to execute the union of tables.
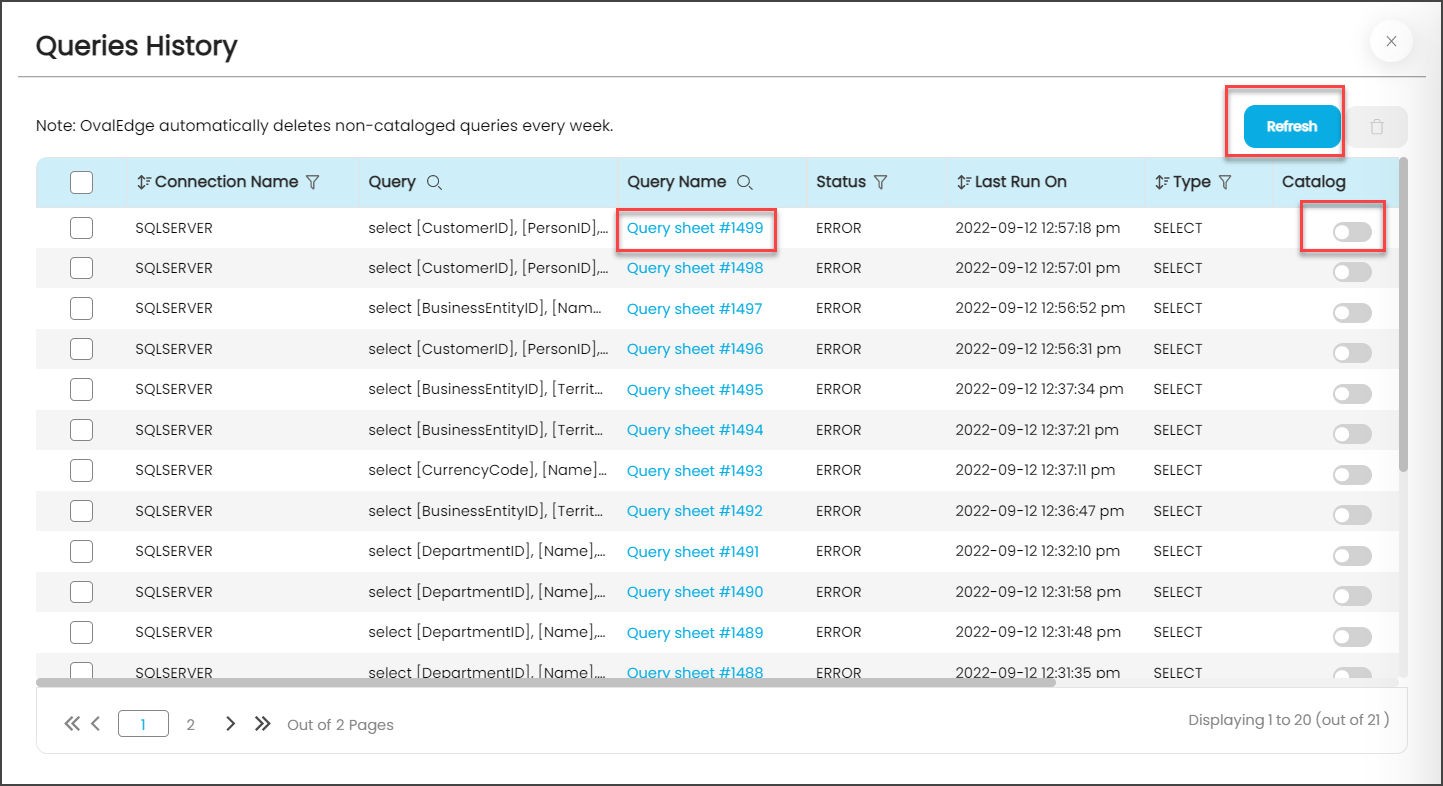
Queries History
All the queries executed in the query editor are recorded in the query history. You can simply view the latest query executed and save the query by selecting the catalog button. Additionally, you can view the results of the historic queries by clicking the view result icon on this page. You can change the toggle icon to save/Catalog a query. Additionally, click the edit icon to enter into a Code name and save.
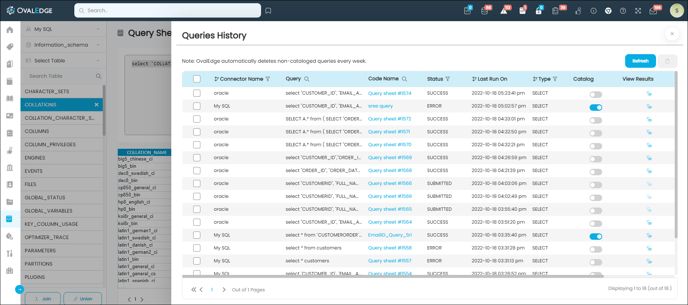
Note:
- You can use the Escape or button to close the pop-up windows throughout the application. OvalEdge automatically deletes the non-cataloged Queries every week.
- A version history is maintained whenever a query is created or edited. You can use the version dropdown list to select the latest or previous query versions. It shows the Query version no, User name, and Update Date & Time.
Saved/Cataloged Queries
All the saved queries are displayed in this window. The cataloged queries can be later enhanced and or used to build visualizations.
Sharing Queries
In OvalEdge, you can share any or all the executed queries to any user by simply saving the queries. All saved queries are cataloged and displayed in the Query Interface tab. This window is accessible from the Data Catalog > Queries in the object browser or can be directly launched by accessing the cataloged queries in the Query sheet module.
The query interface window allows you to execute additional operations on a cataloged query. Users can further enhance and save the query to get results.
- Navigate to Data Catalog > Queries.
- Click on the Query name. It navigates to the query interface window.
- In the query interface window, you can edit or enhance the query.
- Click on the Save Query button to save it.
Execute the Shared Query
In this example, we will see how to execute a cataloged Query,
- Go to the Data Catalog > Queries.
- Use the filters to select a specific query.
- Click on the Apply filter and select a specific query name.
- Edit the query. Click on the Save button to save it.
- Click the Execute button to run the query.
- The results of the query will be visible in the results window.
Copyright © 2019, OvalEdge LLC, Peachtree Corners GA USA