Overview
OvalEdge Projects manages governance initiatives, such as data curation and impact analysis. The Projects module's primary objective is to monitor and measure the progress of the Project, ensuring that project managers and key stakeholders stay informed. This process includes creating a new project, creating a new task by adding the objects to the project, inviting users, tracking status, posting instructions, adding task notes, leaving comments, and searching for data objects using an advanced search filter. By leveraging projects, teams can collectively manage tasks, communicate effectively, and seamlessly track progress.
Security of Projects
The OvalEdge Administrator, also known as OE_ADMIN, plays a crucial role in managing and administering projects. One of their primary tasks is to create users with the role of Project Administrators (Project Admins) and remove them when necessary. This ensures that the right individuals have the necessary privileges and authority to oversee projects effectively.
In addition to user management, an OE_ADMIN can access and view all the projects stored in the system. This allows them to have a comprehensive overview of the ongoing projects and their respective details. They also have the authority to designate a specific project as the Default, which holds significance in terms of default settings or preferences for the system. Similarly, they can remove the default status from a project if needed, allowing for greater flexibility and customization.
By managing user roles and project accessibility, the OvalEdge Administrator ensures smooth project administration and fosters efficient collaboration among team members. Their contributions play a vital role in maintaining the integrity and effectiveness of the project management system.
The various roles defined for Projects include:
|
Role(s) |
Responsibilities |
Licenses Required |
|---|---|---|
|
Project Admin |
The Project Admin role, configured at the System Settings, gives complete access across all projects within the tool. It's important to note that only one role can be designated as the Project Admin. |
Author |
|
Project Owner |
Project Owners possess full privileges within the specific project(s) they own. Any user holding an Author license can be assigned the role of Project Owner. |
Author |
|
Project Member |
Project Members holding Author licenses can undertake various operations related to objects within the project. However, they do not have the authority to carry out actions like user management, status configuration, project deletion, etc. |
Author |
|
Project Member |
Project Members with Viewer licenses have limited capabilities. Their main function is to view the project and its objects in the Board view. However, they can add new search keywords for configuration, to enhance the discoverability of the projects. |
Viewer |
Within the System Settings, users have the option to configure permissions regarding the viewing of objects added to a project.
- If set to "true," Project members can view only those objects in projects for which they possess Meta Read permission.
- If set to "false," Project members can view all objects across the projects, regardless of individual permissions.
Projects Activities
Project activities carried out by specific user roles are defined below:
|
Roles |
Project Activities |
|---|---|
|
OvalEdge Administrator |
Creates the Project Admin role with project creation privileges. Note: OvalEdge Administrators are project administrators by default, but they can leverage their responsibilities as Project Administrators if necessary. |
|
Project Administrator |
Creates a new project and assigns the ownership. |
|
Project Owners |
|
|
Project Member |
|
|
Project Member as Viewer |
|
Working with Projects
Project workflows involve inviting project members to participate, assigning them to data objects (tasks), and allowing them to perform various operations as shown below.
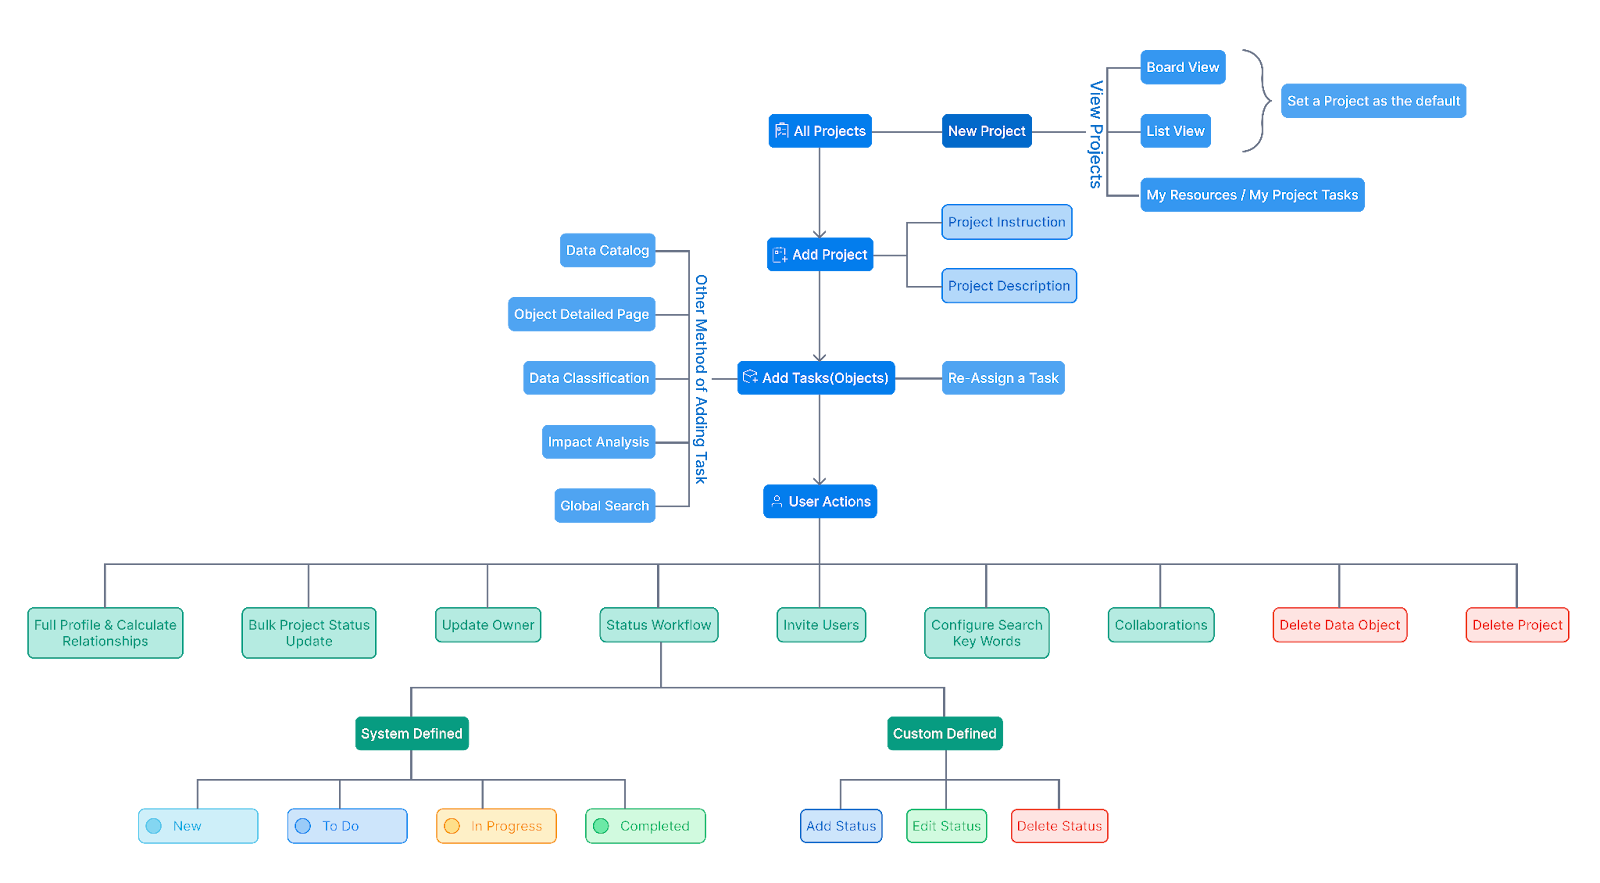
To facilitate these workflows, users need to designate a project administrator who will create the project and invite members to participate. Once the project is created, members can be assigned to specific tasks, enabling them to fulfill their responsibilities.
The key members associated with a project include:
- OvalEdge Administrator
- Project Administrator
- Project Owner
- Project Member
User actions performed by project members include:
- Invite users
- Full profile and calculate relationships
- Delete project
- Delete data object
- Configure search keywords
- Status workflow
- Bulk project status update
- Update owner
All Projects
The OvalEdge Projects module includes an ‘All Projects’ area which provides a comprehensive overview of all created projects. When logged in, users can view existing projects in a straightforward format, including Project Name, Type, Description, Default, Items, Progress, Members, Started on, Completed on, Created By, Created On, and Last Activity On.
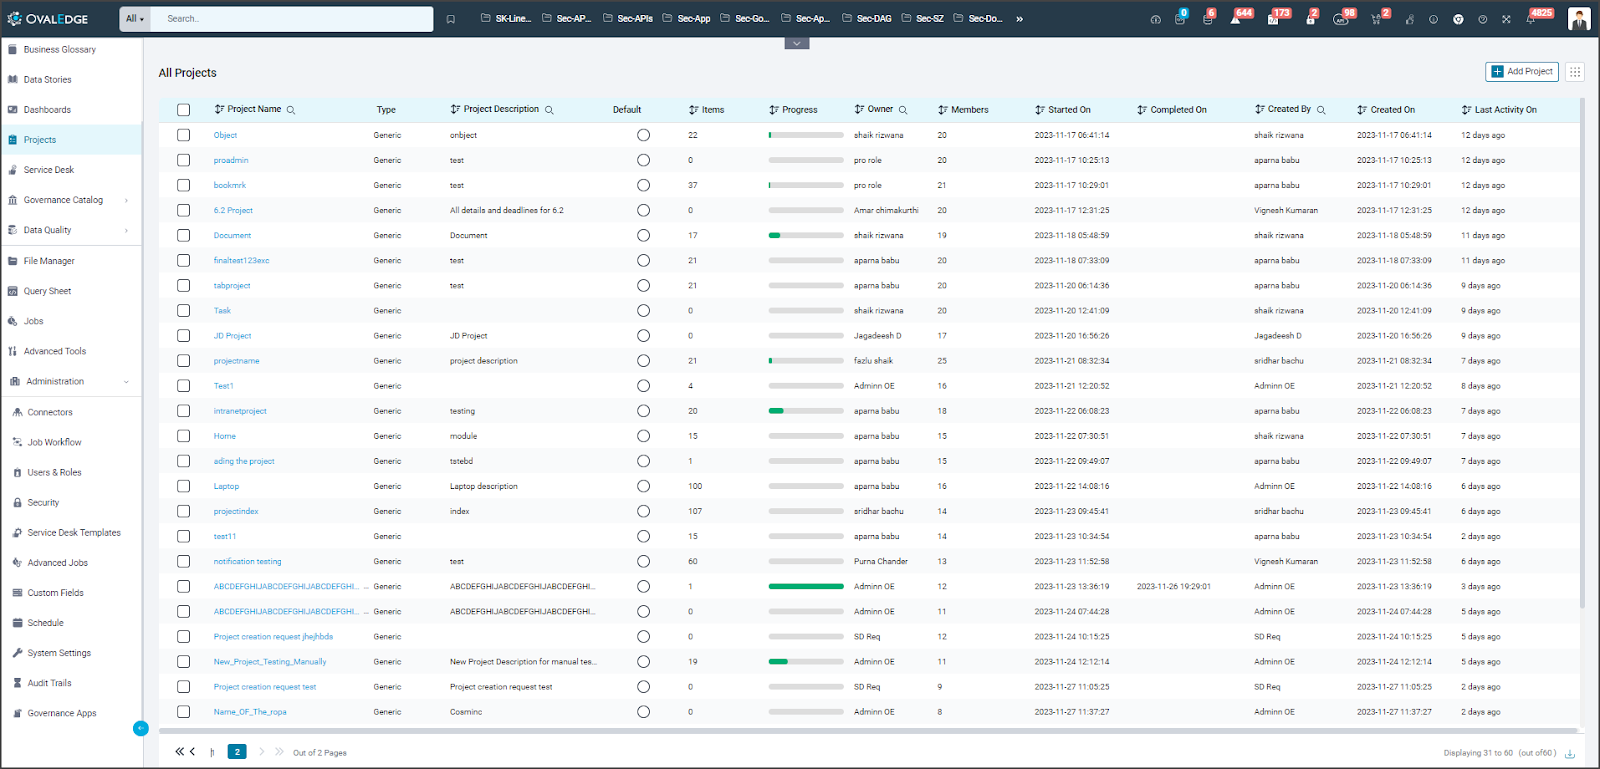
- Name, Project Description, Owner, and Created By can be sorted based on Search criteria.
- All Columns other than Type and Default can be sorted in ascending or descending order.
- Type signifies the type of Project - Generic or Access Cart.
- Default is a radio button that signifies the Default Project.
- Items signify the total number of items in a particular Project.
- Progress signifies the completion rate of a Project
- Members represent the total number of Project members in a Project.
- Project Members can download the basic details of all the projects that are available to them. The basic details include the details that are displayed on the Projects page.
Default Project
Users can choose a default project on the Projects page. By default, this is set to Access Cart if it is enabled in System Settings. The default project is usually used to add multiple objects to a project at once. The selection of the Default Project depends on the user's requirements.
Objects can be added to a Default Project from various modules such as:
- Data Catalog View
- Business Glossary List View
- Global Search
- Data Stories
- Objects
On the Objects page, when choosing to include the Object in projects, the first project displayed is the Default Project. The ability to add objects to the Default Project is a privilege reserved for Project members with an Author License. Members with a Viewer License within a Project can choose a Default Project but cannot add objects to the Default Project.
Access Cart
Data Catalog objects like Tables, Files, Folders, APIs, and API Attributes can be incorporated into the Access Cart. The Access Cart is utilized to generate access requests for the objects that have been included in it.
Objects can be added to the Access Cart from the Data Catalog view or from the Object Summary page.
Once added, the objects are segregated based on the object types. Users can select multiple objects or a single object to either Request Access or delete those objects from the Access Cart.
Creation of Projects
The creation of new projects is a privilege exclusive to Project Admins. When initiating the creation of a project, the user is required to input the Project Name, provide a description, and select a user to act as the Project Owner.
Users with an Author License can submit a service request for the creation of new projects. Once this request is approved with all the required details, a new project is generated.
Upon being assigned as the Project Owner for a project, the respective user will receive a notification informing them of their new role as the Project Owner for that particular project.
However, when a Project Owner is updated or changed, a notification will be sent to all the project members, informing them of the change in the Project Owner.
Operations on Projects
Delete Project
The Project Owner or OE_Admin can delete a project.
Note:
- Projects cannot be deleted if they are set as the default project. To delete a project, it must first be removed from the Default Project setting.
- From the All Projects page, a user can select multiple projects by selecting the checkboxes next to the Project Name column, clicking on the 9-Dots menu, and selecting the Delete Project option.
Removing Default Project
The Default column will be left empty when "Remove Default Project" is selected from the 9-Dots options.
Raising Service Requests for Projects
Service Requests associated with Projects can be initiated from the ‘All Projects’ page. The primary system request is the Project Creation request, exclusively available for the Author license users seeking to propose new projects. Additionally, users can generate custom requests for specific Projects, but these will be visible solely on the All Projects page.
Accessing a Project
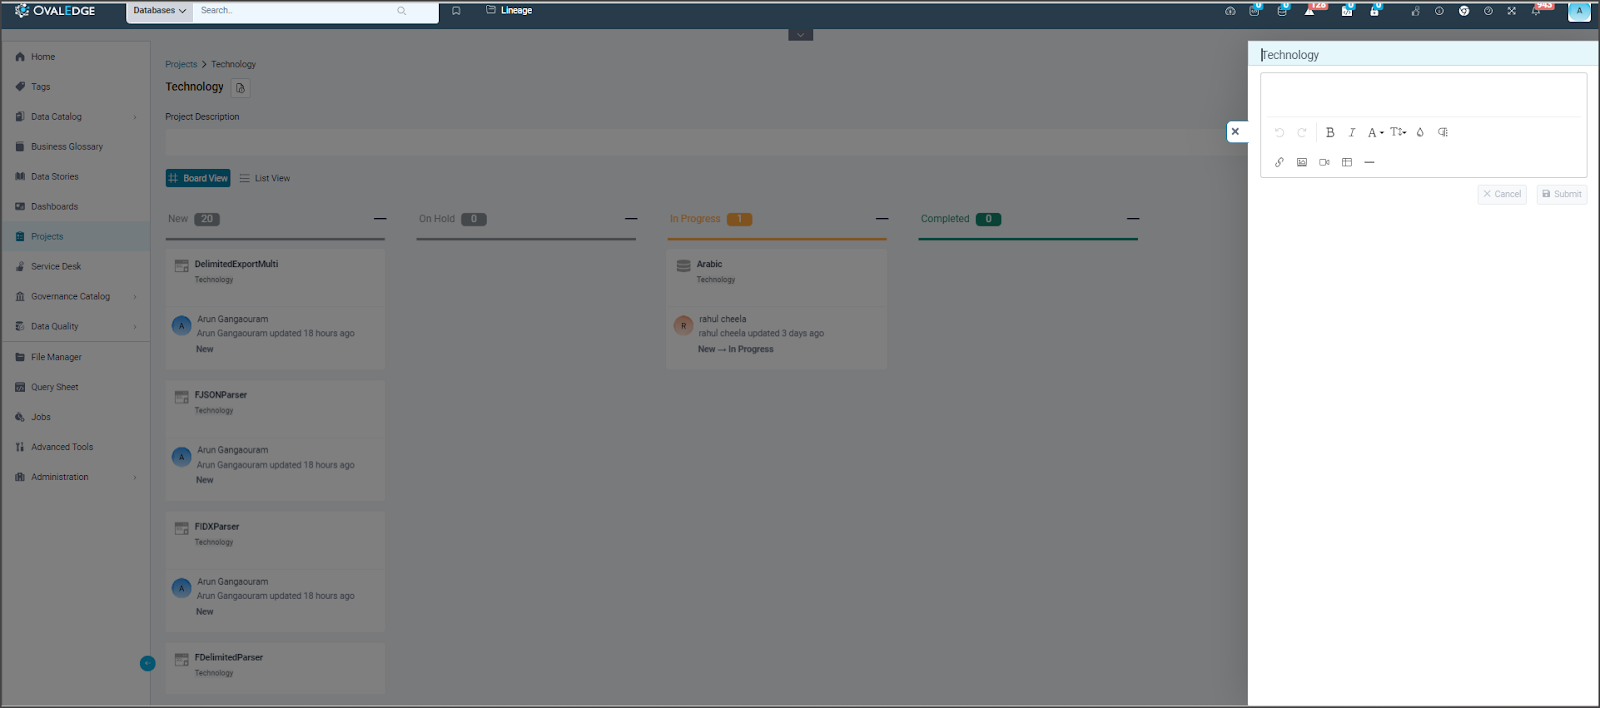
Project Instructions
Project instruction notes are written guidelines or explanations provided within a project by the designated project owner, typically to assist project members in understanding specific procedures or expectations related to that project. These notes can include information about how to use the project, what actions are allowed or restricted, important deadlines, special requirements, or any other instructions relevant to the project's goals and tasks. Project instruction notes aim to ensure that all project members are on the same page, following standardized procedures, and working efficiently to meet the project's objectives.
In OvalEdge, these project instruction notes are composed using a rich text editor, which not only offers standard text editing functionalities but also enables users to insert images and videos to enhance the comprehensibility and effectiveness of the instructions. This feature allows project owners to provide detailed and multimedia-rich guidance to project members, ensuring that they have access to clear and informative instructions.
Actions in a Project
- Viewing Projects Members
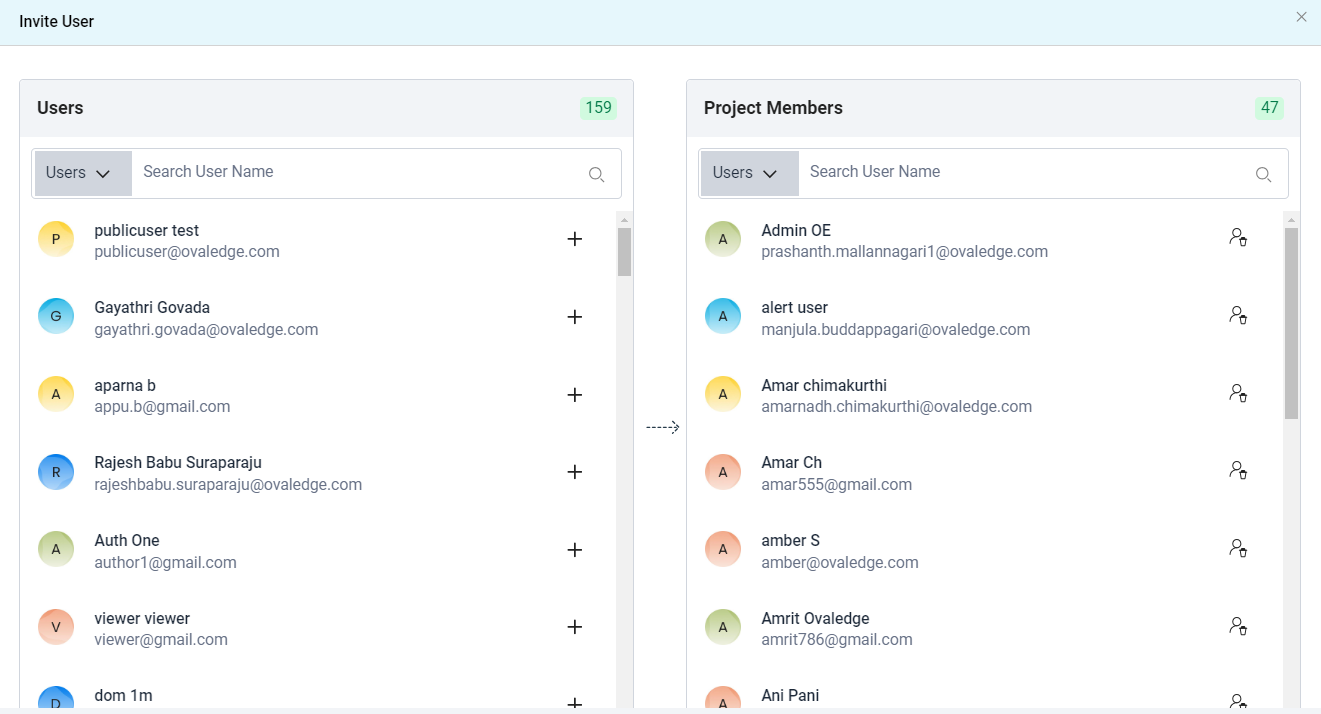
The list of project members on the Projects page can be viewed at the top right corner, next to the Invite User icon. Users can be displayed based on either Users or Roles. All project members can view the list of members within a project. Project Owners and Project Admin users can remove other users from a project through this interface.
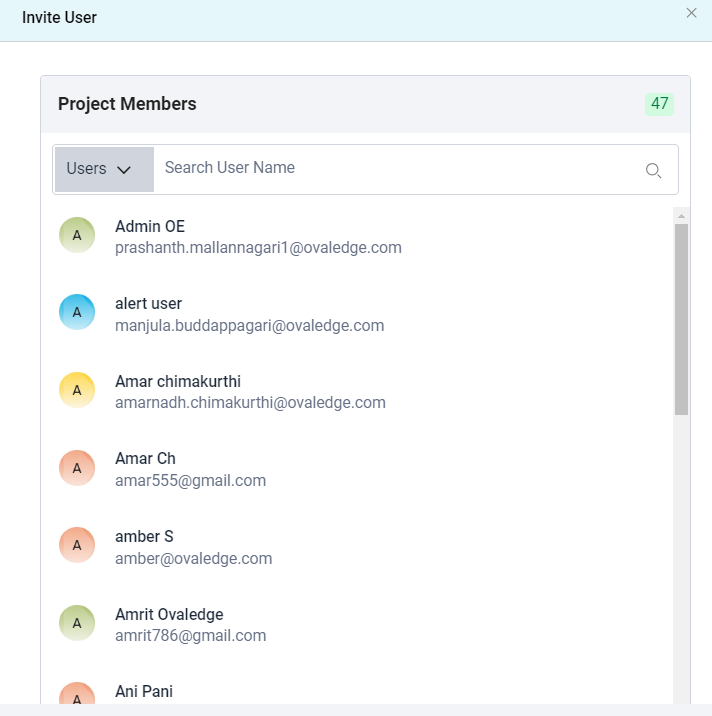
- Adding/Removing Project Members
Any user can be added to a Project, their roles and capabilities are determined by their license type, as previously detailed. The authority to add or remove users from a Project lies exclusively with the Project Admin, Project Owner or OE_ADMIN. The Project Owner cannot be removed from a project unless their role is modified. The Project Admin users cannot be taken off the project. When inviting a user, all users that aren’t in the project are displayed on one side in a pop up list and Project Members are displayed on the other side of the pop up list. The Users can be sorted via the Role types as well.
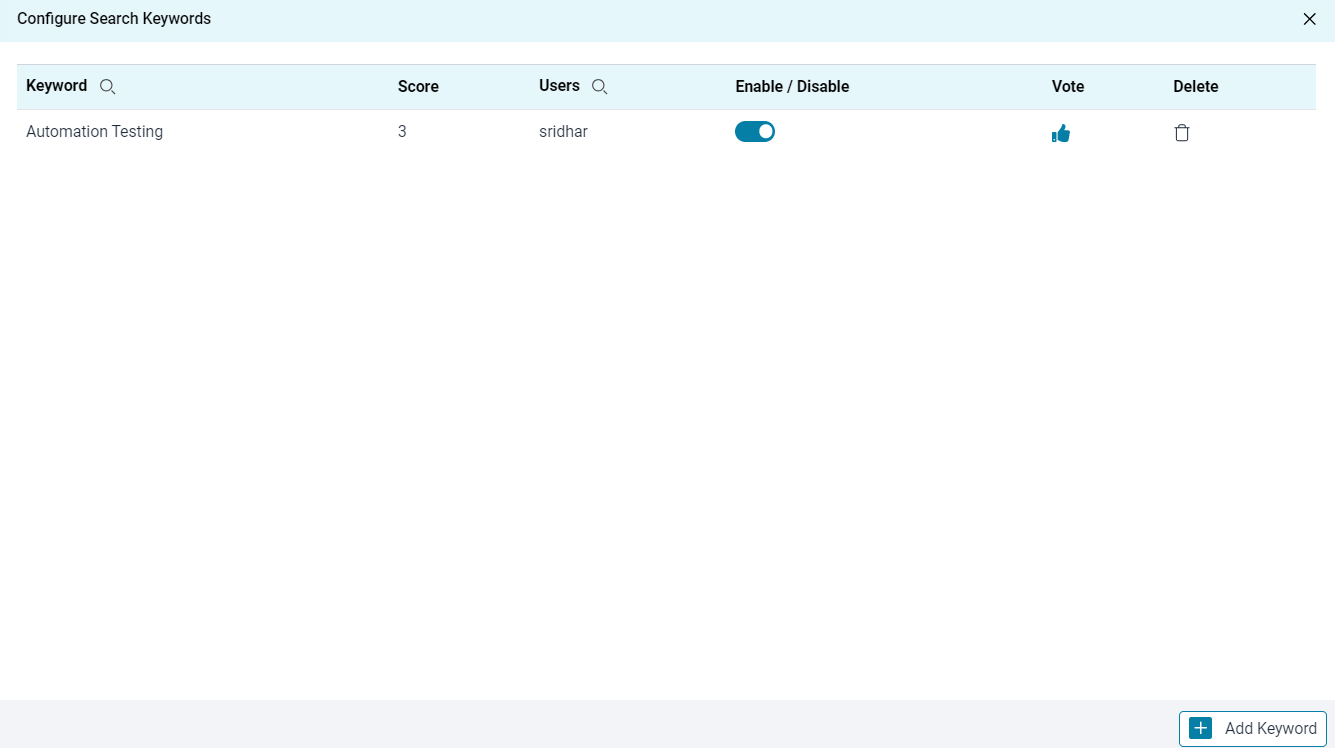
- Configure Search Keywords
Configure Search Keywords are specifically added to projects to enhance their discoverability and accessibility for users. These keywords streamline the process of locating relevant data within the application.
A score is assigned to each keyword created and voted on
- Any keyword configured by the administrator is recorded as 3.
- A minimum score of 3 points is required for keywords to be considered for Global Search, which ensures data stories associated with configured keywords are displayed more prominently.
- Status Workflow
The progress of a project can be tracked through configurable stages (called “Status” in OvalEdge).
For example, a data curation project can be configured to have the following stages/statuses- Assigned, In-progress, In-review, and Completed.

Only the Project Owner/Admin can view, edit, or delete various statuses within a Project. The Status page exhibits different columns, each providing specific details:
- Status Name: Displays the name of the status.
- Color: Displays the allocated color for the status.
- Status Description: Displays the description of the status.
- Status Category: Displays the category of the status.
- Type: Specifies whether the status is system-defined or customer-defined.
- Is Active: Specifies whether the status is active or inactive.
- Is Default: Indicates whether the status is selected as the default.
- Order: Displays the order of the status.
- Created By: Displays the name of the user who created the status.
- Created On: Displays the date on which the status was created.
- Modified By: Displays the name of the user who modified the status.
- Modified On: Displays the date on which the status was modified.
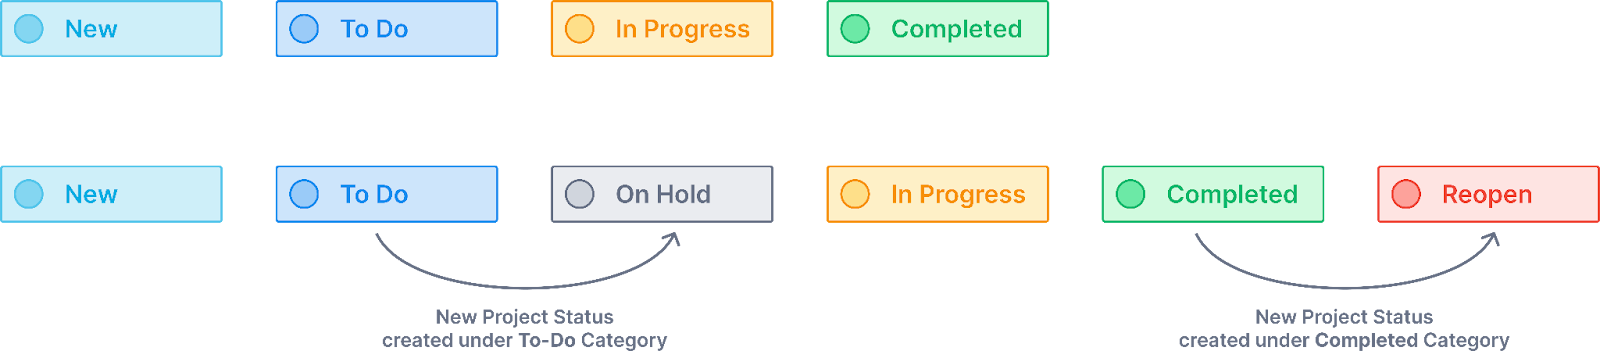
System defined status
The Status Workflow consists of four predefined statuses:
- New: This status is used to list new tasks that have been identified and need to be addressed.
- To-Do: Tasks that are open and actionable, but not actively in progress, fall into this category.
- In Progress: This status is for tasks that are actively being worked on. Tasks in this status indicate that work is underway and progress is being made toward completion.
- Completed: Tasks that have been completed successfully and require no further action required are placed in this status.
Note:
- The Project Owner and Project Admin can change the status.
- System statuses cannot be deleted but they can be made Inactive.
Custom Status
Based on project-specific requirements, custom statuses can be created. While setting up a custom status, it is required to fill in the Status Name and Category. The Status Name must be distinct in a Project. Users have the choice to assign a customized color to the status, or a default color will be applied depending on the selected category. It's important to ensure that the Status Name is not duplicated.
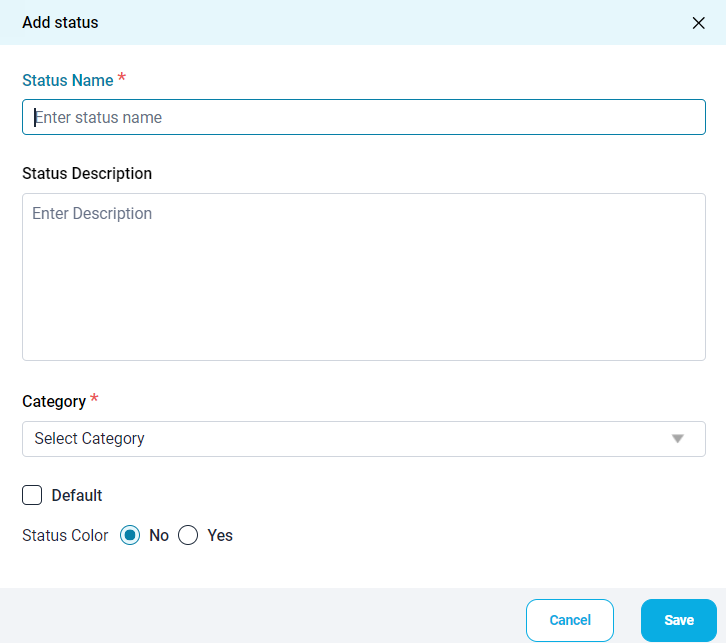
Status Categories
There are three status categories in a Project and each status should be assigned to one category.
- New and On-Hold Status are assigned to the To Do category. The default status color for the To Do category statuses is gray.
- In Progress status is assigned to the In Progress category. The default status color for In Progress category statuses is yellow.
- Completed status is assigned to the Done category. The default status color for Done category statuses is green.
Deleting statuses
Users can delete status only if they have a custom status. It is not possible to delete System Status. As soon as a custom status is deleted, all objects in that status are moved to the Default Status.
Active/Inactive statuses
Status can be made Inactive/Active based on the requirement of the project. Once a status is made inactive, it will not be displayed in the Project. When a status is made Inactive, the objects in that status are moved to the Default status.
Default status
Whenever objects are added to a Project, they are added to the Default status. Typically the default status is New status, but it can be changed to any other status. There can only be one Default status.
- If a status is marked as Default status, that status cannot be made inactive nor can it be deleted.
- If a status is made Inactive or deleted, the objects in that status are moved to the Default status.
Order of Status
The sequence of statuses can be arranged within the Status Workflow configuration. This order dictates how the statuses appear in the dropdown menu when users aim to change the status of an item, ensuring that the options are presented in the same order as established in the status workflow settings.
Update Owner
Only the Project Admin and the current Project Owner can update the Project Owner. Only Project members with Author Licenses can be updated as the Owner of the Project. When the Owner is updated, all the members of the Project receive notifications about the change in Owner.
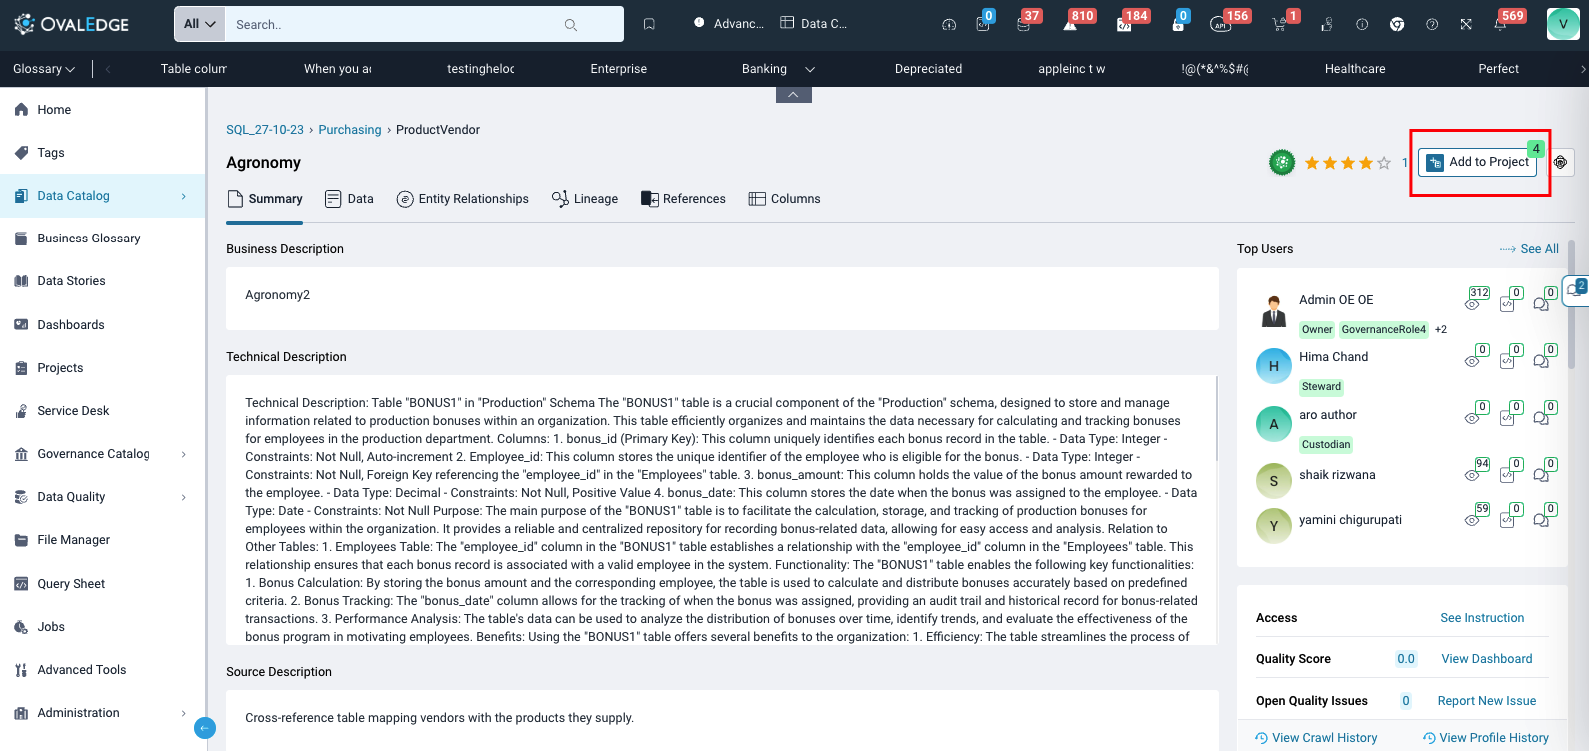
Add Objects to a Project
Adding/Removing Objects from within the Project
Members of a Project with an Author license can add or remove objects from that Project. Objects can be added to a Project either through the Board view or the List View. Once an object is added to a Project, it will be indicated on the Object Summary Page that the object is part of the Project. Additionally, objects can be included in a Project directly from the Object Summary Page.
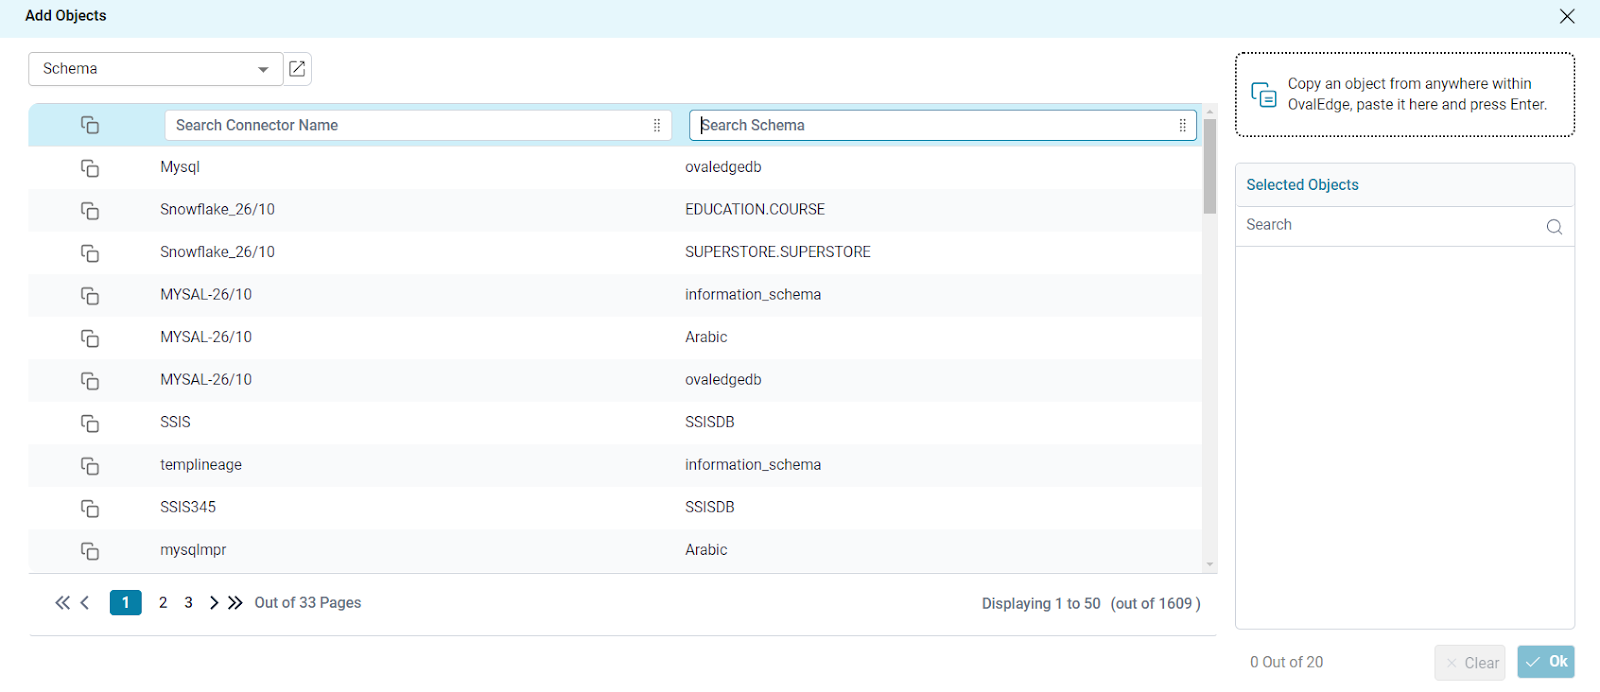
The number that is displayed as a superscript denotes the number of Projects that the Object is added to.
When adding objects from the Board view or list view of a Project, a maximum of 20 objects can be included at once. However, there is an overall limit of 10,000 objects that can be added to a Project.
Different types of Objects that can currently be added to a Project are a Schema, Table, Table Column, File, File Column, Report, Report Column, Code, API, API Attributes, Data Stories, and Business Glossary.
Objects can be easily removed from a project using various methods. Whether the user is in the board view, list view within a project, or even on the object summary page, they have the option to remove objects individually. Moreover, if the user needs to remove multiple objects at once, they can efficiently perform bulk removal directly from the list view within the project.
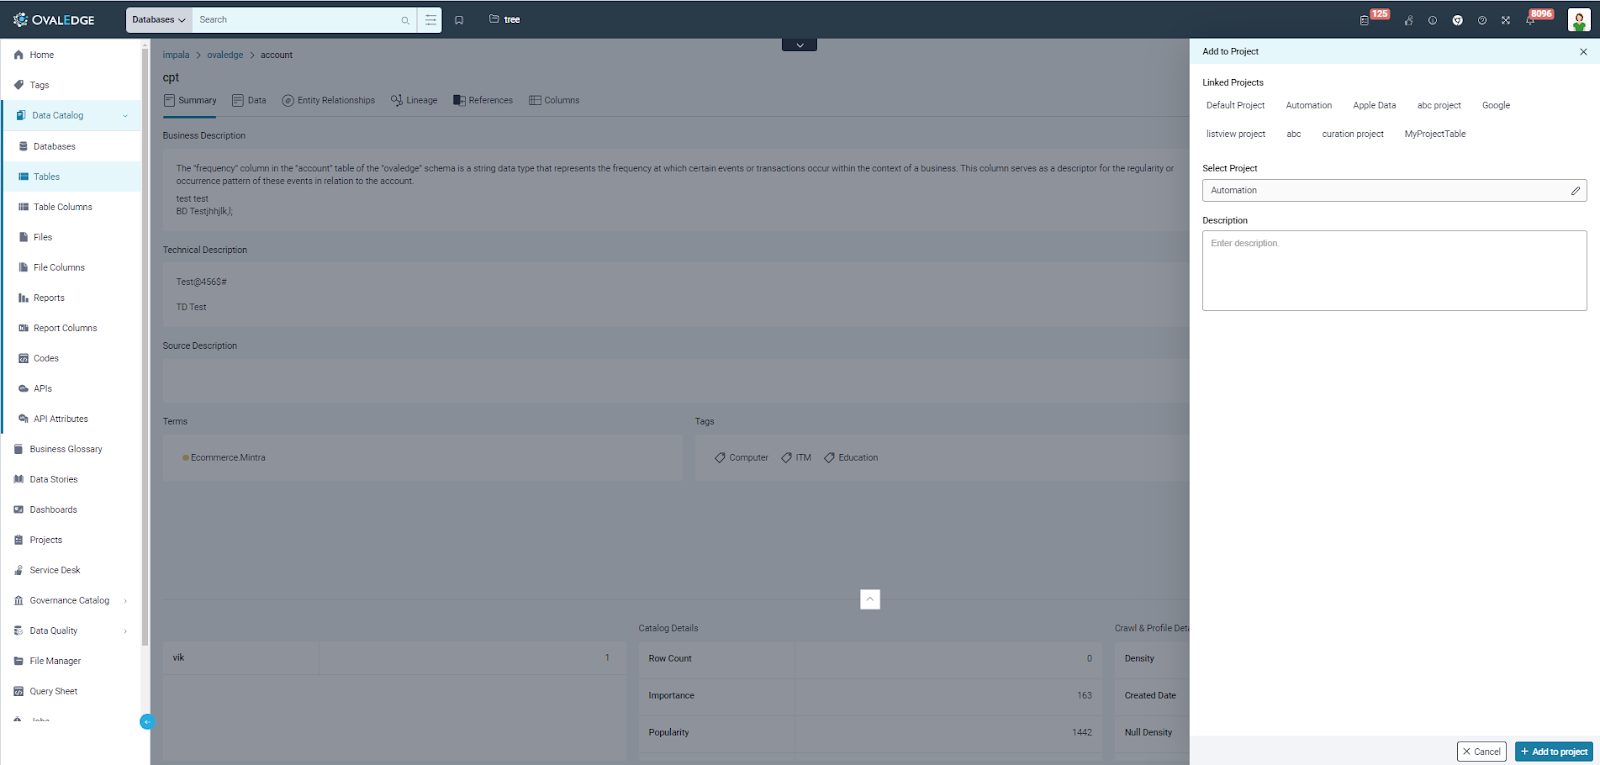
Adding Objects from Data Catalog
Objects can be added to a Project directly from the Data Catalog view page. Users have the option to select several objects and add them to the Default Project or pick from a list of Projects to add them to one specific project at a time. The first project listed in the dropdown menu is the Default Project, making it easily identifiable for users.
Objects can also be added to a Project from their Object Summary page as well. Users can select the "Add to Projects" icon, which will show the number of projects the object is currently associated with. Upon clicking this icon, they can choose the Project they wish to add the object to. Additionally, users can include a pre-written task description for the object when adding it to the project.
Adding Objects from Business Glossary
Objects can be added to a Project directly from the Business Glossary list view page. Users have the option to select several objects and add them to the Default Project or pick from a list of Projects to add them to one specific project at a time. The first project listed in the dropdown menu is the Default Project, making it easily identifiable for users.
Objects can also be added to a Project from their Object Summary page as well. Users can select the "Add to Projects" icon, which will show the number of projects the object is currently associated with. Upon clicking this icon, they can choose the Project they wish to add the object to. Additionally, users can include a pre-written task description for the object when adding it to the project.
Adding Data Stories to a Project
Data Stories can be added to a Project from the Data Story page. Users can select the "Add to Projects" icon, which will show the number of projects the story is currently associated with. Upon clicking this icon, they can choose the Project they wish to add the story to. Additionally, users can include a pre-written task description for the story when adding it to the project.
Adding Objects from Global Search
In the search results page, where all objects are displayed for the search request, users can add/remove that object from the Default project.
Adding Objects from Impact Analysis
From Impact analysis, Impacted objects can be added/removed from the Default Project from 9-dots.
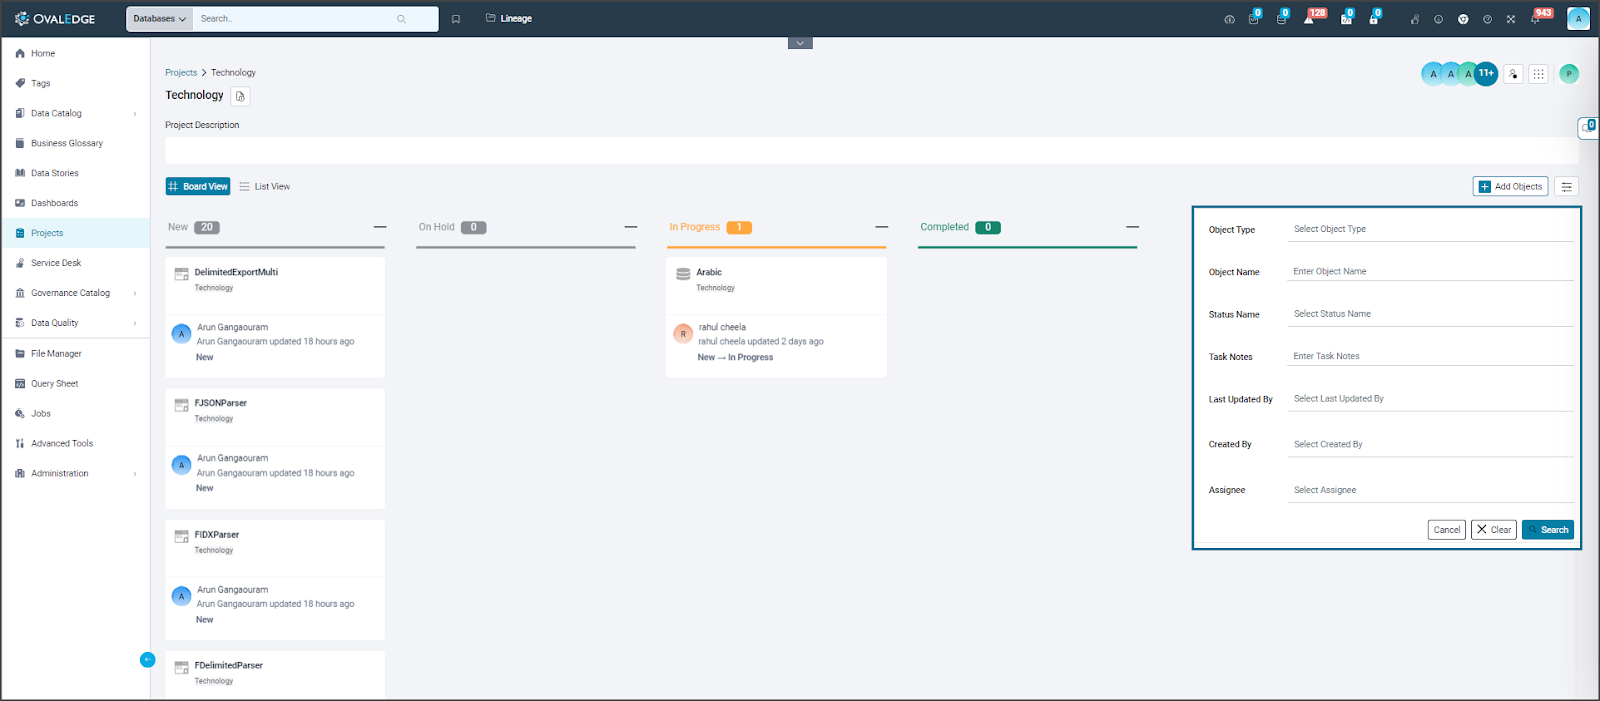
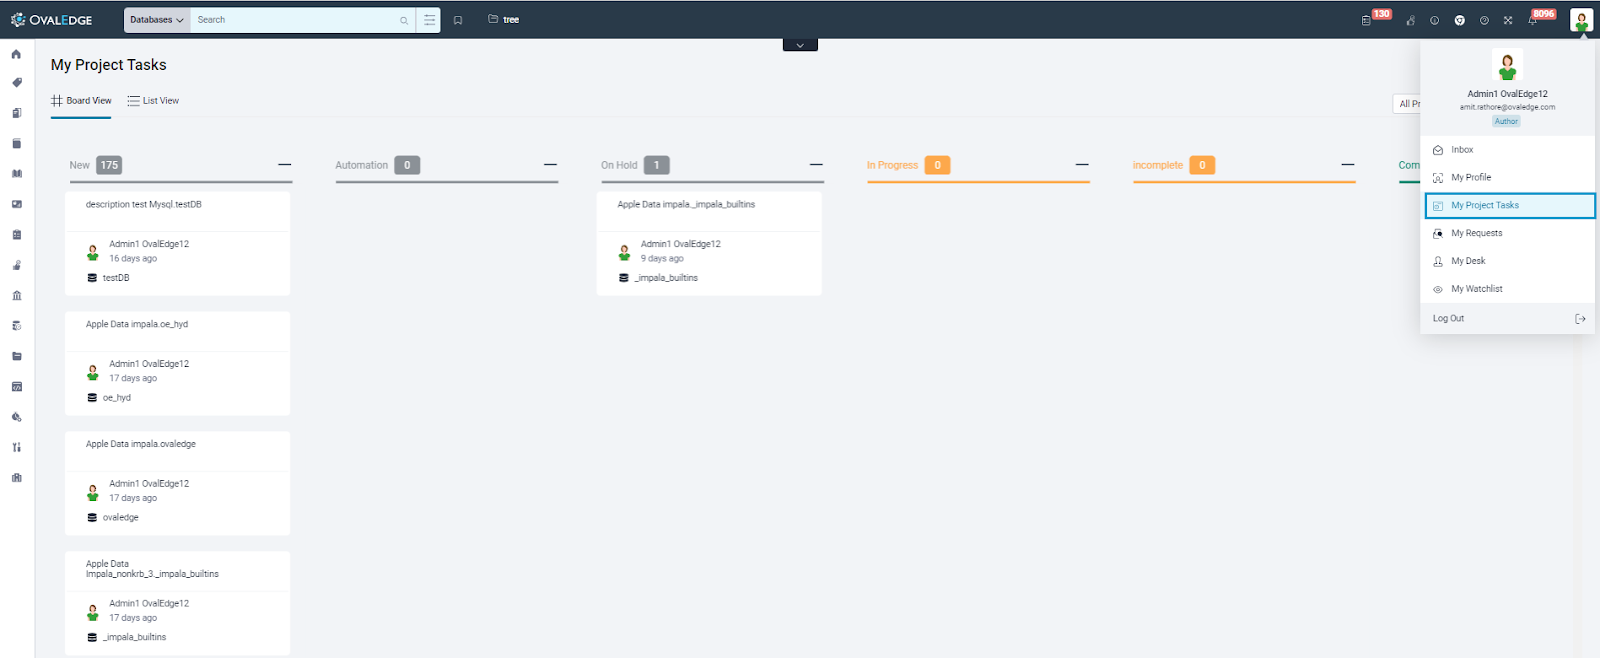
Board View
The Kanban board view is a visual project management tool that helps teams manage and visualize project work. In the Kanban board, objects are represented as cards on a board, and these cards move through different columns or "lanes" that represent various stages of the workflow. Kanban boards provide a clear and visual way to track the progress of tasks, identify bottlenecks, and manage work efficiently.
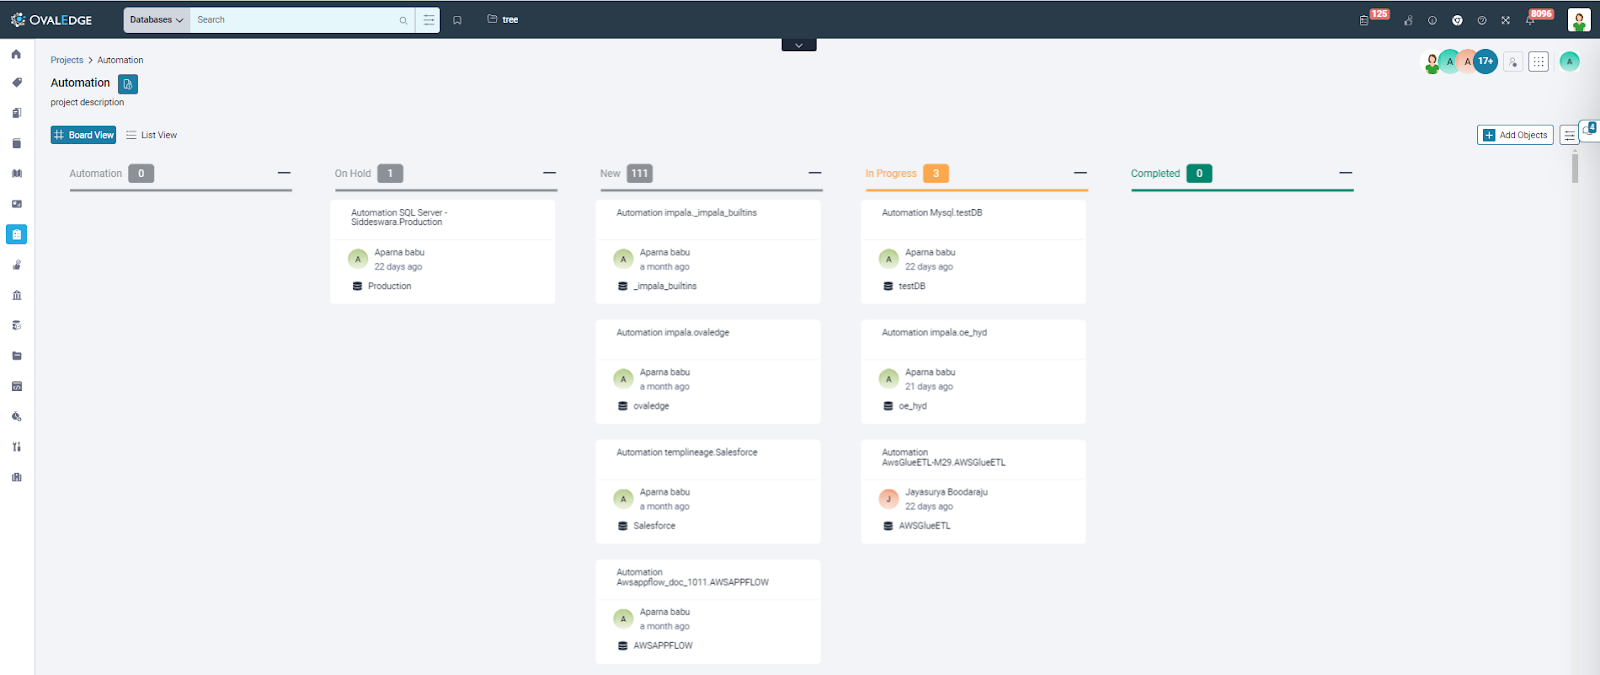
The Board View of Projects in OvalEdge is displayed in the Kanban board view. Objects that are added to a Project are displayed in the default state, which is typically the “New” status. After adding, the object can either be directly moved from one status to another, or it can be done through the Edit Status icon.
Quick View
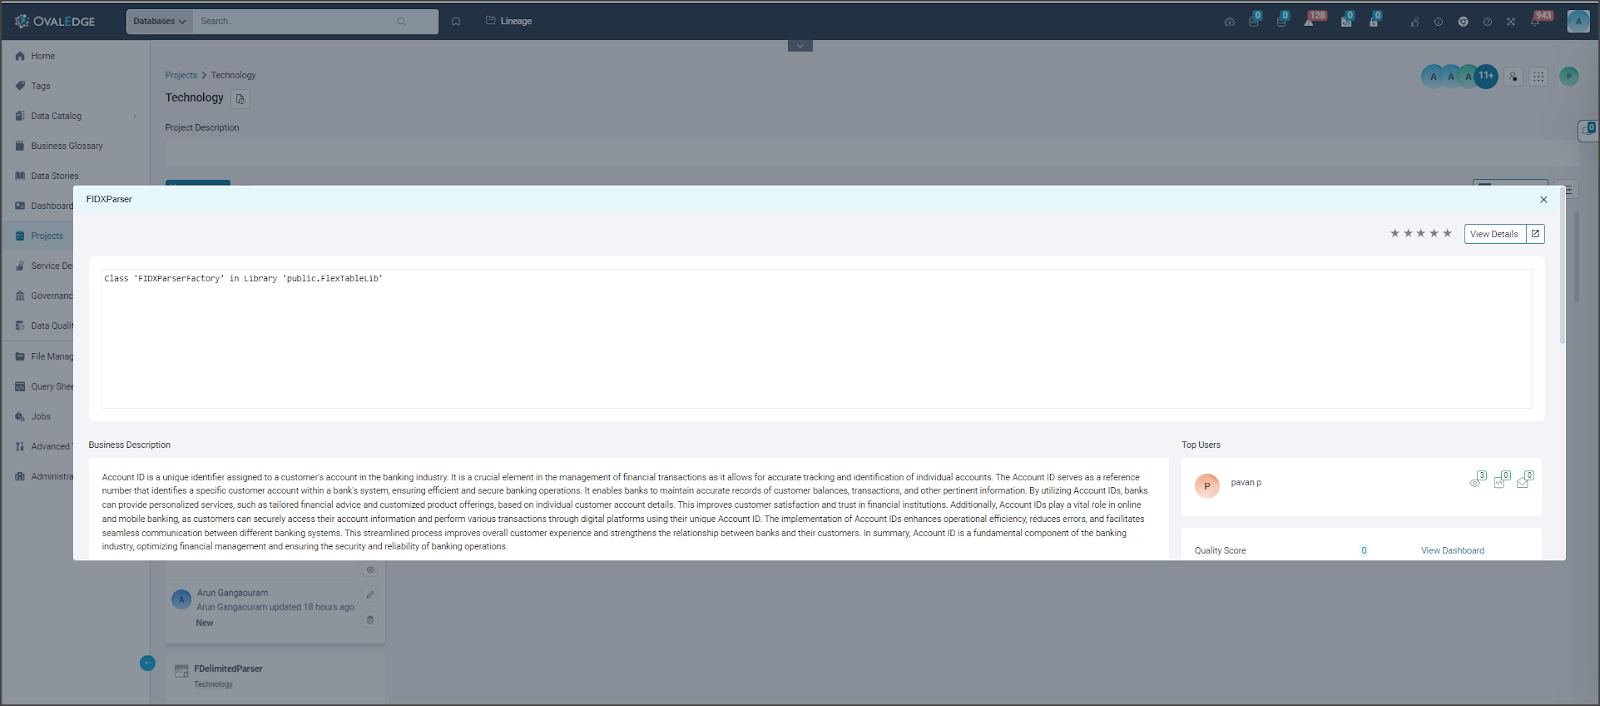
The details of the Objects that are added to the Project can quickly be viewed through the Quick View icon which displays the Summary page of the Object.
View in new tab
Objects that are added to the Project can be viewed in detail in a new tab.
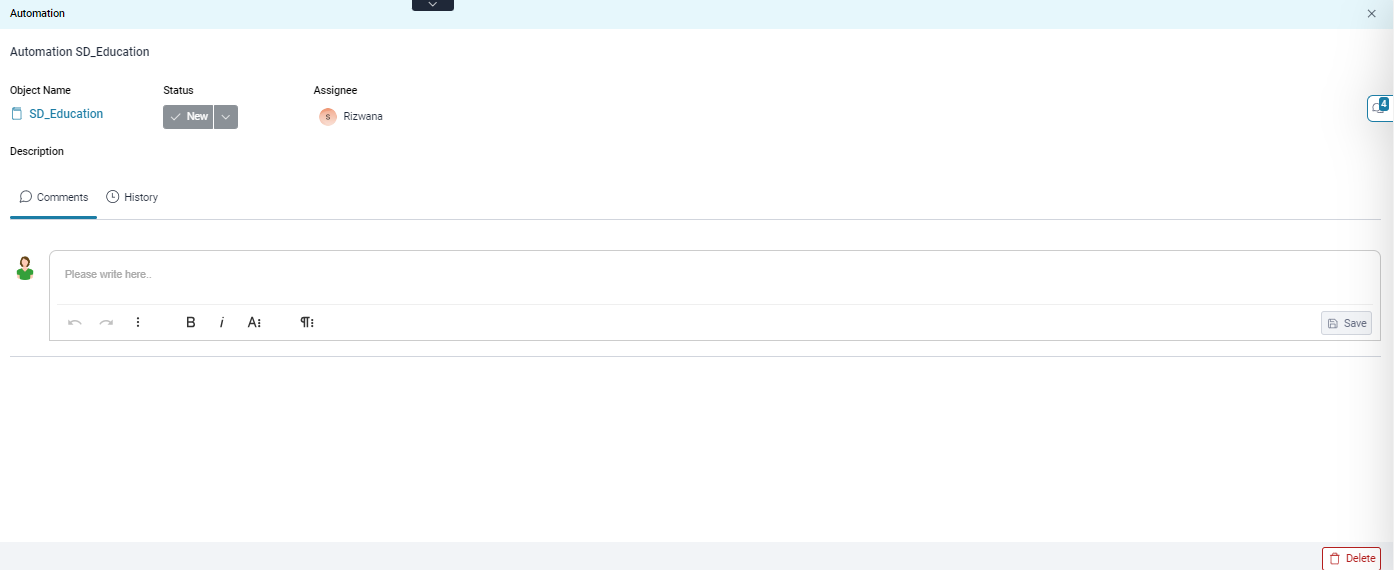
Task Name
When an object is added to a project, it automatically adopts a default task name in the format "<Project Name> <Object Name>." By clicking on the task name, users can access details and modify the task name.
- Change the Status of a Task
Changing the status of a task can be done by dragging it from one status to another in the Board View. Or, it can be done by adjusting the status from the Task Name page.
-
Change Assignee of a Task
Author License members of the project can modify task assignees on the Task Name page. There are further restrictions on assignees configured in System Settings.
- Task Description
Descriptions of tasks can be found on the Task Name page. Members with Author licenses can edit the description without a word limit. Members of the project can also tag other members in the task description.
- Comments
Comments related to a task are recorded beneath its description. The project members can tag each other for collaboration. It is possible for users to delete their own comments, but not those of others.
- History
All changes that are made to a Task are captured in the History with a time stamp and when a task is deleted, the object is removed from the Projects.
Advanced Search
Advanced Search functionality provides an enhanced search experience by enabling users to precisely filter data objects based on various criteria such as Object Type, Object Name, Status Name, Task Notes, Last Updated By, Created By, and Assignee details.
For example:
- Object Type: Filter data objects by selecting one or more object types, such as Schema, Tables, Table columns, File, File Column, Report, Report Column, Code, Story, and Term.
- Object Name: Users can retrieve search results based on the specified Object Name.
- Status Name: This filter allows users to narrow down search results based on the status of the objects, including options such as On Hold, In Progress, Completed, and Review.
- Project Notes: Users can leverage this filter to search for specific project-related information based on the detailed notes entered.
- Last Updated By: Search results can be filtered based on the user who made the most recent updates.
- Created By: This filter narrows down search results based on the user that added a data object to a project.
- Assignee: Users can retrieve search results specific to the assignee of the data objects.
By utilizing these filters, users gain granular control over their search queries, optimizing their ability to find the precise information they need within the project's dataset.
List View
Objects that are added to the project can be viewed on the list view page as well. In the List View page, the objects are displayed based on the Object type.
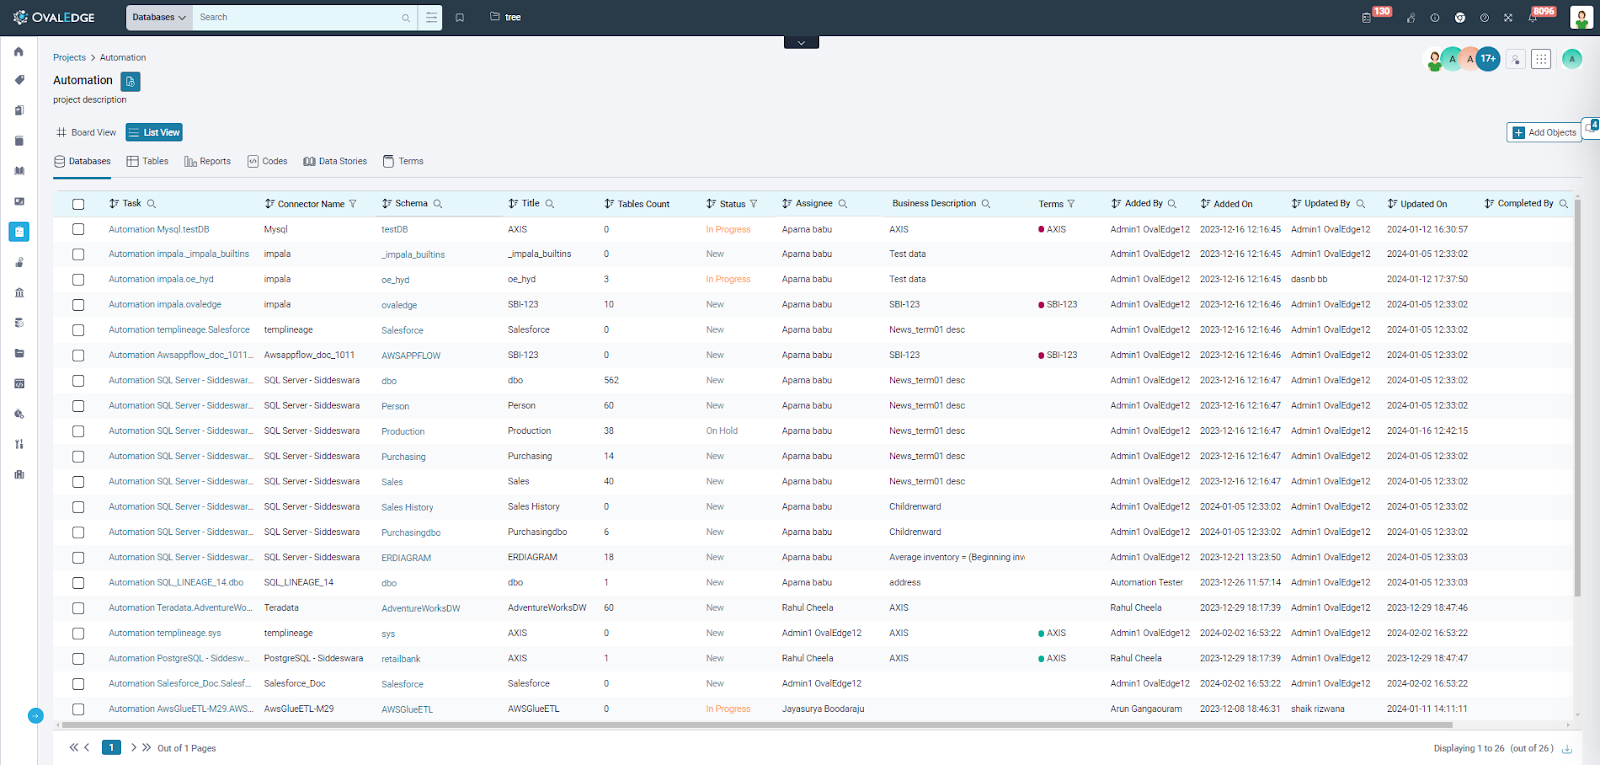
Similar to modifying task details in the Board View page, clicking on the corresponding Task Name opens the Task Name window in the List View. Users can also modify the project's status, assignee, and description and add comments. Author license users, who are Project Members, can directly change the status and assignee from the list view instead of navigating into the Task Name.
Bulk operations in List View
Users can select multiple objects in the list view and bulk delete them. After deleting them, the objects are removed from the Project from both the List View and Board View.
Collaboration
Project Members can easily communicate and collaborate using the chat window. Users can tag specific individuals or teams in the message using the @ annotation to ensure that the right people are notified and can easily access the message. This feature supports various types of media, including images, URLs, links, and more, to provide additional context and information.
My Assigned Tasks on Home Page
Tasks assigned to a Project member appear as "My Assigned Tasks" on the Home Page for that user. Users can directly edit their tasks from the Home Page. The functionalities performed on the Home Page for "My Assigned Tasks" mirror those performed on the Projects page.
Project Notifications
Projects are equipped with a notification system that generates alerts, keeping Project Members informed about updates and actions taken within the project. The respective Project Members may receive system-generated notifications triggered in the following scenarios:
- Inviting a project member to a project Re-assigning the Project Member to a task
- Adding comments to a task
- Adding notes in a task
- Collaborating with other Project Members
- Updating owner
The Inbox feature in OvalEdge allows users to have a consolidated view of all the messages received and sent by other Project Members within the organization.
System Settings
In OvalEdge > Administration > System Settings, users can assign specific permissions to each role, controlling what actions and functionalities that role can perform. These permissions include a range of actions, such as creating a Project Administrator, accessing data objects (such as tasks), and assigning tasks. Moreover, configurations ensure that the system checks the assigned roles to determine who has access to the project and what actions they are authorized to carry out.
- The System Administrator can configure the task assignee in such a way that a Project Member will be made a task assignee based on the access permissions he/she has on the object. The default value is empty, but it can be configured to Meta Read, Meta Write, Data Preview, Data Read, Data Write, Governance Role, and Admin.
- The System Administrator can configure who can reassign tasks to project members. The default is set to project members, but it can be changed to Project Owner or Current Assignee.
- The System Administrator can ensure that Project Members can view the objects in Board View or List View only if they have Read permissions on the object.
- The System Administrator can assign a role to the Project Admin.
To configure project roles and permissions, navigate to the Administration | System Setting | Users & Roles tab.
Here are the system settings needed for a project:
|
Configuration Name |
Value |
Descriptions |
|---|---|---|
|
role.project.admin |
OE_ADMIN |
OvalEdge Admins can assign the role of a Project Admin using this setting. By default, the value is set to OE_ADMIN. To assign the PROJECT_ADMIN role, simply click on the Value text box and enter PROJECT_ADMIN. |
|
project.task.assignee.change |
PROJECT_MEMBERS |
The default value for members of the team who can reassign a task to others is PROJECT_MEMBERS. Supported values include:
|
|
project.task.object.assignee.permissions |
Empty |
When assigning a task object, the system will validate all permissions that the user holds so that they can be assigned to the task object. By default, the value is set to Empty. Supported Permission Values include:
|
|
project.task.object.visibility.with.security |
True/False |
Based on the security permissions, the system determines whether to display the task on the board or list view of projects. The default value is set to False which means that by default, a list of all tasks available in the project is displayed. If it is set to True it will display the list of tasks to which the Project Member has been assigned. Supported values include:
|
Note: In Projects, the OvalEdge Administrator is a super user who is by default referred to as the Project Administrator.