Projects assist in creating collaborative workspaces for a group of users and help track the progress of activities or assist in the effective management of tasks. Projects are intended to track the progress of projects, so that project managers and key stakeholders are informed regarding the status of the project. A group of members or users are given access to the Project (tasks or data objects) to work upon a project or group of data objects (Tasks).
Key Features:
- Create new Projects and view all projects in one central place.
- Add data objects to the default/selected project.
- Invite or assign users to the projects to collaboratively work on a project.
- Manage the tasks effectively by segregating and customizing projects into different project statuses.
- View projects specific to the logged-in user in the My Resources > My Projects Tasks tab.
|
Project Grid Fields |
Description |
|
|
A color bar gives high-level insights on the count of projects in different project statuses in New, To Do, In Progress, and Completed statuses. |
|
|
Click to add a new project. |
|
|
Action options to delete selected Project(s) or remove Default Project from the grid. |
|
Name |
Displays the name of the project. It is an editable field. Hover on to the field to see an Edit icon. Click the edit icon to enter a unique project name. |
|
Project Description |
Displays the description of the project. It is an editable field. Hover on to the field to see an Edit icon. Click the edit icon to add or edit the Project description. |
|
Default |
It is a radio button-enabled field where only one project can be set as a default project. Data objects from Data Catalog, Business Glossary, or Global Search can be directly added to the default project. |
|
Status |
Displays the project status, whether New / To Do / In Progress / Completed or any other status configured. |
|
Tasks |
Display the total number of tasks associated with the project. |
|
Progress |
The bar indicates the completeness of the project. |
|
Owner |
Displays the name of the owner. It is an editable field. Hover on to the field to see an Edit icon. Click the edit icon to select an owner from the pop-up window. |
|
Team |
Displays the total number of users collaboratively working on the project. |
|
Started On |
Displays the Start Date & Time of the project. |
|
Completed On |
Displays the Completion Date & Time of the project. |
|
Created By |
Displays the user name who created the Project. |
|
Created On |
Displays the Project creation Date & Time. |
|
Last Activity On |
Displays the last modifications Date & Time made to the Project. |
Projects & Permissions
|
Action items |
User Permissions |
|
Create a New Project |
Any logged-in user can create a project. |
|
Delete a Project |
Admin/ Owner / Creator can delete a project. |
|
Invite Users |
Admin/ Owner / Creator can Invite users. |
Creating a New Project
To create a new Project,
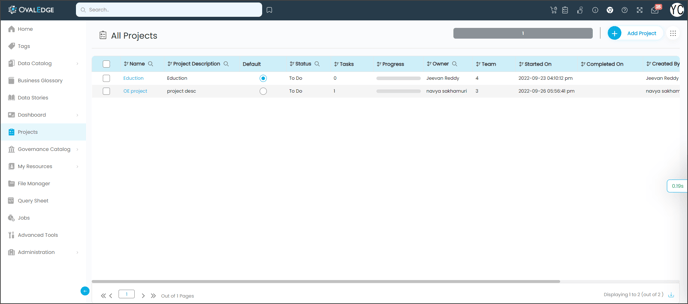
- Go to Projects > All Projects displays existing projects in a grid.
- Click on the Add Project button enabled at the top right.
- An ‘Add Project’ pop-up window is displayed.
- Enter the Project Name and Project Title in the fields provided.
- Select the Project Owner Name from the drop-down list.
- Click the
to add a New Project to the grid.
Note: Users do not need administrator permissions to create new projects.
Deleting a Project
To delete a project,
- Go to Projects > All Projects.
- Select desired Project(s) you wish to delete from the grid by selecting the checkboxes.
- Upon selection, click on the Nine Dots icon to see the Delete Project option.
- Click Delete, and a confirmation dialogue box will appear on the screen to confirm the deletion.
- Click Ok to delete the Project.
Note:
- The project creator/project owner/user with the admin role can delete the project. Invited users do not have the right to delete other users' projects.
- Users cannot delete a project that is selected as a default project.
- Once a project gets removed, no members of the user group to the project can further access that project.
Viewing Project Details
Selecting a specific project from the All Projects grid navigates you to the Board View of Projects details, where visibility of all aspects of the project is provided. You can view the selected Project information at a single source point in either Board view or List View.
It gives you full control over the project to carry out various actions mentioned below:
- To invite and add users to the project
- Add Instructions
- Add data objects to the project
- Delete Project
- Create Status Workflow
- Configure Search Keywords
- Full profile and calculate relationships
- Bulk project status update
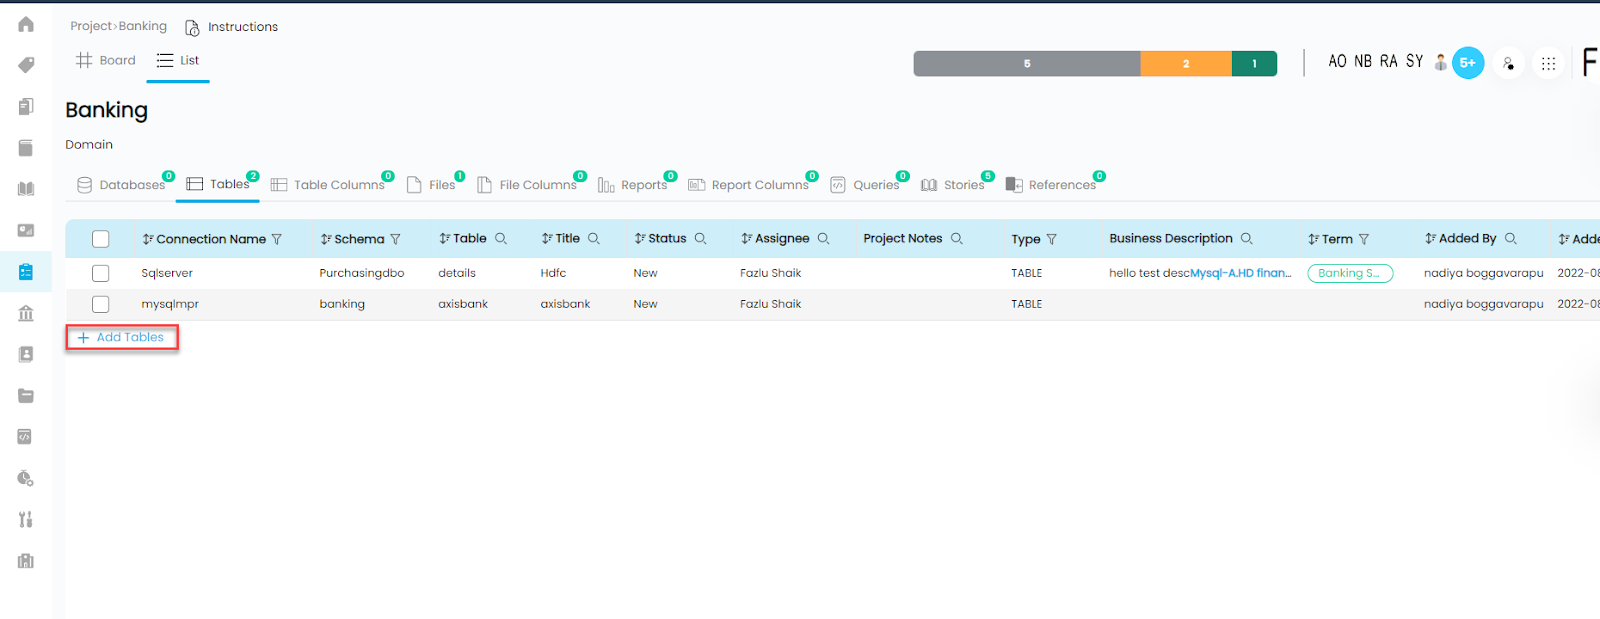
List View
List View helps you to view the list of tasks/data objects added to a specific project in respective Object Type tabs. This gives you a clear count of data objects (Tables, Files, or Reports) added to the project. Also, you can add manually more data objects to the current Project using the +Add Tables or +Add Schemas clickable buttons provided in each object type tab at the left bottom.
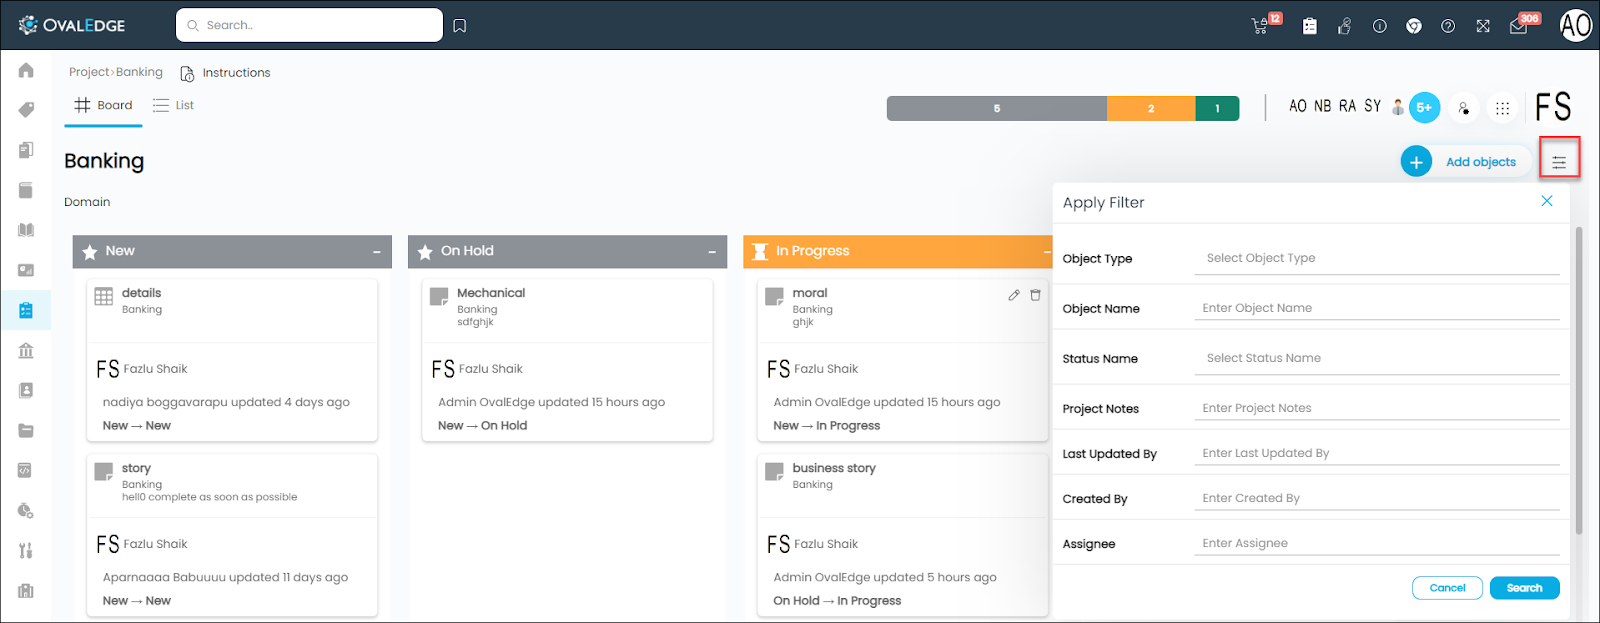
Board View
Board View also called Kanban View, gives a high-level update on tasks to know if a project is on track or off track in separate widgets. It helps to organize and view tasks/data objects under different project Status Column- New / On Hold/ In Progress /Completed from left to right to show the progress of the tasks.
Each Project Status widget visually represents the tasks under it which contain details about the data object, description, assigned team members, and last updates made on the task. It enables you to track and manage a project through the project lifecycle, from creation and planning, through to completion.
- You can drag and move the tasks to different project statuses.
- Apply Advanced Filter to help find and locate data objects.
- Add data objects or tasks to the project.
- Hover on to a Task to edit Task details or delete a Task.

Changing Project Status of a Task in Board View
- Hover on to a task under a Project Status Widget to see the edit icon.
- Click on the edit icon to see a Status pop-up window.
- You can now change the status of the Task to the desired status. The Status drop-down options display the default statuses and custom statuses created for the specific project.
- Add or Edit the Task Notes.
- You can change the Assignee using the drop-down options.
- Click on the Save button to save the details.

Advanced Search
Advanced search filter is enabled for every object type with multi-level granularity filtering. It facilitates the users to refine the search results by applying filters on top of the search results. A data object can be filtered based on the Object Type/ Object Name / Status Name/ Project Notes / Last Updated By/ Created By / Assignee details.
Instructions
Instructions helps to list the directives or guidelines on how to carry out a task to give your team more help in understanding the project or executing a task. An Instructions icon is provided for every Project created in the application.
- Go to Projects > Select a project from the grid.
- Click on the Instructions icon enabled in the top left.
- An Add Instructions pop-up window is displayed with added instructions.
- Click on the edit icon to add more information. You can add text, images, videos, insert links, add tables, and much more.
- Click on the Save button to save the details.
Adding data objects to Project
An Add Objects button helps to add multiple Data Objects (Tables/ Files ) to the Project.
Method 1: Board View
- Go to Projects > Select a Project from the grid to navigate to the Projects Board View.
- Select the Add Objects button enabled at the top right.
- An Add Objects pop-up is displayed.
- Select the Object Type /Connection Name / Database/ Schema / Table / Assignee from the drop-down options.
- Click on the Add Object button to add the object to the project.
Method 2: List View
In List View for every data object type tab an Add Table/ Add File/ Add Query button is enabled in the bottom left to add data objects from the selected Connection / Schema / data object.
Method 3: The data objects can be added to the Project from various places in the application such as data Catalog grid and Global Search results using the Add To Project icon enabled in the grid under Projects Column or Nine dots option. However, the desired Project must be first set as Default Project.
Invite Users
You can invite multiple users in the organization to collaborate and work on your project. Project Creator/Current Project Owner/users with admin rights can invite the users to add to the project.
- Go to Projects > All Projects > Select a Project.
- In the Board view / List View an Invite User icon is enabled on the right and Nine Dots options.
- Select the Invite User option to see a pop-up displayed.
- The pop-up window displays the assigned users in the right panel with a delete icon to delete users from the project.
- You can add individual users and Roles from the left panel drop-down.
- Click on the +button next to the user name, and the selected user gets added to the right panel assigned users list.
- Click on the Save button.
Note: The Project Creator, Owner and the Admin user can invite other users to the Project.
Delete Project
- Go to Projects > All Projects.
- Select a project from the grid. In the Project Details click the Nine Dots icon.
- Click on the Delete Project option to delete the project after a confirmation message.
Full profile and Calculate Relationships
The Full Profile and Calculate Relationships feature is enabled for Table objects. You can build relationships and also calculate scores among Table data objects that are added within the project.
There should be at least 2 or more tables associated, the tables are then analyzed, and considering the top 50 values of each table column, relationships are built and scores are calculated. As the feature starts to build relationships and calculates the score, an Advanced Job is triggered with the name ‘Project Level Relationships Building,’ and while it is running, a user may check the logs for understanding/progress under the Jobs section.
Upon successful completion, the relationships along with scores are established and can be accessed under the column details → Relationships.
Go to Projects > All Projects > Select a Project.
In the Project, detailed page > click on the Nine Dots > select the Full Profile and Calculate Relationships option.
Bulk Project Status Update
Bulk Project status update helps to change the status of multiple tasks to To Do, In Progress or Done all at once, which will undoubtedly save you time.
Update owner
The option helps you to change the Owner of the Project.
- Select a project from the All Projects grid and navigate to the selected Project details.
- From the Nine dots options, select the Update Owner option.
- An Update Owner pop-up window is displayed with a list of Owner names in the left panel.
- Click the +icon next to the Owner name you wish to add and the Owner name gets updated to the Project.
Configure Search Keywords
Configure Search Keywords are searchable or relevant keywords added to the Projects for the end-users to search the Project in an easy way.
- Go to Projects > All Projects > Select a Project.
- In the Project detailed page > click on the Nine Dots > select the Configure Search Keyword option from the list.
- A Configure Search Keywords pop-up is displayed.
- Click on the Add the keyword button enabled at the bottom.
- Enter the keyword in the field. Click Save and the keyword gets added to the Search Keyword grid.
- Search keywords with a minimum score of 3 are considered for the Elastic search to find and locate the objects.
- If the admin user adds the keyword, then the score is recorded as 3.
- If the non-admin user adds the keyword the score is recorded as 1.
- If the admin user votes the keyword, the score gets additional three points added to it.
- If the non-admin user votes the keyword the score gets an additional 1 point added to it.
- You can enable/disable the search keyword using the toggle.
- You can delete the search keyword using the delete icon.
Status Workflow
The Status Workflow is a hierarchical organization of project status within a project. It helps users create new Project statuses under any of the four Predefined Status Categories: New, To-Do-, In Progress and Done. You can create multiple new project statuses to keep track of project progress and completeness. You can define project statuses for each of your projects, as opposed to using a single standard status template to manage tasks.
- New: To list the new tasks.
- To-Do: Tasks that are open and actionable, but perhaps not actively In progress.
- In Progress: Tasks that are actively being worked on.
- Done: Tasks that are completed.

Creating New Project Status
- Go to Projects > select a project for which you wish to create new project status.
- The Status Workflow option is provided in both Board View and List View under the Nine Dots option.
- Select the Nine Dots icon to see the Status Workflow option.
- Select the Status Workflow option, and you will be navigated to the Selected Project status window. The different project statuses, both system and custom-defined statuses for the selected project, are displayed in the grid.
- Click on the + Add Status Icon enabled in the top right to create new project status to see an Add Status pop-up window.
- Status Name: Enter the Status Name you wish to create.
- Status Description: Enter a short description of the status.
- Category: The dropdown displays the system-defined Project Statuses i.e. New, To-Do, In-Progress and Complete. Select the Category under which the new status will be lined-up in transition (one after the other) in the Board view.
For Example: If a new Project status Review has to be created, then the position of the Review status has to be defined by selecting the appropriate status options from the Category. If the Completed status is selected, then the new Review status will be lined up after the Completed project Status. A new Review status widget gets displayed in the Board view. - Default: You can enable the default checkbox to add the data objects to the project status created.
- Click on the Save icon to save the details. The created project can be viewed in the Board view with a separate project status column.
- The newly created status gets added to the Status grid.
- For the system-defined statuses, only the description details can be edited, and you cannot change the Name or Category of the status. However, you can change the Order of the project status in the grid from 1-4.
- Also, you can make the template to Active/Inactive status to temporarily disable the project status.
Transition Flow
Transition flow is a set of statuses that a task moves through during its lifecycle. It helps to define and set a path based on the processes and stages required for a project. When a Task status has to be changed, it can be moved back and forth between two statuses, Source and Target. Multiple Transitions can be set differently for different projects. When changing the status of a Task you can view the different transition status(es) set for that specific status in the drop-down options.
Example: If New/To-Do/Awaiting Approval/ Review/Completed are the different statuses defined and created for a specific project, then a transition flow can be set in multiple ways, as listed below.
- New to Review
- New to Awaiting Approval
- New to Completed
Users trying to change a Task under New project status can be able to view Review, Awaiting Approval, and Completed options in the Status change drop-down. A user, in this case, cannot change the project status from New to T- Do status as it is not set in the transition flow.
- Click the + Add Transition icon, and the Add Transition pop-up window is displayed.
- In the Add Transition pop-up window, the Source and Target Status fields displays the different project statuses. (system defined and newly created Project statuses in the respective dropdowns.
- Select the Source status and Target Status.
Note: The Source Status is where the Task is expected to be moved from. The Target Status is where your Task is to be moved to.
- Transition Description: Add a small description of the transition made to refer to.
- Click the Save button to save the transition to the grid.
- You can thus define multiple Transition flows for a project.

Configuring Transition flow
The Transition button is not enabled by default in the application. To enable the Transition button, navigate to the Administration module > Configuration Page > Others > Enter Transition in Key search field “is.statustransitions.enabled” to True once set to True, it applies to all the projects in the application.
Once configured, the Transition button gets enabled in the Projects > All Projects > select a Project > Status workflow > + Add Transition icon is enabled.
Copyright © 2019, OvalEdge LLC, Peachtree Corners GA USA