Overview
The Jobs module in OvalEdge is a central hub for displaying and managing all tasks performed within the application. Whenever a task is carried out, it undergoes different stages: Initializing, Running, Success, Failure, Killed or Executed. The dedicated job information page, which is a List View of jobs with intricate details about each job, makes it easy to track the status of each task.
In the course of a job's execution, a user who has access to information about different events in its lifecycle can be immensely beneficial. The Jobs module ensures transparency and accessibility, making it a valuable tool for understanding and managing the status of various tasks within the OvalEdge application.
Navigating Jobs
In OvalEdge, users, specifically Author users with proper authorization, can explore the Jobs module and its details. Viewer users do not have access to view any Jobs.
Additionally, only users with the OvalEdge Jobs Role can see Admin-level Jobs in the module. Users can adjust these settings through the System Settings.
Viewing Jobs
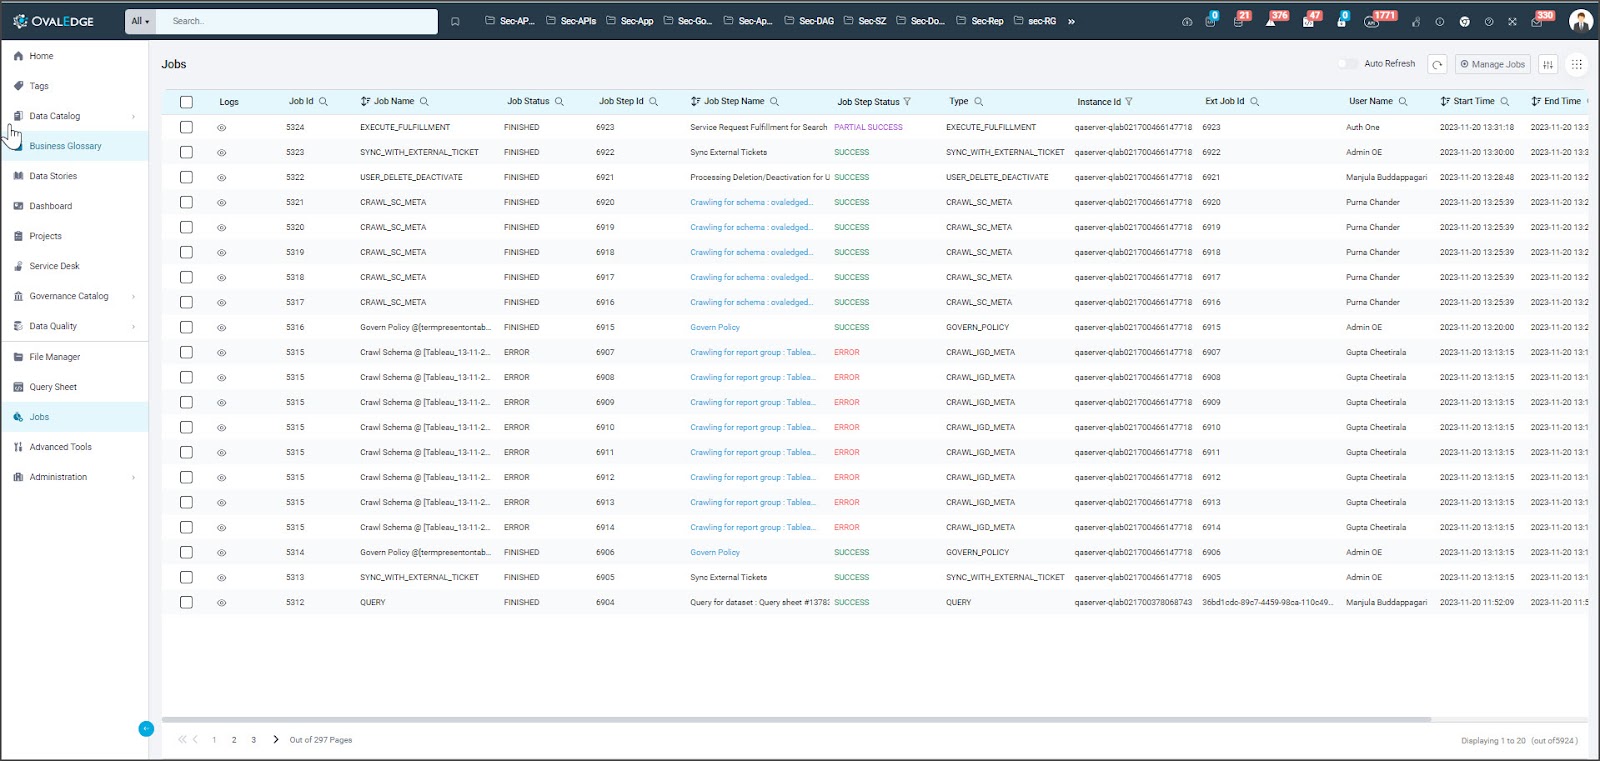
The Jobs Page displays a list of all jobs that have been executed or are currently in progress, along with their respective statuses. Users can see specific details and take essential actions related to these jobs. Additionally, users have the option to access detailed logs for each job.
Logs
Every job executed generates a log file that documents job activities. The log file is a record of all jobs, events, and processes performed within the OvalEdge application. Author Users can view the details of the log file by clicking on the eye icon.
When the user clicks on the ‘Eye’ icon, a window appears, presenting step-by-step information about the execution of a job. This log includes a series of steps that document the updated activities, events, and processes performed within the OvalEdge application.
The Job log details make it easy to monitor the status of a job. When a job is initiated, created, dropped, enabled, or any other action performed by the Scheduler (a module in OvalEdge to schedule jobs), gets recorded in the job log. Each job run gets documented with multiple log entries, providing insights into the completion status.
The Job Logs show a detailed description of a job and its steps, including the date, status, and count. It includes various details such as the start and end times of a job, commands in progress, failure notices, and error messages. Job Logs offer a set of features for easily checking the status of a specific job.
Managing Job Logs
Author Users can take specific actions with Job Logs to enhance discovery and analysis. Here are some features they can use:
- Date Filter: Users can filter jobs based on a selected date, allowing them to list or view job log details specifically executed on a particular date.
- Search: A Search box is available for entering characters or words to find specific job logs.
- Filter Icon: The filter icon lets users search for log values, providing options like INFO, WARNING, and ERROR. Depending on the chosen filter criteria, the job log values are displayed accordingly.
- Refresh Button: Users can click the Refresh button to observe real-time updates in the log while the job is being executed.
- Download Button: A Download button is provided for users to download the logs in a .csv sheet, facilitating further analysis.
Other Details
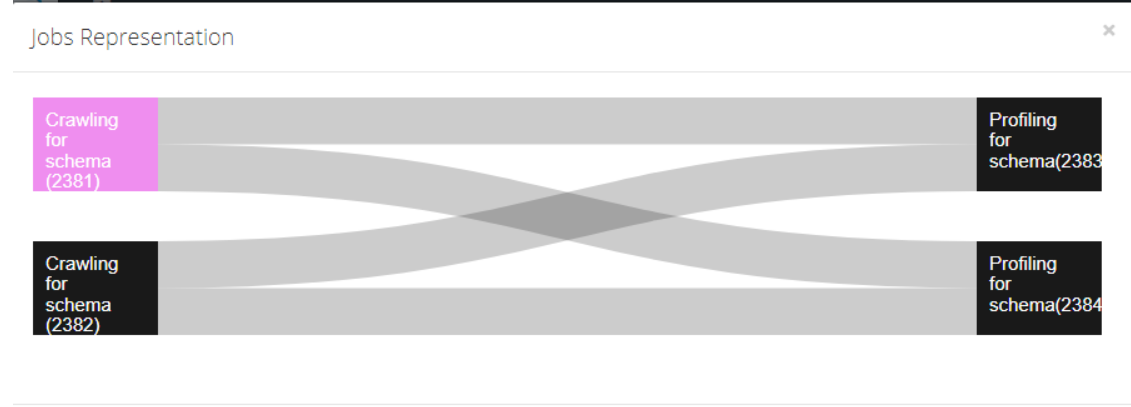
- Job ID: A unique identifier assigned to each initiated and executed job. Clicking on the Job ID provides a graphical representation of the jobs executed from Job Workflow.
- Job Name: The title representing the specific job.
- Job Status: The current status of the submitted job. Possible statuses include:
- Initiated: The job has commenced execution.
- Pending: The job is created but hasn't started execution, remaining in a pending state until it's ready to be run.
- Finished: The job is completed.
- Error: The job encounters a failure.
- Job Step ID: Reveals the Job ID for the currently running activity in both single-step and multi-step jobs. Single-step jobs execute the entire task as a single unit, while multi-step jobs involve multiple stages.
- Job Step Name: Presents the name of the job step corresponding to the job step ID. In some cases, the Job Step Name has a hyperlink that takes users to a specific object page where the Job is run.
- Job Step Status: Displays the status of the job step, with states including:
- RUNNING: Jobs are being processed in the submitted order.
- WAITING: A submitted job is in the queue, awaiting execution.
- SUCCESS: The invoked job has been completed successfully.
- PARTIAL SUCCESS: The submitted job has been executed partially, and the entire job could not be completed.
- ERROR: The job has failed; users can check the error message in the logs.
- INIT: A job has been initiated.
- KILLED: The task is aborted, and the execution of the job is stopped.
- Type: Indicates the type of job submitted, such as crawling, profiling, or file table exchange.
- Instance ID: Displays server and virtual machine (VM) details where the OvalEdge application is running.
- Ext Job ID: A job ID is created when a job is submitted from an external platform like Hadoop or Google Query. If submitted within OvalEdge, the Ext Job ID matches the Job Step ID.
- User Name: Displays the name of the user who initiated the job.
- Start Time: Displays the date and time when the job was started.
- End Time: Displays the date and time when the job was completed.
- Duration: Displays the total run time of the job.
- Size: Displays the amount of data processed during the execution of the job.
Refresh Jobs
On the Jobs Page, Author Users can use the Refresh button to see real-time updates in the Job details while the Job is being executed. The Refresh button’s primary purpose is to capture changes in both the Job Status and Job Step Status, making it easier to track overall progress.
Author Users also have the option to enable an Auto Refresh using the toggle available, which, when activated, automatically updates the job status every 30 seconds without requiring manual intervention. In the OTHERS tab of System Settings, users can configure the page refresh timing using the “page.refresh.time” configuration.
Manage Jobs
After initiating a job, users can manage the status on the Jobs Page by selecting the submitted job and clicking the Manage Jobs button in the top-right corner. A drop-down menu appears, offering the following options for the chosen job(s):
- Kill Job: Ends and removes the chosen job.
- Initialize/Resume Job: Initiates the selected job for execution or resumes a job that has been paused.
- Hold Job: Halts the selected job.
Note: Any job that is already in a Success State cannot be killed.
Date Filter on Jobs
Author Users have the option to utilize a Date filter for Jobs on the Jobs Page, enabling them to sort jobs according to the start and end dates. This filter allows users to see all executed jobs within the specified start and end date range.
Users can use the Date filter on the Jobs Page to sort jobs based on their start and end dates. This filter provides the option to view all executed jobs within the specified start and end date range.
System Settings on Jobs
The system settings for Jobs are designed to provide administrators and users with the flexibility to configure the behavior and display of Jobs functionality. These settings enable users to tailor their search experience, control the visibility of certain features, and fine-tune the search parameters according to their specific requirements. These settings can be configured from the Administration> System Settings > Others tab.
|
Key |
Default Value |
Description |
|
ovaledge.jobs.view.role |
OE_ADMIN |
Configure a role to view the job logs. Parameters: The default value is OE_Admin. Click on the field to select a role from the drop-down. You can select only 1 Role. |
|
ovaledge.running.jobs.count |
15 |
Specify the maximum number of concurrent jobs that should run at a time in the application. Parameters: The default value is 15. Enter the value in the field provided. |
|
oe.diagnostics.activeusersandjobs.enable |
TRUE |
Configure to enable the Active Users And Jobs tab on the Application Diagnostics page. Parameters: If set to True, the Active Users And Jobs tab becomes accessible on the Application Diagnostics page. If set to False, the Active Users And Jobs tab is not available on the Application Diagnostics page. |
|
page.refresh.time |
30 |
Set the time interval (in seconds) to auto-refresh your pages or tabs. Parameters: The default value is set to 30. Enter the value in the field provided |