Article Summary
This article provides a detailed overview of various administrative capabilities that can be configured in the OvalEdge application, enabling organizations to decentralize administrative capabilities from application administrators. These changes allow multiple administrators to achieve granular control over connectors and metadata, enabling organizations to establish clear lines of responsibility and access controls.
The article outlines the responsibilities and privileges of each administrator, enabling users to understand different administrative roles and their duties. Additionally, the article provides a complete flow of setting up administrators, from initial configuration to assigning specific administrative roles at various levels for a particular connection.
What’s new?
Significant improvements have been made to the security and administration of the OvalEdge application. Previously, only the super admin (OE_ADMIN role) had exclusive privileges to manage users and roles, create domains, configure domains, add custom fields, create service desk templates, manage workflows, etc. This centralized control led to extended timelines and dependency on Super admin for implementing governance changes. However, with the recent changes, OvalEdge now offers new administrative capabilities that enhance flexibility and enable the sharing of responsibilities with multiple other administrators distributing the workload and reducing the reliance on a single super admin.
Following are the new administrative capabilities that OvalEdge has introduced in the application
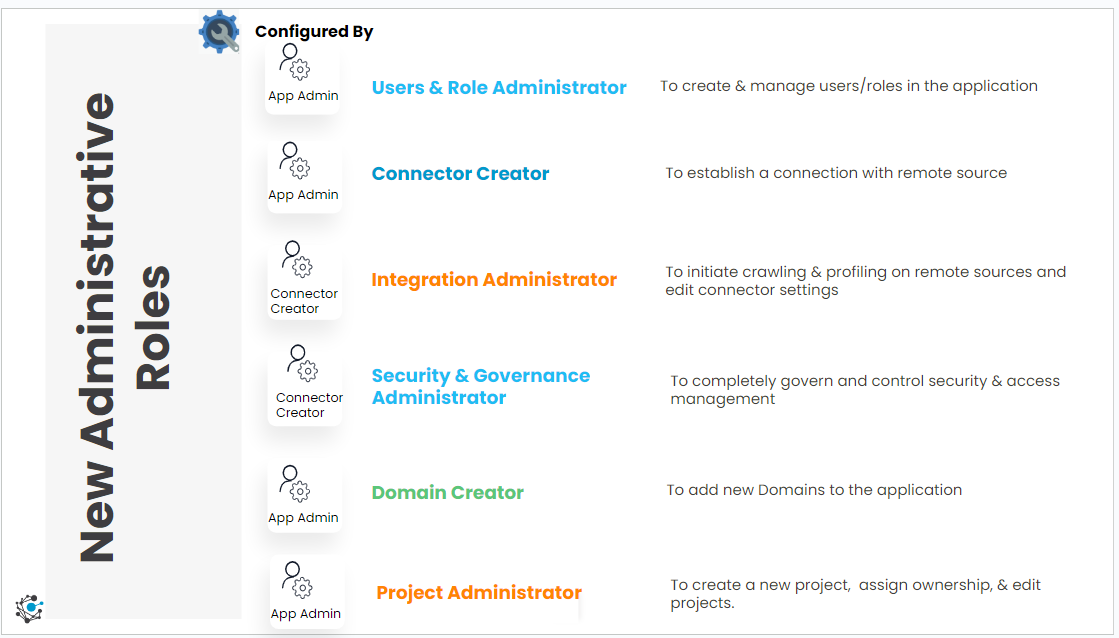
Users & Role Administrator
The User & Role administrator is responsible for managing user accounts, adding users to the application, and assigning roles and permissions. They have the authority to handle teams and remote system properties.
✅ Creating and managing user accounts
✅ Creating, editing, assigning roles and permissions to users
✅ Creating and managing Teams and access Column Security Policies
✅ View & Edit remote connector Users, Roles & Policies on the connector they are assigned to.
❌Can only view the remote connector users/ roles and does not have editing privileges.
Configuring User & Role Administrator
Users with OE_ADMIN privileges can set up a role as ‘User & Role Administrator’. To configure the Users & Roles Administrator in OvalEdge, follow these steps:
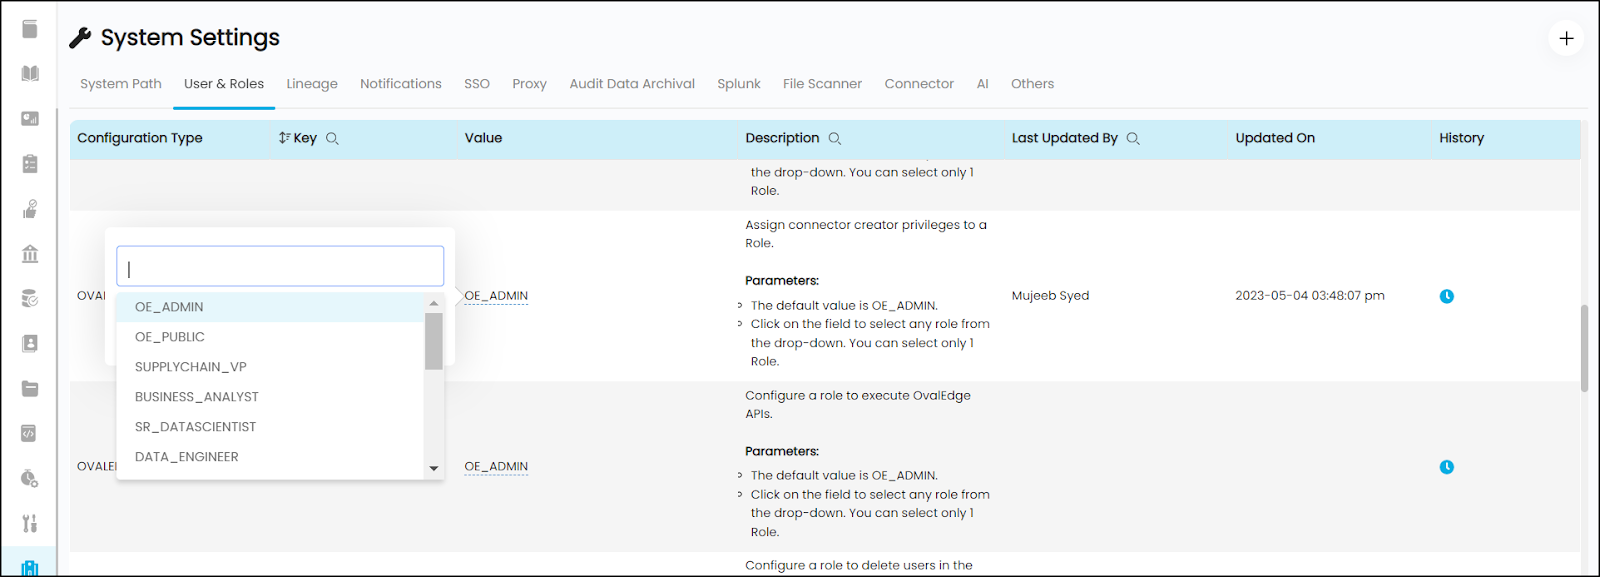
- Select the ‘Administration’ module from the left panel menu and select the ‘System Settings’ sub-module.
- In the System Settings page, navigate to the ‘Users & Roles’ tab.
- Search for the ‘oe.user&role.admin’ key.
- This setting helps to assign Users & Roles admin privileges to a Role. All the users associated with the role will be able to perform the tasks of Users & Roles Administrator as mentioned above.
- By default, the value is set to OE_ADMIN.
- Click on the field to select any role from the drop-down.
- Choose only one Role to assign Users & Role administrator permissions to those associated with that Role.
- Save the changes to apply the configuration.

Once configured, the Users & Role Administrators, have the authority to access the Administration > Users and Roles module. It allows designated individuals to have comprehensive control over user and role management within the system. They can efficiently onboard new users, define roles with appropriate permissions, and handle the intricacies of user and role permissions management.
Additionally, these administrators can effectively configure and manage remote connector properties, ensuring seamless integration and data flow between different systems.

Connector Creator
The Connector Creator's responsibilities are only limited to establishing a connection with the remote connector and adding a connection to the OvalEdge application. Their role is primarily limited to these initial tasks. During the connection setup, they have the authority to nominate an Integration Administrator and a Security & Governance Administrator for the connector. Once the connection is established, the creator's role is considered complete and the Connector Creator does not have the authority to modify or delete the connector itself.
✅Adding remote connectors to establish a connection with the OvalEdge application.
✅Designating Integration and Security & Governance Administrators during the connection creation process.
✅Integrating with External tools (ServiceNow, Jira, Azure DevOps) in Service Desk Templates.
✅Create and Manage Bridge
❌ No authority to edit connector settings, build lineage or delete a connector.
❌ Cannot crawl or profile the connection.
Configuring Connector Creator
Users with OE_ADMIN privileges can set up a role as ‘Connector Creator’. To configure the Connector Creator in OvalEdge, follow these steps:
- Select the ‘Administration’ module from the left panel menu and select the ‘System Settings’ sub-module.
- In the System Settings page, navigate to the ‘Users & Roles’ tab.
- Search for the ‘ovaledge.connector.creator’ key.
- This setting helps to assign Connector Creator privileges to a Role. All the users associated with the role will be able to perform the tasks of Connector Creator as mentioned above.
- By default, the value is set to OE_ADMIN.
- Click on the field to select any role from the drop-down.
- Choose only one Role to assign Connector Creator permissions to those associated with that Role.
- Save the changes to apply the configuration.
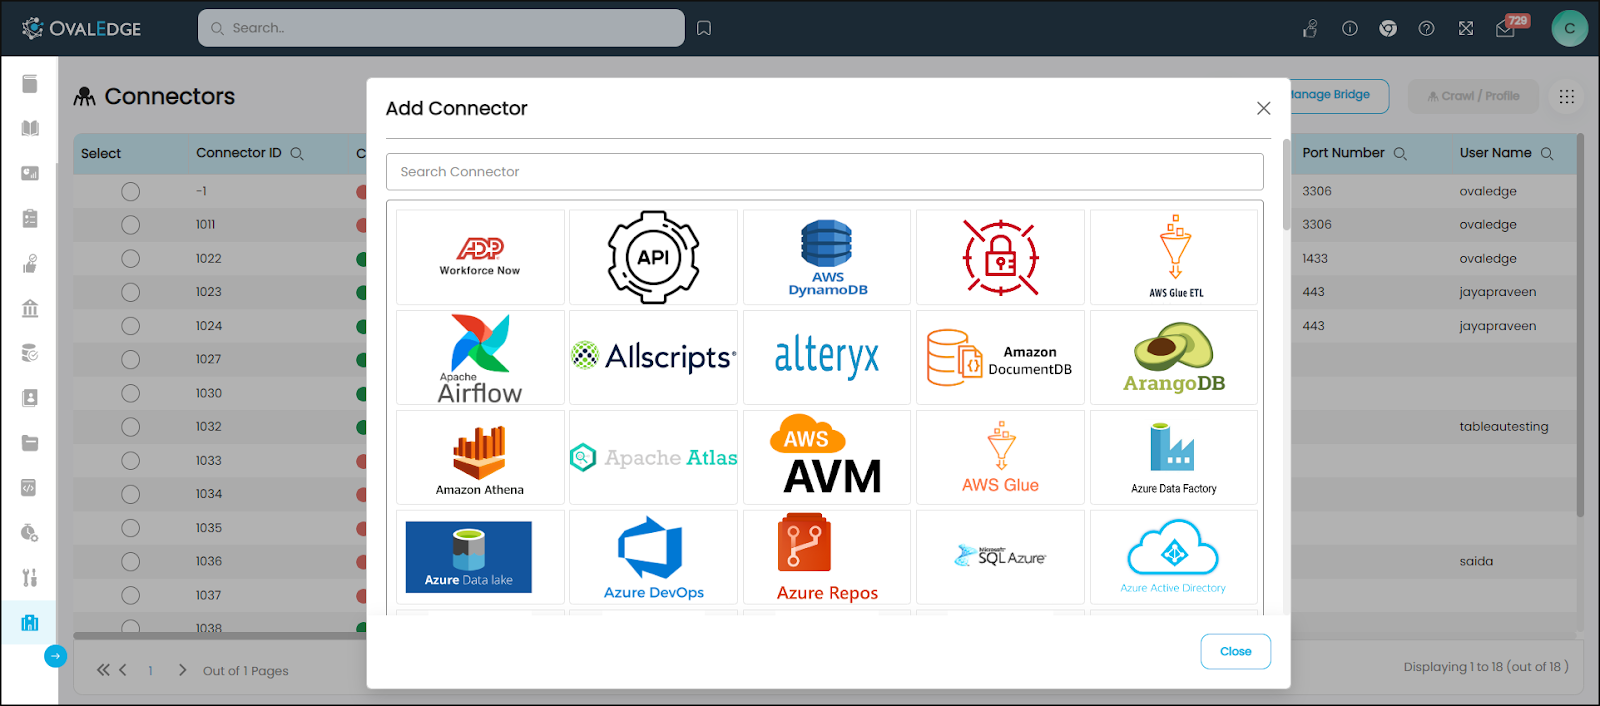
- Once configured, the Connector Creator can access the Administration > Connectors module and add new connections using the + Add New Connection icon. Also, from the ‘Add Connector’ pop-up the Connector Creator can designate the Integration Administrator and Security & Governance Administrator roles.


Integration Administrator
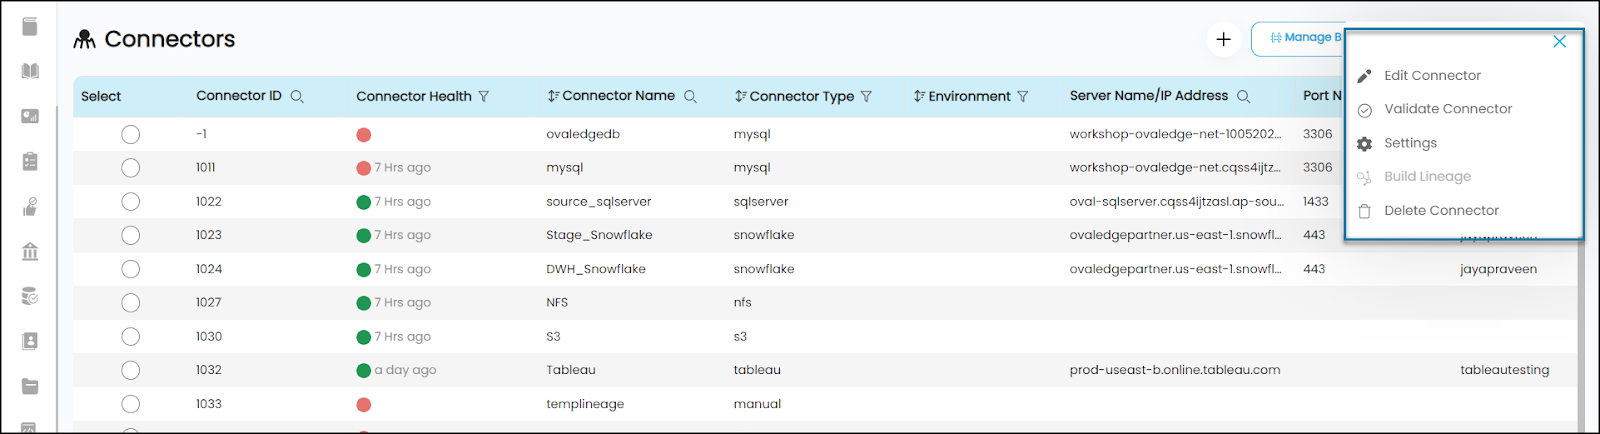
The Integration Administrator is specifically designated to handle all activities related to crawling and profiling, as well as have the authority to edit connector settings.
✅ Perform Crawl & Profile on the connector
✅ Has default access to the Administration > Connectors page and can edit connector settings
✅ Perform Nine Dot action items to Edit Connector, Validate Connector, Settings, Build Lineage, and Delete Connector.
✅ Delete the connector or schema or data objects
✅ Access Data Catalog data objects to initiate profiling at the object level.
✅ Access Job Workflow to use advanced properties specific to crawling/profiling/cataloging
❌ No authority to edit connector settings of other connectors to which the user/role is not the Integration Administrator
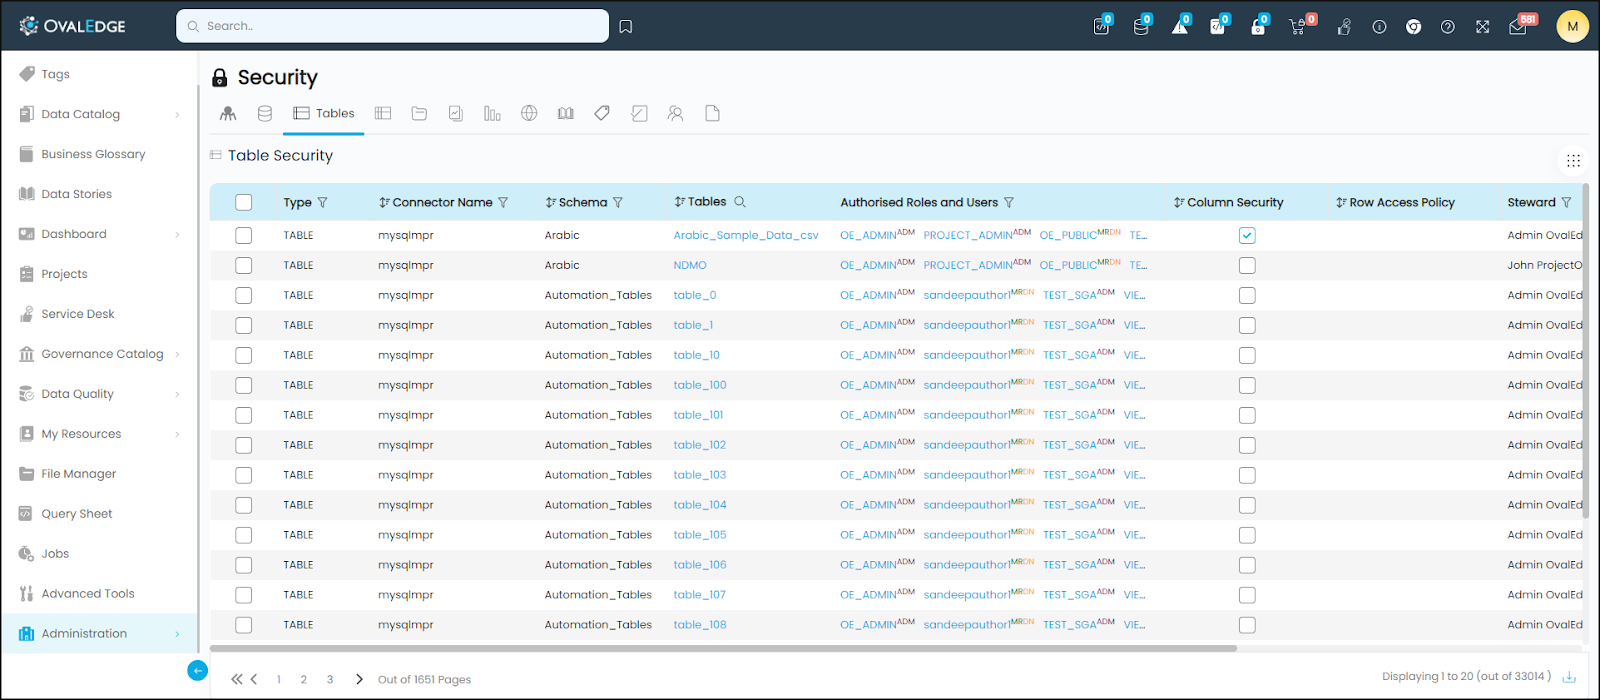
Security & Governance Administrator
The Security & Governance Administrator is assigned the complete responsibility of governing and controlling security and access management for data objects.
✅ Setting Permissions for roles on the connector and associated data objects
✅ Privileges to edit metadata and data of the data objects.
✅ Update governance roles
✅ Create custom fields
✅ Create Service Request templates for authorized connectors.
✅ Create Approval workflows for the templates
❌ No authority to edit connector settings
❌ Cannot Profile any data object
❌ Cannot create Global custom fields
❌ Cannot see metadata or data objects of other connectors to which the user/role is not Security & Governance Administrator.
Configuring Integration and Security & Governance Administrators
During the process of establishing a connection, the Connector Creator will nominate the Integration Administrator and Security & Governance Administrator roles in the ‘Add Connector’ pop-up.
Once configured, the Integration Administrator can access the Administration > Connectors page to edit and manage the connector settings.

Once configured, the Security & Governance Administrator can access the Administration > Security module to grant users/roles access to data objects and additionally perform various activities to create custom fields specific to the connector, service request templates, and more.
Domain Creator
The Domain Creator can only add a new domain to the application and nominate a Security and Governance Administrator on a domain. Once the domain is added, the Domain creator’s responsibilities end and the configured Security and Governance Administrator on the domain will be responsible to manage and edit the domain.
✅ Add a Domain
✅ Nominate a Security and Governance Administrator on a domain
❌ Cannot delete a Domain.
❌ Cannot edit Domain Properties

Security and Governance Administrator on the domain
The Security and Governance Administrators assigned to a domain have the capability to configure and manage domain properties specific to that particular domain. Each domain can have a designated Security & Governance Administrator responsible for assigning permissions to users authorized by the domain and its associated terms.
✅ Manage domains
✅ Configuring categories, sub-categories, and classifications for each domain
✅ Assigning permissions to users or roles authorized to access the domain and its associated terms.
❌ Cannot create a Domain.
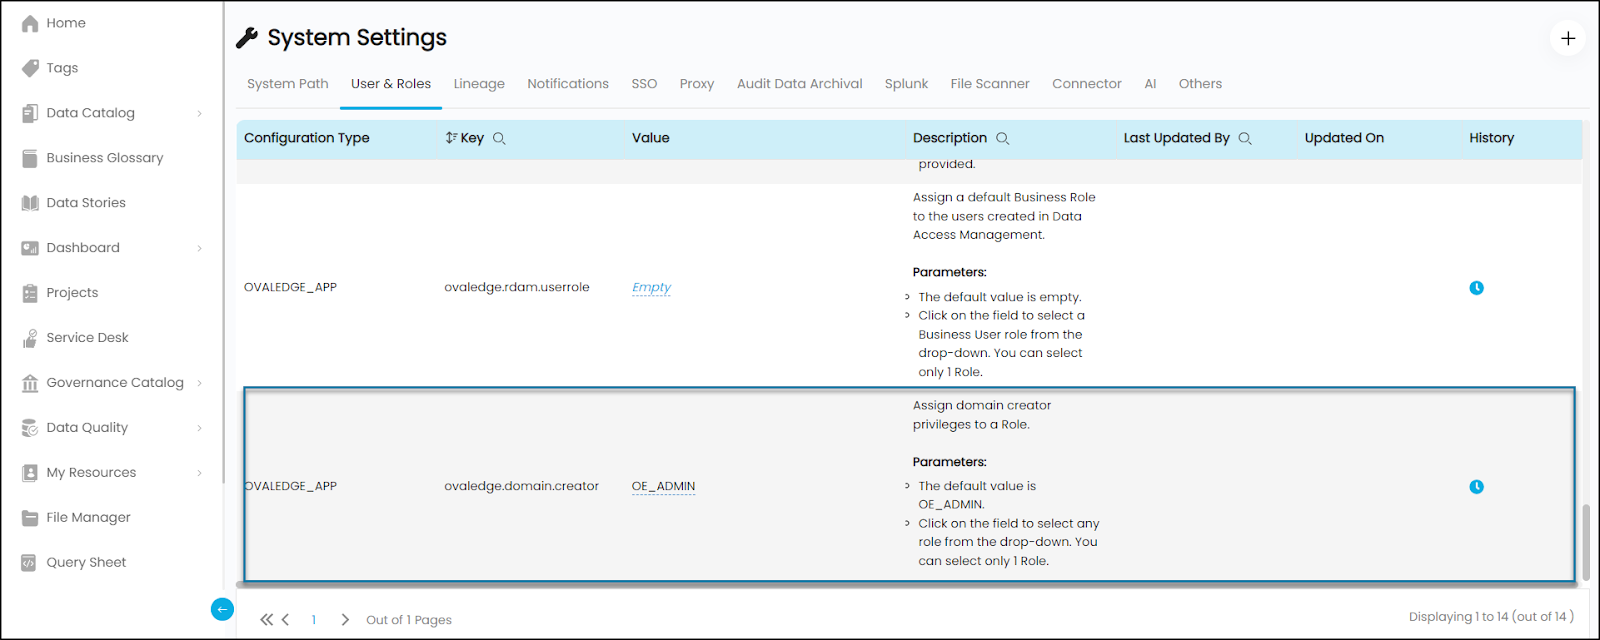
Configuring Domain Creator
The super admin users can configure the settings to set up a role as Domain Creator.
- Select the Administration module from the left panel menu and select the System Settings sub-module.
- In the System Settings page, navigate to the ‘Users & Roles’ tab.
- Search for the ‘ovaledge.domain.creator’ key.
- This setting helps to assign Domain Creator admin privileges to a Role. All the users associated with the role will be able to perform the tasks of Domain Creator Administrator as mentioned above.
- By default, the value is set to OE_ADMIN.
- Click on the field to select any role from the drop-down.
- Choose only one Role to assign Domain Creator permissions to those associated with that Role.
- Save the changes to apply the configuration.

Project Administrator
The Project Administrator plays a crucial role in a project as they have permission for important tasks such as creating projects, inviting members, assigning project ownership & modifying project descriptions and instructions.
✅ Create a new project
✅ Invite users
✅ Assign ownership (update owner)
✅ Edit descriptions and instructions for a project
Configuring Project Administrator
Users with OE_ADMIN privileges can set up a role as ‘Connector Creator’. To configure the Connector Creator in OvalEdge, follow these steps:
- Select the ‘Administration’ module from the left panel menu and select the ‘System Settings’ sub-module.
- In the System Settings page, navigate to the ‘Users & Roles’ tab.
- Search for the ‘role.project.admin’ key.
- This setting helps to assign Project Administrator privileges to any author role(s). All the users associated with the role will be able to perform the tasks of Project Administrator as mentioned above.
- By default, the value is set to OE_ADMIN.
- Click on the field to select any role from the drop-down.
- Choose only one Role to assign Project Administrator permissions to those associated with that Role.
- Save the changes to apply the configuration.
- Once configured, the Project Administrator can access the Projects module from the left panel menu and work with the projects.

Copyright © 2023, OvalEdge LLC, Peachtree Corners GA USA