My Resources act like a personal library of modules that you create in OvalEdge. It's easy to collaborate, set up your profile settings, monitor your application usage, and receive various alert notifications. My Resources provides information regarding the following:
- Inbox
- My Profile
- My Project Task
- My Permissions
- My Watch List
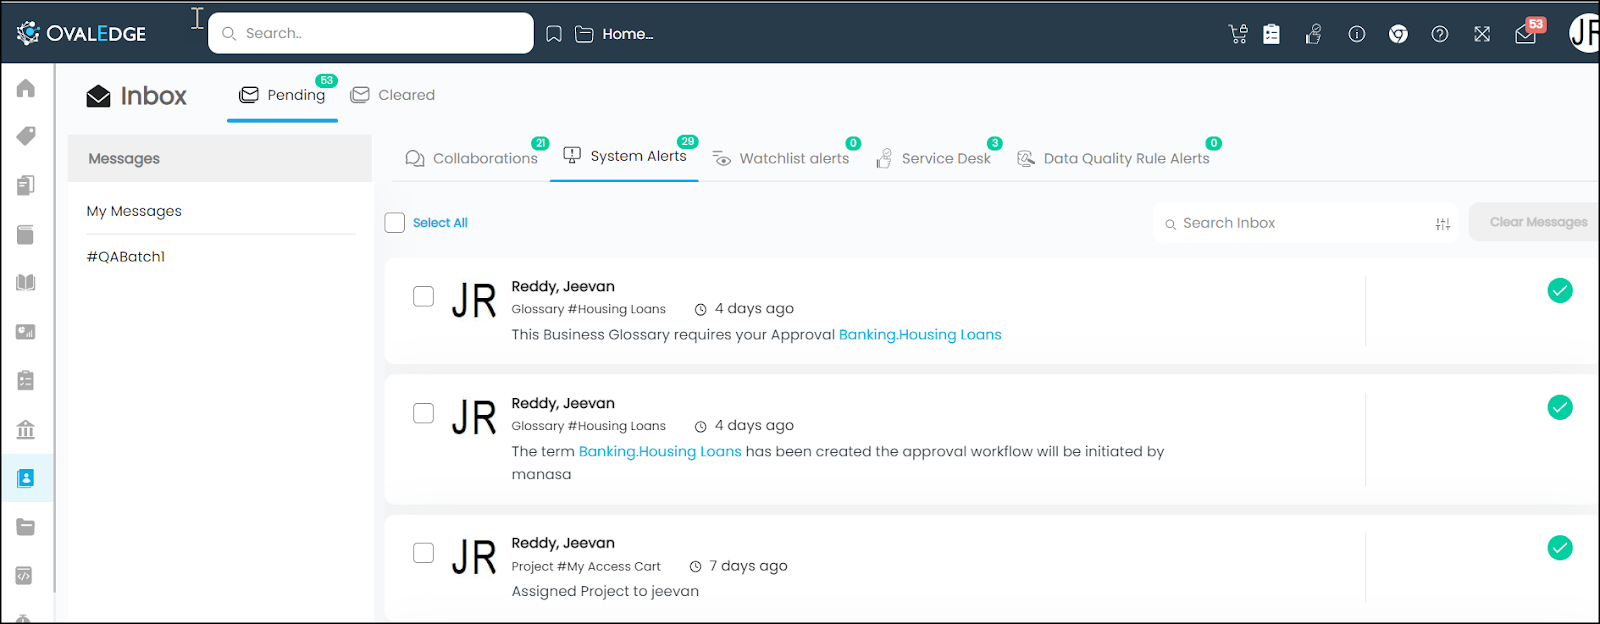
Inbox
Inbox provides a platform to collaborate with the users and user groups within an organization. The Inbox feature in OvalEdge allows a user to have a consolidated view of all the messages received/sent across by other users within the organization. The messages include
- Collaborations- Message added thorough collaboration on the Data object summary page will be displayed here.
- System Alerts- It gives the alert message when the user runs any type of job (Example: crawling, scheduling, creating terms, etc.) within the application.
A system alert will be generated in the following scenarios:
- Projects: When a user is invited to a project.
- Crawler: When a user opts for ’User Notification’ for Metadata changes
- Job workflow: When a user opts to receive a notification under Setting.
- Business Glossary: If a term is in draft status and needs permission to be published, there is a system alert generated, and the STEWARD of that DOMAIN receives a notification to publish the term.
- Watchlist Alerts: Whenever you add a data object to my watch list on the Data Catalog > Data object and enable the Metadata Changes option on the My watchlist page, an alert message will be triggered and displayed on this page for Owner and Steward.
- Service Desk: Wherever a user creates a service desk request on the Governance Catalog > Service Desk page, a message alert will be displayed here.
- Data Quality Rule Alerts: When you click on the yes radio button for the Alert on the DQR summary page, after running the rule, an alert message will be triggered and displayed on this page.
All the unread above-mentioned message types are viewed in the pending tab, and the read messages are viewed on the cleared tab. When you select a pending message and then click on the Clear Messages button, the selected message can now be viewed on the Cleared tab.
Team Message
The messages associated with a particular team are displayed in the Teams tab. Whenever any message is sent to a team and if you are a part of that team then you will receive a notification and that message will be available in Inbox > #Team.
Example: A message is sent to the #Sales team, you are a part of that sales team. So you could view the team message in the Inbox > #Sales team.
User Actions
Search Inbox
The search Inbox is enabled to search a message in the My Profile > Inbox.
You can search the message in the inbox using the “Message-ID” Example: #1098 or “Text from Messages/replies”.
Reply Message
A replay button is enabled to replay the message.
When you click on the Reply button, an inline text box will be displayed. You need to write your reply message in the text box and click on submit to send the reply.
Clear message
The Clear Message is used to make the selected messages as read.
To make those messages as unread, you can click on the Move to Pending button from the Inbox > Cleared tab.
You can also delete the read message from the Inbox > Cleared tab using the Delete button.
You can also clear the individual messages using the Clear icon , configured against each message.
My Profile
The My Profile displays the details of the user who logged in to the OvalEdge application with contact information (phone number and email), profile photo, and last updated on (the date and time on which the user profile information was last updated).

Email Notifications
OvalEdge allows you to receive an email notification related to various user actions. To receive the email notification, select the checkboxes for the following actions.
- Collaboration
- Watchlist alerts
- System Alerts
- Data Quality Alerts
- Service Desk Alerts
- Governance Roles Alerts
- Team Communication
- Data Quality Alert
- Send selected Notifications to Slack
Edit Profile
You can edit the profile details, upload a new profile picture, or change the existing profile picture on the profile details. When you log in for the first time, the identification will be abbreviated by your first and last name.
To edit the user profile details,
- Navigate to the My Resources > My Profile.
- Click on the Edit Profile icon, and the Edit profile pop-up window is displayed, and modify the required details such as First Name, Last Name, Email, Phone number, Slack Id, and Profile Picture.
Note: The User field in the Edit Profile pop-up window is not editable. - Click on the Save button, the existing profile details will be updated and the message Profile updated successfully is displayed.
Change Password
To Change the Password:
- Navigate to the My Resources > My Profile.
- Click on the Change Password, and the Change Password pop-up window is displayed.
- Enter the details in the required fields and then click on the Save button, the existing password details will be updated and the message Password updated successfully is displayed.
Read Permission
The Read Permissions allows you to view the permissible Data Objects for the assigned Users on the My Resources > My Permissions.
You can review the ownership, stewardship, authorship, access, and remote access for the permissible data objects.
Download API Credentials
The Download API Credentials allow you to download the API Credentials in .crd format.
You can log in to the OvalEdge Chrome Plugin using these credentials.
My Project Task
My Project Task allows you to view the projects and data objects assigned to the projects created by you or the project to which you are invited, along with the status of the projects.
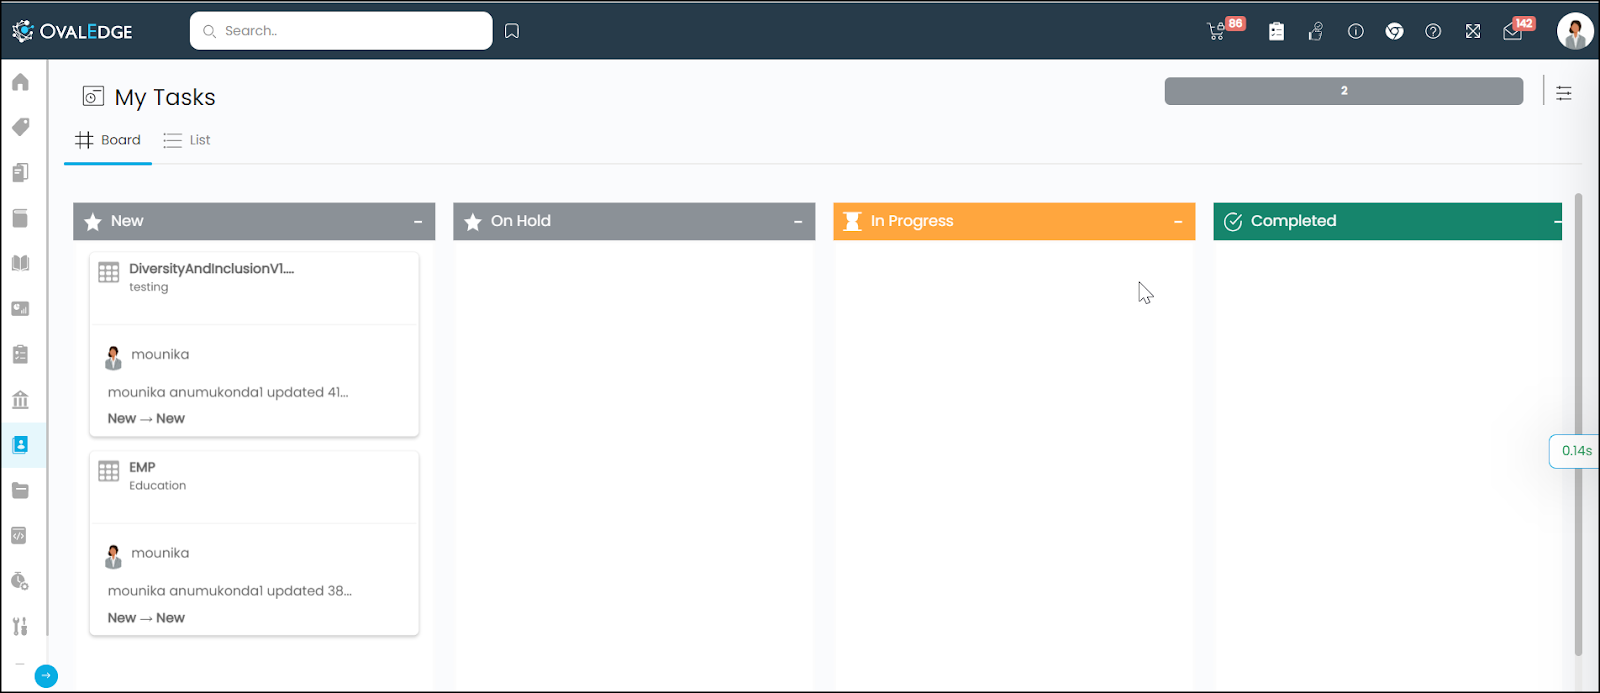
There are two types of view:
- Kanban View
- List View
Kanban view- In the Board view, you can view the tasks in a Dashboard view. The tasks will be categorized under New, On Hold, In Progress, and Completed tasks.
When you mouse hover over the task, the edit icon is enabled where you can change the task status.
To change the task status.
- Click on the edit icon, the tasks status pop-up window is displayed.
- Select the status from the Status dropdown menu.
- Select the name of the assignee to whom you need to assign the task from the Assignee dropdown menu.
- Click on the Save button, the task status will be updated and displayed on the My Tasks.
Note: You can also change the task status by the drag and drop method.
Example: You have created a task for the dbo database under Bank Project, and the task status is New. To change the status of the task to In progress, you need to drag the task from the New widget and drop it on the In progress widget.
List view-The list view allows you to view the data objects associated with the projects, created by you in the respective data objects tabs.
You can view the Project Name, Connection Name, Table Name, Schema Name, Title, Status, Assignee, etc, with respect to the data object.
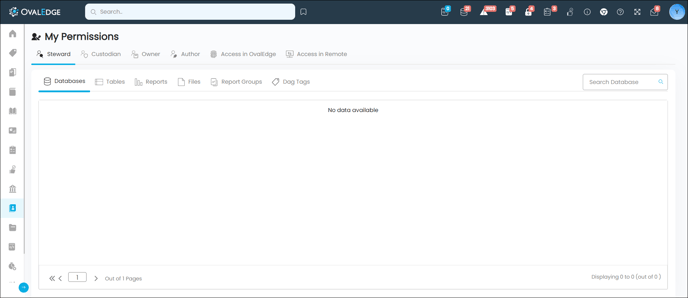
My Desk
The My Permissions allows you to view the list of all the data objects for only the users having access as a Steward/Custodian/Owner/Author. The visibility of the user’s permission is segregated to depict Access to Databases, Tables, Reports, Files, Report Groups & DAG Tags.
The permissible Data Objects (Databases/tables/ reports/Files/Report Groups/DAG Tags) are displayed with regard to the governance roles (Steward, Custodian, Owner, and Author).
Example: Stewards can view or access the Data Objects based on the permissions.
Note:
- Admin can view and access all the available permissions for all users within the application.
- For Databases, Tables, Reports, Files, Report Groups, and Data Tags, there is a search option where you can search for the required information by adding the keyword in the search bar.
Example: To search a particular table, enter the table's name you want to search in the Search bar and then click on the search icon or enter. The results associated with the entered text will be displayed.
My Watch List
The My Watch List allows you to view the watch-listed Data Objects. When a data object is added to the My Watchlist using the Add to My watchlist option in the Data Object Main page and Data Object summary, then you will be able to view those data objects on the My Permissions > My Watch List.
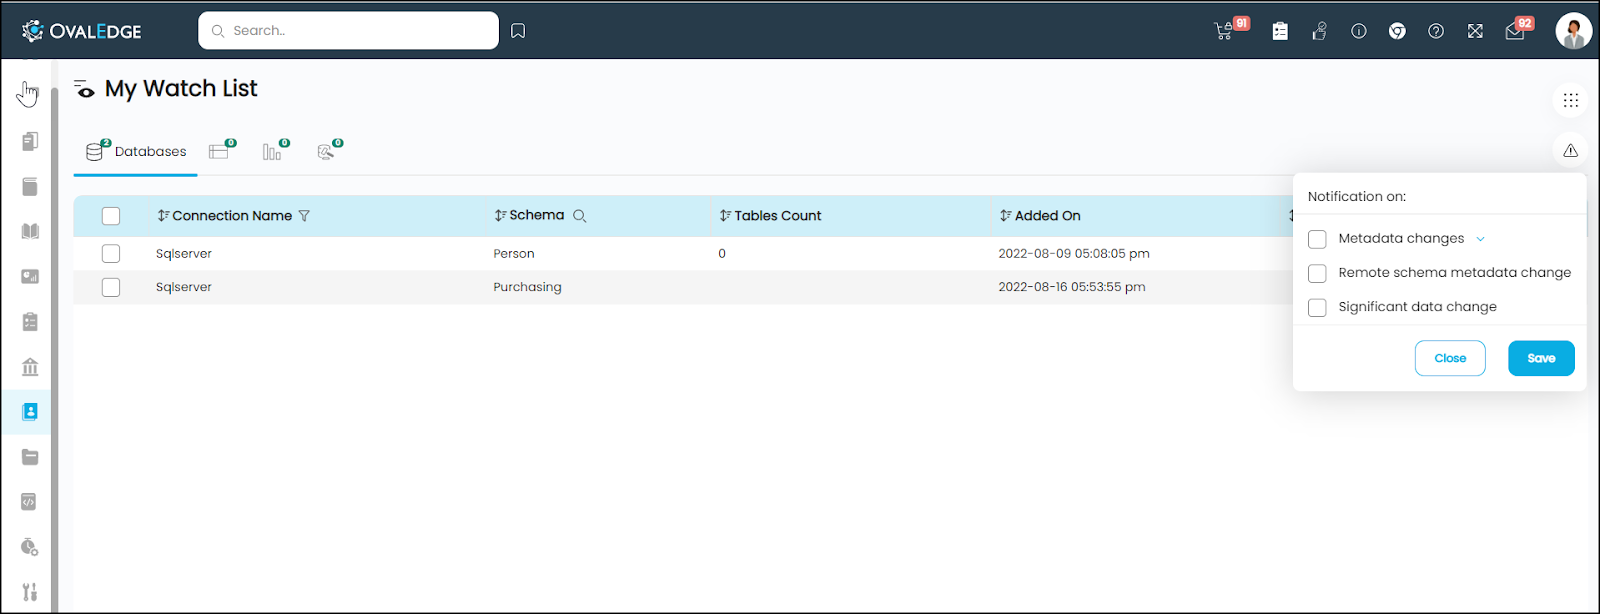
My Watch List- Databases
The Databases added to My Watch List from the Data Catalog > Data Bases are viewed on the My Watch list > Databases with Connector Name, Schema, Table Count, Added on, and Last Notified On details.
My Watch List- Tables
The Data Tables added to My Watch List from the Data Catalog > Tables are viewed on the My Watch list > Tables with Connector Name, Schema, Table, Title, Added on, and Last Notified On details.
My Watch List- Tables Columns
The Table columns added to My Watch List from the Data Catalog > Table columns are viewed on the My Watch list > Table columns with Connector Name, Schema, Table, Lookup Table Name, Column Type, Title, Business Description, Added date, and Last Notified date details.
My Watch List- Reports
The Data Tables added to My Watch List from the Data Catalog > Reports are viewed on the My Watch list > Reports with Report Group, Report Name, Title, Type, Changed On, Created By, Added on, and Last Notified On details.
My Watch List- Data Quality Rule
When you add a Data Quality Rules to the My Watch List, the watch listed Data Quality Rules will be viewed on the My Watch List- Data Quality Rule with Domain, Rule Name, Purpose, Added on, and Last Notified On details.
Notification
A notification icon is enabled on the My Watch List to receive notifications. You will be notified after enabling the particular option, as mentioned below:
- Metadata Changes: In case of any changes in the Business Description, Technical Description, Ownership, Tags, Terms, and Custom Field for the watch-listed data objects, you will get the notification.
- Remote Schema Metadata Changes: In case of any changes made in the structure of the Data objects ( Addition/deletion of a row/column in the table) for the watch-listed Data Objects, you will get an email notification.
Example: The Purchasing Schema and the Grocery Table under the Purchasing Schema is added to My watch list. The Grocery Table is having two columns when the table is added to My watch list. Now one more column is added to the Grocery table in the source database. When you recrawl the database, you will receive a notification in the My Resources > Inbox > Watchlist alerts, if the Remote Schema Metadata Changes option is enabled.
- Significant Data Changes: An automatic alert will be sent to notify whenever the watch-listed data objects undergo a significant percentage of data change. This helps to keep a quick track of both the metadata and data changes for the watch-listed data objects.
Example: The Purchasing Schema and the Grocery Table under the Purchasing Schema is added to My watch list. The Grocery table is empty when it is watch-listed. You can enable the Significant Data Changes notification, and the percentage you have given is 100%. Now you have added one row in the Grocery table, which satisfies the given data change percentage (100%). In this case, a notification will be triggered and can be viewed in the My Resources > Inbox > Watchlist alerts.
Delete from Watchlist
You can delete a data object which is added to your watch list using the Nine dots icon.
To delete a data object from the My watchlist module:
- Select the checkbox for the Data Object.
- Click on the Nine Dots icon, and select the Delete from Watch list option.
The Data object will be removed from the My watch list.
Copyright © 2019, OvalEdge LLC, Peachtree Corners GA USA