Overview
This article is intended to teach users to navigate and effectively use Nine Dots Action's functionalities, including adding or editing Tags and Terms, adding data objects to a project, adding data objects to My Watchlist, or raising service requests on data objects.
- Introduction to Data Catalog Object Nine Dots Options
- Performing Action Items on Multiple Data Objects
- Performing Action items at a single data object or summary page level
Introduction to Data Catalog Object Nine Dots Options
The Data Catalog Nine Dots options play a vital role in efficiently managing objects within the data catalog. These options provide users with various functionalities that enable them to control and organize data objects effectively. This section will provide a detailed overview of the Data Catalog Object Control feature and its functionalities, highlighting the importance of these options in data catalog management.
Listed Below is the list of Nine Dots Actions that can be carried out in bulk on multiple data objects at once:
|
Action Items |
S |
T |
TC |
F |
FC |
R |
RC |
C |
|
Add to Watchlist |
Yes |
Yes |
Yes |
No |
No |
Yes |
No |
No |
|
Remove From Watchlist |
Yes |
Yes |
Yes |
No |
No |
Yes |
No |
No |
|
Add Tags |
Yes |
Yes |
Yes |
Yes |
Yes |
Yes |
No |
No |
|
Remove Tags |
Yes |
Yes |
Yes |
Yes |
Yes |
Yes |
No |
No |
|
Add Terms |
Yes |
Yes |
Yes |
Yes |
Yes |
Yes |
Yes |
Yes |
|
Remove Terms |
Yes |
Yes |
Yes |
Yes |
Yes |
Yes |
Yes |
Yes |
|
Add to Default Project |
Yes |
Yes |
Yes |
Yes |
Yes |
Yes |
Yes |
Yes |
|
Remove Default Project |
Yes |
Yes |
Yes |
Yes |
Yes |
Yes |
Yes |
Yes |
|
Service Desk |
Yes |
Yes |
Yes |
Yes |
No |
Yes |
No |
Yes |
|
Update Governance Roles |
Yes |
Yes |
Yes |
Yes |
Yes |
Yes |
Yes |
Yes |
|
Apply Certification Type |
No |
Yes |
No |
Yes |
No |
Yes |
No |
No |
|
Add Data Quality Rules |
No |
Yes |
Yes |
Yes |
Yes |
No |
No |
Yes |
|
Delete Data Quality Rules |
No |
Yes |
Yes |
Yes |
Yes |
No |
No |
Yes |
|
Anomaly Detection Settings |
Yes |
Yes |
Yes |
No |
No |
No |
No |
No |
|
Add to Impact Analysis |
No |
Yes |
Yes |
Yes |
Yes |
Yes |
Yes |
No |
Performing Action Items on Multiple Data Objects
- Add / Remove to My Watchlist (S, T, TC, R)
Purpose: When users add a data object to their watchlist, they gain access to real-time notifications that keep them informed about any changes or updates associated with that specific object. It ensures that users stay up-to-date with the latest changes or updates happening both within the catalog and across remote data sources. By receiving timely notifications, users can make well-informed decisions, and effectively leverage the data to meet their business needs.
- Metadata changes: If any changes are made to the business descriptions, tags, or terms associated with the data object within the OvalEdge instance these changes will be displayed. This ensures that users stay informed about any updates or modifications to the metadata, helping them stay up to date with the latest information.
- Remote metadata changes: In addition to changes made within the OvalEdge instance, users can also receive notifications when there are updates to the data object at the remote source. This feature enables users to monitor changes that occur externally, ensuring they have the most accurate and current metadata information available.
- Significant data changes: This feature provides users with the ability to receive notifications regarding significant data changes in the data object located at the remote source. These changes can be the addition or deletion of new rows within the data object.
Users can define a threshold value, and if the change in row counts exceeds this threshold, notifications can be triggered. For example, if the threshold is set to 50% and the row count of the data object increases by more than 50%, a notification will be generated.
How to: To add multiple data objects in your watchlist, select the desired data objects and choose either the "Add to My Watchlist" or "Remove from My Watchlist" option from the menu (nine dots). This allows you to add or remove the selected data objects from the "My Watchlist" section in the "My Resources" area.
If the Remove from My Watchlist option is selected for a watchlisted data object, it will be removed from the My Resources > My Watchlist page, and all alert notifications will be disabled for that data object.
- Add/Remove Tags
Purpose: Tags are like labels or keywords that are used to group data objects together to make them easier to search for and discover. Tags can be very useful for managing and organizing data objects when dealing with large volumes of information. A single data object can have multiple tags associated with it, and a tag can be applied to multiple data objects. This allows for flexible grouping and organization of data objects based on various criteria.
How to Bulk Update Tags on Multiple Data Objects
-
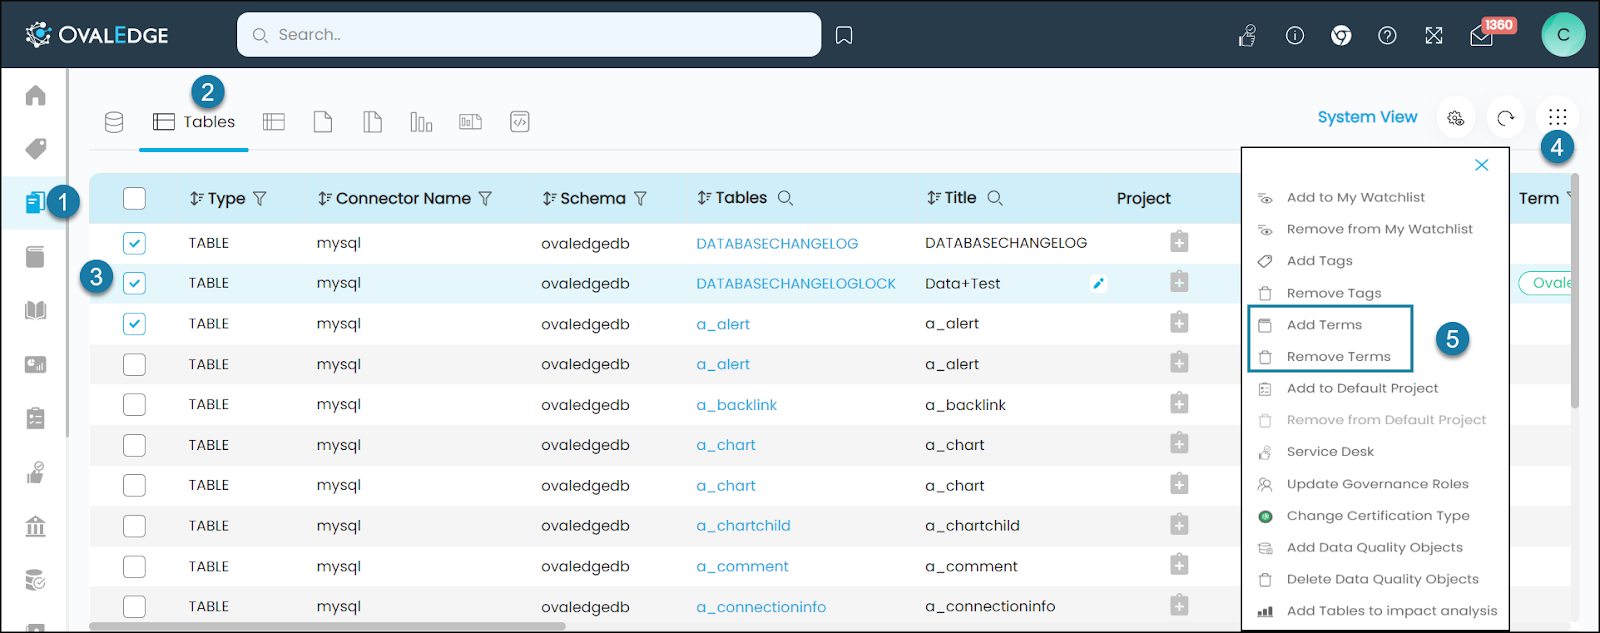
- In the left panel menu select Data Catalog.
- Select Data Object Type: From the top menu in the Data Catalog, choose the appropriate data object type tab.
- Choose Multiple Data Objects: In the tabular plugin, select the checkboxes corresponding to the data objects you want to update tags for.
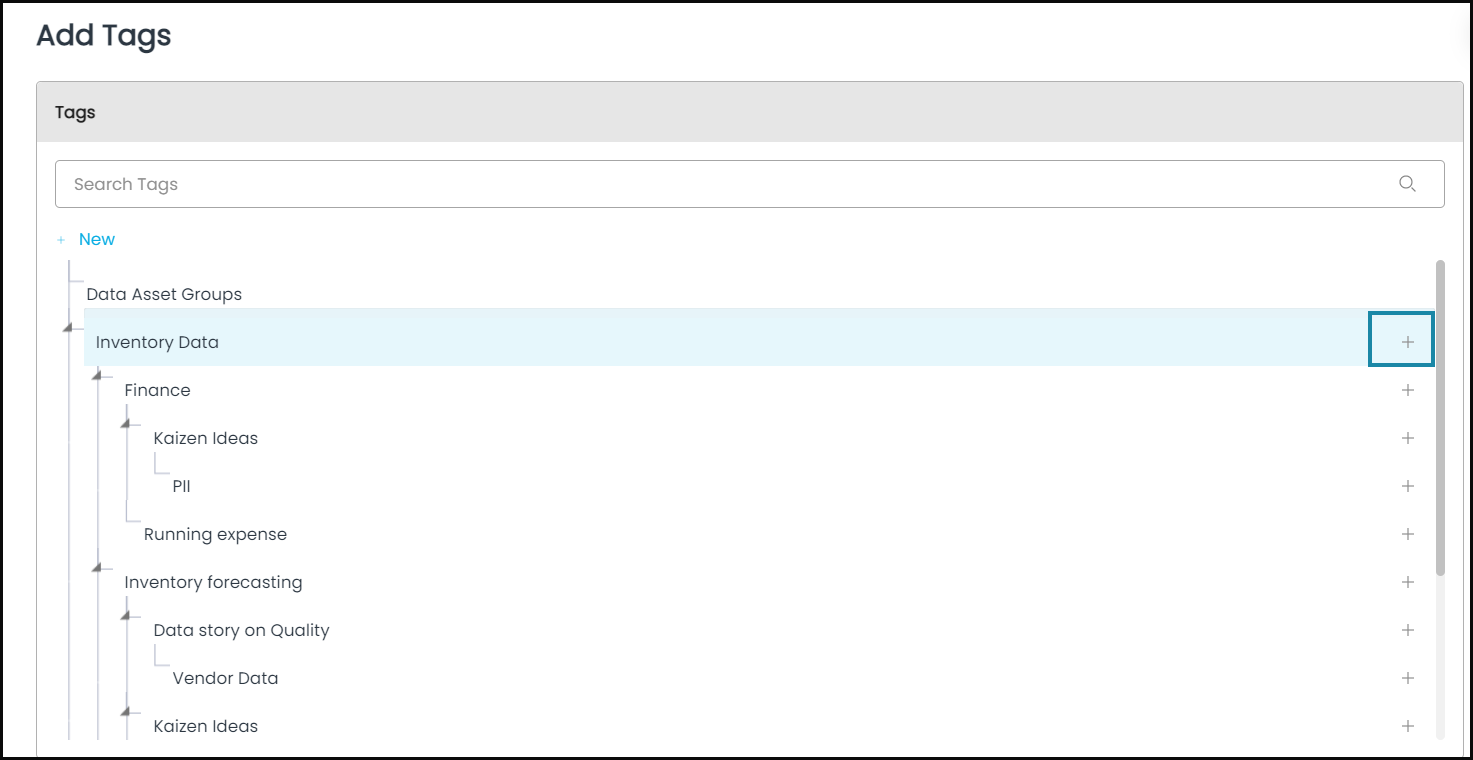
- Access Tag Options: Click on the Nine dots (menu) and select "Add Tags" from the available options. An Add Tag pop-up window appears, displaying the available tags in the left panel.
- To add Tags: Click on the "+" icon next to the desired tags to add them to the data objects.
-
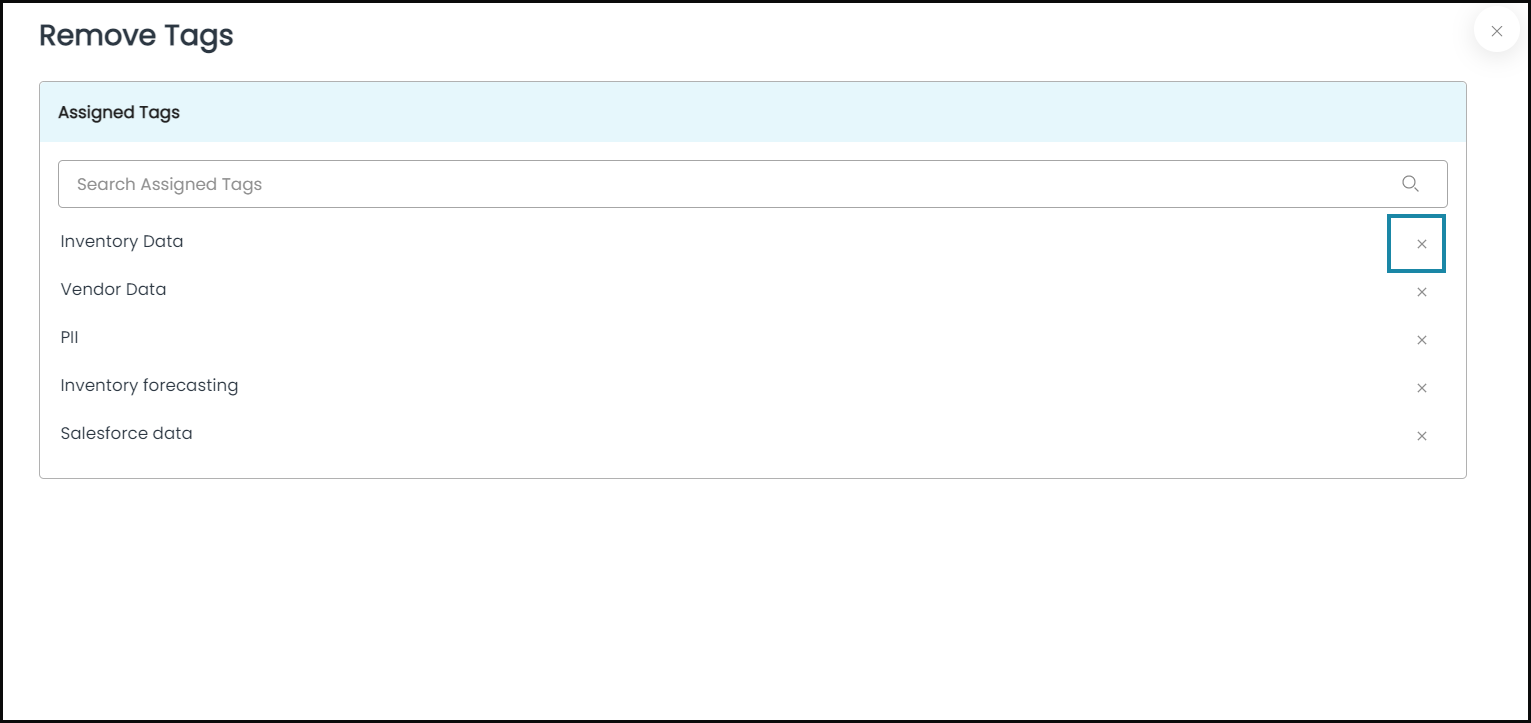
- To Remove Tags: After completing steps 1 to 3, choose the 'Remove tags' option from the Nine dots menu. A pop-up window titled "Remove Tags" will appear, showing all the tags assigned to the selected data objects. Click the "x" icon next to each tag and the selected tags will be removed from the data objects.
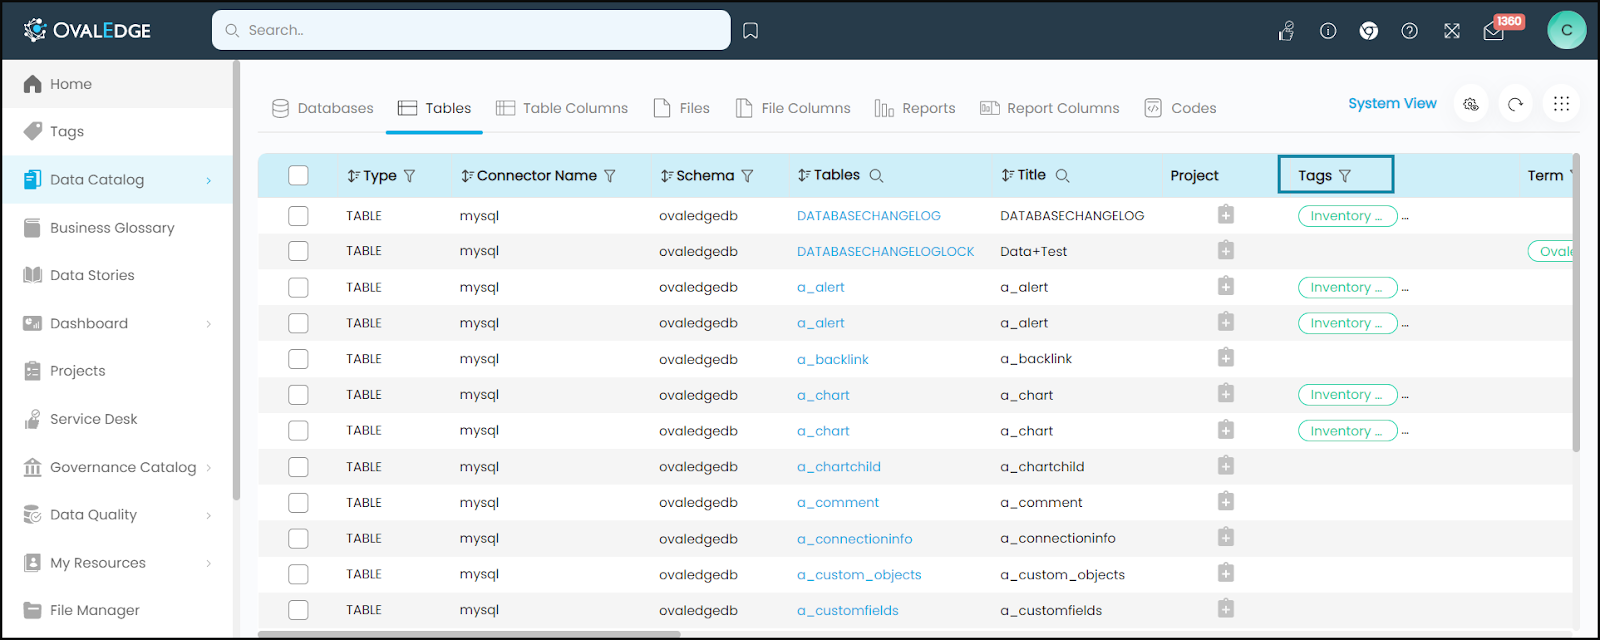
- To verify the updates, navigate back to the Data Catalog - Tabular Plugin and review the updated tags listed under the "Tags" column for each data object.
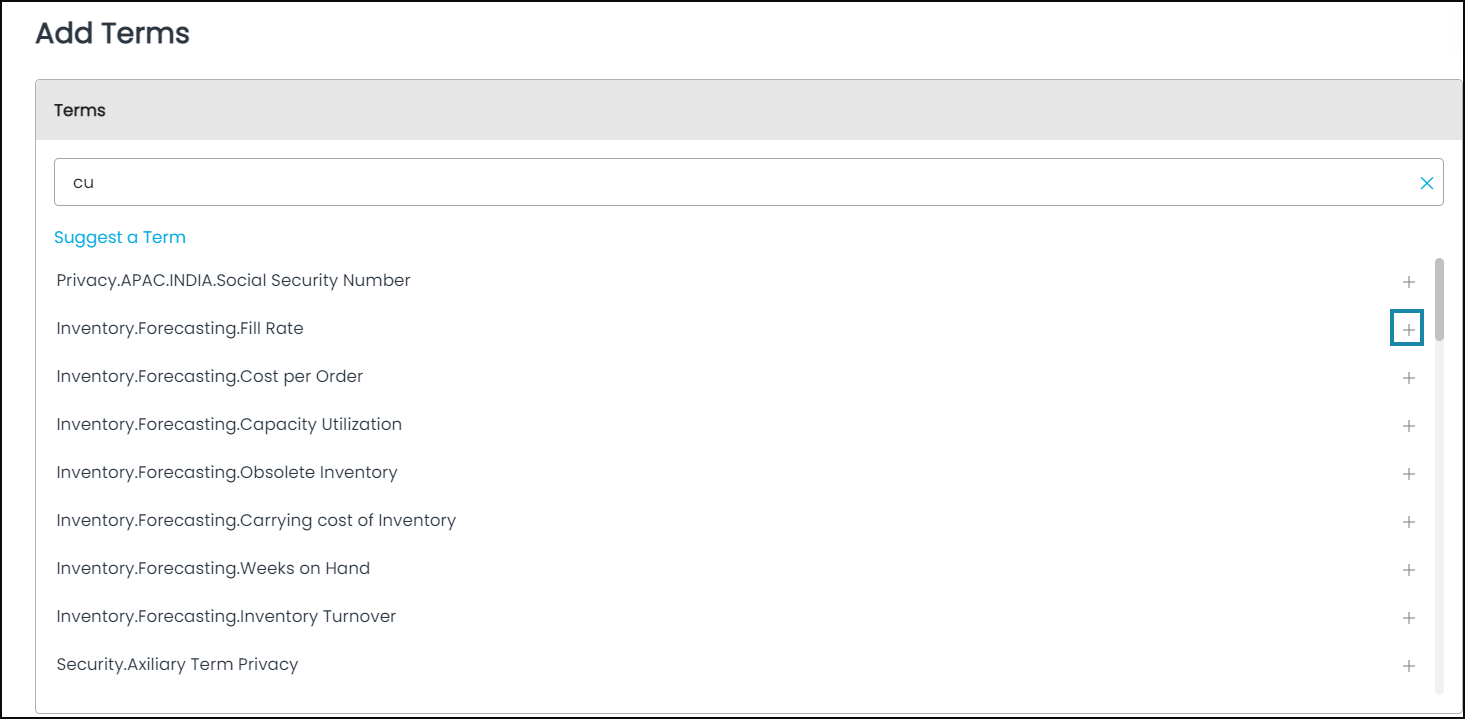
- Add/Remove Terms
Purpose: Terms are unique and standardized definitions for key processes and concepts within an organization. They are assigned to data objects to apply term properties, allowing for greater control and governance over the data. By associating a term with a data object, you can accomplish various tasks such as applying classifications, data masking, user restrictions, assigning governance stakeholders, and copying titles and descriptions to associated data objects.
Each data object can have only one primary term associated with it, but multiple auxiliary terms can be applied. However, it's important to note that terms cannot be applied to objects with DAG tags and vice versa.
For Example: In a financial organization, the term "Confidential Customer Data" has several properties applied to it that include masking policies, copying the term title to the data catalog, and copying the governance stakeholders (owners, stewards, and custodians). When this term is applied to a data object, it associates the term properties, overrides existing governance stakeholders with the term's governance stakeholders, updates the title with the term title, and applies the specified masking policy to the data object.
How to Bulk Update a Term on Multiple Data Objects?
-
- In the left panel menu select Data Catalog.
- Select Data Object Type: From the top menu in the Data Catalog, choose the appropriate data object type tab.
- Choose Multiple Data Objects: In the tabular plugin, select the checkboxes corresponding to the data objects you want to update tags for.
- Access Term Options: Click on the Nine dots (menu) and select "Add Terms" from the available options. An Add Termpop-up window appears, displaying the available tags in the left panel.
- To add a Term: Click on the "+" icon next to the desired tags to add them to the data objects.
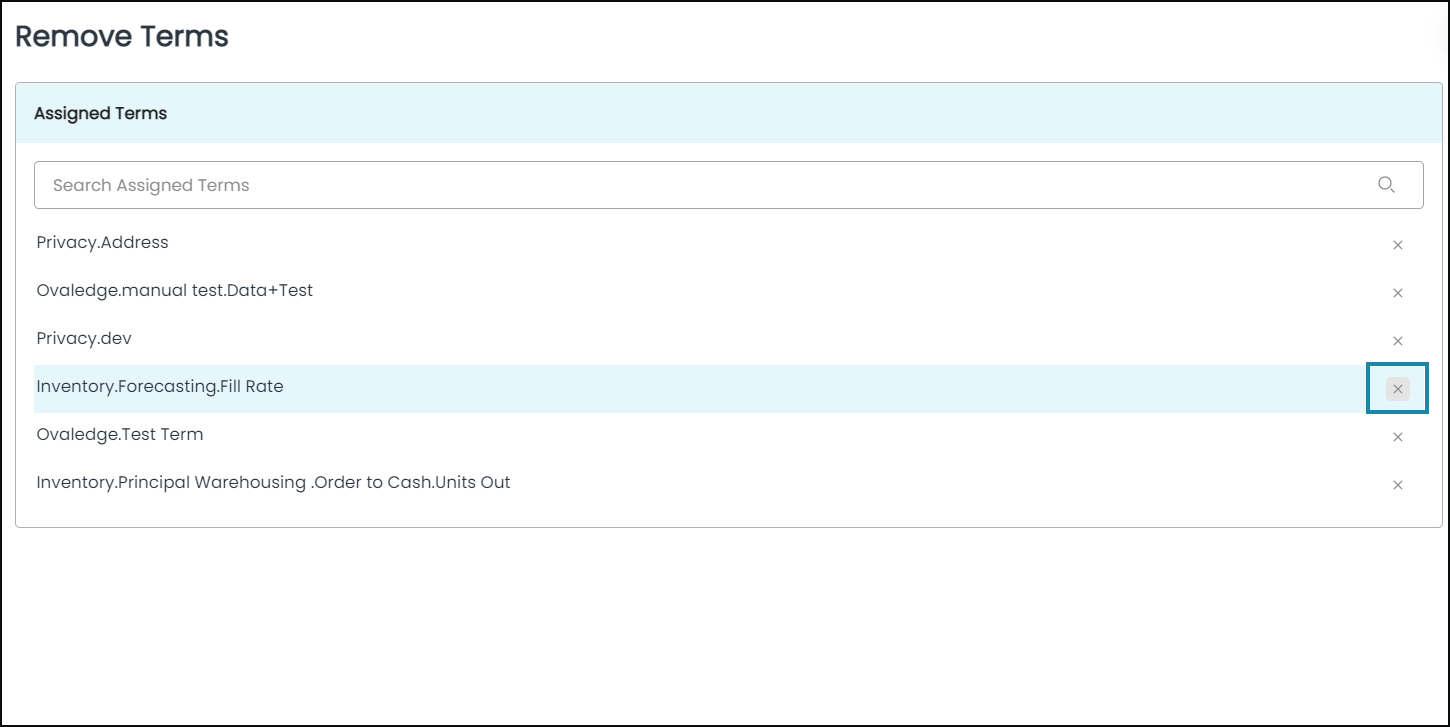
- To Remove Terms: After completing steps 1 to 3, choose the 'Remove Terms' option from the Nine dots menu. A pop-up window titled "Remove Terms" will appear, showing all the terms assigned to the selected data objects. Click the "x" icon next to each term and the selected terms will be removed from the data objects.
- To verify the updates, navigate back to the Data Catalog - Tabular Plugin and review the updated tags listed under the "Terms" column for each data object.
- Add/ Remove Data Objects to Default Project
Purpose: Data objects are added to any project set as the default project. For example, a team is working on a project called "Customer Feedback Analysis." By setting this project as the default, data objects (referred to as tasks in projects) related to customer feedback can be easily added to the project. This ensures that all team members have quick access to the relevant data objects and can collaborate and effectively work around the data objects.
Set a default project: It is important to first designate a preferred project as the default project. Once a default project is set, any data objects added to the system will automatically be assigned to the default project.
Note: When “Access Cart” is chosen as the default project, data objects are added to the access cart when the Add to Projects button is clicked.

Adding Data Objects to a Default Project:
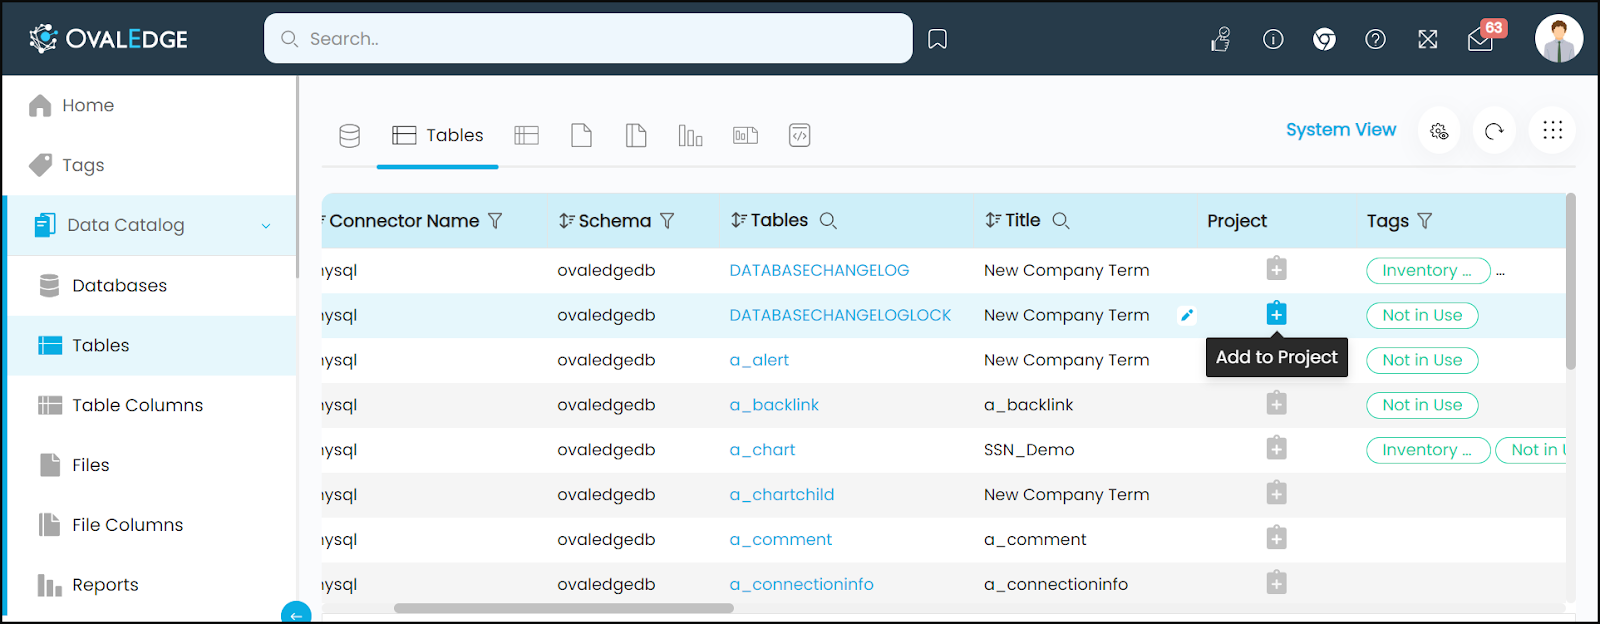
Data Catalog > List View - The image below demonstrates the 'Add to Project' icon in the List View of a data catalog. Users can simply click on the icon to include objects in the chosen default project.
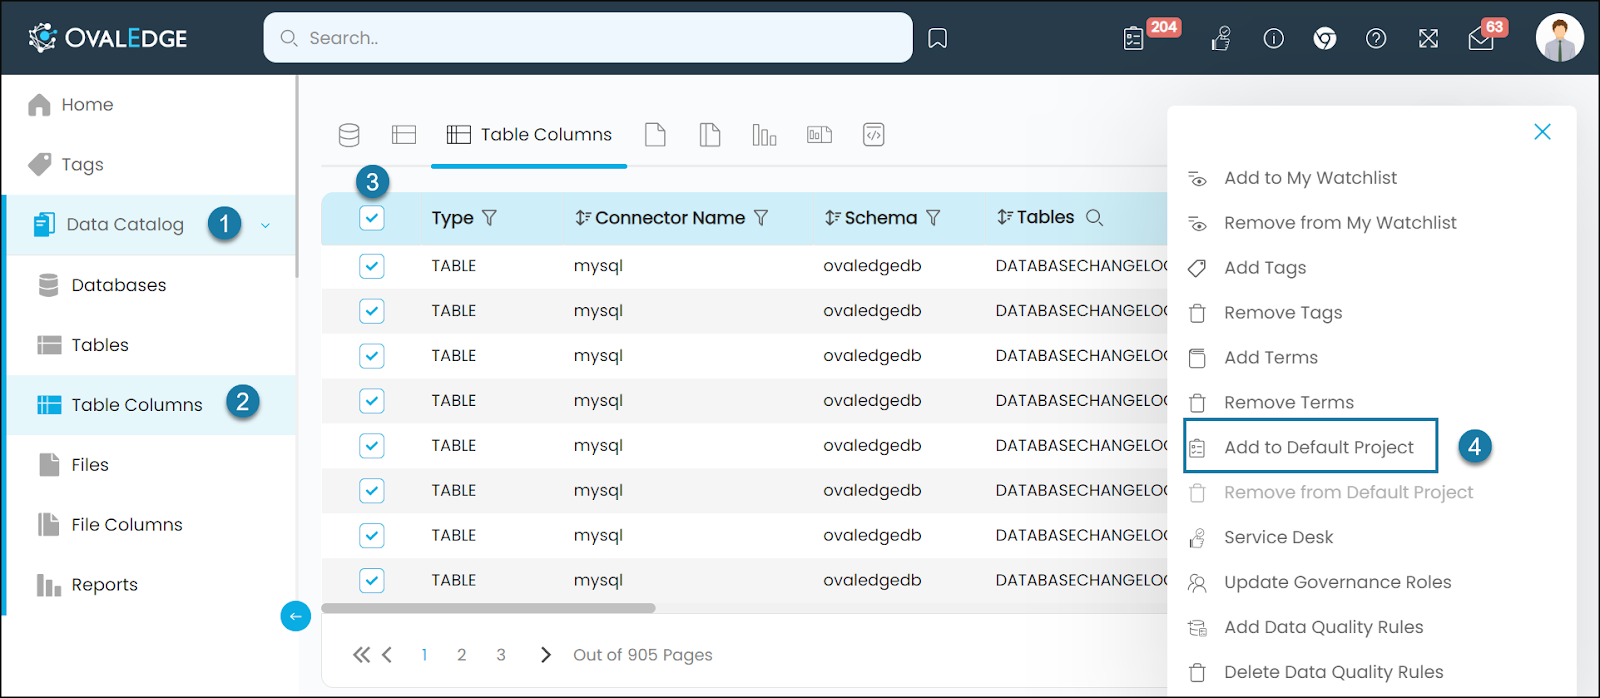
Data Catalog > List View - The image below demonstrates the 'Add to Project' icon in the List View of a data catalog to add multiple data objects to a default project in bulk. Users can select the multiple checkbox to the corresponding data objects and click on the Nine dots icon to select Add to Default Project.
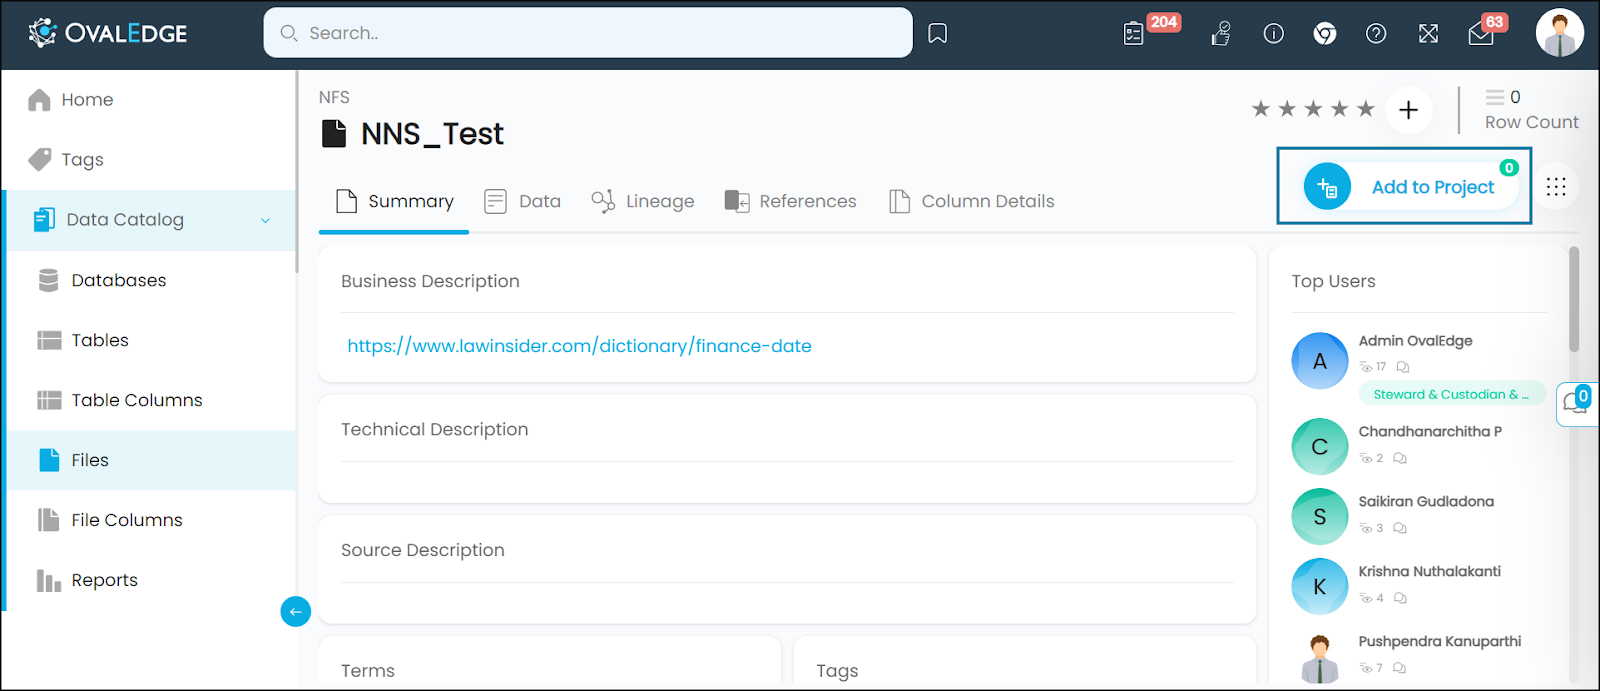
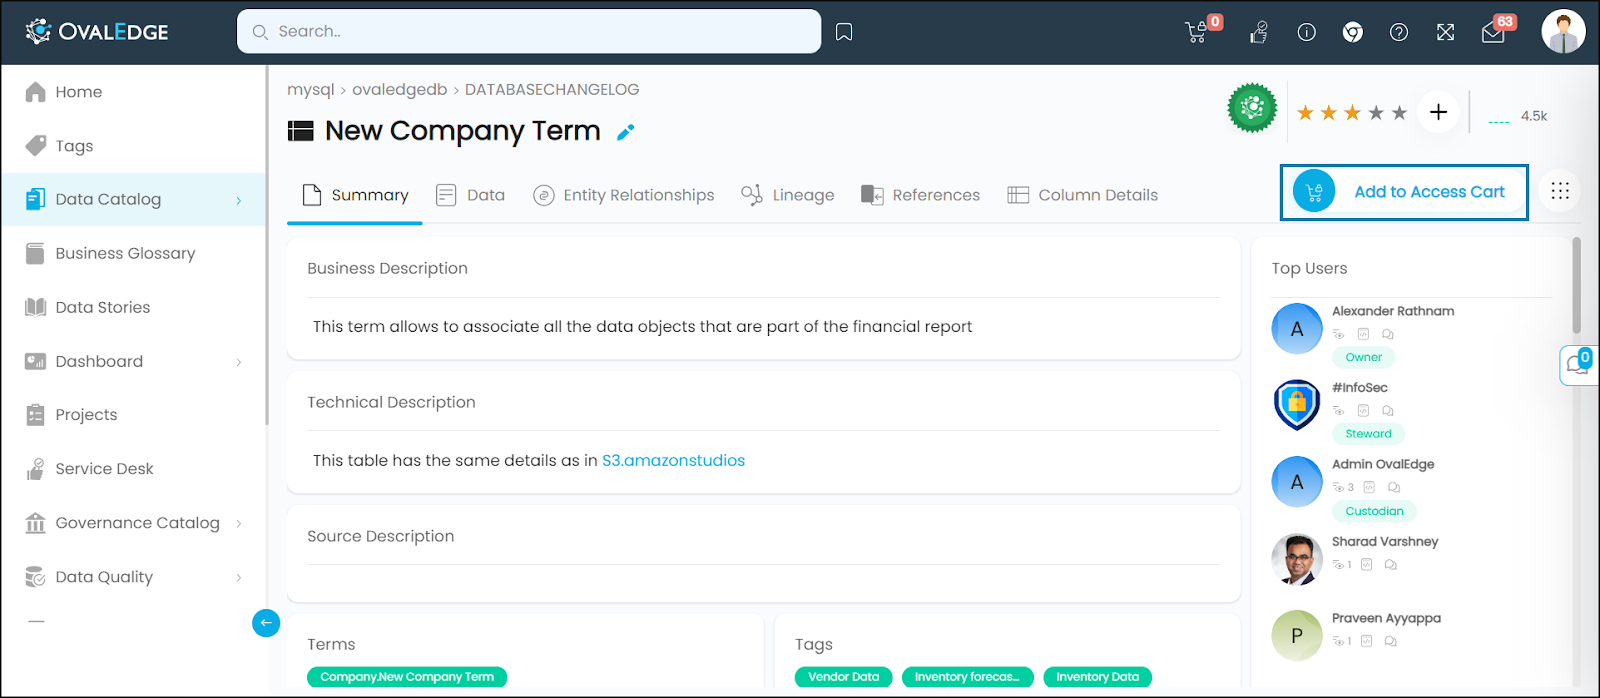
Data Catalog > Data Object Summary Page - The image below demonstrates the 'Add to Project' icon in the detailed view of a data object. Users can simply click on the icon to include objects in the chosen default project.
Adding Data Objects to the Access Cart:
When the Access Cart is set as the default project, it serves as a centralized access request management system. Users can add multiple data objects to the cart and raise access requests in bulk. This simplifies the process of managing and tracking access permissions for the selected data objects, improving efficiency in granting appropriate access to users on the data objects.
Set default project as Access Cart: It is important to first designate a preferred project as the Access Cart. When “Access Cart” is chosen as the default project, the selected data objects are automatically added to the access cart when the Add to Access Cart button is clicked.
Adding Data Objects to Access Cart
Data Catalog > List View - The image below demonstrates the 'Add to Access Cart' icon in the List View of a data catalog. Users can simply click on the icon to include objects in the chosen default project.
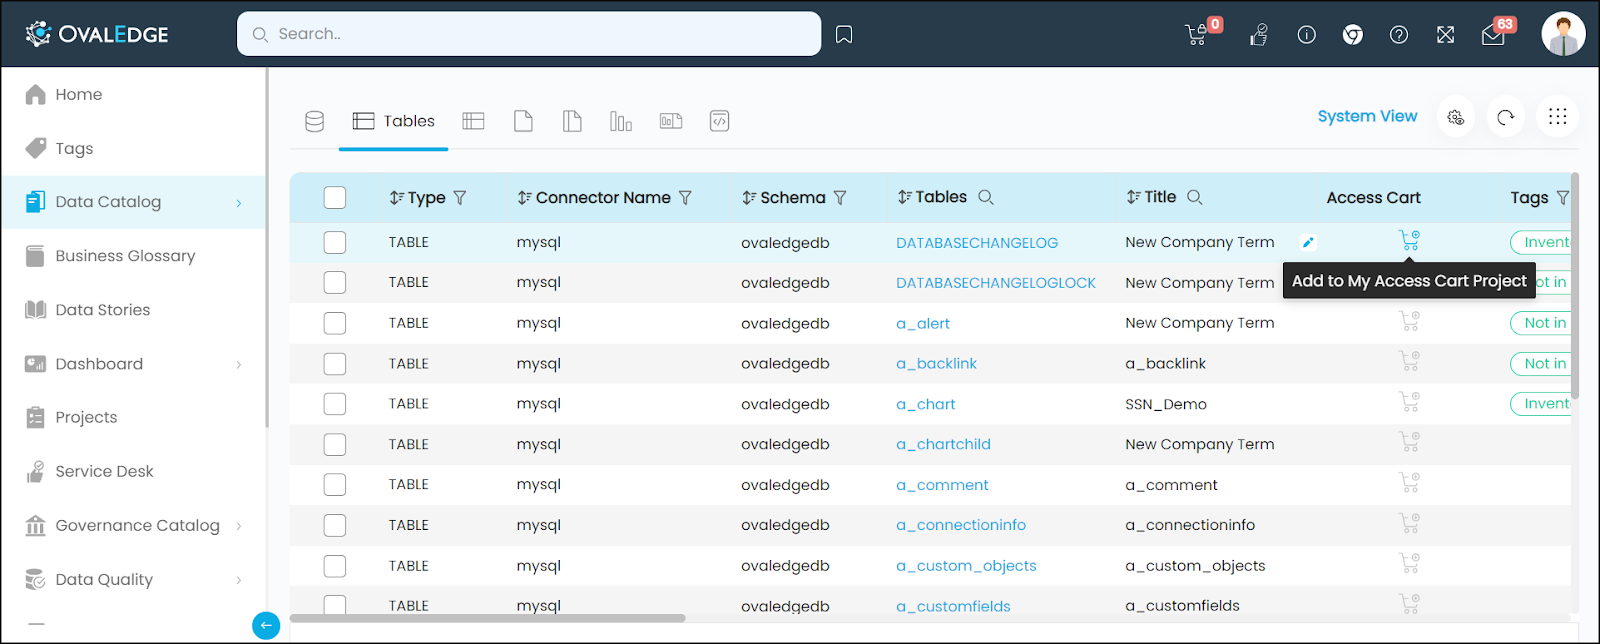
Data Catalog > List View - The image below demonstrates the 'Add to Project' icon in the List View of a data catalog to add multiple data objects to a default project in bulk. Users can select the multiple checkboxes to the corresponding data objects and click on the Nine dots icon to select Add to Default Project.

Data Catalog > Data Object Summary Page - The image below demonstrates the 'Add to Project' icon in the detailed view of a data object. Users can simply click on the icon to include objects in the chosen default project.
Service Desk
The Service Desk option provides users with the ability to raise service requests for various purposes, such as accessing data objects without proper permissions, reporting data quality issues, and more. The available service request options are based on templates associated with the specific data object (Table, File, Report). These templates can be either system-defined or custom-made. Users can initiate a service request to address their specific needs or requirements by selecting the appropriate template.
The list of important service requests is explained below but it is not an exhaustive list.
- Request Access: This service request allows users to request access permissions on data objects (Tables, Files, Reports). Users can request access to specific resources within the system to perform their required tasks or access relevant information.
- Request Content Change: Users can request changes or updates to the content of the metadata i.e., the Business Description, Tags, or Terms of data objects (Tables, Files).
- Report Data Quality Issue: Users can submit this service request to notify about data quality issues found in data objects (Tables, Files, Reports). This request prompts the designated approver to verify and address the data quality concerns.
- Crawl / Profile: Users can use this service request option to request the crawling or profiling of a database. They can request the configured approver to perform the necessary data crawling or profiling tasks to fetch and gather the latest information about the remote data sources.
- Build Lineage Request: Users can submit this service request to request the building of a lineage to understand how data is transformed and utilized across different objects.
- New Asset Request: Users can utilize this service request category to request the creation of new data object(s) in the application. This can include creating a new table, table column, report, or business glossary term.
- Others: This category encompasses any other requests or concerns that may not fit into the predefined categories mentioned above. Users can use this service request option to notify configured approvers about any other issues or concerns they may have regarding data objects.
How to Raise a Service Request
Upon selecting the relevant service request option, the system automatically populates the chosen data objects, users continue to select additional data objects as needed and proceed by clicking "Continue”.
Upon doing so, users are seamlessly directed to a service request template where they can fill in the necessary details before submitting the request. After the user submits the request, it is automatically sent for approval to the designated approvers who are configured in the system. Upon receiving approval from the appropriate authorities, the request is processed, and the desired action is fulfilled.
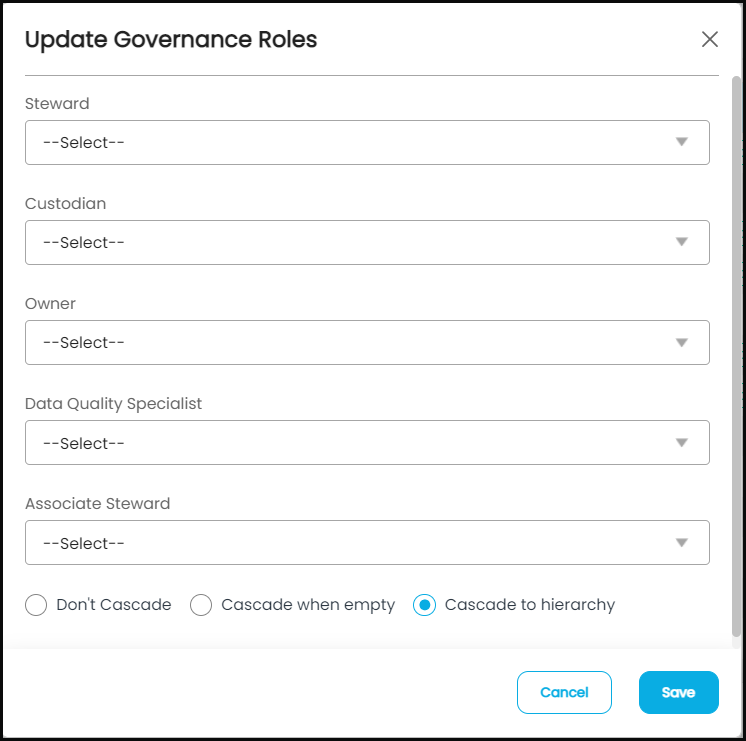
Update Governance Roles
The Update Governance Roles feature allows users to add and update governance roles including Owner, Steward, Custodian, and additional custom Governance Roles (if configured). Users can select members from a dropdown list to assign these roles. This feature ensures that the data object has designated individuals who are responsible for governing it and can serve as points of contact for any queries related to the data object. The following options are available at the bottom of the window:
- Don't Cascade: The new set of governance roles will not be transferred to the associated columns if any are present at a Table or File level.
- Cascade when Empty: The governance stakeholders will be automatically transferred to the columns that do not have any governance stakeholders set.
- Cascade to Hierarchy: The governance stakeholders selected will be transferred to the columns, if any, present in the table's hierarchy.
Apply Certification Type
Apply Certification is an important action item that can only be performed by users with meta-write(Author) privileges. It serves to provide assurance regarding the quality and trustworthiness of a data object for decision-making purposes. By using these certification status indicators, users can quickly identify and trust high-quality data assets while being aware of any limitations or issues associated with uncertified or cautionary data objects.
- Certified: The Certified icon signifies that a data object meets specific standards and can be relied upon for decision-making. For example, a sales report that has undergone rigorous data validation and quality checks may be certified.
- Caution: The Caution icon indicates that a data object has certain limitations or issues that users should be aware of before basing decisions on it. For instance, a Customer Details Table may have incomplete or outdated records, which might impact the accuracy of analyses performed on it.
- Violation: The Violation icon suggests that a data object does not meet certain standards or requirements, rendering it unreliable or unsuitable for decision-making. For instance, a financial report with discrepancies or irregularities may be marked with a violation status.
- Inactive: The Inactive status signifies that a data object is not currently in use or has been archived. It may no longer be relevant for decision-making or ongoing operations. An example could be a historical dataset that is no longer actively updated or used for analysis.
- None: The None status indicates that a data object has not undergone certification. Its reliability and accuracy cannot be assured, and users should exercise caution when utilizing it for decision-making. An example could be a newly created dataset that hasn't been reviewed or validated yet.
Add objects to Data Quality (T, TC, F FC, C)
When you add a data object to the Data Quality Objects (Data Quality Rule) feature, the user will be navigated to the Data Quality Objects page to select a DQR from the list of predefined DQR rules that are automatically displayed based on the specific data object. When the rule is run it either passes or fails the rule to understand the quality of the data object.
Let's consider an example related to inventory management. Suppose you have a dataset that includes various attributes for inventory items, with one of the columns representing the quantity of each item. To assess the quality and completeness of the "quantity" column, you can apply a Data Quality Rule (DQR) that focuses on the empty or null count percentage.
By executing this DQR rule, you can determine the proportion of missing or empty values within the "quantity" column compared to the total number of inventory records. For instance, let's assume you have 100 inventory records, and out of those, 20 records do not have a specified quantity.
Calculating the empty or null count percentage using the DQR: Empty or Null Count Percentage = (20 / 100) * 100 = 20%
In this scenario, the empty or null count percentage is 20%, indicating that 20% of the inventory records have missing or null values in the "quantity" column. To interpret the outcome of the DQR, let's consider different success rate threshold ranges. If the success rate threshold is set to 0-15%, the DQR will fail because the observed empty or null count percentage (20%) exceeds the threshold. On the other hand, if the success rate threshold is set to any value greater than 20%, the DQR will pass.
Add Tables to Impact Analysis (T, TC, F, FC, R, RC)
The "Impact Analysis" feature provides users with a way to preview the data objects that will be affected if any changes or modifications are made to a specific data object. It helps users understand the potential impact of their actions on the overall data ecosystem if they were to change the value or any row of the selected data object.
Let's consider a scenario where an organization is planning to make changes to a critical File ‘Financial Performance’ within its data infrastructure. This ‘Financial Performance’ file is extensively used by various downstream systems and processes. Before implementing the changes, the organization wants to assess the potential impact on other interconnected data objects (files, tables, or reports).
Once a data object is added to a predefined impact analysis and once it is executed, OvalEdge performs a comprehensive analysis of the data lineage, taking into account the complex relationships and dependencies. The impacted data object results are presented in a clear and concise tabular format, displaying the count of impacted objects. If the Impacted data object count displays 50.
For example, the analysis might reveal that the changes to the critical data object will impact 50 other data objects across multiple levels of lineage. The tabular display allows users to quickly understand the scope and magnitude of the potential impact.
How to add:
- Click on the Add to Impact Analysis option to see the pre-defined Impact Analysis.
- Select the appropriate Impact Analysis from the list of predefined Impact Analyses. The data object gets added to the corresponding Impact Analysis.
Note: You can create a custom Impact analysis based on your requirements by navigating to Advanced Tools (left menu) > Impact Analysis.
- Go to Advanced Tools (left menu) > Impact Analysis > select the preferred Impact Analysis. Execute the Impact Analysis using the Nine Dots icon.
- Impacted Objects: Review the results presented in a tabular format, which will display the count of impacted objects and provide insights into the potential impact on the interconnected data ecosystem.
Performing Action items at a single data object or summary page level
Listed Below is the list of Nine Dots Action that can be carried out on multiple data objects at once.
|
S |
T |
TC |
F |
FC |
R |
RC |
C |
|
Profile |
Profile / Analyze |
Profile / Analyze |
Profile File |
Profile File |
-- |
- |
- |
|
Profile Unprofiled |
|||||||
|
Process Upstream / downstream objects |
Process Upstream / downstream objects |
Process upstream / downstream data objects |
Process Upstream / downstream objects |
Process Upstream / downstream objects |
Process Upstream / downstream objects |
- |
|
|
Profile and Do Anomaly Detection |
Profile and Do Anomaly Detection |
Profile and Do Anomaly Detection |
Profile folders assuming the same content |
- |
- |
-- |
- |
|
- |
Add to Impact Analysis |
Add to Impact Analysis |
Add to Impact Analysis |
Add to Impact Analysis |
Add to Impact Analysis |
Add to Impact Analysis |
|
|
Add to Watchlist |
Add to Watchlist |
Add to Watchlist |
Add to watchlist |
- |
Add to Watchlist |
Add to My Watchlist |
- |
|
Download Descriptions |
Download - Data -Descriptions -Entity Relationships |
Download - Data -Descriptions -Entity Relationships |
Download |
Download |
- |
- |
— |
|
Governance Roles |
Governance Roles |
Governance Roles |
Governance Roles |
Governance Roles |
Governance Roles |
Governance Roles |
|
|
Service Desk |
Service Desk |
Service Desk |
Service Desk |
Service Desk |
Service Desk |
Service Desk |
|
|
Configure Search Keywords |
Configure Search Keywords |
Configure search keywords |
Configure search keywords |
Configure Search Keywords |
Configure Search Keywords |
Configure Search Keywords |
Configure Search Keyword |
|
Data Quality |
Data Quality |
Data Quality |
Data Quality |
Data Quality |
Data Quality |
||
|
View in Query Sheet |
View in Query Sheet |
||||||
|
Send Messages |
Send Messages |
Send Messages |
Send Messages |
Send Messages |
Send Messages |
||
|
Apply Certification |
Apply Certification |
Apply Certification |
Apply Certification |
Apply Certification |
Apply Certification |
Apply Certification |
|
|
—-- |
—---- |
Calculate Relationships |
Uncataloged File/Folder |
Uncataloged File/Folder |
Add New Code |
||
|
Run Folder Analysis |
Remove from favorites |
Remove from favorites |
Recommend Lineage and References |
||||
|
Catalog and Profile all file |
Delete Associations |
||||||
|
Catalog all the subfolders |
Delete Lineage |
||||||
|
Report Data Quality Issue |
|||||||
|
Delete Code |
Profile
Who can perform: Only Integration Admin can perform this operation.
Profiling is an analysis performed on the remote source to gather statistical information on data objects. It retrieves details on data objects that include row count, top values, null density, and density. However, for data objects that do not have profiling details, the nine dots action menu can be used to individually profile the details of a single data object. This approach helps reduce the workload on remote sources.
How to: Upon clicking the 'Profile' option, a background job is triggered to initiate profiling. Once the job successfully completes the profiling process, the profiling statistics are updated on the summary page of the data object.
If the profiling is performed on a schema, the tables and columns within the schema are updated with the corresponding profiling details. Similarly, when profiling is performed on a specific table, the profiling information for the table's columns is updated within the table itself.
Profile Unprofiled
Who can Perform: Only the Integration Admin can perform this operation.
The "Profile Unprofiled" option allows for schema-level profiling of data objects that have not been profiled yet. This feature enables the profiling of data objects within a schema that does not have existing profiling information. You can initiate the profiling process for these unprofiled data objects, to gain valuable statistical insights.
Add / Remove to My Watchlist
Purpose: When users add a data object to their watchlist, they gain access to real-time notifications that keep them informed about any changes or updates associated with that specific object. It ensures that users stay up-to-date with the latest changes or updates happening both within the catalog and across remote data sources. By receiving timely notifications, users can make well-informed decisions, and effectively leverage the data to meet their business needs.
- Metadata changes: If any changes are made to the business descriptions, tags, or terms associated with the data object, within the OvalEdge instance these changes will be displayed. This ensures that users stay informed about any updates or modifications to the metadata, helping them stay up to date with the latest information.
- Remote metadata changes: In addition to changes made within the OvalEdge instance, users can also receive notifications when there are updates to the data object at the remote source. This feature enables users to monitor changes that occur externally, ensuring they have the most accurate and current metadata information available.
- Significant data changes: This feature provides users with the ability to receive notifications regarding significant data changes in the data object located at the remote source. These changes can be the addition or deletion of new rows within the data object.
Users can define a threshold value, and if the change in row counts exceeds this threshold, notifications can be triggered. For example, if the threshold is set to 50% and the row count of the data object increases by more than 50%, a notification will be generated.
How to: To add multiple data objects in your watchlist, select the desired data objects and choose either the "Add to My Watchlist" or "Remove from My Watchlist" option from the menu (nine dots). This allows you to add or remove the selected data objects from the "My Watchlist" section in the "My Resources" area.
If the Remove from My Watchlist option is selected for a watchlisted data object, it will be removed from the My Resources > My Watchlist page, and all alert notifications will be disabled for that data object.
Download Descriptions
To download Business and Technical Descriptions of the tables associated with the scheme to your local system in an .xlxs file format.
Governance Roles
The Update Governance Roles feature allows users to add and update governance roles, including Owner, Steward, Custodian, and additional custom Governance Roles (if configured). Users can select members from a dropdown list to assign these roles. This feature ensures that the data object has designated individuals who are responsible for governing it and can serve as points of contact for any queries related to the data object.
- Don't Cascade: The new set of governance roles will not be transferred to the associated columns if any are present at a Table or File level.
- Cascade when empty: The governance stakeholders will be automatically transferred to the columns that do not have any governance stakeholders set.
- Cascade to Hierarchy: The governance stakeholders selected will be transferred to the columns, if any, present in the table's hierarchy.
Service Desk
The Service Desk option provides users with the ability to raise service requests for various purposes, such as accessing data objects without proper permissions, reporting data quality issues, and more. The available service request options are based on templates associated with the specific data object (Table, File, Report). These templates can be either system-defined or custom-made. Users can initiate a service request to address their specific needs or requirements by selecting the appropriate template.
The list of important service requests are explained below but it is not an exhaustive list.
- Request Access: This service request allows users to request access permissions on data objects (Tables, Files, Reports). Users can request access to specific resources within the system to perform their required tasks or access relevant information.
- Request Content Change: Users can request changes or updates to the content of the metadata i.e., the Business Description, Tags, or Terms of data objects (Tables, Files).
- Report Data Quality Issue: Users can submit this service request to notify about data quality issues found in data objects (Tables, Files, Reports). This request prompts the designated approver to verify and address the data quality concerns.
- Crawl / Profile: Users can use this service request option to request the crawling or profiling of a database. They can request the configured approver to perform the necessary data crawling or profiling tasks to fetch and gather the latest information about the remote data sources.
- Build Lineage Request: Users can submit this service request to request the building of a lineage to understand how data is transformed and utilized across different objects.
- New Asset Request: Users can utilize this service request category to request the creation of new data object(s) in the application. This can include creating a new table, table column, report, or business glossary term.
- Others: This category encompasses any other requests or concerns that may not fit into the predefined categories mentioned above. Users can use this service request option to notify configured approvers about any other issues or concerns they may have regarding data objects.
Upon selecting the relevant service request option, the system automatically populates the chosen data objects, users continue to select additional data objects as needed and proceed by clicking "continue”. Upon doing so, users are seamlessly directed to a service request template where they can fill in the necessary details before submitting the request.
After the user submits the request, it is automatically sent for approval to the designated approvers who are configured in the system. Upon receiving approval from the appropriate authorities, the request is processed, and the desired action is fulfilled.
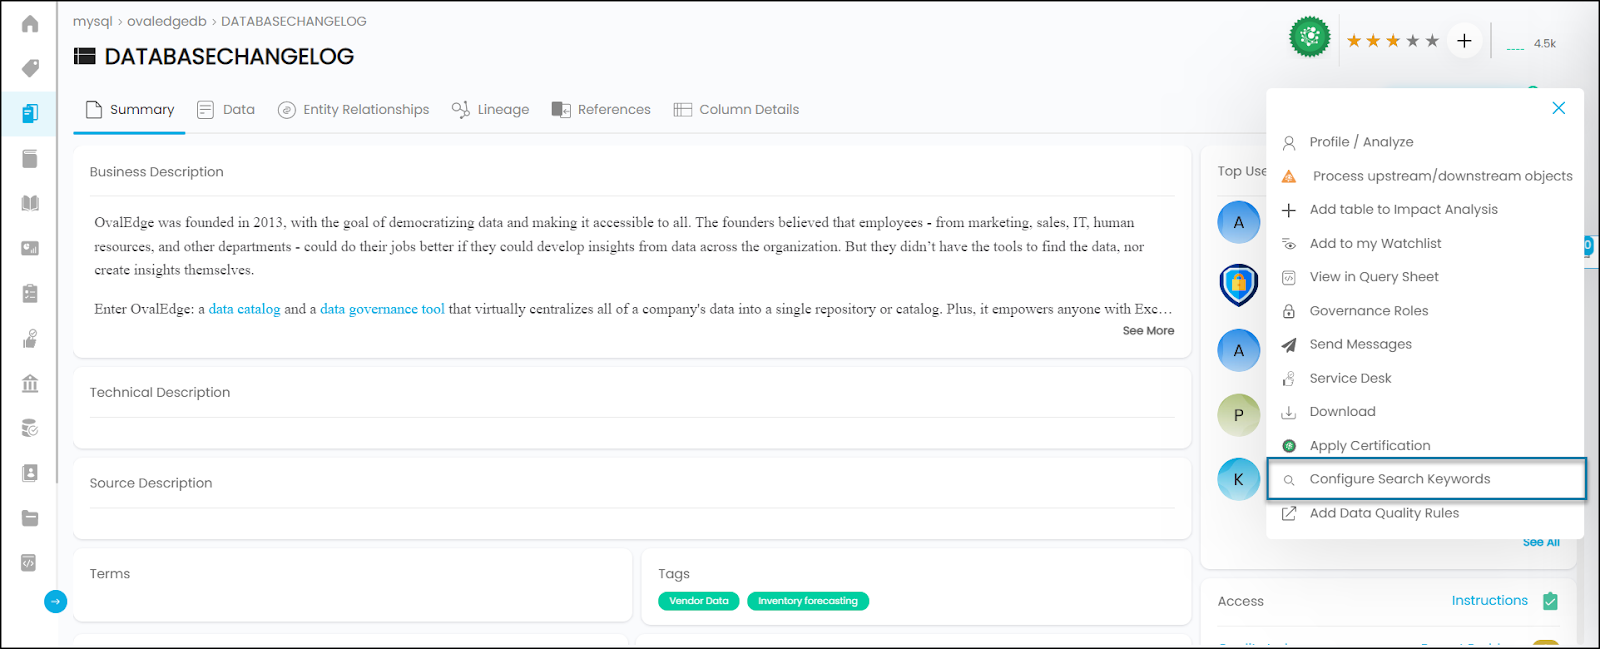
Configure Search Keywords
Configuring Search Keywords (Synonyms) enhances the discoverability and accessibility of data objects in the application. By adding relevant keywords to data objects, users can easily find the information they need through searches. This process involves identifying appropriate keywords associated with the data objects and assigning them as searchable metadata.
Any user (meta-read or meta-write) can configure Search Keywords to add or delete keywords from data objects.
To configure Search Keywords,
First, identify the relevant keywords that users are likely to search for when looking for specific data objects.
- Go to Data Catalog from the left panel menu.
- Select a data object and navigate to the data object summary details page.
- Click on the Nine Dots icon to see the ‘Configure Search Keywords’ option.
- Click the
button provided in the bottom right side of the pop-up to add a new keyword.
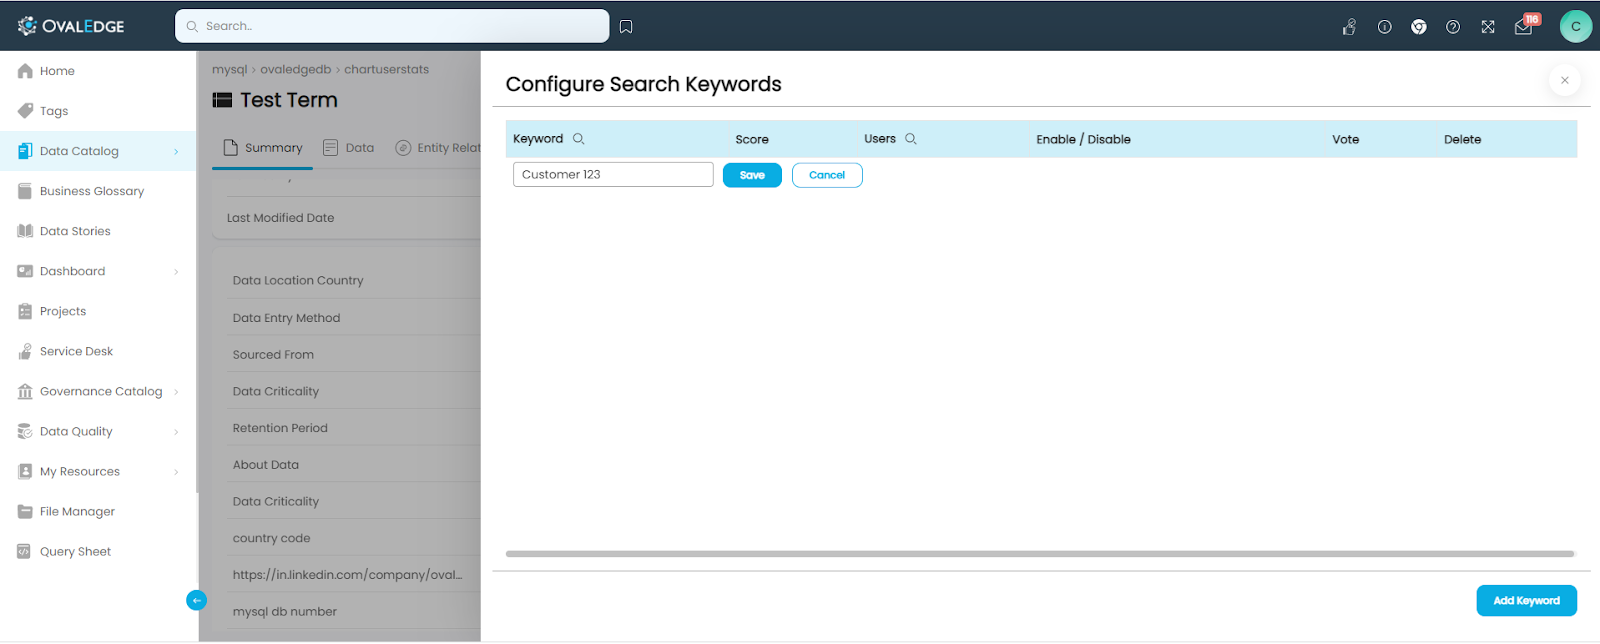
- Enter the keyword in the text field provided and click the ‘Save’ button. The keyword gets assigned to the data object.
- Once the keywords have been assigned, you can upvote
the keyword so that a score gets assigned to the keyword. This helps to prioritize certain keywords, making it more likely that users will find the most relevant data objects first.
- You can choose to toggle
their visibility in the global search results. To do this, you have two options: enabling/disabling the keyword or deleting it altogether. Enabling or disabling a keyword means you can turn it on or off for global search visibility.
Note: This can be useful if you want to temporarily remove a keyword without deleting it altogether. To enable or disable a keyword, simply toggle the switch next to the keyword in the keyword list.
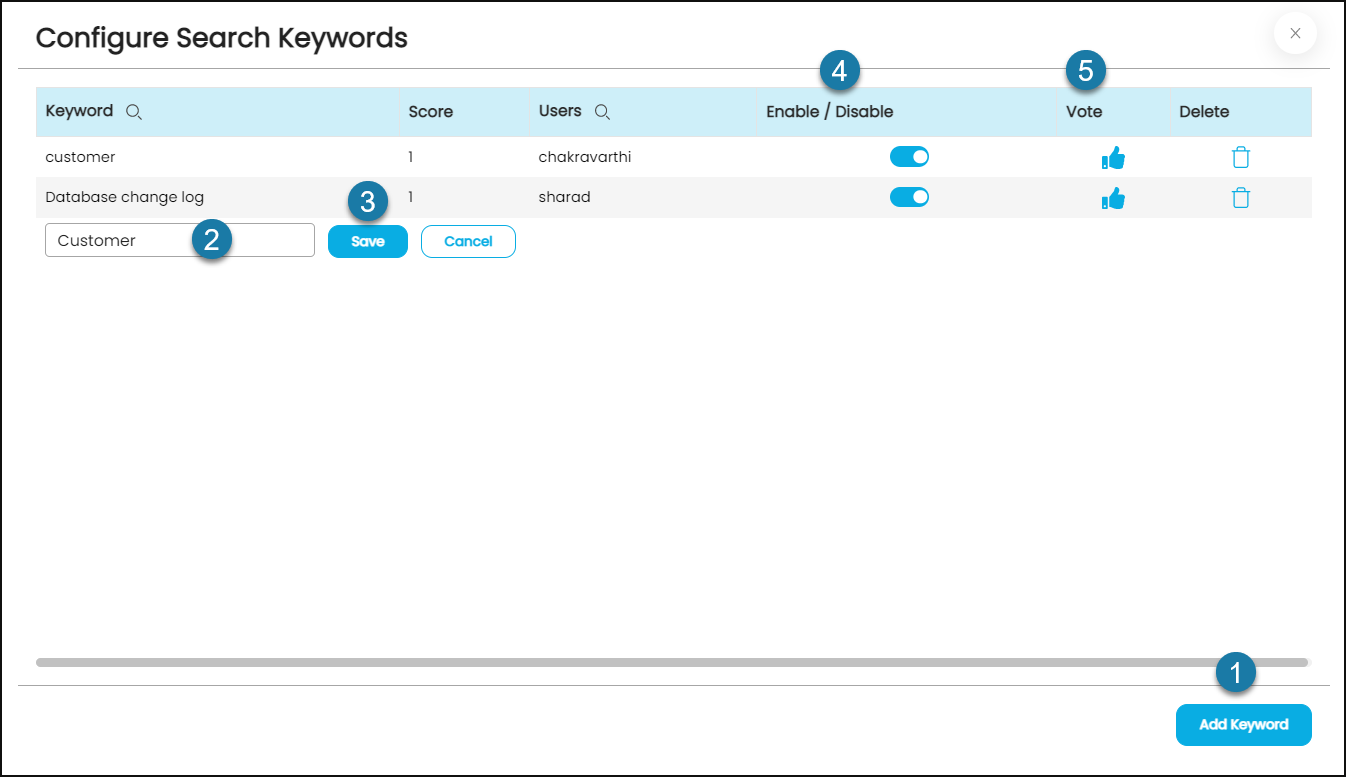
- Alternatively, if you want to remove a keyword completely, you can do so by deleting it from the keyword list. This will permanently remove the keyword and its associated score from the global search index. To delete a keyword, simply click on the delete icon
next to the keyword in the keyword list.
Process Upstream / Downstream objects
Process Upstream and Downstream Objects offer the ability to update two important parameters: Adding Metadata to lineage data objects and applying Caution certification to downstream objects. It enables effective data management by automating crucial tasks and ensuring data integrity.
By using Lineage, you can easily apply the Caution certification to downstream data objects associated with the current data object. This ensures that users of the data object are promptly informed about any potential issues or sensitive data present in the related data objects (Tables, Files, or Reports). This certification acts as a warning or alert to raise awareness among users.
Also, you have the flexibility to add metadata to the different lineage levels. This metadata can include Business Description, Technical Description, and Tags. You can apply this metadata to either upstream or downstream data objects or both.
How to perform:
- Apply/remove caution certification on data objects: Select the radio button corresponding to the desired option.
- Copy Metadata using Lineage:
Step1: You need to first enable the Copy Metadata Using Lineage checkbox to activate additional settings. By default, the Propagate to all levels checkbox is selected.
Step 2: Lineage Levels: Set the lineage level to update metadata up to the specified level. If you enter a value of 3 for lineage levels, it indicates that the metadata updates will propagate up to three levels of lineage.
Step 3: Direction: Choose to update metadata on Upstream or Downstream data objects or both.
Step 4: Content: Select the specific metadata content you wish to update or add, such as Tags, Technical Description, or Business Descriptions. You can choose all or specific options.
Note: The metadata applied cannot be reverted.
Step 5: Click Submit to apply the changes.

Add Tables to Impact Analysis (T, TC, F, FC, R, RC)
The "Impact Analysis" feature provides users with a way to preview the data objects that will be affected if any changes or modifications are made to a specific data object. It helps users understand the potential impact of their actions on the overall data ecosystem if they were to change the value or any row of the selected data object.
Let's consider a scenario where an organization is planning to make changes to a critical File ‘Financial Performance’ within its data infrastructure. This ‘Financial Performance’ file is extensively used by various downstream systems and processes. Before implementing the changes, the organization wants to assess the potential impact on other interconnected data objects (files, tables, or reports).
Once a data object is added to a predefined impact analysis and once it is executed, OvalEdge performs a comprehensive analysis of the data lineage, taking into account the complex relationships and dependencies. The impacted data object results are presented in a clear and concise tabular format, displaying the count of impacted objects. If the Impacted data object count displays 50.
For example, the analysis might reveal that the changes to the critical data object will impact 50 other data objects across multiple levels of lineage. The tabular display allows users to quickly understand the scope and magnitude of the potential impact.
How to add:
- Click on the Add to Impact Analysis option to see the pre-defined Impact Analysis.
- Select the appropriate Impact Analysis from the list of predefined Impact Analyses. The data object gets added to the corresponding Impact Analysis.
Note: You can create a custom Impact analysis based on your requirements by navigating to Advanced Tools (left menu) > Impact Analysis.
- Go to Advanced Tools (left menu) > Impact Analysis > select the preferred Impact Analysis. Execute the Impact Analysis using the Nine Dots icon.
- Impacted Objects: Review the results presented in a tabular format, which will display the count of impacted objects and provide insights into the potential impact on the interconnected data ecosystem.
Download
Download Data: To download the data records of the data object to your local system.
(S) Download Descriptions: To download the Business and Technical Descriptions of the data object.
Download Entity Relationships: To download the PK and FK relationship details associated with the table to your local system with Unique match scores and left and Right table counts.
View in Query Sheet
Adding a data object to the query sheet enables users to include specific tables into the query sheet. It provides access to the data within these table columns and allows to perform various operations, filter results, apply aggregations, and extract meaningful insights from the data.
Query sheet provides a user-friendly interface to build and run queries without needing to have a lot of experience with SQL or programming languages. It allows users to select the data tables they want to include in their query and to specify any criteria or conditions that the data must meet.
It has two modes: Advanced mode and Auto SQL mode.
In advanced mode, users have complete control over the selected table query and can write their own SQL codes to specify exactly what data they want to retrieve.
In auto SQL mode, users who are less familiar with SQL and coding can use the filters and functions to perform union/join operations, and retrieve the data, but it is optional to write their own SQL code to run simple queries.
Calculate Relationships
This feature updates the relationship scores for tables that have entity relationships i.e., the Primary Key (PK) and Foreign Key (FK) relationships that are established during data source crawling, as well as those that are manually created within the application.
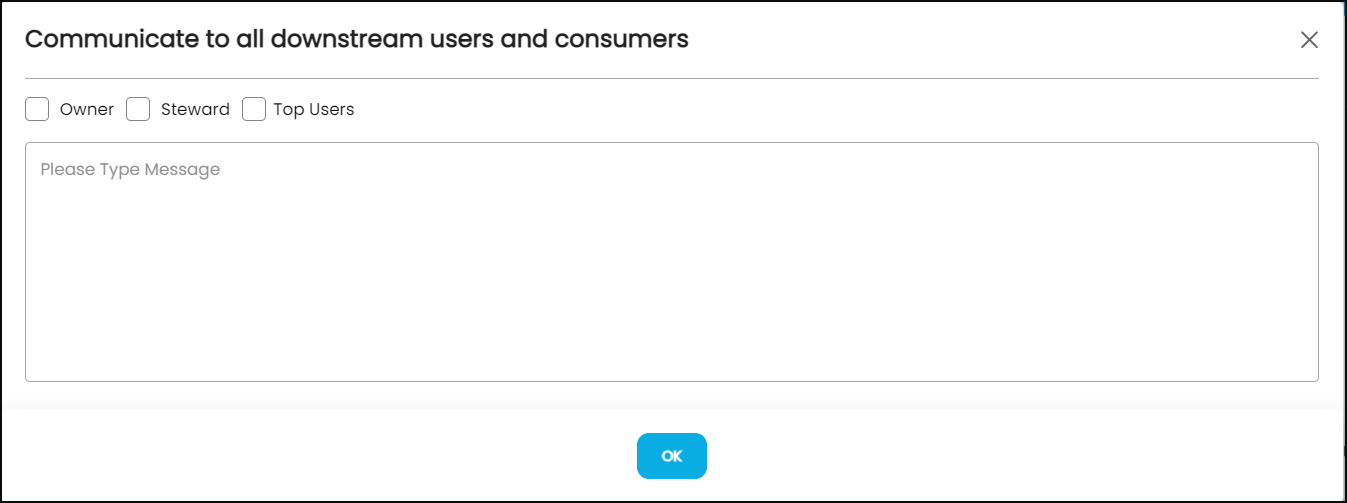
Send Messages
Users can directly communicate and collaborate with the Owner, Steward, and Top Users associated with a data object. This functionality facilitates seamless collaboration and enables efficient discussions related to the data object. The top users are the active users who have interacted with the data object through activities such as views, comments, and collaborations.
Users can send messages to a maximum of 5 top users, although this limit can be configured according to specific requirements. By clicking on the user count, a new field is displayed where the desired number of recipients can be specified.
Note: It's important to note that this option is only enabled when the data object has downstream dependencies in its lineage, indicating that there are associated relationships or connections to other data objects.
Folders - Action Items
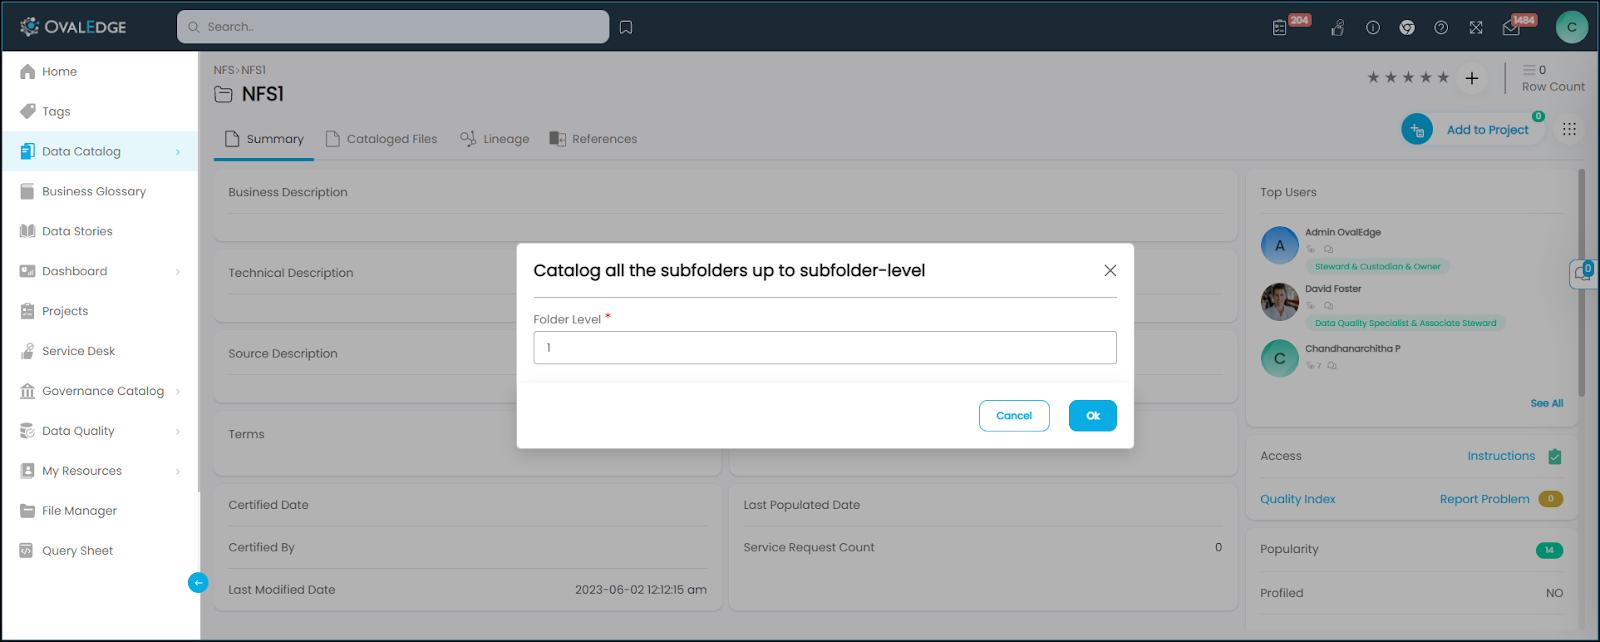
Catalog all the Subfolders
The Data Catalog follows a selective approach in cataloging files/folders from remote data sources. While the first-level folder is stored directly in the Data Catalog, all subsequent sub-folders and files are not directly cataloged. Instead, the actual file structure is stored in the File Manager module.
However, users have the option to catalog all sub-folders if needed. This allows users to organize and manage the corresponding sub-folders and files by moving them from the File Manager to the Root Folder, which is at the top-level (level '0') of the Data Catalog. Users can specify the level of sub-folders they wish to catalog, ensuring flexibility and control over the organization of files/folders within the catalog. Users can specify the level of subfolders to be cataloged.
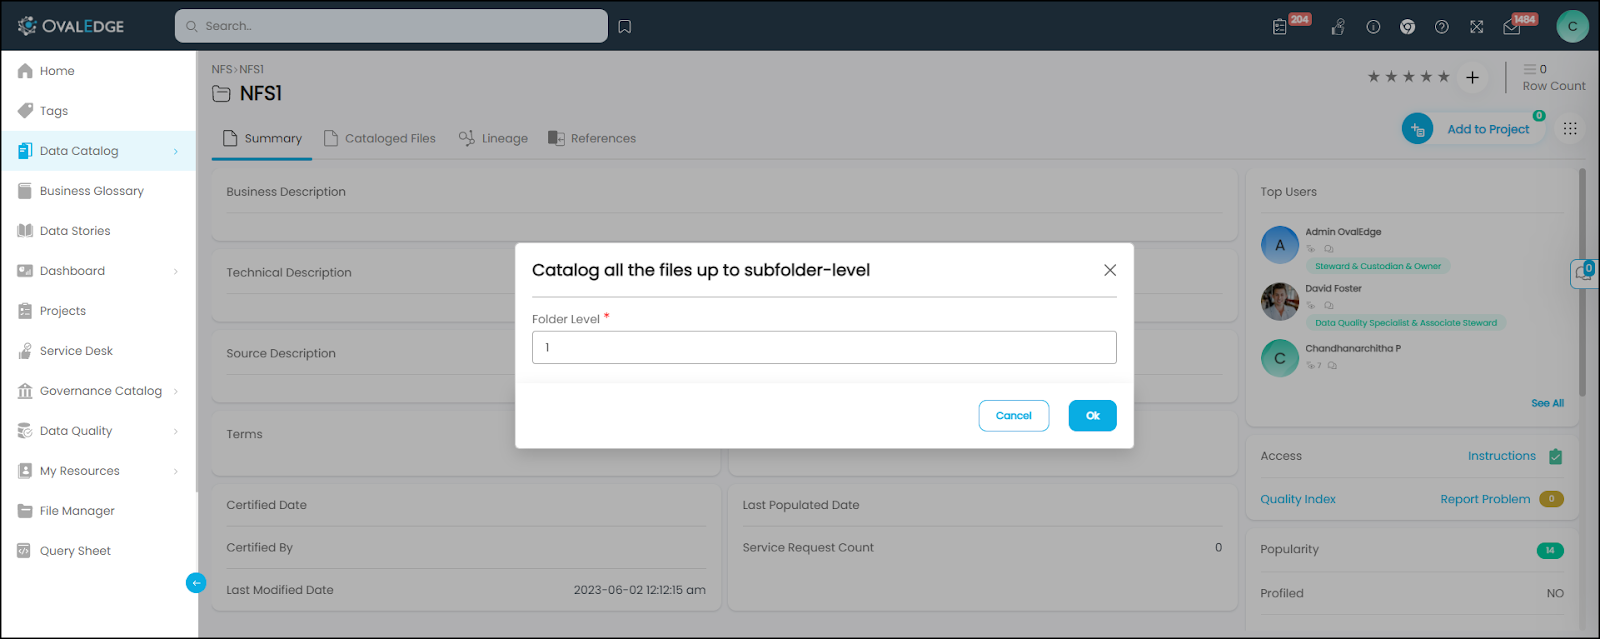
Catalog all the Files
The Data Catalog follows a selective approach in cataloging files/folders from remote data sources. While the first-level folder is stored directly in the Data Catalog, all subsequent sub-folders and files are not directly cataloged. Instead, the actual file structure is stored in the File Manager module.
However, users have the option to catalog all sub-folders if needed. This allows users to organize and manage the corresponding sub-folders and files by moving them from the File Manager to the Root Folder, which is at the top-level (level '0') of the Data Catalog. Users can specify the level of sub-folders they wish to catalog, ensuring flexibility and control over the organization of files/folders within the catalog. Users can specify the level of subfolders to be cataloged.
Note: The corresponding folder must be cataloged first, to catalog a File.
Catalog and Profile All Files
The Data Catalog follows a selective approach in cataloging files/folders from remote data sources. While the first-level folder is stored directly in the Data Catalog, all subsequent sub-folders and files are not directly cataloged. Instead, the actual file structure is stored in the File Manager module.
Furthermore, this option also performs the profiling on all the files that are cataloged to update file details such as minimum and maximum values, top users other relevant statistical information. By profiling the files, users gain valuable insights into their data, making it easier to understand and work with the information stored in the files.
Profiling Folders assuming the same content
In order to profile a folder, it must contain at least one file, and the first file within the folder must be in a supported file format. The option to "Profile Folders with the same content" allows for the profiling of all files and folders within the root folder (the top-level folder at level '0'). During the profiling process, the system runs the profiling job on the first file in the selected folder, extracting and applying statistical details to the entire folder. It's important to note that since a folder itself does not hold any information, it is necessary to have a file present in order to obtain profiling details.
Some of the File formats that OvalEdge supports to profile include: csv, json, parquet, orc, xlsx, avro, GZ—unsupported File formats: class, zip, dll, yaml, sql, html, jar.
Uncatalog Files / Folder
It removes the file/folder from the Data Catalog > Files. However, if needed, it can easily be re-cataloged to the Data Catalog from the File Manager.
Run Folder Analysis
The folder analysis feature is designed to provide users with valuable insights into the structure and contents of a selected folder within a connector. This functionality enables users to gain a comprehensive understanding of the folder hierarchy and obtain useful information about the folders and files contained within. It provides a convenient way to understand the contents of a folder at a glance, enabling users to make informed decisions about their data.
Reports - Action Items
Add to Favorites
The "Add to Favorites" feature enables users to conveniently access their preferred reports in the Dashboard's "Favorites" section. By marking a report as a favorite, users can easily locate and view it without the need to search through the entire report repository. This feature streamlines access to frequently used reports and enhances user productivity.
Codes - Action Items
Add New Code
Supported data objects: Codes
Typically, when the OvalEdge application performs crawling, queries are cataloged and included in the data catalog. Additionally, the Querysheet feature enables users to record and monitor the queries executed within the system. Similarly, the Add New Code option allows users to include a new code or query to a chosen Connector/Schema in OvalEdge.
- Select the desired Connector/Schema: Choose from the drop-down options to select the specific Connector and Schema where you want to add the code/query.
- Provide the name: Enter a name or label for the new code/query. This name should provide a brief and meaningful description of the purpose or functionality of the code.
- Enter the query: Input the query or code into the designated input field. This query represents the specific SQL statement, code snippet, or query language syntax that you want to add to the data catalog for the selected Connector/Schema.
Recommended Lineage and References
The 'Recommended Lineage and References' option serves a dual purpose in the application:
Lineage Establishment: When new codes are added or modifications are made to existing codes from the query sheet, this functionality helps establish the latest connections and associations. It tracks the lineage of codes, documenting their origin, modifications, and relationships to other data objects.
References and Associations: Additionally, this feature displays the associations between the query and other data objects. It highlights the relationships and dependencies that the query has with various data elements, providing a comprehensive view of how the code interacts with the broader data ecosystem.
Delete Associations
When the "delete associations" option is utilized, it removes any connections or links that the query has with other data objects. This action effectively eliminates the associations between the query and any related data objects.
Delete Lineage
Deleting the lineage of a query refers to removing the historical record of how the query was created, modified, and connected to other data objects. This action effectively erases the lineage information associated with the query.
Delete Code
Deleting code refers to the act of removing a specific code from the OE instance. When code is deleted, it is permanently removed and no longer exists within the DataCatalog > Codes.
|
Nine Dots Action items - Bulk Actions |
meta-read |
meta-write |
Admin |
|
Add/ Remove to My Watchlist (S, T, TC, R) |
✅ |
||
|
Add/Remove Tags (S,T, TC, F, FC, R, RC, C) |
✅ |
||
|
Add /Remove Terms (S, T, TC, F, FC, R, RC, C) |
✅ |
||
|
Add/ Remove to Access Cart (T, TC, F, FC, R, RC, C) |
|||
|
Add/Remove to Default Project (S) |
✅ |
||
|
Service Desk (S, T, TC, F, R) |
✅ |
||
|
Update Governance Roles (T, TC, F, FC, R, RC, C) |
|||
|
Change Certification Type (T,F, R) |
|||
|
Add/Delete Data Quality Objects (T, TC,F FC, C) |
|||
|
Add Tables to Impact Analysis (T, TC, F, FC, R, RC) |
|||
|
Nine Dots Action Items - specific data object |
|||
|
Profile (S, T, TC, F) |
❌ |
✅ |
|
|
Profile Unprofiled (S, FC) |
✅ |
✅ |
|
|
Calculate Relationships (TC) |
❌ |
||
|
Process Upstream / Downstream objects (T,TC,F,FC, R RC) (Caution downstream objects / lineage-driven metadata copying) |
❌ |
✅ |
✅ |
|
Add Table to Impact Analysis(T,TC,F,FC, R, RC) |
✅ |
✅ |
✅ |
|
Add to My Watchlist (S,T, TC, F, FC, R, RC) |
✅ |
✅ |
✅ |
|
Download Descriptions (S,TC,F,FC) |
✅ |
✅ |
|
|
View in Query Sheet |
|||
|
Governance Roles(S, T, TC,F,FC, R, RC) (update gov roles) |
❌ |
❌ |
|
|
Uncatalog Files (F,FC) |
❌ |
||
|
Send Messages (T, TC, F, FC,R, RC) |
❌ |
✅ |
|
|
Service Desk (S,TC,F,FC) |
✅ |
✅ |
|
|
Apply Certification(T,TC,F, FC, R, RC) |
❌ |
❌ |
|
|
Configure Search Keywords(S, T, TC,F,FC,R, RC) |
✅ |
✅ |
|
|
Add Data Quality Rules (T, TC,F,FC) |
✅ |
✅ |