Managing Users
- Creating a new user account
- Uploading multiple users
- Editing user
- Changing Password
- Deleting user
- Changing License Type
- Assigning additional user roles to a user
Creating a new User account
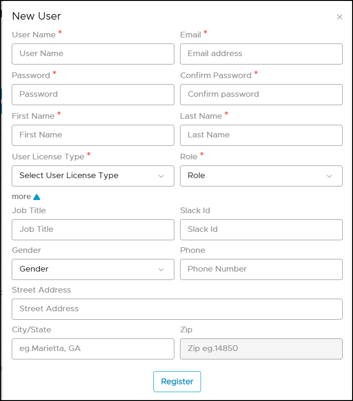
- Navigate to the Administrator > Users & Roles.
- Click the
 button. Enter all the mandatory fields represented by an * symbol.
Note: The Password should contain at least one UpperCase, LowerCase, Number/Special Character, and it should be minimum 8 characters. - Select a License type, and choose an appropriate role for the user.
- Click the Register button and confirm to create the user.
Uploading multiple users
For companies that have a wider user base, it would be difficult and time-consuming to create multiple users individually. The following template allows you to load a list of users into OvalEdge.
- Generate a .csv file with the defined headings and contents.
The license type code is,
3-Author role
2-Reader role
1-Reader Preview role - Store the .csv file in your datalake (NFS-local directory) or path. Example:D:/Datalake
- Create a datalake(NFS) connection in the Administration > Crawler page with the respective credentials.
- Select the NFS connection and click Crawl. The files stored in the NFS connection will be cataloged.
- Navigate to Administration > Advanced Job and search the job name “Load Users into OvalEdge”.
- Click the
 Edit button and enter the following values in the appropriate attributes.
Attribute 1- Enter the crawler ID of NFS connection
Attribute 2-File name with file extension(Example: load_usrs.csv) that has the user list. Get the details of the NFS connection from your administrator. - Select the advanced job and click
 .
. - Once the job is successful, the users from the .csv file are uploaded. You can navigate to the Administration > User Manager to see the list of user names added.
Editing User
Administrators can edit the user profile within Ovaledge using the ![]() edit icon in User Name field. Here the administrator can edit First Name, Last Name, Job title, Address, Email, and phone number fields.
edit icon in User Name field. Here the administrator can edit First Name, Last Name, Job title, Address, Email, and phone number fields.
Note: The administrator can change the user role by navigating to the ‘Users and Role’ tab.
Changing Password
To change the user password,
- Navigate to the Administration > Users & Roles.
- Select the user and click the
 Nine dots icon and click change password from the drop-down menu. The popup will allow the administrator to change the password.
Note: The Password should contain at least one UpperCase, LowerCase, Number/Special Character, and it should be minimum 8 characters.
Deleting User
The user with administrator roles and responsibilities can delete a user within Ovaledge.
To delete a user,
- Navigate to the Administration > Users & Roles.
- Select the specific user that needs to be deleted.
- Click the Nine dots icon and select the Delete User from the drop-down menu. A confirmation message appears to delete the user, click Yes. The selected user will be deleted.
Changing License Type
To change the user password,
- Navigate to the Administration > Users & Roles.
- Select the user and click the Nine dots icon and click Change License type from the drop-down menu. The popup will allow the administrator to change the License type.
Assigning additional user roles to a user
To add an additional role to an existing user:
- Expand the Administration tab in the object browser and select Users & Roles.
- Select the Users and Roles tab from the User Manager.
- Choose the User and click on the Available Groups associated with that user. A pop-up window displays the available user roles linked to the selected user.
- Enter the user role to be added to the user. Alternatively, select the user role from the drop-down menu.
- Click Save.
Managing User Roles
- Create a new User Role
- Setting Permissions on a User Role
- Enable default user roles on the data object
- Delete a user role
Create a new user role
Administrators can create roles through Manage Roles.
To create a new user role,
- Navigate to the Administration > Users & Roles > Roles tab > Add New Role.
- Enter the New Role Name, select User License Type, Enter Description and click Add.
- The User Role gets saved to the Users & Roles list.
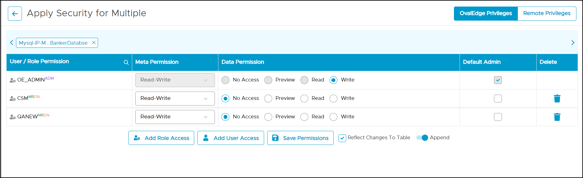
Setting Permissions on User Roles
To set user role permission,
- Navigate to the Administration >
Security.
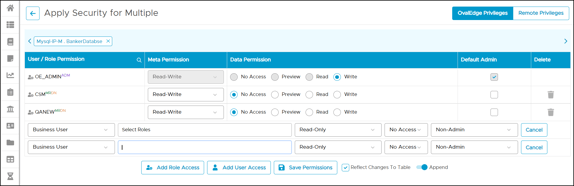
- Select an object and click
 Nine dots icon.
 - Click the Add User/Role Access button.
- A pop-up window displays all the user roles with settings. Initially, the permissions are set to default Metadata Read-only , Data No Access, Non-Admin.
- Select the required permission for each user role.
- Click “Save Permissions” to save the permissions.
Enable Default user roles on the data Objects
By default, only the OE_ADMIN role is enabled on the Data Objects.
- Upon creating custom user roles in the Users & Roles tab, navigate to Administration > Users & Roles > Roles tab > click Apply Default Roles which applies default roles to existing or new data objects.
Note: When a new data object is crawled in OvalEdge, the selected default role and the users within that role are automatically given access to new data objects.
Note: The users associated with a user role, inherit the permissions of that user role. Alternatively, a user role can be given controlled access to a particular data object by setting individual permissions using Security module.
Only OvalEdge Administrators can manage and control the user role access through the Security tab.
Delete a user role
To delete a user role,
- Navigate to Administration > Users & Roles > Roles tab.
- Select the users that are to be deleted and navigate to Nine dots icon.
- Select Delete Roles option.
- A confirmation message appears to confirm the delete action, click Confirm. The selected user role will be deleted.
Note: A user role cannot be deleted until all the users associated with that user role are revoked access through that role. An error message is displayed. To revoke a user role for a user, see Assigning additional roles to a user.
In addition to the system-defined ADMIN role(OE_ADMIN), any user role can be chosen to have ADMIN level permissions on existing and/or new data sources. A role selected to be a Default_Admin will have all the capabilities an admin user has on the application modules. However, they will not be able to control and manage the activities in the ADMINISTRATION MODULE(such as managing users, security, configuration, crawling data objects, etc.)
Note: A role can only be chosen to be acting as a Default_Admin if you select the role to be a default_role on all the objects.