Manage Service Desk modules supports the following:
- View system provided service request templates that are available out of the box
There are seven system defined service templates as listed below.
Note: This list is evolving and new ones will get added in future versions.S.No
Service Request Template
Impacted Objects
Description
1
Access
table and reports.
To request data access permissions (like Data Preview, Data Read, and Data Write)
2
Build Lineage
tables
Request stewards or configured approvers to build a lineage between the objects
3
Content Change
Business description, tags, terms for a table, table column, file, report, business glossary.
Request stewards or configured approver to modify the business description, tags and terms for a table/ table column/ file/ report/ business glossary.
4
Crawl/Profile
Database
Request stewards or configured approvers to crawl or profile a database. Crawl / Profile will be done manually by the approvers
5
Data Quality
Table, table column, file, report, business glossary, URL
Notify stewards or configured approver for attention in data quality for a table/table column/file/report/business glossary/URL
6
New Asset Request-
Table , table column
A request to create a new table and table column at the data source
7
Other
Changes on the data objects
Notify stewards of any additional changes required on the data objects
- Create customized service request templates
In addition to the predefined Service Request templates, users can also create customized service request templates to meet their specific needs. Once created, these templates will be available for creating new service requests. Users may create any number of customized service request templates; however, one custom service request template is limited to a maximum of 20 fields. - Integrate service request templates with external service desk systems. For example, Jira Service Desk or ServiceNow.
- Service requests created in OvalEdge can be pushed to external service desk systems to view the status in a centralized location. The scope of integration is:
- All the mapped fields are pushed to the external system ticket
- Comments are pushed to the external system ticket as the ticket moves through approval stages or rejection
- The status of the ticket on the external system can be seen in OvalEdge
Navigating to Service Request templates
- Go to Administration → Manage Service desk
It consists of :- Add + icon to add a new service request template.
- Edit icon to update the service request custom template.
- Delete icon to delete the service request template.
- Service desk integration button to integrate with external tools.
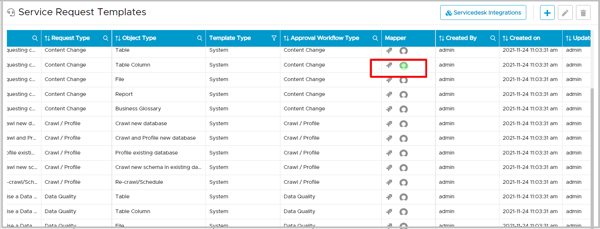
- Service request template displays the following:
- ID
- Name of the template
- Description of the template
- Request Type
- Object Type: The impacted object of the the service request
- Template Type : System type or custom type.
- System types cannot be created or edited
- Custom types can be created and edited by the admin user.
- Mapper: JIRA or ServiceNow
- Created by: Admin User
- Created on: Date on which request is raised
- Updated by: Admin user
- Updated on: Data on which request is updated
Steps to create a New Service Request template
- Navigate to the Administration → Manage Service desk
- Click on the + icon to create a new request.
- Choose the Request type as Access.
- Choose the request Object type as Table/Reports.
- Press “Enter” Key
- Enter the name of the template (It is the name of the object on which the user needs the selected data permissions Example: Table name or Report name)
- Enter description about the template. (A brief description of why the user needs to request access can also be added.)
- Choose Custom Template Fields (Summary, Description, Priority) accordingly.
- Summary, Description, Priority are mandatory fields for any template and are added by default.
- Add additional fields using + Add
- A minimum of 4 fields are required to create a new custom template
- Click on the Save button, the service access request template is created and displayed in the list.
- A service request template must be unique.
- The admin user cannot update or delete the template once the ticket is raised mapped to that template
- Approval workflow can be setup from Security - > Configuration
OvalEdge integration with JIRA tool
Navigating to connection details page
- Navigate to the Administration → Manage Service desk,
- Click on the Service desk Integrations button, it shows the JIRA/ServiceNow tab.
- Click on the JIRA button,
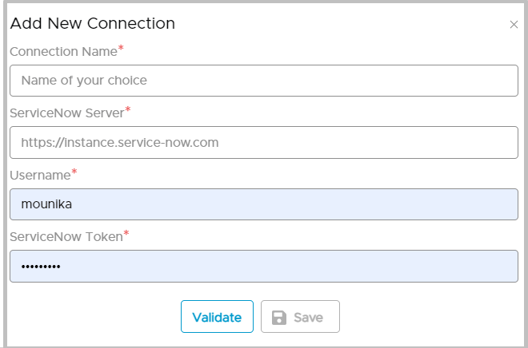
- Click on + New Connection, following pop-up is displayed.
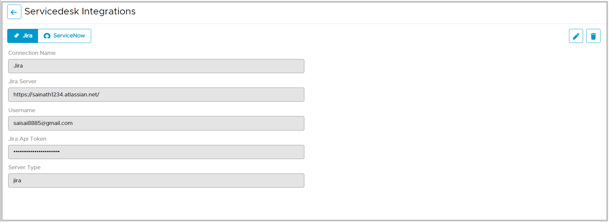
- To establish connection enter the following parameters,
- Enter the Connection Name: Name of a JIRA connection(User-defined).
- JIRA Server: Instance URL.
- Username: Authorized email id associated with JIRA account password.
- JIRA API Token: JIRA account password.
- Click on the Validate button , it gives the success alert message that “JIRA connection validated Successfully” and then Save the connection.
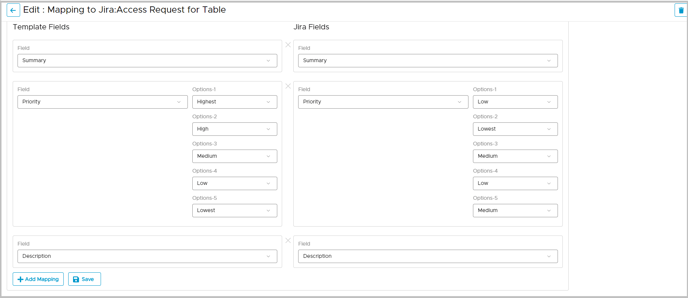
JIRA Fields Mapping
The OvalEdge is able to integrate with JIRA with the help mapper icon. By selecting a ticket template, users can create a service desk ticket. If a ticket template has a JIRA/ServiceNow mapper associated with it then the same ticket information will be posted to JIRA. Here 1 template will have only one mapper associated with it. Either Jira or ServiceNow.
JIRA Hierarchy
JIRA has projects, if you select a project then you will have issue types associated with the selected project. Then, you will get issue type specific attributes metadata.
Fields Mapping page
Here, the user may apply the mapping OvalEdge templates to JIRA fields.
|
Template Fields |
JIRA Fields |
|
Summary |
Summary |
|
Priority
|
Priority
|
Step to create service request ticket from Service Desk
- Navigate to Governance Catalog - > Service Desk
- Click on the “New Service Request” , then select the ticket template.
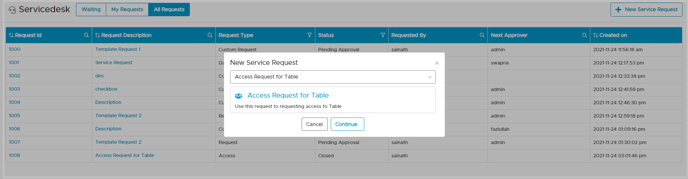
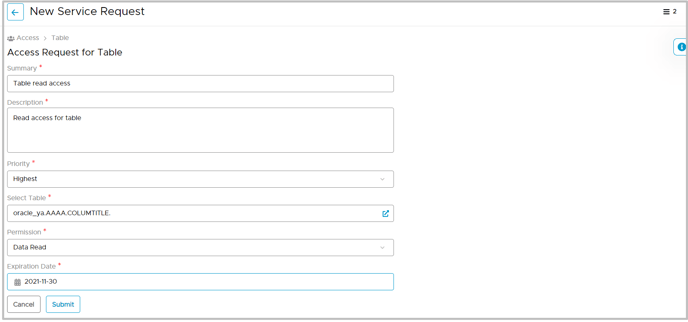
- Click on Continue and then the New Service Request page is displayed.
- Enter all the details on the New Service Request screen.
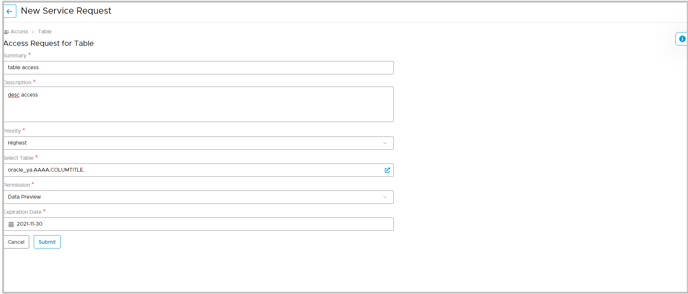
- Click on the Submit button. A new service desk ticket created in the OvalEdge application as well as mapper associated external JIRA system . The new ticket ID is created under the Waiting tab of the Service Desk page.
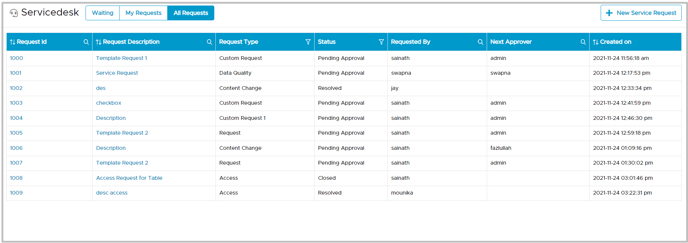
- Click on ticket number to see the ticket summary. In the summary page users can view the external JIRA system ticket number.
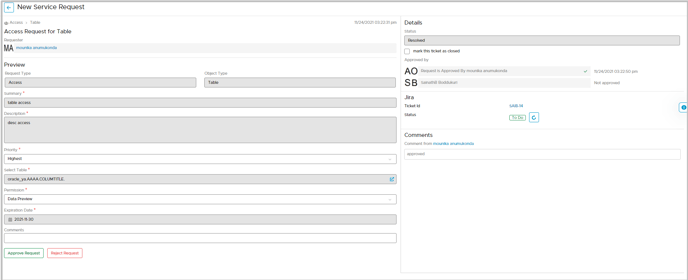
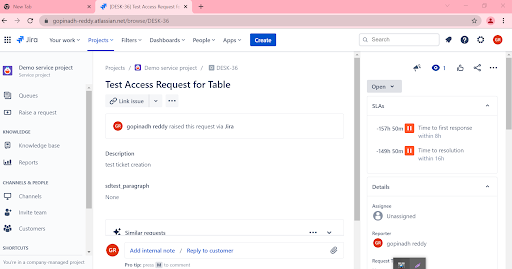
- Click on Ticket Id then page will be redirected to external JIRA application login page. Once a user is successfully able to login in JIRA a summary page of that particular ticket ID is displayed.
Note: If the failure of ticket creation in the external system then the user can see the “REPOST” option as below. The user can click on the REPOST button, then it will retry to push the ticket to the JIRA application.
OvalEdge integration with ServiceNow tool
ServiceNow external tool that allows users to raise the following type of request. OvalEdge can collaborate and transfer
- Content Change Requests
- Incident
- Knowledge
- Problem
Navigating to the connection details page
- Navigate to the Administration → Manage Service Desk,
- Click on the Service Desk Integrations button, it shows the JIRA/ServiceNow tab.
- Click on the ServiceNow button.

- Click on + New Connection, following pop-up is displayed.
- To establish connection enter the following parameters,
- Enter the Connection Name: Name of a ServiceNow connection(User-defined).
- ServiceNow Server: Instance URL.
- Username: Authorized email id associated with ServiceNow account password.
- ServiceNow API Token: ServiceNow account password.
- Click on the Validate button and then Save the connection.
ServiceNow Fields Mapping
- Select a request template and click on ServiceNow mapper icon
- Following mapping page is displayed
- Select a ServiceNow Ticket type as Incident from the dropdown menu,
- Enter the OvalEdge fields and their respective ServiceNow Fields.
- Click on Add Mapping button to add one more many fields as your requirement
- Click on the Save button, the green color ServiceNow icon shows that the ticket has successfully mapped.
Steps to raise service request ticket
- Navigate to Governance Catalog - > Service Desk
- Click on the “New Service Request” , then select the ticket template.
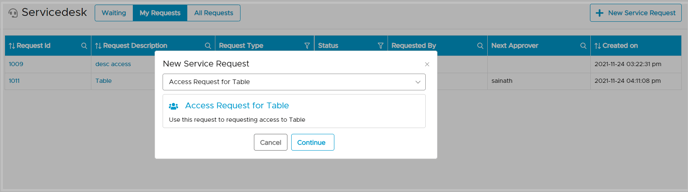
- Click on Continue and then the New Service Request page is displayed.
- Enter all the details on the New Service Request screen,
- Click on the Submit button then it creates a new service desk ticket in the OvalEdge application as well as the mapper associated ServiceNow system. The new ticket number created under the Waiting tab of the Service desk page.

- Click on ticket number to see the ticket summary. In the summary page users can view the external ServiceNow system ticket number.

- Click on the Ticket Id then page will be redirected to external ServiceNow application Login page.
- Once a user is successfully able to login a summary page of that particular ticket ID is displayed.
Note:- REPOST: If ticket creation fails in an external system then the user can see the “REPOST” option. Once a user can click on repost, then it will retry to push the ticket to ServiceNow.
- Status: In order to track the request ID in the external tool, users can refer to the status of the ticket (New, InProgress, Hold). When the ticket is created, the status of the ticket is new. This status is sync between the OvalEdge application and external tool.