Prerequisites
A. Installation Prerequisites
Review the hardware prerequisite to ensure that your environment meets the minimum standards before you perform the installation.
B. Software Prerequisites
Review the software prerequisites and ensure that your environment meets the minimum standards before you start the installation.
- Install My SQL
- Install OvalEdge Database
- Install Java
- Install or Copy Tomcat
- Deploy Web Application
C. Hardware Prerequisites
OvalEdge has two components, web application, and algorithms.
For the web application, OvalEdge requires the following minimum hardware configuration:
| Component | Minimum | Recommended |
| Processor | 2 Core Processors | 4 Core Processors |
| Memory | 8 GB RAM | 16 GB RAM |
| Disk | 50 GB Physical Disk Space for the Installation | 100 GB Physical Disk Space for the SSD |
For algorithms, OvalEdge is dependent upon the participating Hadoop cluster and various databases it connects to.
Installing OvalEdge
Component 1
Install My SQL
- Download the rpm bundles - Download and add the following MySQL Yum repository to your respective Linux distribution system’s repository list to install the latest version of MySQL.
wget https://dev.mysql.com/get/mysql57-community-release-el7-11.noarch.rpm
2. Install the downloaded package with the following command.
sudo yum localinstall mysql57-community-release-el7-11.noarch.rpm
3. Verify that the MySQL Yum repository has been added successfully by using the following command.
sudo yum repolist enabled | grep "mysql.*-community.*"
4. Installing the Latest MySQL Version
sudo yum install mysql-community-server5. Starting the MySQL Server
sudo service mysqld start6. To verify the status :
sudo service mysqld status7. Securing the MySQL Installation
- Get the root user password using the below command :
sudo grep 'temporary password' /var/log/mysqld.log
- Execute the secure MySQL installation tool
sudo mysql_secure_installation
- Enter the temporary password and create a new password for root. Login into MySQL with the command:
mysql -u root -p
In MySQL, my.ini config file user needs to be set the below details:
Before adding stop the MySQL services and then add it and save and start the services
[client] - default-character-set=utf8mb4

[mysql] - default-character-set=utf8mb4

[mysqld] -

collation-server = utf8mb4_unicode_ci

init-connect='SET NAMES utf8mb4'

character-set-server = utf8mb4

character-set-client-handshake=FALSE
Install OvalEdge Database and some .sql scripts
- Connect to MySQL
mysql>source /home/linux_user/vx.x/1.database.sql mysql>show databases;
Now you can see the OvalEdge database is created successfully.
2. Run all the remaining .sql files.
mysql>source /home/linux_user/vX/2.tables.sql
mysql>source /home/linux_user/vX.X/3.views.sql
mysql>source /home/linux_user/vX.X/4.data.sql
mysql>source/home/linux_user/vX.X/5.multilang.sql
mysql>ALTER TABLE helpcenter_topic CONVERT TO CHARACTER SET utf8mb4 COLLATE utf8mb4_unicode_ci;
mysql>source /home/linux_user/vX.X/9.helpcenter.sql
mysql>source /home/linux_user/vX.X/6.validate.sql
mysql> select * from version;
Component 2
Install Java
- Go to Oracle JDK8 and download the web URL -

2. Login in with valid creds and click on download Linux x86 RPM Package
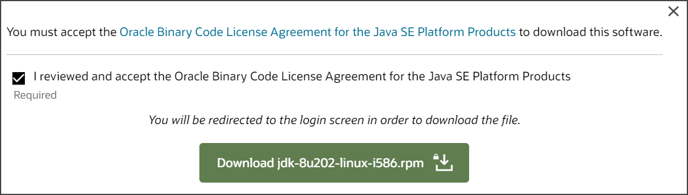
3. Move the package into the remote machine either with SCP.
4. Install the java package with the command
sudo yum localinstall jdk-8u251-linux-i586.rpm
The below command has been used if running any error only
- To troubleshoot the Bad ELF Error, Run the following command and retry installing JAVA.
sudo yum provides ld-linux.so.2

sudo yum install glibc-2.17-307.e17.1.i686
- Verify the Java version with the command
java -version

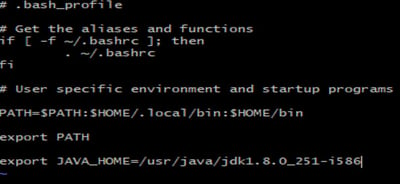
- Set the Environment Variable JAVA_HOME
- Find the JDK path, export the variable in bash_profile, and open the Editor
vi ~/.bash_profile
- To make the changes saved permanently, run the command
source ~/.bash_profile
- To verify the path set
echo $JAVA_HOME
Component 3
Install or Copy Tomcat
- Go to the Apache Tomcat Website to download apache-tomcat-9.0.63
- wget it into the remote server
wget https://downloads.apache.org/tomcat/tomcat-9/v9.0.63/bin/apache-tomcat-9.0.63.zip
Note: There are two system type variable available on the website for Windows 32bit/Windows 64bit.
3. Unzip the downloaded apache tomcat archive.
Deploy Web Application
- Move ovaledge.war file to Webapps folder. We need to move the root.war file.
Source path: /home/linux_user/ovaledge.war
Destination path: /home/linux_user/apache-tomcat-8.5.40/webapps/ovaledge.war
linux_user@ip-XXX-XX-X-XX:~$ mv /home/linux_user/ovaledge.war
/home/linux_user/apache-tomcat-8.5.40/webapps/
- Run the below command to start the Tomcat Server
linux_user@ip-XXX-XX-X-XX:~$ cd apache-tomcat-8.5.40/bin/ linux_user@ip-XXX-XX-X-XX:~/apache-tomcat-8.5.40/bin$ ./startup.sh
- Run the command below to stop the Tomcat server.
linux_user@ip-XXX-XX-X-XX:~/apache-tomcat-8.5.40/bin$ ./shutdown.sh
Settings in oasis.properties file
- We need to check the Port number Username and Password details on oasis.properties file.
This file is available in - /home/linux_user/apache-tomcat-8.5.40/webapps/ovaledge/WEB-INF/classes folder
linux_user@ip-XXX-XX-X-XX:~$ cd
/home/linux_user/apache-tomcat-8.5.40/webapps/ovaledge/WEB-INF/classes/
- Check whether the oasis.properties file exists in the classes folder.
linux_user@ip-XXX-XX-X-XX:~/apache-tomcat-8.5.40/webapps/ovaledge/WEB-INF/classes$
ls Spring-Config.xml com ehcache.xml letters logback.xml oasis.properties quartz.properties saml udfCollector users.ldif
application.yml dbversion.properties i18n log4j.properties net org release.properties scripts udfdetails.txt xsd
- To view the content in oasis.properties file use cat command as shown below :
linux_user@ip-XXX-XX-X-XX:~/apache-tomcat-8.5.40/webapps/ovaledge/WEB-INF/classes$ cat oasis.properties #local DB Credentials.
driverClassName=com.mysql.jdbc.Driver
url=jdbc:mysql://localhost:3306/ovaledgedb?useUnicode=true&characterEncoding=UTF-8 username=ovaledge password=XXXXXXXXXX ovaledge.role.public=OE_PUBLIC
samlHTTPMetadataProvider=https://ovaledgeshilpi.okta.com/app/exk10m30m4TPWBJ9f357/sso/ saml/metadata
- To Edit the content of the file, use vim command as shown below
linux_user@ip-XXX-XX-X-XX:~/apache-tomcat-8.5.40/webapps/ovaledge/WEB-INF/classes$ vim oasis.properties
Type “i” to go to insert mode
Do the changes you want and press ESC and type “:wq!” and press Enter.
If you want to exit without making any changes, press ESC and type “:q!” and press Enter.
- And run the ./startup.sh cmd under tomcat bin folder
- Restart the tomcat server after the configuration
Verify user Installation
Please use the following command (whenever Tomcat doesn't restart properly) after storing in a shell script.
vi restart.sh
Copy-paste the following and save the file:
#Finds the tomcat process id
ps -ef|grep tomcat | grep org.apache.catalina.startup.Bootstrap | awk -F " " '{print $2}' > tomcatProcessID
#Kills the process id returned from above-mentioned command.
kill -9 `cat tomcatProcessID` && echo "Tomcat killed Successfully" ;rm -rf tomcatProcessID
#Start the server
exec /usr/local/tomcat8/bin/startup.sh
#Make it executable
chmod +x restart.sh
#Run it.
./restart.sh
Copyright © 2019, OvalEdge LLC, Peachtree Corners GA USA