Summary
Kubernetes, also known as K8s, is an open-source system for automating deployment, scaling, and management of containerized applications.
Components
Below are the software and hardware components required:
| Software Components | Hardware Components |
| Install Docker | Components |
| Install HTTPS support components(if necessary) | Specifications |
| Install Curl (if necessary) | Recommended |
| Install ebtables and ethtool | Production Cluster Specification |
Pre-requisites
Components Required
Review the hardware prerequisite to ensure that your environment meets the minimum standards before you perform the installation.
Installation Prerequisites
Review the hardware prerequisite to ensure that your environment meets the minimum standards before you perform the installation.
Hardware OvalEdge has two components, web application and algorithms.
A. Software prerequisites
Kubeadm Install Process:
- Install Docker.
sudo su

apt-get update

apt-get install -y docker.io
- Install HTTPS support components (if necessary):
apt-get update

apt-get install -y apt-transport-https
- Install Curl (if necessary):
apt-get install curl
B. Hardware prerequisites
|
Component |
Minimum |
Recommended |
|
Processor |
2 core processors |
4 core processors |
|
Memory |
8GB RAM |
16GB RAM |
|
Disk |
50GB physical disk space for the installation |
100GB physical disk space for the installation |
Install OvalEdge
There are a few things you need to do to get the VM ready. Specifically, you need to turn off swap, tweak some configuration settings, and make sure you have the prerequisites libraries installed. To do that, follow these steps:
- Change to root.
sudo su
- Turn off swap: To do this, you will first need to turn it off directly.
swapoff -a
- Comment out the reference to swap in /etc/fstab. Start by editing the file.
vi /etc/fstab
- Then add below swap thing in fstab appropriate line, as in:
none swap sw 0 0
- Now configure iptables to receive bridged network traffic. First edit the sysctl.conf file.
vi /etc/ufw/sysctl.conf
- And add the following lines to the end.
net/bridge/bridge-nf-call-ip6tables = 1

net/bridge/bridge-nf-call-iptables = 1

net/bridge/bridge-nf-call-arptables = 1
- Reboot so the changes take effect.
- Install ebtables and ethtool.
sudo su

apt-get install ebtables ethtool
- Reboot again.
Kubeadm Install Process
Now we’re ready to go ahead and do the install.
- Install Docker:
sudo su

apt-get update

apt-get install -y docker.io
- Install HTTPS support components (if necessary)
apt-get update

apt-get install -y apt-transport-https
- Install Curl (if necessary)
apt-get install curl
- Retrieve the key for the Kubernetes repo and add it to your key manager
curl -s https://packages.cloud.google.com/apt/doc/apt-key.gpg | apt-key add -
- Add the Kubernetes repo to your system.
cat <<EOF >/etc/apt/sources.list.d/kubernetes.list

deb http://apt.kubernetes.io/ kubernetes-xenial main

EOF
- Install the three pieces you’ll need - Kubeadm, Kubelet, and Kubectl:
apt-get update

apt-get install -y kubelet kubeadm kubectl
At this point you should have all the tools you need, so you should be ready to go ahead and actually deploy a k8s cluster.
Create a cluster
Now that the Kubeadm installation is complete, we’ll go ahead and create a new cluster using kubeadm init. Part of this process is choosing a network provider, and there are several choices; we’ll use Calico for this kubeadm init example.
- Create the actual cluster. For Calico, we need to add the –pod-network-cidr switch as command line arguments to kubeadm init, as in:
kubeadm init --pod-network-cidr=192.168.0.0/16
This will crank for a while, eventually giving you output as follows:
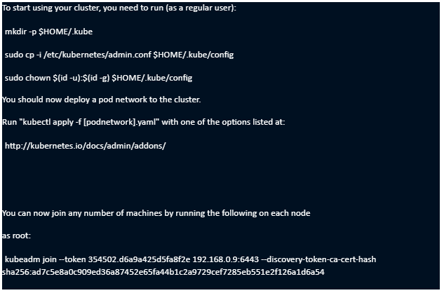
- Notice that last bit, about joining other machines to the cluster; we’re not going to do that in our example, but you do have that option. Prepare your system for adding workloads, including the network plugin. Open a NEW terminal window and execute the commands from kubeadm:
mkdir -p $HOME/.kube

sudo cp -i /etc/kubernetes/admin.conf $HOME/.kube/config

sudo chown $(id -u):$(id -g) $HOME/.kube/config
- Install the Calico network plugin:
kubectl apply -f https://docs.projectcalico.org/v3.14/manifests/calico.yaml
- Check to see if the pods are running:
kubectl get pods --all-namespaces
- The pods will start up over a short period of time. Untaint the master so that it will be available for scheduling workloads:
kubectl taint nodes --all node-role.kubernetes.io/master-
Now let’s make sure everything’s working properly by installing the application.
Follow these steps:
- Pull the docker image using below command
docker pull ovaledgellc/ovaledge:ng-5.0-7
- Now create the deployment manifest yaml file and create the deployment.
vim deployment.yaml
Create the manifest file as per your requirement with the docker image and environmental variables.
- Now deploy the application.
kubectl apply -f deployment.yaml
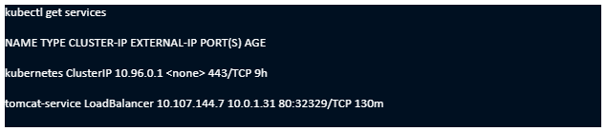
- Use kubectl get pods to make sure the pods are all running.
kubectl get pods

NAME READY STATUS RESTARTS AGE

tomcat-deployment-6559fd6bc-ksg48 1/1 Running 0 4h18m
- Now Verify the logs using the below command:
kubectl logs -f tomcat-deployment-6559fd6bc-ksg4
- Now create the service with the below commands to expose the application externally.
kubectl expose deploy tomcat-deployment --type=LoadBalancer --port=80 --targetPort=8080 --name tomcat-service
Example
kubectl expose deploy tomcat-deployment --type=LoadBalancer --port=80 --target-port=8080 --name tomcat-service

kubectl patch service tomcat-service -p '{"spec": {"type": "LoadBalancer", "externalIPs":["private ip of server"]}}'

kubectl patch service tomcat-service -p '{"spec": {"type": "LoadBalancer", "externalIPs":["10.0.1.31"]}}'
Output:
Now take that public IP address and point the browser on your host machine to that IP on port 80.

Now we have successfully installed Kubernetes, you will see the OvalEdge application login page.