Note: Microsoft has recently renamed its "Azure Active Directory" (also called "Azure AD" or "AAD") to "Microsoft Entra ID". This is not to be confused with "Windows Server Active Directory" which will remain the same.
This integration document provides information about setting up the prerequisites for the Microsoft Entra ID (formerly, Azure Active Directory) integration with the OvalEdge application.
The Setup
Please follow the steps below to integrate the OvalEdge application with Microsoft Entra ID.
Run the OvalEdge application with HTTPS, Example: https://<DNS>:8443/ovaledge
- Create an Enterprise application in Azure: It is used to authenticate Azure users in the OvalEdge application.
- Create Key Vault Secrets: It stores the Mysql Database details and Saml certificate.
- App Registration: It is used to authenticate the OvalEdge application to the Azure Key Vault.
- Authentication and Authorization: This section explains how to create roles and groups in the AD and add members to the group.
- Tomcat Configuration: It is used to configure Azure with the OvalEdge Application.
Create an Enterprise application in Azure
To create an Enterprise application in Azure, complete the following steps:
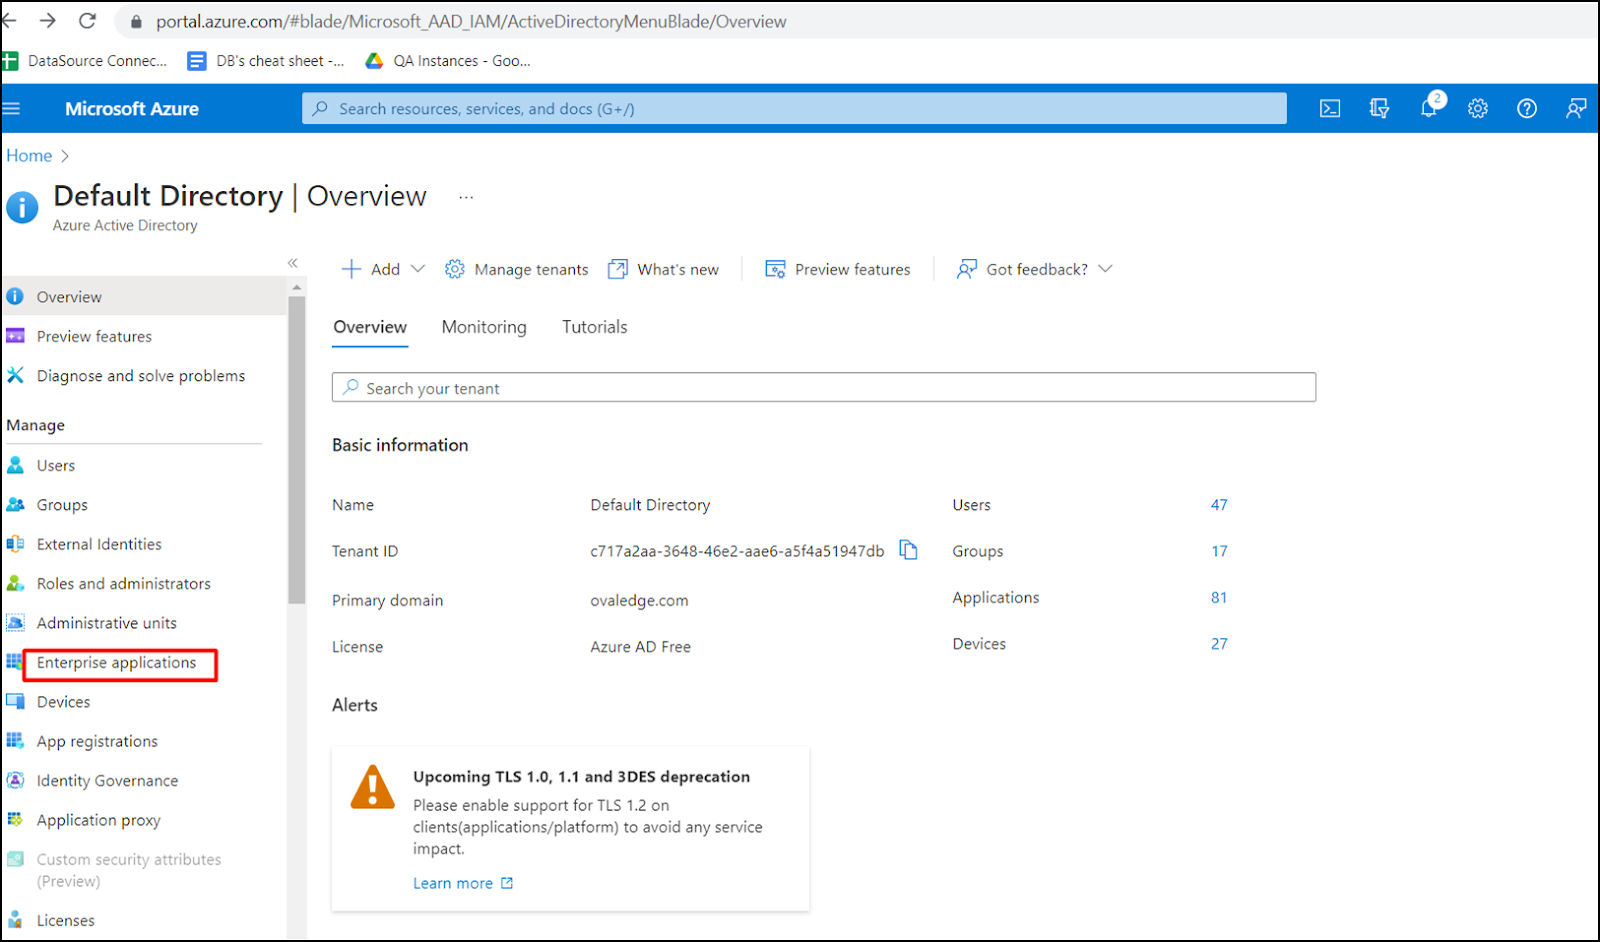
Step#1: Navigate to Azure Active Directory and click on the Azure Active Directory.

Step#2: To display the Enterprise applications page, click on the Enterprise Applications page.
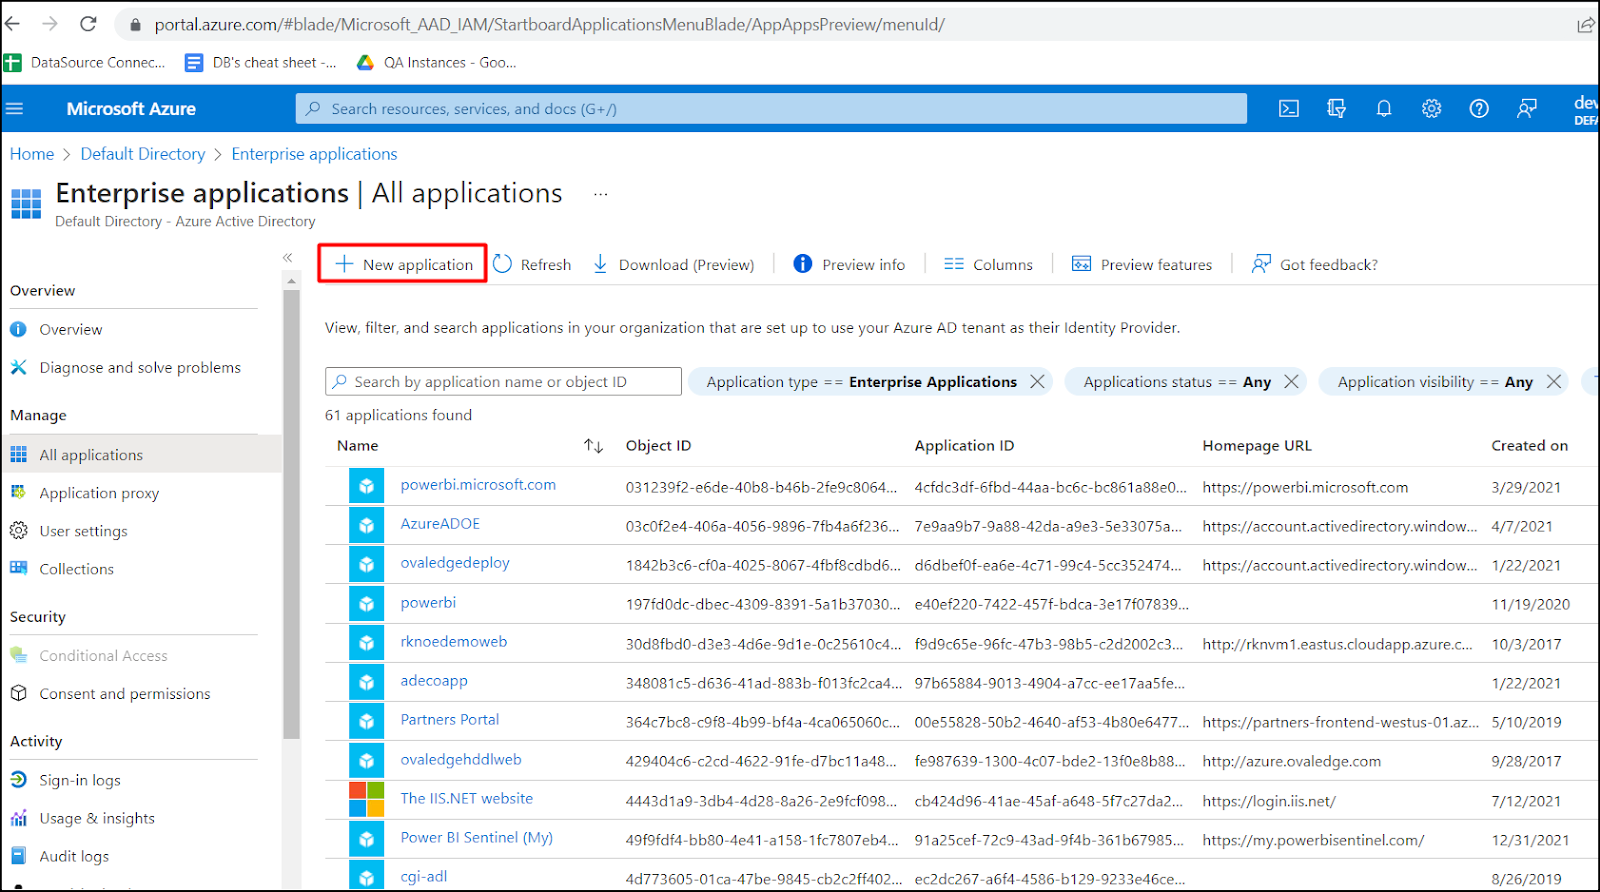
Step#3: On the Enterprise applications page, click + New Application to display the Browse Azure AD Gallery Page.
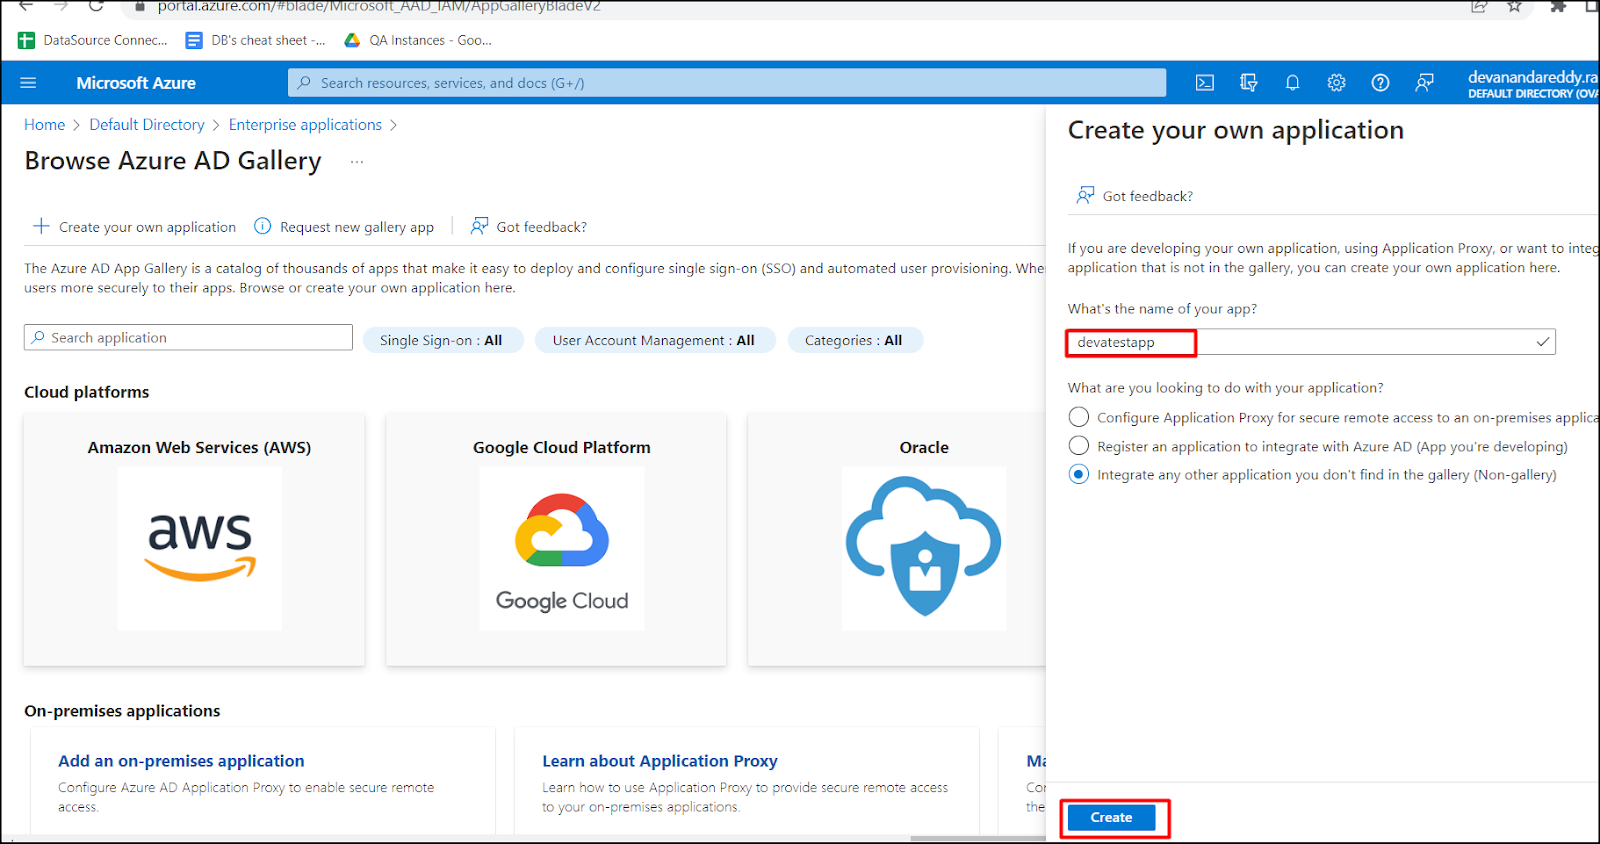
Step#4: On the Browse Azure AD Gallery page, click on Create your own application.

Step#5: Name the application and click on Create.
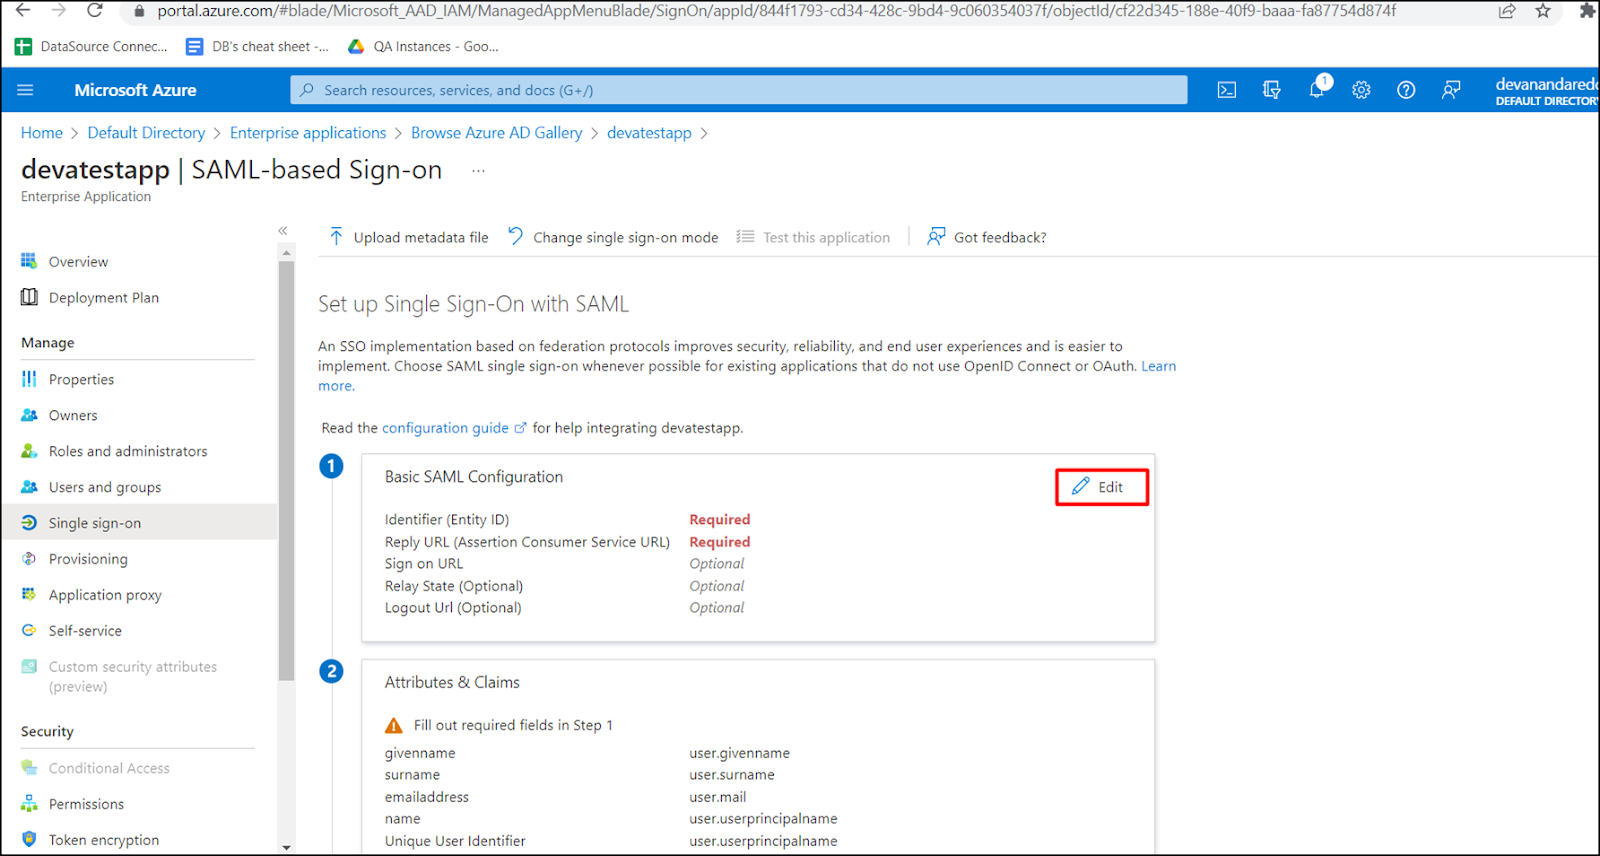
Step#6: Open the application you have created, click on ‘Single Sign-on’ and select ‘SAML’.


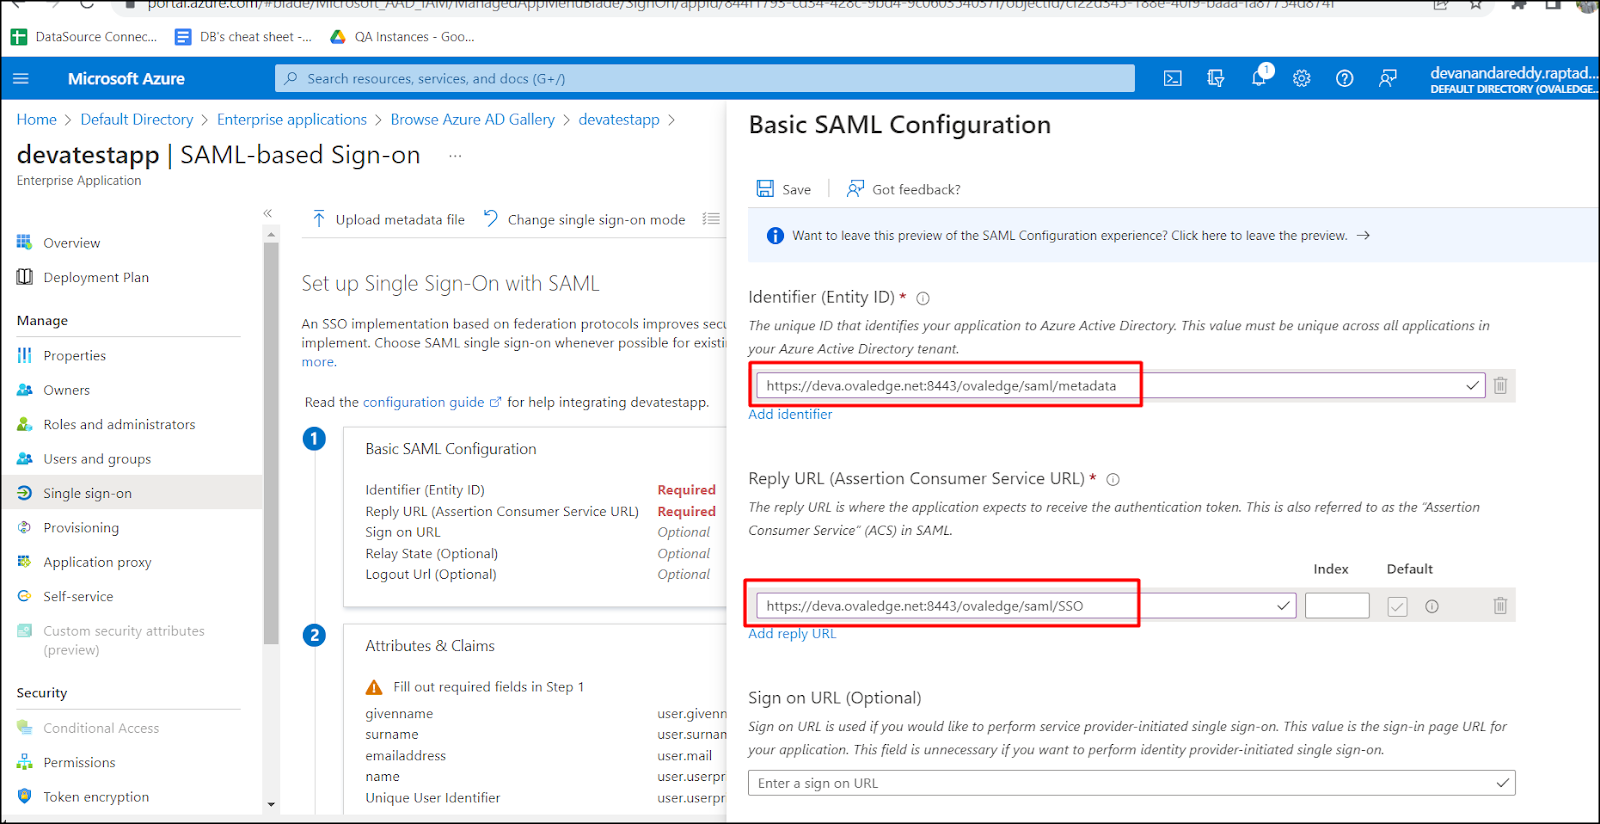
Step#7: Click on Edit to edit 'Basic SAML Configuration'.
Step#8: Enter
- https://<DNS>:<PORT>/ovaledge/saml/metadata for identifier
- https://<DNS>:<PORT>/ovaledge/saml/SSO for 'Reply URL (Assertion Consumer Service URL)
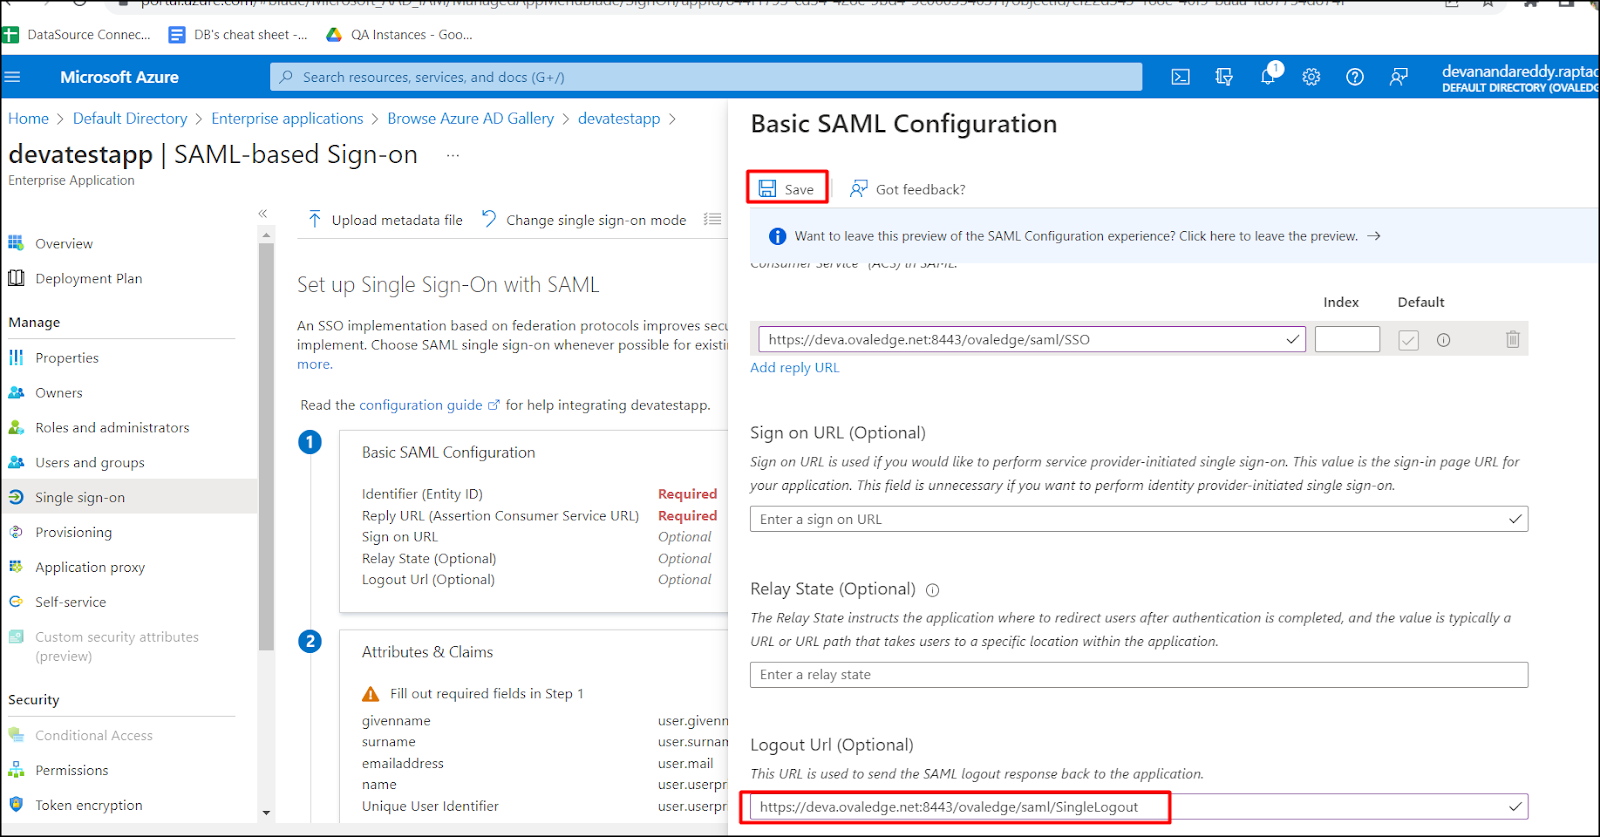
- https://<DNS>:<PORT>/ovaledge/saml/SingleLogout for 'Logout Url (Optional)'.
Click on Save.
Step#10.1: Click on Edit to configure 'Attributes & Claims'.

Step#10.2: Click on '+ Add a group claim' and select 'Groups assigned to the application' and click Save.

Step#10.3: Click on Edit to edit 'SAML Signing Certificate'.

Step#11: Select 'Signing Algorithm' as 'SHA-1' and click 'Save' to display the SAML-based Sign-on Page.
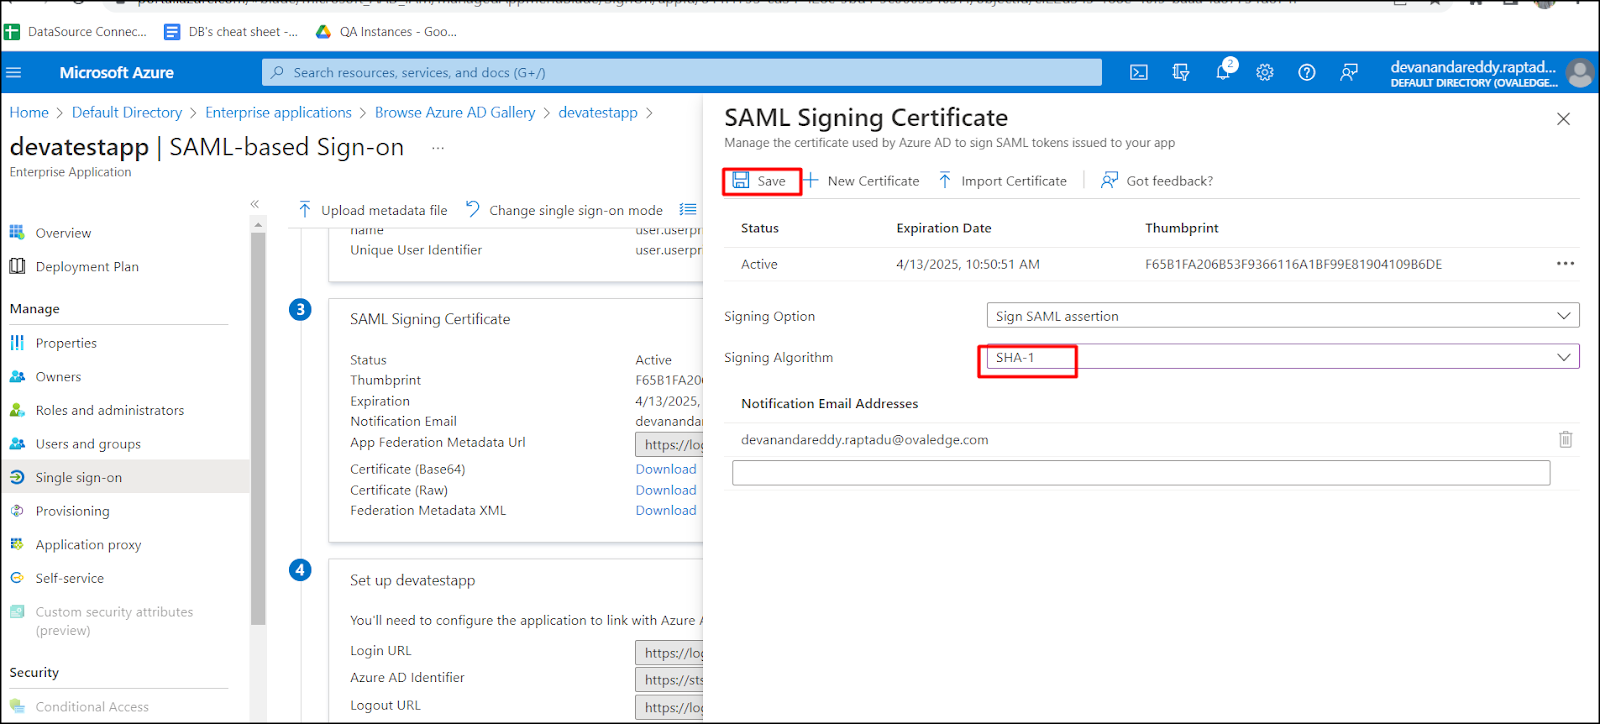
Step#12: On the SAML-based Sign-on Page, click on the Copy icon to copy the metadata URL.

2. Creating Key Value Secrets.
To create key vault secrets in Azure, complete the following steps:
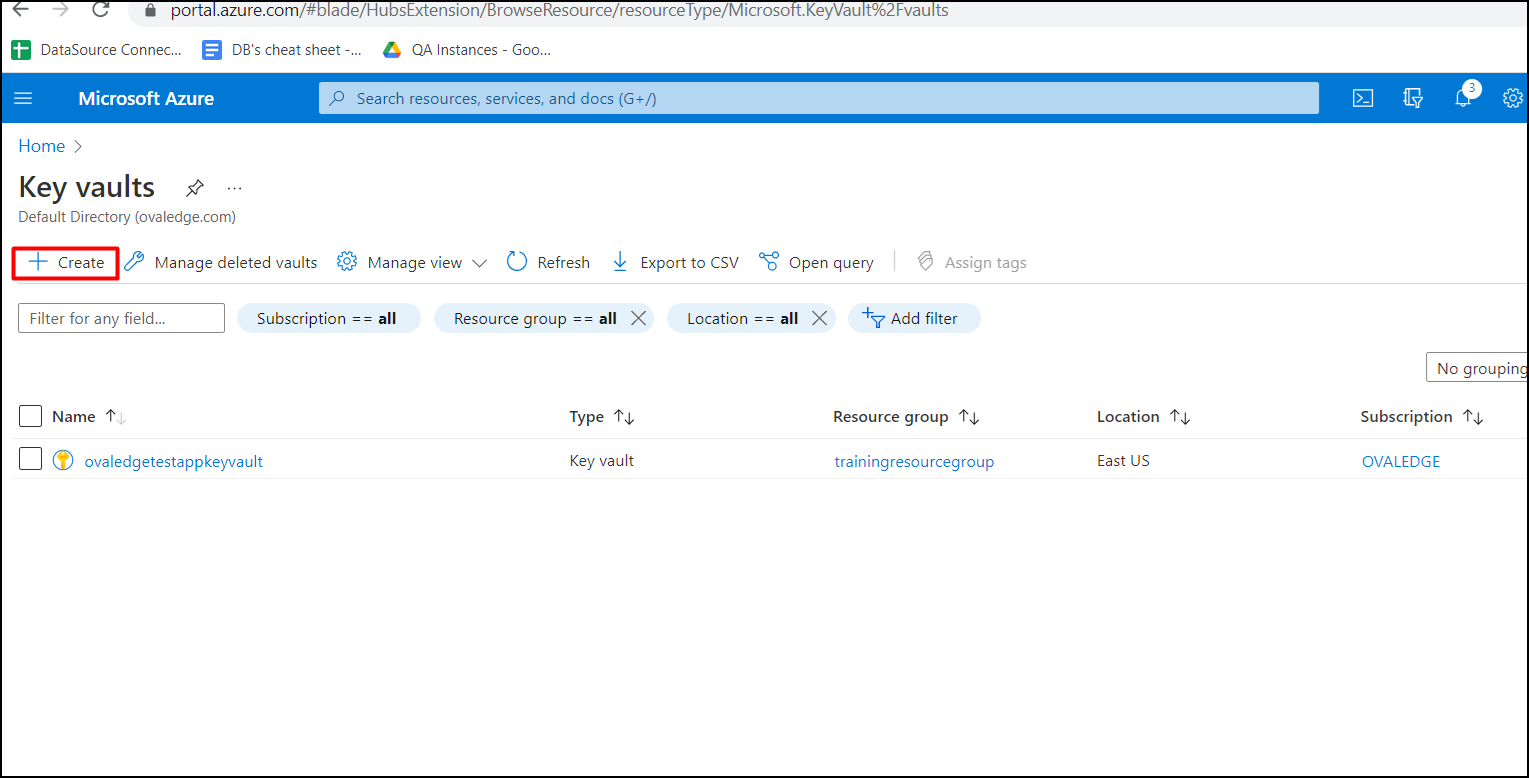
Step#1: Navigate to Azure Key Vaults.

Step#2: On the Key vaults page, click on Create.
Step#3: Enter the Resource group and Key vault name.

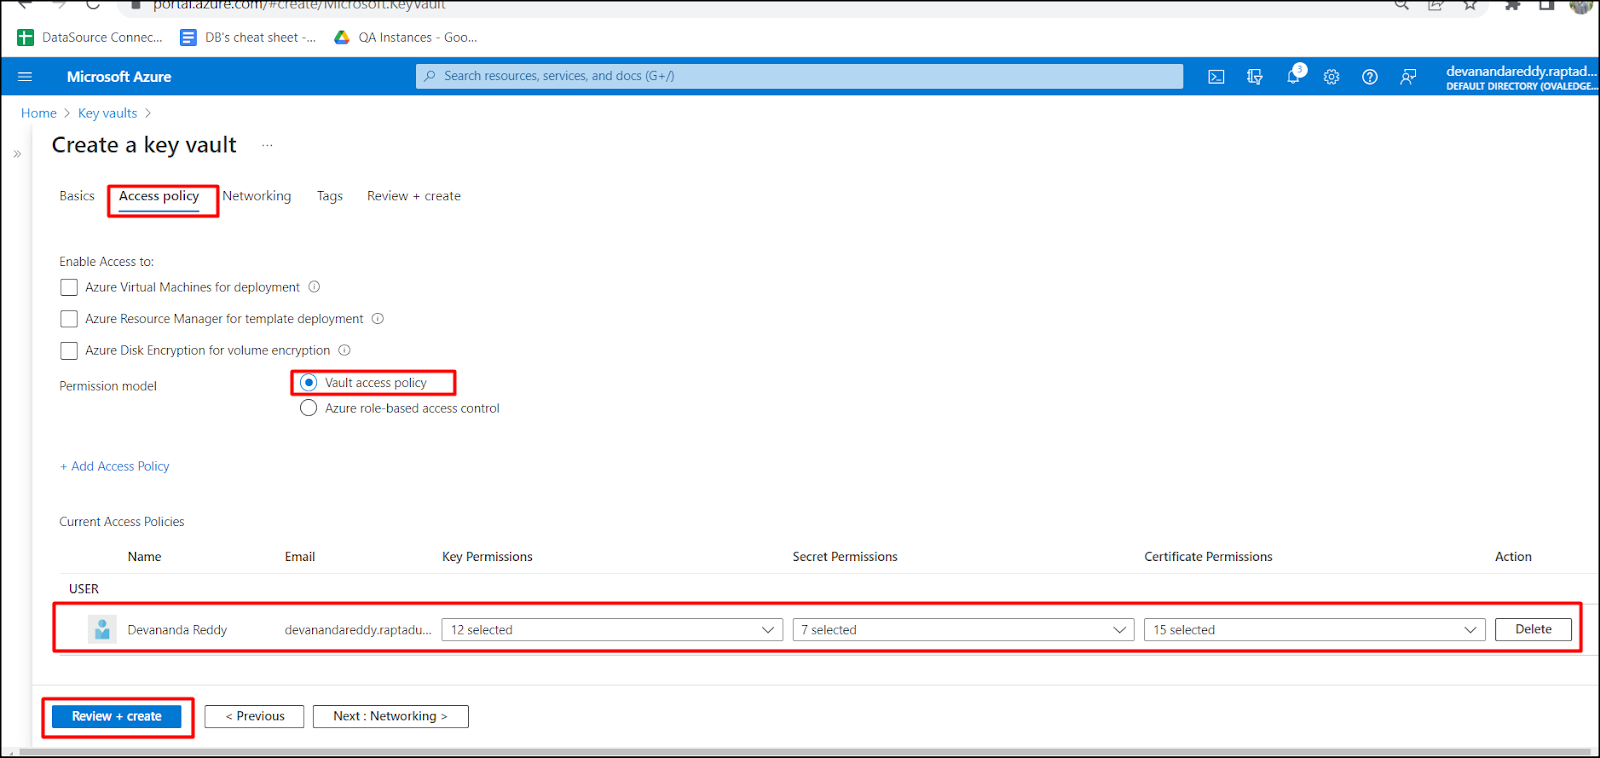
Step#4: In the Access Policy tab select the ‘Vault access policy’ against ‘PermissionModel’ and provide key, secret, certificate permissions to the required users and click on ‘Review and Create’.
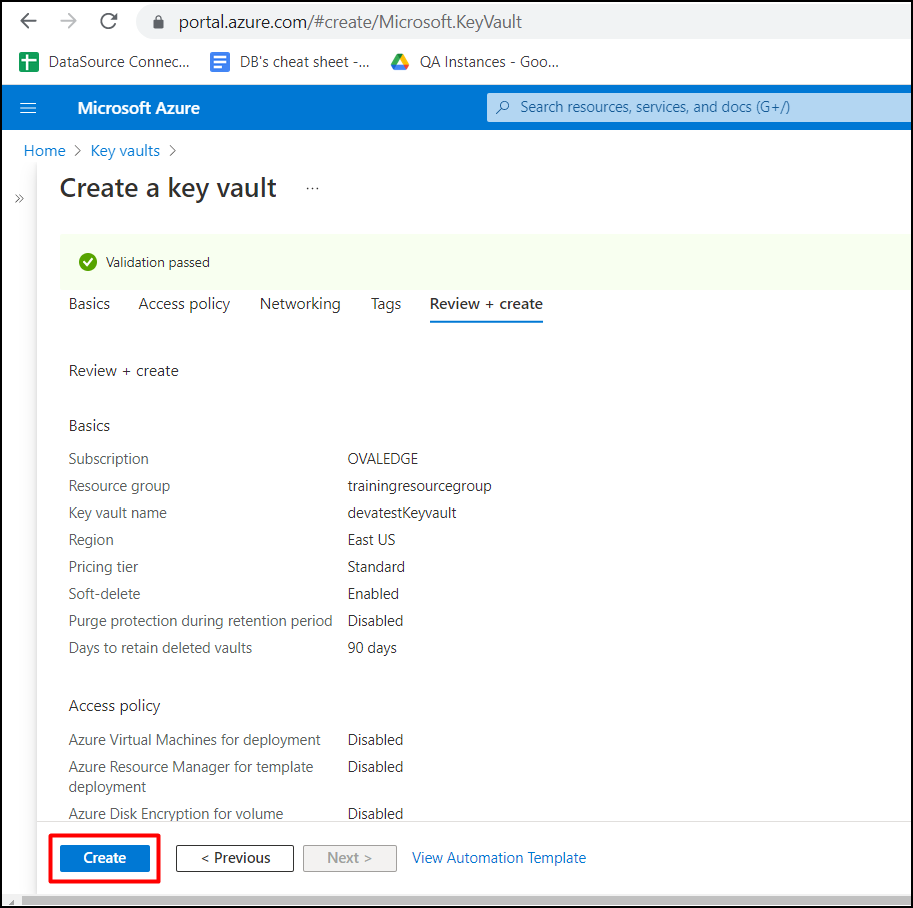
Step#5: Verify the details you have filled in and click on create.
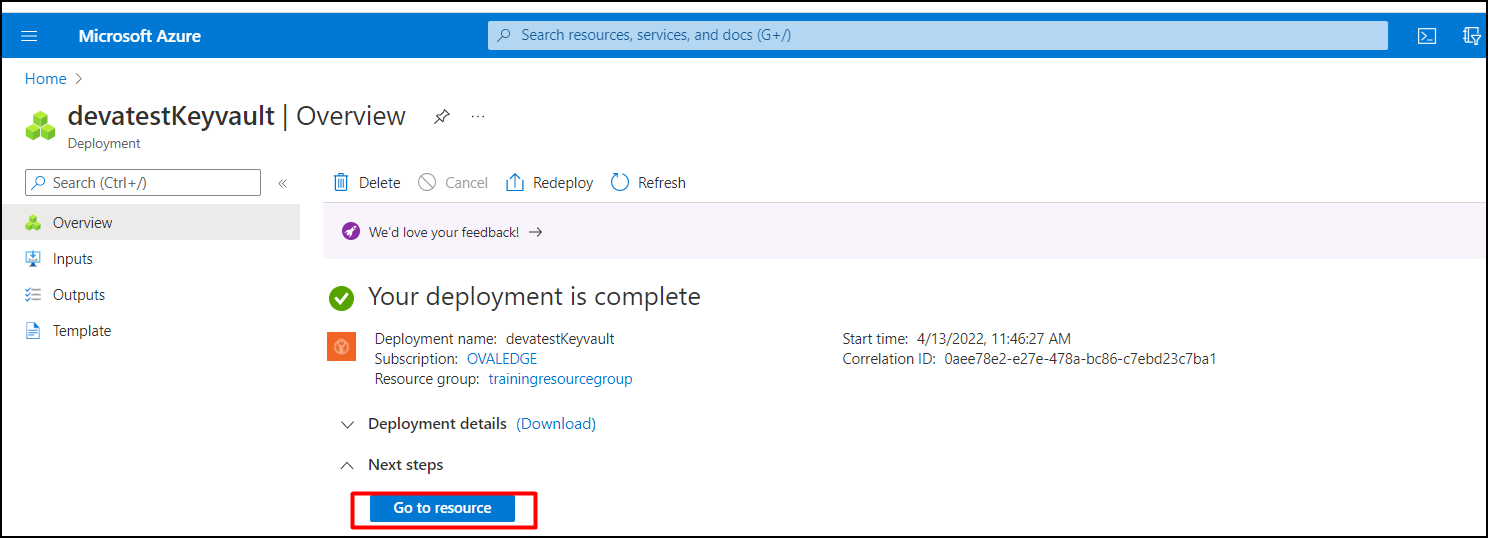
Step#6: Once the deployment is complete click on 'Go to resource' to view the key vault | Overview page.
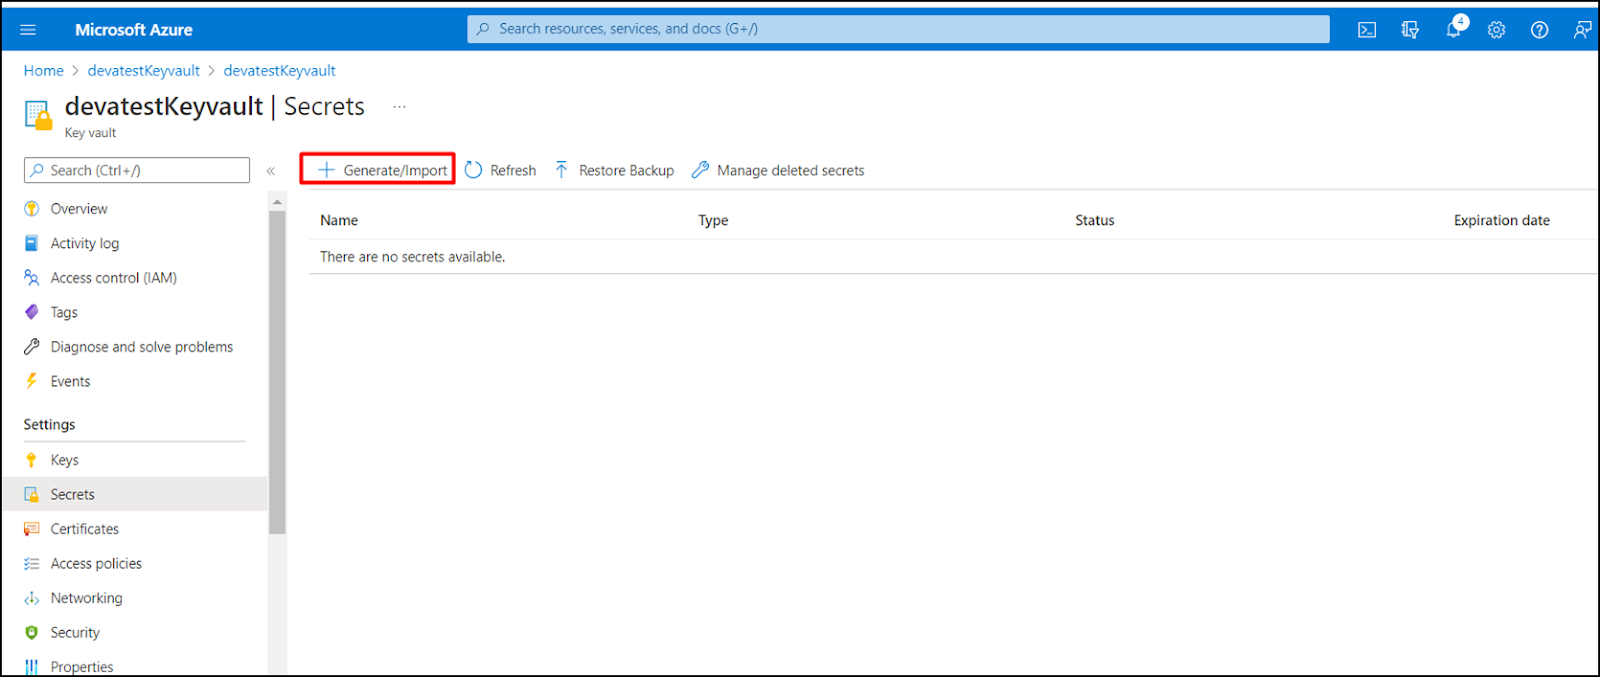
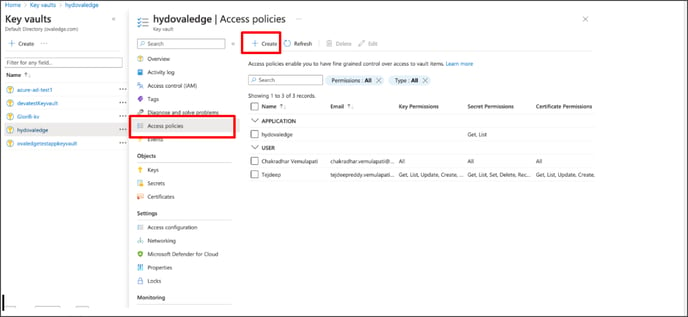
Step#7: Click on ‘Secrets.’

Step#8: Click on ‘+ Generate/Import.’
Step#9: To create the first secret, select ‘Upload options’ as ‘Manual.’ Enter ‘Name’ as jdbcstring’, ‘Value’ as ‘jdbc:mysql://<host(or)RDSendpoint>:3306/ovaledgedb’ and click on ‘Create.’

Step#10: To create the next secret, select ‘Upload options’ as ‘Manual.’ Enter ‘Name’ as the username, and ‘Value’ will be the username used to access the database. After this, click on ‘Create’.
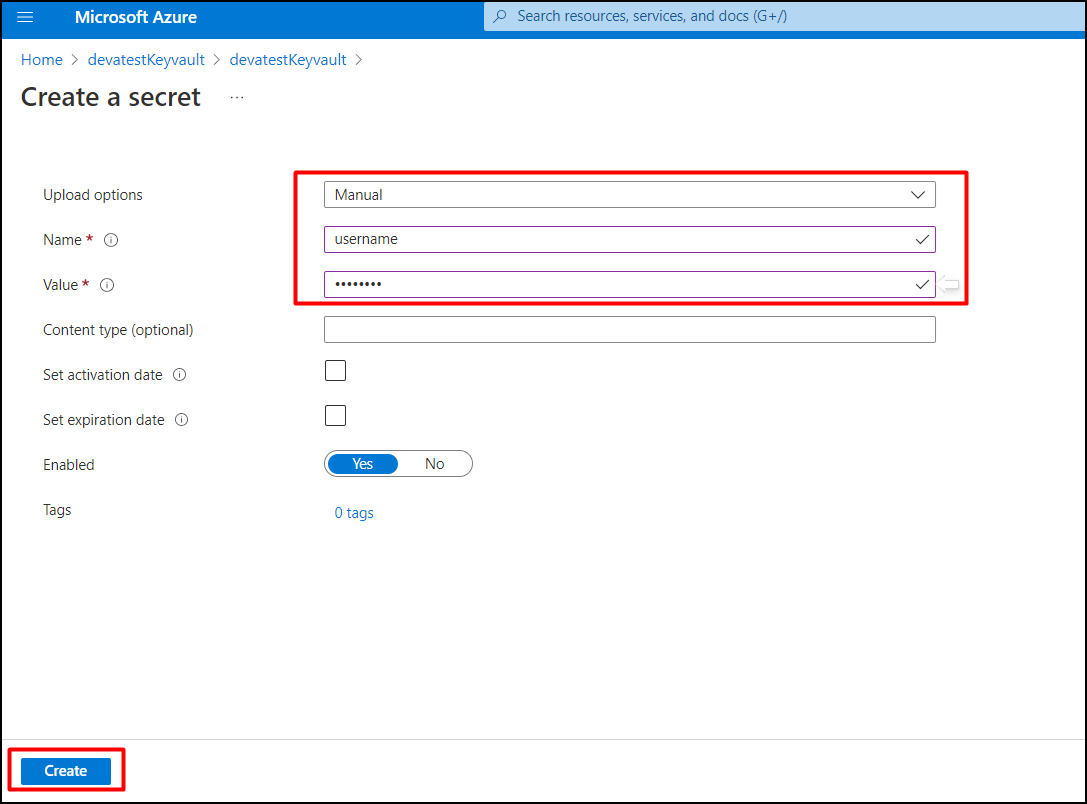
Step#11: Enter ‘Name’ as a password, ‘Value’ will be the password used to access the database. After this, click on ‘Create.’

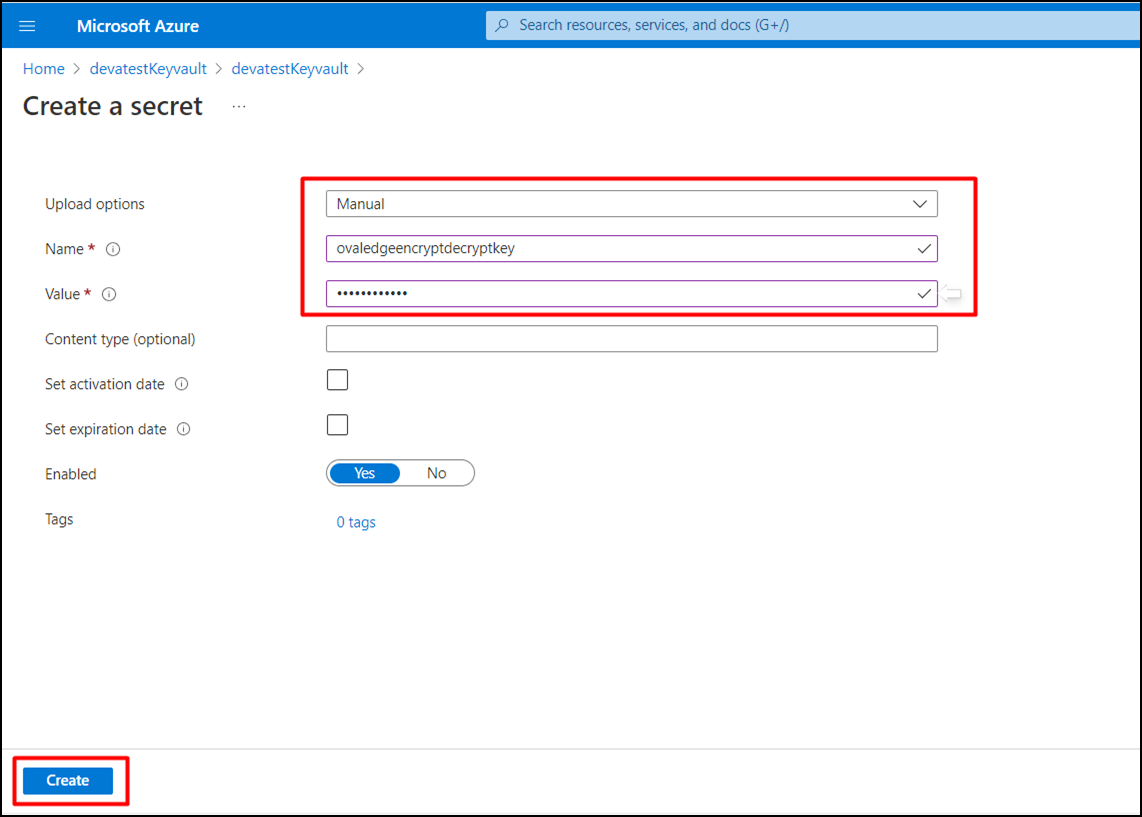
Step#12: Enter ‘Name’ as ovaledgeencryptdecryptkey, enter a value you would like to set and click on ‘Create.’
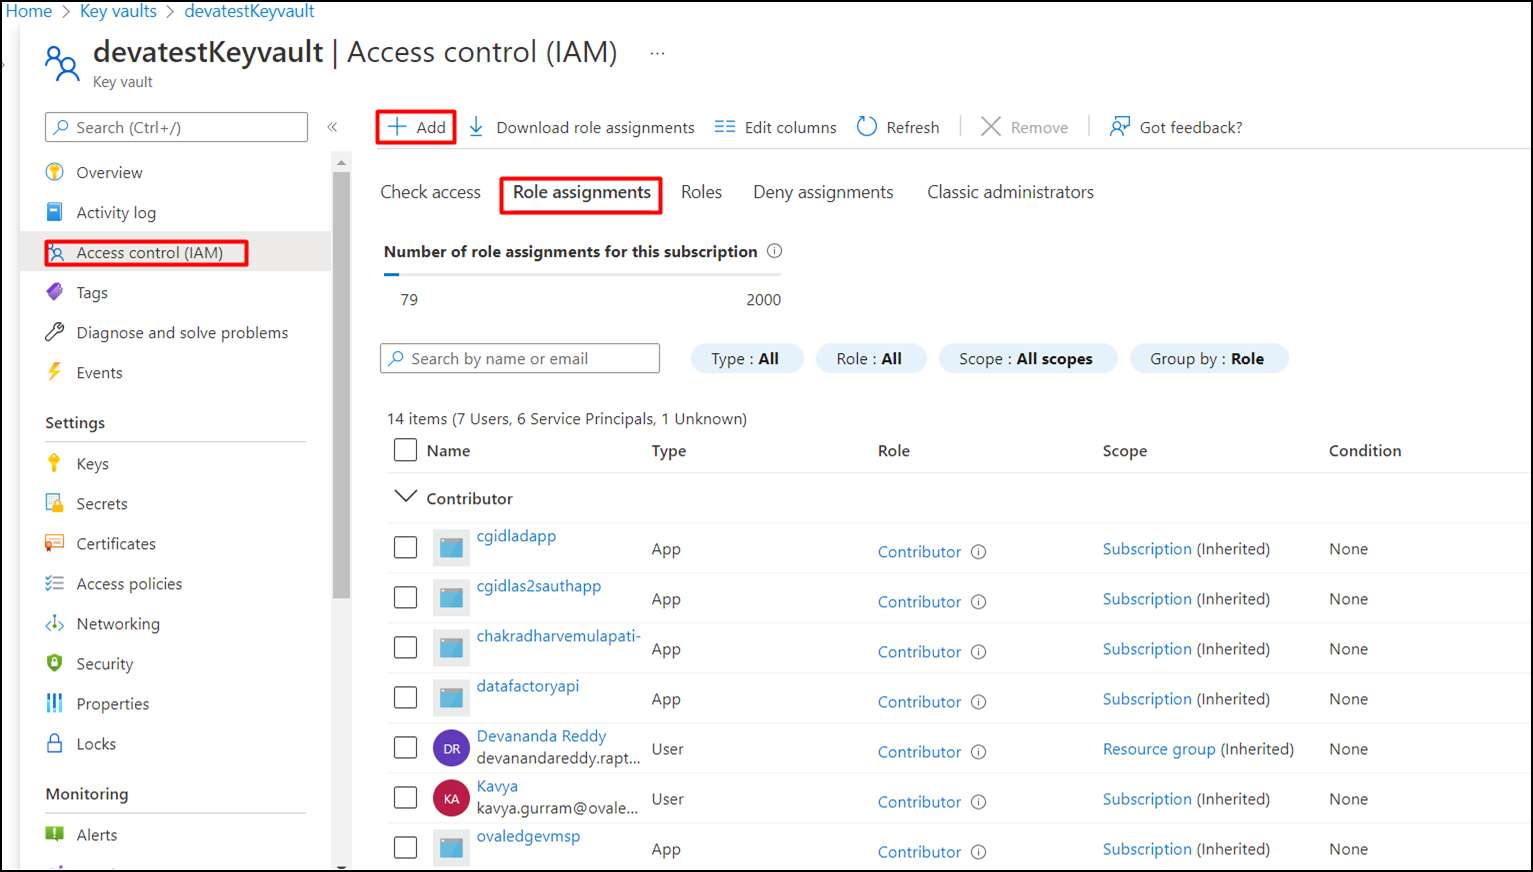
Step#13: Navigate to 'Access control (IAM)' and select 'Role assignments' then click '+ Add'.
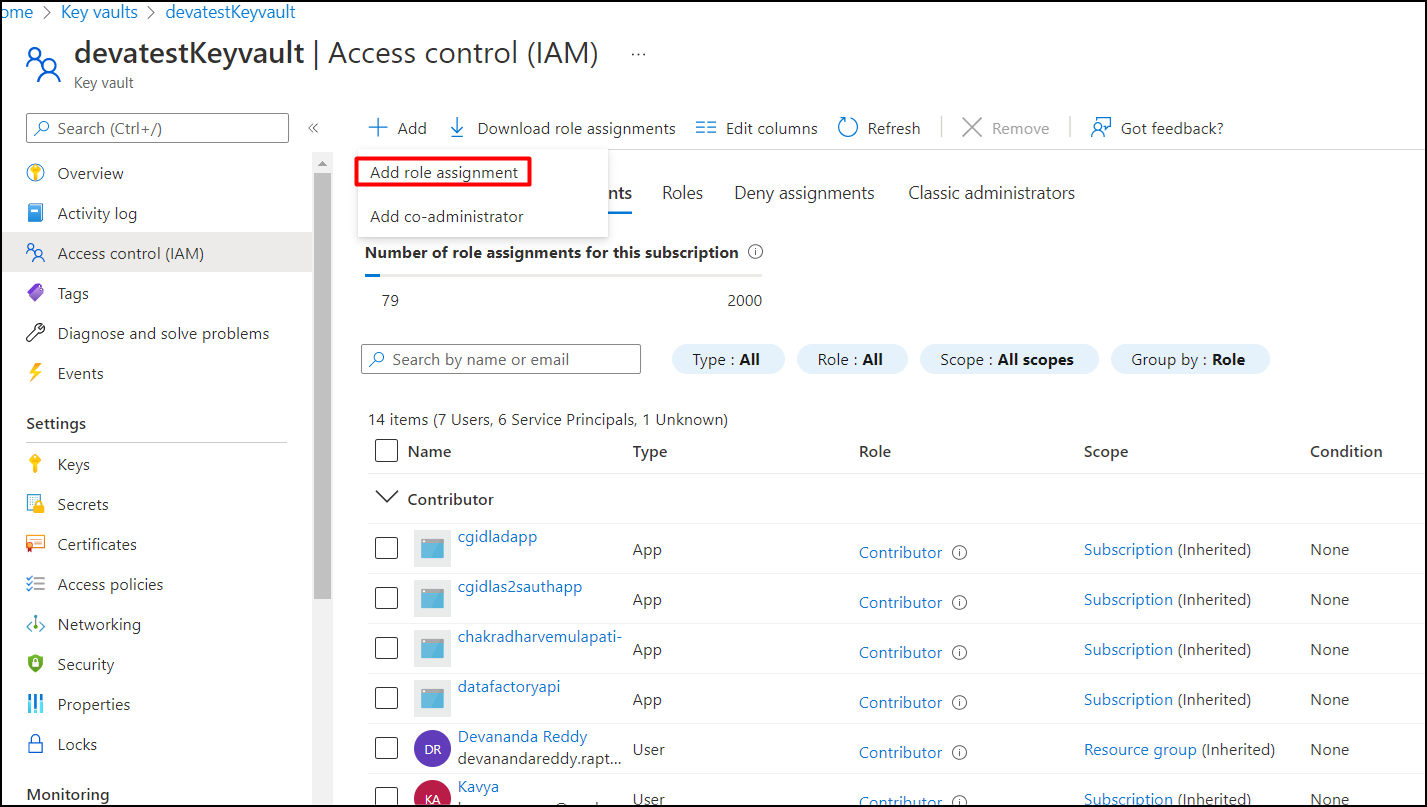
Step#14: Select 'Add role assignment' on the Access Control page.
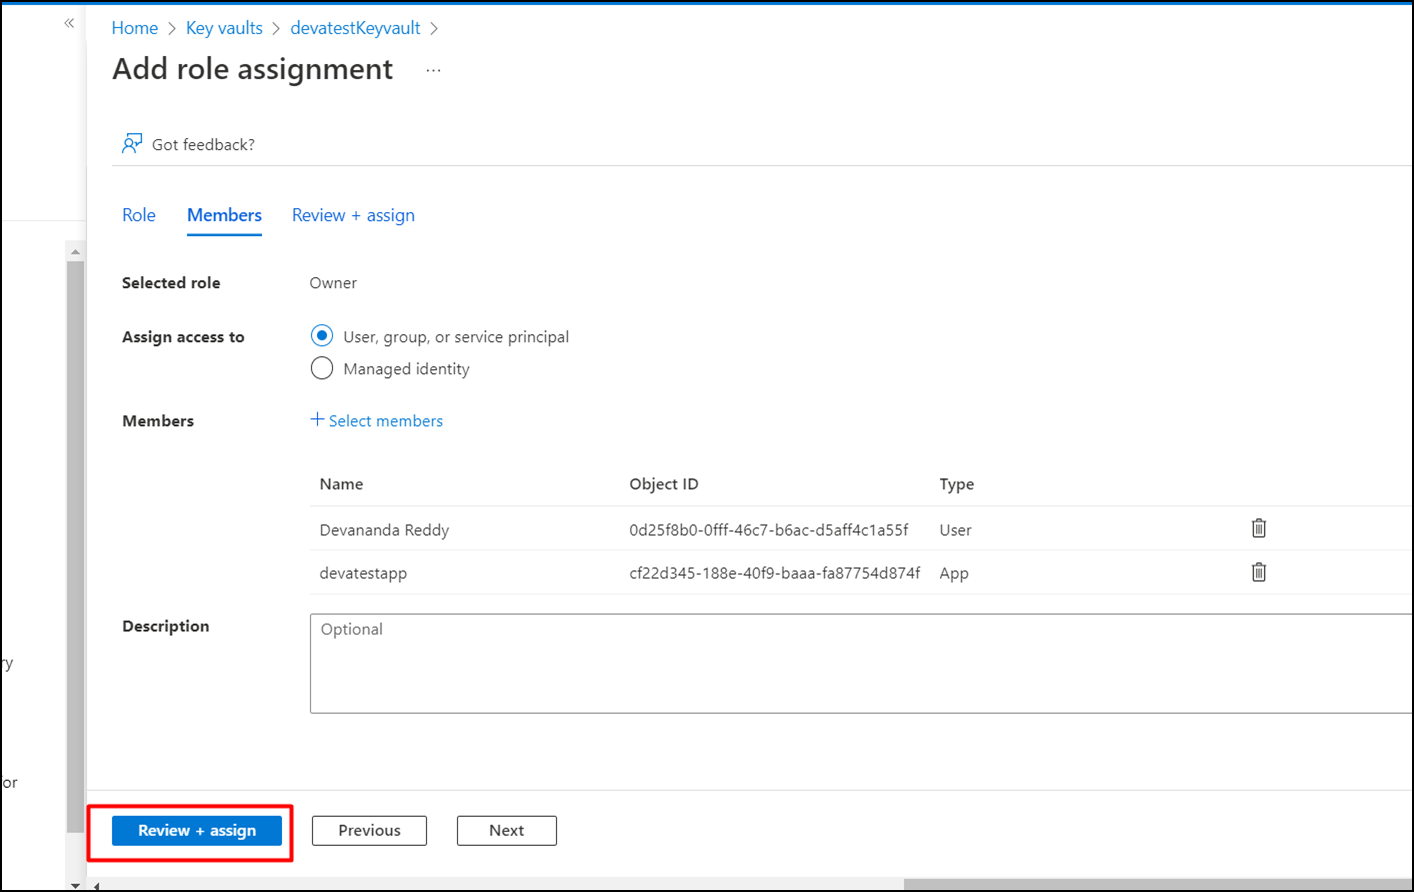
Step#15: On the Add role assignment page, click on Role and select Owner.

Step#16: Click on select Members, click on '+ select members,' and select the application and users as required.

Step#17: Click on review + assign to display the Access Policies page.
Step#18: On the Access policies page, click on the check box to enable access to ‘Azure Virtual Machine for deployment, ‘Azure Resource Manager to template deployment’, Azure Disk Encryption for volume encryption.’ Also, select ‘vault access policy’ in the permission model.
Click on create to create a polices.
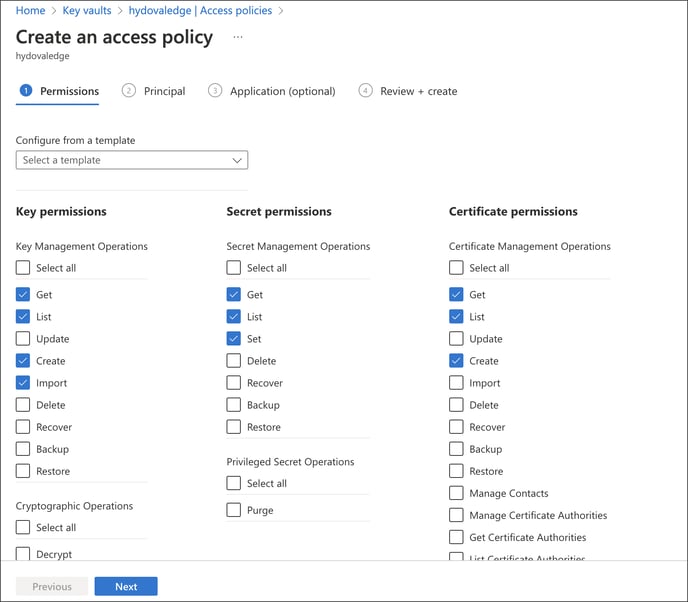
 Step#19: Set 'Key permissions' as Get, 'secret permissions' as Get, 'Certificate permissions' as Get. Then click 'Next.'
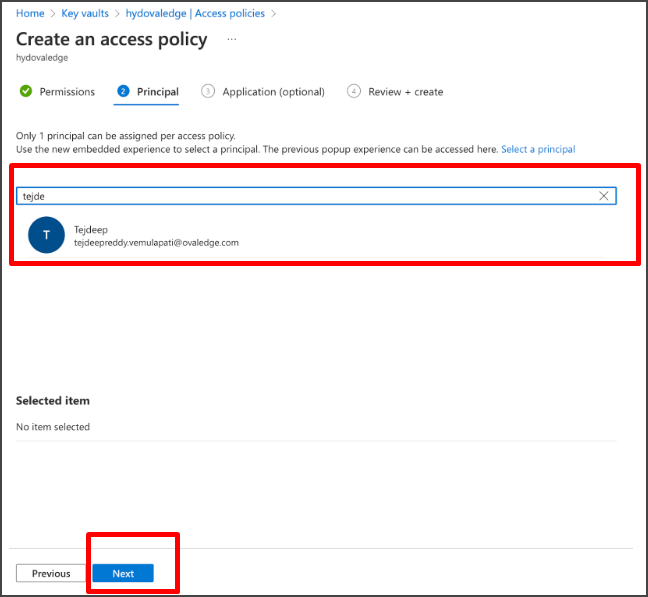
 Step#20: Search user name to assign the permissions and select user. Then click ‘‘Next’.
 Step#21: Select the app you created. Then select ‘Next’.
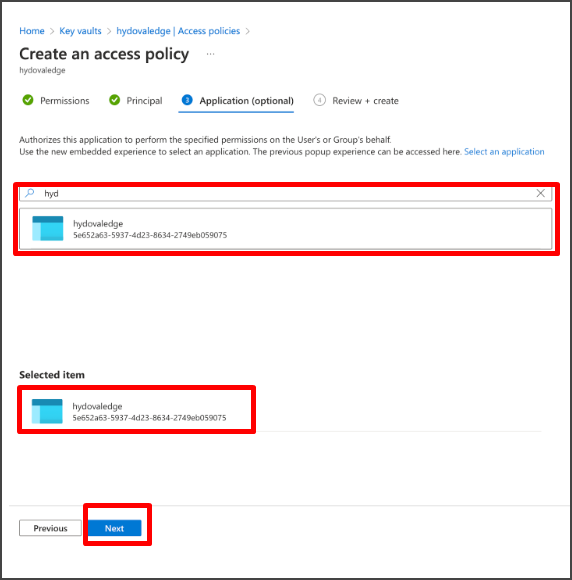
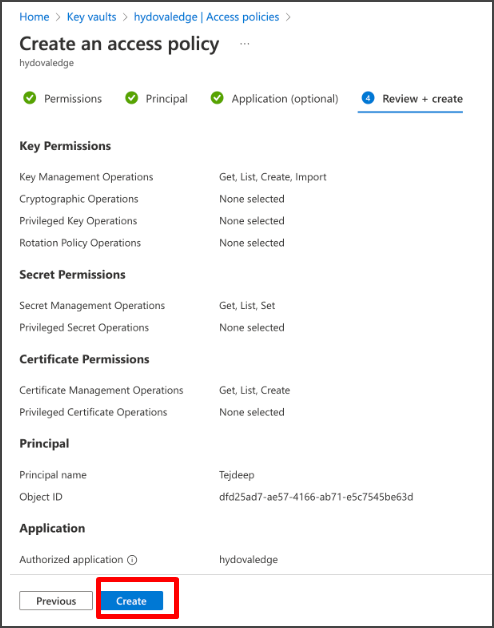
Step#22: Review and click on Create to create the access policy.
3. App Registration
Follow the below steps in the App Registration.
Step#1: Navigate to App Registrations.

Step#2: Select 'All Applications' and search for the app name you created in the enterprise application( Example: devatestapp ) and click on the app.

Step#3: Navigate to ‘Certificate and secrets,’ select 'Client secrets', and click on 'New Client Secret'.
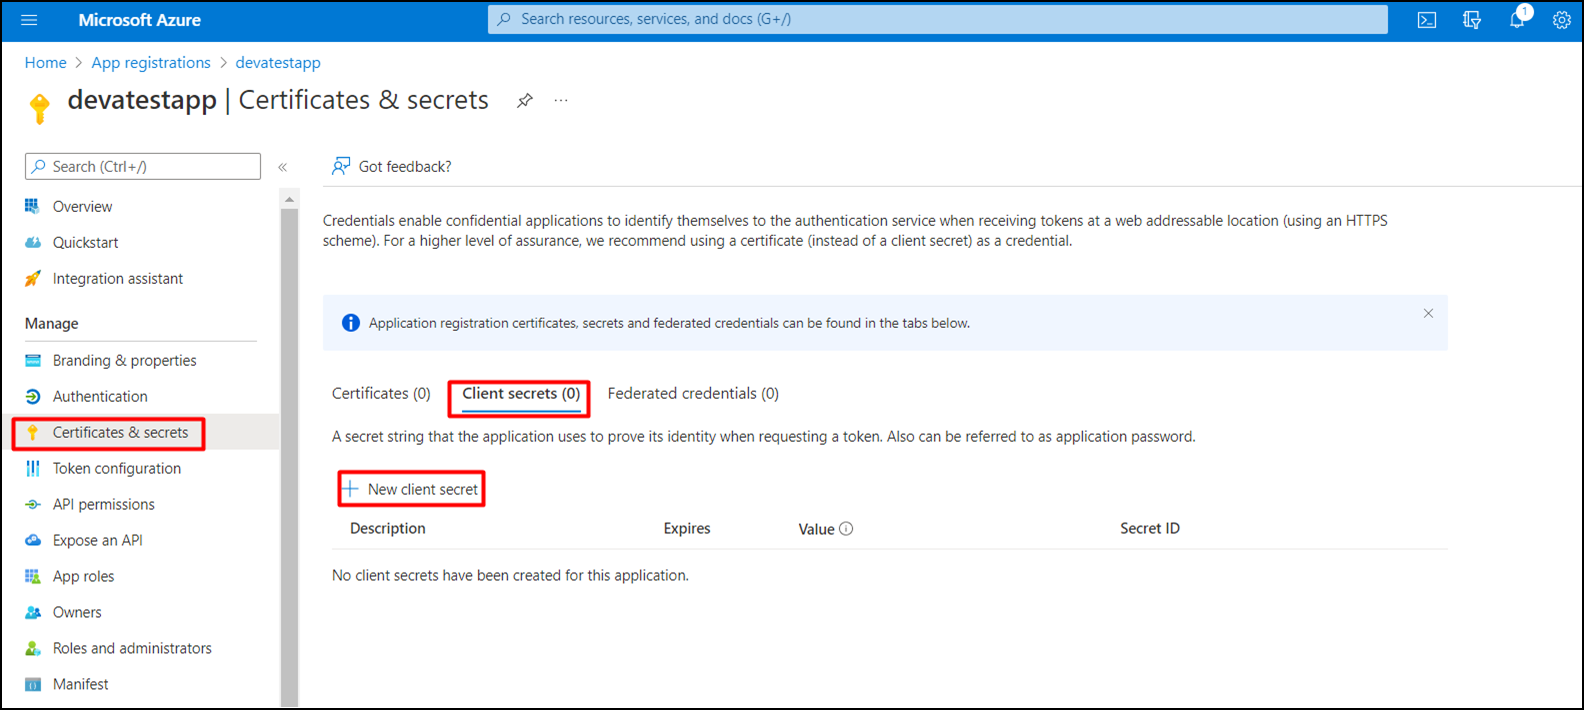
Step#4: Give any name in the description and click on 'add.'

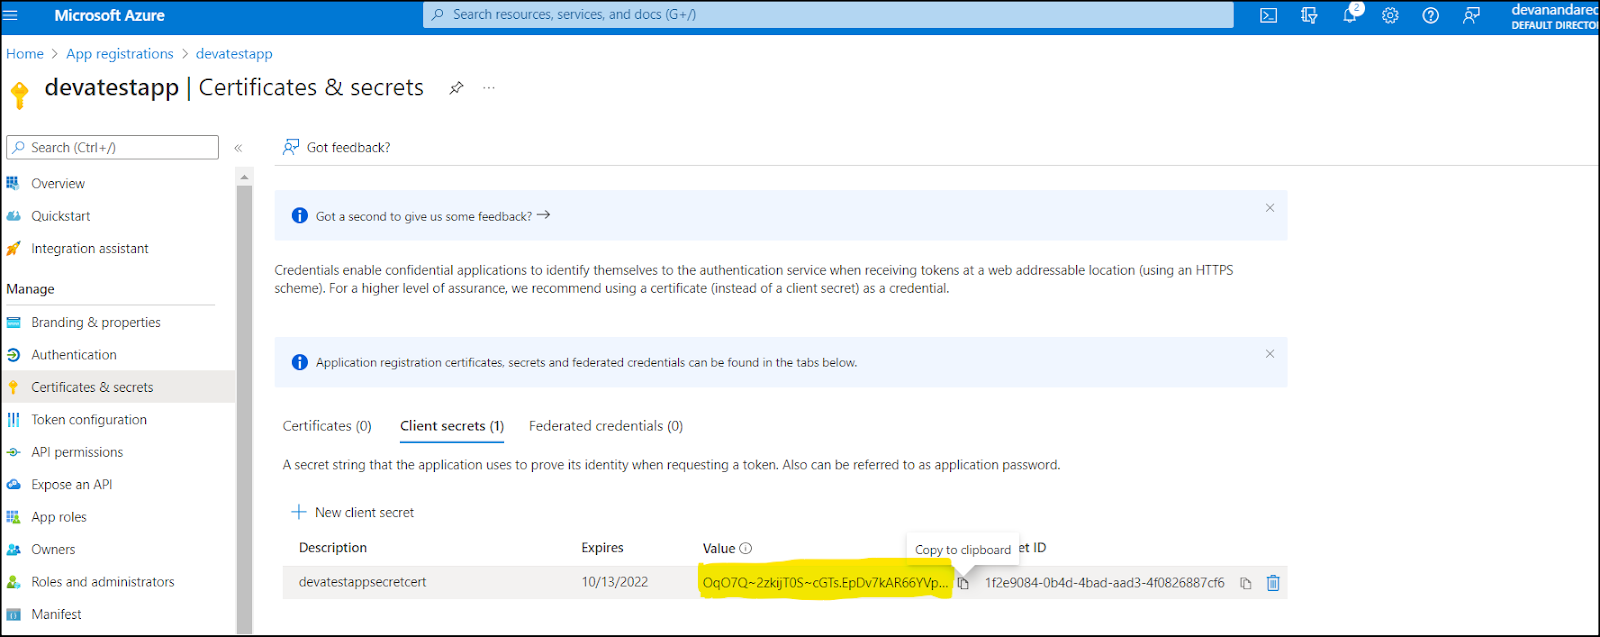
Step#5: Copy the value ID and paste it into a document.
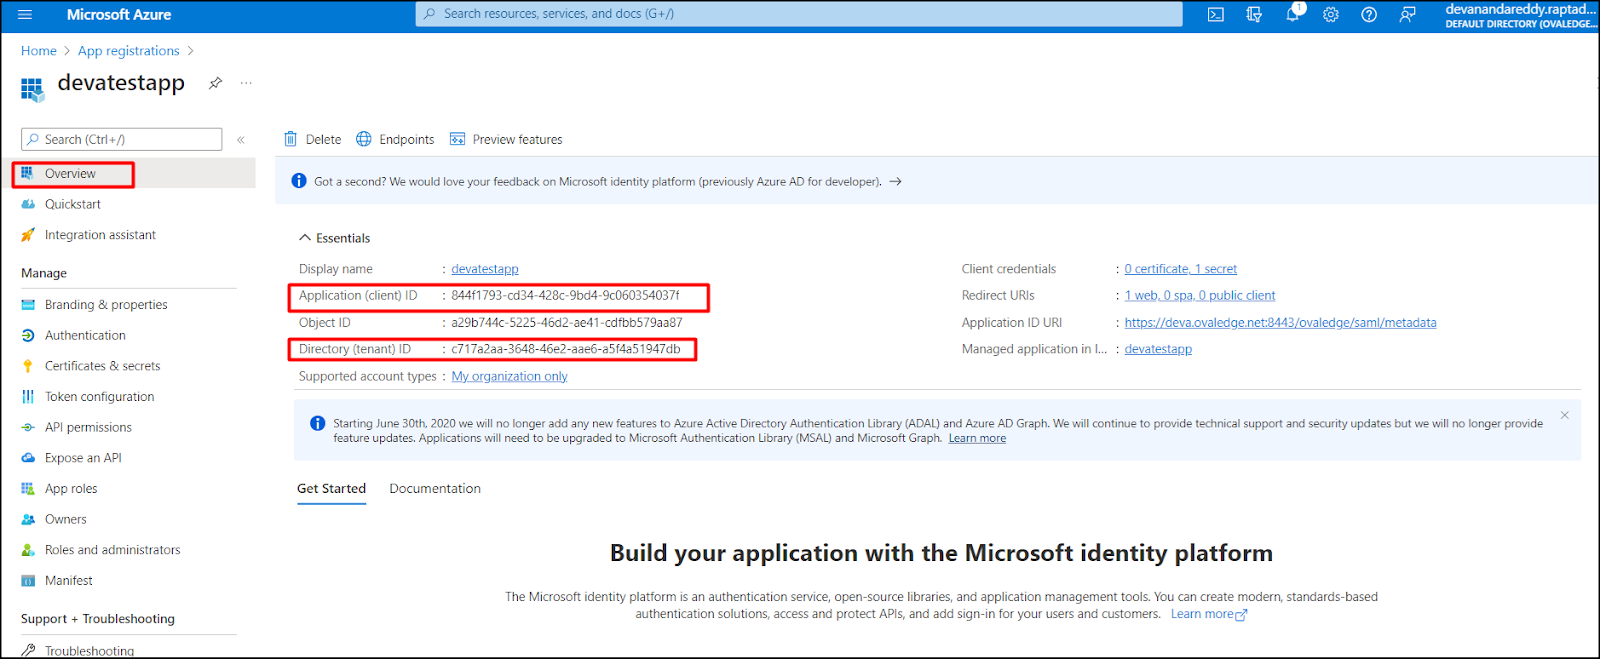
Step#06: Click on 'Overview,' Copy Client ID and Tenant ID, and paste them into another document.
4. Authentication and Authorization
Please follow the below steps to authenticate and access the OvalEdge application.
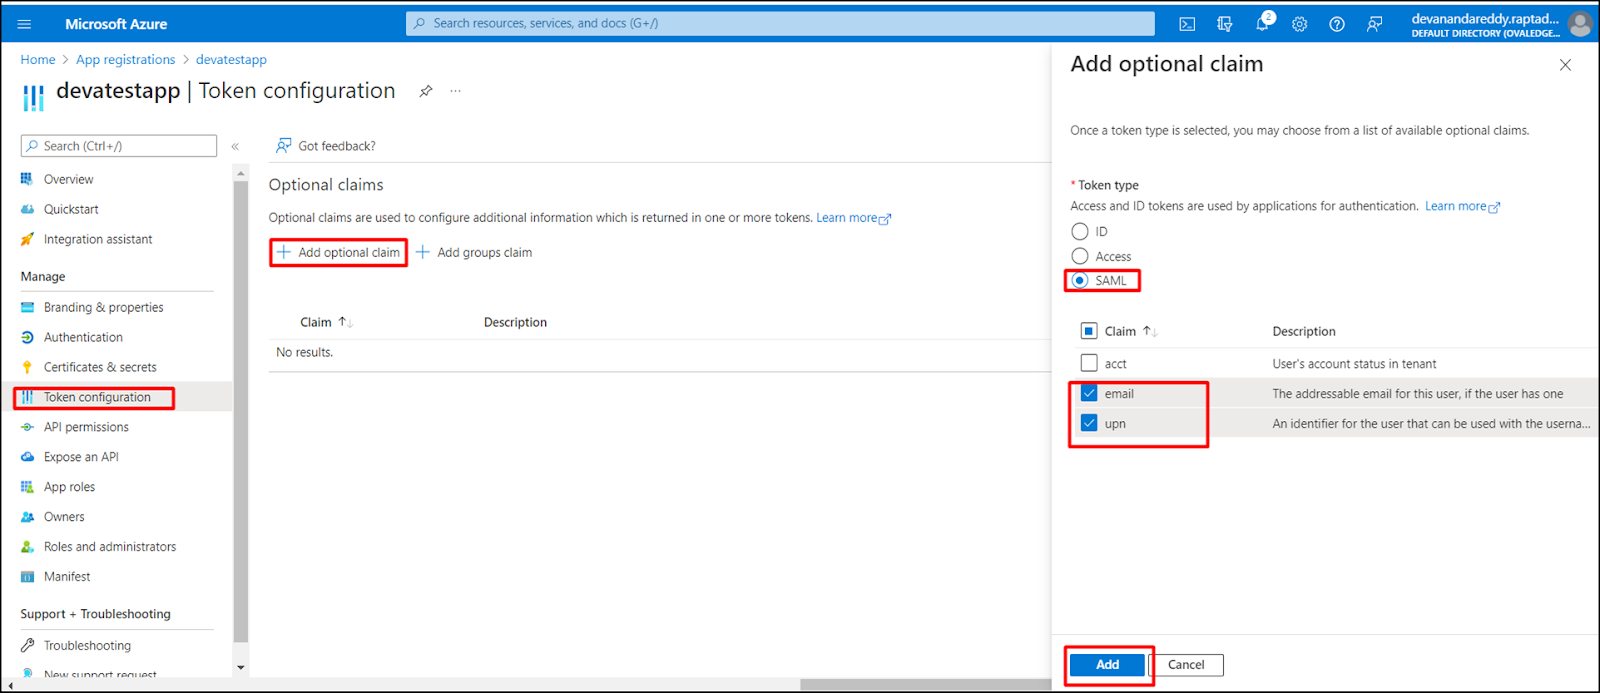
Step#1: Navigate to APP registration and click on the 'Token Configuration'. Click on '+ Add optional claim', select 'SAML'. Under SAML, select email and upn and click on 'Add.'
Step#2: Enable 'Turn on the Microsoft Graph email, profile permission (required for claims to appear in token)' and click on add.

Step#3: Click on '+ Add groups claim'. select security groups and under ID select 'sAMAccountName', under Access select 'sAMAccountName', under SAML select 'Group ID'. And then click on 'add'.

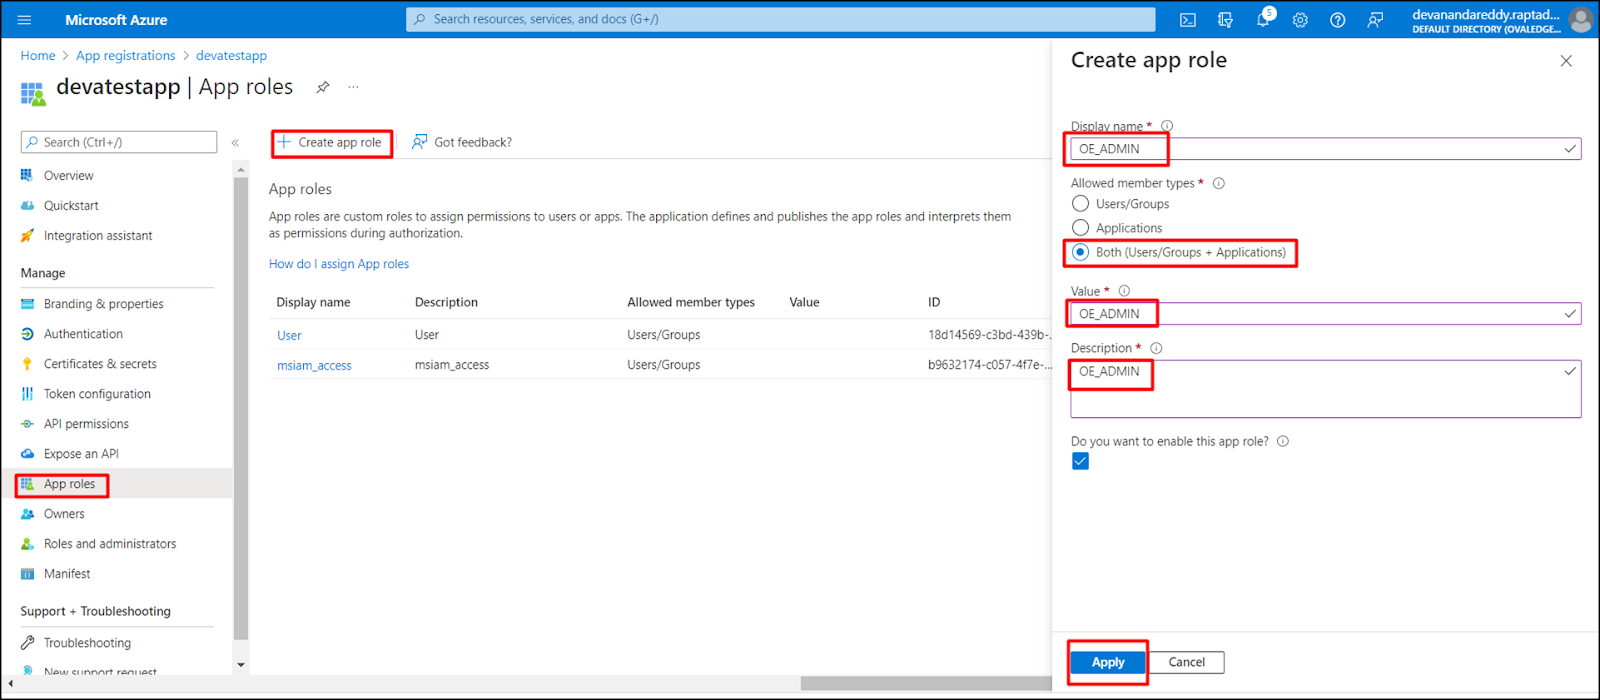
Step#04: Navigate 'App roles'. Click on '+ Create app role', enter display name as 'OE_ADMIN,' select 'Allowed member types' as 'Both (Users/Groups + Applications),' give value as 'OE_ADMIN,' enter Description as 'OE_ADMIN' and click on apply.
5. Tomcat Configuration
There are two different scenarios for Tomcat configuration,
Without Keyvault:
In this scenario, azure-dbkeyvault=false. Please follow the below steps to configure Tomcat when the azure-dbkeyvault is false.
Step#1: Import the Azure AD certificate to keystore.jks file by executing the below command.
>>> keytool -importcert -alias identtrustca -file <path to azureAD.cer> -keystore <path to/keystore.jks> -storepass secret -noprompt
Step#2: In tomcat setenv.sh file add the below line.
export CATALINA_OPTS="-DOVALEDGE_SECURITY_TYPE=saml"
Step#3: Keep keystore.jks and azureAD.cer in the saml folder.
Step#4: In the oasis.Properties configure the below information.
samlHTTPMetadataProvider=<AzureADmetadata>

entityBaseURL=https://<DNS NAME>:8443/ovaledge

azure-dbkeyvault=false

azure-tenantid=<tenant id>

azure-clientid=<client id>

azure-clientsecret=<client secret>

azure-resource=https://vault.azure.net
-Mar-14-2024-12-43-03-6834-PM.png?width=688&height=97&name=image%20(1)-Mar-14-2024-12-43-03-6834-PM.png)
Step#4: Start the Tomcat.
With Keyvault:
In this scenario azure-dbkeyvault=True.
Please follow the below steps to configure Tomcat when the azure-dbkeyvault is true.
Step#1: In tomcat setenv.sh file add
export CATALINA_OPTS="-DOVALEDGE_SECURITY_TYPE=saml.
Step#2: Keep keystore.jks and azureAD.cer and keyvault.jar in the saml folder.
Step#3: Add the below information to the oasis.properties file.
samlHTTPMetadataProvider=<AzureADmetadata>

entityBaseURL=https://<DNS NAME>:8443/ovaledge

entity-base-islb=false (If there is any load balancer to the application, it should be true)

SAML_PATH=<path to the saml folder>

azure-dbkeyvault=true

azure-keyvaulturi=<your keyvault uri>

azure-tenantid=<your tenant id>

azure-clientid=<your client id>

azure-clientsecret=<your client secret>

azure-resource=https://vault.azure.net

azure.secretname.jdbcstring=<secrete key>

azure.secretname.username=<secrete key>

azure.secretname.password=<secrete key>

azure.secretname.encryptdecryptkey=<secrete key>

KEY=<secrete key>
Note: The secret keys mentioned in the above steps are the keys generated in chapter 2, step#14.
Example:
azure.secretname.jdbcstring=jdbcstring
azure.secretname.username=username
azure.secretname.password=password
azure.secretname.encryptdecryptkey=ovaledgeencryptdecryptkey
KEY=devatestappcertificate
-Mar-14-2024-12-43-04-0848-PM.png?width=688&height=882&name=image%20(2)-Mar-14-2024-12-43-04-0848-PM.png)
Step#4: Start the Tomcat.
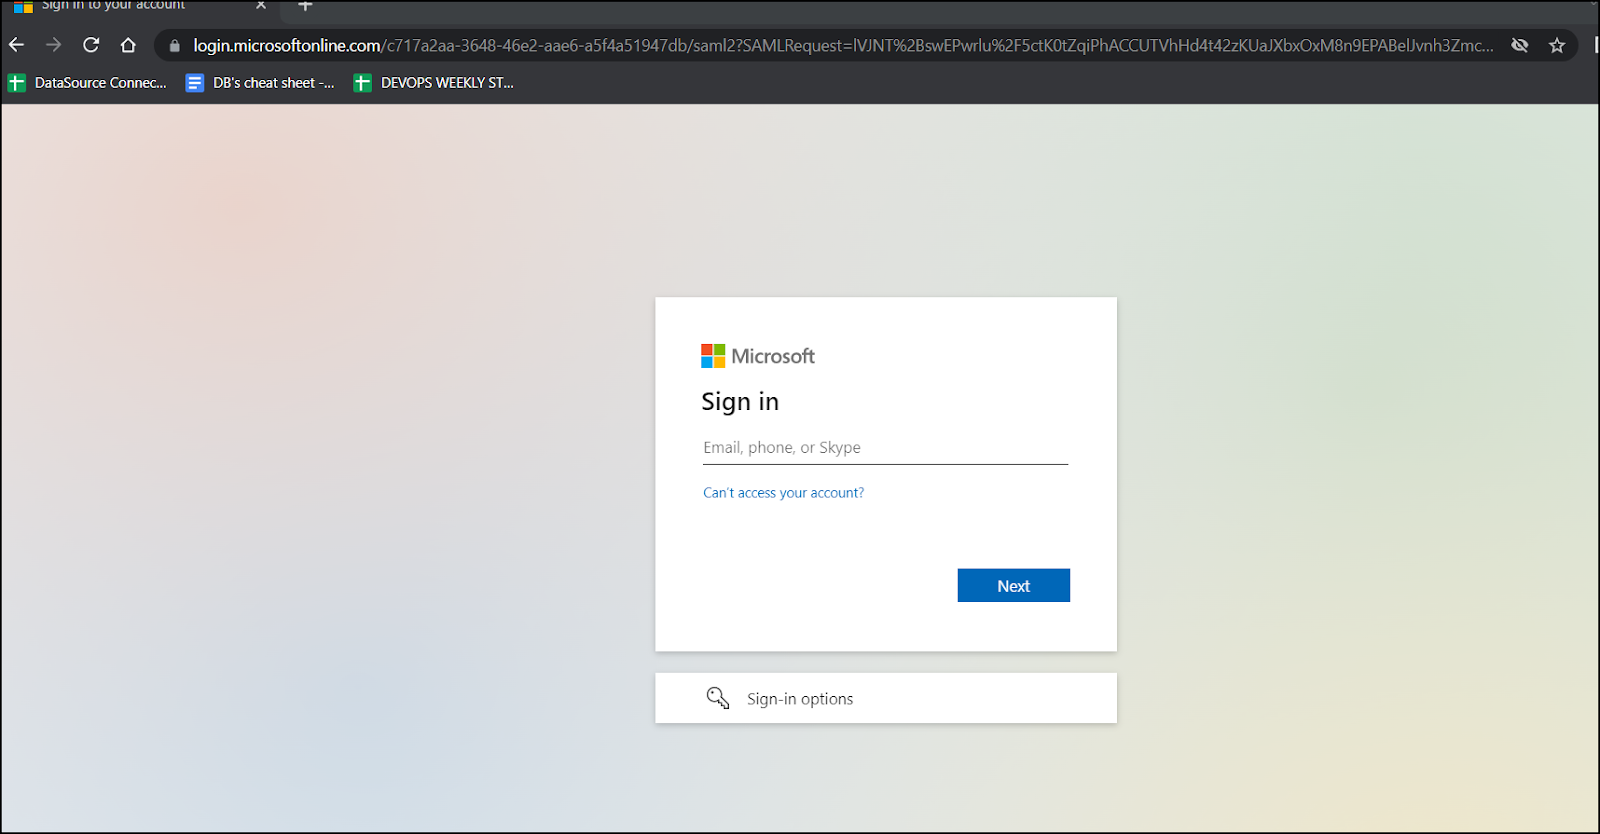
After running the Tomcat configuration, go to the web browser and enter the URL to log in to the OvalEdge application. The login page will display below.

Click on Login to see the Sign-in page. Enter the required credentials to enter into the OvalEdge application.
You can view the new user role on the Administration > User’s & Roles > Roles page.

Copyright © 2023, OvalEdge LLC, Peachtree Corners GA USA