The Impact Analysis refers to the process of analyzing the impact of changes to a product or application. To understand the potential outcome of the change, an Impact Analysis is required.
In the OvalEdge application Impact Analysis involves analyzing and tracing the impact of data changes on the data in the source system. It tracks both the upstream and downstream data elements that are impacted, due to the change made in the source data object.
Example: In a health care domain, for a patient, there is a patient Id and the Id is used in the sonography department, cardiology department, and other testing departments. And it is been six months since the patient is discharged from the hospital, so you want to delete the patient Id. Before deleting the patient Id from the hospital database you need to understand how many departments the ID is used in and how it will impact the other fields if the ID is deleted. This process of understanding the impact of the ID before deleting it is called impact analysis.
Note: It is required to crawl the database, and build the Lineage for the data objects before performing Impact Analysis.
Source Data Objects and Data Flow
In OvalEdge, the data object on which the impact analysis is performed is called the Source Data Object. OvalEdge Impact Analysis can be performed on six different data object types:
- Tables
- Files
- Reports
- Table columns
- File columns
- Report columns
The end-to-end traceability (the direction in which the data moves) of the data flow is achieved in four ways:
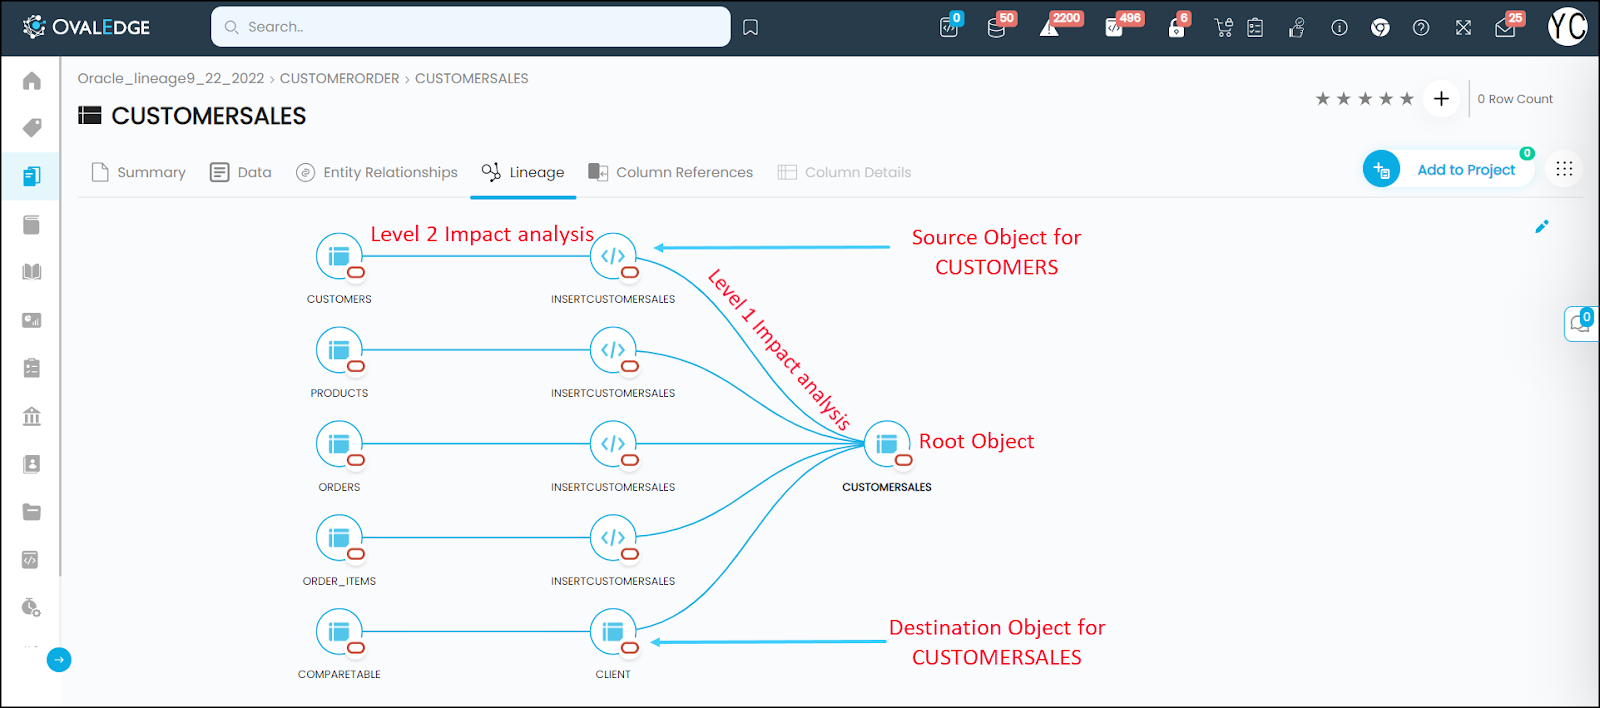
UPSTREAM: The upstream data path of a source data object (the object on which the impact analysis is conducted) lists all the INPUT data elements to the selected data object. In other words, it lists the source lineage for the selected data object.
DOWNSTREAM: The downstream data path on a source data object lists all the OUTPUT data elements from the selected data object. In other words, it displays the destination lineage for the selected data object.

UPSTREAM with Association: The upstream with association data path of a source data object (the object on which the impact analysis is conducted) lists all the INPUT data elements to the selected data object and for the object/objects that are associated with the selected object. In other words, it lists the source lineage of the data object selected and its associated object.
DOWNSTREAM with Association: The downstream with association data path of a source data object (the object on which the impact analysis is conducted) lists all the OUTPUT data elements to the selected data object and of the object/objects that are associated with the selected object. In other words, it lists the source lineage of the data object selected and its associated object.
Impact Analysis
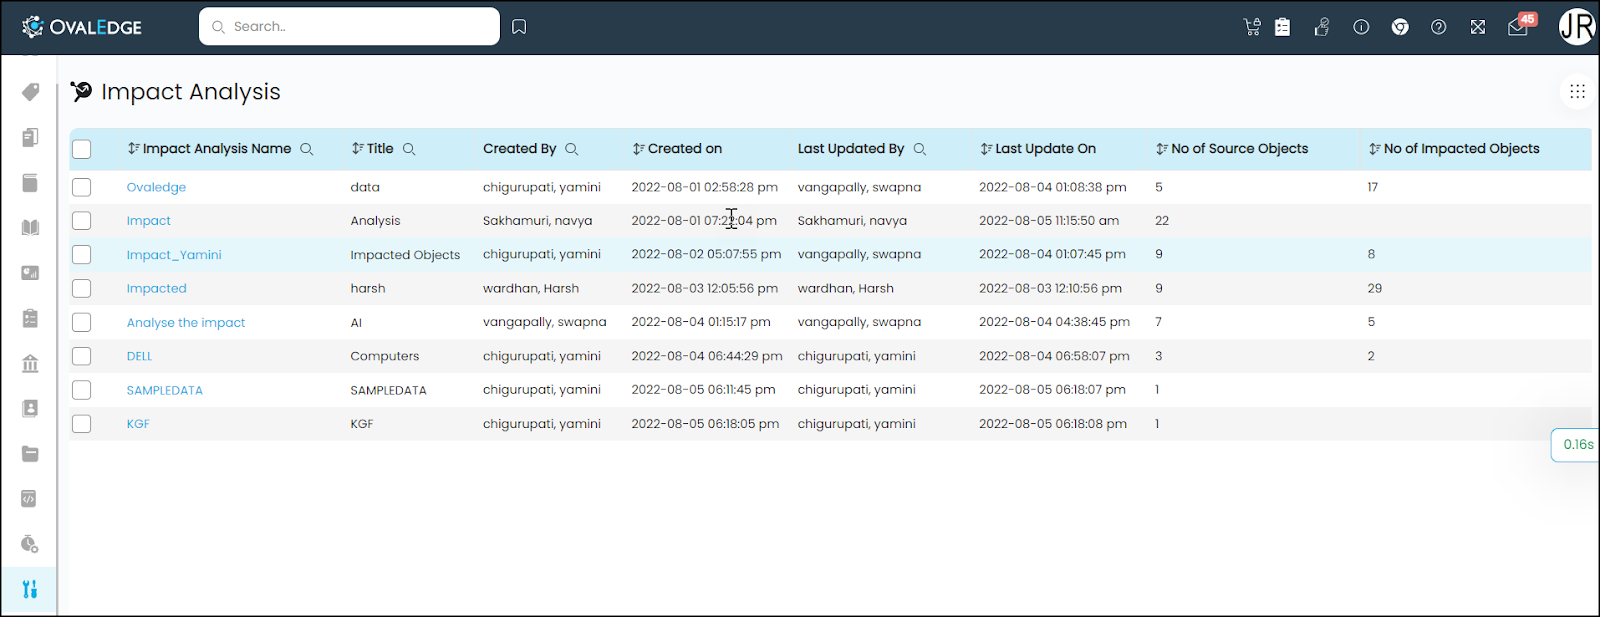
You can navigate to Impact Analysis via Advanced Tools > Impact Analysis. The Impact Analysis page displays information such as Impact Analysis Name, Title, Created By, Created On, Last Updated By, Last Updated On, No of Source Objects, and No of Impacted Objects.
|
Fields |
Description |
|
Impact Analysis Name |
Displays the name of the Impact Analysis. |
|
Title |
Displays the title of the Impact Analysis |
|
Created By |
Displays the name of the user, who has created the Impact Analysis |
|
Created On |
Displays the date on which the Impact Analysis was created |
|
Last Updated By |
Displays the name of the user, who has last updated the Impact Analysis |
|
Last Updated On |
Displays the date on which the Impact Analysis was last updated. |
|
No of Source Objects |
Displays the number of Source objects, for which you have performed the Impact Analysis. |
|
No of Impacted Objects |
Displays the number of objects getting impacted by the Impact Analysis. |
The Nine Dot icon is also enabled on the Impact Analysis page to Add Impact Analysis and Delete Impact Analysis.
To Add Impact Analysis:
- Click on the Nine dots icon > Add Impact Analysis, to display the Add Impact Pop-up window.
- Enter the Name of Impact Analysis and also provide a title and click on Add Impact button.
A new Impact Analysis will be created and will be displayed on the Impact Analysis page.
To Delete the Impact Analysis:
- Click on the check box to select the Impact Analysis, you want to delete.
- Click on the Nine dots icon > Delete Impact Analysis, which will display a confirmation pop-up.
- Click on the Delete button, if you want to delete the Impact Analysis, or else click on the Cancel button.
- Once you click on the Delete button, the Impact Analysis will be deleted and will be removed from the screen.
Impact Analysis Summary
In the Impact Analysis summary:
- You can Identify the upstream and downstream impact of a specific data object, which will help in root cause analysis or impact analysis.
- You can add or delete the source objects on which impact analysis is executed.
- You can discover the impacted objects for both upstream and downstream data flow independently.
- You can edit or modify the business descriptions of the impact analysis activity and the analysis activity name and title.
You can navigate to the Impact Analysis summary via Advanced Tools > Impact Analysis > Impact Analysis Name.
The Impact Analysis Summary displays the Business description added to the Impact Analysis, No of associated objects ( Upstream, Downstream, Upstream with association, and Downstream with association), Total Number of Impacted Objects, Created and Last updated date, and Created and Last Updated By along with the Top Users.
Actions Performed on the Impact Analysis Summary
You can add source objects to the Impact analysis using the + icon enabled and also perform multiple actions using the Nine dots icon.
Adding Source Objects to Impact Analysis
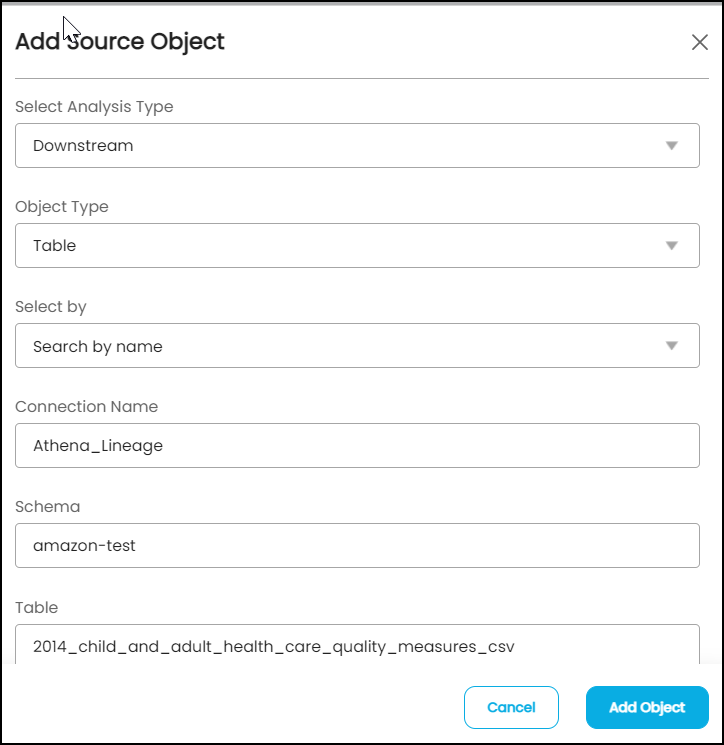
To Add Source Objects:
- Click on the + icon to view the Add Source Object pop-up window.
- Select Analysis Type (Example: Downstream, Downstream with Association, Upstream, Upstream with Association), and Object Type from the dropdown menu.
Based on the selected data objects, the field will appear to fill in. - Enter the Required details. (Example: For object type Table, it is required to enter the Connection Name, Schema Name, and Table Name. For object type File, it is required to enter the File system and File Name)
- Click on Add Object Button, to add the source object to Impact Analysis.
After adding the source object to the Impact Analysis you can view the below details related to the source object.
|
Fields |
Description |
|
Source Id |
Displays the unique Id created in the backend for the Impact Analysis source object. |
|
Connector Name |
Displays the connection name of the added impacted data object. |
|
System |
Displays the Schema Name of the added impacted data object. |
|
Object |
Displays the Name of the Data Object. |
|
Object Type |
Displays the Type of the Data Object (Whether it is a table/report/file). |
|
Type |
Displays the type of Report (Workbook/Dashboard/Chart) Note: It is only applicable for Reports. |
|
Field |
Displays the name of the Table/Report/File column. |
|
Field Type |
Displays the column type (Whether it is a Table column/file column/report column). |
|
Analysis Type |
Displays the type of analysis selected for the source object. (Upstream/Downstream/Upstream with association/ Downstream with Association). |
|
Job Status |
Displays the status of the job (SUCCESS/PENDING/INITI) |
|
Job Run On |
Displays the date and time of the Job when it was run. |
|
Impact Count |
Displays the number of Impacted Data Objects. |
|
Impact Level |
Displays the level added to the Impact Analysis. Note: The Impact Analysis level is based on the level of a lineage you want run for Impact Analysis. To run an impact analysis for all levels you need to leave the Impact Analysis level as empty. |
Note: An auto refresh toggle button is available on the Impact Analysis summary to refresh the page automatically, once it is enabled.
User Action Item
You can Discover Impacted Objects, Discover Impacted Objects for All Source Objects, Delete Source Objects, and Invite Users using the Nine dots icon.
Discover Impacted Objects
The Discover Impacted Objects Nine dots option helps you to understand the impact of the selected data objects on the source object.
To discover Impacted Objects:
- Click on the check box to select a source ID, on the Impact Analysis Summary Page.
- Click on Nine dots > Discover Impacted Objects, to display the Impact Analysis up to level pop-up window.
- Add the Impact Level and click on Ok, to view a successful job submission message.
Discover Impacted Objects for All Source Objects
The Discover Impacted Objects for All Source Objects from the Nine dots option helps you to understand the impact of all the available data objects on the source object.
To discover Impacted Objects for All Source Objects:
- Click on the check box to select a source ID, on the Impact Analysis Summary Page.
- Click on Nine dots > Discover Impacted Objects, to display the Impact Analysis up to level pop-up window.
- Add the Impact Level and click on Ok, to view a successful job submission message.
Delete Source Objects
You can delete the Source Objects added to the Impact Analysis using this nine dots option.
To delete a source object,
- Click on the check box to select a source, which will enable the Delete Source object Nine dots option.
- Go to Nine dots, and click on Delete Source Objects. The added source object will be deleted and will disappear from the summary screen.
Invite Users
The Invite Users option allows you to invite Users to view and analyze the Impact Analysis.
To Invite Users,
- Click on the Nine dots icon, to view all the Nine dots options.
- Click on Invite Users, which will display the Invite User pop-up window.
- Enter the User Name on the search bar, you want to invite. The User Name will appear below the search bar.
- Disable the check box against the User Name and click on the Invite button. The User will be notified to view the Impact analysis.
Impact Analysis Impacted Objects
The Impact Analysis Impacted Objects page allows you to:
- Filter the impacted objects by Impact Type, Source Type, Source Connection Name, object type, connection name, transformation type, Job Type, Reviewed Status, and Status.
- Search for the schema name where the impacted objects exist, impacted object name like a table, column name, and analysis reviewer name.
- Search for the impacted object using Source ID, Source system, Source Object, Source Field, System, Object, Field, Dataset Connection, Responsible code, T/R code, and Reviewed by.
- Add the impacted objects to the projects and invite team members to collaborate.
The Impact Analysis Impacted Objects page gives an overview of the following:
|
Fields |
Description |
|
Source Id |
Displays the unique Id created in the backend for the Impact Analysis source object. |
|
Root Object |
Displays the name of the source object added to the impact analysis summary. |
|
Impact Type |
Displays the type of impact of the impacted objects on the source objects. (Example: Transformation/reference) Note: For the upstream, and downstream impact analysis, the impact type will be transformation, and for the upstream with association, and downstream with association impact analysis, the impact analysis type will be reference. |
|
Source Genre |
Displays what type of data object the Source object is. (Table/report/file) |
|
Source Object Type |
Displays the type of Report (Workbook/Dashboard/Chart) the source object is Note: It is only applicable for Reports. |
|
Source Object Connection |
Displays the source system of the Source Data Object. |
|
Source Object System |
Displays the Schema name, to which the source object belongs to. |
|
Source Object Name |
Display the name of the source object. Example: The level 1 target object will be the source object for level 2 impact analysis |
|
Source Object Field |
Displays the column names added to the impact analysis. |
|
Analysis Type |
Displays the type of impact analysis (Upstream/downstream etc). |
|
Project Status |
The source table can be added to the default project using the + icon available on the Project status column. |
|
Impact Genre |
Displays the category of impact object. (Table/file/report etc) |
|
Impacted Object Type |
Displays the type of Report (Workbook/Dashboard/Chart) the impacted object is Note: It is only applicable for Reports. |
|
Impacted Object Connection |
Displays the source system of the impacted data object. (Example: MySQL) |
|
Technical Description |
Displays the technical description of the impacted data object |
|
Impacted Object System |
Displays the Schema name, to which the impacted object belongs to. |
|
Impacted Object |
Displays the name of the impacted object. |
|
Impacted Object Field |
Displays the impacted column names. |
|
Dataset Connection |
Displays the connection name of the used query/dataset. |
|
Dataset Schema Name |
Displays the schema name of the used query/dataset. |
|
Dataset Name |
Displays the name of the dataset |
|
Dataset Tags |
Displays the name of the tag, the dataset is associated with. |
|
Job Type |
Displays the type of the data set (example: view/procedure/sql) |
|
Responsible query |
Displays the query used in the lineage. |
|
Review status |
Displays the review status (Pending/reviewed) |
|
Reviewed By |
Displays the reviewer name. |
|
Reviewed Date |
Displays the date on which the impact analysis is reviewed. |
|
Status |
Displays the status of the impact analysis (Active/inactive) Note: In case of the availability of temporary tables in impact analysis, the status will be inactive. |
|
Impact Level |
Displays the impact level used for impact analysis. |
Action Performed on the Impact Analysis Impacted Objects
There is a Show/Hide Column icon enabled on the Impacted Objects page to display the columns as per your requirement.
When you click on the Show/Hide Column icon, it will display the list of columns available on the Impacted object page. You need to enable and disable the check box available against the column you want to display on the screen and click on Apply button.
User Action Item
You can perform the below actions using the Nine dots icon.
- Add to Project- You can add a project to the Impact Analysis.
- To add a project to the Impact Analysis:
- Click on the check box to select the Impact Analysis.
- Click the Nine dots, which will display all the available Nine Dots Options.
- Click on Add to Project option.
- Remove from Project- You can remove a project from the Impact Analysis.
- To remove a project from Impact Analysis:
- Click on the check box to select the Impact Analysis.
- Click the Nine dots > Remove from Project.
- Download Impacted Objects- You can download Impacted Objects. The file will be downloaded in .csv format.
- Invite User- You can invite the User to see the Impact analysis details.
Validation of Impact Analysis
To validate the impact analysis for the downstream and upstream data objects:
- Navigate to the Data Catalog.
- Select the Data object for which the impact analysis is executed.
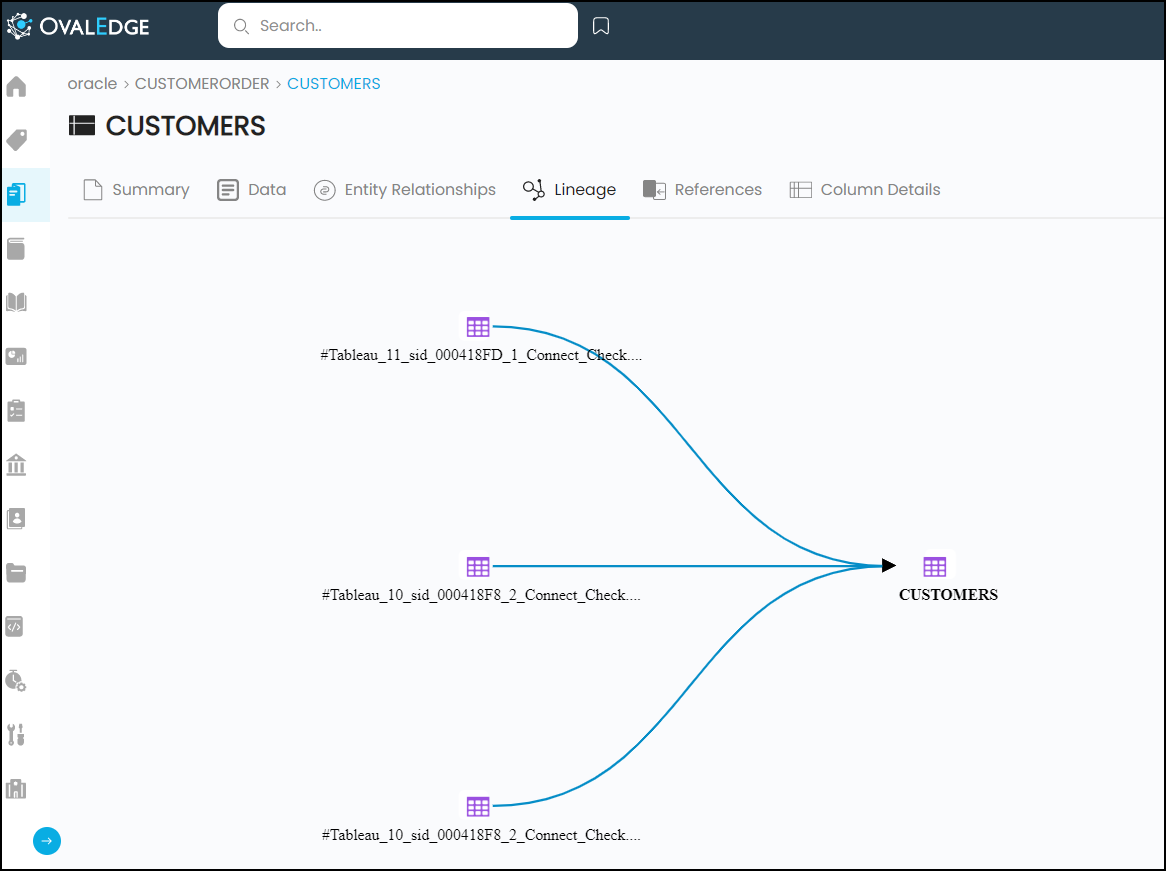
- Go to the Lineage tab. You can view the graphical representation of the data flow for the selected data object.
- Compare the graphical representation in the lineage tab with table listings in the impact analysis.
- A + sign on the table icon means there are more data objects in the data path. Click on the table to further drill down.
- Click on the blue data flow lines to display the transformation steps and field/column mappings between data objects.
Multiple ways to add data objects to impact analysis
There are multiple ways in the OvalEdge application, to perform Impact analysis.
- Data Catalog- You can add data objects to impact analysis from the Data Catalog > data object > nine dots > Add to impact analysis.
- Advanced Tools > Impact Analysis- You can add a data object to impact analysis from the Advanced Tools > click on impact analysis > Add source objects.
- Advanced Tools > Load Metadata from Files- From the Advanced tools > Load metadata from files > Lineage, you can upload the file with source object details to impact analysis.
Copyright © 2019, OvalEdge LLC, Peachtree Corners GA USA