General Data Protection Regulation (GDPR) is a new set of rules defined to give European customers more control over their personal and sensitive information and how it is used within Organizations. GDPR applies wherever personal data is processed.
- First name, last name/surname, maiden name
- Email address
- Home address (street, zip, postal code, city)
- Phone number
- Photo
- Date of birth
- Bank account number
- Credit card number
- National Identification Number, (Social) Insurance Number, Social Security Number
- Taxpayer Identification Number, Tax File Number, Permanent Account Number
- Passport number, national ID number, driver's license number
- Vehicle registration plate number
- Employee number
- IP address
- Location data
- Handwriting
- Login
- Password
- Social media profile IDs/links
- Mobile device IDs
- Employment history, job title
- Education history
- Payroll data
- R & D data
- Personal Medical Data
Purpose of Governed Data Query
Governed Data Query (GDQ) is a tool that assists in retrieving any customer information or personally identifiable information (PII) from the entire organization’s database, complying with GDPR and other regulations laid out by different government authorities. OvalEdge assists in complying with any such regulations.
For instance, when a customer (for example, you) has subscribed to a service from a vendor (let's say a Cell Phone provider), all your personal information is stored in the Phone provider databases. You can ask for the following things from the Cell Phone provider:
- Show all the company's information about you.
- Delete all the information the company has about you. (Provided you left the business with this vendor like you switched your cell phone provider)
The above scenarios are complex as the company IT team must develop processes and tools to retrieve customer data from all their data sources.
OvalEdge provides a solution to this. Once the data is crawled in OvalEdge, the IT team or the responsible person can classify and audit the privacy information (using the Data Classification module). The privacy or any sensitive PII information is governed using business Terms created under each domain. That means the IT team can classify and group the privacy data under each domain. Once the privacy terms are created, the IT team can associate appropriate data objects with them to identify the Customer information. Since the privacy information contains sensitive data, it can be masked or restricted when creating the terms. See How to add a PII to learn about Masking and restricting the column data.
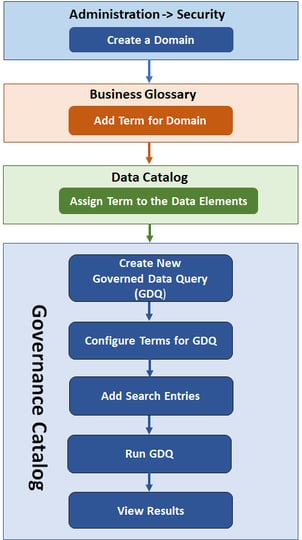
When a user requests the cell phone provider to discover and delete all his information, the provider can simply use the Governed Data Query module in OvalEdge. The IT team can build search patterns around the business terms, and by discovering the associated data objects, the IT Team can gather the Customer information present in the entire organization. For more details on the entire process, See GDQ Process Flow.
Roles and Permissions
A user role who has access to a specific DOMAIN with RO/RW permissions can ONLY create a Governed Data Query(GDQ) in that DOMAIN. Additionally, users with an OE_ADMIN role can create a GDQ.
In GDQ summary page, users can configure privacy terms, edit terms, and add/edit/delete entries.
|
DOMAIN Access |
Meta Permission Type |
Permission Abbreviation |
Access Privileges |
|
Yes |
READ ONLY |
RO |
Can create a GDQ |
|
Yes |
READ WRITE |
RW |
Can create a GDQ |
|
No |
READ ONLY/READ WRITE |
RO/RW |
Cannot create a GDQ |
Note: User roles who don’t have any DOMAIN access cannot add a GDQ.
Working with GDQ
Stewards and data users need a method to govern the privacy compliance data in OvalEdge. OvalEdge adapts a standard method by using a Governed Data Query search result to search Customer sensitive data.
In OvalEdge, each data query is governed across a domain, and privacy terms are created under each domain(such as First Name, Last Name, mobile number, and Personal ID). The terms are then associated with the data objects before creating the data Query.
Example: Assume the IT team wants to now search customer data by entering his First name, Last name, mobile number, and Personal ID.
He will go to the GDQ module and Create a Governed data Query. Then add the privacy terms and configure the term search conditions. (Here users can search the data with a combination of different privacy terms and values).
Add the configured term search values and execute the GDQ. View the results to see all the associated data objects for this customer.
Governed Data Query (GDQ) Summary
The Governed Data Query (GDQ) Summary displays the list of predefined Data Query names that are created under each domain. It contains information such as GDQ name, Steward (approver who can approve the GDQ), Creation Date, and Created By.
You can do the following within the Governed Data Query module,
- Create a new GDQ.
- View the list of GDQs.
- Configure each GDQ with combinations of privacy terms.
- Update the GDQ configuration with more privacy terms.
- Add entries based on the configured terms to search the customer information.
- Edit the GDQ entries.
- Run or Execute all or specific GDQ search entries.
- View associated data objects for the search result.
- Delete a Governed Data Query.
Creating a Governed Data Query
To create a Governed data Query in the Governed Data Query Summary Page,
- Go to Governance Catalog > Governed Data Query.
- Click the Add GDQ
icon to create a new GDQ. The add GDQ page opens to create a Governed Data Query.
- On the Add GDQ page, enter the following:
- GDQ name-A unique name for the Governed data Query
- Domain- Select the Domain name from the list that has the privacy terms
- Steward-Approver for the Governed Data Query
- Click on the Add GDQ button to create and display the data query on the summary page.
Configuring Privacy Terms to Perform a Search
Once the data Query is created, the privacy terms must be configured. To add the privacy terms and set the term conditions,
- Go to Governance Catalog > Governed Data Query.
- Choose and select a Data Query and click on the Nine Dots.
- Select the option as Configure Terms to add the privacy terms with search conditions to build the data Query. OvalEdge provides an option to configure various privacy terms and set multiple search conditions.
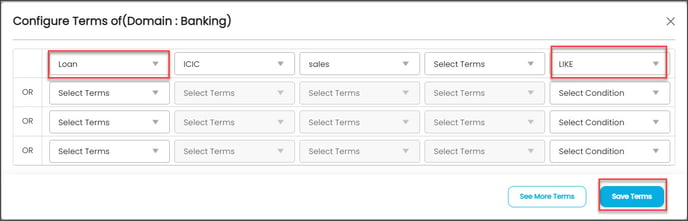
- Add the privacy terms and set conditions.
- Click on the See More Terms to add another row of terms and conditions if required.
- Click on the Save Terms to store the search criteria for the GDQ.
Search Criteria for Privacy terms
You can build complex queries using a combination of privacy terms and operators that can be later set to required values. This page provides information about the operators available for building these queries and specific conditions for searching terms.
AND operator- When you enter terms separated by the word "AND," a record will only be found if all the terms you specified are contained somewhere in the associated data objects. For example, if you enter “Gabriel” as your search entry for tt name” and “Dizzosa” as your search entry for the term “Last if the required name,” the result will only display if a record matches both the search conditions.
OR operator- When you enter terms separated by the word "OR," a record will be found if any of the terms you specified is contained somewhere in the associated data objects. For example, if you enter “Gabriel” as your search entry for the term “First name”, and “Dizzosa” as your search entry for the term “Last name,” the result will display records that match either the first name or the last name or both the entries.
In OvalEdge, configured terms with “AND” conditions execute on all the associated data objects separately. In the same way, configured terms with “OR” conditions execute on all the associated data objects separately.
Note1: You can also choose how the entries should match.
Note2: Select EQUAL for an exact match or LIKE for all or partial matches.
Editing the terms
Once you configure the Privacy terms and the search conditions, users can add more privacy terms by editing.
To edit and add more terms to a Governed Data Query,
- Go to Governance Catalog > Governed Data Query.
- Select a Data Query and click the nine dots.
- Select the Edit GDQ to edit the privacy terms and search conditions of the Data Query.
- Add new terms and conditions or edit existing terms and conditions.
- Click on the Update GDQ to update and save the changes.
Deleting the Governed Data Query
To delete a GDQ,
- Go to Governance Catalog > Governed Data Query.
- Select a Data Query and click the Nine Dots.
- Click on the Delete GDQ option to delete the GDQ. A pop-up window opens to ask the user for confirmation to delete the GDQ.
- Click on the Confirm button to Delete the GDQ.
Search Entries
Once the Privacy terms and conditions are configured, users can add/edit/delete the entries to search for customer information.
To add the entries,
- Go to Governance Catalog > Governed Data Query.
- Click on the GDQ name.
- Click on the + Add New Entries to add the entries for the configured terms. A pop-up window to add new entries is displayed.
- Add the entries and click Save Entries to save.
To Edit the entries,
- Go to Governance Catalog > Governed Data Query.
- Click on the GDQ name.
- Select the entry to make the changes and click Nine Dots.
- Click on the Edit Entries button to change the entries for the configured terms. A pop-up window to Edit entries is displayed.
- Make the changes and click Update Entries to save.
To Delete the entry,
- Go to Governance Catalog > Governed Data Query.
- Click on the GDQ name.
- Select the entry to delete and click Nine Dots.
- Click on the Delete Entry icon to delete the entry. A pop-up window asks for the user's confirmation to delete the entry.
- Click on Confirm to delete the entry.
Executing the Governed Data Query
There can be multiple search entries for a single search criterion. Entries in a single GDQ can be executed in bulk or individually.
To Execute each entry,
- Go to Governance Catalog > Governed Data Query.
- Click on the GDQ name.
- Select an entry to execute and click Nine Dots.
- Click the Run GDQ option. A job is submitted to execute the entry search in the data objects mapped under that domain.
To Execute all the entries at once,
- Go to Governance Catalog > Governed Data Query.
- Click a GDQ name and select Nine Dots.
- Click the Run GDQ All to execute all the entries simultaneously.
- A job is submitted to execute the entry search in the data objects mapped under that domain.
Viewing results of the Governed Data Query
The purpose of the View result tab is to display the matched results against the value of the data asset column, once the entries are executed, the matched results can be viewed using the View results tab.
To view the results of an entry,
- Go to Governance Catalog > Governed Data Query.
- Click on the GDQ name.
- Select an entry.
- Click the View Results to see the data objects as a result of the search.
A new page opens, displaying the list of all the associated data objects that have the information entered in the GDQ.
Note: Each search Entry should be selected individually to view results. Each time the GDQ search entry is executed, a data point is created and represented in the timeline scale above. You can click on the data point timeline scale to see the earlier results.
Copyright © 2019, OvalEdge LLC, Peachtree Corners GA USA