OvalEdge is a self-service data exploratory tool that helps Business Users, Data Analysts, Data Governance users, and BI teams across the organization to extract value from data.
It maintains a central repository of your organization's data assets by crawling all your data sources and your data lake - to index the metadata of every file, table, analytics software, or other piece of data. OvalEdge ensures the data assets fetched from the different connectors to the inventory (database) are managed responsibly by enabling different levels of access permissions.
OvalEdge doesn't store any source data but rather uses the contextual metadata information of the data object to give insights about the data.
Key Features:
- Simplify and standardize Data Definitions using the business glossary Terms.
- Clearly define Roles and Responsibilities like data owners, data stewards, and data Custodians.
- Centrally manage and control access to data in various data warehouses, data lakes, and reporting systems by controlling compliance, internal access policies, and workflows.
- Define Data Quality Rules to improve the trust in Data and enable effective decision making
- Get Reports about data usage and controls
- Deliver a self-service platform to your organization that enables anyone to discover data, request access, and manages its workflow.
- Comply with various privacy laws such as the GDPR, CCPA, and banking regulations like the BCBS with a unified access governance solution.
Logging into OvalEdge
OvalEdge supports two types of user authentication methods to login into the OvalEdge application.
DB Authentication
OvalEdge provides DB Authentication by default. DB Authentication authenticates the user details to login to the application database. The database stores the user credentials (password) in an encrypted form. The user credentials are verified against those stored in the database for authentication. New users shall register to store their credentials in the database. Users can change their passwords and other data. Users must provide the correct password to login into the Application and prevent unauthorized use of the database.
To self-register,
- In the login page, click on the Register Now button.
- The User Registration pop-up window appears on the screen. You will be required to provide your Email address, First Name, and Last Name details and click on the Register button.
- On verification of the details provided, your login id and system-generated password will be generated, and the user is notified the same through email with the login credentials and to set the password for the account.
- Follow the prompts to check your email and verify it. You will be directed to the OvalEdge, where you will be required to log in to the OvalEdge application with new credentials.
Note: The Registration process is only for customers that log into the OvalEdge with an email address and password. Anyone that uses the Sign in with Google method to log in to their account, must manage their password directly with Google. - The user logging in for the first time is by default given an OE_Public access role or role that is configured in Administration > Configurations > Users and Roles tab > OE public > the OE_Public role set as default role.

Single Sign-on (SSO) Method
It is a type of authentication process where a centralized logging system validates and stores the user credentials. The user signs and logins into one application and is signed up into another application automatically, without having to remember separate sets of credentials for each application, hence the name of the feature (Single Sign-on).
Below listed are the different types of SSO authentication methods OvalEdge supports
- Google: AUTH 0.2- It is the third-party authorization system where the user does not share Password details but uses authorization tokens to prove identity. You can login to the OvalEdge application using Google credentials by selecting the Continue with Google option on the login page.
- GitHub: OAUTH2.
- OKTA: SAML 2.0
- Microsoft ADFS - SAML 2.0
- OneLogin - SAML 2.
Directory Services
1. Microsoft Active Directory - LDAP
Azure AD-SAML
Others- LDAP
Application UI Layout
- Application Menu
- Header Menu
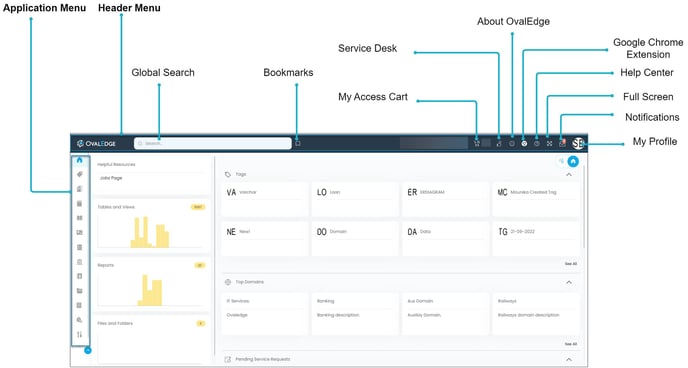
Application Menu
It displays all the modules and submodules of the application in a cascading layout.
Header Menu
|
Icon |
Description |
|
|
It helps users to navigate to the main home page from wherever you are in the application. |
|
Global Search |
Enables users to quickly search for any data asset or information across the application. |
|
|
It helps to save the most used or important URL address of the application pages for future reference or easy access. |
|
|
To add Objects from multiple locations/connections to raise Service Requests in bulk. |
|
|
It helps to raise a Service Request by redirecting you to the Service Desk page. |
|
|
The Application Version details and license information is provided for reference. |
|
|
The extension allows you to gain instant access to the application from any native applications from the web browser. It adds the OvalEdge application into Chrome to enhance the browser functionality. |
|
|
Inbuilt self-service help icon is enabled to give quick information about the page functionality and helps to find relevant FAQ’s using the search filter. |
|
|
It helps to view the application in full-screen mode. |
|
|
It displays the number of unread notifications in the toolbar. It is a clickable icon that navigates you to the My Resources > Inbox. |
|
|
The logged-in user profile details are displayed. |
Global Search
Global Search is a powerful search function that searches for the data objects and its links across the application giving relevant search results. The Global search is dynamic, the filters and advanced search options help narrow down the search application wide. However, search isn't the only way to find data in OvalEdge. You can navigate too, from one object to the next to find the data you are looking for.

For more information on Global Search, refer to this article.
Adding Bookmarks
It helps to save the most frequently used or important URL address of the application pages for future reference or easy access. The Bookmark icon is next to the Global Search field in the header banner. Click the icon to save the URL by giving a name to the URL. Click Add to Bookmark button to save the created bookmarks to the Bookmark list. You can Pin the bookmark to show in the header banner to easily pick the selected bookmark.
To add a Bookmark,
- Click on the Bookmark icon in the header, and a pop-up window is displayed with the existing bookmark list.
- Click on the Add this to Bookmark field to see an ‘Add Bookmark’ pop-up window.
- Select the Bookmark Folder from the drop-down list to which you wish to save the current bookmark.
- Enter the Bookmark Name in the field provided.
- The Link field, by default, displays the URL of the application page you are on.
- Select the Pin to Header checkbox to add the bookmark to the header.
- Click on the Add button, and the bookmark gets saved. Once Saved, you can see options to Delete, Edit, Pin/Unpin on the saved bookmark in the list.

My Access Cart
My Access Cart is a multi-Object Access Request functionality that helps to raise Service Requests on multiple data objects in a single click. Clicking upon the My Access Cart icon, the user gets navigated to the My Resources > My Access Cart, where data objects on which Access permissions are needed are displayed in respective data object tabs - All / Tables / Table Columns / Files / File Columns.

A Request Access button is enabled in the top right to raise the request in a single go.
- The data objects on which Access permissions are needed are grouped based on SR Template Id, Connection type, Object Type, Object Id, and Configured approvers (Owner, Steward, Custodian, Governance Roles).
- Users can select multiple objects and raise Service Requests for multiple objects in one user flow and be able to track the approvals for the same holistically.
- In My Access Cart > In every object type tab > Add Table or Add File, clickable buttons are provided in the bottom left to add data objects to the Access Cart.
- Add to Project: The Add to Project icon is enabled in multiple places across the application that include Global search results page, Data Catalog, to directly add the data objects to Projects. If My Access Cart project is selected as the default project then you can raise service requests on the selected data objects in bulk.
Default Project
You can select any project as Default Project, which helps to add selected data objects directly to the projects with a click. Click on the Default Project icon in the header to see a My Default Project pop-up window displaying the current project selected. You can select a project from the drop-down list and click the Set Default Project button.
Note: Selecting My Access Cart Project as Default Project helps add selected data objects to My Access Cart to raise bulk access requests.

Service Desk
Clicking upon the icon navigates you to the Data Governance > Service Desk - to raise a request on Access permissions, Request Content change, Report Data Quality issues, and other concerns.
About OvalEdge
It displays the complete License, License usage, and Version details about the OvalEdge application. There is also a provision given to update the License with OvalEdge.

Add Chrome Extension
The OvalEdge Chrome Browser Extension is much like any other browser extension; it is a miniature widget to access OvalEdge applications and view the Reports and its Certification Status (Certified / Caution / Violation / Inactive). You can also have a quick glance at the bookmarked data assets, search data assets, report issues on data assets, and view
Configure the OvalEdge chrome plugin
Now it is very easy to configure the OvalEdge chrome plugin. Just click on the chrome symbol at the top right corner of the application. It automatically redirects to the chrome web store; click on the Add to Chrome button. The chrome extension gets added and displayed in the browser Extensions, where you can pin the OvalEdge to display in the browser extension header.
- Click on the Chrome Extension icon in the header menu. You will be navigated to the Chrome web store to Add the OvalEdge extension to Chrome.
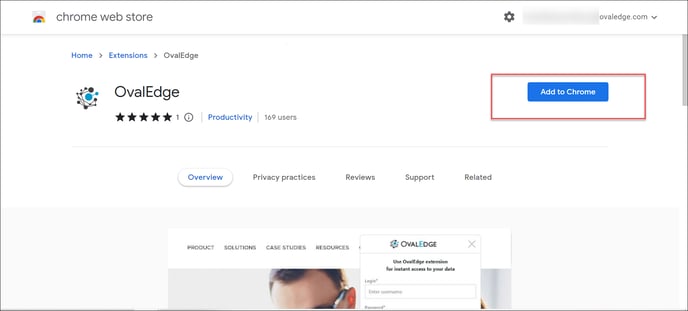
- Click on the Add Extension button and pin the OvalEdge
- Enter the OvalEdge URL in the URL field.
- Enter the required credentials - Login Name, Password and click on the Login button. The specified user will be logged in with the Chrome extension. Once logged in, the plugin will remember the user credentials for the next time.
Using the Extension,
The plugin allows you:
- View Bookmarked pages
- Search and gain instant access to the Terms and data.
- View Certification status and Endorsement Ratings of the Reports.
Note: To show the Report details Certification Status /Endorsement Rating status in the chrome plugin the Context URL should be entered for a specific Report Connector Type > Crawler settings > Context Id.
Context URL feature
The OvalEdge Browser Extension supports the Context URL functionality. The Context Id helps users to catalog reports from source reports database. When the Context Id is entered for a specific Report Connector Type > Crawler settings, the OvalEdge application plugin acts as a bridge between the OvalEdge application and Source Report Database to view Certification status or Endorsement Rating applied to the Report using the OvalEdge application.
Steps to Add a Context URL
- Select the desired database in the Administration >> Crawler and then click the 9 dots button.
- Enter the URL for the selected source.
Example: https://tableauad.ovaledge.net is entered in for the tableau connection.
Bookmarks
The bookmarks that are saved by the user within the OvalEdge application can be accessed from the browser extension. In this view, you will get to see the list of your saved bookmarks. Click on a bookmark to navigate to the corresponding page within the OvalEdge application.
Search
You can search for a Term or data object using the search filter. Select a Term to view the details of the Term. The search results for data objects will display the basic metadata details such as database, schema, table, and column information.
Suggesting a Term
If the Term searched is not found or does not exist, you can Suggest a Term (create new term) right from this screen. This setting can be configured using the toggle button under settings. Select the Suggest a Term button, add a Term Name, Domain, Description, and Save it. A term will be added to the OvalEdge Business Glossary module in draft status until reviewed and published.
Report
The Report button allows you to directly report a data quality issue whenever you notice one. This will send a notification within OvalEdge to the assigned approver for Data Quality issues.
The data quality issue will have the URL from which the issue was raised so that the approver can quickly navigate through and investigate. This is automatically populated if the corresponding data source URL is defined in the Context URL of the connection within OvalEdge.
Help Center
The Main help icon placed in the header explains the features and functionality of the module. Additionally, help icons are provided on top of a few call-to-action elements to instantly give basic insights on the field or instructions to accomplish a job.

Notifications
Clicking upon the Notifications icon takes you to My Resources > Inbox > Pending messages tab > where you can view the alerts, reminders, and communication from other people. The notifications are sorted and displayed under the below-mentioned tabs, where you can directly respond to messages, take action or clear the alert instantly from the notification.
- Collaborations
- System Alerts
- Watchlist alerts
- Service Desk
- Data Quality Rule Alerts
My Profile
It contains all the relevant information about logged-in users.
- Name, Image, email address, Contact number, Slack Id.
- The user Role associated with the user is displayed. It can be either system-defined roles (OE_ADMIN, OE_PUBLIC) or special roles.
- You can configure and enable Notifications to get notified or alerts on Collaborations /Watchlist alerts / System Alerts / Data Quality Alerts / Service Desk Alerts / Team Communication / Send selected Notifications.
- Displays Last Updated Date & Time.
Copyright © 2019, OvalEdge LLC, Peachtree Corners GA USA