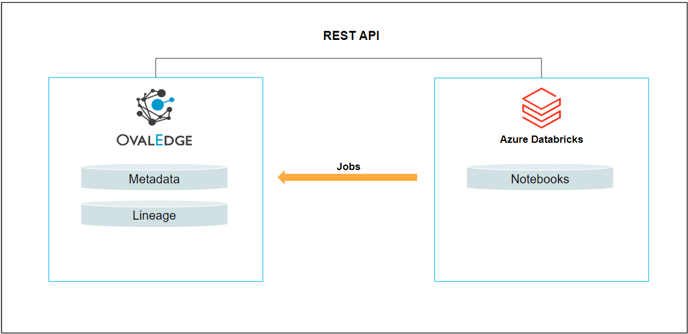
Databricks is a unified data analytics platform that enables data engineering, data science, and business analytics teams to collaborate and work together on data-driven projects. The platform is built on top of Apache Spark, an open-source distributed computing framework.
OvalEdge uses API to connect to the data source, which allows users to crawl data objects and build lineage.
Prerequisites
This section discusses the requirements that must be met before configuring the connector.
Configure Temporary Path
This is a global configuration and may already have been established, before crawling the Databricks connection, be sure the temporary file path is configured in OvalEdge. This is the area on the OvalEdge server that will hold the DBC files that will be ingested into the Catalog.
Path setup:
- Select the configuration tab located under Administration in the left panel menu.
- In the system path tab, search in the key column for ‘temppath’.
Note: Please ensure that the temporary file path is present in the value column. In case the value column already contains a path, it indicates that the configuration already exists. However, if the temporary file path has not been configured yet, please follow below steps: - Create a folder on the OvalEdge server.
- Enter the path of the local folder in the value column. Eg: /home/ovaledge/temp(Path)
Configure Environment Names
This is a global configuration and may already have been established.
To distinguish between environments for connections, such as production, testing, and others, please follow the steps outlined below:
- Navigate to the Configuration tab in the Administration menu.
- Select the Connector tab.
- In the OVALEDGE_APP configuration type, enter the desired environment values in the value column.
Connection Requirements
The subsequent section outlines the necessary connection details that must be available. It is essential to have the minimum privileges required, which are as follows:
|
Operation |
Validation |
|
Established Service Account or Access Token |
You should have a service account with read permissions for all items/areas in Azure Databricks that you would like crawled. |
Establish a Connection
To establish a Databricks Connection, complete the following steps:
- With your OvalEdge Administration access, log in to the OvalEdge application. Navigate to the Administration module and click on the Connectors menu item.
- Click on the + icon (New Connector) to the top right, and the Add Connector pop-up will be displayed.
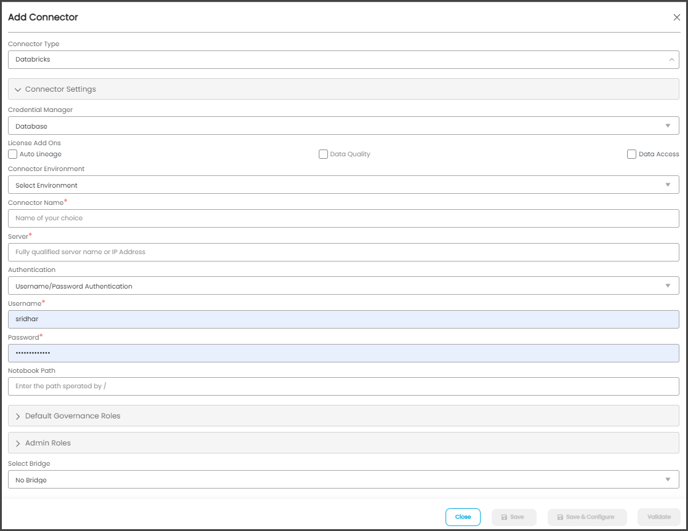
- Search and select the desired connector, and the Add Connector pop-up with the selected connector details is displayed. Complete the required fields.
Property
Details
Connector Type*
By default, ‘Databricks’ is selected.
Credential Manager*
Select the option from the drop-down menu, where you want to save your credentials:
Database: Databricks connection is configured with the basic Username and Password of the service account in real-time when OvalEdge establishes a connection to the Databricks database. Users need to add the credentials manually if the database option is selected.
HashiCorp: The credentials are stored in the HashiCorp database server and fetched from HashiCorp to OvalEdge.
AWS Secrets Manager: The credentials are stored in the AWS Secrets Manager database server and fetched from the AWS Secrets Manager to OvalEdge.
License Add-Ons*
All the connectors will have a Base Connector License by default that allows you to crawl and profile to obtain the metadata and statistical information from a datasource.
OvalEdge supports various License Add-Ons based on the connector’s functionality requirements.
- Select the Auto Lineage Add-On license that enables the automatic construction of the Lineage of data objects for a connector with the Lineage feature.
- Select the Data Quality Add-On license to identify, report, and resolve the data quality issues for a connector whose data supports data quality, using DQ Rules/functions, Anomaly detection, Reports, and more.
- Select the Data Access Add-On license that will enforce connector access via OvalEdge with Remote Data Access Management (RDAM) feature enabled.
Connector Environment
It allows the user to select the environment configured for the connector from the dropdown list. The configured environments can be Microsoft Azure and Amazon Web Services.
The purpose of the environment field is to help users to understand that the new connector is established in an environment available at the Development, Production, and QA.
Connection Name*
Enter a Connection name for Databricks. You may choose any name you like. We recommend a thoughtful nomenclature be used as it is viewable in the tool.
Example: DB Prod Server 2
Server*
Enter the database instance URL (on-premises/cloud-based)
Authentication
Select either Username/Password authentication or Token Authentication. The appropriate fields will be present based on your selection.
Username*
Enter the Service Account Name you established to access the databricks environment. Note: Your web browser may populate this field with the current OvalEdge user login. Make sure you use a Service Account.
Password*
Enter the Service Account password.
Access Token
You can also use an Access token to login in lieu of a service account. If you are using an Access token method, please see below for how to retrieve a service account token from Databricks.
Default Governance Roles*
Users can select a specific user or a team from the governance roles (Steward, Custodian, Owner) that get assigned for managing the data asset.
Note: The dropdown list displays all the configurable roles (single user or a team) as per the configurations made in the OvalEdge Security | Governance Roles section.
Admin Roles*
Select the required admin roles for this connector.
- To add Integration Admin Roles, search for or select one or more roles from the Integration Admin options, and then click on the Apply button.
- The responsibility of the Integration Admin includes configuring crawling and profiling settings for the connector, as well as deleting connectors, schemas, or data objects.
- To add Security and Governance Admin roles, search for or select one or more roles from the list, and then click on the Apply button.
The security and Governance Admin is responsible for:- Configure role permissions for the connector and its associated data objects.
- Add admins to set permissions for roles on the connector and its associated data objects.
- Update governance roles.
- Create custom fields.
- Develop Service Request templates for the connector.
- Create Approval workflows for the templates.
Select Bridge
With the OvalEdge Bridge component, any cloud-hosted server can connect with any on-premise or public cloud data sources without modifying firewall rules. A bridge provides real-time control that makes it easy to manage data movement between any source and destination.
- Click on the Validate button to validate the connection details.
- Click on the Save button to save the connection. Alternatively, the user can also directly click on the Save & Configure button that displays the Connection Settings pop-up window to configure the settings for the selected Connector. The Save & Configure button is displayed only for the Connectors for which the settings configuration is required.
Note: * (asterisk) indicates the mandatory field required to establish a connection. Once the connection is validated and saved, it will be displayed on the Connectors home page.
Note: It is up to the user's wish, you can save the connection details first, or you can validate the connection first and then save it.
Connection Validation Errors
|
Sl.No |
Error Message(s) |
Description |
|
1 |
Failed to establish a connection; please check the credentials. |
Invalid credentials provided or user/role does not have access. |
|
2 |
Errors while downloading the File. |
403: Access denied [Provide appropriate access to user or role using in connection] 404: No such key [The object does not exist in the remote.] |
How to Retrieve a Service Account Access Token from Databricks
To obtain an access token that establishes a connection with Databricks, please follow the steps below.
- From the Azure Databricks Portal, Navigate to User Settings.
- Click on the Generate New Token button as shown below.
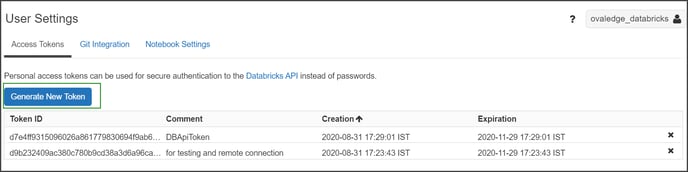
Note: The Rest APIs are used to authenticate and get the Notebooks from Databricks. For information on Rest API, please refer to the Rest API.
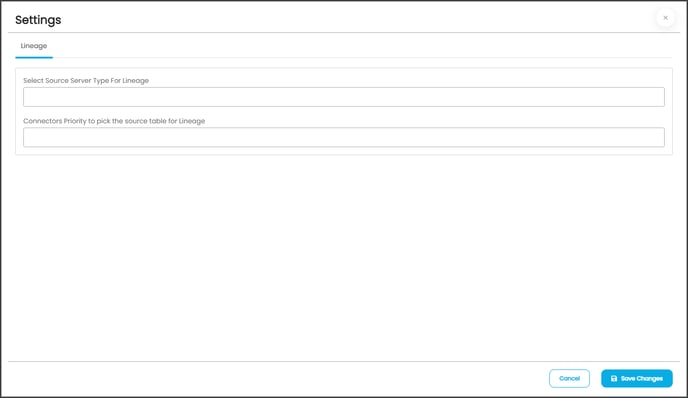
Connector Settings
Once the connection is established successfully, various settings are provided to retrieve and display the information from the data source. The connection setting include Lineage.
|
Connection Settings |
Description |
|---|---|
| Lineage |
The lineage options allow you to configure multiple dialects (by Selecting Source Server Type for lineage) and connection priority lists to pick the tables to build lineage.
|
Copyright© 2023, OvalEdge LLC, Peachtree Corners GA USA