Data Quality Rules
Data quality rules are essential for maintaining trustworthy data. The predefined standards evaluate various aspects of data quality, guaranteeing data reliability for crucial tasks like decision-making and analysis.
Each rule works with a specific function to check data quality. These functions, like accuracy or completeness checks, analyze data against defined criteria.
OvalEdge offers pre-built data quality functions for various criteria, allowing users to create rules easily. Additionally, users can tailor rules to their specific needs by creating custom functions through the "Load Metadata From Files" template.
This approach allows users to ensure their data meets the quality standards required for their business operations.
Viewing Data Quality Rules
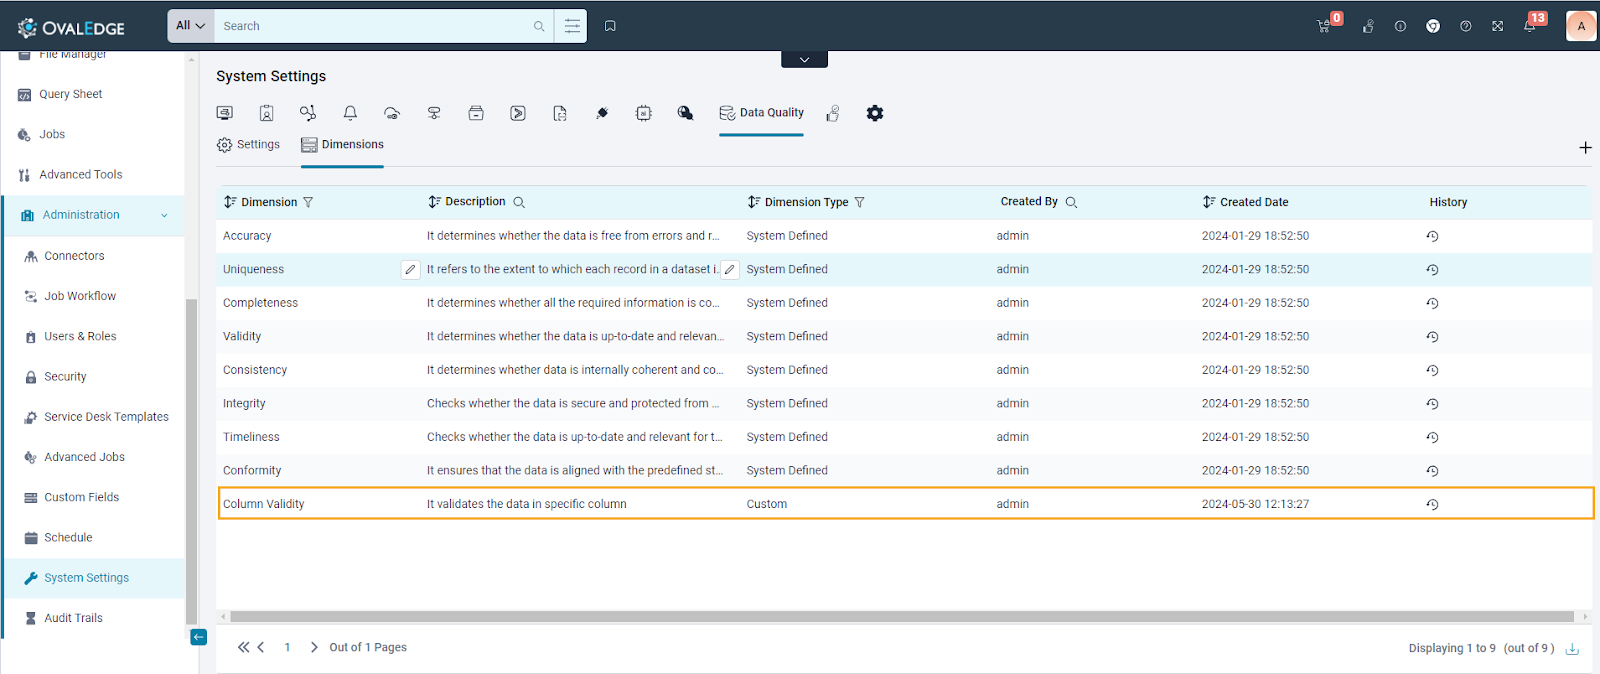
In OvalEdge, Author users can access data quality rules through the Data Quality Rules landing page.
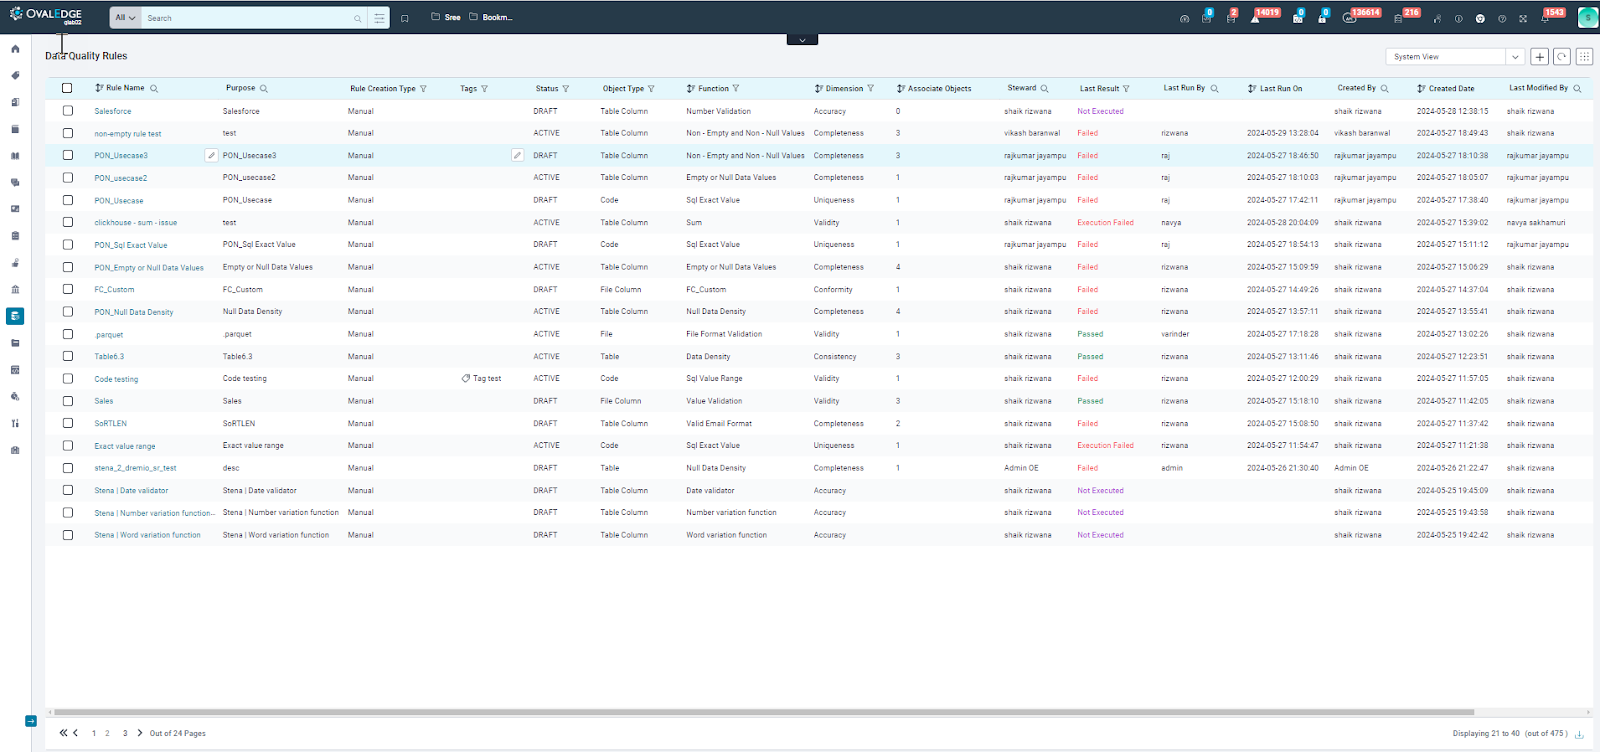
|
Field |
Description |
|
Rule Name |
It displays the names of the rules and helps users efficiently manage their rules:
|
|
Purpose |
It explains the purpose of creating the Data Quality Rules by describing each rule's reasons and intentions. |
|
Rule Creation Type |
OvalEdge offers flexibility in creating data quality rules through various methods:
The "Rule Creation Type" displays the method used to create the rules and enables the filtering option to filter rules by method. |
|
Tags |
The Tags help users organize and locate data quality rules efficiently. It displays all tags associated with each rule, allowing for:
|
|
Status |
The Status clarifies whether a rule is Active or in Draft form. This information determines what actions users can perform on the rule:
The status also allows users to filter the list by status (Active or Draft), enabling them to focus on specific rules based on their current stage. |
|
Object Type |
The Object Type indicates the type of objects associated with each rule, such as Table, Table Column, File, File Column, or Code. |
|
Functions |
It lists the various functions used to build each data quality rule. These functions fall into two categories:
This column also allows users to filter the rule list by specific functions, making finding rules that address particular data quality concerns easier. |
|
Dimensions |
The Dimensions focus on the criteria used to assess data quality. These categories help users evaluate data reliability, accuracy, and usefulness in various contexts. They provide a framework for ensuring data meets specific standards.
This column allows users to see which dimensions are applied by each rule. |
|
Associated Objects |
The Associated Objects display the number of data objects connected to each rule. These data objects, called "associated objects," can include tables, columns, files, or code.
This helps users understand the scope of each rule and how many data items it impacts. |
|
Steward |
It displays the name of the person responsible for each data quality rule. Users can search this column to find rules assigned to specific stewards. |
|
Last Result |
It displays the data quality rule's last execution status, and users can search for rules based on that status. |
|
Last Run On |
It assists users in understanding the timestamp of the last run for each data quality rule. Users can sort the rules based on the date provided in the timestamp. |
|
Created By |
It displays the username of the user who created the data quality rule. |
|
Created Date |
It displays the creation date of the data quality rule. |
|
Last Modified By |
It displays the username of the user who made the last changes to the data quality rule. |
|
Last Modified On |
It displays the date and time of the last modification made to the data quality rule. |
Configure Views
OvalEdge allows users to customize how data quality rule information is presented on the landing page through Configurable Views.

- Column Management:
- Adjust Columns: Users can easily select, hide, or rearrange columns to focus on the data quality rule details most relevant to their needs.
- Multiple Views:
- Custom Views: Users can define personalized views for various use cases. These custom views can be saved for quick access in the future.
- System-Defined Views: OvalEdge also provides pre-built views optimized for common tasks, saving users time and effort.
- Reset Functionality:
- Restore Default View: Users can easily revert to the default view configuration by clicking the Reset icon.
User Actions
The Data Quality Rule landing page offers a 9-Dots menu for managing rules in bulk. This menu allows users to perform the following actions efficiently:
- Delete Multiple Rules: Select and remove unwanted data quality rules simultaneously.
- Bulk Tagging: Assign relevant tags to multiple rules simultaneously, simplifying the organization and filtering for easier user rule management.
- Mass Tag Removal: Quickly remove tags from a group of data quality rules, streamlining the user categorization process.
- Execute Rules in Bulk: Run multiple data quality rules concurrently to assess data quality and consistency across various datasets, providing users with a comprehensive overview.
Creating Data Quality Rule
The Author users can create data quality rules by associating multiple data objects.
- Access the Creation Page:
- Navigate to the "Data Quality" module and select the "Data Quality Rule" submodule.
- Click the "+" icon to initiate data quality rule creation.
- Select a Function:
- The creation page allows users to choose a data quality function. These functions act as the criteria for evaluating data. OvalEdge offers various built-in functions for common checks like accuracy or completeness.
- Associate Data Objects:
- Once a function is chosen, users can define the rule's scope by associating multiple data objects with it. These objects represent the data users want to assess using the chosen function. Think of them as the specific data points to which the rule will be applied.
- By associating multiple objects, users can create a broader rule that evaluates data quality across a group of related items. This approach streamlines data quality checks and ensures consistency within datasets.
Note: The other methods for creating data quality rules are Rule Recommendations, OvalEdge APIs, and Load Metadata from Files.
Add Rule
On the Data Quality Rule landing page, click the "+" icon to initiate the creation of a data quality rule.
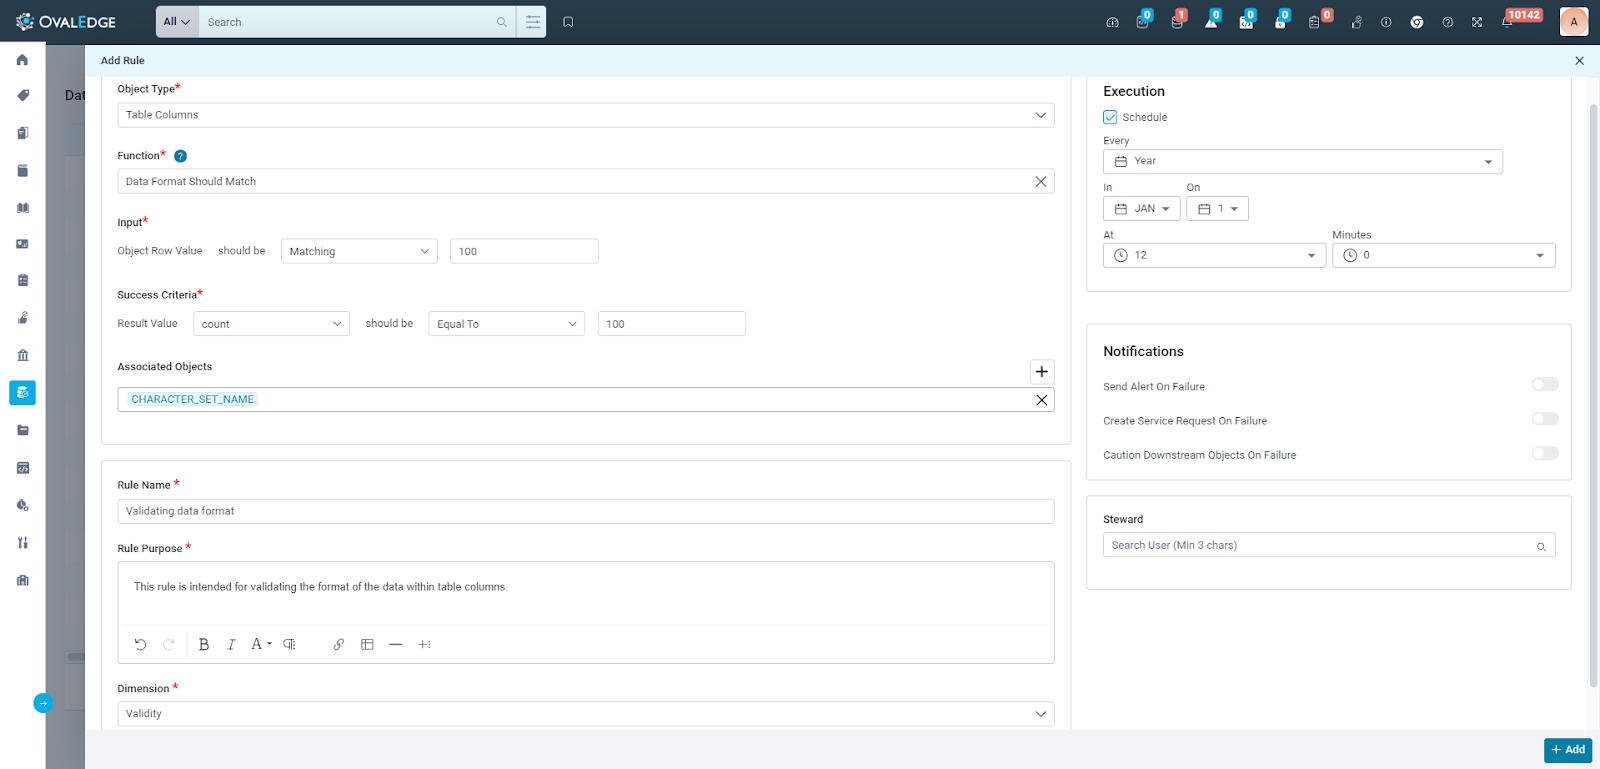
Selecting Object Type
When creating a new data quality rule, users must first select an Object Type. This essentially defines the kind of data the rule will assess. Here's an overview of the supported Object Types to help users choose the right one:
- Tables: If the rule targets the overall quality of an entire table within the data set, select "Tables."
- Table Columns: For rules focusing on specific data points within a table (e.g., checking for missing values or invalid entries in a particular column), choose "Table Columns."
- Files: This option is suitable for rules that evaluate the quality of entire files within the data storage.
- File Columns: Similar to table columns, "File Columns" allows users to create rules that assess specific data points within a file (e.g., verifying data format or ensuring consistency across multiple files).
- Codes: This Object Type is used for rules that evaluate the quality of custom code snippets used in data management processes.
Selecting the appropriate object type is crucial for users in creating effective data quality rules. It ensures the rule is applied to the intended data and provides targeted checks for the specific data points users want to monitor.
Selecting Function
Once users select the object type for their data quality rule, OvalEdge assists them in choosing the proper function.
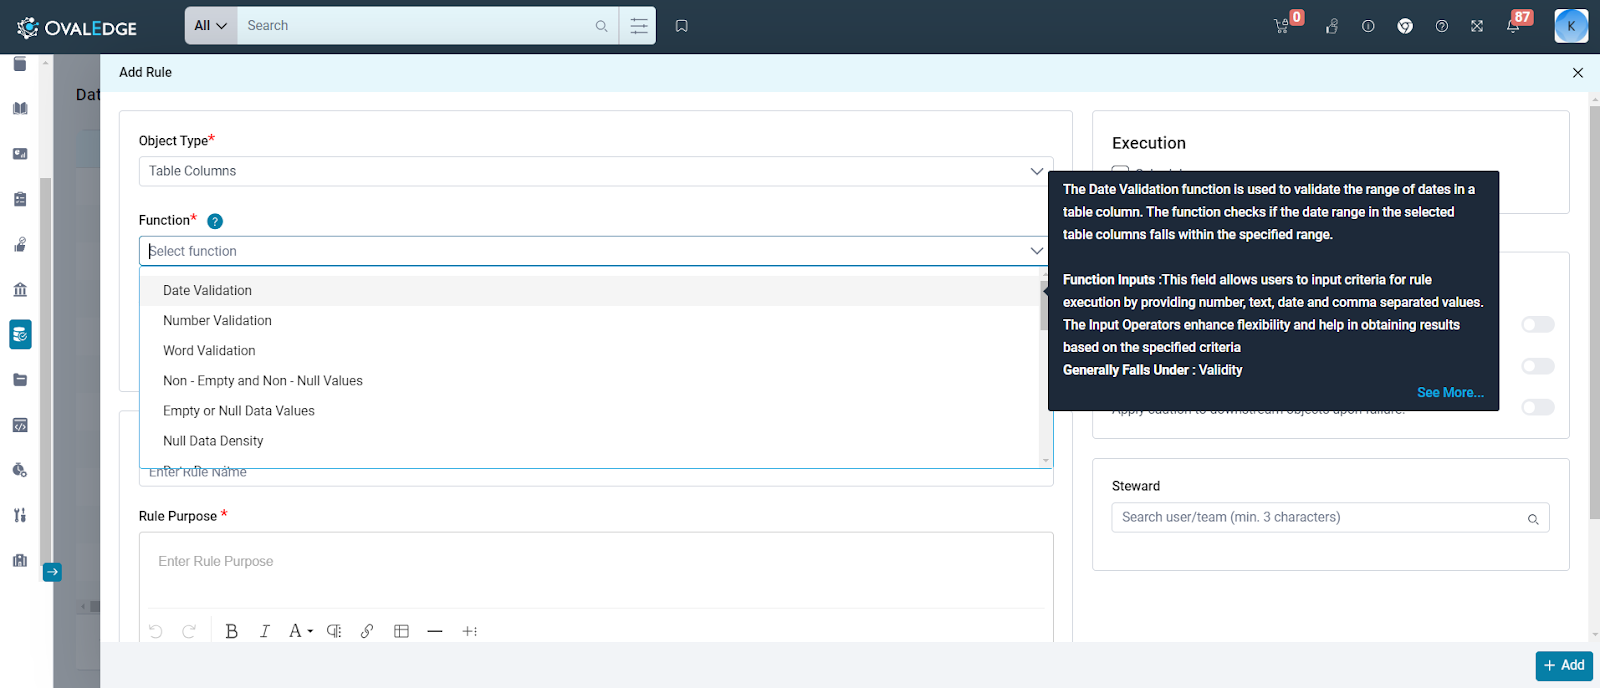
Here's how it works:
- Function Selection: Based on the chosen object type (tables, columns, files, etc.), OvalEdge presents a relevant list of pre-built data quality functions.
- Function Guidance: Each function has a handy tooltip that appears on hover, providing users with a brief explanation of its purpose. This quick info helps users understand what each function does.
- Deeper Dives: For a more comprehensive understanding, users can click the "See More" option within the tooltip. This directs them to the OvalEdge Help Center, where detailed explanations and use cases for each function are available.
By offering pre-built functions, tooltips, and comprehensive Help Center resources, OvalEdge allows users to select the most appropriate function for their specific data quality needs. This ensures their rules effectively evaluate the chosen data points.
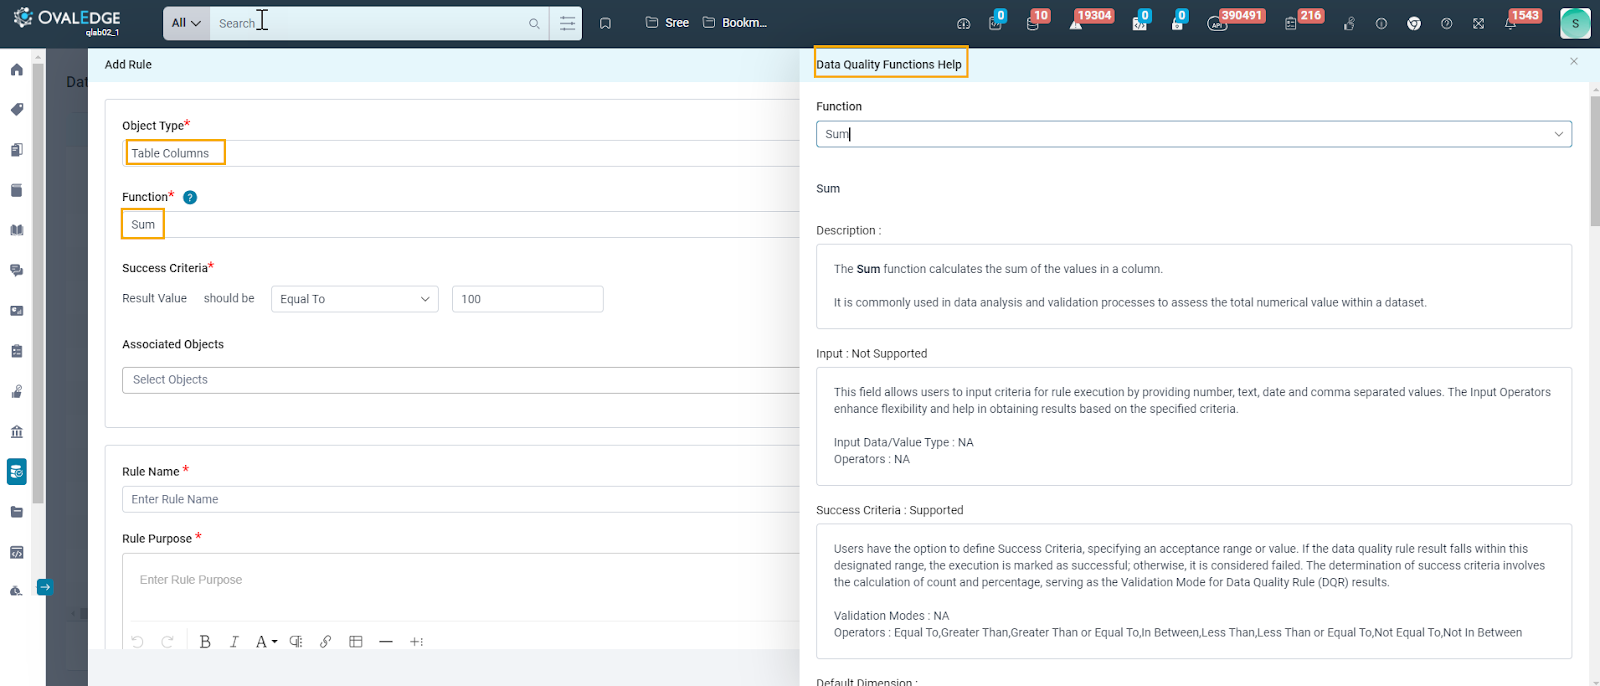
Please refer to the OvalEdge_Data Quality Functions
Configuring Function Inputs
Each Data Quality Function has a set of inputs that are used to configure the criteria of the selected Data Quality Function. The input comprises of Input and Success criteria:
- Input: This field allows users to input criteria for rule execution by providing number, text, date and comma separated values. The Input Operators enhance flexibility and help in obtaining results based on the specified criteria.
Note: It changes according to function. Please refer to the OvalEdge_Data Quality Functions to determine which functions Input is applicable. - Success Criteria: Users can define Success Criteria, setting an acceptable range or value. If the result of the data quality rule falls within this specified range, the execution is deemed successful; otherwise, it is considered failed. The Success Criteria determination involves calculating count and percentage, serving as the Validation Mode for Data Quality Rule results. Both Input and Success Criteria fields offer various operators to facilitate configuration.
- Operator Labels: Equal To, Matching, Not Equal To, Less Than, Less Than or Equal To, Greater Than, Greater Than or Equal To, In Between, Not In Between, Starting With, Ending With, Is Empty, Is Null, Is Not Empty, Is Not Null, and Containing.
- Success Validation Mode: Count and Percent.
Associating Objects
- Depending on the chosen object type (tables, table columns, files, file columns, codes), users can add the data quality rule to the desired objects where they want the rule to be applied. The Add Object widget enables users to select the data objects and associate the rule with them.
Configuring Rule Name
- Each data quality rule requires a unique name. The Rule Name field enables users to define the name of the data quality rule.
Configuring Rule Purpose
- The Purpose field is mandatory, serving to explain the intent and rationale behind creating a specific Data Quality Rule. Users can include essential information related to the rule in this field.
Selecting Dimension
Data quality dimensions are specific aspects used to evaluate and quantify the quality of data within a dataset. Each Data Quality Function is linked with a default dimension, allowing users to categorize created rules based on that dimension.
OvalEdge has eight system-defined dimensions, providing a framework for categorizing data quality rules effectively.
- Accuracy: This dimension measures the degree of correctness and precision of the data. It focuses on eliminating errors, inconsistencies, or inaccuracies that might be present in the data.
- Completeness: The completeness dimension evaluates the extent to which all required data is present and available. It ensures that there are no missing values or gaps in the dataset, enabling a comprehensive understanding of the data.
- Consistency: Consistency examines the uniformity and coherence of data across different sources or time periods. It ensures that data is consistent in terms of format, structure, and meaning, regardless of its origin.
- Timeliness: Timeliness refers to the relevance of data. It ensures that data is up-to-date and available when needed, enabling informed decision-making and analysis based on the most current information.
- Validity: The validity dimension assesses the extent to which data conforms to predefined rules or standards. It ensures that data meets the specified criteria and is fit for its intended purpose.
- Uniqueness: Uniqueness focuses on the absence of duplicate or redundant data records. It ensures that each data record is unique and that there are no unnecessary repetitions, which can affect data analysis and processing.
- Integrity: The integrity dimension represents the overall accuracy, consistency, and reliability of data throughout its lifecycle. It encompasses multiple aspects of data quality, ensuring that data remains accurate and reliable from creation to disposal.
- Conformity: Conformity measures the degree to which data conforms to standardized data definitions. It ensures that data adheres to predefined formats, structures, and naming conventions, facilitating consistency and interoperability across different systems and processes.
User Defined Dimensions
Users also have the option to define custom dimensions, which can be created within the Data Quality -> System Settings.
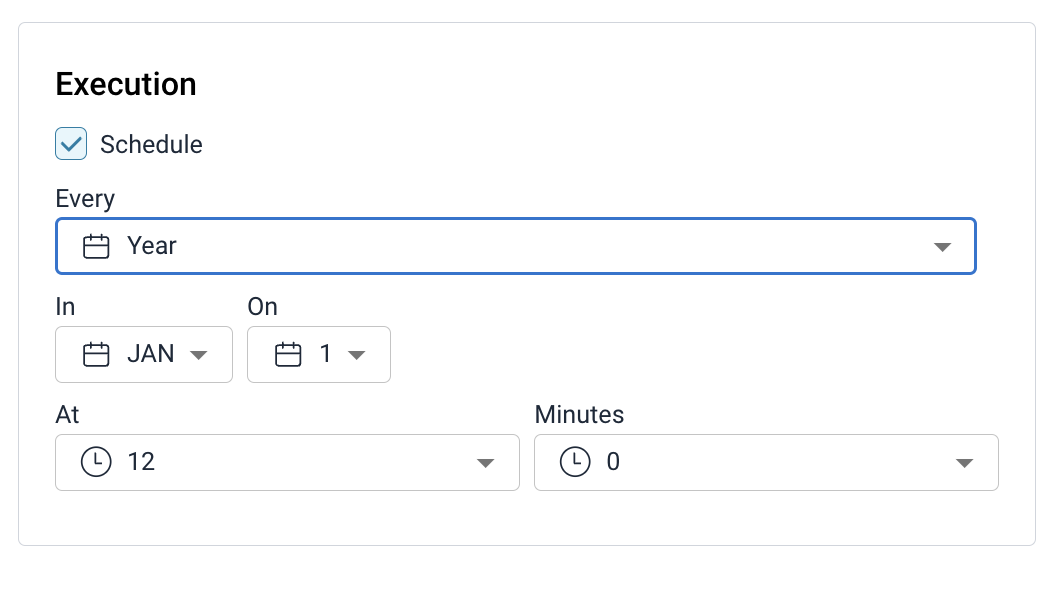
Scheduling Execution
Users assigned the role admin or steward can schedule Data Quality Rules using the Schedule toggle button. This scheduling feature automates rule execution at set intervals. Users can adjust the schedule post-creation, ensuring flexibility to adapt to evolving requirements. Modifications to the schedule are possible only when the Data Quality Rule is in the Active state, facilitating efficient adjustments to execution timing and frequency in line with evolving data quality management needs.
Configuring Notifications
This section provides radio buttons to activate Alerts and Service Requests in the event of a rule failure. Enabling these options notifies users of Data Quality Rule failures and allows OvalEdge to initiate service requests. The configurable options in this section include:
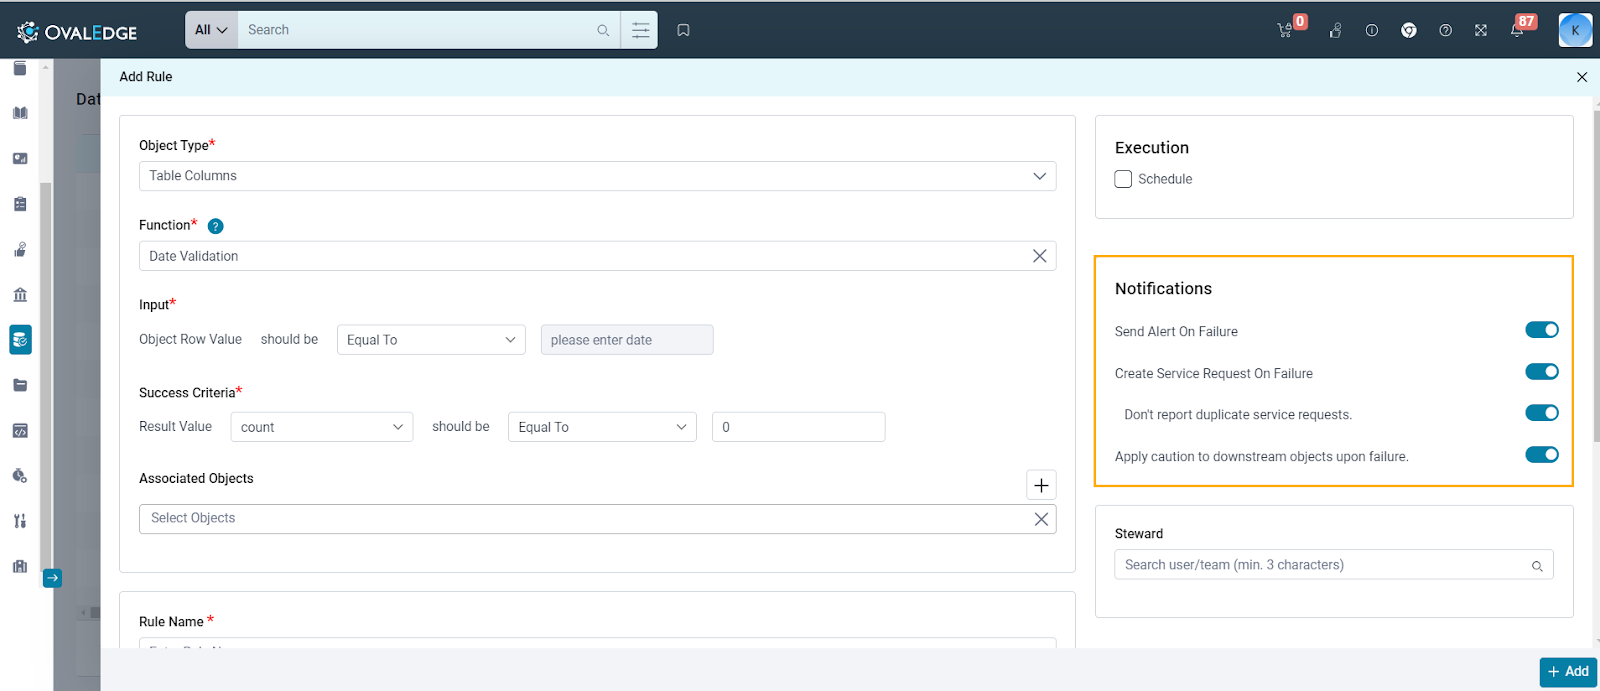
- Send Alert on Failure: Once activated, this toggle button triggers an inbox alert to the Data Quality Rule Steward. This feature ensures prompt notification whenever a data quality rule fails.
- The notifications related to the rule failure or successes will be shown in My Profile > Inbox > Data Quality
- The Service Requests created on the failure for the rule are displayed in Data Quality > Data Quality Rule Summary > Service Requests.

- Create Service Request On Failure: Enabling the "Create Service Request on Failure" toggle ensures automatic generation of service requests in response to data quality rule failures on associated objects. Service requests play a crucial role in calculating the Data Quality Score for the associated object. These requests can be accessed from the Service Request tab within the Data Quality Rule. Conversely, turning off this toggle prevents service request generation, leaving the Data Quality Score unaffected.
- Do Not Report Duplicate Service Requests: This button is visible only when the "Create Service Request on Failure" option is enabled. Its purpose is to prevent duplicate service requests by ensuring that a new request is created only if there is no existing request in an OPEN status. The button remains hidden when the "Create Service Request on Failure" option is disabled. A Data Quality Service Request for an object will be created only if there are no existing OPEN requests with a status other than Closed, Rejected, Expired, Deleted, or Resolved.
- Closed- When a service Request is closed after its resolution.
- Rejected - When a Service Request is rejected by the approver.
- Expired - When a Service Request has surpassed a time limit without being completed or resolved.
Caution Downstream Objects On Failure
Enabling this toggle triggers a caution message on downstream objects, highlighting potential data quality issues resulting from a failed rule.
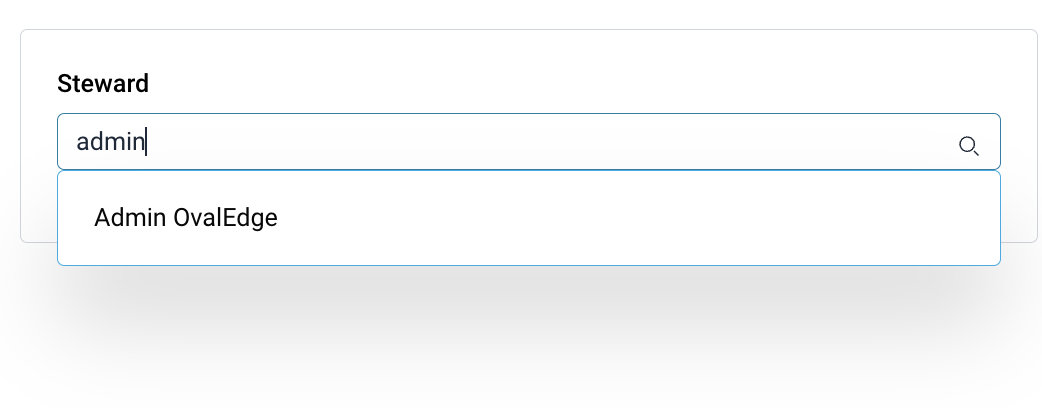
Updating Steward
Each data quality rule is assigned a steward who oversees the configuration tasks, ensuring compliance with data quality standards for the corresponding objects. Stewards are responsible for setting rule parameters, such as input and success criteria, leveraging their understanding of data quality principles. They also monitor rule execution and resolve any data quality issues. Initially, the creator or owner of the rule is assigned as the default steward, but this can be updated to include other users with role admin assigned.
Use Case
Use Case 1: In a customer relationship management (CRM) system, ensuring accurate and valid email addresses is crucial for effective communication and data integrity. Implementing a data quality rule around an email format check function helps maintain high-quality data within the CRM system.
- Solution: In this scenario, you can create a rule with the following settings:
- Object Type: Table Column
- Function: Valid Email Format
- Success Criteria: Result Value Percent should be Equal To 100
- Associate Objects: Associate the table columns that should go through this validation
- Rule Name: Email Validation
- Rule Purpose: This rule validates email addresses for correct formatting, ensuring data consistency and accuracy
- Dimension: Validity
By configuring the rule this way, it ensures that every value in the specified column matches the email format with 100% validity.
Accessing Data Quality Rules
The Data Quality Rules landing page displays a list of all current rules. Users can click on any rule name to access the specific rule, which redirects them to the summary tab for that particular data quality rule.
Summary Tab
This tab consolidates crucial information regarding the configuration of a particular data quality rule.

- Execution Information: This section provides execution details of the data quality rule. It includes the "Last Status," indicating the last execution status, and the "Last Run Time," displaying the timestamp of the most recent execution.
- Purpose: The purpose field is mandatory and articulates the objective of the data quality rule. It communicates to users why the rule was created, its validation criteria, and the expected output.
- Function: Within the summary tab, this section presents details about the chosen data quality function applied to the rule. It displays the function name, inputs, and the selected dimension for the data quality rule.
- Data Quality Remediation Center: The Data Quality Remediation Center section is visible on the Data Quality Summary tab only if the selected object type is supported for the Data Quality Remediation Center (DQRC). To modify the fields in this section, the Data Quality Rule must be in the Draft state, and the "Add Failed Rows to Remediation Center" toggle button must be activated. Enabling this toggle button allows for the reporting of failed values to the remediation center; otherwise, the failed values specific to the associated objects within the rule will not be sent to the Data Quality Remediation Center (DQRC).
The following fields are configured under this section which are mapped to the Data Quality Remediation Center:
- Monetary Value - This field is configured at the Data Quality Rule level and helps users understand the cost of each failed value reported as an independent entry in the Remediation Center.
- Criticality - The criticality field assists users in understanding the severity of a failed value and its importance. The severity range is categorized into three levels: high, medium, and low.
Note: With the Monetary Value and Criticality Fields, users can grasp the impact of a particular failed value.
- Violation Message - The purpose of a violation message is to explain why a specific data object failed to meet the specified criteria. It serves important roles for both technical and business users by helping identify the root cause of the issue. The violation message bridges the gap between business and technical users, facilitating better communication and enabling effective data quality management in various scenarios.
- Corrective Action - This field aims to offer actionable guidance and assistance to users for resolving data quality issues related to reported failed values. It provides practical steps, recommendations, or references to help business users address the specific problems flagged by the data quality rules.
- Avoid Duplicate Failures: Failures allow users to determine whether to report duplicate failures to the DQRC. Selecting "Yes'' skips reporting duplicate entries, simplifying the remediation process for unique issues. Selecting "No" (default) maintains the current behavior of reporting all failures, including duplicates, for detailed review.
- Tags: This section lists all the tags associated with the Data Quality Rule. Users can edit these tags when the rule is in the Draft state.
- Additional Fields: This section presents the Custom Fields added to the Data Quality Rule. Users can edit these fields while the rule is in the Draft state. The History option shows all previous changes related to the custom fields section.
- Top Users: This section showcases users who have viewed, commented, and collaborated on data quality rules. By default, the Data Quality Steward appears at the top, while other users who have engaged with the rule are listed based on their activity count.
- Alerts and Service Requests: This section provides radio buttons to enable Alerts and Service Requests in the event of a Data Quality Rule failure. By activating these options, users will receive Inbox notifications for data quality rule failures, and the application can initiate service requests for appropriate actions. The configurable options within this section include:
- Send Alert on Failure
- Create Service Request on Failure
- Do Not Report Duplicate Service Request
- Caution Downstream Objects on Failure
Users can configure these options during the creation of a Data Quality Rule and have the flexibility to edit these details in the summary tab of the rule, provided that the rule is in the Draft state.

Associated Objects
This tab offers detailed information about all associated objects for a Data Quality Rule, enabling users to customize settings for each object and execute rules with unique criteria specified for each one.
Table
The table displays the contextual information, object-level configuration, and the last execution details for the respective objects.
- Contextual Information: In the Associated Objects tab, contextual information for Tables includes details such as Database, Schema, and Table. These columns offer essential context for understanding the selected table. Users can also utilize filter functionality for each of these columns, allowing them to refine and narrow down their results based on specific criteria or preferences.
- Execution Details:
- Last Run On: This field displays the timestamp indicating when the Data Quality Rule was last executed. Users can sort the timestamps to view the most recent or oldest executions.
- Last Object Execution Result: Users can observe the last execution status of the data quality rule and filter rules based on this status. Additionally, a quick view option provides a summary of the last execution result, including Message, Result Value, Input, Success Criteria, Service Request ID, Failed Values sent to Remediation Center, and Downstream Objects Cautioned.
- History: Selecting this option directs users to the Object Execution Results tab, where detailed execution information specific to a particular data object is presented.
- Advanced Settings: This allows users to configure additional settings for each object associated with the rule. (Please refer to the Advanced Settings section.)
- Add Objects:This tab also offers users the ability to add multiple objects belonging to the supported Data Quality Function.
Table Columns
The table column displays the contextual information, object-level configuration, and the last execution details for the respective objects.
- Contextual Information: In the Associated Objects tab for Table Column, contextual information includes details such as Database, Schema, Table, and Column. These columns provide essential context for understanding the selected table columns. Users can also utilize filter functionality for each of these columns, enabling them to refine and narrow down their results based on specific criteria or preferences.
- Max Failed Values Limit: This column displays the object-level configuration option for setting the maximum number of failed values reported to the Data Quality Remediation Center.
- Execution Details:
- Last Run On: This field displays the timestamp indicating when the Data Quality Rule was last executed. Users can sort the timestamps to view the most recent or oldest executions.
- Last Object Execution Result: Users can observe the last execution status of the data quality rule and filter rules based on this status. Additionally, a quick view option provides a summary of the last execution result, including Message, Result Value, Input, Success Criteria, Service Request ID, Failed Values sent to Remediation Center, and Downstream Objects Cautioned.
- History: Selecting this option directs users to the Object Execution Results tab, where detailed execution information specific to a particular data object is presented.
- Primary Columns: Including primary columns assists in identifying failed values effectively. This approach showcases the failed value alongside the selected primary columns, aiding in pinpointing the specific records causing the issue.
- Additional Columns: Incorporating additional columns enhances the identification of failed values. This allows for displaying the failed value alongside the selected additional columns, facilitating clearer identification of problematic data.
- Advanced Settings: This allows users to configure additional settings for each object associated with the rule. (Please refer to the Advanced Settings section.)
- Add Objects: This tab also offers users the ability to add multiple objects belonging to the supported Data Quality Function.
Files
The files display the contextual information, object-level configuration, and the last execution details for the respective objects.
The Associated Objects tab for files presents the following information.
- Contextual Information: Contextual information for the Associated Objects tab for File includes details such as File System, File Name, File Location. These columns offer essential context for understanding the selected table columns. Additionally, users have the option to utilize filter functionality for each of these columns, enabling them to refine and narrow down their results based on specific criteria or preferences.
Execution Details: - Last Run On: It helps users understand the timestamp when the Data Quality Rule was last run on. Users can sort by new and old dates based on the timestamp.
- Last Object Execution Result: Users can view the last execution status of respective DQRs. This column offers users the ability to search the DQRs based on their last execution status as well.
- History: Selecting this option directs users to the Object Execution Results tab, where comprehensive execution information specific to a particular data object is presented.
File Columns
The file columns display contextual information, object-level configuration, and the last execution details for the respective objects.
- Contextual Information: Contextual information for the Associated Objects tab for File Column includes details such as File System, File Name, File Column Name, File Location. These columns offer essential context for understanding the selected table columns. Additionally, users have the option to utilize filter functionality for each of these columns, enabling them to refine and narrow down their results based on specific criteria or preferences.
- Max Failed Values Limit: This column serves as an object-level configuration option for setting the maximum number of failed values reported to the Data Quality Remediation Center (DQRC). It is exclusively visible for Table Columns and File Columns object types. Presently, support for reporting failed values to the Data Quality Remediation Center is available only for Table Columns.
- Execution Details:
- Last Run On: It helps users understand the timestamp when the Data Quality Rule was last run on. Users can sort by new and old dates based on the timestamp.
- Last Object Execution Result: Users can view the last execution status of respective DQRs. This column offers users the ability to search the DQRs based on their last execution status as well. This column allows users to configure additional settings for each object associated with the rule.
- Root Path - Displays the location of the file column.
- Where Column 1 - This allows users to select the column.
- Where Predicate 1 - This field helps in selecting the operator.
- Where Value 1 - This field is for entering the value
- Root Path - Displays the location of the file column.
- History: Selecting this option directs users to the Object Execution Results tab, where comprehensive execution information specific to a particular data object is presented.
Code
The code displays contextual information, object-level configuration, and the last execution details for the respective objects.
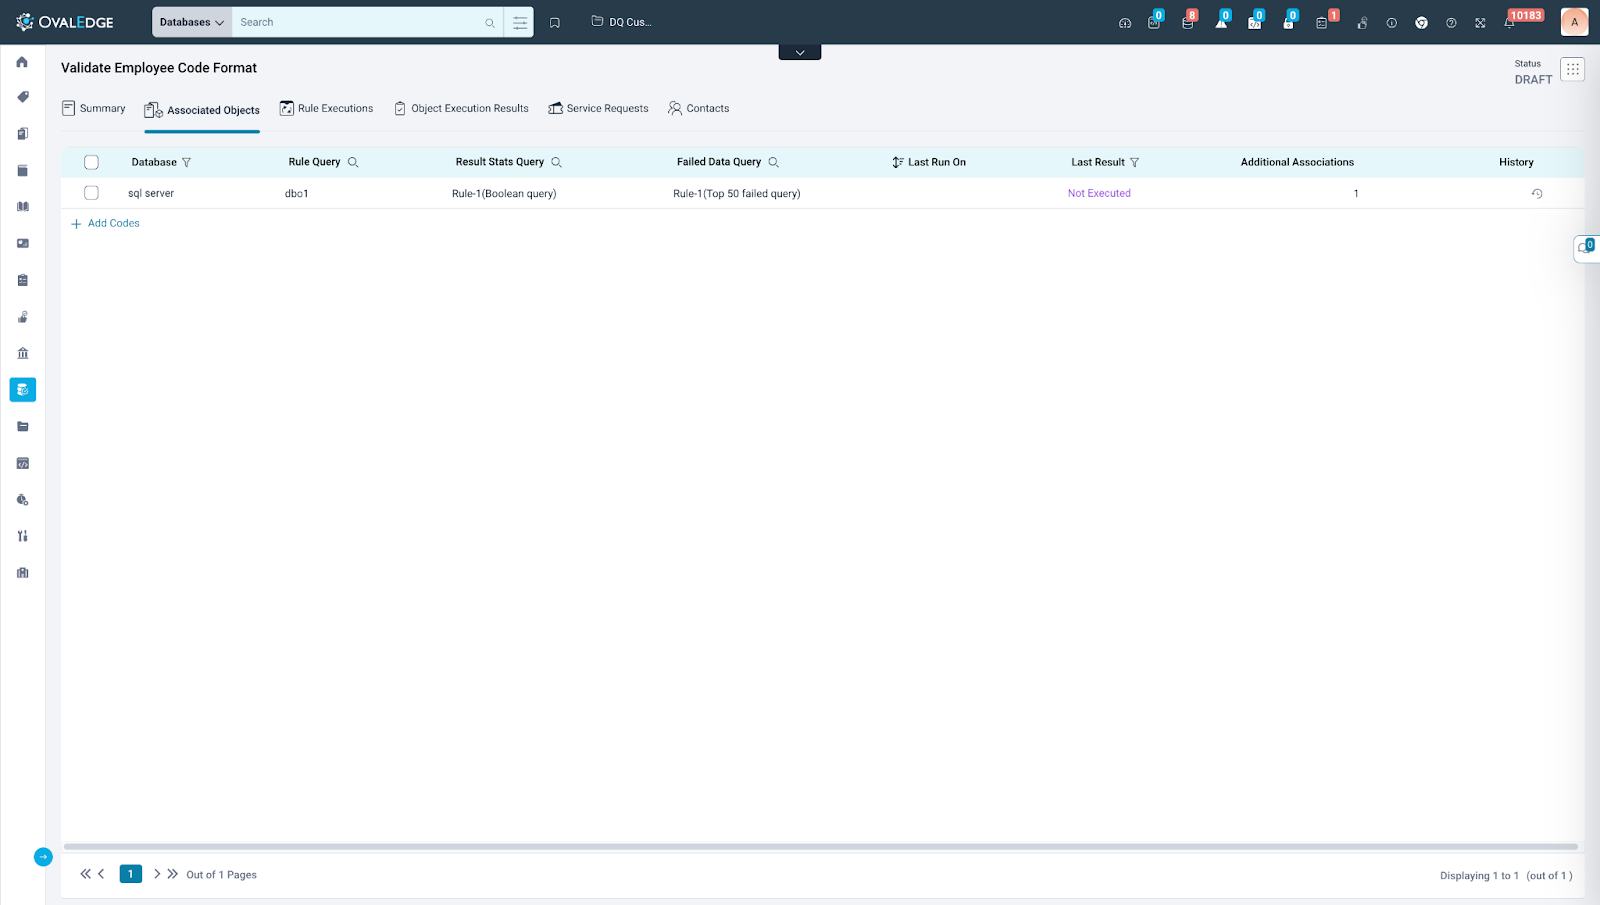
- Contextual Information: Contextual information for the Associated Objects tab includes details such as Database, Rule Query, Results Stats Query and Failed Data Query. Additionally, users have the option to utilize search functionality for each of these columns, enabling them to refine and narrow down their results based on specific criteria or preferences.
- Execution Details:
- Last Run On: It helps users understand the timestamp when the Data Quality Rule was last run on. Users can sort by new and old dates based on the timestamp.
- Last Result: Users can view the last execution status of respective DQRs. This column offers users the ability to search the DQRs based on their last execution status as well.
- History: Selecting this option directs users to the Object Execution Results tab, where comprehensive execution information specific to a particular data object is presented.
Advanced Settings
This column is displayed for table, table column, file, and file column functions and allows users to configure additional settings for each object associated with the rule.
- Filter: Provides essential features for Object level configuration.
- Parameterised Query: The text box within the filter tab enables users to adjust the object level Data Quality Function queries by adding a where clause. This acts as a parameterised query, facilitating the filtering of data quality rule execution based on specific conditions.
- Editing Object level Data Quality Function Queries: The editing icon, located next to the object level queries, permits users to modify the DQF query specifically for that object. This feature proves useful when users anticipate different configurations or execution results for a particular data object.
- Function Inputs: This tab lists the Input and Success Criteria fields that are to be configured for the particular object.
- Input
- Success Criteria
- The Violation Message displayed below would display the object-level violation message, which, once configured, would be reflected under the DQRC.
Rule Executions
The Rule Executions tab, accessible for every data quality rule, serves as a comprehensive resource for users seeking insights into the execution history of their Data Quality Rules. It offers a high-level overview of total associated objects, execution time details, and user-related information for each rule execution. Users can track the progression of Data Quality Rules executions, understand outcomes, and delve into crucial details such as execution logs, number of objects passed, failed, undetermined, execution failed, result execution ID, result, overall object count, execution timing, and the user responsible for each execution.
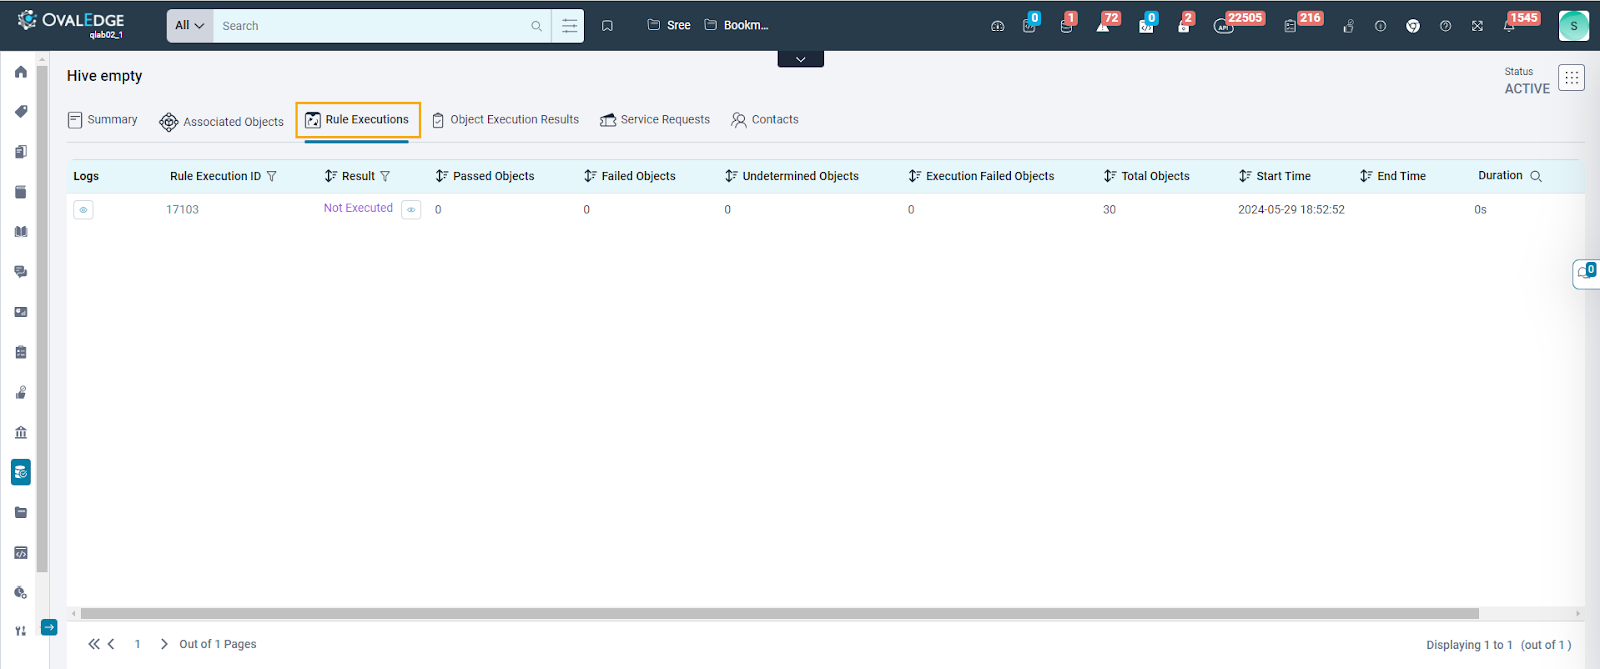
- Logs: Clicking on the log eye icon reveals the job logs associated with a specific Rule Execution Id. This option consolidates all essential execution details at the Data Quality Rule (DQR) level, eliminating the need for users to navigate to the Jobs module to track job logs for each rule execution.
- Select Date: Aids in searching job logs between the provided date and timestamp.
- Search Job Logs: Facilitates searching content based on the provided keyword.
- Filter Options: Assists in filtering job logs based on their type, i.e., Info, Warning, and Error.
- Refresh: Allows refreshing applied filters, search results, and displaying all job logs for the particular Job Id.
- Download: Helps download the job log.
- Rule Execution ID: Each Data Quality Rule is assigned a unique Rule Execution ID, offering users a distinct identifier to recognize and distinguish the execution results of a specific data quality rule. This ID helps in understanding the rule's status, reviewing generated statistics, and gaining insights into the outcomes for associated objects during that particular execution. By providing this unique identifier, clarity is enhanced, and effective tracking of the rule's performance and associated data quality metrics is facilitated.
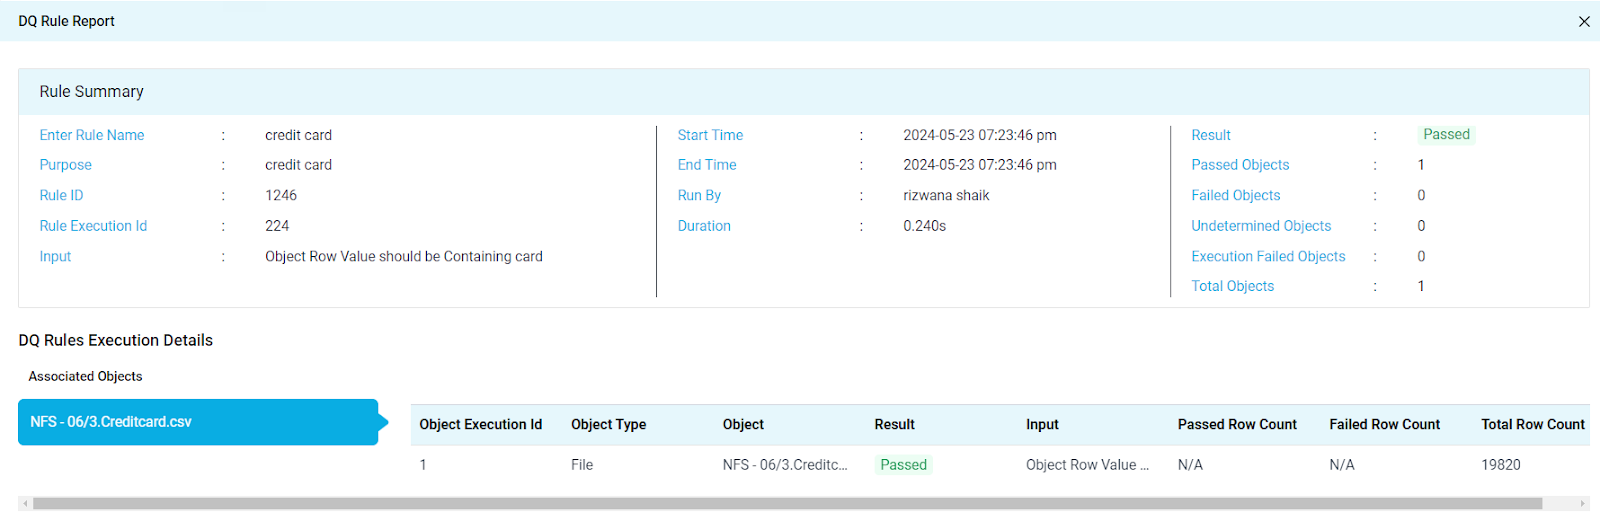
- DQ Rule Report: When a user accesses the Rule Execution ID, it opens up a DQR Report, offering in-depth insights into a specific rule execution, covering all execution details of associated objects within that execution.
- The DQ Rule Report is structured into two sections.
- The first section, Rule Summary, encompasses contextual information such as Rule Name, Purpose, Rule ID, Rule Execution ID, Success Criteria, configuration settings, timestamps of execution (Start time, End Time, Run By, and Duration), statistics of associated objects (Passed Objects, Failed Objects, Undetermined Objects, Execution Failed Objects, Total Objects), and the execution status (Result).
- The second section, DQ Rules Execution Details, provides information for associated objects, presenting contextual details, results, and statistics recorded post-rule execution. Users can freely select different objects and compare results within this section, facilitating a detailed analysis of the rule's impact on individual associated objects.
- The DQ Rule Report is structured into two sections.
- Result: This column presents essential information capturing the Execution Result of the DQR per execution. Users can utilize the filter option to sort DQR based on their execution results. The following options are available under this column:
- Failed: Indicates that the DQR encountered failure during its execution.
- Passed: Denotes successful completion of DQR execution without issues.
- Execution Failed: Indicates failure due to connection issues with associated objects or errors in Data Quality Function queries.
- Undetermined: Signifies an inconclusive determination of the DQR execution result. Additionally, an eye icon is provided, offering a message based on the status and a summary including Input, Success Criteria, Passed Objects, Failed Objects, Number of Service Requests Created, Number of Failed Values sent to Remediation Center, and Downstream Objects Cautioned.
- Passed Objects Count: This column displays the count of Associated Objects that were successfully executed during the rule execution.
- Failed Objects Count: This column lists the count of Associated Objects that encountered failures during the rule execution.
- Undermined Objects Count: This column indicates the count of Associated Objects that were undetermined during the rule execution.
- Execution Failed Objects Count: This column displays the count of Associated Objects that encountered execution failures during the rule execution.
- Total Objects Count: This column shows the count of the total Associated Objects added to the rule.
- Start Time: This column showcases the timestamp when the DQR execution was initiated.
- End Time: This column presents the timestamp indicating when the DQR execution was successfully completed.
- Duration: This column illustrates the duration taken by the DQR to complete its execution.
- Run By: This column exhibits the username of the individual who initiated the execution of the DQR.
Object Execution Results
This tab serves as a source of detailed information, providing insights into the execution details at the object level. It offers a comprehensive view of how each associated object has performed in each rule execution.
The important columns under this tab include:
- Rule Execution ID: Each Data Quality Rule (DQR) is assigned a unique Rule Execution ID, offering users a distinct identifier to discern and differentiate the execution results of a specific data quality rule.
- Object Execution ID: Each object associated with a data quality rule is allocated a unique Object ID for every execution. To understand the relationship between Object Execution ID and Rule Execution ID, consider the following example:
|
Data Quality Rule Name |
Email Validation |
|
|
No. of Associated Objects |
3 |
|
|
Name of Associated Objects |
Column 1, Column 2, Column 3 |
|
|
No. of Rule Executions |
4 |
|
|
Rule Execution Id |
Object Execution Id |
Object Name |
|
20 |
1 |
Column 1 |
|
20 |
1 |
Column 2 |
|
20 |
1 |
Column 3 |
|
21 |
2 |
Column 1 |
|
21 |
2 |
Column 2 |
|
21 |
2 |
Column 3 |
|
22 |
3 |
Column 1 |
|
22 |
3 |
Column 2 |
|
22 |
3 |
Column 3 |
|
23 |
4 |
Column 1 |
|
23 |
4 |
Column 2 |
|
23 |
4 |
Column 3 |
- In the provided table, the Email Validation Rule undergoes four executions, and for each Rule Execution, all three associated table columns share a common Object Execution ID. This correlation between Rule and Object Execution IDs facilitates linking the Data Quality Rule to its associated objects, enabling users to identify and monitor the execution details of the DQR alongside its objects.
- The following columns offer contextual information about the associated data objects when a Data Quality Rule is created for table columns. These columns are listed on the Object Execution Results tab.
- Database: This column showcases the database. Users can utilize the filter option to narrow down the respective databases for easier navigation and analysis.
- Schema: This column exhibits the schema. Users can utilize the filter option to narrow down and focus on specific schemas for more streamlined navigation and analysis.
- Table: This column shows the table name. Users can use the filter option to narrow down the respective tables for easier navigation and analysis.
- File: This column presents the file name. Users can leverage the filter option to narrow down the respective files for easier navigation and analysis.
- Column: This column indicates the column name to which the selected table/file column belongs. Users can use the filter option to refine the view and concentrate on the respective schemas for enhanced navigation and analysis.
- Failed Values: This column records the failed values identified after the rule execution. It is specifically supported for Table Column and File Column functions where the calculation of failed values is applicable. By clicking on the eye icon, users can view the entire list of failed values in that column.
- Passed Row Count: This column indicates the total number of passed rows present in the associated Table Column. This result is retrieved from the source system and is also displayed as a percentage.
- Failed Row Count: This column indicates the total number of failed rows present in the associated Table Column. This result is retrieved from the source system and is also displayed as a percentage.
- Total Row Count: This column indicates the total number of rows present in the associated Table Column. This result is retrieved from the source system and is also displayed as a percentage.
- Result Value: This column displays the calculated result value for a specific record after the rule execution.
For example: Data Quality Rule Name: Checking Valid Email Format
Purpose: To evaluate the count of valid email values within a specified column. The rule checks whether the email values conform to the standard pattern of “username@companydomain.com”
After the rule execution following statistics have been generated:
|
Total Row Count |
Passed Row Count |
Failed Row Count |
Success Criteria |
Result Value |
|
50 |
19 (38%) |
31 (62%) |
Result value count should be equal to 100 |
19 |
- In the provided example, out of a total of 50 rows in a table column, if 19 rows meet the criteria for records in the desired email format, then the Result Value will be 19.
- Result: This column presents essential information capturing the Execution Result of the DQR per execution. Users can utilize the filter option to sort DQR based on their execution results.
- The following options are available under this column:
- Failed: Indicates that the DQR encountered failure during its execution.
- Passed: Denotes successful completion of DQR execution without issues.
- Execution Failed: Indicates failure due to connection issues with associated objects or errors in Data Quality Function queries.
- Undetermined: Signifies an inconclusive determination of the DQR execution result.
- The following options are available under this column:
- Additionally, an eye icon provides a message based on the status and a summary including Result Value, Input, Success Criteria, Maximum Failed Values for Remediation, Service Request ID, Failed Values sent to Remediation Center, and Downstream Objects Cautioned.
- Run On: This column provides users with the timestamp indicating when the associated data object was last executed. Users can sort the entries by timestamp to view either the newest or oldest executions.
Service Requests
The Service Requests tab within a Data Quality Rule presents a comprehensive list of all service requests generated for that rule. These requests are initiated when the "Create Service Request on Failure" toggle is enabled. Service requests play a crucial role in the DQ Score calculation, holding a default weightage of 25 percent for an object, adjustable based on user preference. The formula for the Service Request Score is integral to ensuring accurate data quality assessment.
The below columns are displayed in the Service Request tab:
- Request ID: The Service Requests are each assigned a unique Request ID upon creation. This Request ID acts as a distinct identifier, aiding users in locating, identifying, and monitoring individual service requests. This unique identifier ensures effective management and traceability of service requests within the system.
- Request Description: Each Service Request has a request description which is auto generated based on the DQR Name, associated objects and the configured success criteria.
The below template is used:
Failure Data Quality Rule: (Data Quality Rule Name) for (Associated Object) (Success Criteria during rule execution)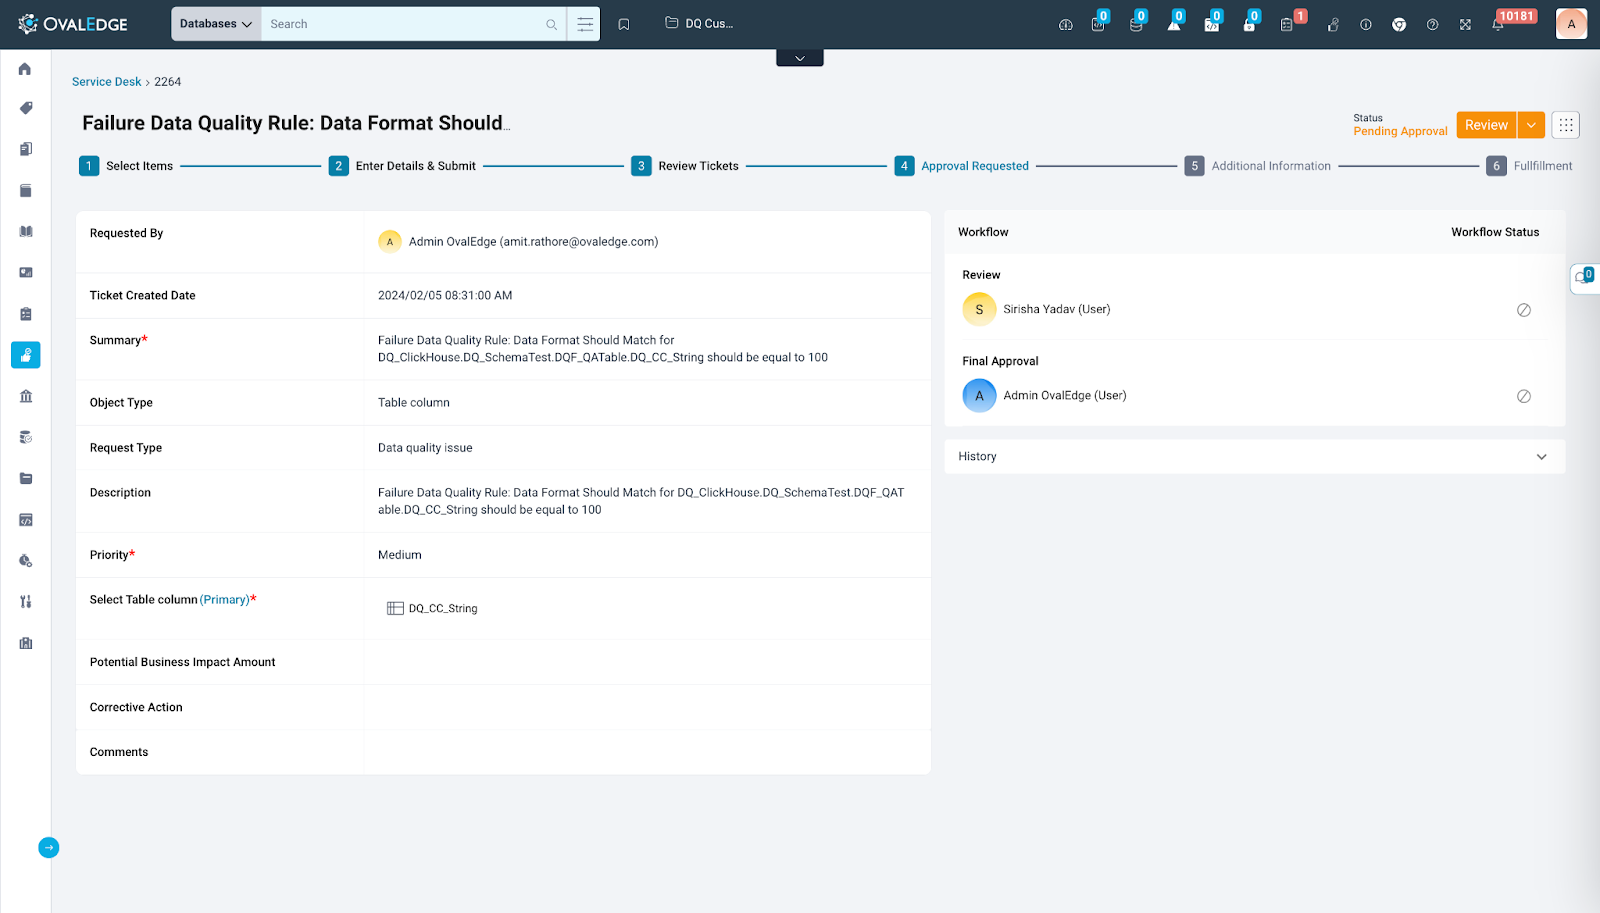
Here, users can adjust the Priority of the Service Request, selecting from options like Highest, High, Medium, Low, and Lowest. Moreover, users can update the status of the Service Request, moving it from Pending Approval to Review, Approve, or Reject. This interactive configuration page offers a comprehensive interface for managing and fine-tuning the attributes of individual Service Requests.
- Status: The Status column provides an overview of the current status of each Service Request, indicating its progress and position within the workflow. Service Requests can have various statuses, including Draft, Pending Approval, Reviewed, Rejected, Expired, Resolved, and Request Closed. These statuses are essential for organizing collaboration efforts and maintaining a structured workflow, thereby ensuring transparency and efficient tracking of each Service Request's lifecycle.
- Priority: The Priority column displays the priority level assigned to each Service Request (SR). By default, Service Requests are set to Medium priority upon creation. However, users can adjust and choose from priority levels such as Highest, High, Medium, Low, and Lowest. This feature allows for efficient organization and prioritization of tasks. Users can also utilize filtering options to group Service Requests based on their priority levels, facilitating better task management.
- Request Object: The Associated Object column displays the specific object for which the Service Request has been initiated. Users can utilize the search functionality to easily locate and identify the associated data objects linked to a particular Service Request. This capability streamlines the management and tracking of Service Requests, providing users with a convenient way to navigate and monitor requests within the system.
- Requested By: The "Requested By" column presents the username of the individual who initiated a Service Request. By default, this is typically the Data Quality Rule Steward.
- Created On: The "Created On" column indicates the date when a particular Service Request was created. Users can utilize the sorting feature to arrange the Service Requests chronologically, enabling them to prioritize or review them based on their creation dates.
Contacts
The Contacts tab serves as a repository for storing the contact details of users designated to receive email notifications related to the Data Quality Rule. This feature supports both OvalEdge users and external contacts, fostering collaboration by consolidating essential contact information in one centralized location.
Admins configure SMTP settings in System Settings > Notifications for email alerts to work.
Adding Contacts
The "Add Contacts" option provides flexibility in adding email notification contacts within a Data Quality Rule. This includes the following categories:
- OvalEdge User: This option offers an existing list of OvalEdge users who can be added as contacts to a specific rule.
- Existing External Users: Users can select from a list of external users whose contact details are already configured within OvalEdge, streamlining the process of adding them to a Data Quality Rule.
- New External Users: This option enables the configuration of contact details for a new external user who should receive email notifications for various actions related to a Data Quality Rule.
Contacts added can be configured to receive notifications for specific actions, including Notify on Edit, Notify on Passed, and Notify on Failed. This feature enhances customization and ensures that stakeholders are informed based on their preferences and the relevant actions within the DQR.
User Actions Using Nine Dots
The Nine Dots option lists a number of functionalities that users can perform across different tabs of the Data Quality Rule. These functionalities are listed below:
- Change Status: This option enables users to modify the status of the Data Quality Rule. The status can be switched between Active and Draft as needed.
- Delete Rule: This option allows users to delete the particular Data Quality Rule.
Remove Associated Objects: This option permits users to eliminate associated objects from the Data Quality Rule. To execute this action, the Data Quality Rule must be in the Draft state, and the specific objects intended for removal must be selected from the Associated Objects tab. - Regenerate Object Queries: This option becomes relevant when modifications are made to the Data Quality Functions Template queries. To update the Data Quality Functions object queries for pre-existing Data Quality Rules , users should utilize this functionality. Clicking on this option initiates a background job that regenerates the Data Quality Functions queries for all associated objects within a Data Quality Rules.
- Run Now: This option empowers users to run a Data Quality Rule. To execute a rule, it must be in the Active state.
- Update Steward: Using this option, users can update the steward of a specific Data Quality Rule. It is important to note that the rule steward can only be updated if the DQR is in the Draft state.
- Delete Contacts: This option allows users to delete added contacts within a Data Quality Rule). To execute this action, the rule must be in the Draft state.
Rule Recommendations
Data Quality Rule Models streamline data management. Previously, applying rules to various data types took time, leading to delays and issues. Rule Models eliminate this hurdle, enabling users to simultaneously handle rules for multiple data types (tables, files, etc.). This simplifies the process and saves significant time.
Users can create, run, and adjust rules in bulk, offering a more efficient approach. Additionally, Rule Models provide:
- Clear recommendations.
- Allowing users to accept or reject them quickly.
- Minimizing errors and accelerating decision-making.
Furthermore, valuable features like bulk actions and detailed metrics enhance user understanding of model performance. Compatibility with existing tools (Data Quality Rules, notifications) ensures continuous synchronization and informed users.
For further insights, please refer to the comprehensive article on this topic.: Data Quality Rule Recommendations | Deep Dive
Data Quality Remediation Center
The Data Quality Remediation Center is intended for business users. It acts as an error-trapping table for business users to get a detailed view of the Failed Values coming from data objects associated with a Data Quality Rule.
The Data Quality Remediation Center lists the failed values coming from the data objects associated with executed data quality rules; provides contextual information (connector name, schema name, object name) about them, and allocates a user who works on carrying out the Remediation Process.
The Data Quality Remediation Center will list the following columns:
- Failure ID: This column lists the ID of each failed value being reported into the Data Quality Remediation Center. This ID will be unique and help differentiate each value in the Data Quality Remediation Center. With the help of a search utility, users can search for a particular failed record. Also, the sorting option helps in arranging these values.
- DQ Rule Name: This column plays a crucial role in informing users about the specific Data Quality Rule associated with a failed data object. This information is important for tracking the rule to which a particular data object belongs, allowing users to address the source of the failure. The "DQ Rule Name" field is a hyperlink, enabling users to navigate to the corresponding Data Quality Rule page. This redirection provides users with a deeper understanding of the failed value, offering insights into the details of the rule and its parameters and potentially offering guidance on effective remediation strategies.
- Violation Message: The purpose of a violation message is to provide information about why a particular data object has failed to meet the specified criteria. It serves several essential purposes for the technical and business users in identifying the root cause of the issue. The violation message is key for bridging the gap between users, fostering better communication, and enabling effective data quality management across various scenarios.
Configuration
The Violation message is configured at the Data Quality Rule level for the functions that are supported for the Data Quality Remediation Center. There are two levels of configuration:
- Rule Level: The configured message at this level will be reflected for all the associated data objects within the rule.
- Object Level: As multiple objects within a Data Quality Rule exist, there can be different violation messages for different objects. Therefore, with the object level configuration, users can enter the violation message specific to that particular object.
The object-level configuration, if provided, will be reflected in the Data Quality Remediation Center, and the rule-level configuration will be superseded.
The complete Violation Message in Data Quality Remediation Center will be viewed when a user hovers over the field and can be read from the tooltip.
The "Violation Message" and "Remediation Help" fields work hand in hand to create a comprehensive system for managing data quality. The violation message identifies and explains issues, while the remediation help field equips users with the tools and knowledge needed to address and resolve those issues effectively. They contribute to a more informed, collaborative, and efficient data quality management process.
Failed Values
- This column is of great significance under the Data Quality Remediation Center as it lists the failed values that are being reported. Each failed row is reported as a separate entry in the Data Quality Remediation Center.
- Each failed row value has an eye icon next to it, and clicking on this will open the popup listing the Primary and Secondary columns associated with the reported failed row, which will help the users understand contextual information about the failed row and help them in the remediation process.
Failed Values Counter
- The "Failed Values Counter" column in the Data Quality Remediation Center keeps track of how many values or rows have failed from a specific table column. For instance, if you see "8/41," it means it is the 8th failed value out of a total of 41 reported failed values.
An important detail is the warning icon that appears next to the failed value when the actual count of failed values surpasses the reported count. This warning alerts users if there are more failed values than what's officially reported.
To illustrate, let us consider a scenario where, at the Data Quality Rule level, associated table columns have 100 rows and the Max Failed Values Limit is set to 50. After a rule failure, all the rows failed, resulting in a total of 100 failed values. However, since the maximum configured value to be reported is 50, only the first 50 will be reported in the Data Quality Remediation Center. The warning icon steps in to make users aware of the potential issue. It signals that the actual count of failed values is higher than what's officially reported, prompting users to notice and address these additional failed records that may require attention.
Contextual Information
- Connector: This column lists the connector name from where the failed records are coming into the Data Quality Remediation Center.
- Schema: This column will list the schema name of the failed values.
Object: This column displays the Table Column name under which the failed rows are present and are being reported to the Data Quality Remediation Center. - Attribute: This column displays the Table Name from which the failed rows are being reported into the Data Quality Remediation Center.
- Remediation Assignee: The purpose of this Data Quality Remediation Center is to record the failed values and help in carrying out the remediation. Hence, the Remediation Assignee field lists the designated person who needs to be notified as well as supposed to be working on fixing the failed records.By default, the Data Asset Custodian of the failed record is assigned as the Remediation Assignee, which can be updated. It is important to note that only Author license users can be updated as remediation assignees.
- Current Status: This field lists the status of the failed values with respect to the remediation process. The below statuses are displayed in the Data Quality Remediation Center:
- New - This status indicates that the remediation process has not yet commenced. It signifies that no action has been taken to address the issue.
- In Progress - This status reflects that the remediation process is actively underway. It is used when actions are being initiated to resolve the issue.
- Corrected - This status is applied when the remediation has been successfully completed. It signifies that the issue has been resolved and is no longer a concern.
- Void - This is used to classify a failed value as invalid. It is used when a rule mistakenly identifies values as failed and sends them to the Data Quality Remediation Center, even though they are not actually errors. In these cases, the values are marked as "Void" in the Data Quality Remediation Center, indicating that they should be ignored as errors.
- Allowed - This is used when a value is a valid exception and requires review. When you designate selected value(s) as "Allowed," they are removed from the Data Quality Remediation Center because they are no longer necessary for remediation.
Note: When a user designates selected value(s) as “Corrected,” “Void,” or "Allowed," they are archived from the Data Quality Remediation Center as they have been acknowledged.
Remediation Help
- The purpose of this field is to provide users with the information that can be used to facilitate the remediation process.
- This field will have an remediation help icon, which, upon clicking, will display a pop-up showing the Corrective Action field and the Assistance SQL.The Corrective Action field provides actionable guidance and assistance to users on how to address and remediate data quality issues. This field is intended to offer practical steps, recommendations, or references that can help business users resolve the specific problems flagged by the data quality rules. Users can tag Data Stories within this field, clicking on which will redirect them to the respective data story, helping them in carrying out the remediation.
Configuration
The Corrective Action field is configured at the Data Quality Rule level, and the same content is being mapped to the Data Quality Remediation Center.
Below the Corrective Action field, users are provided with an Assistance SQL, which, when executed on the query sheet, will list all the failed values falling under the particular table column. The “Open To Query Sheet” option will help users open this query in the query sheet and offer users the flexibility to identify the failed values.
- Monetary Value: This field is configured at the Data Quality Rule level and will help the users understand the cost of each failed value being reported as an independent entry in the Remediation Center.
- Criticality: The criticality field helps users understand the severity of the failed value and how critical is a failed value for the users. With monetary value and criticality fields, users can understand the impact a particular failed value will cause.
- Rule Execution Id: This column lists the rule execution id. This helps users in tracking the failed value being reported during a particular DQR execution.
- Object Execution Id: This column lists the object execution id. This helps users in tracking the
- Assigned On: This displays the details, i.e., the timestamp when a particular failed value was reported to the remediation center.
Data Anomalies
Data anomalies are unexpected values that differ significantly from past data. These deviations disrupt typical patterns and can arise from data integration issues, process changes, migration errors, human mistakes, or system failures.
Anomalies can lead to inaccurate analysis, decisions, and reports, potentially harming businesses. Detecting and fixing them is vital for good data quality management, ensuring data is accurate, complete, consistent, and valid.
OvalEdge identifies anomalies during profiling by comparing newly profiled data with previously profiled data. Any inconsistencies are flagged as anomalies.
A list of detected anomalies is available for review in Data Anomalies. This section provides details like anomaly type, assigned person for correction, and other relevant information.
Data Anomaly Detection
- Supported Objects: Schemas, Tables, and Table Columns (for RDBMS connectors only).
- Algorithms: Deviation or Deflection (configurable by admins in System Settings).
- Calculated Statistics: The table below presents the computed statistics associated with each object type.
|
Object Type |
Profiling Statistics |
Anomaly Type based on Algorithm |
|
Schema |
Table Count |
Deviation:
IQR:
|
|
Table |
Row Count |
Deviation:
IQR:
|
|
Table Column |
Distinct Count Null Count |
Deviation:
IQR:
|
Data Anomaly Algorithm
OvalEdge offers two anomaly detection algorithms that are configurable through System Settings.
Interquartile Range (IQR)
The Interquartile Range (IQR) algorithm is a statistical measure used to assess the spread or dispersion of a dataset. It focuses on the middle 50% of the data, specifically the range between the first quartile (Q1) and the third quartile (Q3).
The steps below are involved in the calculation:
- Sort the Data:
- Arrange the dataset in ascending order.
- Calculate Quartiles:
- Q1 (First Quartile): This is the median of the lower half of the dataset.
- Q3 (Third Quartile): This is the median of the upper half of the dataset.
- Calculate IQR:
- IQR is determined by subtracting Q1 from Q3: IQR = Q3 - Q1.
- Identify Outliers:
- Any data points below Q1 - 1.5 * IQR or above Q3 + 1.5 * IQR are considered potential outliers.
Example:
Consider a scenario where we have profiled a table with the following statistics:
Profile Executions:
Profile 1 Row Count - 40
Profile 2 Row Count - 67
Profile 3 Row Count - 87
Profile 4 Row Count - 76
Profile 5 Row Count - 85
Profile 6 Row Count - 70
Profile 7 Row Count - 80
The steps below are involved in the calculation:
- Sort the Data:
- Arrange the dataset in ascending order.
- 40, 67, 70, 76, 80, 85, 87
- Arrange the dataset in ascending order.
- Calculate Quartiles:
- Q2 (Second Quartile): 76 (Overall Median)
- Q1 (First Quartile): Median of the First Half (40, 67, 70) = 67
- Q3 (Third Quartile): Median of the Second Half (80, 85, 87) = 85
- Calculate IQR:
- IQR is determined by subtracting Q1 from Q3:
- IQR = Q3 - Q1
- IQR = 85 - 67 = 18
- Identify Outliers:
- Any data points below Q1 - 1.5 * IQR or above Q3 + 1.5 * IQR are considered potential outliers.
- Q1 - 1.5 * IQR = 67 - 1.5 * 18 = 40
- Q3 + 1.5 * IQR = 85 + 1.5 * 18 = 112
- Any data points below Q1 - 1.5 * IQR or above Q3 + 1.5 * IQR are considered potential outliers.
- Now let us assume we have done the 8th Profile,
- Case 1: We got the Row Count as 150
- Case 2: We got the Row Count as 90
- In Case 1, we consider it an anomaly and report it to the Data Anomalies because it does not fall under the range of 40 - 112.
- In Case 2, we consider it a normal value and do not report it to the Data Anomalies because it falls under the range of 40 - 112.
Deviation
The Deviation Algorithm assesses the deviation percentage in profiling metrics among supported data objects. The Last Profiled and the Recently Profiled data are considered for anomaly detection using the deviation algorithm. The algorithm computes the percentage increase or decrease by comparing the recent and last profiled data statistics.
Example:
Consider a scenario where we are profiling a table with the following statistics:
- Row Count in First Profiling: 50
- Row Count in Second Profiling: 85
Now, let's compute the deviation percentage:
Deviation Percentage = ((Recent Profiled - Last Profiled) / Last Profiled) * 100
Deviation Percentage = ((85 - 50) / 50) * 100
= 70%
- The deviation percentage between the first and second profiling is 70%.
- Case 1: If the user sets the threshold value at 50%, we consider this an anomaly and report it to the Data Anomalies as a positive deviation.
- Case 2: If the user sets the threshold value at 75%, we consider this a normal value and do not report it.
Data Anomaly Detection Configuration
Levels:
- Global: Apply settings across the entire application.
- Connector: Configure settings for specific RDBMS connectors and overrides global settings for that connector.
- Schema: Choose which schemas within an RDBMS connector to analyze for anomalies.
- Object: Define custom settings for individual profiling statistics of each data object.
Global Level
Global settings are configured in Administration > System Settings and apply across the entire application.
- Enable/Disable Anomaly Detection:
- Key: anomaly.detection.analysis.enabled
- Default Value: TRUE
- TRUE: Enables anomaly detection functionality.
- FALSE: Disables anomaly detection functionality. Note: Disabling grays out connector and data object level settings.
- Supported Anomaly Detection Algorithms:
- Key: anomaly.detection.analysis.algorithm.list
- Default Value: Deviation, IQR
- Description: This setting defines the list of available algorithms for anomaly detection. Users can enter the algorithms' names separated by commas.
- Active Anomaly Detection Algorithm:
- Key: anomaly.detection.analysis.algorithm.selection
- Default Value: Deviation
- Description: This setting allows users to choose the primary algorithm used for anomaly detection.
- IQR Threshold:
- Key: anomaly.detection.analysis.iqr.range
- Default Value: 1-50
- Description: This setting defines the IQR algorithm's threshold range (percentage change) to identify anomalies. Values outside this range are flagged.
- Deviation Threshold:
- Key: anomaly.detection.analysis.deviation.threshold
- Default Value: 50
- Description: This setting defines the threshold percentage (above or below) for the deviation algorithm to identify anomalies. Values exceeding this threshold are flagged.
Connector Level
Anomaly detection is only available for RDBMS connectors. Integration Admins can configure unique settings for each connector, overriding the global settings.
Configuration Steps:
- Navigate to Administration > Connectors.
- Select an RDBMS Connector (SQL Server) and access its "Nine Dots."
- Select “Settings” and go to the "Anomaly Detection Settings" tab.
- Choose "Custom Setting" and configure the following:
- Enable/Disable anomaly detection for this specific connector.
- Preferred anomaly detection algorithm (Deviation Percent or InterQuartile Range)
- Threshold Range/Percentage for the chosen algorithm.
Schema Level
Integration Admins can choose which schemas within an RDBMS connector to analyze for anomalies.
Configuration Steps:
- Go to Administration > Connectors.
- Select an RDBMS connector.
- Click the "Crawl/Profile" button.
- Choose the number of schemas to include for anomaly detection.
- Select "Crawl/Profile" or "Profile" (profiling is required).
- Check "Execute Anomaly Detection."
- Click "Run" to start background jobs that calculate anomalies for the chosen schemas.

Notes:
- Anomaly detection settings are only available for RDBMS connectors.
- Profiling is mandatory for anomaly detection to function.
Object Level
The Object Level custom settings are configured specifically for the selected profiling statistics of each data object.
Example:
Null Count and Distinct Count are the two available profiling statistics for table columns. To configure custom settings for a table column titled "CHARACTER_SET_NAME," Null Count is selected first, and configuration is done accordingly. However, settings applied for Null Count will not be reflected for Distinct Count statistics.
Configuration Steps:
- Navigate to Data Catalog. Select any supported object type (Schema, Table, Table Column).
- Click on the Anomaly Detection Settings from the Nine Dots.
- Select the Custom Setting Radio button.
- Choose the preferred algorithm for anomaly detection.
- Specify the threshold range/percentage for the selected algorithm.
- Use the Skip Anomaly Detection option to exclude anomaly detection for the selected profiling statistics of the particular data object (Schema, Table, Table Column).
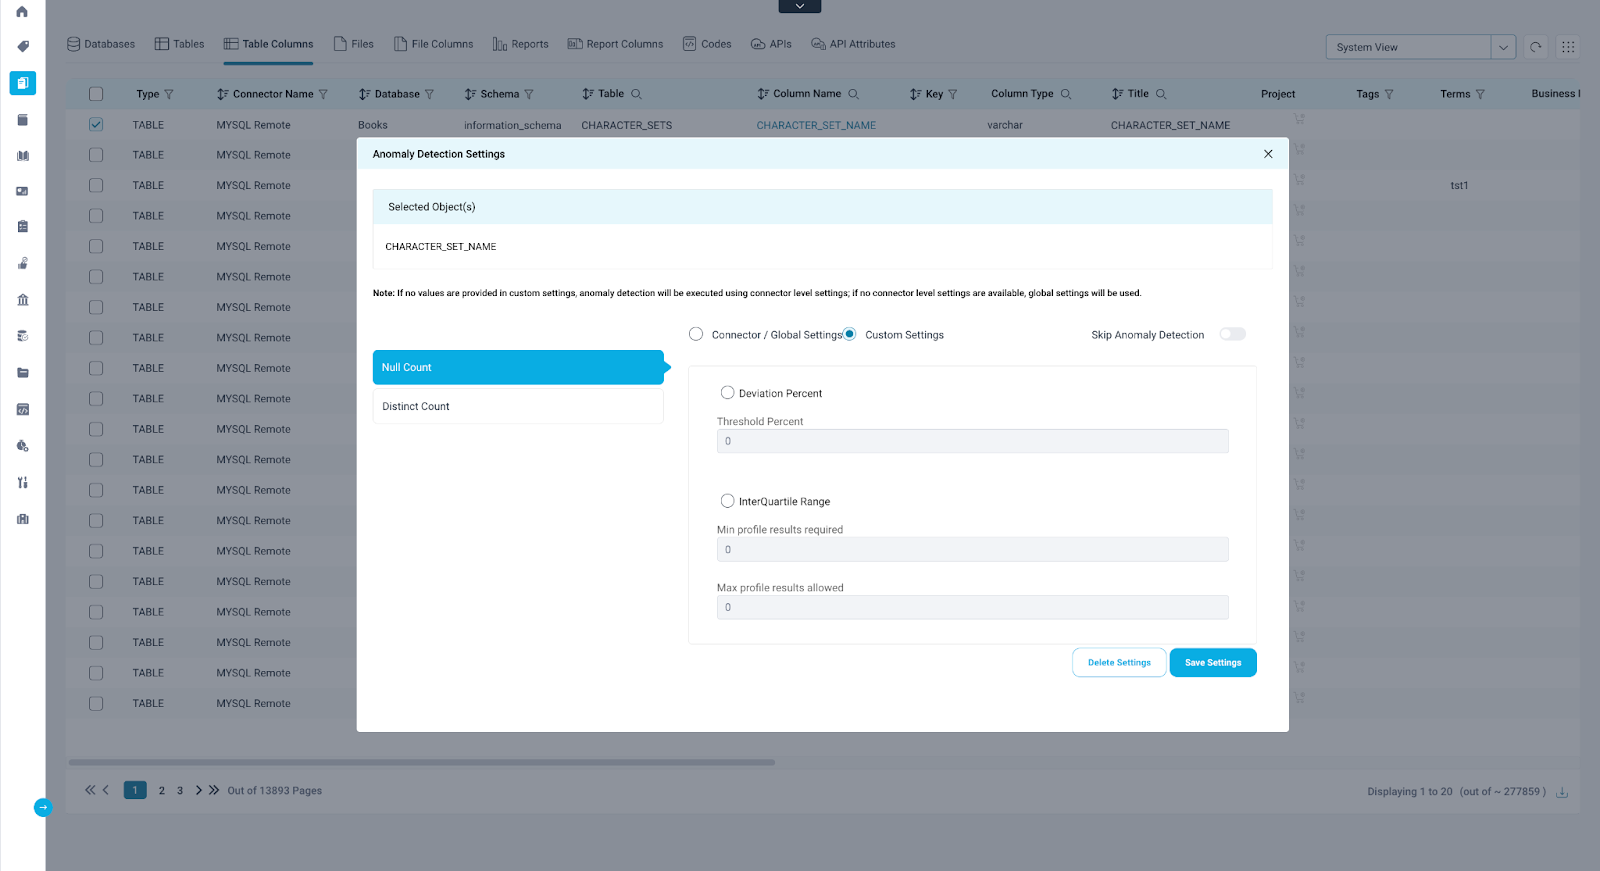
Note: The Skip Anomaly Detection option is available in the object-level settings, offering the flexibility to include or exclude the selected data object from anomaly detection. The object-level settings take precedence over the connector and global-level settings for Anomaly Detection.
Viewing Data Anomalies
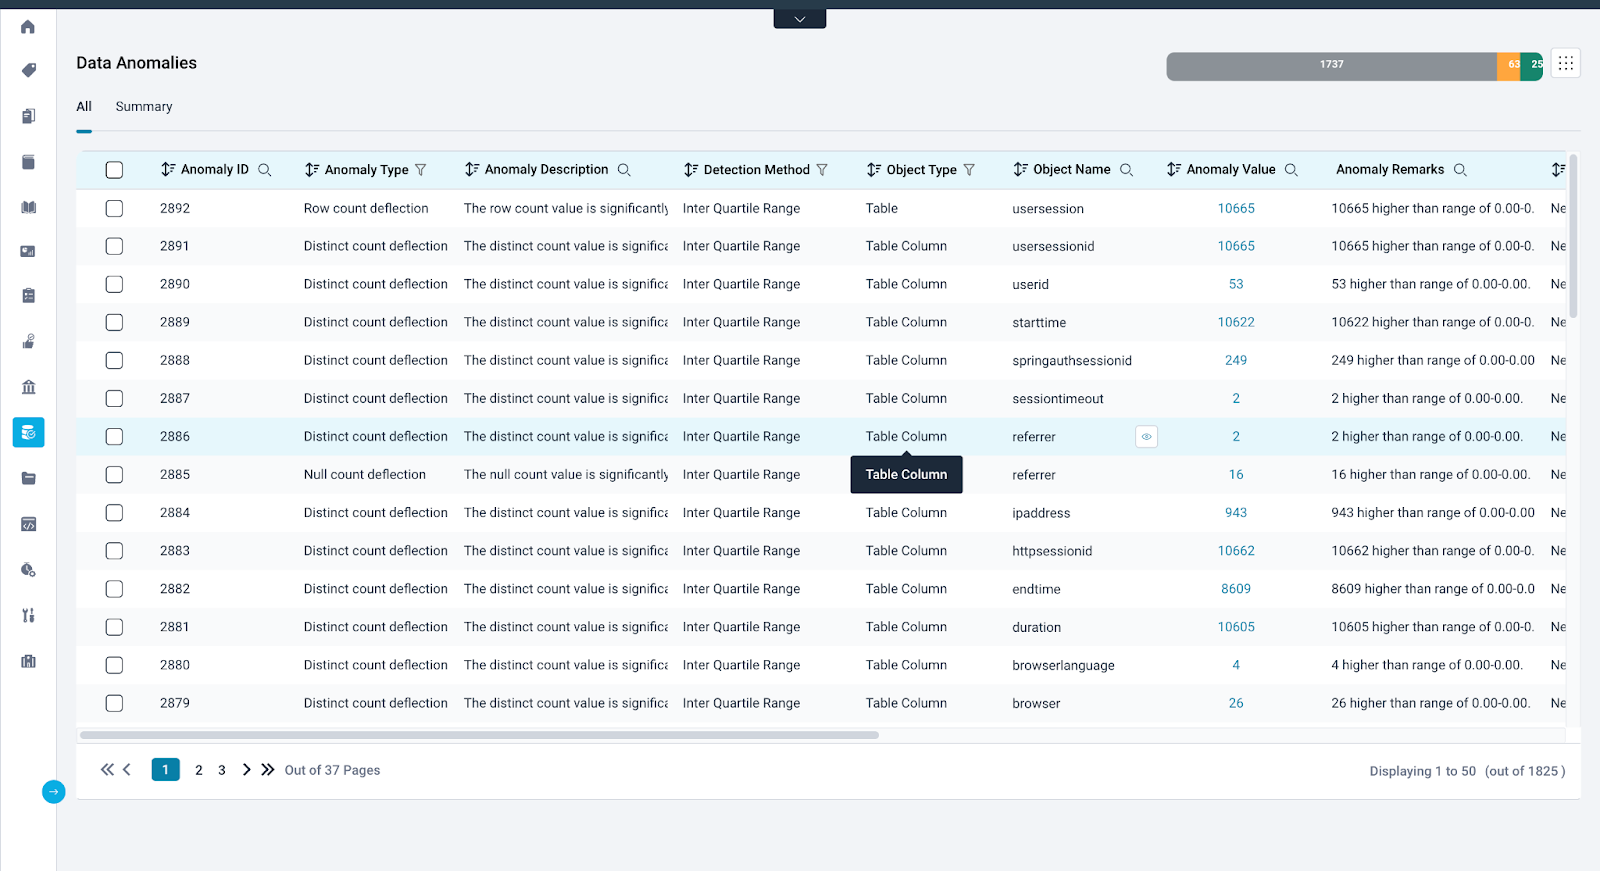
The Data Anomalies page provides a central location to review all detected anomalies and their details.
All
This tab lists all identified anomalies and offers various filters and sorting options for detailed analysis:analysis:
|
Field |
Description |
|
Anomaly ID |
Displays the unique identifier for each anomaly. |
|
Anomaly Type |
Displays the category of the anomaly based on profiling statistics and detection algorithms. Example: IQR:
|
|
Anomaly Description |
Provides a concise explanation of the anomaly. When hovering over a description, complete information is revealed, which makes it easier for the assignee to address the identified issues effectively. |
|
Detection Method |
Displays the algorithm name used to detect the anomaly (Interquartile Range or Deviation). |
|
Object Type |
Displays the data object type with the anomaly (Schema, Table, or Table Column). |
|
Object Name |
Displays the name of the data object with the anomaly. |
|
Anomaly Value |
Displays the details on how the anomaly affects specific profiling statistics over time. Clicking this reveals a trend graph for further analysis. |
|
Anomaly Remarks |
Describe the change based on profiling statistics (e.g., "X% positive deviation from the previous value of Y"). Example:
Note: X, Y, and Z are the variables |
|
Anomaly Status |
Displays the current state of the anomaly
Note: When a user designates selected value(s) as “Corrected,” “Void,” or "Allowed," they are archived from the Data Anomalies as they have been acknowledged. |
|
Assignee |
Displays the name of the user who has been assigned to investigate and resolve the anomaly. Data object custodians are typically assigned by default. These assignees get notifications whenever there is a change in the anomaly status or whenever the assignee is updated. Only Author license users can be the assignee. |
|
Executed By |
Displays the user's name who triggered the anomaly detection on the specific object. |
|
Updated By |
Displays the name of the user who last modified the anomaly status. |
|
Detection Date |
Displays the date and time the anomaly was detected. |
|
Profiled Date |
Displays the date and time the data object was last profiled. |
|
Updated On |
Displays the date and time any changes were made to the anomaly. |
|
Job ID |
Displays the Job ID associated with detecting and reporting the anomaly. |
|
Logs |
Displays the Job logs for the specific Job ID. |

Summary
This tab provides an overview of anomalies reported for each data object:

|
Field |
Description |
|
Anomaly Type |
Category of the anomaly based on profiling statistics and detection algorithm. Example: IQR:
|
|
Object Type |
Displays the type of object on which the anomaly has been detected and reported. |
|
Anomaly Count |
Displays the count of reported anomalies for the specific object. |
|
Object Name |
Displays the Name of the data object with anomalies. |
|
Start Date |
Displays the Date when the first anomaly was detected for the object. |
|
End Date |
Displays the Date when the last anomaly was detected for the object. |
Data Quality Score
The Data Quality Score allows users to assess the data quality of the data objects. It considers various factors during calculation, which can be triggered during profiling or running data quality rules.
- Data Quality Rule Score: This score reflects the results of data quality rules executed on the specific object. The better the data adheres to the rules, the higher the score.
- Profile Score: This score is based on the null density (percentage of missing values) identified during profiling. A lower null density translates to a higher profile score.
- Child Score: For objects with hierarchical relationships (e.g., a table column being a child of a table), the data quality scores of these child objects are factored in.
- Service Request Score: This score acts as a reduction factor. It considers data quality service requests raised and resolved on the object. A higher number of unresolved issues lowers the score.
The Data Quality Score provides a weighted average of these factors, giving users a clear picture of their data's health.
Data Quality Rule Score
Data Quality Rules are essential for evaluating data quality in OvalEdge. They define specific criteria that data must adhere to, and their success or failure is determined based on the data quality function's results. These rules hold a significant weight (typically 25%) in calculating the overall data quality score, highlighting their importance in assessing data health. Here's how it works:
Calculating the Data Quality Rule score involves three cases:
- The rule is a success.
- The rule is a failure with statistical information.
- The rule is a failure with no statistical information.
|
Data Quality Rule Outcome |
Resulting Weightage |
|
The rule is a success |
1 |
|
The rule is a failure with statistical information. |
Passed Values/ Total Number of Values |
|
The rule is a failure with no statistical information. |
0 |
For example, the rules A, B, and C ran on their corresponding data objects.
- Rule A was successful. Hence, its weightage factor is 1.0.
- Rule B was a failure and with no statistical information. Hence, its weightage factor is 0.
- Rule C failed and has the statistical information that the function has passed on 2,000 columns out of the total 10,000 columns. Hence, its weightage factor is 0.8.
Profile Score
The Profile Score offers a quick assessment of data quality during profiling, even without data quality rules. This score focuses on the profiled object's null density (percentage of missing values). Here's how it works:
- Calculation: Null density plays a key role in the calculation. A higher null density indicates a larger portion of missing values, leading to a lower score. Conversely, a lower null density signifies good data completeness and results in a higher score.
- Weighting: By default, the profile score contributes 25% to the overall data quality score.
- Dynamic Updates: The score automatically recalculates when the object's null density changes or when the object is profiled again, ensuring it reflects the latest data quality.
The Profile Score provides a valuable indicator of how well the data is populated, offering insights into potential data quality issues.
Child Score
The Child Score assesses the quality of related objects, such as table columns within a table. It plays a role in the overall data quality score only when child objects are present. Here's how it works:
- Weightage: When child objects exist, their quality contributes a default weightage of 50% to the data quality score.
- No Child Objects: If no child objects are associated with the main object, the child score weightage becomes 0%.
- Weight Redistribution: In the absence of child objects, the 50% weightage originally allocated to the child score is redistributed to the Data Quality Rule Score. This increases the weightage of Data Quality Rules from the default 25% to 75%.
The Child Score provides an additional layer of evaluation for objects with hierarchical structures. However, when there are no child objects, the focus shifts entirely to the adherence to data quality rules.
Service Request Score
The Service Request Score plays a crucial role in the Data Quality Score by acting as a reduction factor. It considers the impact of unresolved data quality issues on a specific data object. Here's how it works:
- Function: Service requests are created when a Data Quality Rule fails. This can happen automatically based on rule settings or manually by users. These requests essentially act as tickets notifying data stewards (responsible parties) about potential data quality problems.
- Impact on Score: The Service Request Score has a default negative weightage of 25% (configurable in "System Settings"). This means more unresolved service requests (indicating more outstanding issues) lower the overall data quality score. Conversely, fewer unresolved requests signify better data quality and lead to a less negative impact on the score.
The Service Request Score encourages proactively addressing data quality issues and helps users improve data health by resolving service requests.
Configurations
The weightage of the scores can be configured in “System Settings > Data Quality.”
Type of Score |
Parameter |
Default Weightage (%) |
Default Weightage, if no Child (%) |
|
Rule Score |
dq.dashboard.dqrscore.weightage |
25 |
75 |
|
Profile Score |
dq.dashboard.profilescore.weightage |
25 |
25 |
|
Child Score |
dq.dashboard.childscore.weightage |
50 |
0 |
|
Service Request Score |
dq.dashboard.srscore.weightage |
25 |
25 |
Note: The sum of Profile Score, DQ Rule Score, and Child Score should equal 100 and the Service Request Score is the Reduction Factor.
Age Factor
In addition to the above metrics, the age of the Data Quality Rule or the Service Request raised will also be considered for the data quality score calculation. The objective is to ensure that the Data Quality Score is as recent as possible to give an accurate quality perspective. The older the quality data, the lesser its impact. The table below illustrates the age factor multiplier, with each element multiplied to compute the scores.
|
When was the DQ rule Executed, or SR was raised? |
Age Factor |
|
1 to 30 days ago |
1 |
|
31 to 60 days ago |
0.9 |
|
61 to 90 days ago |
0.8 |
|
91 to 120 days ago |
0.7 |
|
121 to 150 days ago |
0.6 |
|
151 to 180 days ago |
0.5 |
|
181 to 210 days ago |
0.4 |
|
211 to 240 days ago |
0.3 |
|
241 to 270 days ago |
0.2 |
|
Over 271 days ago |
0.1 |
How is the Data Quality Score Calculated?
The Data Quality score is determined by adding the scores of four components:
- Data Quality Rule score
- Profile Score
- Child Score
- Service Request Score (Reduction Factor)
Before calculating the Data Quality Score, it is necessary to calculate these scores using the following formulas.
Data Quality Rule Score:
(Passed Values / Total number of values) x Age Factor x Weightage, expressed as a percentage.
Profile Score:
(100- Null Density Percentage) x Weightage, expressed as a percentage.
Child Score: The Data Quality Score of the associated child objects.
If no child objects are present, the weightage (50%) of the child score is added to the DQ rule score weightage (25%). This score is obtained based on the average DQ score of the child objects.
Service Request Score:
Σ (Open Service Requests in that period) x (Age Factor) x (- weightage of SR Score) / Total number of SRs, expressed as a percentage.
The Formula to calculate the Data Quality Score is illustrated below, along with the corresponding default weightage:
- If child objects are present: Profile Score (25%) + DQ Rule Score (25%) + Child Score (50%) + Service Request Score (25%)
- If child objects are not present: Profile Score (25%) + DQ Rule Score (75%) + Service Request Score (25%)
Example
- Object Type: Table
- Number of Data Quality Rules Executed: 1
- Data Quality Rule Executed Period: 35 days ago
- Data Quality Rule Outcome: Failed
- Total Values: 10
- Number of Passed Values: 3
- Number of Failed Values: 7
- Number of Active Service Requests: 3
- Service Requests Raised Period: One 13 days ago, one 47 days ago, one 93 days ago
- Total Number of Service Requests: 10
- Number of Child Objects: 5
- Null Density Percentage: 20
Data Quality Rule Score Calculation
If the Data Quality rule score of the data object mentioned in the above example has to be calculated, then as a rule in totality is a failure and the statistics are available, the failed and the passed values of the data object will be considered.
So, the formula is (Passed Values (3) / Total number of values (10)) x Age Factor (0.9) x Weightage (0.25) = DQ Rule Score (6.75)
Profile Score Calculation
(100- Null Density Percentage (0.20)) x Weightage (0.25) = Profile Score (19.96)
Child Score Calculation
The Child Score is an average of the Data Quality Scores of all the associated child objects multiplied by the weightage allocated for Child Score.
Child Score = ∑ (Data Quality Scores of child objects) x Weightage for Child Score
To understand it better, let's take an example of ”5” child objects with the Data Quality Scores 52, 62, 33, 95, and 88. The average score of these child objects is “66.” The default weightage of the Child Score is 25%, so the child score in this scenario will be “16.”
Service Request Score Calculation
Let us consider the data object in the above example. The formula that is used to calculate the Service Request score is as follows:
∑ Open Service Requests in that period x (Age Factor) (1x1 + 1x0.9 + 1x0.7)
x (- weightage of SR Score ) (-0.25) / Total number of SRs (10) = - 6.5
The sum of the four above scores will be the Data Quality Score.
In this case, the Data Quality Score would be equal to the Data Quality Rule Score (6.75) + Profile Score (19.96) + Child Score (16) + SR Score (-6.5) = 36.21.
Data Quality Dimension Score
Data Quality Dimension Score refers to the quality of data across various dimensions. The specific dimensions and criteria used to calculate the score can vary depending on the type of data being evaluated.
The dimension score is similar to the Data Quality score, but it is calculated at the dimension level.
The formula to calculate the Dimension score is:
∑ (DQ Rule Score + Profile Score + Child Score + Service Request Score) for the given Dimension = Data Quality Dimension Score
Note: The Data Dimension Score only considers the Service Requests generated by the application while disregarding those initiated manually by the user (since there is no way to associate the manually created service requests to a dimension).
Viewing Data Quality Score
In the OvalEdge application, a user can access the data quality score of a specific data object from the following modules:
Data Catalog
Navigate to the Data Object > Summary and click the “View Dashboard” option.
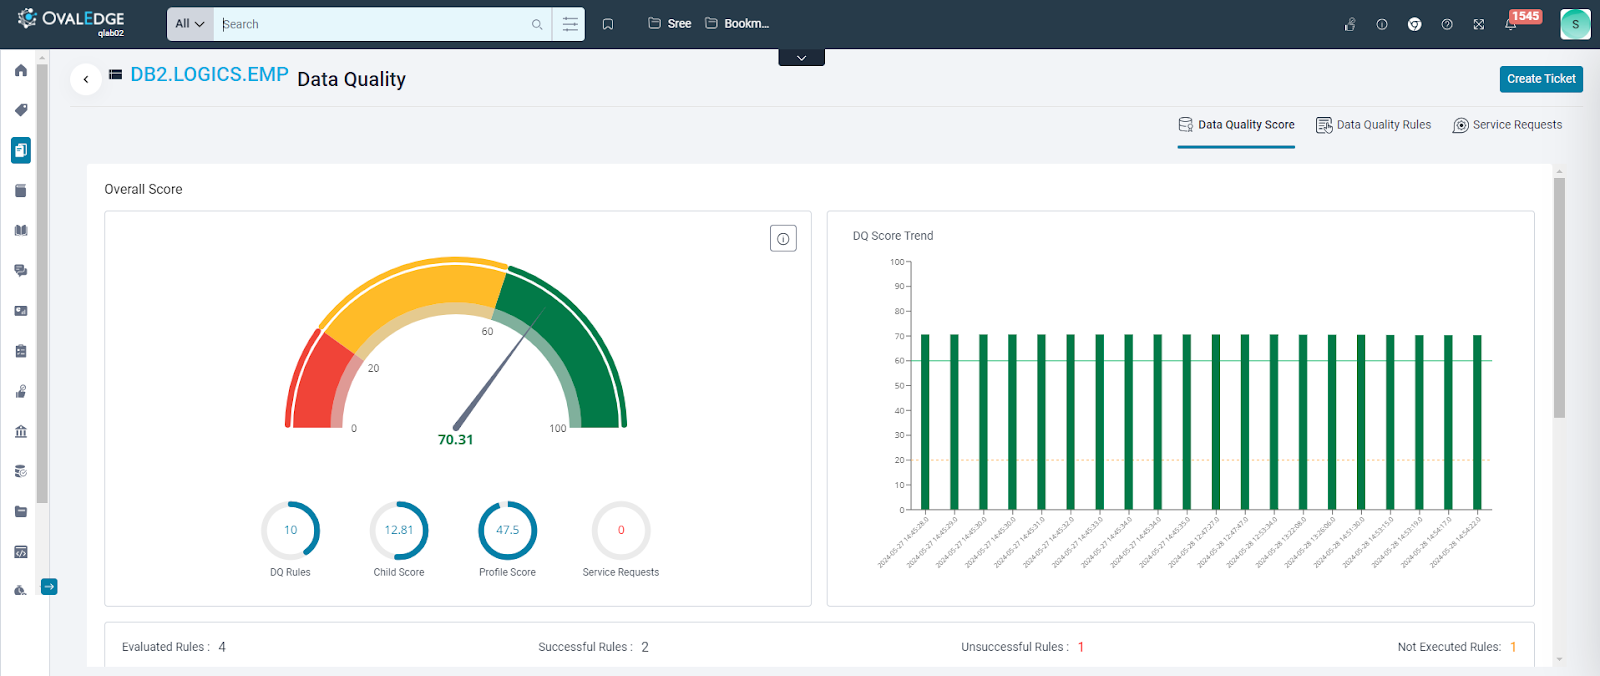
The View Scores display the calculations and formulas used to obtain the Overall Score, Data Quality Rules Score, Child Score, Profile Score, and Service Request Score.
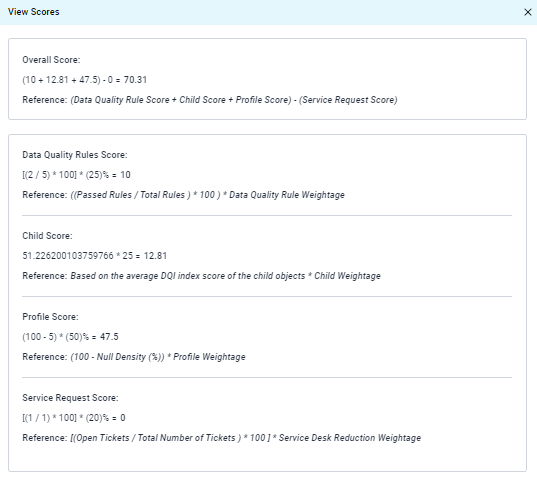
Dashboard
Navigate to Dashboard and click on “Data Quality Scores”.
- Home View: Provides a high-level overview of data quality scores for various schemas at the connector level.
- Donut charts represent the aggregate score for all child objects within a schema.
- Tooltips display object names and last updated timestamps when hovering.
- Clicking an object name leads to the Tree View for detailed exploration.
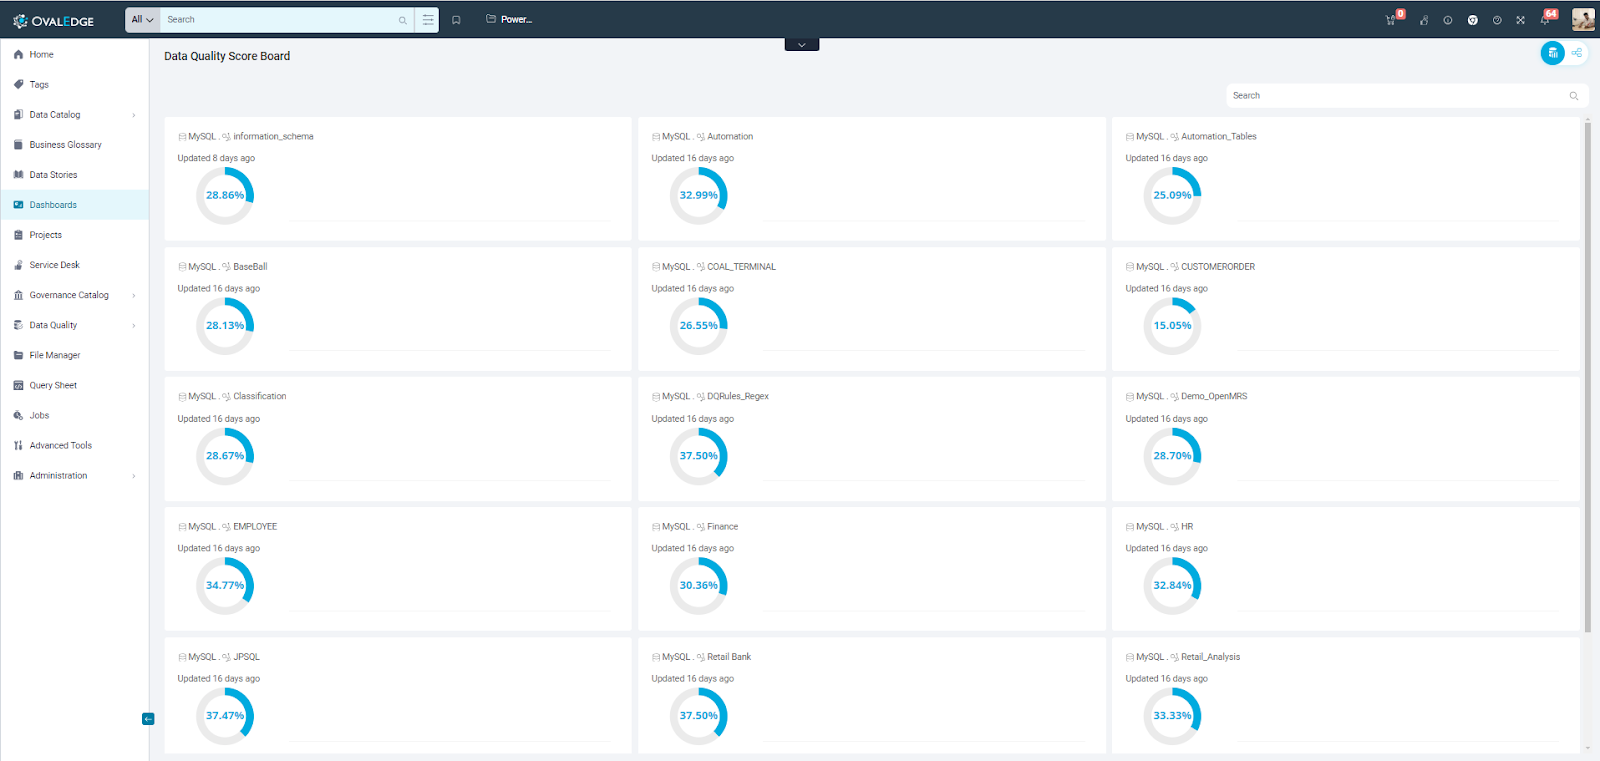
- Tree View: A granular breakdown of data quality scores for individual elements like tables, columns, files, and file columns. It assesses data along the following dimensions:
- Integrity: Checks data security and protection.
- Timeliness: Ensures data is up-to-date and relevant.
- Uniqueness: Evaluates if records are distinct within the dataset.
- Accuracy: Verifies data is error-free and reflects the true value.
- Completeness: Determines if all necessary information is present.
- Conformity: Checks data alignment with predefined standards.
- Validity: Assesses data relevance for the intended use.
- Consistency: Ensures internal coherence and adherence to system rules.
- Users can select specific tables and files within the Tree View to view detailed data quality scores on the right side.
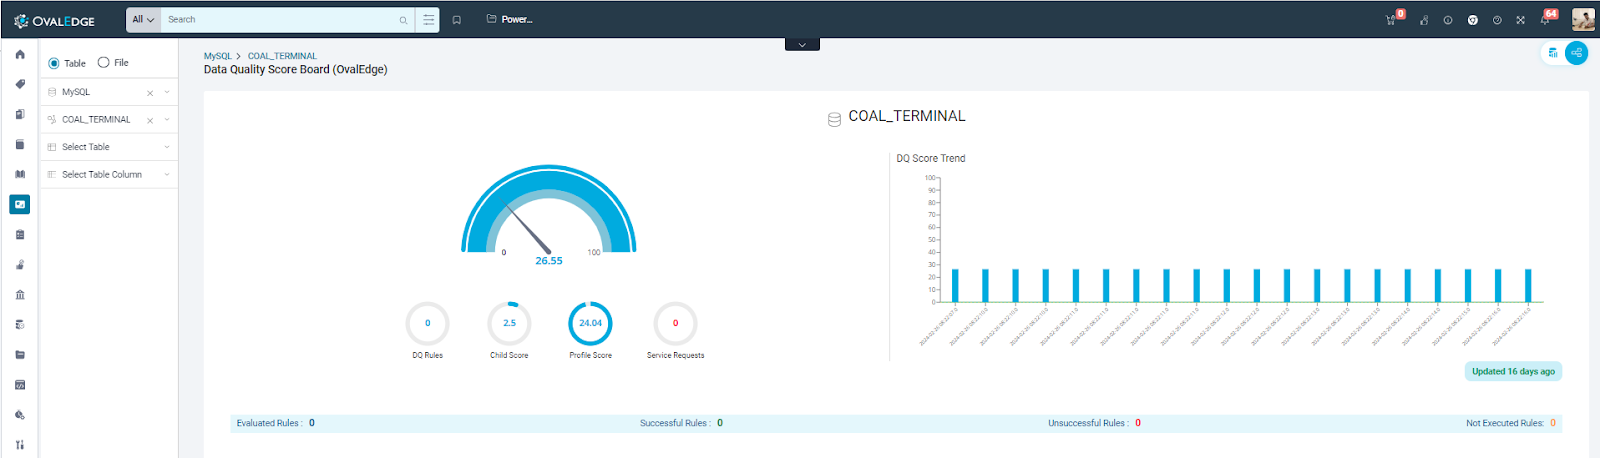
Data Quality Dashboard
OvalEdge equips users with the ability to visualize Data Quality insights through Data Quality Dashboard. Users can navigate to these dashboards to access comprehensive insights and a detailed overview of their data quality metrics from the Dashboards Module.
The Data Quality Dashboard includes two reports that provide a visual overview for users to monitor data quality.
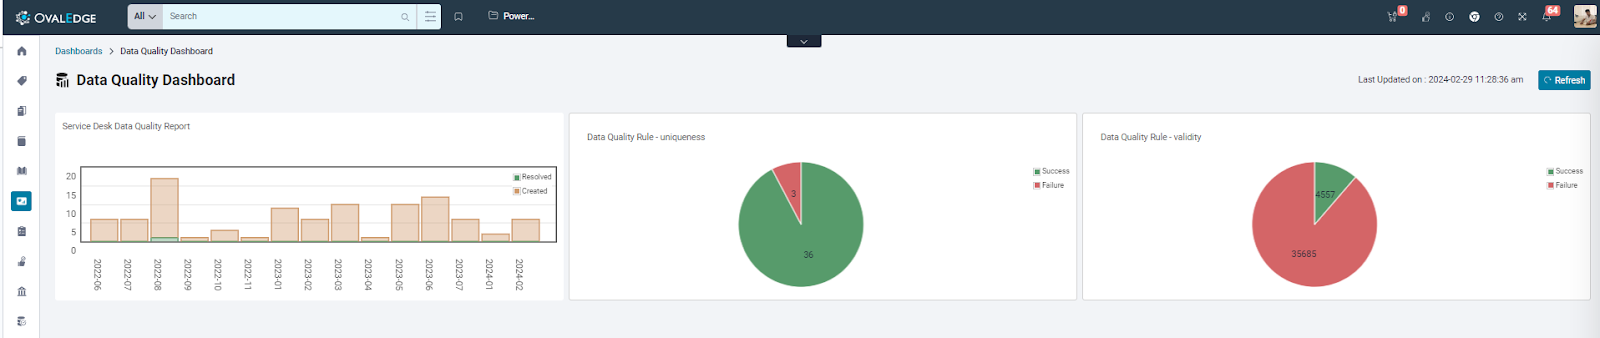
- Data Quality Rule (DQR) Performance: These reports display the success and failure rates for each DQR dimension. This allows users to identify areas where data quality issues are most prevalent and prioritize improvement efforts. The reports use color-coded pie charts to visually represent the execution status of DQRs within each dimension (successful vs. failed).
- Service Desk Data Quality Trends: This report tracks trends in data quality issues raised through service desk requests. It uses bar graphs to compare the number of service requests raised for data quality issues in a month against the number of requests resolved in that same month over a year.
Additional Features
Data Catalog
There are a number of operations which can be performed from the Data Catalog which are related to Data Quality:
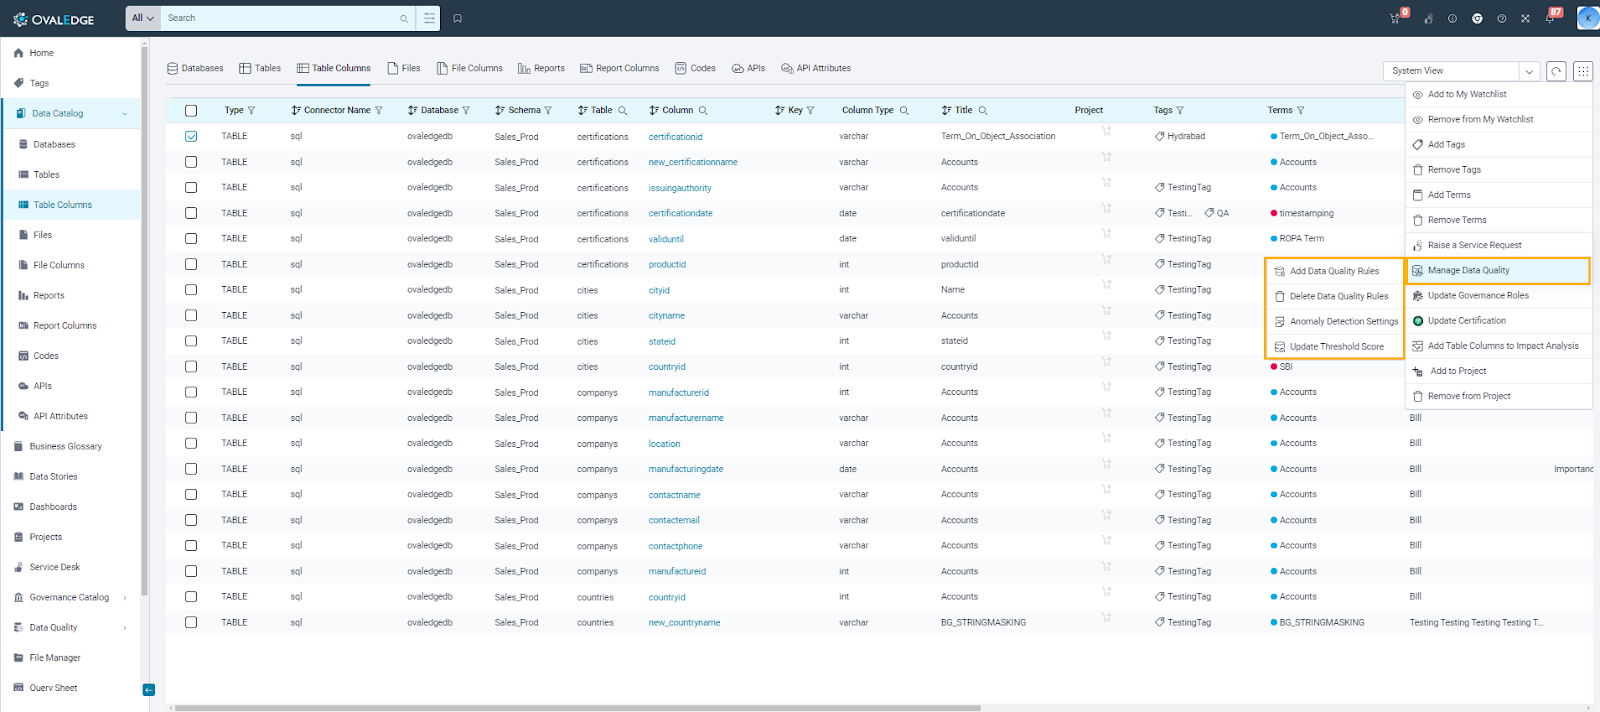
- Add Data Quality Rules: Utilize this option to add the selected data object to existing Data quality Rules. This feature is supported for Tables, Table Columns, Files, File Columns, and Codes.
- Delete Data Quality Rules: This option facilitates the removal of the selected data object from existing Data Quality Rules. It is supported for Tables, Table Columns, Files, File Columns, and Codes.
- Anomaly Detection Settings: This feature is to provide object level settings for the Detection of Data Anomalies. This feature is supported for Schemas, Tables and Table Columns.
- Update Threshold Score: This feature allows users to set threshold values for the Data Quality Score. Clicking on this option opens a popup where users can update the Accepted Score and Optimal Score for a specific data object. As a result of this configuration, the Data Quality Score falling within different threshold ranges is displayed with distinct color codes.

Load Metadata from Files
Two templates are available for uploading rules and functions through load metadata from files.
- Data Quality Rules: Data Quality Rules can be configured with the help of Data Quality Rule Load Metadata from Files Template. To select the Data Quality Rules, navigate to Advanced Tools > Load Metadata from Files > Select Data Quality Rule Template.
- Data Quality Functions: User Defined Data Quality Functions can be configured using the Data Quality Function Load Metadata from Files Template, allowing users to create their own Data Quality Function and associate objects with them for Data Quality Rule execution. This provides users with significant flexibility to customize Data Quality Functions according to their specific requirements and business standards. To select the Data Quality Rules, navigate to Advanced Tools > Load Metadata from Files > Select Data Quality Function Template.
Data Quality Rule APIs
OvalEdge supports thirteen types of APIs which are centered around Data Quality and perform respective operations, listed below:
- Updating Data Quality Rule Status
- Executing Data Quality Rule
- Updating Data Quality Rule Schedule
- Adding/Updating Data Quality Rule
- Adding Objects to Data Quality Rule
- Adding File Object Parameters in a Data Quality Rule
- Fetching Associated Objects from a Data Quality Rule
- Fetching Custom Fields from a Data Quality Rule
- Fetching a list of Data Quality Rules
- Fetching a single Data Quality Rule
- Deleting a Data Quality Rule
- Deleting Data Quality Rule Schedule
- Deleting Associated Objects from a Data Quality Rule
Notifications
|
Events |
When |
Who |
|
Data Quality Rule - Notify On Failure |
When a data quality rule is failed |
Steward and Contacts |
|
Data Quality Rule - Notify On Success |
When a data quality rule is successful |
Contacts |
|
Data Quality Rule - Notify On Edit |
When a data quality rule is edited |
Contacts |
|
Anomaly Detected |
When a anomaly is detected during the recent profiling |
Object Custodian |
|
Remediation Alert |
When a failed value is reported in the remediation center |
Object Custodian |
|
Mentions |
When a user is mentioned in the collaboration |
Mentioned User |
System Settings
The System Settings Data Quality tab encompasses all the relevant settings pertaining to data quality.
| Key | Default Value | Description |
| anomaly.detection.analysis.algorithm.list | Deviation, IQR | To configure anomaly detection analysis algorithms. Parameters: Enter the names of the algorithms separated by commas. Currently, we support the 'iqr' and 'deviation' algorithms" |
| anomaly.detection.analysis.algorithm.selection | IQR | These values represent the algorithm that will be used for anomaly detection on different objects. Parameters: Enter the algorithm that should be considered to identify anomalies. |
| anomaly.detection.analysis.deviation.threshold | 50 | This value represents the threshold percent above or below which anomaly will be generated for the rate of change in data series |
| anomaly.detection.analysis.enabled | TRUE | To activate or deactivate the anomaly feature within the application. Parameters: If set to "True," the anomaly feature gets activated, allowing it to function as intended. If set to "false", the anomaly feature gets deactivated, and the connector and data object level anomaly-related settings will appear grayed out. |
| anomaly.detection.analysis.iqr.range | 1-50 | This numerical value represents the threshold percentage of data change (positive or negative) that, if exceeded, will trigger an anomaly. |
| data.quality.provider.type | Internal | To switch the DQR calculation between Internal (OvalEdge) and External (connector) modes. Parameters: The default value is set to internal. If the configuration is set to Internal, then the DQR (Data Quality Rules) performed in the OvalEdge application is displayed in the dashboard under the Data Quality section. If the setting is set to External, the scores are calculated based on the external connector inputs. |
| dataquality.associatedobjects.additionalcolumns | 20 | To set a limit on the number of parameters that can be configured within Additional Column details for the Data Quality Center. For instance, when set to a value such as 10, it enforces a maximum limit of 10 parameters that can be configured for the additional columns. Parameters: Enter the value in the field provided. The maximum limit is 20. |
| dataquality.associatedobjects.max.limit | 1000 | Set the maximum number of data objects that can be associated with a DQ Rule. Parameters: The default value is set to 1000. Enter the value in the field provided. |
| dataquality.remediationcenter.failedrecords.max.limit | 50 | Configure the maximum number of failed results of the DQR (Data Quality Rule) to be displayed in the Control Center Tab. Parameters: The default value is set to 50. Enter the value in the field provided to configure the new maximum limit. |
| dq.dqprinciple.visible | FALSE | To show/hide DQ Principle column in the Results tab of Custom SQL functions showcasing the entered principle value from the stats query. Parameters: If set to true, the DQ Principle column will be made visible. If set to False, the DQ Principle column will be hidden. |
| dq.object.filter.maxlength | 500 | To configure the maximum allowable length for text filters: Parameters: The default is set to 500. Enter the value in the field provided. |
| dqf.querytemplate.modification.enable | FALSE | Configure system-generated queries across connectors for specific object types and functions. Parameters: The default value is False. If the value is set to True, users should be able to modify the system-generated query templates. If the value is set to False, users will not be able to configure the system-generated query templates. Note: Changes made to system query templates are reflected across the selected connectors. Please save any user written queries at the object level before making modifications. |
| dqr.databricks | (Empty) | To process Data Quality Rules for Databricks connection Parameters: The default value is empty. If set to Yes, the DQR is processed for Databricks connection. If set to No, the DQR is not processed for Databricks connection. |
| loadmetadata.dqr.update.dataset | FALSE | Configure to enable or disable editing of queries that have been added to the application using Load Metadata from Files. Parameters: The default value is False. If set to True, users can edit the queries that were loaded into the application using Load Metadata from Files. If set to False, users will not be able to edit the queries loaded into the application using Loading Metadata from Files. |
Copyright © 2024, OvalEdge LLC, Peachtree Corners GA USA