Data Object Summary - User Actions
Add to My Watchlist
Whenever a data object is added to My Watchlist using the Nine Dots icon, then the object gets displayed in the My Resources > My Watchlist page respective object type tab.
If a data object is watch listed you will be given options to notify of significant data changes or metadata changes made to the data object whenever Crawling or Profiling is done.
A Notification icon 
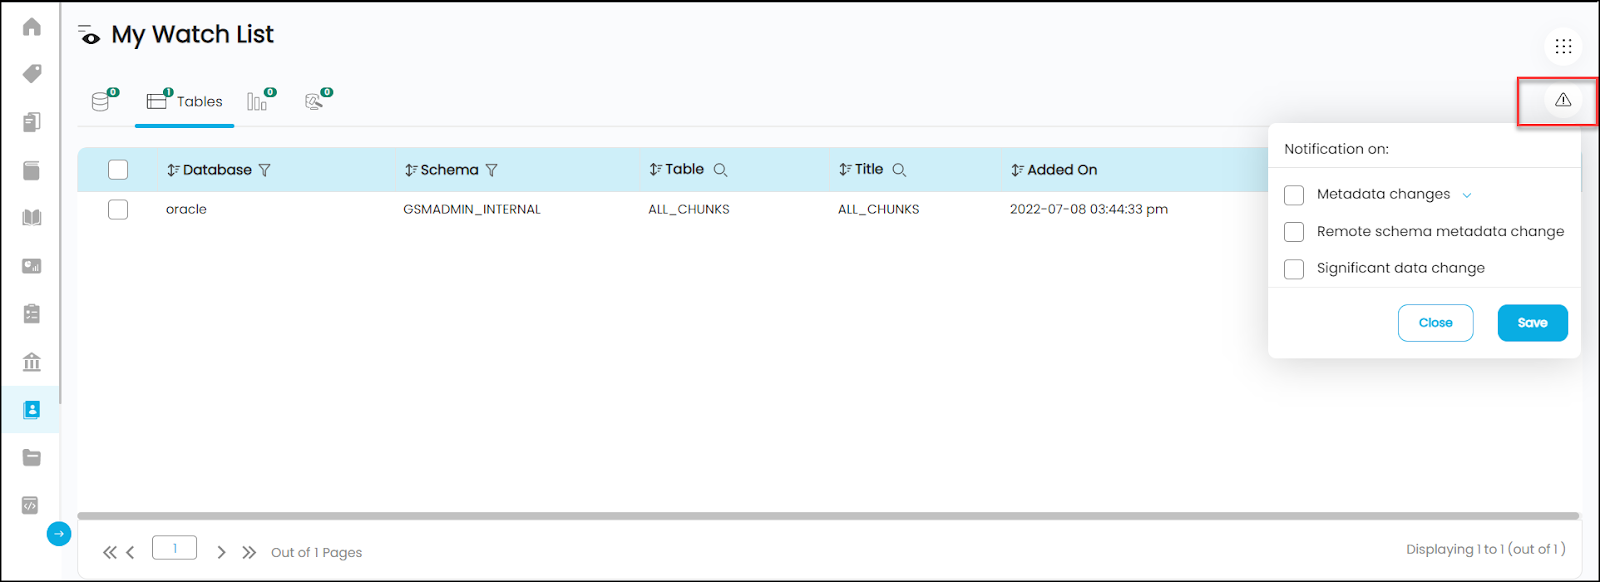
- Metadata Changes You can enable the metadata change notifications and get notified whenever the data objects undergo metadata changes. To trigger the metadata change notification, the source should be Crawled.
- Remote Schema Metadata Changes: You can enable Remote Schema metadata changes to receive notifications whenever the data objects undergo meta changes at the remote source. To trigger the Remote Schema Metadata notifications, the source data should be Crawled.
- Significant Data Changes: You can enable the Significant data changes and enter the percentage and get notified when the data changes exceed the entered percentage limit.
Remove from My Watchlist
It helps remove the selected data object(s) from My Resources > My Watchlist and disables all the alert notifications.
Add Tag
It helps you to add Tags to the selected data objects.

To add the tag:
- Click on the Nine Dots icon to see Add Tag option.
- An Add Tag pop-up is displayed with a search filter enabled to search.
- Click on the +New button to create a New Tag and add it to the Tags dropdown list.
- Select the Tag from the drop-down list.
- Click on the + icon against the Tag name.
- Click on the Close button and the selected Tag is applied to the object.
Remove Tag
It helps to remove Tags applied to the Table.
To remove the tag:
- Click on the Nine Dots icon to see the Remove Tag option.
- A pop-up with Assigned Tags in the list is displayed
- Click - against the Tag to remove the Tag.

Add Term
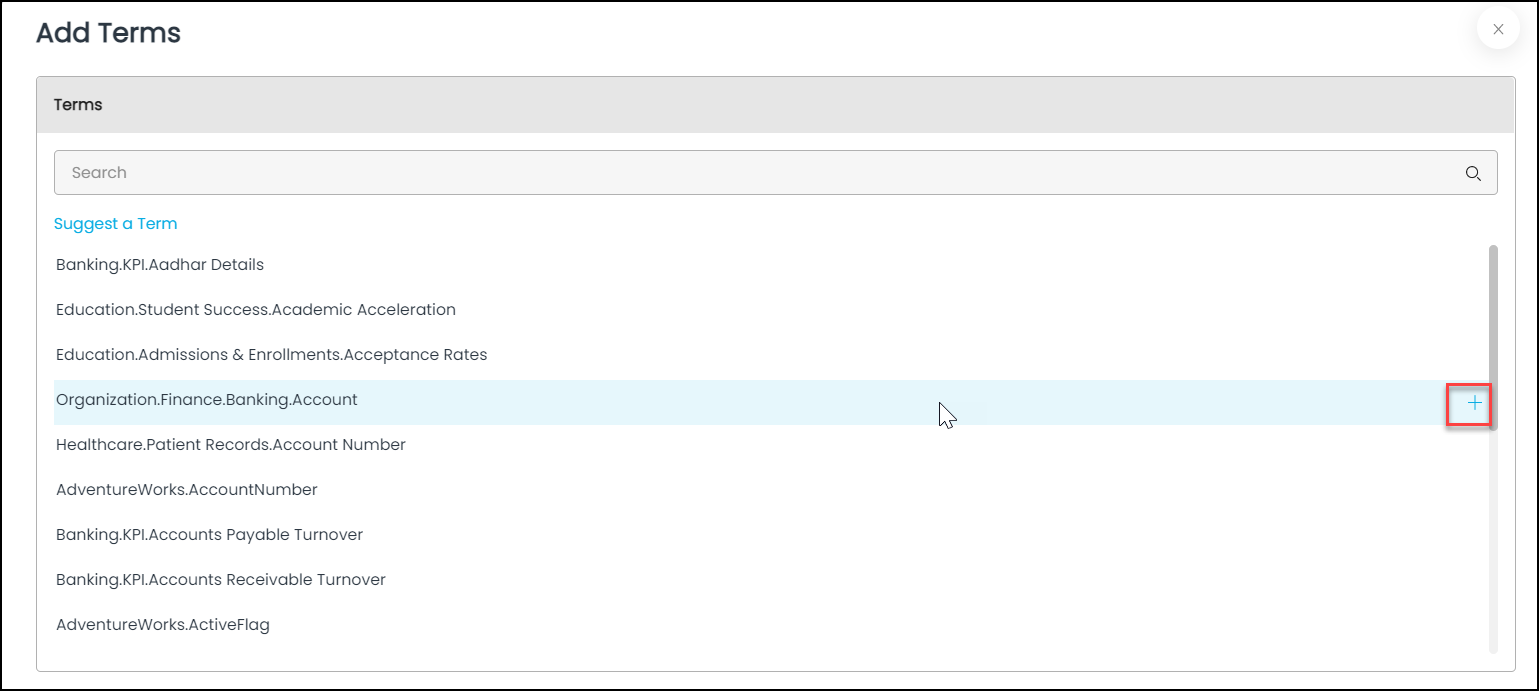
It helps add Terms to the selected object(s).
- Click on the Nine Dots icon to see Add Term option.
- A pop-up window is displayed with a search filter enabled to find Terms from the drop-down list. The Drop-down list displays all the Terms created in the application.
- You can also Suggest a Term (create a new Term) from this pop-up.
- Click on the
icon to add and save the term to the data objects selected.
Remove Term
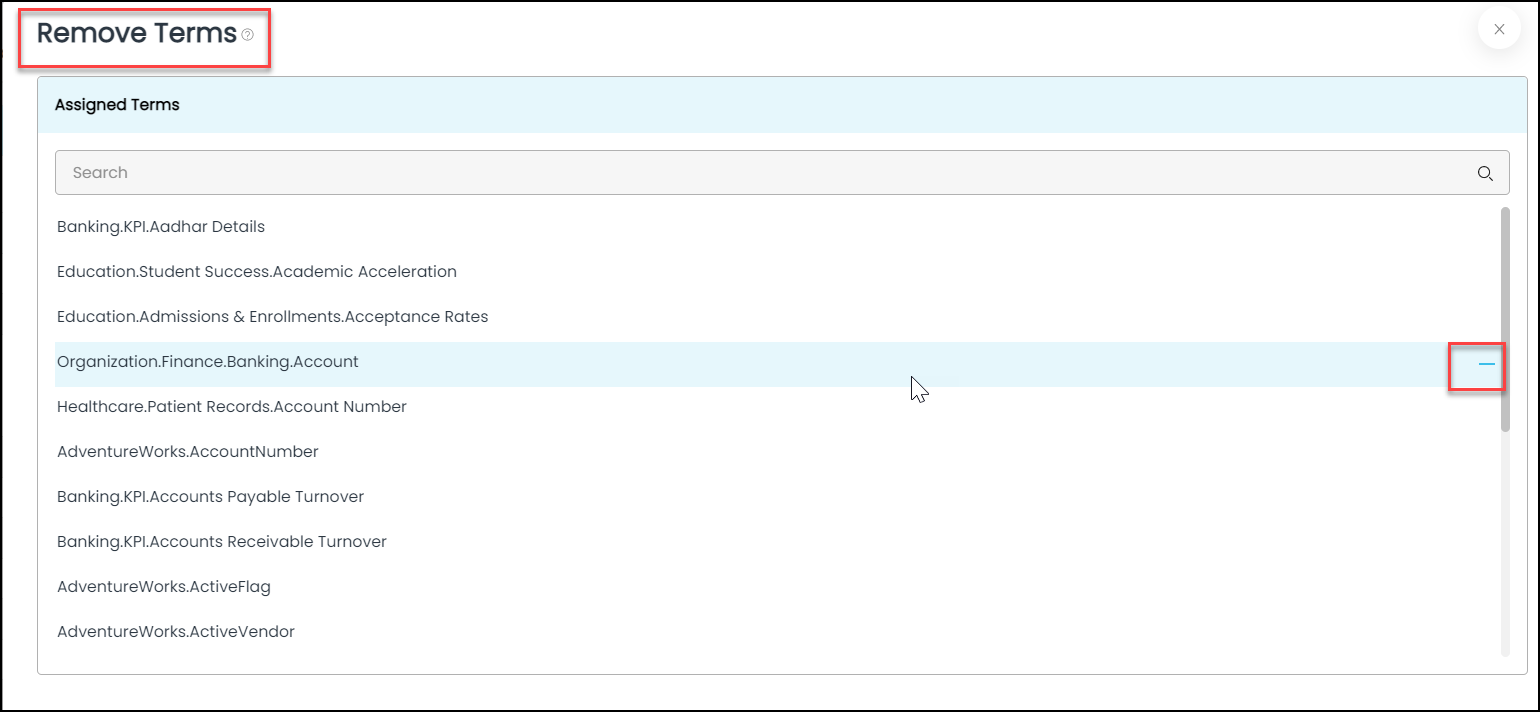
It helps remove associated Terms from the selected object(s).
To remove a term:
- Go to the Data catalog, and select the desired table object(s).
- Upon selection, click on the Nine Dots icon to see the Remove Term option.
- A pop-up with the Assigned Terms is displayed.
- Click on the - icon to remove the Term.
Add to Default Project / Add to Access Cart
It helps add the selected data objects(s) to the Default Project. If the selected Default Project is Add to My Access Cart Project then the objects added get saved to the My Access Cart - to raise Access request permissions on the object(s).
Note: You can select and set a project as the default project using the Default Project icon enabled in the header banner.
Remove from Default Project
It helps to remove the added object from the default Project.
Update Governance Roles
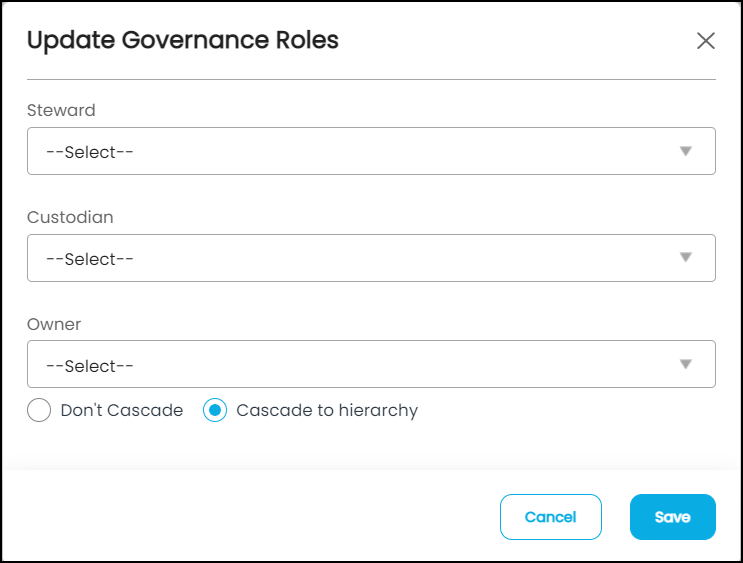
You can change or update the Steward / Custodian / Owner / Custodian roles / Gov Roles (4,5,6).
Don’t Cascade: Select the checkbox to not apply the Gov Roles to the Column level objects.
Cascade to Hierarchy: The updated Governance Roles get applied to the column-level objects. If applied the Gov Roles are selected and applied to a Table then the same Gov Roles can be applied to the Table column objects by selecting the checkbox.
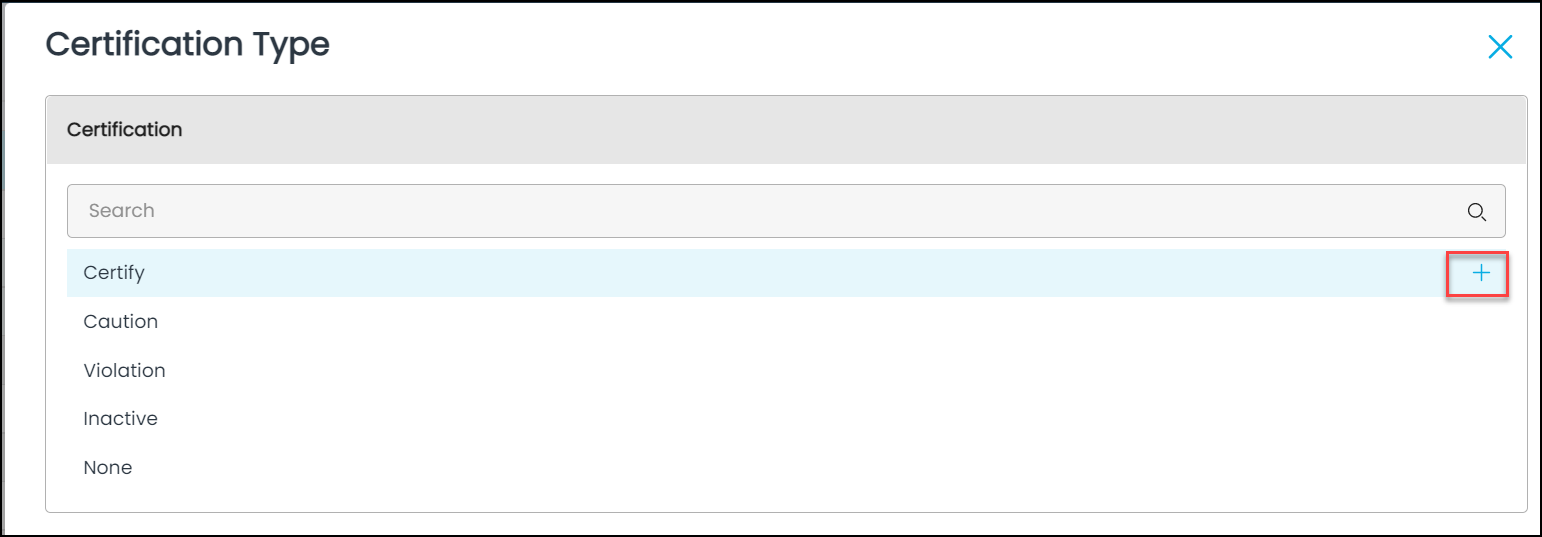
Change Certification Type
Data Certification is giving a stamp of approval to data objects ensuring the definitions and data are consistent, timely, and correct. It let you filter reports based on their certification status.
- Certify
- If the data object complies with the rules assigned for certification policies, it is marked as Certify.
- Caution
- If the data object contains conflicting information, it is marked as Caution.
- Violation
- If the data object has inconsistent and suspect values, format violations, values out of range, or violates DGR rules, it is marked as a Violation. Example: In a table, if it is pre-defined to have 15% null values. However, the table has only 12% null Values. In this case, the table is marked as a Violation.
- Inactive
- If a data object is not used for a longer period of time, then it is marked as Inactive.
- None - If the data object needs to be removed from any of the above certifications, it is marked as None.
To Apply Certification, click on the +icon next to the option and the certification gets applied to the data object.

Add objects to Impact Analysis
You can manually add the objects to the impact analysis to understand the dependencies on other data objects in the application. If any changes are made to the selected data object, Impact Analysis helps identify the number of data objects that get impacted.
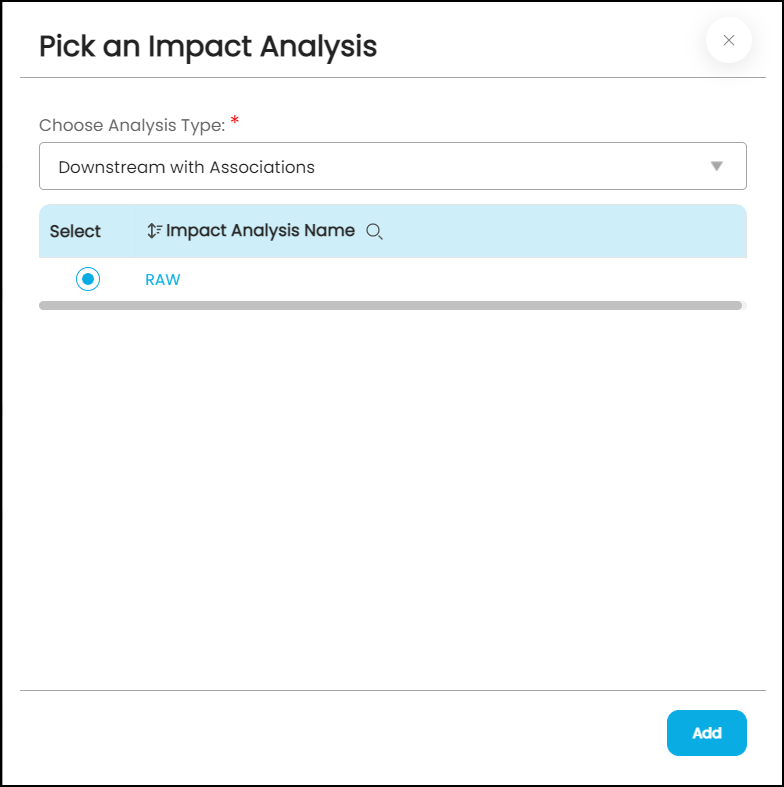
- Select the Add to Impact Analysis option, a pop-up is displayed.
- You can select the Analysis Type from the drop-down.
- Downstream: To view the impact on associated downstream objects.
- Downstream with Associations: To view the impact on downstream objects and their associated objects.
- Upstream: To view the impact on associated Upstream objects.
- Upstream with Associations: To view the impact on Upstream objects and their associated objects.
- Select the Impact Analysis Name from the drop-down. (You can add a new Impact Analysis Type from Advanced Tools > Impact Analysis.)
- Click the Add button.
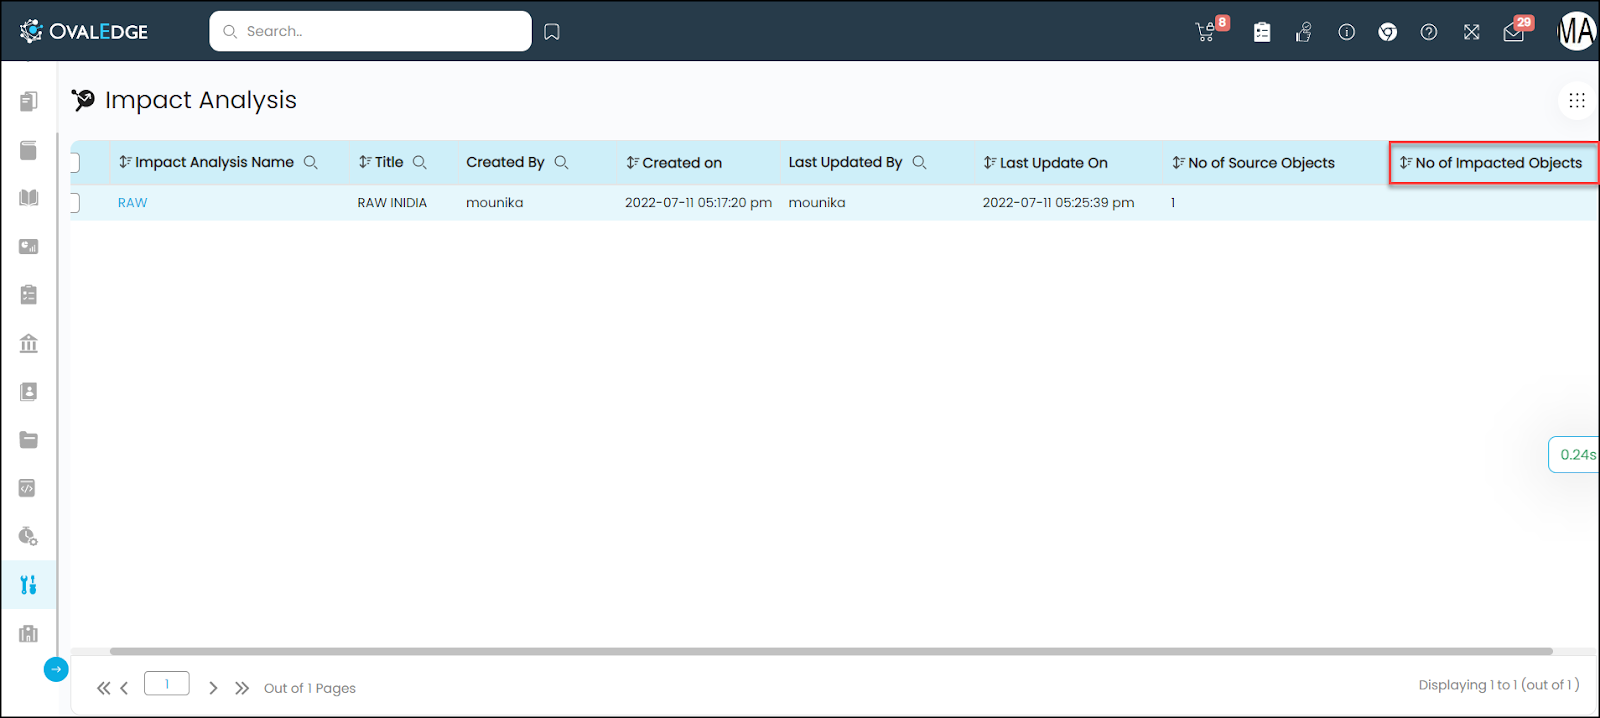
- The no of Impacted Objects can be viewed in the Advanced Tools > Impact Analysis > under selected Impact Type.

Quick Tips
It gives a few insights into the data objects like Tables, Table Columns, Files, File Columns, Reports, Report Columns, and Queries.
Data Object Details Page User Actions
The following are the possible actions you can perform in the object detailed page using the Nine Dots icon.
Profile/Analyze
Profiling is the process of connecting to a data source to gather statistical information about a data object. Example: Once crawling is done, a Table can be profiled to view the statistics of the total number of Table columns present in the table, the null count, distinct count, and other parameters. Once an object is profiled, then a Job is submitted and the Statistical information is updated.
Catalog all the subfolders
When users have different levels of subfolders in your root folder, they can catalog all the subfolders in it with a single click.
To catalog all subfolders,
- Go to the Data catalog >Files tab.
- Select a root folder.
- Click the Nine dots and select Catalog all the subfolders
A pop-up page displays to enter the operational level up to which the subfolders should be cataloged. - Select a level. Example: level 2. The root folder is at level 0.
- Click Ok to start the process to catalog all the subfolders to the level entered.
- Navigate to the Files tab to see the cataloged subfolders up to the level selected.
Note: When OvalEdge connects to any data lake, the first level of folders is automatically cataloged. The files or folders need to be cataloged manually for NFS or other data lakes.
Catalog all the files
When users have different levels of files in your root folder, they can catalog all the files in it with a single click. To catalog all the files in a subfolder, users need first to catalog that subfolder in which the file exists.
To catalog all files,
- Navigate to the Data catalog-->Files tab.
- Select a root folder.
- Click the
nine dots and select Catalog all the files.
A pop-up page displays to enter the operational level up to which the files should be cataloged. - Select a level. Example: level 2.
- The root folder is at level 0.
- Click Ok to start the process to catalog all the files up to the level entered.
- Navigate to the Files tab to see the cataloged files at each level.
Profile all Files
Profiling a file allows you to collect the file column statistics. To profile a file, it should be first cataloged. When you have different levels of cataloged files in your root folder and subfolders, you can profile all the files in a single click using the profiling all files button.
Once the files are profiled, the file columns and their statistics are listed on the summary page. The data can then be used to run the Artificial Intelligence Algorithm for File Column tagging and Lineage discovery of files and folders in OvalEdge.
To profile files in a cataloged folder and subfolder,
- Navigate to the Data catalog >Files tab.
- Select a root folder.
- Click the
A pop-up page displays to enter the operational level up to which the files should be profiled. - Select a level. Example: level 2.
The root folder is at level 0. - Click Ok to start the process to profile all the files to the level entered.
- Navigate to the profiled files and click the data tab to see the file contents.
Note:
- Before profiling, a file(s) in a subfolder, catalog the subfolder and the respective file(s). Similar to database profiler settings, certain parameters are needed to be configured to execute file profiling. Ask your OvalEdge administrator or refer to the configuration to validate the settings to profile a file.
- If a schema or a table is never profiled - the profiled status field in the object summary page displays as "Not Profiled Yet"
Profile folders assuming same content
Profile Folders Assuming the Same Content
Assume that a folder in the root folder in a data lake connection has similarly structured files.
Example: Assume a folder has 100 files that are of the same file type and with the same file column headers. However, the data collected in these files are collected over a period of time.
When users execute a Profile folder assuming the same content task, the profiler scans the first file under that selected folder and parses all the file columns. The collected file column names will be stored under that folder metadata.
By doing this task, the system does not have to profile all the 1000 files to retrieve the file columns.
OvalEdge supports profiling for the following file types:
- XLS
- XLSX
- CSV
- JSON (deeply nested)
- Parquet
- AVRO
- ORC.
Note: There are no limits on the number of files profiled in each folder.
Process upstream/downstream objects

The data objects that are certified as Caution objects can be applied to the associated downstream objects so that users of that data objects are aware of the issue or the table contains sensitive data. Also, any applied Cautions can be removed from the associated downstream objects using this option.
Additionally, you can choose to copy the metadata details that include Tags, Business Descriptions, or Technical Descriptions to the associated Downstream or Upstream objects on different Lineage levels.
To enable selection, select the Copy Metadata using the Lineage option, to select:
Levels: To enter the number of lineage levels the metadata can be copied to.
Propagate to All Levels: Select to copy metadata to all the levels of the lineage.
Direction: Select the direct of the lineage to copy metadata to downstream or upstream objects. Content: Select the metadata options Tags, Business Description, or Technical Description.
Add Object to Impact Analysis
You can manually add the objects to the impact analysis to understand the dependencies on other data objects in the application. If any changes are made to the selected data object, Impact Analysis helps identify the number of data objects that get impacted.
- Select the Add to Impact Analysis option, a pop-up is displayed.
- You can select the Analysis Type from the drop-down.
- Downstream: To view the impact on associated downstream objects.
- Downstream with Associations: To view the impact on downstream objects and their associated objects.
- Upstream: To view the impact on associated Upstream objects.
- Upstream with Associations: To view the impact on Upstream objects and their associated objects.
- Select the Impact Analysis Name from the drop-down. (You can add a new Impact Analysis Type from Advanced Tools > Impact Analysis.)
- Click the Add button.
- The no of Impacted Objects can be viewed in the Advanced Tools > Impact Analysis > under selected Impact Type.

Add Column to Impact Analysis
You can manually add the selected column to understand the dependencies on other data objects in the application. If any changes are made to the selected data object, Impact Analysis helps identify the number of data objects that get impacted and can be viewed in the Advanced Tools > Impact Analysis > under the selected Impact Type.
Add to My Watchlist / Remove from My Watchlist
Whenever a data object is added to My Watchlist using the Nine dots icon, then the object gets displayed in My Resources > My Watchlist page respective object type tab.
If a data object is watch listed you will be given options to notify of significant data changes or metadata changes made to the data object whenever Crawling or Profiling is done.
A Notification icon 

- Metadata Changes You can enable the metadata change notifications and get notified whenever the data objects undergo metadata changes. To trigger the metadata change notification, the source should be Crawled.
- Remote Schema Metadata Changes: You can enable Remote Schema metadata changes to receive notifications whenever the data objects undergo meta changes at the remote source. To trigger the Remote Schema Metadata notifications, the source data should be Crawled.
- Significant Data Changes: You can enable the Significant data changes and enter the percentage and get notified when the data changes exceed the entered percentage limit.
Adds the selected data object to the My watchlist window to o get regular notifications on any metadata and data changes.
If the Remove from MyWatchlist is selected, it helps remove the selected data object(s) from My Resources > My Watchlist. It disables all the alert notifications.
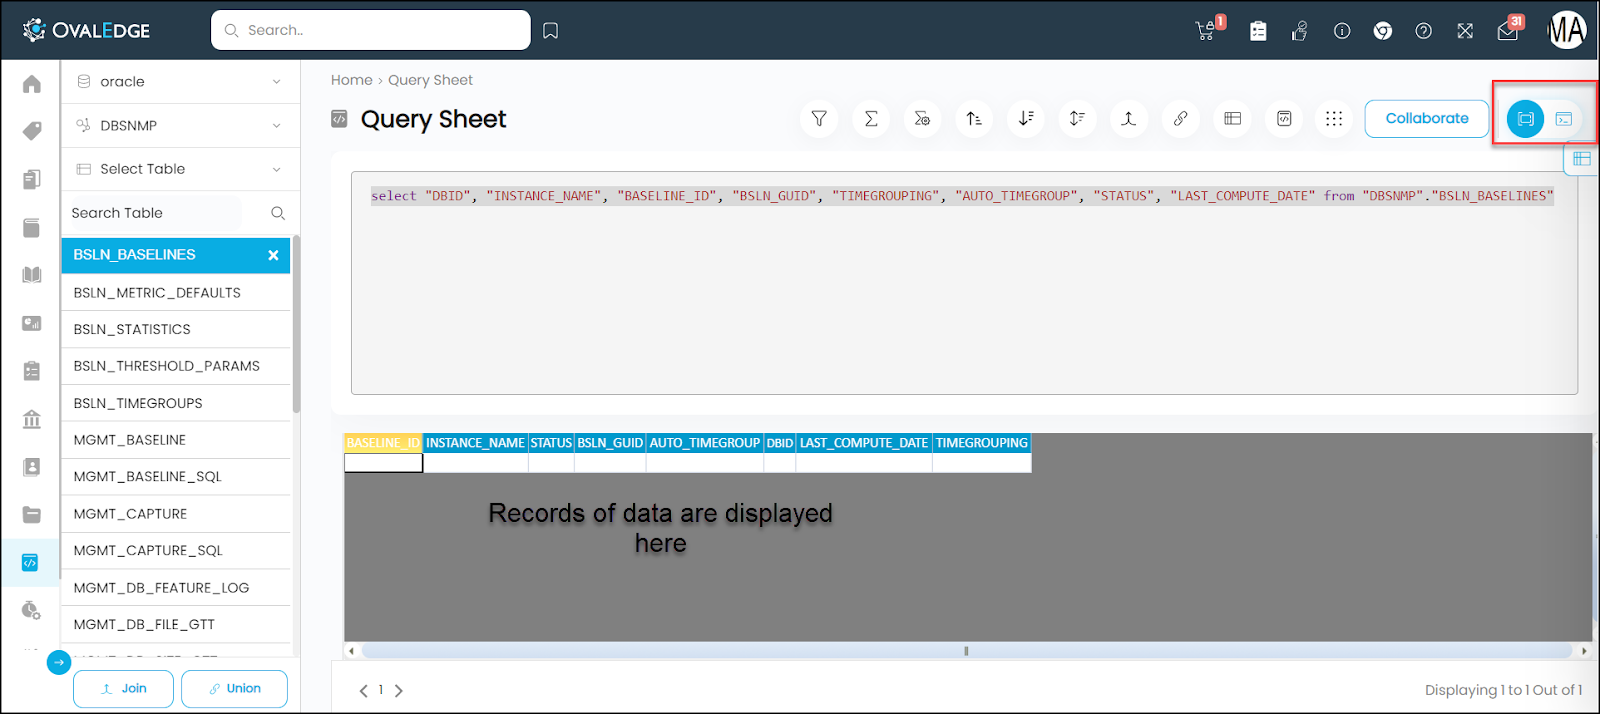
View in Query Sheet
It navigates you to the Table -Query sheet, where you can view all the data records of the data object from the source.
- Use the Auto SQL options to add filters and functions to the query Filter / Aggregate / Aggregate Functions / Ascending Sort / Descending Sort/ Original Sort / Join / Union / Rename Column Name / View Script.
- Use the Advanced button to manually add functions to the query.
- The queries thus run can be cataloged (to display in the data catalog queries grid) or uncatalogued.
Send messages
Users can send messages to the Owner/Steward/Top users for any concerns. Refer to Collaboration to learn how to collaborate with team members.
Uncatalog File
Users can Uncatalog the Files. Uncatalog will remove the files from the data catalog module and it will no longer be available for search.
Servicedesk
Request Access - You can raise an access request on the data object to request access (view) to the data.
- A New Service Request template opens.
- Summary: Enter a short note on why the service request is being raised.
- Description: Enter a detailed description of the request to include the data object and permissions required.
- Priority: Set the request Priority to High / Highest / Low / Lowest /Medium.
- Select Object: Select the Data object (Table/ File/ Reports) from the drop-down list. The Data object is by default displayed if the request is raised directly from the Data Object’s page.
- Potential Business Impact Amount: Enter the percentage of the impact the specific object has on other objects like the Lineage or Impact Analysis. Example: 70%, 50%.
- Corrective Action: Enter the corrective measures to be taken to resolve the data quality issue on the objects.
- Click on the Submit button to create a new service desk ticket (Request ID) and is sent to the approver for the Approval of the request.
Request Content Change - You can raise a Content Change request on the data object to change the associated Business Description/ Term/ Tag of the data object.
- A New Service Request template opens.
- Summary: Enter a short note on why the service request is being raised.
- Description: Enter a detailed description of the request to include the data object and permissions required.
- Priority: Set the Priority to High / Highest / Low / Lowest /Medium.
- Select Object: Select the Data object (Table/ File/ Reports) from the drop-down list. The Data object is by default displayed if the request is raised directly from the Data Object’s page.
- Business Description: You can edit/update the description of the selected Object.
- Technical Description: You can edit/update the description of the selected Object.
- Associated Tags: You can add/update additional tags to the selected object to organize the terms in OvalEdge for easy navigation.
- Associated Terms: You can add/update additional Terms to the selected object.
- Additional Fields: You can update additional field value fields to the selected object.
- Click on the Submit button to create a new service desk ticket (Request ID) and is sent to the approver for the Approval of the request.
Report Data Quality Issue - You can raise a Report of a data quality issue on a Data object if you find any gaps or inconsistencies in the data.
- A New Service Request template opens.
- Summary: Enter a short note on why the service request is being raised.
- Description: Enter a detailed description of the request to include the data object and permissions required.
- Priority: Set the request Priority to High / Highest / Low / Lowest /Medium.
- Select Object: Select the Data object (Table/ File/ Reports) from the drop-down list. The Data object is by default displayed if the request is raised directly from the Data Object’s page.
- Potential Business Impact Amount: Enter the percentage of the impact the specific object has on other objects like the Lineage or Impact Analysis. Example: 70%, 50%.
- Corrective Action: Enter the corrective measures to be taken to resolve the data quality issue on the objects.
- Click on the Submit button to create a new service desk ticket (Request ID) and is sent to the approver for the Approval of the request.
Download
You can download the Data/Description/Entity Relationships in .XLXS Excel formats.
- Download Data: To download data records of the data object.
- Download Descriptions: To download Descriptions of the data object.
- Download Entity Relationships: To download the ER with a Unique match score, Left and Right table counts.
Download Descriptions
You can download the Data, and descriptions by using this Nine dots feature.
To download the description for a particular Database,
- Click on the Database to display the database summary page.
- Go to Nine dots > click on Download Descriptions. A .csv file will be downloaded having the detailed information of the schema such as Such as schema name, schema ID, Business Description, Technical Description etc.
Security Settings Description
You can update the governance roles associated with the data object, by using this Nine dots option.
Apply Certification
Data Certification is giving a stamp of approval to data objects ensuring the definitions and data are consistent, timely, and correct. It let you filter reports based on their certification status.
- Certify
- If the data object complies with the rules assigned for certification policies, it is marked as Certify.
- Caution
- If the data object contains conflicting information, it is marked as Caution.
- Violation
- If the data object has inconsistent and suspect values, format violations, values out of range, or violates DGR rules, it is marked as a Violation. Example: In a table, if it is pre-defined to have 15% null values. However, the table has only 12% null Values. In this case, the table is marked as a Violation.
- Inactive
- If a data object is not used for a longer period of time, then it is marked as Inactive.
- None - If the data object needs to be removed from any of the above certifications, it is marked as None.
To Apply Certification, click on the +icon next to the option and the certification gets applied to the data object.
Change Status
Certified data object increases trust in data and defines data to be compliant. This option allows you to certify your data as violated/Exception/certify.
Configure Search Keyword
Configure Search Keywords are searchable or relevant keywords added to the data objects for the end-users to search the data objects they are looking for from the database effectively.
- Navigate to the specific data object Detailed Page > click on the Nine Dots icon > select Configure Search Keyword option from the list.
- A Configure Search Keywords pop-up is displayed.
- Click on the Add the keyword button enabled at the bottom.
- Enter the keyword in the field. Click Save and the keyword gets added to the Search Keyword grid.
- Search keywords with a minimum score of 3 are considered for the Elastic search to find and locate the objects.
- If the admin user adds the keyword, then the score is recorded as 3.
- If the non-admin user adds the keyword the score is recorded as 1.
- If the admin user votes the keyword, the score gets additional three points added to it.
- If the non-admin user votes the keyword the score gets an additional 1 point added to it.
- You can enable/disable the search keyword using the toggle.
- You can delete the search keyword using the delete icon.

Copyright © 2019, OvalEdge LLC, Peachtree Corners GA USA