Custom Fields allows you to add additional fields to different data assets in the application to provide additional information about a data object.
OvalEdge Data Catalog provides a list of standard fields on the Summary or Statistical page, such as Minimum/Maximum Count, Density, Null Density, Distinct count, etc. You can create custom fields to add more information about a data object like customer details, transactions, purchase history, customer ids, etc.
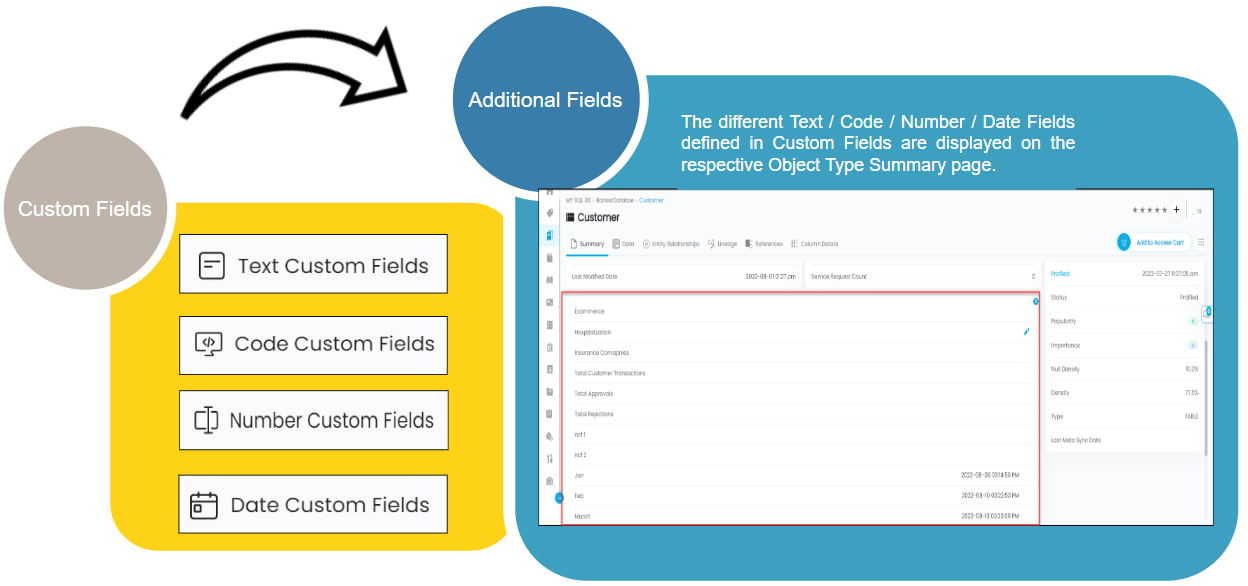
Listed below are the four different types of custom fields:
Text Custom Field
It helps to create text fields to store additional information about the data object, such as the product details, purchase transactions, or serial number.
Once the Text Custom Field label is created with editable and viewable fields selected, you can enter any combination of letters/numbers/symbols in the selected object type > Additional field > selected Custom field. The maximum number of text characters allowed is 245 characters.
Code Custom Field
It helps to create custom fields with drop-down options. The drop-down options can be defined while creating the custom field.
Number Custom Field
It helps to create number fields to create Customer IDs, phone tracking numbers, or sometimes Contact numbers. You can either enter single or double-data numbers. Example: 1-0, 2-3, 6-8.
Date Custom Field
It helps to create Date and Time fields with a calendar icon to select month, day, and year.
Note : The different Custom Fields can be created to apply globally on all connections for a selected Data Object Type (Table, File) or for a Selected connection.
You can add the Custom Fields to the below-mentioned data object types:
- Schemas
- Tables
- Table Columns
- Files
- File Columns
- Reports
- Report Columns
- Query
- Business Glossary
- Data Quality Rule
- Service Desk Access
- Service Desk Data Quality
- Tags
Custom Fields User Permissions
Admin Users can create and update the Custom Fields.
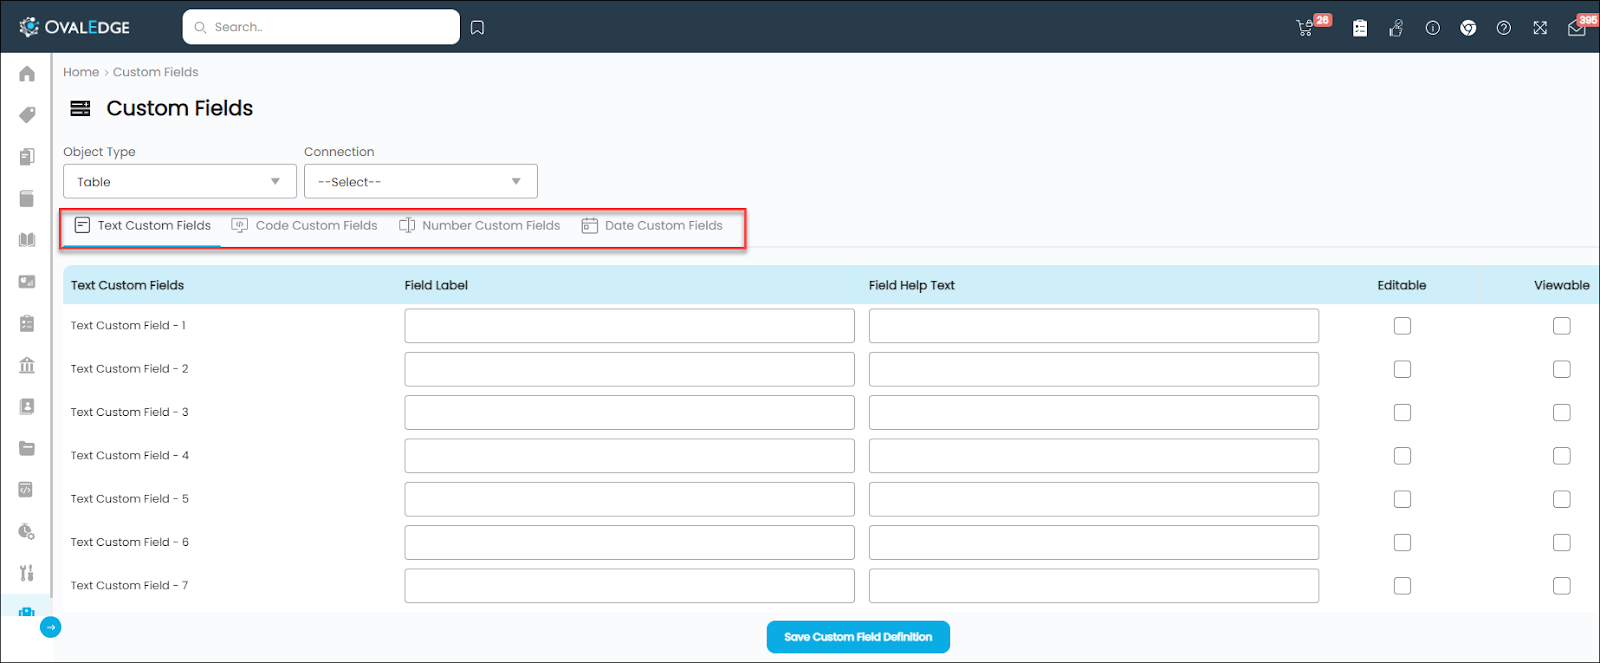
Adding Text Custom Fields
- Go to Administrations > select Custom Fields.
- Select the Object Type from the drop-down to which the Custom Fields will be added. You can select from Schema/ Table/Table Column/Report/Report Column/ File/File Columns/Query/Business Glossary/ Data Quality Rule, ServiceDesk Access/ ServiceDesk Data Quality/Tag.
- Select the Connection from the drop-down options. You can select individual database connections like SQL, MySQL, Oracle, etc., to display the created custom fields in the selected connection data object’s Additional Fields.
- Select the Global option to display the created Custom fields on all the database connections under the selected data object’s Additional fields panel.
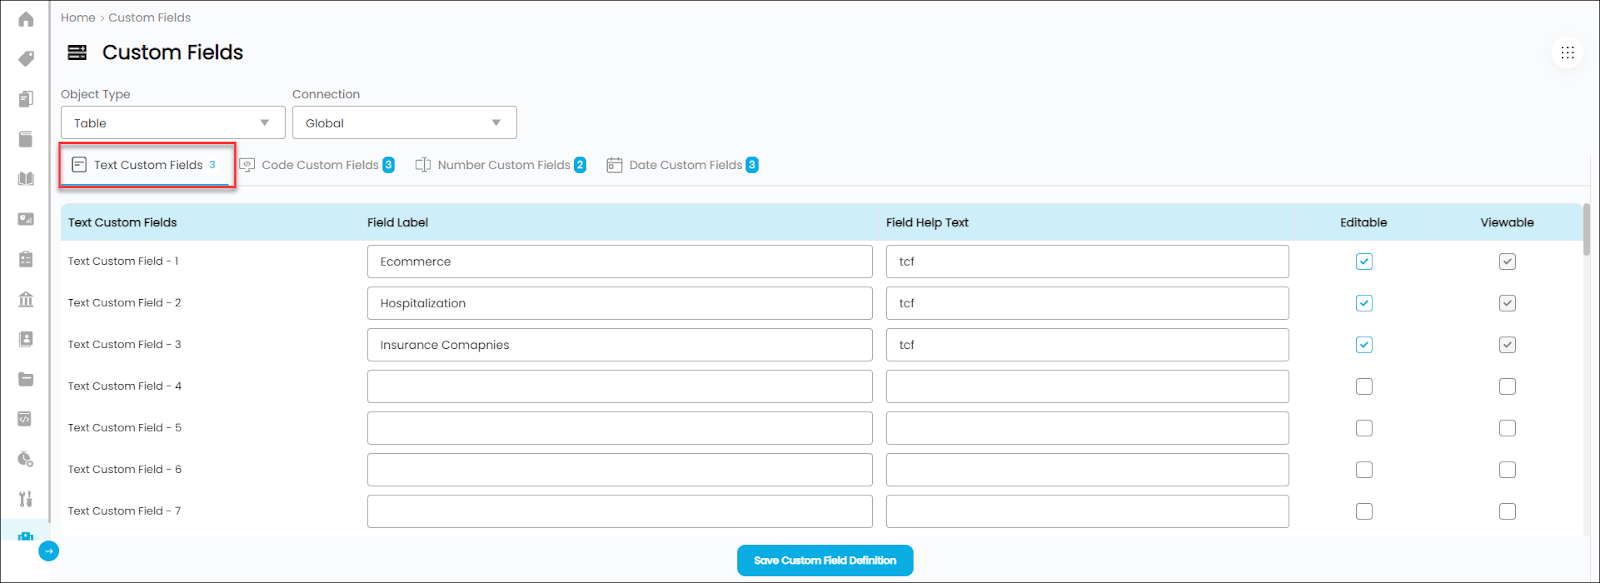
Note: For Business Glossary and Data Quality Rules object types, the Global Domain drop-down is displayed to create custom fields for a selected domain or globally for all the domains. - Based on the Object Type and Connection selected, the custom field displays already created or existing custom fields in respective Text/Code/Number/Date custom fields with a number count.
- Select the Text Custom Field. The Field Label helps define a name for the Custom field to display in the respective Object Type > Additional field panel. Enter the name of the Custom Field in the Field Label.
- Enter label definition for tooltip help in the Field Help Text field - it provides the reference details about the Custom field when hovered onto the field in the respective Object Type > Additional field panel.
- Select the Editable field checkbox to see an edit icon enabled in the respective Object Type > Additional field panel to edit the field details. If unselected, the custom field cannot be edited.
- Select the Viewable field checkbox to see the created Custom field in the respective Object Type > Additional field panel. If unselected, the custom field is not displayed.
- Click on the Save Custom Field Definition button to create/update the custom field.
Note: Users with Admin rights can only create Custom fields.
For Example: If Business Glossary is selected as Object Type and Global is selected for Global Domain, and a Text Custom field is created as ‘Transactions’ as Field label name and ‘credit and debit information as Field Help Text field with Editable and Viewable access given. The newly created custom field can be viewed in Business Glossary > in the Term details > Summary. The created Custom Field can be edited by users with Meta Read-Write access.
Adding Code Custom Fields

To add code custom fields:
- Go to Administration > select Custom Fields.
- Select Object Type from the drop-down to which the Custom Fields will be added.
- Select the Connection from the drop-down options. You can select an individual database connection like SQL, MySQL, Oracle, etc., or select the Global option to display created Custom fields globally on all the database connections data object > addition fields panel.
- For Business Glossary and Data Quality Rules object types, the Global Domain dropdown is displayed to create custom fields for a selected domain or globally for all the domains.
- Based on the Object Type and Connection selected, the custom field displays already created or existing custom fields in respective Text/Code/Number/Date custom fields with a number count.
- Select the Code Custom Field. The Field Label helps define a name for the Custom field to display in the respective Object Type > Additional field panel. Enter the name of the Custom Field in the Field Label.
- Enter the label definition for tooltip help in the Field Help Text field, it provides the reference details about the Custom field when hovered onto the field in the respective Object Type > Additional field panel.
- The Options field gets enabled once the custom field is saved. Click on the Save Custom Field Definition button to save.
- The Multi-Select field is only shown for Code Custom Field. Select the checkbox to enable multiple option selection in the respective Object Type > Additional field panel. If unselected, you can only select a single option from the drop-down.
- Select the Editable field checkbox to see an edit icon enabled in the respective Object Type > Additional field panel to edit the field details. If unselected, the custom field cannot be edited.
- The Viewable field checkbox is by default checked upon saving the custom field. It cannot be changed or unchecked.
- Click on the Save Custom Field Definition button to save the changes.
Note: Admin users can only create Custom fields.
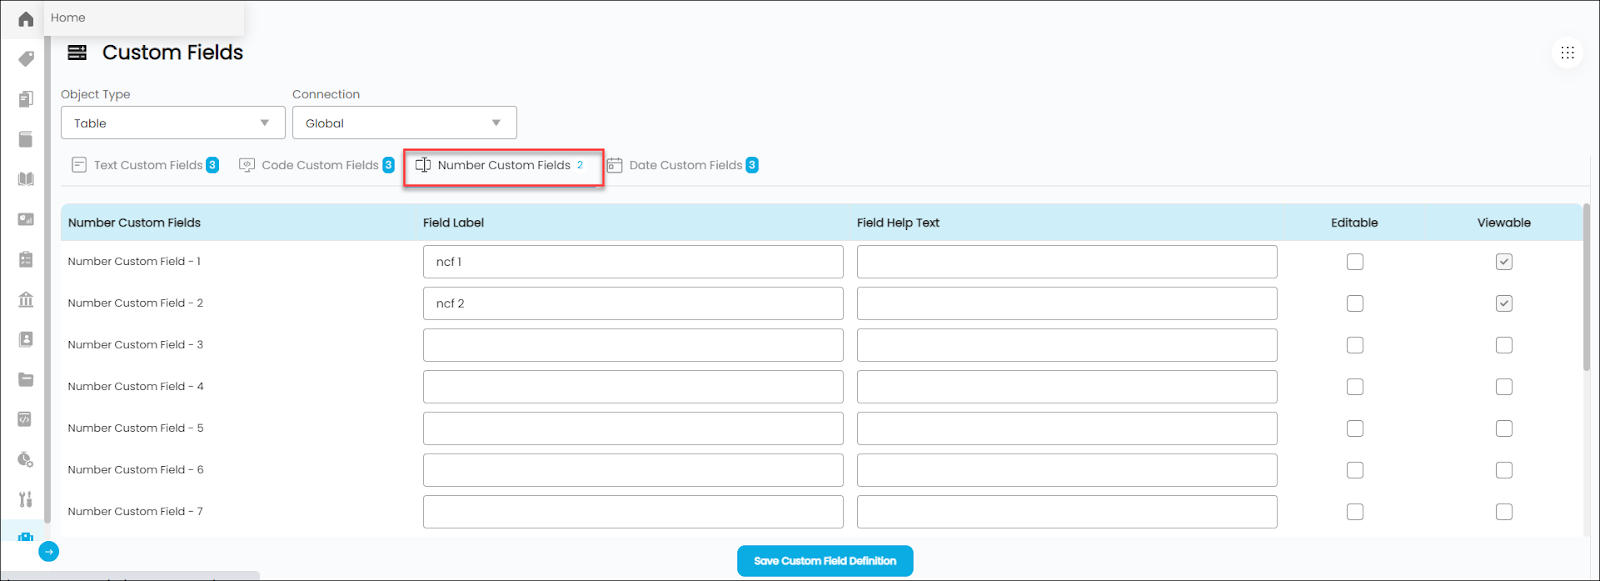
Adding Number Custom Field

To add a number custom field:
- Go to Administrations > select Custom Fields.
- Select the Object Type from the drop-down to which the Custom Fields are to be added.
- Select the Connection from the drop-down options.
- You can select an individual database connection like SQL, MySQL, Oracle, etc., to display the created custom fields in the selected connection data object’s Additional Fields.
- Select the Global option to display the created Custom fields on all the database connections under the selected data object’s Additional fields panel.
- Based on the Object Type and Connection selected, the custom field displays existing custom fields in respective Text/Code/Number/Date custom fields with a number count.
- Select the Number Custom.
- The Field Label helps define a name for the Custom field to display in the respective Object Type > Additional field panel. Enter the name of the Custom Field in the Field Label.
- Enter the label definition for tooltip help in the Field Help Text field, it provides the reference details about the Custom field when hovered onto the field in the respective Object Type > Additional field panel.
- Select the Editable field checkbox to see an edit icon enabled in the respective Object Type > Additional field panel to edit the field details. If unselected, the custom field cannot be edited.
- Select the Viewable field checkbox to see the created Custom field in the respective Object Type > Additional field panel. If unselected, the custom field is not displayed.
- Click on the Save Custom Field Definition button to create/update the custom field.
Note: Admin users can only create Custom fields.
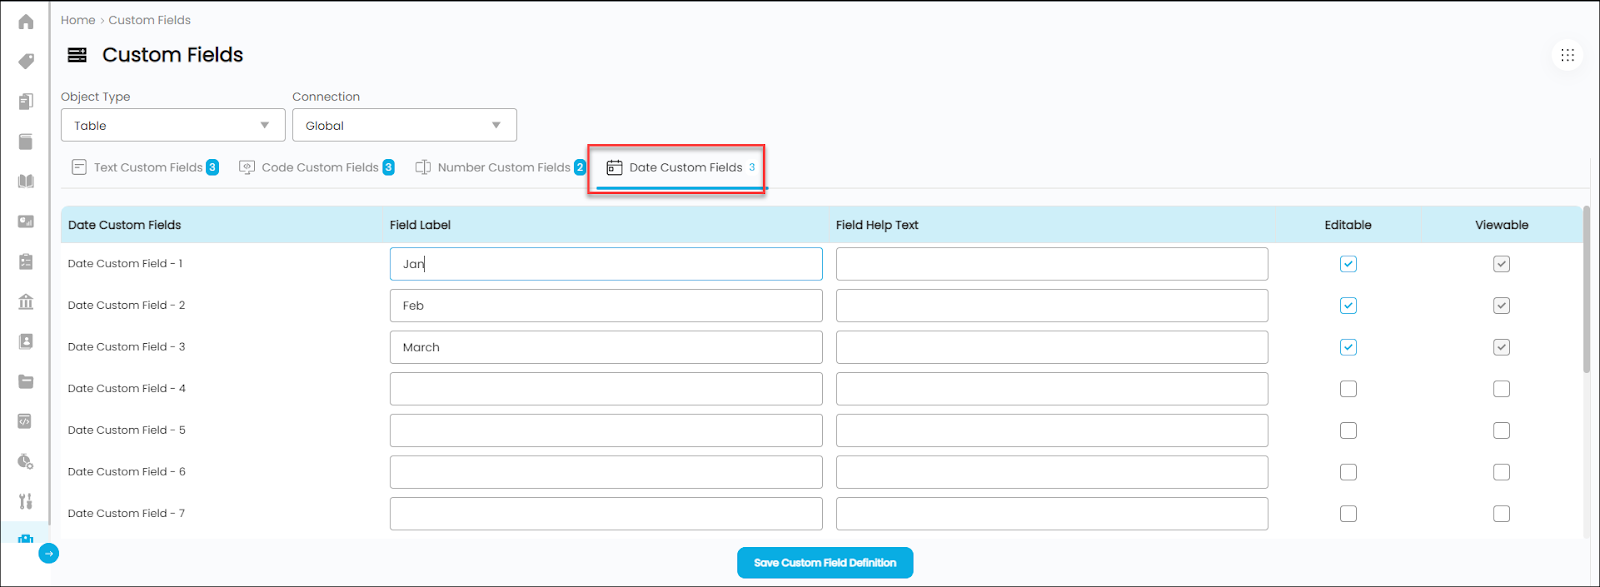
Adding Date Custom Field
- Go to Administrations > select Custom Fields.
- Select the Object Type from the drop-down to which the Custom Fields are to be added.
- Select the Connection from the drop-down options.
- You can select an individual database connection like SQL, MySQL, Oracle, etc., to display the created custom fields in the selected connection data object’s Additional Fields.
- Select the Global option to display the created Custom fields on all the database connections under the selected data object’s Additional fields panel.
- Based on the Object Type and Connection selected, the custom field displays existing custom fields in respective Text/Code/Number/Date custom fields with a number count.
- Select the Date Custom Field.
- The Field Label helps define a name for the Custom field to display in the respective Object Type > Additional field panel. Enter the name of the Custom Field in the Field Label.
- Enter the label definition for tooltip help in the Field Help Text field; it provides the reference details about the Custom field when hovered onto the field in the respective Object Type > Additional field panel.
- Select the Editable field checkbox to see an edit icon enabled in the respective Object Type > Additional field panel to edit the field details. If unselected, the custom field cannot be edited.
- Select the Viewable field checkbox to see the created Custom field in the respective Object Type > Additional field panel. If unselected, the custom field is not displayed.
- Click on the Save Custom Field Definition button to create/update the custom field.
Note: Admin Users can only create Custom fields.
Deleting Custom Fields
To delete the Custom field labels,
- Go to the Administration tab > Custom fields.
- Select the Object type and Connection.
- The custom field displays already created or existing custom fields in respective Text/Code/Number/Date custom fields with a number count.
- Choose the Custom field label and delete the fields by removing the existing data in the fields and disabling the selected access settings viewable/editable options from the list.
- Click the Save Custom Field Definition button, and the custom field labels are deleted.
- Navigate to the respective object type module and select the specific data object to see the Custom field removed.
To delete the Custom Fields created on Global connection/Global Domain,
- Go to the Administration tab > Custom fields.
- Select the Object type and Connection.
- The custom field displays already created or existing custom fields in respective Text/Code/Number/Date custom fields with a number count.
- Click the Nine dots and select the Delete Global Custom Definition button to remove the custom fields configured Globally after a confirmation pop-up.\
Copyright © 2019, OvalEdge LLC, Peachtree Corners GA USA