
A connector is a medium using which the information available in the source system can be fetched to the OvalEdge application. A connector can retrieve and manage the information from a specific data source connection of various database categories, such as RDBMS, Datawarehouse, Files, ETL and etc.
The managed connection process includes crawling, profiling, and lineage building.
- Crawler: collects information about data from various sources like on-premise and cloud databases. When a connector connects to a data source, it collects and catalogs all the metadata of data elements such as schema name, table name, description, column name, column type, column comments, views, procedures, and existing one's relationships of the remote server. The data is subsequently saved in the MySQL data repository in OvalEdge.
- Profiler: Once the connection job is run, the admin user will also have the option to profile the data source. These profiled results are computed by multiple SQL statements running against the source system compute these profiled results. Important statistics are gathered and displayed throughout the tool, where the metadata is populated.
- Lineage: A data lineage is a visual representation of how data flows from beginning to end. Data flows from source to destination across different systems in data lineage. In addition, it includes how and why the data is transformed along the way.
The Connector page presents the details of the connected data sources, such as the Connection Name, Connection Type, License Type, Server Name/IP Address, Port Number, Username, and the Status of the last successful crawl, as well as the last date the crawl was performed.
This connector page is equipped with the following features:
-
Add a new connection
-
To add a new connection using the bridge
-
To manage settings
Data Source connection via Bridge
To set and download the Bridge Artifacts
- Login into the OvalEdge application.
- Navigate to the Administration > Connectors module and display the Crawler Information page.
- Click on the Create Bridge button. The Bridge Details page is displayed.
- Click on the Create Bridge button. The Bridge Details page is displayed.
- Click on the + icon. The Add Bridge pop-up window is displayed.
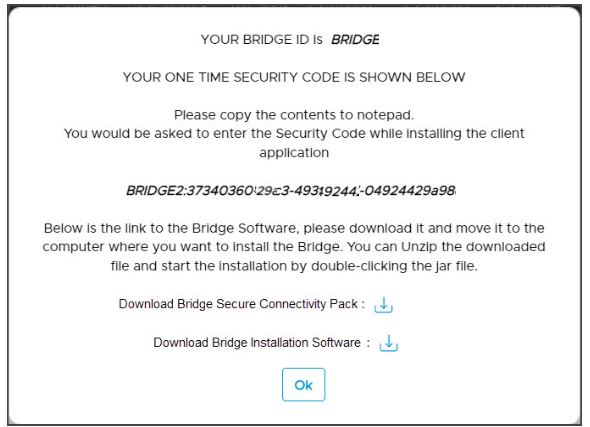
- By default, the Next Available Bridge ID is displayed, enter the Bridge Location Public IP Address and click on the Add button. A pop-up window with the Bridge ID, Security Code, Download of Bridge Secure Connectivity Pack, and Bridge Installation Software is displayed.
- Make a note of the Security Code, which needs to be mentioned in one of the pages of the Bridge Installation process.
- Download the Bridge Secure Connectivity Pack to your desktop.
- Download the Bridge Installation Software to your desktop.
Note: The size of Bridge Installation Software is 982 MB - Click on the Ok button, and the new bridge is created and displayed in the Bridge page.


|
Column Name |
Description |
|---|---|
|
Bridge Id |
By default next available Bridge ID gets displayed |
|
Bridge Name |
Name of a Bridge |
|
IP |
IP address of client data center |
|
Status |
Whether the bridge is connected |
|
User Name 1 |
Displays the username |
|
User Name 2 |
Displays the username |
|
User Name 3 |
Displays the username |
|
User Phone 1 |
Displays the user phone |
|
User Phone 2 |
Displays the user phone |
Connecting to a Database (Data Source)
The first step is connecting to a data source in OvalEdge once you log in. Click on the Administration tab and then the Connector sub-tab.
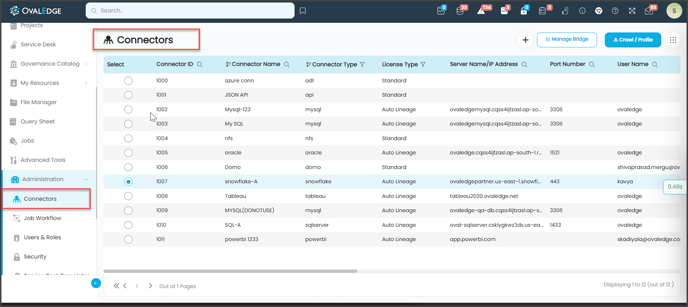 The Connector section shows what data sources have been connected to OvalEdge and allows for new connections.
 |
Crawler |
Description |
|---|---|
|
Select |
To select the desired connection for crawling |
|
Connection ID |
It displays the connection ID |
|
Connection Name |
It displays the name of Connection |
|
Connection Type |
It displays the connection type (RDBM Report and ETL) |
|
License Type |
Auto Build Lineage and Standard |
|
Server Name/ IP Address |
It displays the server name or IP address |
|
Port Number |
3306 |
|
User Name |
OvalEdge |
|
Status |
Displays the status of crawl (SUCCESS, PARTIAL SUCCESS, ERROR, KILLED, RUNNING, INIT, and WAITING) |
|
Steward |
Displays the name of the Steward. |
|
Custodian |
Displays the name of the Custodian. |
|
Owner |
Displays the name of the Owner. |
|
Last Crawled Date |
Displays the last crawled date of connection |
|
Created By |
Name of the user |
|
Created Date |
Date on which connection was crawled |
|
Last Updated By |
Displays the name of the user |
|
Last Modified On |
Date of last update |
|
Validation Status |
Displays the validation status (Validated Not Validated) |
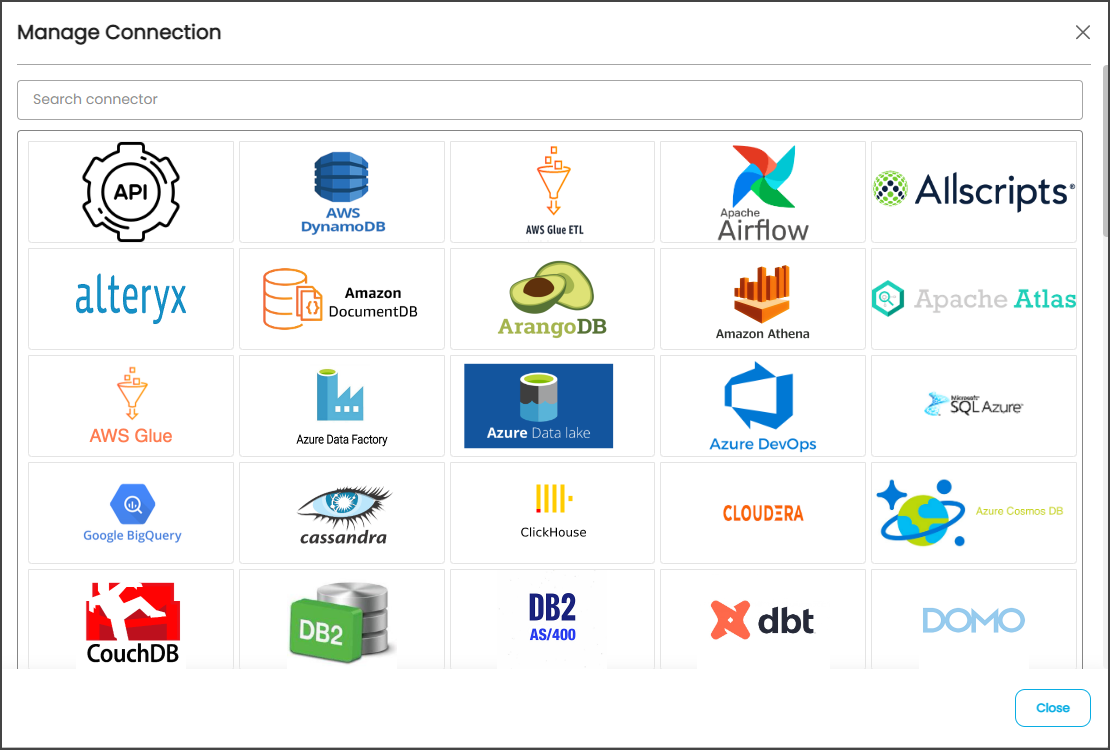
- Click the + icon to establish a new connection.
- You may select the type of connection required from the pop-up window.
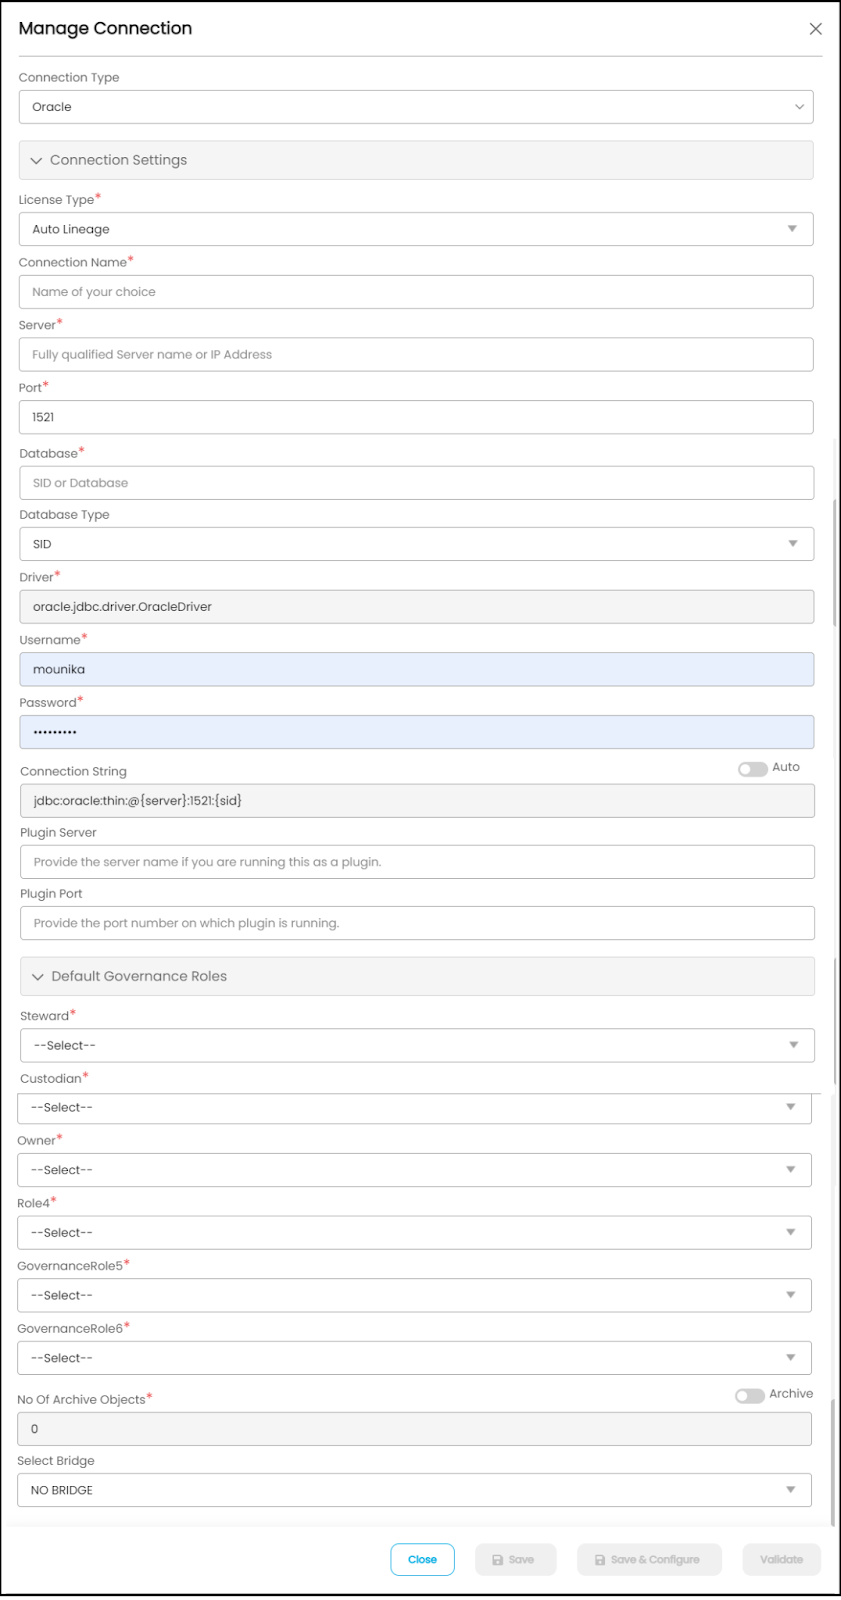
- It will open and deliver a prompt to enter specific authentication credentials about that data source. The Manage Connection popup window displays the connection settings and governance roles.
Manage Connection Fields Descriptions Connection Type By default, Connection Type will display the selected source name, or the dropdown menu will display the list of available connectors. Connection Strings Enter connection Strings Governance Roles A specific user or a team is selected from the governance roles (Steward, Custodian, Owner) from the dropdown list that displays all the configured users (single user or a team) as per the configurations made in the Security > Governance Roles page. Also, any role configured in the application can update or assign other governance roles. For example, the Owner can update the Owner or any other governance roles. No. of Archive Objects No. of archive objects count is the number of last modifications made in the metadata data of a Remote/source (for report connection only). For this, you set the toggle button on the connection page at the time of a crawling connection. For example, if you update the count as 4 in the ‘No. of archive object’ field, and then the connection is crawled. It will provide the last 4 changes that occurred in the remote/source of the connector. You can observe these changes in the ‘version’ column of the ‘Metadata Changes’ module. Bridge Select the Bridge option as “NO BRIDGE.”
Note: The Bridge ID will be shown in the Bridge dropdown menu when bridges are configured and added, or it will be displayed as "NO BRIDGE". - Click the Validate button to ensure that the right credentials have been entered.
Note: Sometimes, if you simply want to save the details and validate the connection later in time, you can use the Nine Dots menu option to Validate the connection. Also, while editing the connection through Nine Dots > Edit Connection, it is also possible to save the settings and validate later through Nine Dots > Validate Connection. It is not mandatory to Validate the connection before saving the connection page. Next, click on the Save button to establish the connection. - After validating the entered connection details, you can click on the Save & Configure button to establish the connection and configure the connection settings.
Note: The Save & Configure button is displayed only for the Connectors for which the settings configuration is required. - The Connector home page displays the user name as a single user or team assigned to the governance roles. For example, Steward as ‘#QAteam.’ The next step is to Crawl the database, which allows OvalEdge to gather all the metadata from the connected source, which begins populating the metadata in OvalEdge Data Catalog.
Edit Connections
To edit a database,
- Go to the Administration > Connector page.
- Select a connection and click the Nine Dots button
- Select the Edit Connection option to update the existing data source.
- Update the details, then save and validate the connection again.
Note: At times, if you simply want to save the details and validate the connection later in time, you can use the Nine dots menu option Validate connection.
Delete Connections
Deleting a database schema can be achieved depending on what the user wants to delete. The architecture design of delete functionality consists of a connection level that includes the Deletion of connection types such as RDBMS, Reports, and Files.
To delete a database connection,
- Click on the Nine dots button and select the Delete Connection button. Choose database or schema (if schema, select the applicable schema).
- Enter the name of the database or schema.
- Select a scheme(s) to delete.
- Click the Delete button. It will delete the schema once the schema name is entered.
- When the deletion of the data source is successful, an alert message will appear that the deleted job has been submitted.
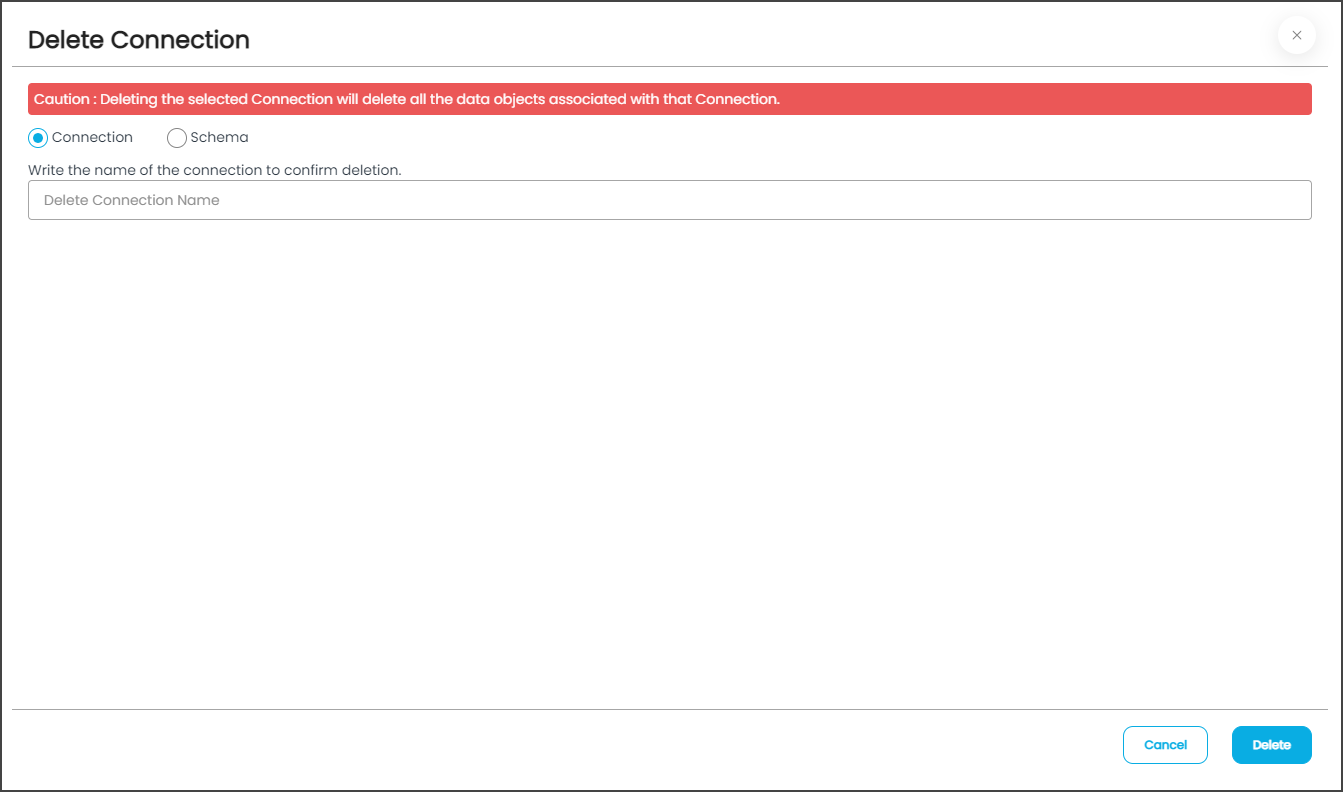

Note: A warning sign will appear before a connection gets deleted. Before deleting the schema, understand that this would remove all the tables, columns, charts, relationships, and objects in OvalEdge associated with this schema.
Crawling a Database (Data source)
To begin a Crawling process,
- Select a connection ID of the desired data source. Click the Nine Dots button on the right side of the screen and then select the Setting option to configure the desired crawl settings. A pop-up window will open, and the Admin user may select several options to tell OvalEdge how to crawl the source system.
- Once the data source is selected, the you can click on the Crawl/Profile button; the Crawler option window is displayed that allows the selection of schemas which will be Crawled, Crawl /profiled, Profile, and Profile unprofiled.
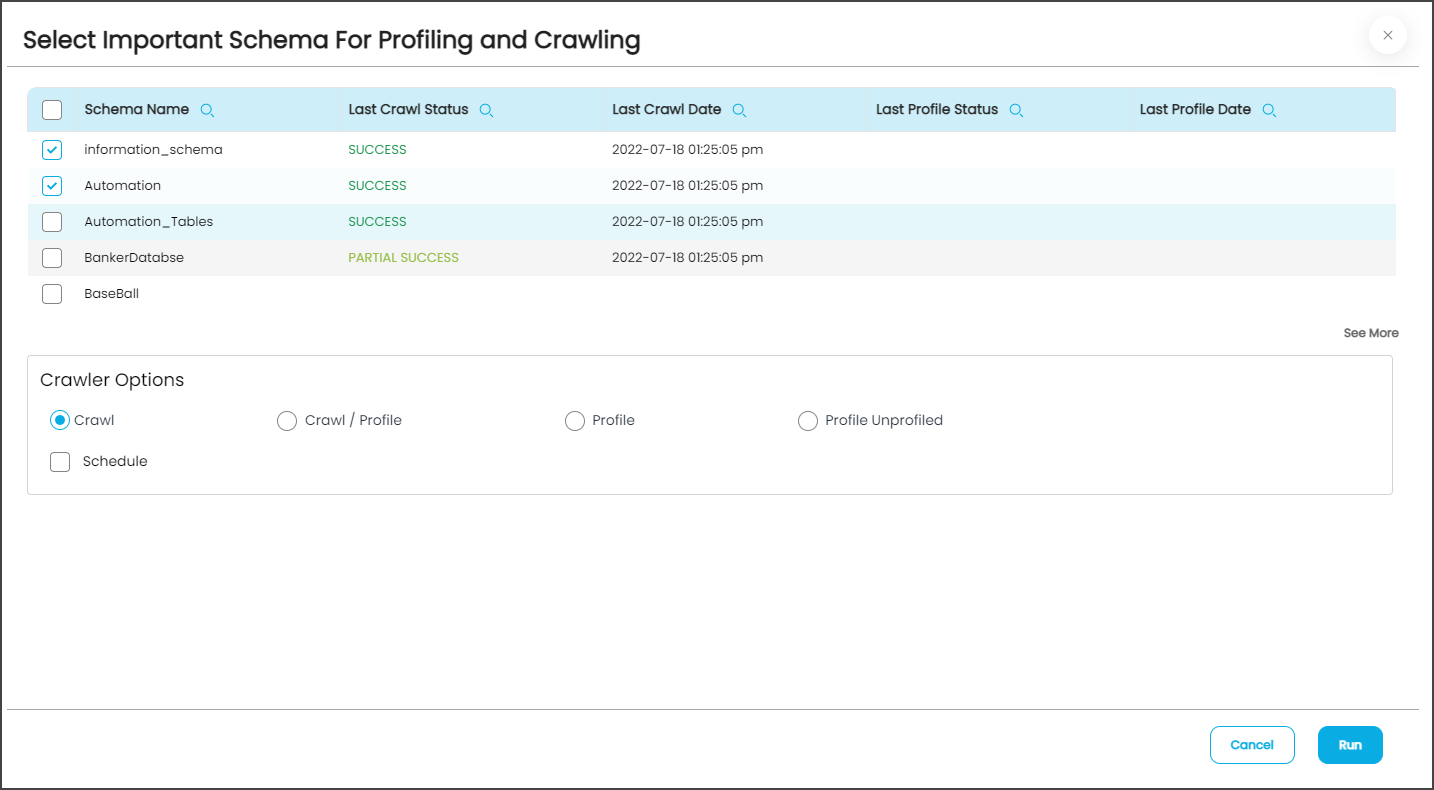
|
Crawler Options |
Description |
|---|---|
|
Crawl |
In order to Crawl, click the Crawl button to display the column in the selected table, and then click the Run button. |
|
Crawl/Profile |
In order to Crawl and profile simultaneously, select the Crawl/Profile radio button to display the profiling column in the selection table, check both the crawl and profile buttons, and click the Run button. |
|
Profile |
In order to Profile, select the Profile radio button for the profiling column in the selected table and click the Run button. |
|
Profile Unprofiled |
To Profile Unprofiled tables in a selected schema, select the Profile Unprofiled radio button and the Run button to resume profiling rows of data objects that were interrupted for any reason. |
Note: Select the schema(s) to crawl and click the Run button, which submits the crawl job against the source system.
Crawler Setting Window
You can access the possible crawling and profiling setting to decide how they want to crawl/profile the selected data source (RDBMS, Data Warehouse, ETL, Reports, Files, NOSQL, etc.) based on the connection, Crawler Setting Window has various setting tabs to perform on a connection. The various tabs are Crawler, Profiler, Remote Access, Query Policies, Access Instruction and Other.

Crawler
To set up a crawler,
- Navigate to Administration > Connections
- Click on the Nine Dots > Settings > and select the Crawler option. It includes setting for
- Crawler option,
- Crawler Rules, and
- Query Log Settings.
- Click Save changes button to save the settings.
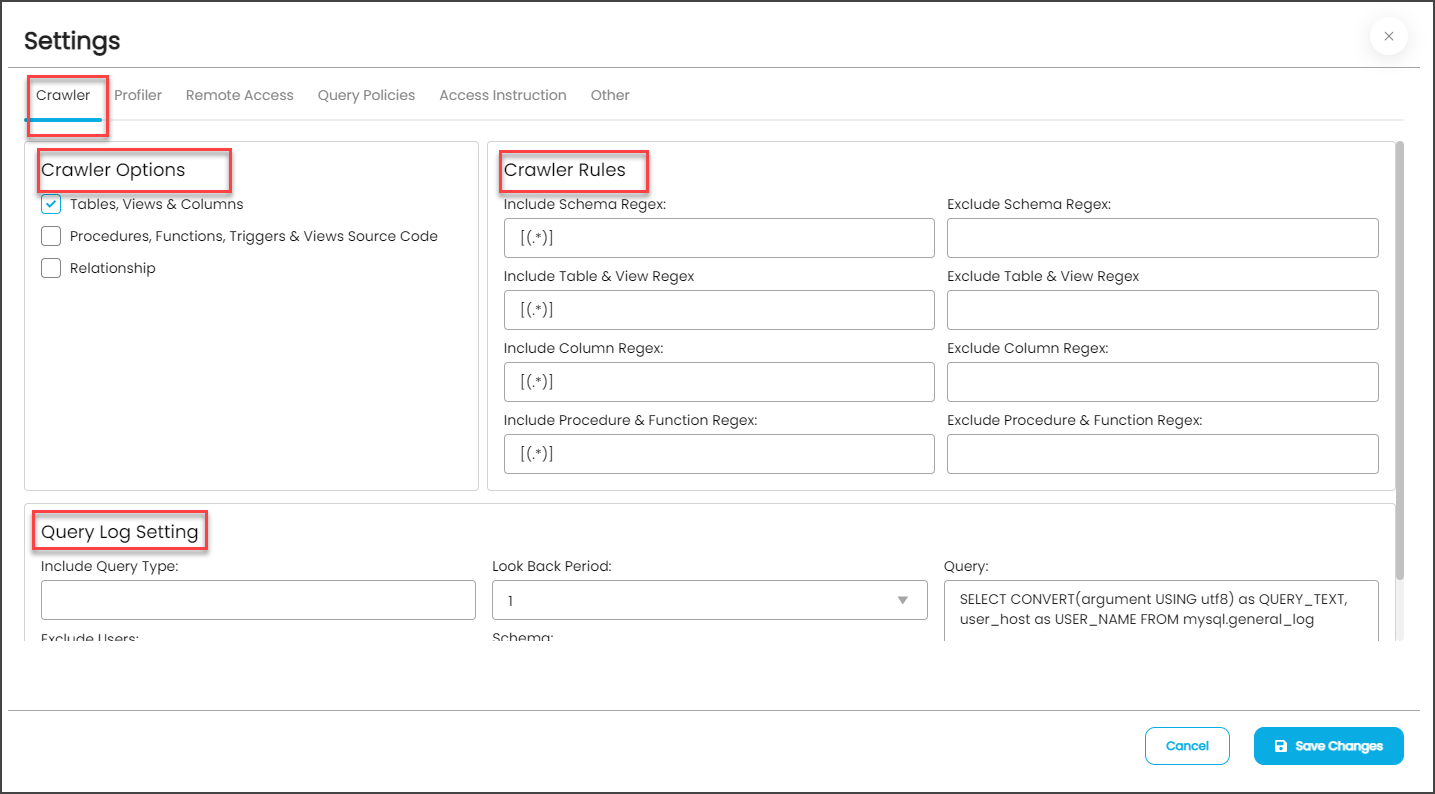
Crawler Option
The Crawler option will allow the crawling of the database based on the following data source elements.
RDBMS
The following are the crawler options you need to select for RDBMS:
- The Setting page has various setting tabs for crawling, profiling, and remote data access options
- Based on the connection selected, the options will differ. Not all crawler options will be available for the connection selected.
|
Settings |
Options |
|---|---|
|
Crawler Options |
|
|
Profile Options |
Tables and Columns Views and Columns |
|
Data Access Authorization |
OvalEdge follows OvalEdge data permissions OvalEdge follows Remote system permissions |
|
Query Policy |
It restricts the use of the selected query types based on your role. |
|
Other |
Send Metadata Change Notifications To and Context URL |
Files
The following are the crawler options you need to select for Files:
|
Settings |
Options |
|
Crawler Options |
Download File FileFolders/Buckets View File |
Reports
|
Settings |
Options |
|
Crawler Options |
Note: In full crawl, we will get all reports/report columns present in the remote data irrespective of any changes in the remote. |
|
Other |
Send Metadata Change Notifications To and Context URL |
ETL
ETL connectors connect to data sources, construct data pipelines, and enable extraction and loading of data. For the ETL-type connectors, the Lineage tab is displayed. To select multiple source systems for Reports and ETL connections, navigate to the Connectors > Settings, and then the Lineage tab is displayed. You can change the server/source connection in the lineage tab for building the lineage.
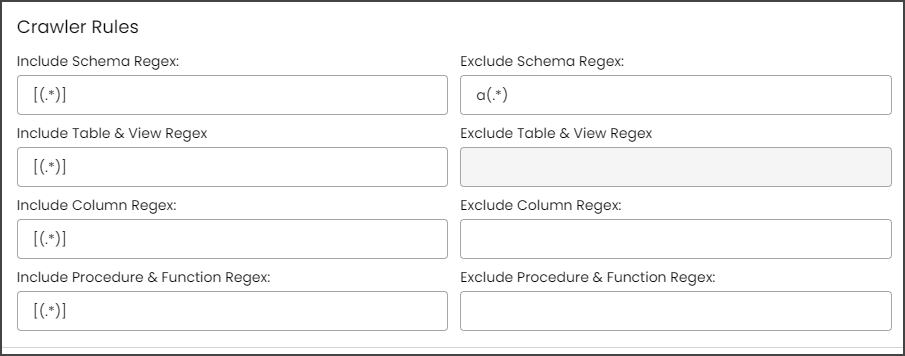
Crawler Rules
Crawler Rules can also be configured to provide more refined results. These rules are nothing more than regular expressions that are written against the source system. A regular expression can be written to search for matching character sequences against patterns specified by regular expressions in the code. These options include
- Include Schema Regex
- Exclude Schema Regex
- Include Table & View Regex
- Exclude Table & View Regex
- Include Column Regex
- Exclude Column Regex
- Include Procedure & Function Regex
- Exclude Procedure & Function Regex

When setting up the regex rules, you can write rules that will either include and / or exclude schema, tables, views, columns, procedures and functions that start with, end with or have middle characters as defined in the rule.
Note: Non-Regex includes/exclude it is supported for starts with, ends with using %.
Example: If you only want schemas that start with "a" then you need to write "a(.*)" in the Include Schema Regex field. After that, they need to run the crawl job, then the results for the schemas that start only with the character "a” are displayed.

Example: If you only want schemas that end with "e," then you need to write "(.*)e" in the Include Schema Regex field. After that, they need to run the crawl job, then the results for the schemas that end only with the character "e” are displayed.
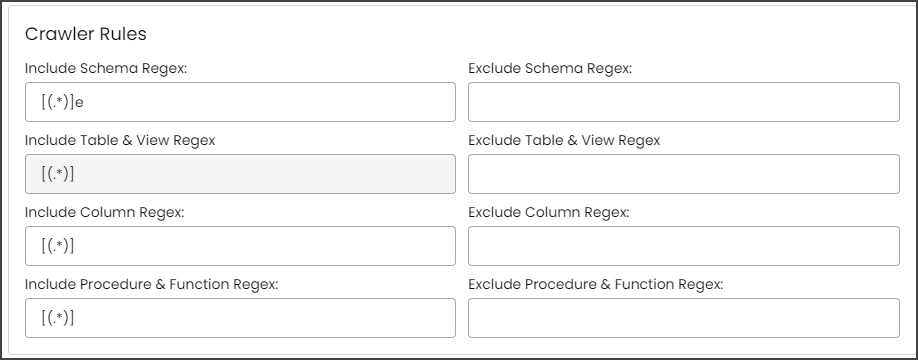
Example: If you only want to exclude schemas that start with "a," then you need to write "a(.*)" in the Exclude Schema Regex field. After that, they need to run the crawl job, then the results for the schemas without a character "a” at the starting of the schema name are displayed.
Example: If you only want to exclude schemas that end with "e," then you needs to write "(.*)e" in the Exclude Schema Regex field. After that, they need to run the crawl job, then the results for the schemas without a character "e” at the end of the schema name are displayed.
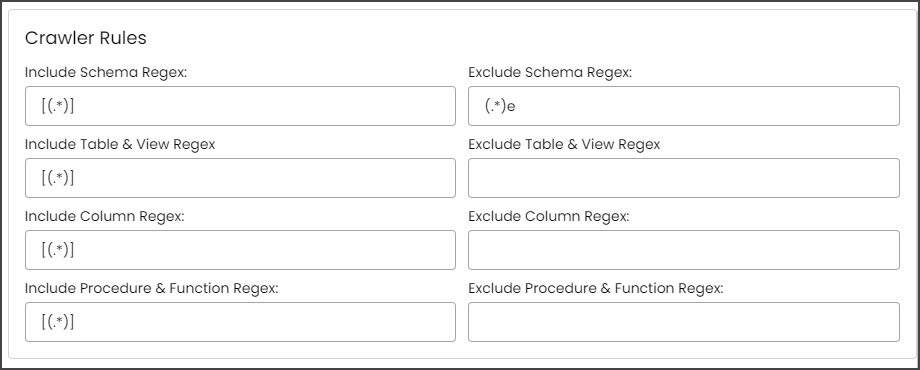
NOTE: Above examples are on the Table, Column, and Procedures & functions are executed the same way.
Query Log Setting
The purpose of Query Log Settings is to build the data lineage for a different type of query ( INSERT, DELETE or UPDATE) for the duration specified.
Query Log Setting comprises:
- Query: It will display the query fetched from the backend and make it available to the front end. It fetches (if any) list of queries that have undergone changes based on the criteria given in the look-back period.
- Look Back Period: Look back period feature allows the query box to save the queries for those specified days and allows you to fetch queries that were processed in the backend for that number of days ago. For example, the lookback period can be set to 1 day, 2 days, or more. The maximum Look back period is 7 days.
- Include Query Type: You can include query types such as Select, Insert, Update, and Delete
- Exclude Users: You can enter the user name of those who are not required for the query logs. In the Query Logs, the administration has the option to exclude the users are not required because If any user name is given in the exclude user, the query log of the executed query by that particular user is excluded from fetching.
- Schema: Select the schema to apply query log settings. If you leave this blank, it will fetch the query log based on all the schema available for that database connection.

Profiler
The process of gathering statistics and informative summaries about the connected data source(s). Statistics can help assess the data source's quality before using it in an analysis. Profiling a data source also helps identify relationships between the tables at the entity level and patterns between them. Profiling is always optional; crawling can be run without also profiling. However, if profiling is desired, there are a few options on how to profile the metadata/data.
Profiling a Database (Data Source)
To profile a data source, navigate to the Administration > Crawler tab. To begin the Profiling process,
- Select the Crawler ID in the Select column (this selects the desired data source).
- Click the Nine Dots button and select the Setting option to configure the desired profile settings. A pop-up window will open, and the Admin user may select several options to tell OvalEdge how to profile the source system. By default, when a data source is profiled, all the rows in a dataset are analyzed to collect the statistics. You can configure the settings to increase the database's efficiency and performance (while the profile job is running).
- A pop-up window of the profiler setting will be displayed
- Click on the Save Changes button to save the profiler option.

To configure the Profile Setting,
Click on the Edit icon that allows the Admin user to configure the profiler setting for the selected data source. There are many attributes you can specify in the profile settings.

The attributes are as follows,
|
Columns |
Description |
|
Order |
Order is the sequence in which the profiling is done. |
|
Day |
The day of the week profiling is set to run. |
|
Start/End Time |
The start and end time at which profiling is set to perform. |
|
Number of Threads |
A thread is a process where a query is executed on a database to do single or multiple tasks. The number of threads determines the number of parallel queries executed on the data source. |
|
Profile Type |
There are four main types of data profiling. Sample - For Sample profiling, The profiling is performed based on a given Sample Profile Size. The data on columns (like Min, Max, Distinct, Null Count, etc.) will be different compared to full profiles as we calculate them only on sample size. To execute a sample profile, select the profile type as “Sample” and enter a sample profile size(count of records to be profiled). Auto - For Auto profiling, If the Row Constraint checkbox is selected (Set as True) and if the configured Rowcount Limit (100) is less than the total Table Row Count (1000) then the sample profiling is performed by considering the count mentioned in the Sample Profile Size. If the Row Constraint checkbox is selected (Set as True) and if the configured Rowcount Limit (1000) is greater than the total Table Row Count (100) then the query is executed without considering the count mentioned in the Rowcount Limit. Note: A profile type set to “Auto” will always depend on the Rowcount limit and the Rowcount Constraint (Set as “True”). Query - For Query profiling, If the Table Row Count (100) is less than the configured Rowcount Limit (1000), then the profiling is executed on the entire table. If the Table Row Count (1000) exceeds the configured Rowcount Limit (100), then the profiling skips execution for those tables to avoid performance issues. Disabled profile type prevents profiling on the selected data source. |
|
Rowcount Constraint |
The Row Count Constraint option is applicable only when the Profile Type is selected as Auto.
|
|
Rowcount Limit |
Enter the maximum number of rows that should be considered for profiling. |
|
Sample Profile Size |
Enter the total number of rows to be included for profiling. |
|
Query Timeout |
Enter the length of time in seconds to allow the query to run on a remote database before timing out. |
To Crawl/Profile the schemas,
Once the setting for profiling has been configured, go back to the Crawler screen and click the “Crawl/Profile” button to begin the profiling.
- Click the Crawl/Profile to crawl as well as profile the schemas; also, there is an option to just profile as well profile.
- Click checkboxes to choose the desired schema(s).
- Then click Run to submit the profile job.
- View the progress of the profile job in the Jobs tab

Schedule of a Crawler or Profiler
For any scheduled Crawlers and profilers, the defined run date and time are displayed on the following screen.

Screenshot: Schedule
Note: The schedule, once created, can be edited using the edit icon placed. When you click the edit icon it will navigate to the ‘Schedule’ module.
Remote Access
This Remote Access tab lists the data objects and the meta and data permissions on these objects that a user is assigned access to in a remote application.

Remote Data Access Management
Remote Data Access Management has three ways for connecting a remote database
- None: When you crawl any schema, all the users and roles from the remote source will come into the Remote Users tab and Remote Roles tab in the Administration > Users & Roles.
- Remote System is a master: In the Remote Access tab, the user selects an option of a Remote system is the master, and when you crawl a remote connection, all the users and roles available in the remote source pertaining to that schema connection are displayed in the OvalEdge (Administration - > Users & Roles).
- At the time of crawling, the user permission available on that schema will also be reflected in the Users & Roles | Remote users and Remote roles tab. You will be able to log in with that user's default password, then you can change it on the first login.
- When this option is selected the admin users cannot create, update or delete the users or roles will also be reflected in the Security, schema, and Tables tab.
- OvalEdge is a master: When OvalEdge is the master, users can assign Roles and User-based permissions to Objects. For that admin, users can use the existing Users and Roles or it can create new Users and Roles and then assign them.
- At the time of Crawling, users and roles assigned to the schema are displayed.
- When this option is selected, the admin users can create, update or delete the users or roles. This will get reflected or added in remote sources as well. It also considers the roles permissions and schema permissions. Security schema level permission can be updated from OvalEdge
Note: Remote is master or OE is master in the Remote Access will not work unless Users, Roles, Policies & Permissions are not checked.
Remote
|
Settings |
Options |
|
Crawler Options |
Procedures, Functions, Triggers & Views Source Code Tables, Views & Columns Relationship Users, Roles, Policies & Permissions |
|
Profile Options |
Tables and Columns Views and Columns |
|
Remote Data Access |
|
|
Remote Policy |
Sync OvalEdge Policies to Source System |
|
Data Access Authorization |
OvalEdge follows OvalEdge data permissions OvalEdge follows Remote system permissions |
|
Query Policy |
It restricts the use of the selected query types based on your role. |
|
Other |
Send Metadata Change Notifications To and Context URL |
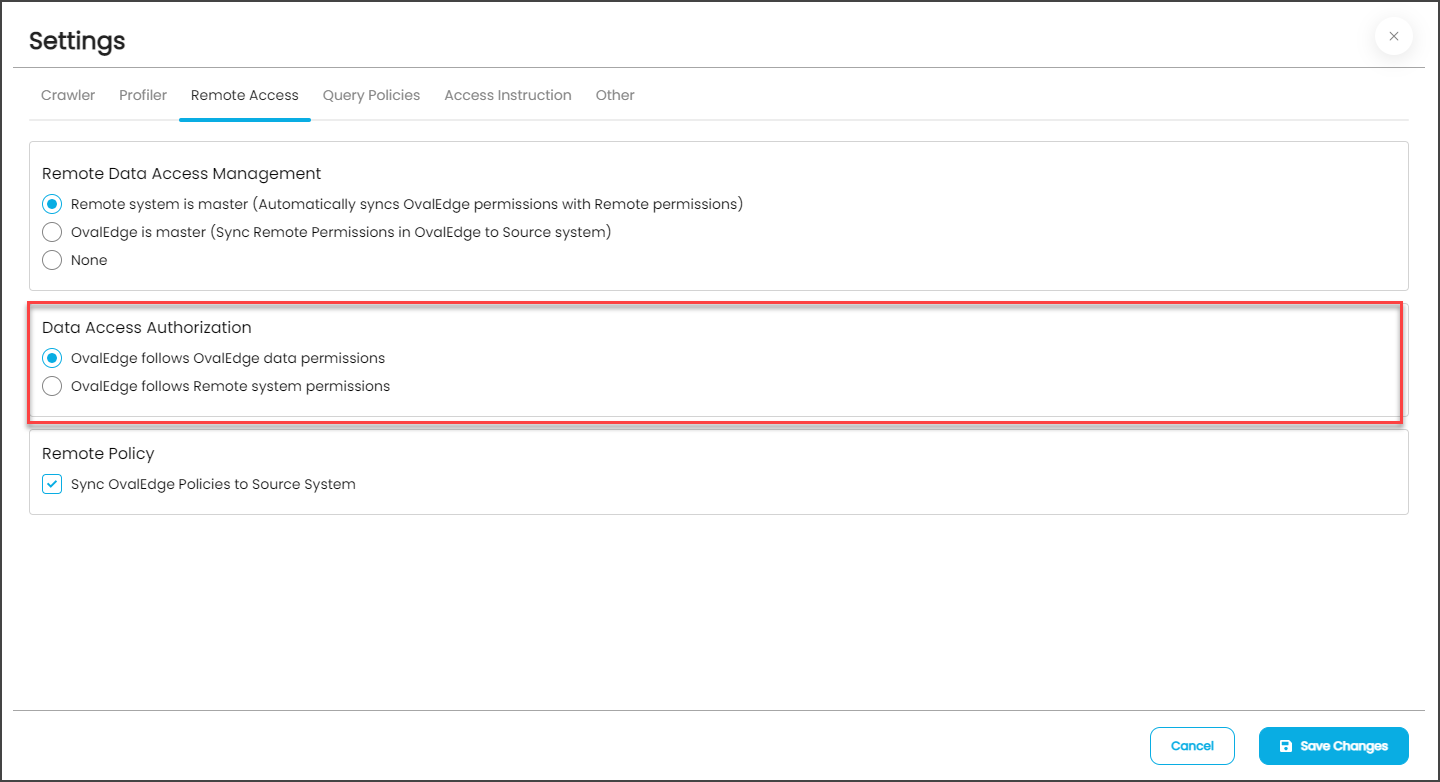
Data Access Authorization
The new feature Remote Access (Data Access Authorization) is included in the crawler specific connector settings to ensure that the right user is accessing the query sheet and queries in the data catalog. Here the system validates the user credentials and allows that particular user to access the query sheet and queries in the data catalog.
- OvalEdge follows OvalEdge data permissions: When this option is selected, the OvalEdge application uses a service account used for creating the connection in the Query Sheet page, Data Catalog > Table > Data page and Data Catalog > Query page to fetch the required data.
- OvalEdge follows Remote system permissions: When this option is selected, then the users are prompted to enter the remote data source credentials in the Query Sheet page, Data Catalog > Table > Data page, and Data Catalog > Query page, and the submitted credentials are used to establish the connection to fetch the required data. Here, these credentials will be cached and cleared after 7 days of inactivity. Example: When the Remote system permissions option is selected and the user navigates to the Query Sheet or Data Catalog Queries and selects the Connection (Database), then the Enter User Credentials pop-up window with the Username and Password is displayed, where the user needs to provide the remote data source credentials for accessing the Database.
Remote Policy
Sync OvalEdge policy with Remote: You can select the check box to assign the OvalEdge policy with the remote. When selected, this option enables various predefined OvalEdge policy schemes to be applied on the remote connection.
Policy management includes Column Level and Table Level Policy schema. The policy applied on the column level is known as the Masking policy and the policy applied at the table level is called the Row Access Policy.
Masking Policy
Following are the masking schemes defined and can be assigned to the table or column of remote connection.
- Mask Alphanumeric Charachter with xxxxxxxxx
- Mask AllCharacters with xxxx
- Show Last 4 characters
- Show First 4 characters
- Show Blank
- Mask Numbers
- Mask with Default Time
- Mask with Default Date
- Masked Column in Remote
Note:
- Refer to how the column level security is enabled in the security module to know how to restrict and mask a column. If any failure or success on objects policies (Success /Failure and update and delete) are displayed in the Audit Trails.
The allowed user roles are available only when a user chooses to restrict a column. Functionally, users choose to either Mask or Restrict the column data.
Row Access Policy
The concept of row-level policy is a masking scheme for the row level of the table. For this, you may navigate to Security > Database. Click on the Edit icon in the column of "available User or Roles." It will navigate to the page of Adding row access policy. It will display the list of Policy names and its SQL statement.
Refer to how the column level security is enabled in the security module to know how to restrict and mask a column. If any failure or success on objects policies (Success /Failure and update and delete) are displayed in the Audit Trails.
- The allowed user roles are available only when a user chooses to restrict a column. Functionally, users choose to either Mask or Restrict the column data.
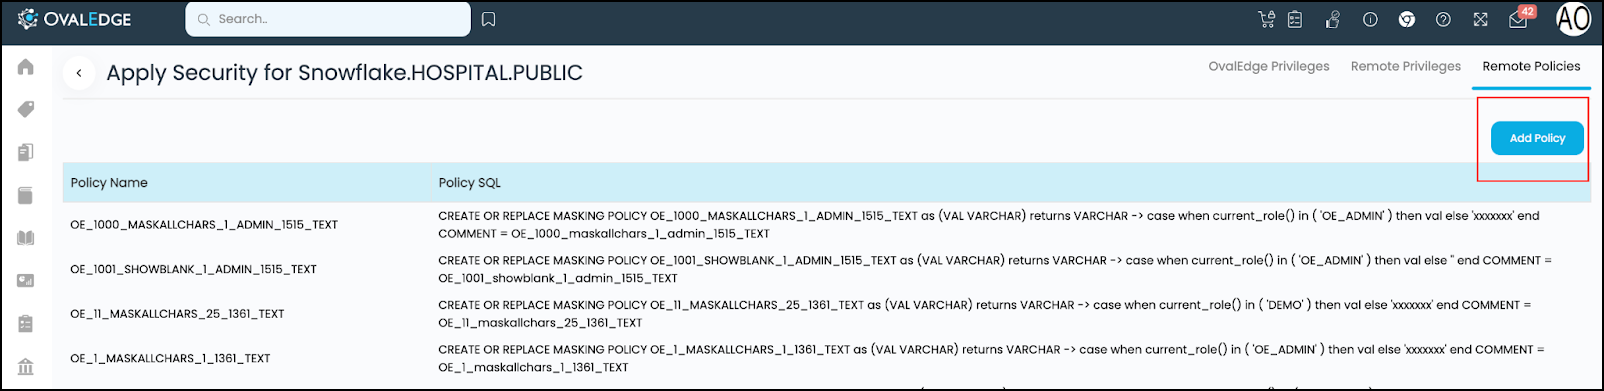
To create a row access policy,
- Click on Add Remote Policy button, and a popup window is displayed.
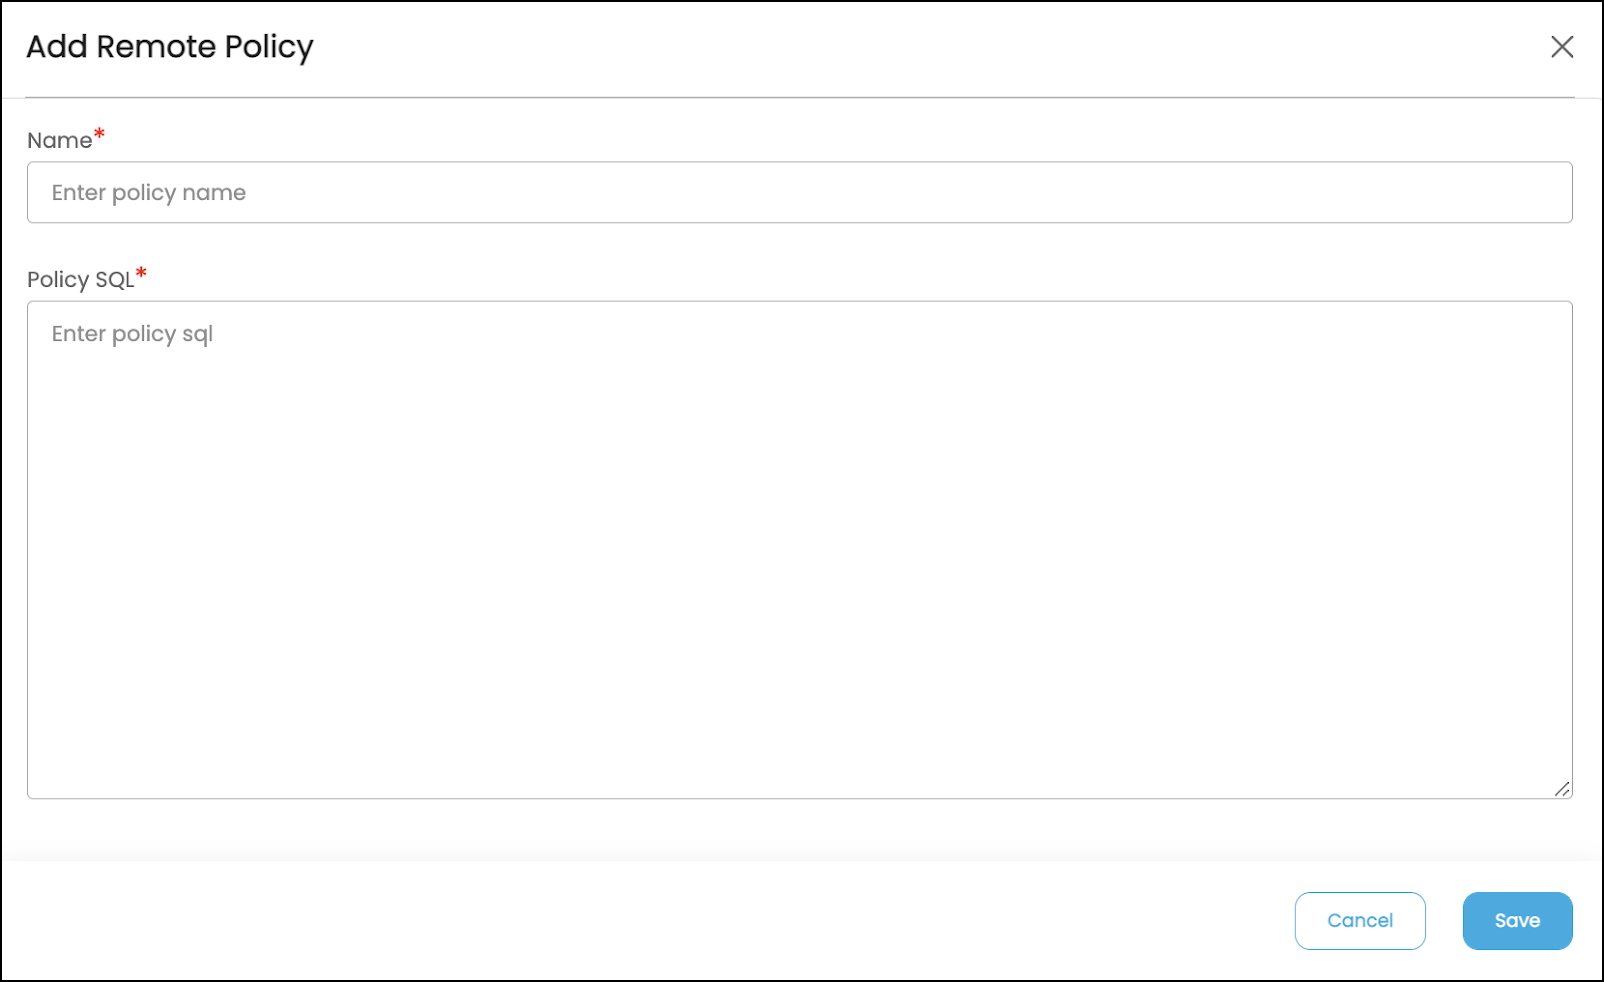
- Enter the policy name
- Write the SQL criteria to create a policy that is applicable for one or more column(s) based on the requirement. If any error occurs, then it will show in Audit trails.
To Assign row access policy,
- Navigate to Security > Tables.
- Click on the Row Access policy column, a popup window is displayed.
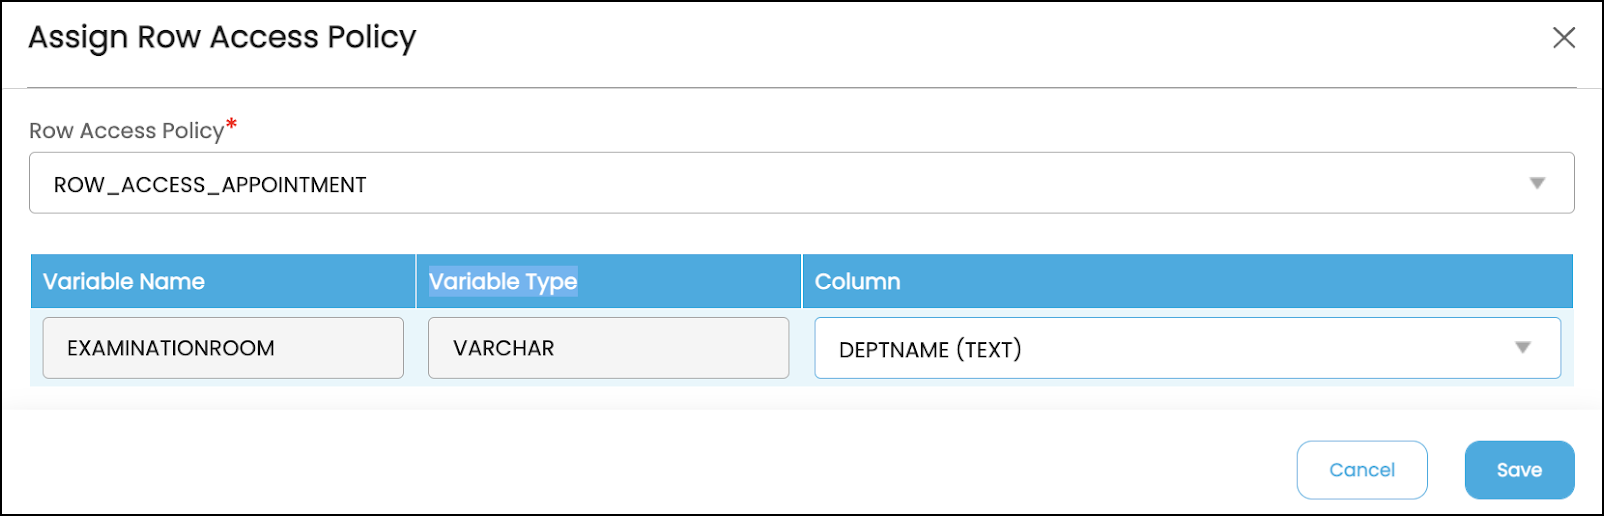
- From the dropdown menu, select the Row Access Policy
- It will display the variable name, variable type, and column. The variable name and variable type are displayed based on the condition defined in the SQL Policy. The column name displays all the columns of the table.
- Select the column based on the variable type and click on the Save button.
- The row access policy gets applied.
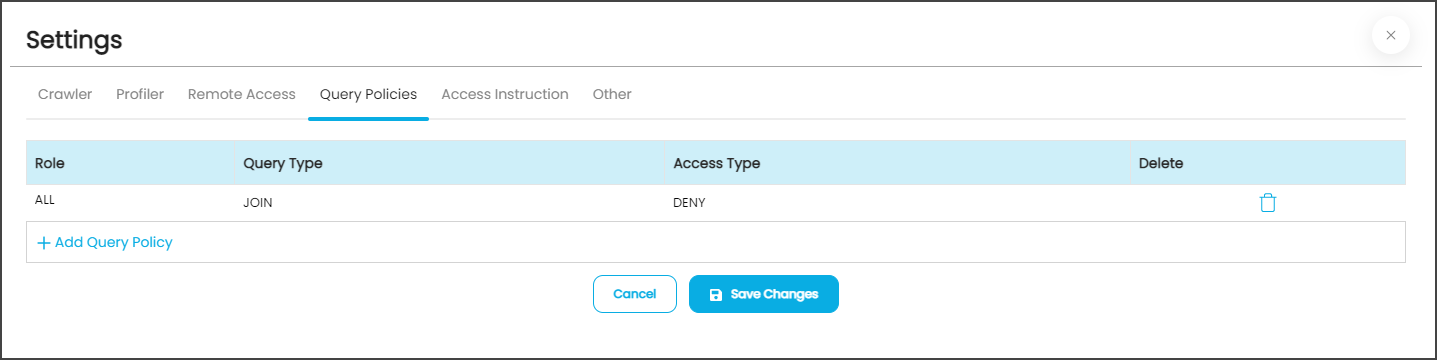
Query Policies
The new feature Query Policies is included in the crawler-specific connector settings for the connectors, which are supported with Query Sheet functionality. Here the system allows you, under the specific role, to restrict the usage of the selected query types in the Query Sheet page for fetching the required data.
To provide the restriction for users to use specific Query Types, complete the following steps:
- In the Crawler Information page, select the specific Crawler ID for which the Query Policies need to be included and click on the Nine Dots button. The connectors options menu is displayed.
- Select the Settings options and display the connectors Setting page.
- Click on the Query Policies tab, and the data grid with existing Policies details with Role, Query Type, Access Type, and Delete columns are displayed.
- To include new query policies, click on the +Add Query Policy button the inline row with Role, Query Type, Access Type, and Cancel options are displayed.
- Select the desired Role, Query Type, and Access Type from the respective dropdowns and click on the Save Changes button
- The selected Query Policy will be displayed in the Data grid.
Example: If the user selects the Role as “OE_ADMIN”, Query Type as “JOIN,” and the Access Type as “DENY,” then the users associated with the OE_ADMIN privileges are restricted to use the JOIN function in the Query Sheet page. - In the Query Sheet, if the user associated with the OE_ADMIN role tries to use the JOIN function for the fetching data, then the error message “User does not have permission on this <TableName> to perform this Function: Join” is displayed.

Other
User Notification
To set up the User Notifications for the data source, complete the following steps:
- In the Crawler Information page, select the specific Crawler ID for which the User Notification needs to be included and click on the Nine Dots button. The connectors options menu is displayed.
- Select the Settings options, the connectors Setting page is displayed.
- Click on the Others tab, the Send Metadata Changes Notifications To, and Context URL sections are displayed.
- Select whether the notifications for the Data Owner and Data Steward under the specific Roles need to be sent or not.
- Select the desired role from the Roles dropdown menu and click on the Save Changes button. The notifications will be successfully sent to select Data Owner and Data Steward.
Context URL
The Context URL feature in the crawler module supports the functionality of the OvalEdge Browser Extension. The Context URL button on the crawler screen allows a user to map OvalEdge to the added URL addresses. The URL embedded in OvalEdge allows your browser to recognize the site and provide the metadata results from the OvalEdge catalog when the plugin is used outside the OvalEdge application. The Context URL is applicable for the Report connection type only. When the Context Id is entered for a specific Report Connector Type > Crawler settings, the OvalEdge application plugin acts as a bridge between the OvalEdge application and Source Report Database to view the Certification status or Endorsement Rating applied to the Report using the OvalEdge application.
To add the Context URL for the desired data source, complete the following steps:
- In the Crawler Information page, select the specific Crawler ID for which the User Notification needs to be included and click on the Nine Dots button. The connectors options menu is displayed.
- Select the Settings options, and the connectors Setting page is displayed.
- Click on the Others > Context URL sections.
- Enter the browser URL for the selected data source.
Example: https://tableauad.ovaledge.net is entered in for the tableau connection.
Note: Click on the + Add New URL option to add multiple URLs. The new textbox to provide the URL details is displayed in the Context URL section.
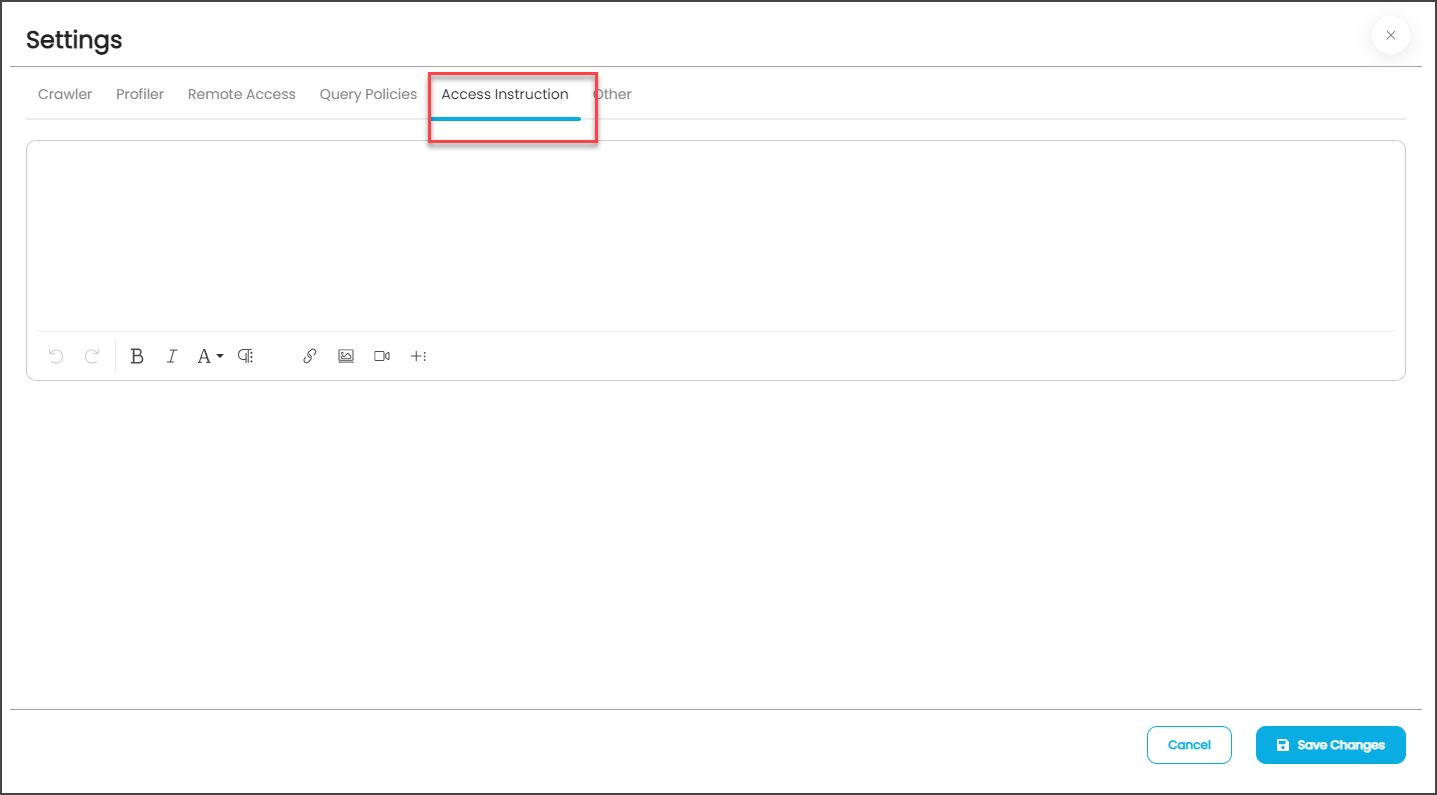
Access Instruction
It allows the Crawler admin to write the instructions. The user is asked to provide relevant information on the data source/connector that has been crawled.
- You can provide the instruction in Crawler > Setting page
- Click the Access Instruction tab
- Enter the instructions
- Click the Save Changes button. Once you add the access instruction for a specific connection in the crawler settings, it will appear in the connection hierarchy like database/schemas.
Lineage
The purpose of the lineage tab is for Reports and ETL connector, which serves the option of changing the server/source connection to build the lineage. You can navigate the Crawler > Setting > Lineage to select the multiple source system for Report and ETL connections. This feature allows you to select multiple servers simultaneously to build the Lineage from the required tables. You can configure multiple servers simultaneously in the Selecting Source Server Type for lineage and also set the connection priority lists to pick the tables in the Connections Priority to pick the source table for lineage building.
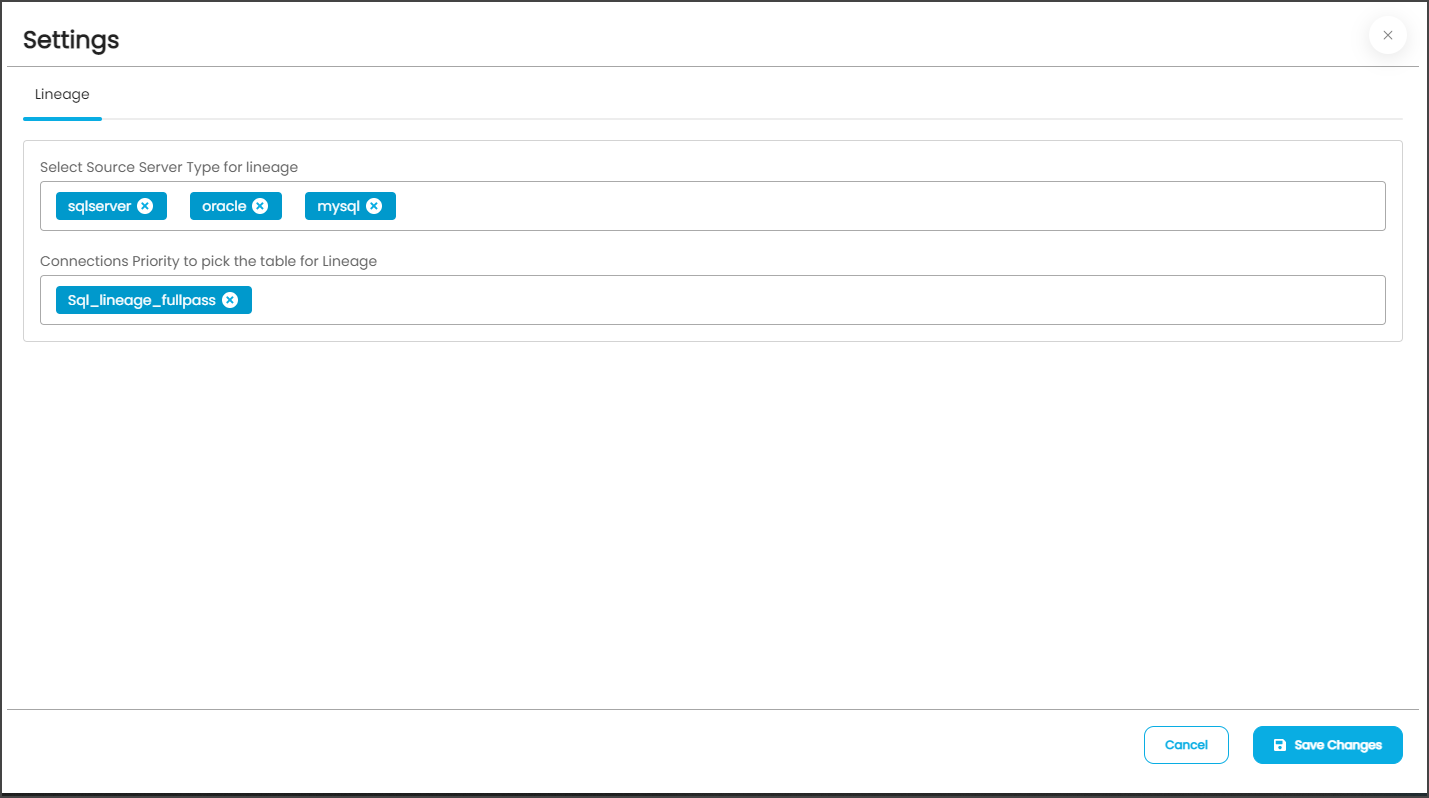
Dialect Configuration in the Crawler Setting
The purpose of the lineage tab is to serve the option of changing the server/source connection to build the lineage. You can navigate the Administration > Crawler > Setting > Lineage tab to select multiple source systems for Report and ETL connections. This feature allows you to choose multiple servers at a time to build the Lineage. When more than one server is selected, the lineage will be built by using the first server type, and if the lineage is failed, then lineage will be built by using the second server type, and so on.
Configuring Connection Priority to Pick the Table for Lineage
To build the lineage for similar server types (Example: QA, Production, Live environments), there might be confusing to pick the table for report or ETL. To avoid this confusion, connections can be configured.
There are two types of configurations:
- Connection Level: While building the lineage when selecting the table, multiple tables with the same name, schema, server type, and IP will create confusion for selecting the table. So the connection names can be configured for a connection at the crawler setting.
- Global Level: In lineage building, if there is more than one table with the same name, schema, server type, and IP, it will create confusion in selecting the table; for this, the connection IDs can be configured at the global level in the Administration > Configuration > Lineage Tab. You can add connection IDs in the Value column against connections.order.lineage key.
Note: While building the Lineage, in case of multiple tables query, will check the connection level in the Crawler setting in the order of priority. If not available in the connection level setting. Still, if not found, the lineage will be formed by selecting the available tables in the OvalEdge application.
Build Lineage
The OvalEdge Crawler allows you to crawl views, procedures, and source codes. After the user has done this, the lineage for that source can be built.
OvalEdge uses Source code Parsing algorithms to parse various kinds of source code to build the lineage and relationships automatically. OvalEdge currently supports building lineage from the following:
- SQL query logs- When you execute a query on the database, OvalEdge can crawl these queries and parse them to find the source and destination.
- Source Code Parsing- PL/SQL(Oracle), T-SQL(SQL Server), and Teradata SQL sources can be parsed by OvalEdge to find the lineage.
- Reporting / Visualization Tools- OvalEdge supports building lineage from visualization tools like Tableau, QlikView, Qlik Sense, SAP Business Objects, Crystal Reports, and Power BI.
To build the lineage for a database using the Build Lineage feature on the Crawler page,
- Select a data source connection (this selects the desired data source with license type as Auto Lineage). You can build lineage from the Crawler page by selecting a database.
- Then click the Nine dots button and choose the Build Lineage button to get started.
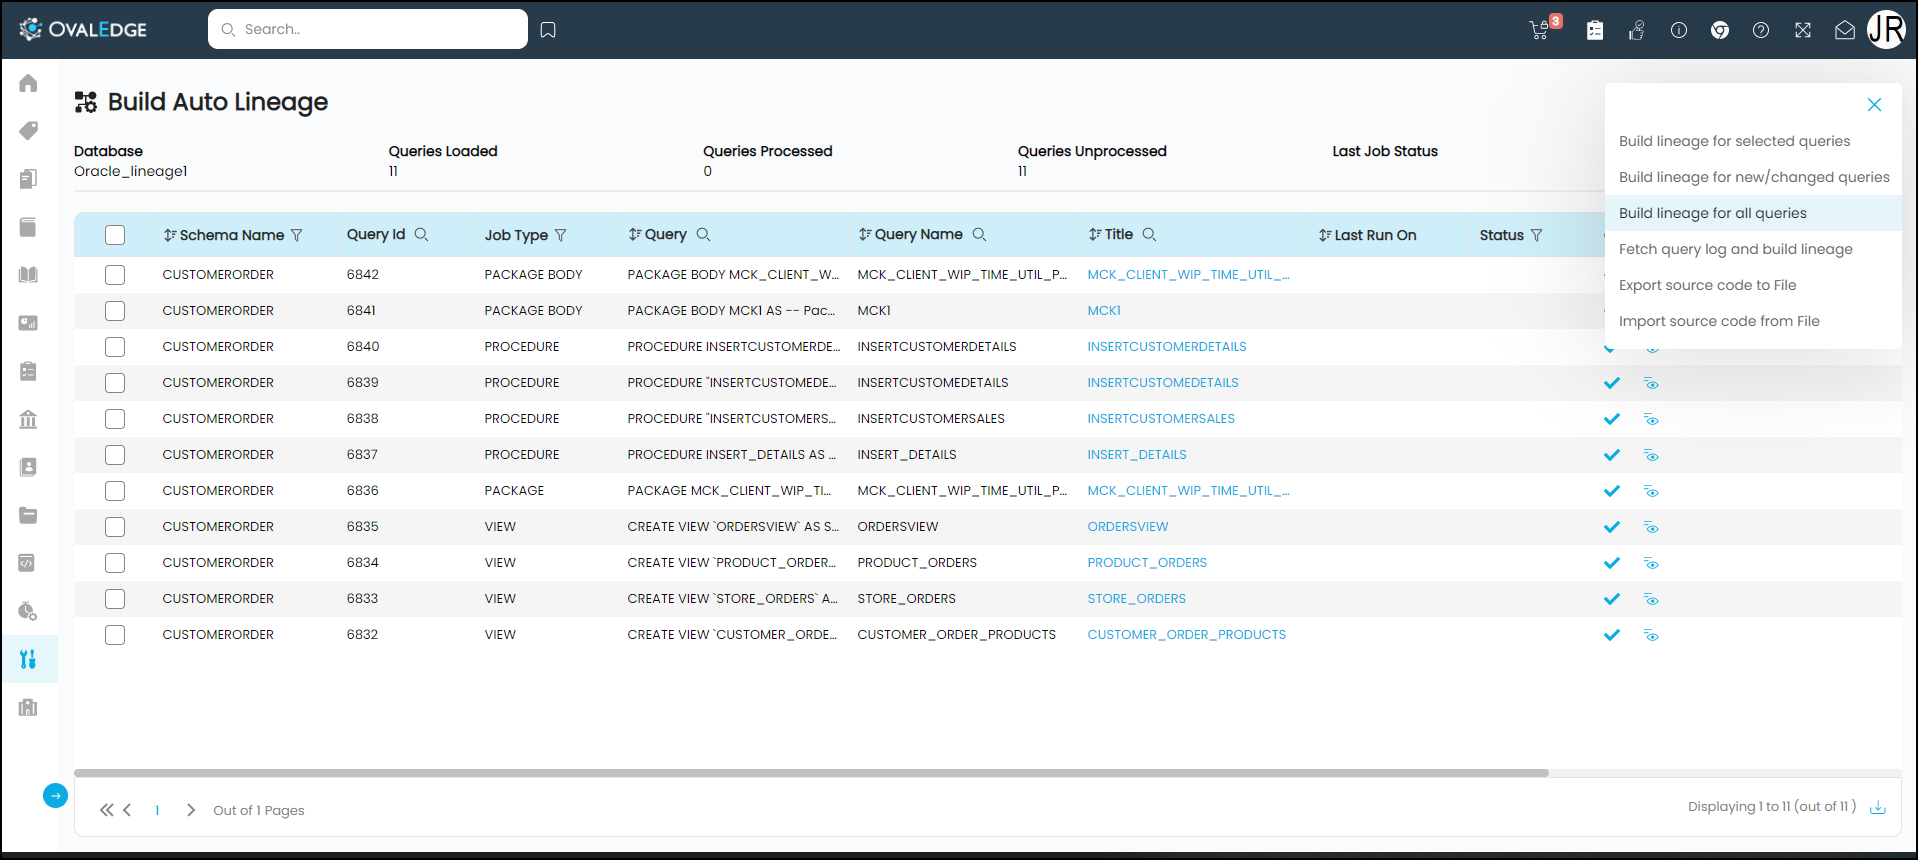
- Click on the Nine dots icon you will have the following options,
- Build Lineage for selected Queries: It allows to build lineage for one or more selected queries from the list.
- Build Lineage for new/changed queries: It allows to build the lineage for new/ changed queries. Whenever you make changes to a query within a remote database, this feature allows you to build lineage for the new or changed query after crawling the database.
- Build Lineage for all queries: It allows to process all the available queries to build lineage. It will rebuild the lineage again for the previous process queries.
- Fetch Query Log and build lineage: It allows you to fetch the query for building lineage, which is performed manually in the remote connection.
- Export Source Code to File: It allows to export the ZIP file to the OvalEdge Labs for the failed lineage at the clients’ environment. Here instead of accessing or requesting access for the client machine, you can now export the failed lineage and investigate in the OvalEdge Lab, and once after investigation, the corrected lineage and manually built lineage are imported to the client’s environment in JSON format.
- Import Source Code from File: Using the ‘Import Source Code,’ you can import a JSON file to fix the lineage query issue or manually build lineage. A JSON file can be directly imported into the client environment. Once the JSON is imported, lineage source code status is displayed as Success manually built from OvalEdge Lab (For other errors) or Success lineage built from OvalEdge Lab (for errors related to query).

Note: For the Report/ ETL connections, you will get the source code option to build the lineage instead of a query.
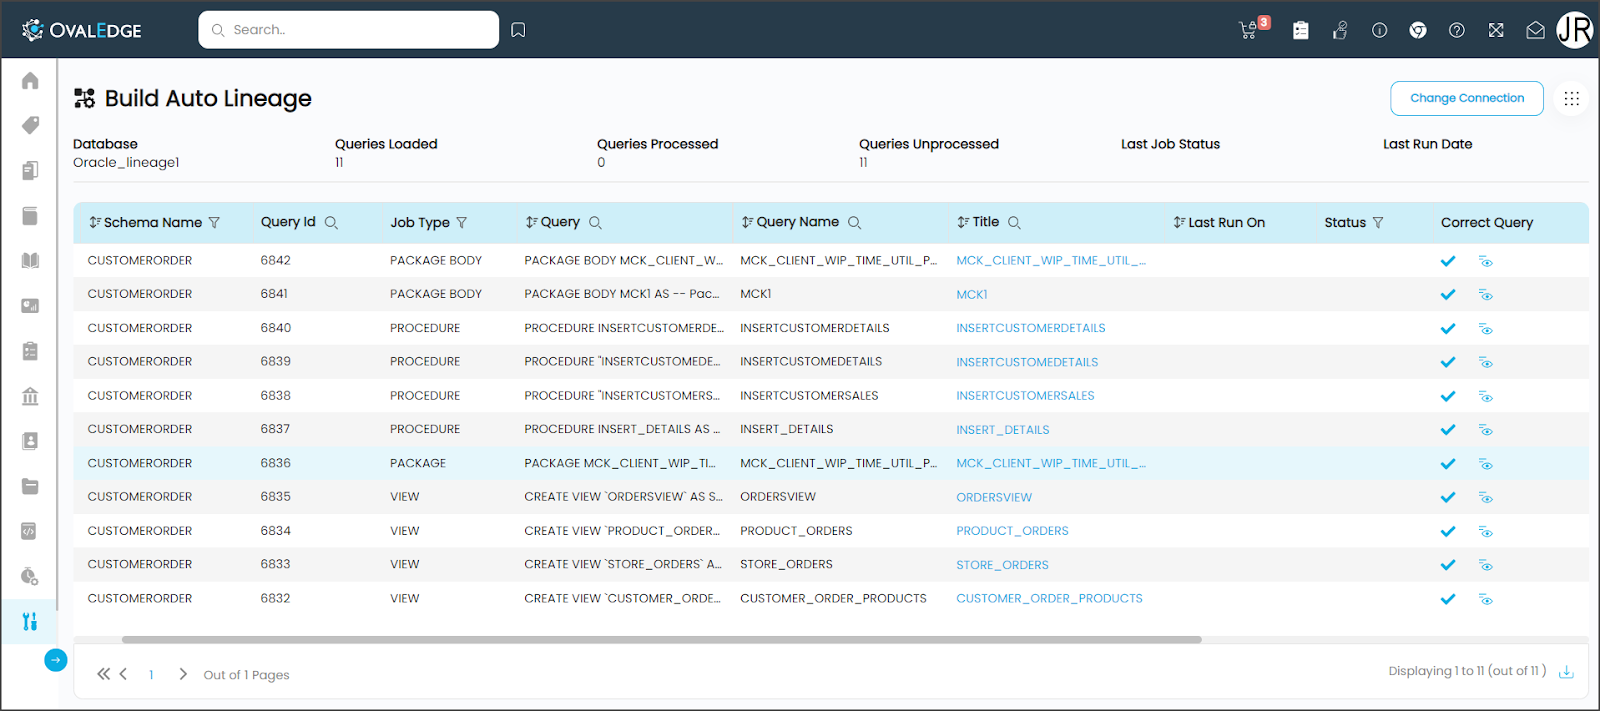
These options, when selected, will initiate a job against the data source. The status of these jobs can be viewed in the Jobs module. The lineage will then be visible in the Data Catalog on the lineage tab for the corresponding data object.
When the Build lineage for unprocessed queries option is selected, the lineage for the source code and/or views unprocessed will be built. You can view the lineage within the catalog. The lineage may not always be built successfully; in this case, you can correct the query and adjust the lineage. See Build Auto Lineage for more details on how to correct the query.
Note: You can build lineage using this feature for all RDBMS systems and reporting tools such as Tableau, PowerBI, etc.
Copyright © 2019, OvalEdge LLC, Peachtree Corners GA USA