Connectors Overview
OvalEdge connects to external data sources using native APIs or Java Database Connectivity (JDBC) with an associated username and password-protected service account. Generally, the permission required is read-only. However, users can find specific details for each connector on the OvalEdge Connectors page.
OvalEdge has connectors to various data sources, including RDBMS, Data Warehouse, Files, ETL, and cloud databases. For a complete list of supported connectors, refer here.
Crawling
Crawling captures the metadata about the data sources. Crawling ensures that an organization's data is managed, governed, and utilized to achieve its business objectives. Through crawling, users can identify and collect information about all their data resources, stored across various systems and platforms. Crawling builds the data catalog, a comprehensive view of the entire data ecosystem
An example where product information is retrieved from the MySQL data source:

(Database Table in MySQL Data Source)
|
PRODUCT_ID |
PRODUCT_NAME |
BRAND_ID |
CATEGORY_ID |
LIST_PRICE |
|
1 |
Trek 820 |
0009 |
0006 |
380.72 |
|
2 |
Timberwolf Frameset |
0006 |
750.88 |
|
|
3 |
Trek Fuel EX 829 |
0009 |
0006 |
29.91 |
|
4 |
Shagamaw Frame |
0006 |
OvalEdge captures the MySQL table as below:
|
Table Name |
Product Header |
|
Description |
Product Information Header Table |
|
Column Name |
Product_ID, Product_Name, Brand_ID, Category_ID, List_Price |
|
Column Type |
Integer, Varchar, Integer, Integer, Double |
|
Column Components |
Product ID, Product Name, Brand ID, Category ID, Currency |
Profiling
Profiling is collecting statistics and informative summaries about data sources to assess the quality of data. It includes identifying relationships between tables at the entity level and patterns between them. The data source must be crawled before it can be profiled.
In OvalEdge, profiling gathers the following statistics:
- Row count for tables
- Null count for columns
- Count of distinct values
- Minimum value, Maximum value, and top 50 values.
All other statistics are derived from the above data points. Profiling can only be performed on databases (Tables and Columns) and files.
An example where statistics about the Product Information Table are fetched from the MySQL data source.
(Database Table in MySQL Data Source)
|
INV_DATE_SK |
INV_ITEM_SK |
INV_WAREHOUSE_SK |
INV_QUANTITY_ON_HAND |
INV_SOLD |
|
24/12/23 |
465188 |
16 |
200 |
2 |
|
25/12/23 |
465189 |
26 |
17 |
9 |
|
25/12/23 |
465190 |
34 |
||
|
26/12/23 |
465191 |
1 |
11 |
10 |
Below is the representation of the same MySQL table in OvalEdge:
|
Min |
24/12/23 |
465188 |
1 |
11 |
2 |
|
Max |
26/12/23 |
465191 |
26 |
200 |
10 |
|
Distinct |
3 |
4 |
3 |
4 |
3 |
|
Null |
0 |
0 |
1 |
0 |
1 |
Lineage
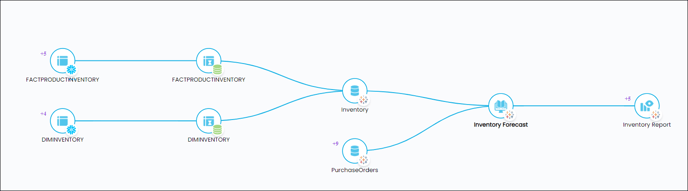
Lineage is the visual representation of the movement of data across the ecosystem from source to destination including the data transformations. Lineage provides valuable insights for data professionals seeking to understand data history and context, including quality, completeness, and reliability. Moreover, it supports organizations in complying with regulatory requirements by providing transparency into data flows and facilitating data governance processes.
The image below illustrates the lineage of an inventory table:
User Permissions
The following are the minimum privileges required for a service account user to crawl and profile data. It changes depending on the connector type.
|
Operation |
Minimum Access Permission |
|---|---|
|
Connection Validation |
Select, Usage |
|
Crawling |
Select, Usage, Reference, and Execution |
|
Profiling |
No permission is required |
|
Query execution |
Execution |
Establishing Connector
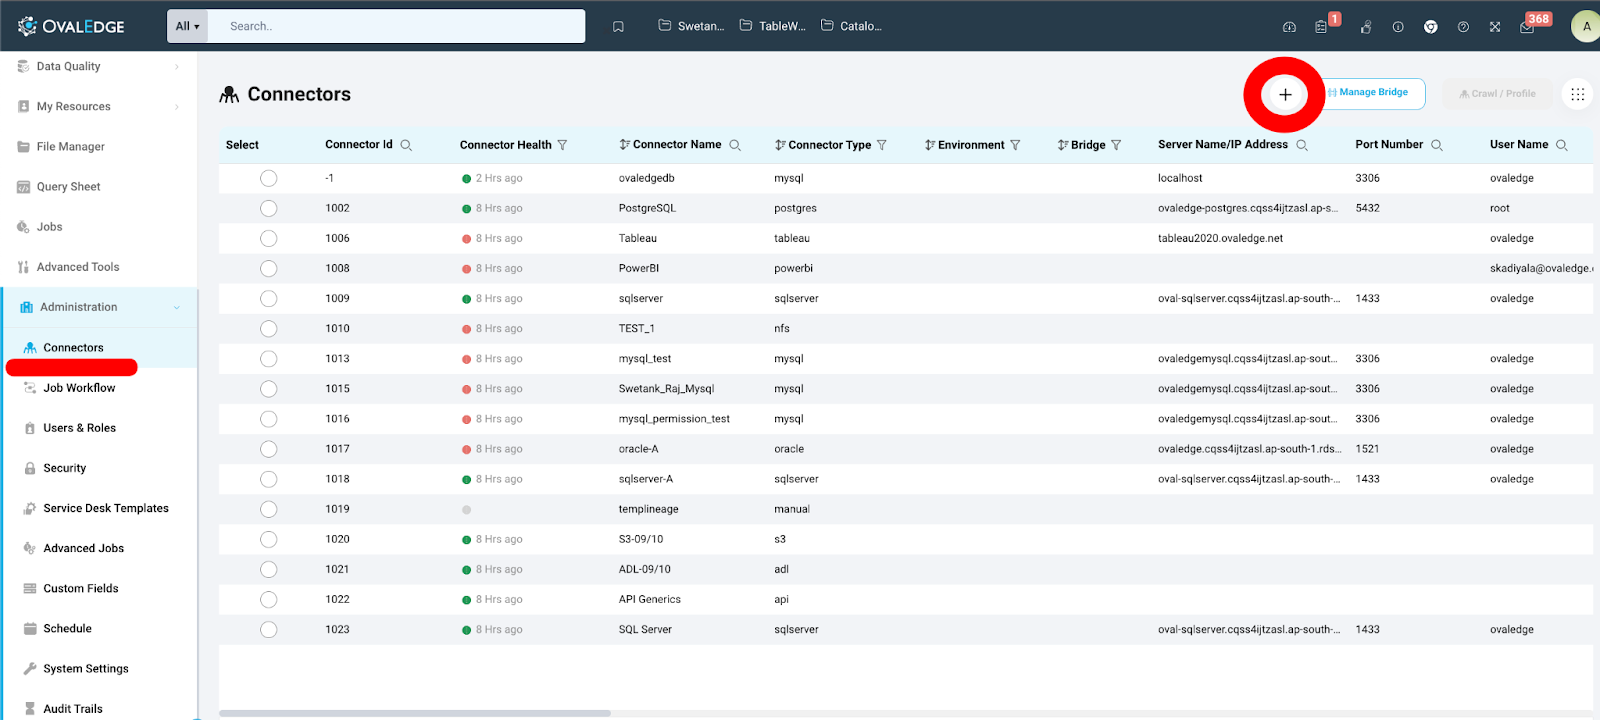
OvalEdge supports more than 100+ connectors. Creating connectors can only be performed by the Connector Creator. For more information, refer to Connector Security.
To establish a new connection, users can visit the Connectors page in the Administration module. Clicking the "+" icon on the top bar allows them to select the desired connector.

Before starting the connector addition process, the initial step involves searching for the desired connector from the list and selecting it.
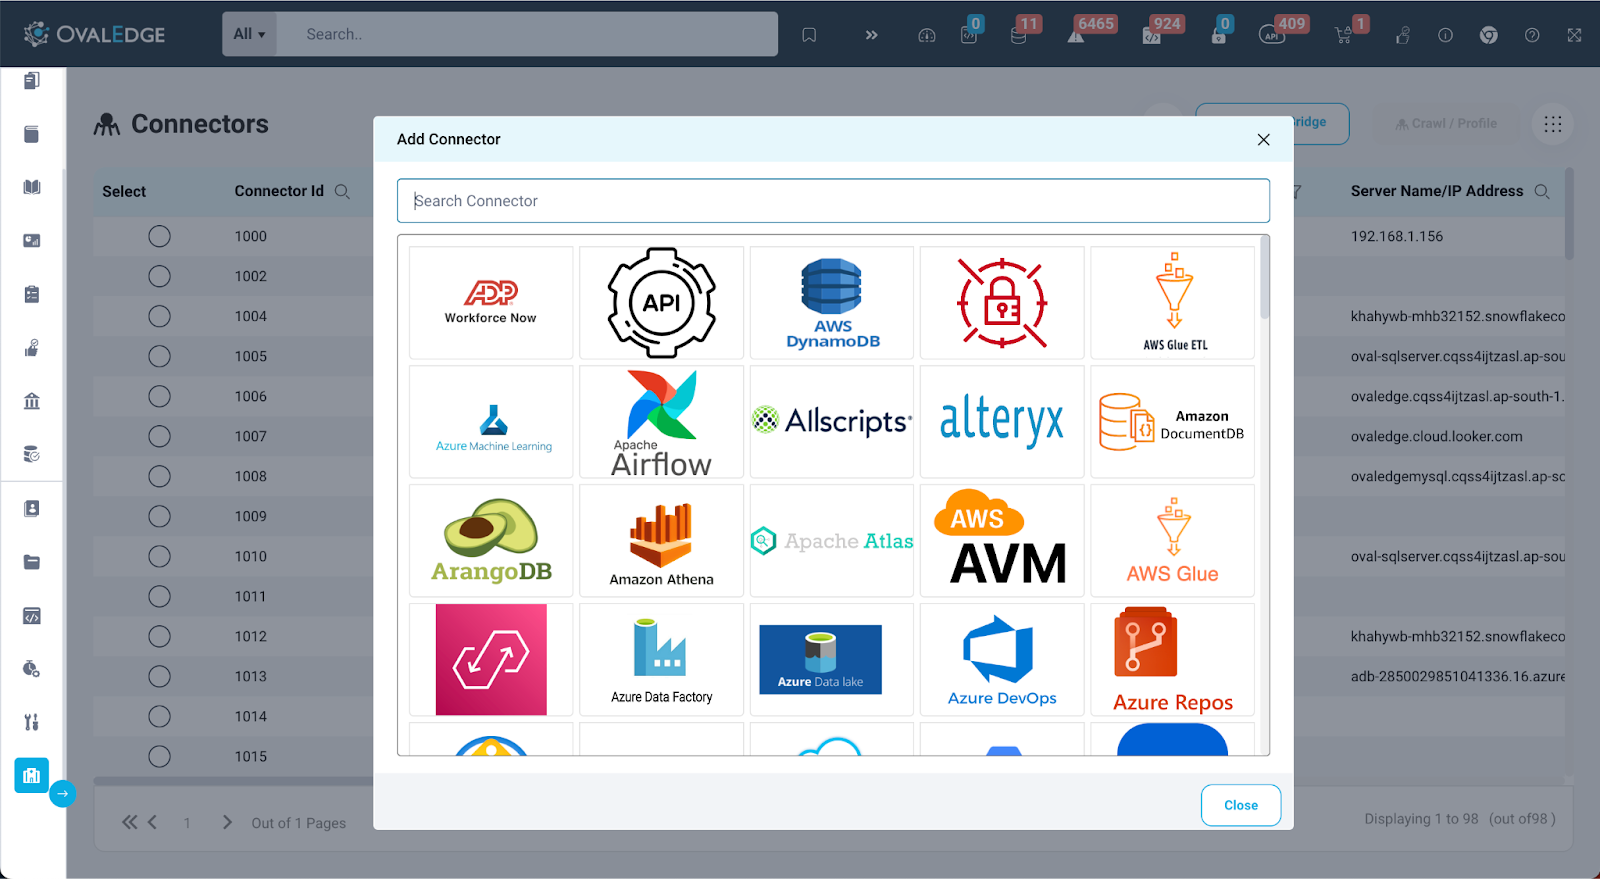
Following connector selection, users should input the required details into the necessary fields to create the connection. These details may include server, port, database, secret key, and more, depending on the specific connector type. For additional and connector-specific information, users can refer to the dedicated connector document available at https://support.ovaledge.com

Upon entering the necessary information, the user is presented with three different options:
- Validate: Selecting this option validates the details. If all the details are correct, a connection between the source system and Ovaledge is established,
- Save: This option allows the user to save the connector with the entered details.
- Save & Configure: This option saves connection details and opens Connection Settings.
Crawl/Profile
After successfully validating and saving the connection, click the "Crawl/Profile" button located at the top right of the connector page to initiate the Crawl/Profile. Clicking this button presents users with the options in the image:
Note: This operation can only be performed by the Connector Creator. For more detailed information, refer to Connector Security.
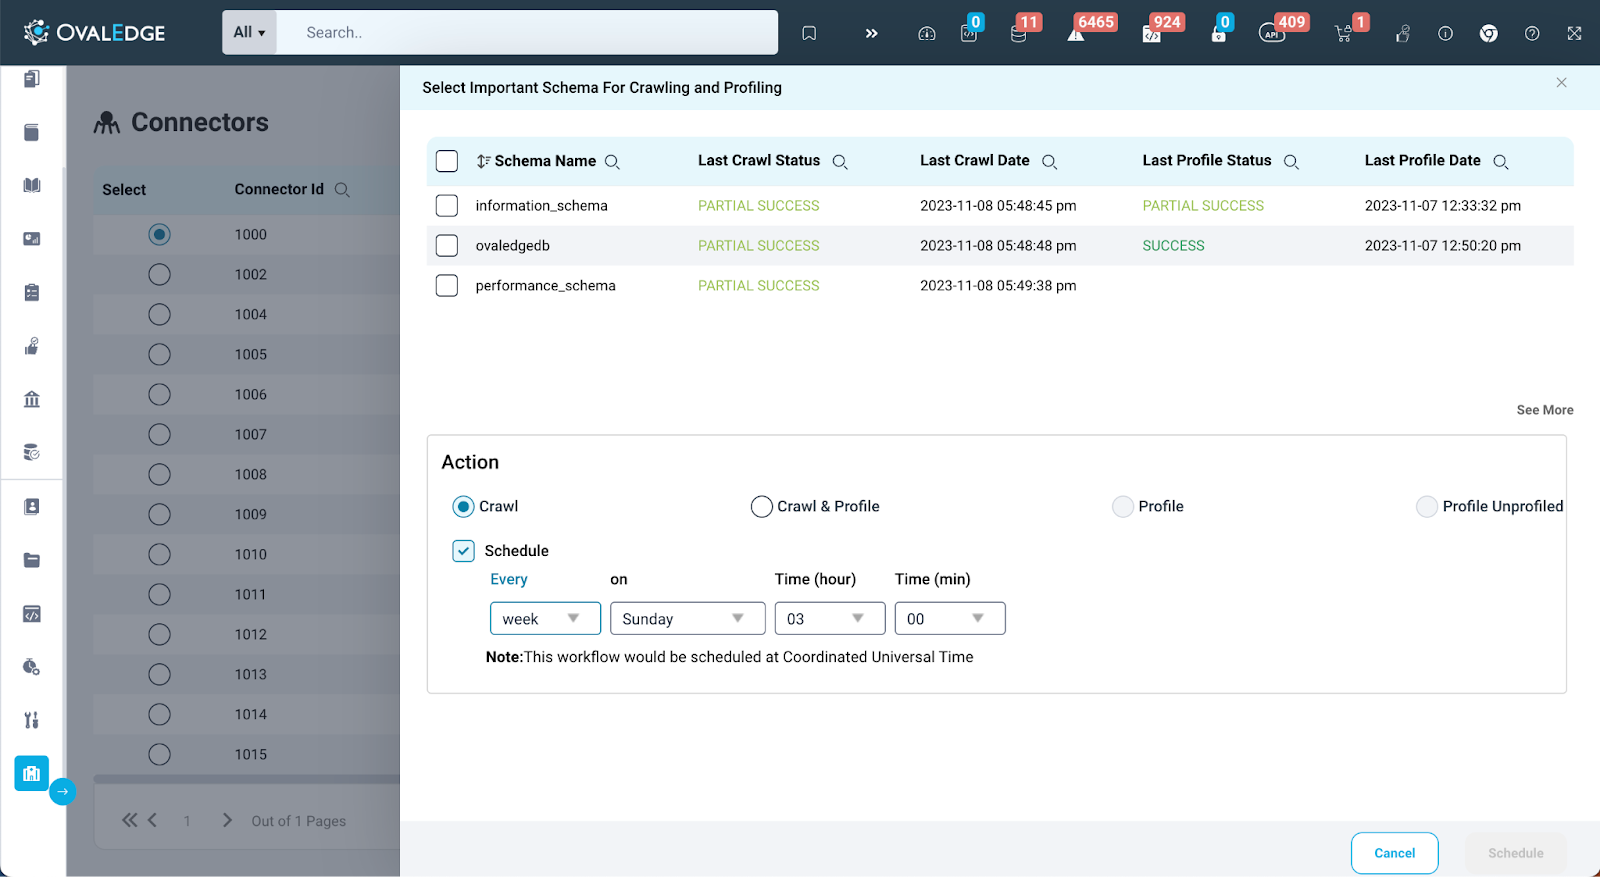
Schema List
A list of all available schemas associated with the connected database will be displayed.
Users are prompted to select the schema to crawl or profile.
If several schemas are present, users can conveniently browse through the schemas by clicking on the "See More" button located in the right bottom corner to expand the view
Action
In addition to selecting the schema, users can utilize the "Action" section on the pop-up window, which contains various action items that can be executed on the chosen schema.
- Crawl
Crawling is the process of gathering metadata from data sources. OvalEdge connectors can be scheduled to regularly scan databases to keep OvalEdge up-to-date.
Examples of metadata include title, description, tags, categories, creation date, modification dates, access permission, ownership, and more. The crawling process achieves the following:
-
- Retrieves metadata from the source system.
- Provides the ability for users to understand any metadata changes after the initial crawl is complete.
- Profile
Profiling is the process of collecting statistics and informative summaries about crawled data sources. Profiling serves the following purpose:
-
- Helps assess the quality of the data source.
- Helps identify relationships between data assets.
- Profiling in OvalEdge gathers the following statistics:
- Table Row Count
- Column’s Null Count
- Distinct Count
- Minimum Value, Maximum Value, and Top 50 Values
It is important to note that profiling can only be performed on databases and files that have already been crawled/cataloged.
- Crawl & Profile
The "Crawl & Profile" option allows users to execute both crawl and profile operations in a single click.
- Profile Unprofiled
The "Profile Unprofiled" option profiles unprofiled data within the connector. This option saves time by profiling only data that hasn't been profiled earlier.
- Schedule
The "Schedule" option allows users to automate the crawl and profile processes. Users have the flexibility to choose a timeframe ranging from a minute to a year.
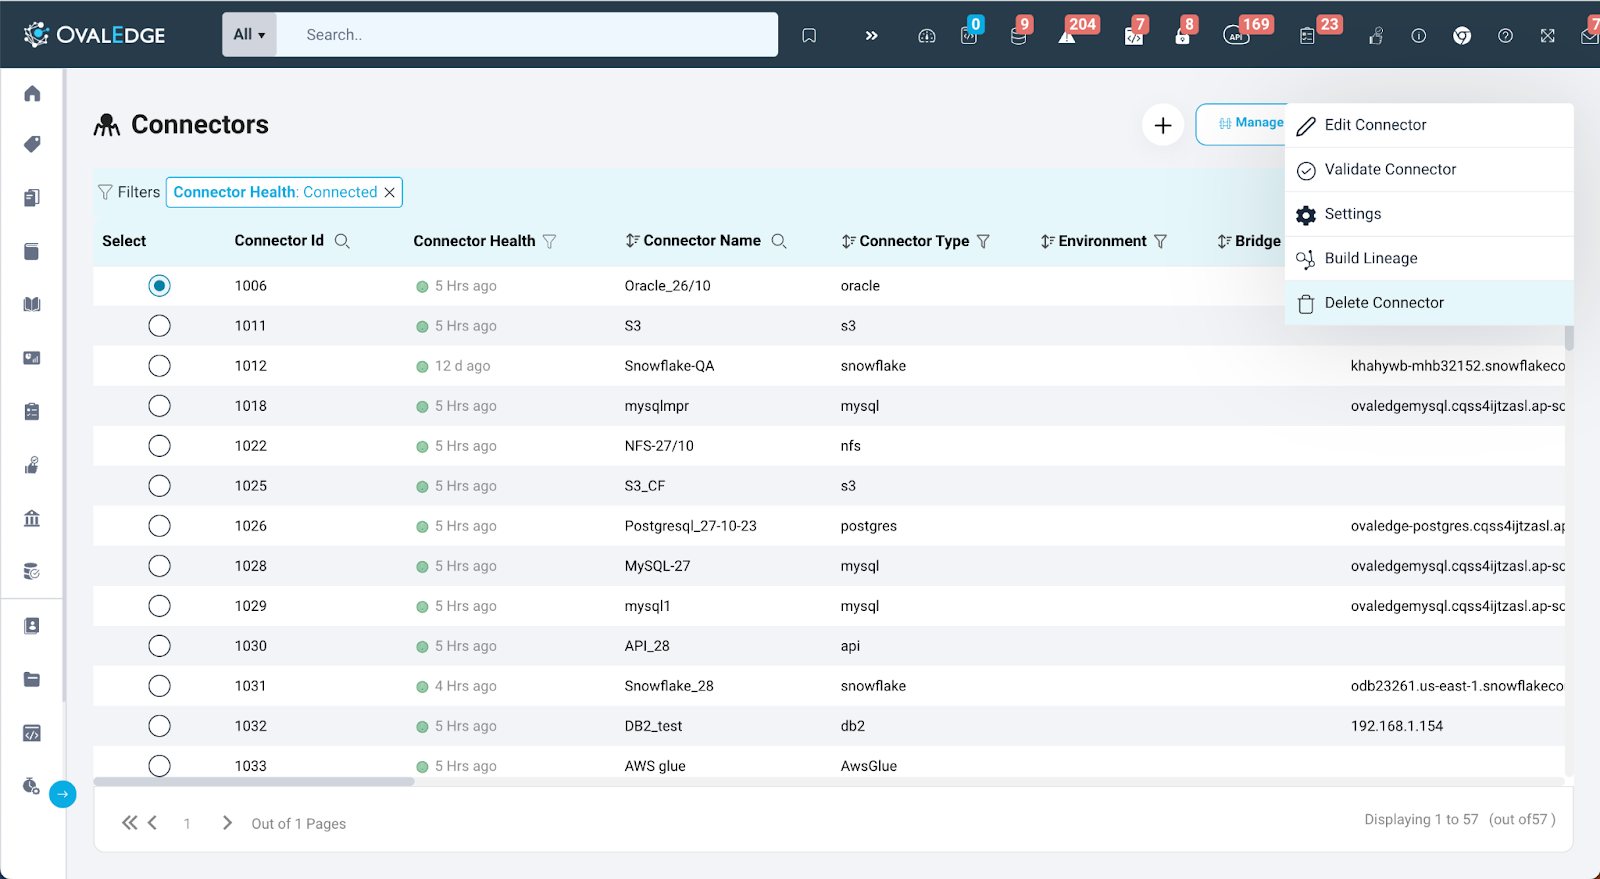
Additional Operations on Connector
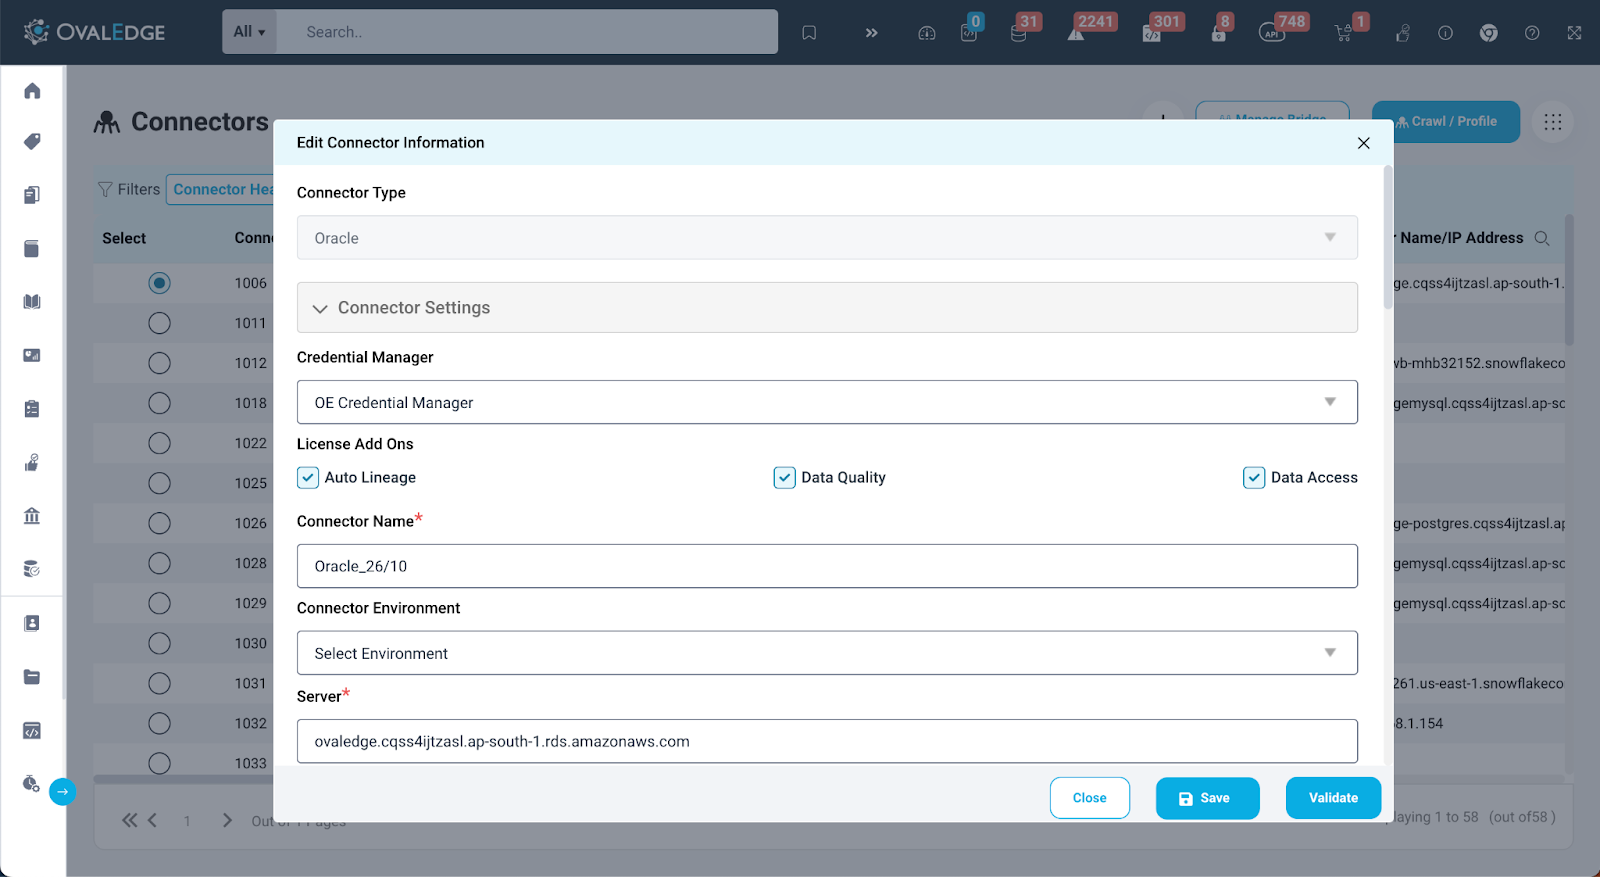
Edit Connector
Users can conveniently edit a connector within OvalEdge by accessing the "Edit Connector" option available in the 9-Dots menu on the Connectors page. Clicking on this option redirects the user to the edit connector page. This is identical to the page used during the initial connector setup. Here, users can modify the values they wish to change and then validate and save changes. On successful validation, the changes are applied to the connector.
Note: This operation can only be performed by the Connector Creator. For more detailed information, refer to Connector Security.
Settings
After the user validates or saves the connection, they can customize the connector settings to align with their specific requirements. These settings cover a range of configurations, such as Crawler, Profile, Lineage, Data Access, Query Policies, Access Instructions, and Business Glossary Settings. It is important to note that the availability of these settings may vary depending on the type of connection. For example, profile settings do not apply to reports. Further details about each setting are provided below.
Crawler Options
The crawler connects to a data source to access metadata stored in the data source. When OvalEdge connects to a data source, it collects and catalogs all the data elements (i.e., metadata) and stores them in the OvalEdge database. The connector creator or admin user may select several options to crawl the data source system. The crawler setting consists of Crawler Options, Crawler Rules, and Query Log Settings (For Oracle, SQL Server, MySql , Postgres & Snowflake)
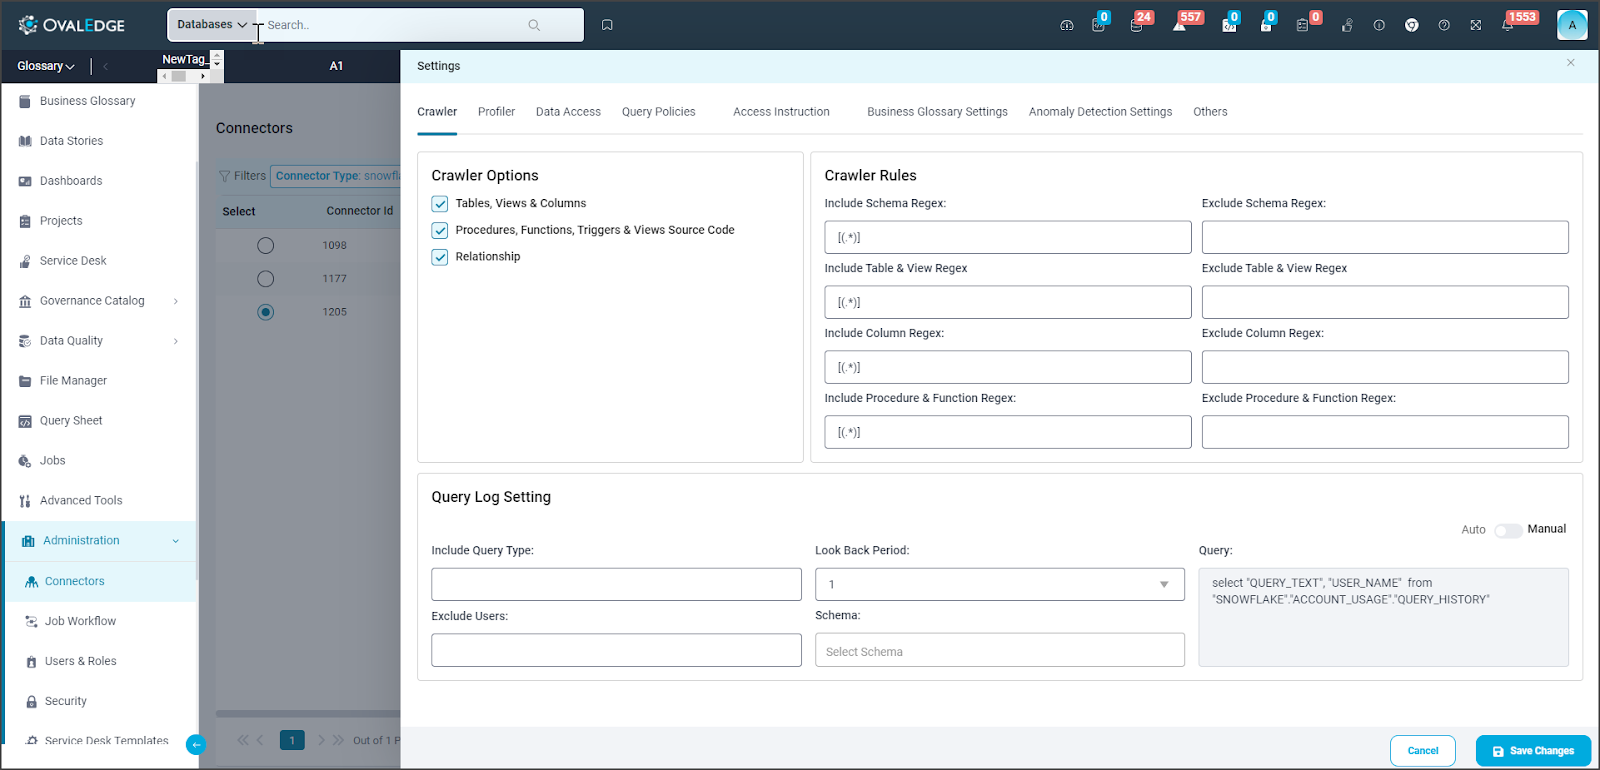
- Crawler Options for RDBMS Connectors
The crawler has different settings for starting the crawling process. Users can go to the settings step if they want to configure these options. If not, they can skip the setup. The Tables, Views & Columns option is the default setting for all connectors.
-
- Tables, Views, and Columns: It is a default option for crawling a database connection. Selecting this option will discover and fetch the tables, views, and columns from the database connection. When the crawler runs, it populates the data catalog with updated table level (table views and columns) details.
- Procedures, Functions & Views Source Code: Enable this option to crawl the procedures, functions, and source code to OvalEdge.
Note: This option should be enabled to build lineage automatically.
-
- Relationship: When this option is selected, the crawl job will analyze schemas, determine relationships between the tables, and populate information into the OvalEdge data catalog.
- Users, Roles, Policies, and Permission: When this option is enabled, the crawler will identify and retrieve information about users and roles possessing remote access permissions for the specified data source, making this data accessible to OvalEdge users
- Crawler Options for Reports Connectors
-
- Reports: When this option is selected, all the reports existing in the data source will be discovered during the crawling process and imported into OvalEdge.
- Report Columns: When this option is selected, all the report columns existing in the data source will be discovered during the crawling process and imported into OvalEdge.
- Restricted Time Zone: This option lets users crawl the data source only during a specific time frame.
- Crawler Options for File Connectors
-
- FileFolders/Buckets: When this option is selected, all the file folders/buckets existing in the data source will be discovered during the crawling process and imported into OvalEdge.
- Users & Roles: This option enables the discovery of the users and their roles from the data source and importing those into OvalEdge.
- Policies: This option enables users to synchronize policies created in OvalEdge with those in the source system
- Permissions: When this option is enabled, the crawler will identify and retrieve information about users and roles possessing remote access permissions for the specified data source, making this data accessible to OvalEdge users
An additional option available for specific data sources is as follows:
- Delta Crawl: This option lets users crawl the data source on or after a specific time. (E.g., a data source comprises 10 reports, of which only 2 have been modified since a specific time. In this scenario, the user can select this specific time frame, and OvalEdge will exclusively crawl those 2 updated reports, thus saving time and computational resources.)
Crawler Rules
The Crawler Rules are regular expressions (regex)to provide more refined results. Users can leverage regular expressions to crawl data assets that match specific patterns.
Crawler Logic Rules
A user can establish crawler rules to either include or exclude schemas, tables, views, columns, procedures, and functions. After defining these rules, they need to save the changes and click on the Crawl/Profile button. The results for the schemas that start only with the character "a” will be displayed in the Schema Name (Advance) for Crawling and Profiling pop-up window.
The regex rule is defined by using logical patterns that start with, end with, or have a middle character.
- Starts with: Syntax: a[(.*)]
Users can utilize the pattern ^a(.*) to identify names that initiate with the letter "a" followed by any sequence of characters.
- Ends with: Syntax : [(.*)]e
Users can employ the pattern (.*)e$ to discover names concluding with the character "e".
- Middle Characters: Syntax : [(.*)]
Users can apply the pattern (.*) to locate names where the specified character sequence appears anywhere within the name.
The logical pattern for each rule is as follows:
There are two formats for Regex patterns:
Format-1:
- Any characters: [(.*)]
- Any object name contains ‘customer’: [.*customer.*]
- Any object name contains ‘customer’ or ‘prospect’: [.*customer.*|.*prospect.*]
- Any object name starting with ‘customer’: [customer.*]
- Any object name ending with ‘customer’: [.*customer]
Format-2:
In this format, patterns are separated by commas
Supported patterns are start with, end with, and equals
Except for equals, all other patterns are case-sensitive
- Any object name starts with ‘customer’: customer%
- Any object name ends with ‘customer’: %customer
Examples for Format-2:
- lineage, lineagecolumn: considers both object names lineage and lineagecolumn
- Prospect, customer%: considers the object names prospect and those start with customer
- oetable, oecolumn, %customer: considers the object names oetable, oecolumn, and those end with customer
Let’s look at an example of advance regex :
Objective :
Write a regex that can be used to either include or exclude any Database Schemas, Tables, Columns, Views, Procedures, or Functions that have "BKP" or "bkp" or any number anywhere in the string.
Building Regex :
Here is an advanced regex [.*(BKP|bkp).*|.*\\d+.*] and let's break it down to understand it better. The regex is made up of different characters and symbols that have specific meanings.
The expression starts with a "[" which denotes the start of a character class. The "." character matches any character string, while the "(" and ")" characters match open and closed parentheses respectively.
The "|" symbol is an alternation operator that matches the previous or next parts. The expression "BKP|bkp" matches either "BKP" or "bkp". The "]" character marks the end of the character class.
The "*" symbol is a quantifier that matches zero or more instances of the preceding character or group of characters. The expression ".*\\d+.*" matches any character followed by one or more digits.
When setting up the regex rules, the user will be able to write rules that will either include and/or exclude tables, views, columns, procedures, and functions that start with, end with or have middle characters as defined in the rule.
|
Regex |
Syntax |
Sample |
|---|---|---|
|
Include Schema Regex |
"a(.*)" |
If a user only wants schemas that start with "a," then the user needs to write "a(.*)" in the Include Schema Regex field. In this case, the schemas that start only with the character "a” are considered. |
|
Exclude Schema Regex |
"(.*)a" |
If a user only wants schemas that end with "a," then the user needs to write "(.*)a" in the Exclude Schema Regex field. In this case, the tables and views that end only with the character "e” are excluded, and the remaining tables are considered. |
|
Include Table Regex |
"e(.*)" |
If a user only wants a Table that starts with "e," then the user needs to write "(.*)e" in the Include Table Regex field. In this case, the Tables that start only with the character "e” are considered. |
|
Exclude Table Regex |
"(.*)e" |
If a user only wants a Table that ends with "e," then the user needs to write "(.*)e" in the Exclude Table Regex field. In this case, the tables and views that end only with the character "e” are excluded, and the remaining tables are considered. |
|
Include Column Regex |
"a(.*)" |
If a user only wants a Column that starts with "a," then the user needs to write "a(.*)" in the Include Column Regex field. In this case, the columns that start only with the character "a” are considered. |
|
Exclude Column Regex |
"n(.*)" |
If a user only wants a Column that ends with "n," then the user needs to write "n(.*)" in the Exclude Column field. In this case, the columns that end only with the character "n” are excluded and the remaining column details are considered. |
|
Include Procedure & Function Regex: |
"s(.*)" |
If a user only wants Procedure & Functions that start with "s," then the user needs to write "s(.*)" in the Include Procedure & Function Regex field. In this case, the columns that start only with the character "s” are considered. |
|
Exclude Procedure & Function Regex: |
"s(.*)" |
If a user only wants Procedure & Functions that start with "s," then the user needs to write "s(.*)" in the Exclude Procedure & Function Regex field. In this case, the columns that start only with the character "s” are considered. |
Note: Non-Regex includes/excludes is supported for “startswith” and “endswith” using %.
Query Log Settings
Data crawling can be achieved in two ways through crawler and via the query log. Queries play a crucial role in building data lineage and relationships.
With Query Log Settings, They have the flexibility to select the query type and the lookback period. However, the query text is predetermined based on the connector, although users can customize it to meet their specific requirements. Additionally, users can specify the schema they want to retrieve the query from and exclude specific users The objective of query log settings is to retrieve the query from the data source, process the queries, and create data lineage for (INSERT) for the specified duration.
Various options to configure query log settings include
|
Query Log Settings |
Description |
|---|---|
|
Query |
Displays the queries that are used to retrieve the Query Logs from the schema |
|
Look back Period |
This feature allows the user to fetch queries that were processed in the datasource for that number of days ago. For example, the lookback period can be set to 1 day, two days, or more. The maximum Look back period is seven days. |
|
Include Query Type |
Users can include query types such as Select, Insert, Update, and Delete |
|
Exclude Users |
In the Query Logs, users have the option to exclude unnecessary users. If a username is specified in the excluded user field, the query log for queries executed by that particular user is excluded from retrieval. |
|
Schema |
The user has the option to select a specific schema to apply query log settings. If a user leaves this blank, it will fetch the query log based on all the schema available for that database connection. |
Profiler Options
Profiling is the process of generating statistics and informative summaries about the connected data source(s). These statistics help assess the quality of the data source. Profiling a data source will also identify relationships between tables at the column level and patterns between them. Profiling is optional; crawling can be executed without profiling.
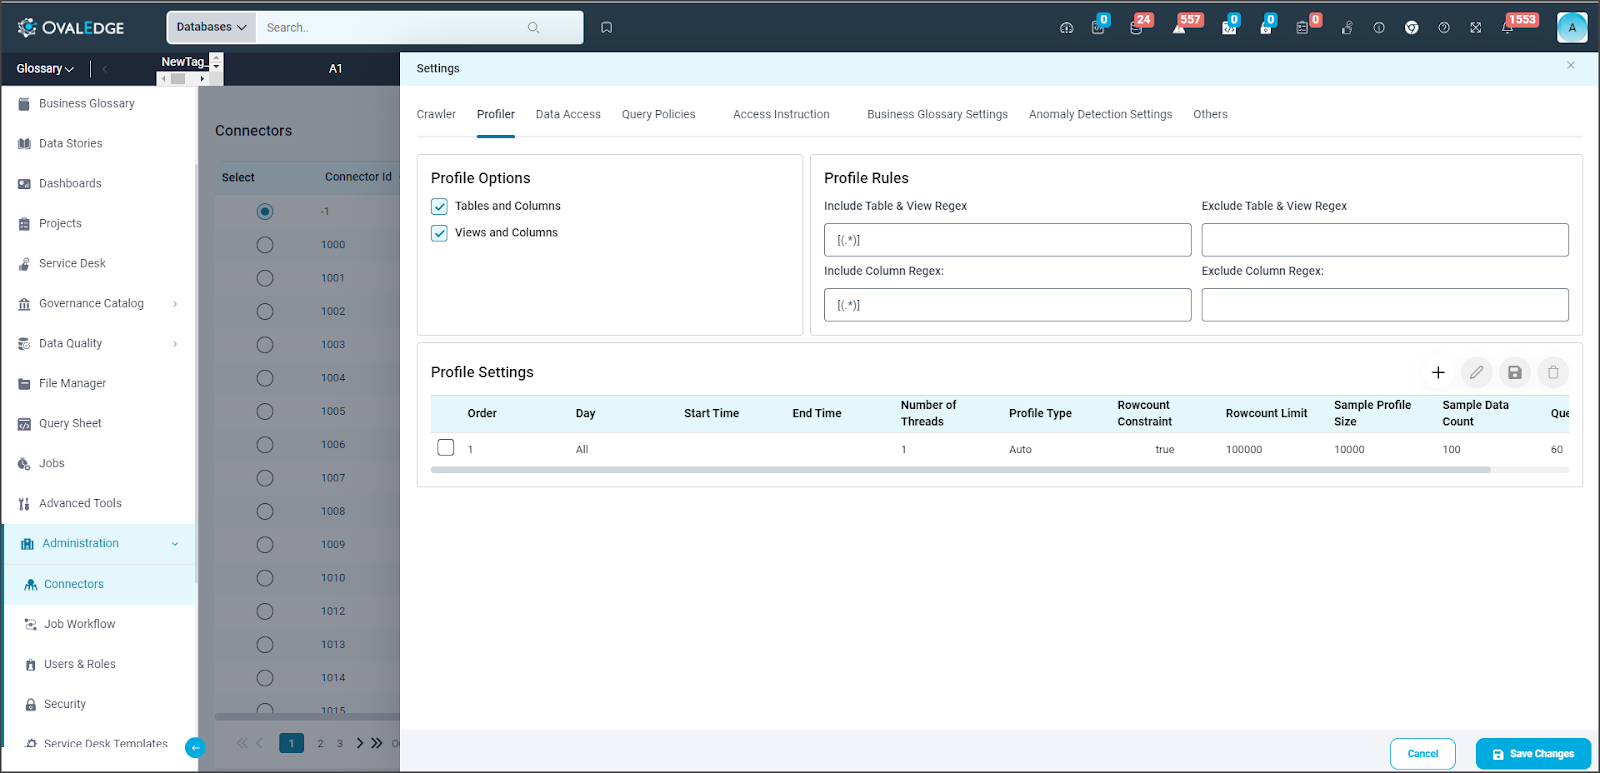
Tables and Columns, Views and Columns: By default (for typical RDBMS) , the checkboxes for Tables and Columns, Views and Columns are selected. By choosing these options, the OvalEdge application profiles the Tables, Views, and Columns from the data source. This options dynamically change based on the connector.
Profiler Rules
In the context of Profiling, regular expressions (regex) are used to refine the Profiling results by specifying patterns to match against the data in the source system. For example, a user can write a regular expression to search the data that contains or starts with or ends with a specific letter or a number. This can help to filter only the relevant information.
For instance, a regular expression can be used to search for all data that starts with a letter or string, ends with a letter or string, or contains a letter or string.
Two types of profiler rules exist, namely "Include" and "Exclude."
- Include Regex: Enter the specific table, view, and column names that start with, end with, or have central characters that are included for profiling.
- Exclude Regex: Enter the specific table, view, and column names that start with, end with, or have central characters that are excluded for profiling.
Note: Profile Rules work similarly to Crawler Rules.
Profiler Settings
Profiler Settings allow users to schedule profiling of data sources with advanced options as mentioned below:
|
Parameters |
Description |
|---|---|
|
Order |
If multiple profiling jobs are scheduled, The application will consider the order number and execute the jobs in sequence (e.g. Order 2 will be executed after order 1) |
|
Day |
The day of the week profiling is set to run. |
|
Start/End Time |
The start and end time that profiling is set to perform. |
|
Number of Threads |
A thread refers to one execution of a query on a database at a time. The number of threads dictates how many simultaneous queries are run on the data source. |
|
Profile Type |
There are four main types of data profiling.
To execute a sample profile, select the profile type as "Sample" and enter a sample profile size (the count of records to be profiled).
(E.g., a sample profile is performed if the Table Row Count is, let’s say 10,000 and the configured Rowcount Limit is 5,000.) However, if the Table Row Count is below the Row count Limit, all rows in the table will be profiled. It's worth noting that when the row count constraint is set to "True," a profile type of "Auto" will always rely on the Rowcount Limit. (E.g., a full profile is performed if the Table row count is 10,000 and the configured row count limit is 15,000)
|
|
Row Count Constraint |
The Row Count Constraint option is applicable only when the Profile Type is set to Auto.
|
|
Row Count Limit |
Enter the maximum number of rows considered for profiling. |
|
Sample Data Count |
Enter the total number of rows that should be shown within the table data page in the Catalog. |
|
Sample Profile Size |
Select this option for considering the total number of rows in profiling. |
|
Query Timeout |
Enter the number of seconds for the query to run on the remote database before it times out. |
Data Access
Using the following features, users can manage the source system by setting up various settings for data objects, metadata permissions, users, and roles.
- Crawler Options
- Data Access Management
- Data Access Authorization
- Connector Policies
Remote Data Access Management
RDAM ( Remote Data Access Management) allows users to access tables and reports from connected source systems. Currently, this feature is only available on Snowflake, Databricks, Redshift, and S3 connectors

Crawler Options
- Users, Roles, Policies & Permissions: This option enables the discovery of users and their roles from the data source, importing them into OvalEdge. It allows users to synchronize policies created in OvalEdge with a source system. This functionality assists in discovering users and their roles, along with the type of remote access permission granted to OvalEdge users.
Data access management includes the following setting options
- Remote is Master
Crawling a schema that will showcase all the users and roles available in the source related to that schema connection will be presented in the OvalEdge Users & Roles Management. During the crawling process, the user permissions associated with that schema will also be reflected in the OvalEdge Connector Users and Connector Roles tabs.
It is crucial to note that when Remote is set as the master, admin users are unable to create, update, and delete users or roles, and these changes will also be reflected in the OvalEdge Security, Schema, and Tables tabs. Additionally, users can log in with the default password for that user and then change it on their first login.
- OvalEdge is Master
. When OvalEdge is Master all the activities are primarily managed within OvalEdge, like users can create, update, or delete users and roles, and these changes will be synchronized back to the source system. Similarly the masking policies can also be created and associated to the column which can sync back to the source system.
- None
If the user selects the None option, OvalEdge synchronizes only the users and roles information from the remote system and displays in the OvalEdge > Administration > Users & Roles > Connector Users and Connector Roles tabs.
Data Access Authorization
Data Access Authorization is incorporated into the connector settings specific to the crawler. This ensures that only the authorized user has access to the query sheet and the queries in the data catalog. OvalEdge validates the user credentials before providing access to the query sheet and the queries in the data catalog.
- OvalEdge follows OvalEdge data permissions
When this option is selected, the OvalEdge application uses a service account for creating the connection in the Query Sheet page, Data Catalog > Table > Data page, and Data Catalog > Query page to fetch the required data.
- OvalEdge follows Remote system permissions.
When this option is selected, the users are prompted to enter the remote data source credentials in the Query Sheet page, Data Catalog > Table > Data page, and Data Catalog > Query page, and the submitted credentials are used to establish the connection to fetch the required data. Here, these credentials will be cached and deleted after 7 days of inactivity.
Connector Policy
- Sync OvalEdge Policies to Source System
Users can select the check box to assign the OvalEdge policy with the remote system. This option enables various predefined OvalEdge policy schemes applied on the data objects to be applied on the remote connection.
- Setup Tag Based Policies includes Column Level and Table Level Policy schema. The policy applied on the column level is known as the Masking policy, and the policy applied at the table level is called the Row Access Policy.
- Currently this is only available for Snowflake
- Column Level: Masking Policy
Following are the defined masking schemes and can be assigned to the table or column of remote connection.
-
-
- Mask Alphanumeric Character with xxxxxxxxx
- Mask AllCharacters with xxxx
- Show Last 4 characters
- Show First 4 characters
- Show Blank
- Mask Numbers
- Mask with Default Time
- Mask with Default Date
- Masked Column in Remote
-
Note:
For guidance on restricting and masking a column, please refer to the Column Level Security module. The permissible user roles are accessible only when a user opts to restrict a column. In terms of functionality, users can choose to either mask or restrict the column data. The Audit Trails showcase any successes or failures related to object policies (Success or Failure) along with updates and deletions.
- Table Level: Row Access Policy
-
- Row-level policies are masking schemes used to mask table rows, achieved by creating and assigning policies to specific table rows.
- To create a row access policy scheme, users can navigate to the OvalEdge Security module and select Security > Database. In the Permission column, clicking the Edit icon directs users to the page for adding a row access policy. This page displays a list of Policy Names and their associated SQL Statements.
- To create a row access policy, users should click on the "Add Policy" button, prompting a popup window. Here, they can enter the policy name and define the SQL criteria applicable to one or more columns based on requirements. If any errors occur, they will be displayed in the Audit Trails.
- After the row access policy is added, users can assign it by navigating to Security > Tables. Clicking on the "Row Access Policy" column opens a pop-up window. Users can select the desired Row Access Policy from the dropdown menu, displaying the variable name, variable type, and column. The variable name and type are determined by the SQL Policy conditions. Users should choose the relevant column based on the variable type and click "Save" to apply the row access policy.
Query Policies
Query Policies are incorporated into the connector settings for connectors that are supported by Query Sheet. Query Policies control the usage of specific query types (Join, Union, Group, Sum, Avg, etc.) on the Query Sheet. For example, an organization can restrict SYSADMIN from executing a Join operation.
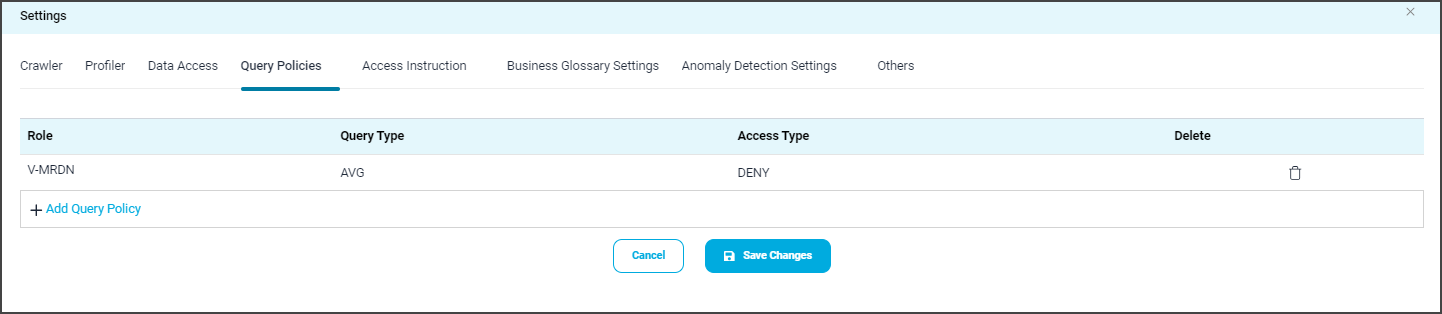
To restrict users from using specific Query Types, the following steps need to be followed:
- Select the Settings options and display the Connectors Setting page.
- Click on the Query Policies, and the data grid with existing Policies details with Role, Query Type, Access Type, and Delete columns are displayed.
- To include new query policies, click on the +Add Query Policy button in the inline row with Role, Query Type, Access Type, and Cancel options displayed.
- Select the desired Role, Query Type, and Access Type from the respective dropdowns and click the Save Changes button
- The selected Query Policy will be displayed in the Datagrid.
Example: If you select the Role as “OE_ADMIN”, Query Type as “JOIN,” and the Access Type as “DENY,” then the users associated with the OE_ADMIN privileges are restricted to use the JOIN function in the Query Sheet page.
- In the Query Sheet, if the user associated with the OE_ADMIN role tries to use the JOIN function, then the error message “User does not have permission on this <TableName> to perform this Function: Join” is displayed.
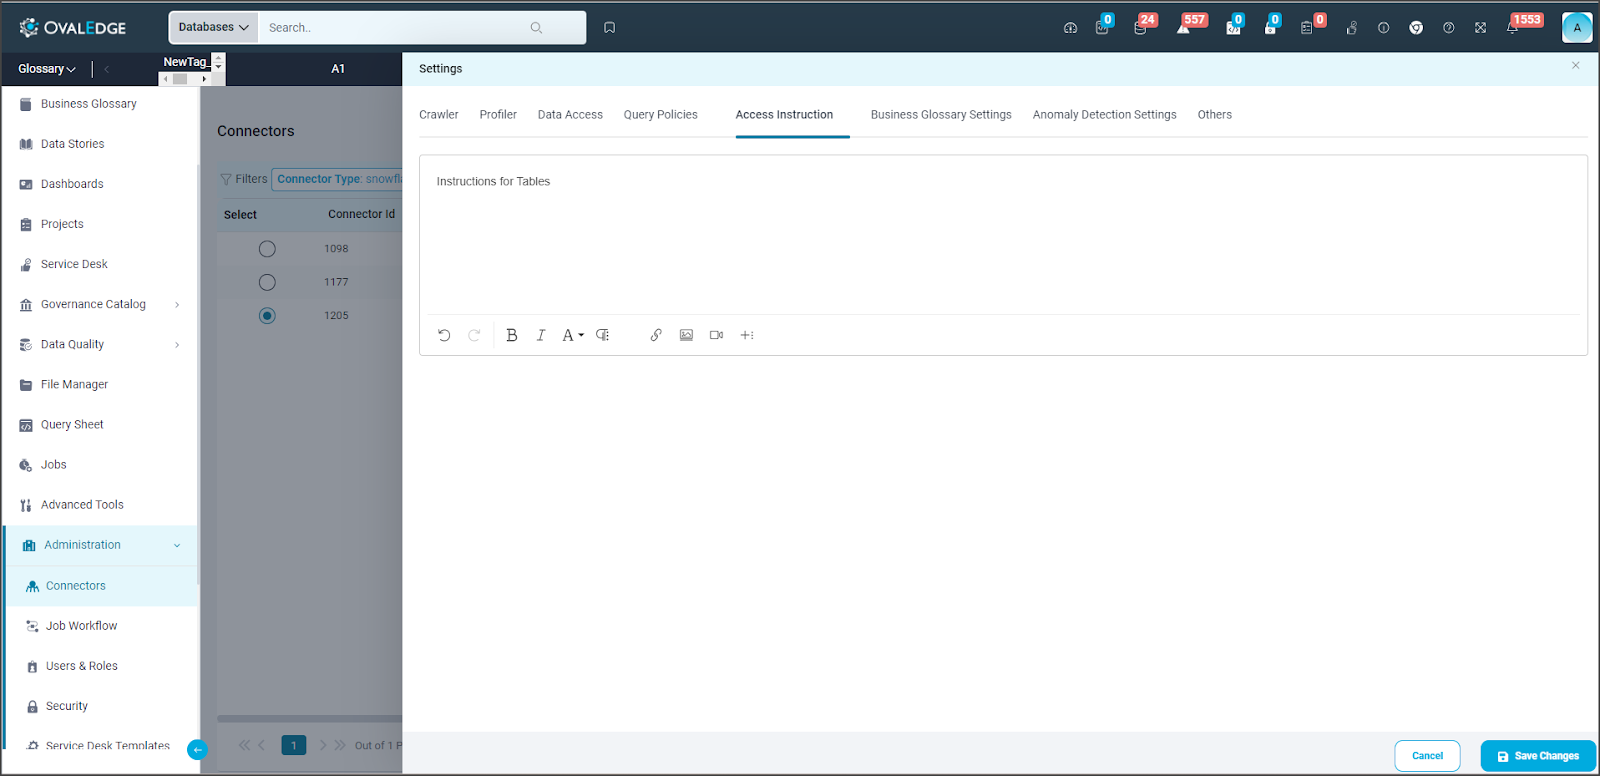
Access Instructions
Access instructions refer to instructions or related information about a data source. Users can share this information in various forms such as links, images, or videos, offering essential details about a specific connector. When the Integration Admin adds instructions for a particular connection in the Access Instruction settings page, the access instruction is displayed on the Data Catalog - Data Objects summary page after crawling is completed.
Business Glossary Settings
The settings within the Business Glossary enable data source admins/owners to define how business terms are linked with data objects in their database. These settings take precedence over the data association preferences configured on the business term itself.
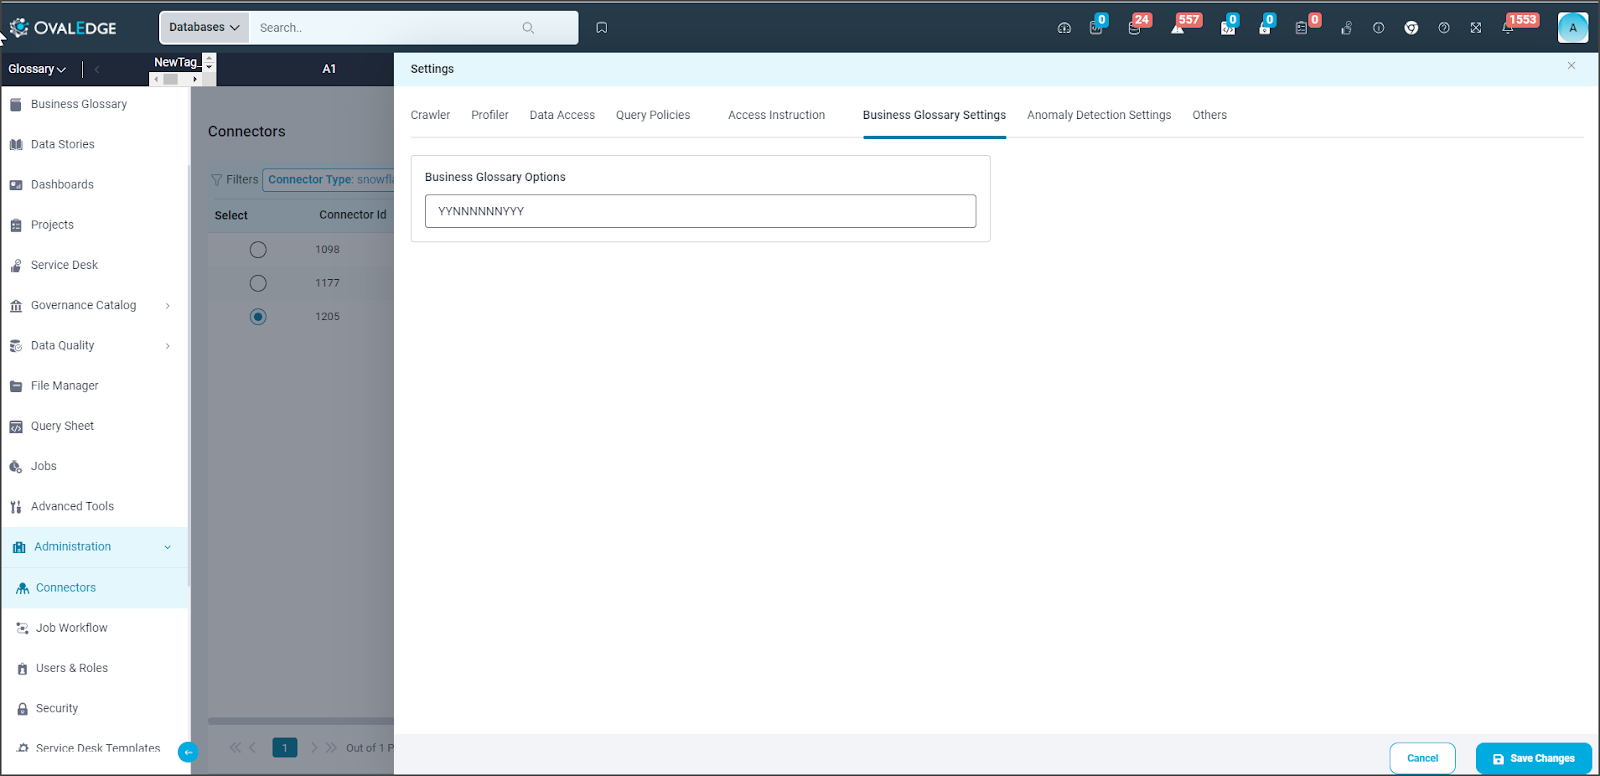
The Business Glossary Term options are ordered as follows:
-
- Copy the title to the catalog
- Copy the business description to the catalog
- Copy Steward to the catalog
- Copy Custodian to the catalog
- Copy Owner to catalog
- Copy GovernanceRole4 to catalog
- Copy GovernanceRole5 to catalog
- Copy GovernanceRole6 to catalog
- Restricted
- Masked
- Show classification in the dictionary
For example, if the setting is 'YYYYYYYYYYYY', all data association preferences will be applied to data objects in the data source when business terms are associated with them. If the setting is 'YYNNNNNNYYY':
- The title of the business term can be copied to the data object if selected on the term.
- The business description of the term can be copied to the data object if selected on the term.
- The Steward, Custodian, Owner, and Governance Roles 4-6 of the business term cannot be assigned to the data object, even if selected on the term.
- The data of the data object can be restricted if selected on the term.
- The data of the data object can be masked if selected on the term.
- The classification defined on the term can be shown on the data object in the catalog if selected on the term.
Note: Application settings always take precedence over these settings.
Anomaly Detection Settings
Anomaly detection settings in OvalEdge involve configuring OvalEdge to identify anomalies while crawling
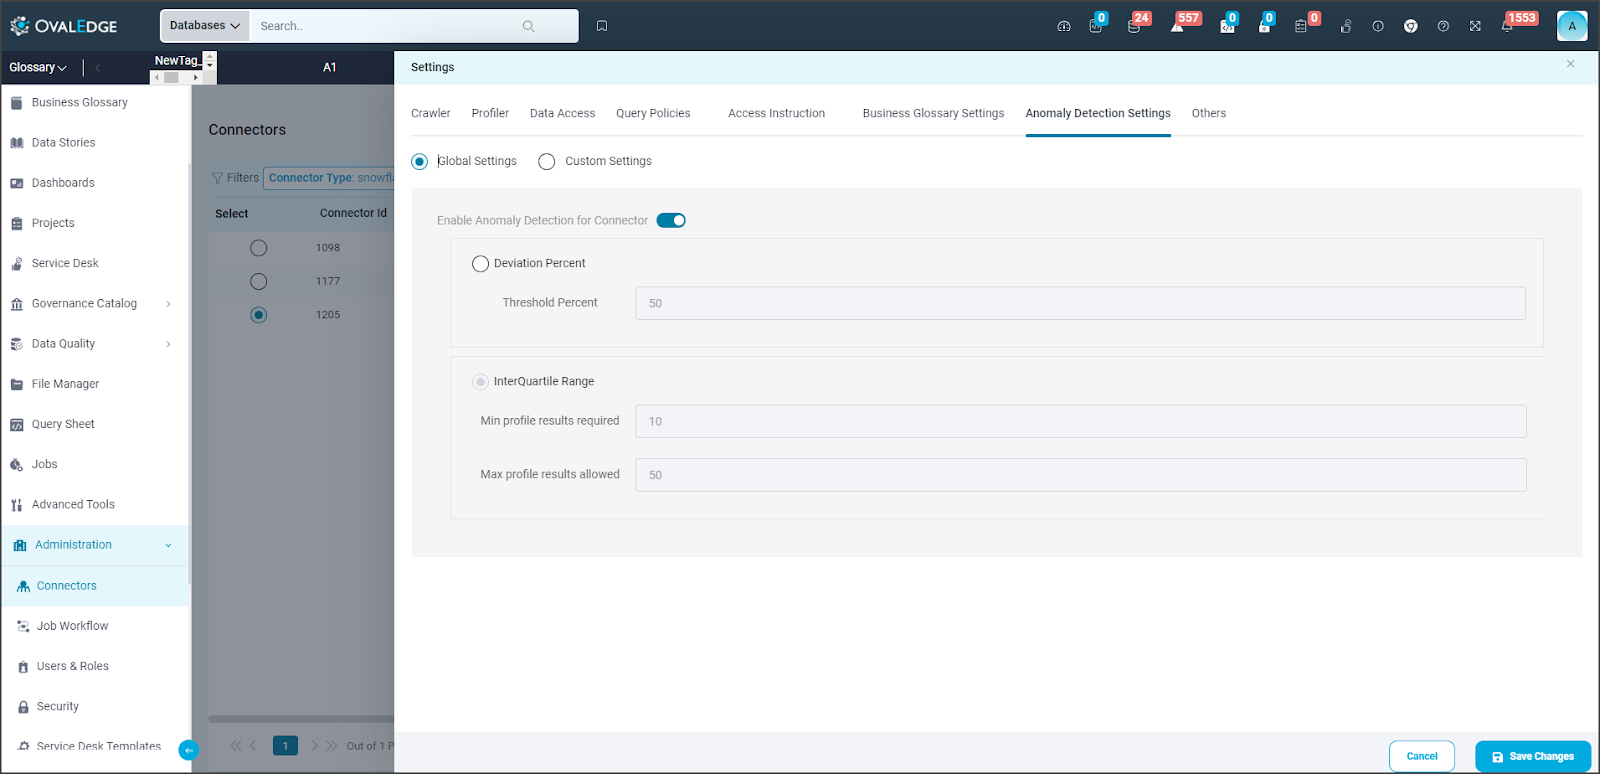
- Deviations:
This method involves analyzing variations or deviations from expected patterns in data to identify anomalous or outlier data points.
Profiled data is compared with previously profiled data, and if it deviates more than the threshold an anomaly is created.
- Interquartile Range (IQR):
The interquartile range (IQR) is a statistical measure of dispersion representing the range within which the middle 50% of a dataset falls.
It is calculated by taking the difference between the third quartile (Q3) and the first quartile (Q1). Q1 is the median of the lower half of the dataset, and Q3 is the median of the upper half.
The IQR is valuable for analyzing data variability while minimizing the influence of outliers. It provides a robust measure of data spread, less influenced by extreme values, making it useful for assessing data quality and setting thresholds for acceptable values.
Others
To receive notifications for changes in object metadata, users can configure the 'Send Metadata Changes Notifications' settings. Depending on the selections, Owners, Stewards, Custodians, and additional Governance Roles can receive notifications as per the configuration.
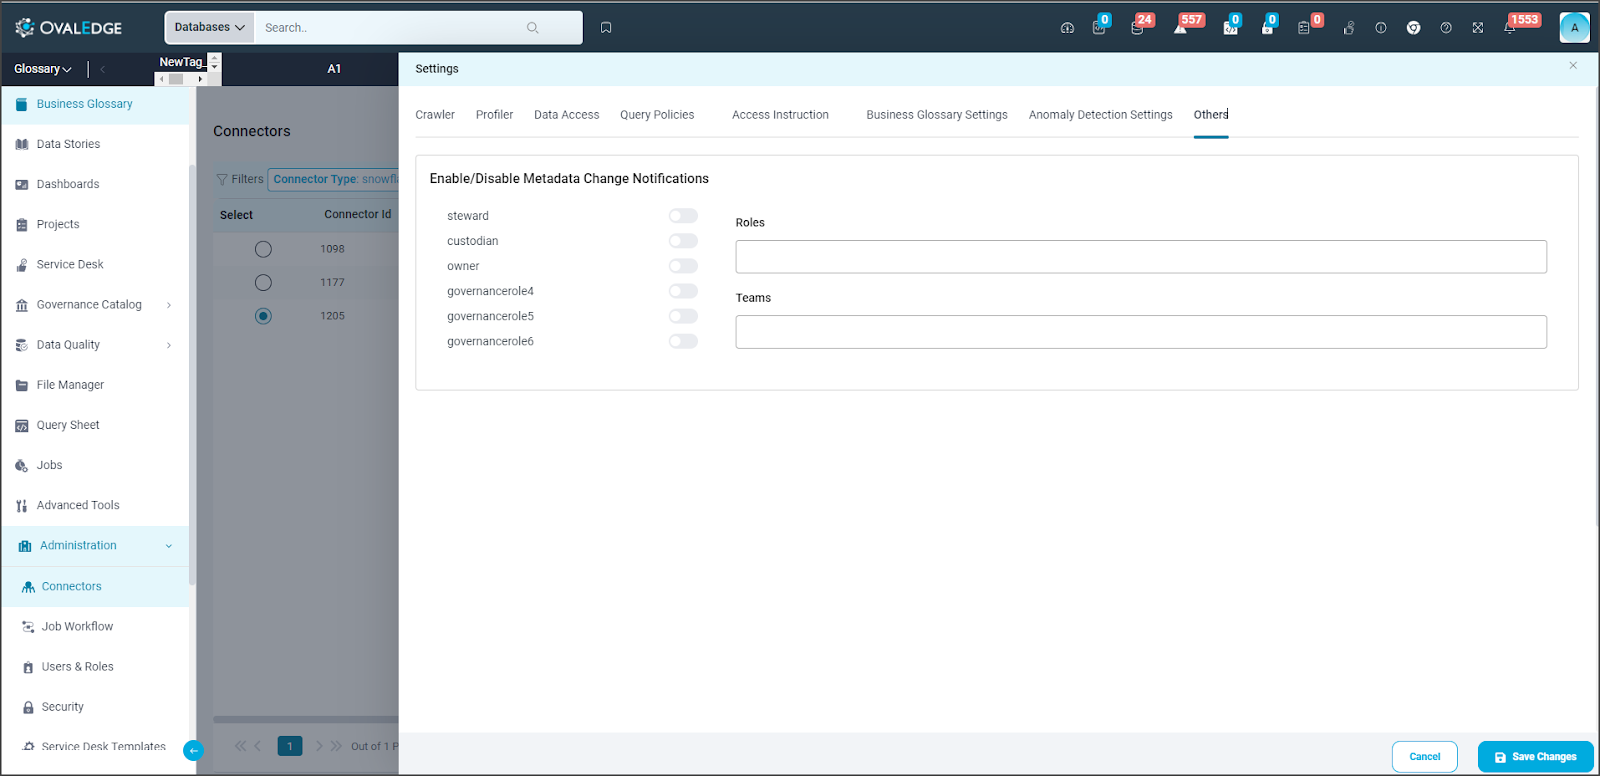
Note: Initially, only the crawl summary is included in the System Alert category. Other changes to the connector's metadata, including notification settings, are categorized as Watchlist Alerts.
Context URL
The OvalEdge Browser Extension leverages the Context URL feature available in Connector Settings. By opting for the Context URL feature, users can associate OvalEdge with specific URL addresses. This enables the browser to recognize the site and fetch metadata results from the OvalEdge catalog even when the Browser Extension is used outside of the OvalEdge application. It is important to note that the Context URL feature is only applicable to the Report connection type.

To activate the Context URL feature for a particular data source, follow these steps:
- Select the Settings option and navigate to the Connectors Settings page.
- Click on Others, then select the Context URL section.
- Enter the browser URL for the desired data source (e.g.:https://tableauad.ovaledge.net)
- To add additional URLs, click on the + Add New URL option. A new textbox will appear in the Context URL section to provide the URL details.
Once the Context URL is configured, the Browser Extension acts as a bridge between the OvalEdge application and the Source Report Database. This enables users to view the Certification status or Endorsement Rating applied to a report using the OvalEdge application.
Lineage
The Lineage setting is provided as a separate tab in Connector Settings specifically for data source types such as Report and ETL Connectors with Auto Lineage License type. These options allow users to configure multiple dialects (by selecting Source Server Type for lineage) and connection priority lists for selecting tables to build a lineage.
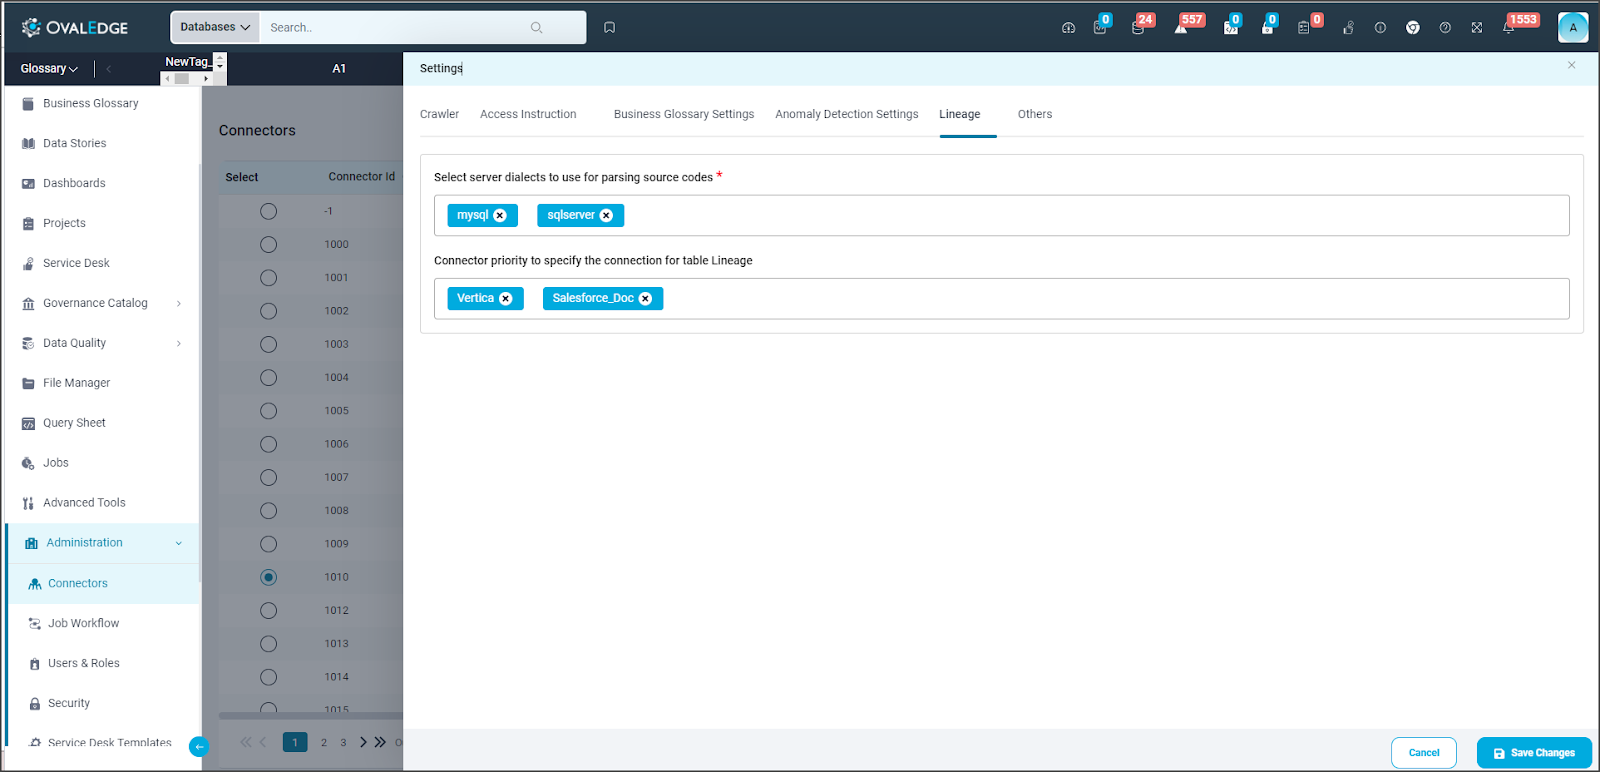
- Select Server Dialects for Parsing Source Codes:
When parsing source codes from the connector, the selected dialects will be used in the specified order.
If the first server dialect fails to parse the code, the parsing will be attempted using the next server dialect until the code is successfully parsed.
If all the dialects fail to parse the code, the lineage will not be built, and the status will be displayed as parse failed.
At least one server dialect should be specified to build the connector code lineage.
- Connector Priority to Specify Connection for Table Lineage:
When a table with the same name or signature is present in more than one connector cataloged table, these objects will be resolved to the connectors listed in the specified order.
Example: Connectors - MySQL X, Oracle Y, and DB2Z. If a customer table is present in both DB2Z and Oracle Y connectors, and Oracle Y is configured before DB2Z, the customer object lineage will be from the Oracle Y customer table.
Build Lineage
In OvalEdge, after a user crawls a connector, the ability to set up auto lineage depends on the license selected during connection setup. Here are two scenarios to consider.
- With the Auto Lineage License Add-On:
When users have the Auto Lineage add-on license, they can effortlessly initiate automatic lineage creation. Clicking the 9-Dots option on the connectors page directs them to a page called "Build Auto Lineage," where they can start building lineage automatically.
- Without the Auto Lineage License Add-On:
If users do not have the Auto Lineage add-on license, clicking the 9-Dots option on the connectors page will not permit them to build automatic lineage. However, they still have the option to manually create a lineage using the lineage maintenance feature.
Delete Connector
The Delete Connector feature in OvalEdge enables users to delete a connection. When a user chooses to delete a connection or schema, it results in the removal of all associated tables, columns, files, reports, relationships, and any other objects in OvalEdge linked to that specific database.
In OvalEdge, users have the option to delete a connection from the Connector page. To ensure this is done deliberately, users are required to enter the name of the connector they intend to delete. Once the name is provided, the user can click on the delete button. This action triggers a job that will remove the connector along with all its associated data, including crawled information, profiled data, metadata, and supported objects like schemas and tables.
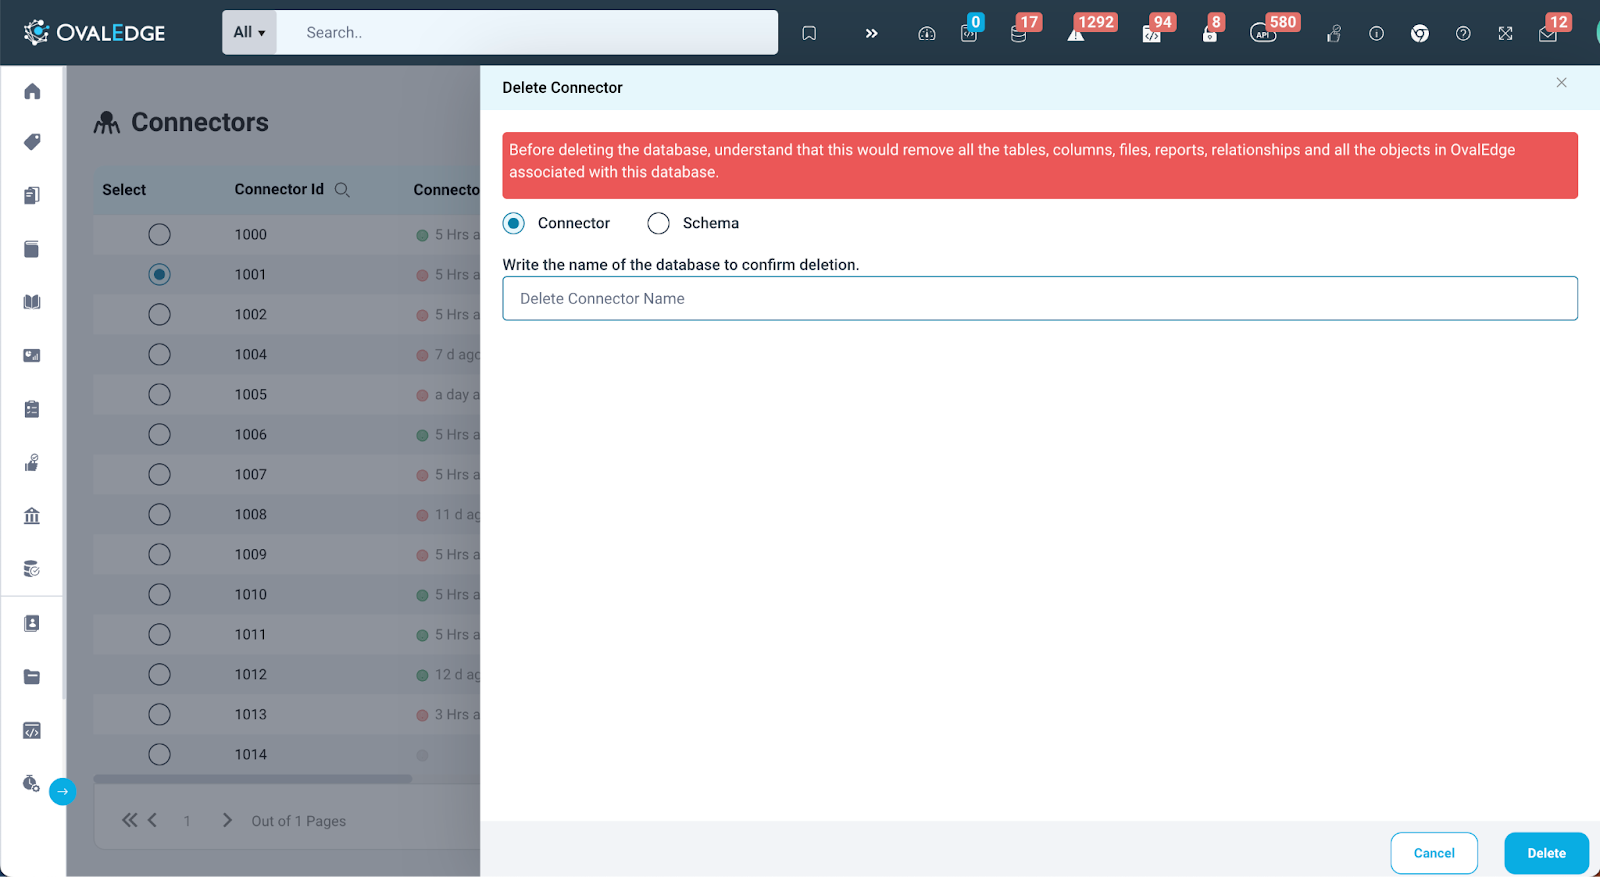
Note: Deletion of a connector will only delete a source from the OvalEdge connection and does not impact the deletion of associated crawled users and roles available in Users & Roles Management.
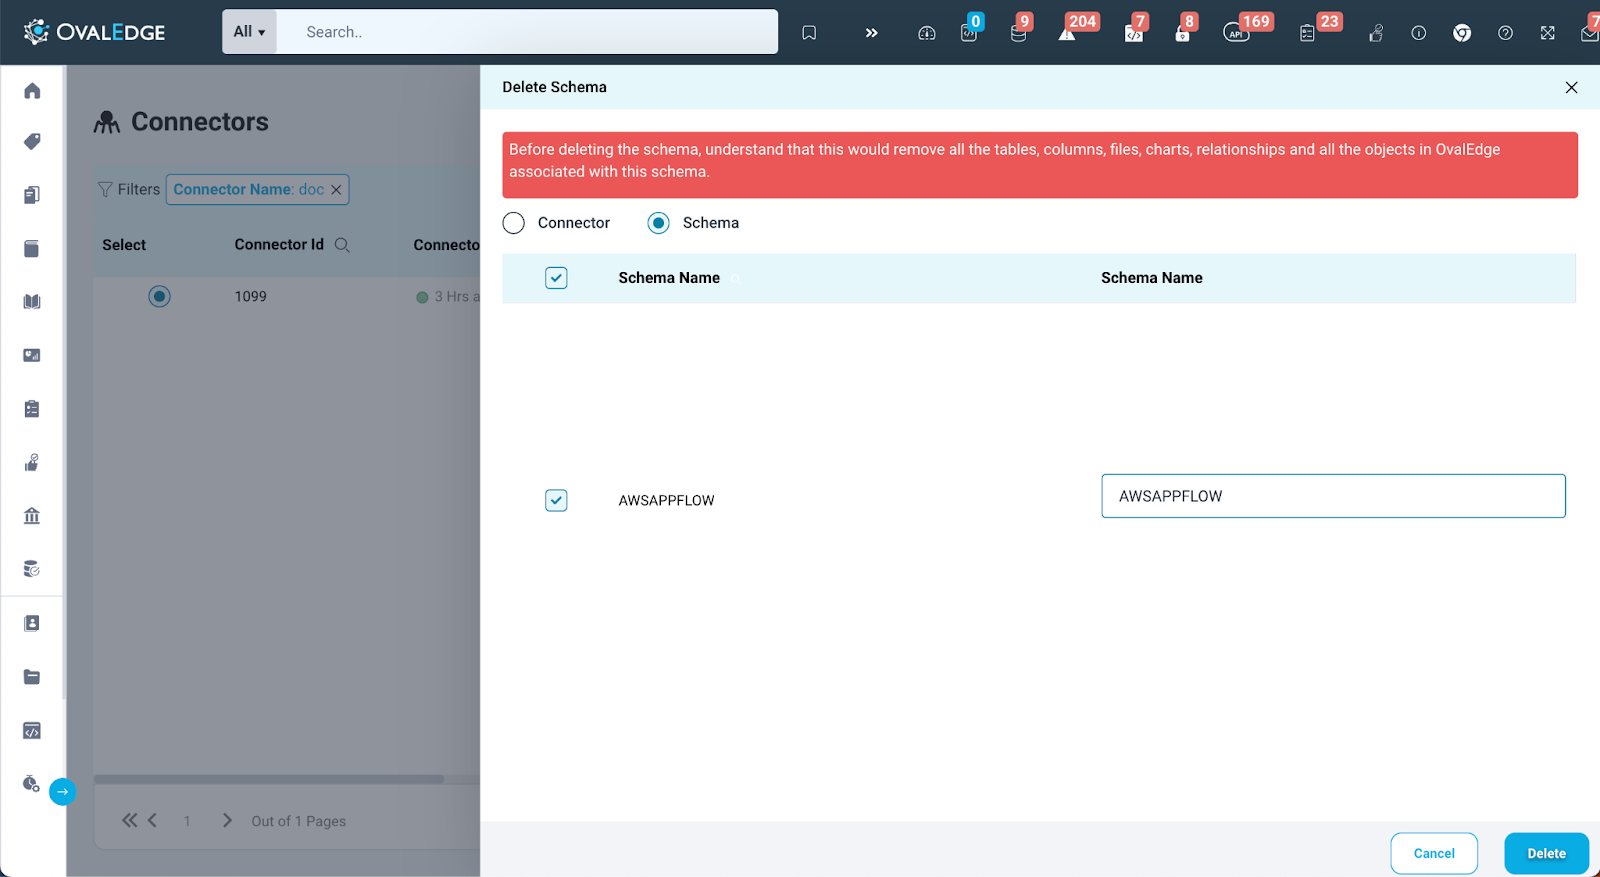
Delete Schema
This feature enables users to choose one or more schemas for removal from a particular connector. As a precaution, users are asked to enter the name of the schema they wish to delete in the provided input box next to each schema. After entering the names and clicking the "Delete" button, a job is initiated to remove the objects linked to the connector. Once the job successfully completed, the selected schemas will be successfully removed from the connection.
Manage Bridge
With the OvalEdge Bridge component, any cloud-hosted server can connect with any on-premise or public cloud data sources without modifying firewall rules. Since the client component of the bridge is installed within the customer infrastructure, the customer only needs to whitelist the IP address of the data sources and respective ports in the bridge client for secured connectivity. This allows the OvalEdge platform to perform the metadata related activities while the Bridge Component acts as a secured VPN between OvalEdge and the data sources.
Below is an image depicting the connection between the Bridge Server and Application Server
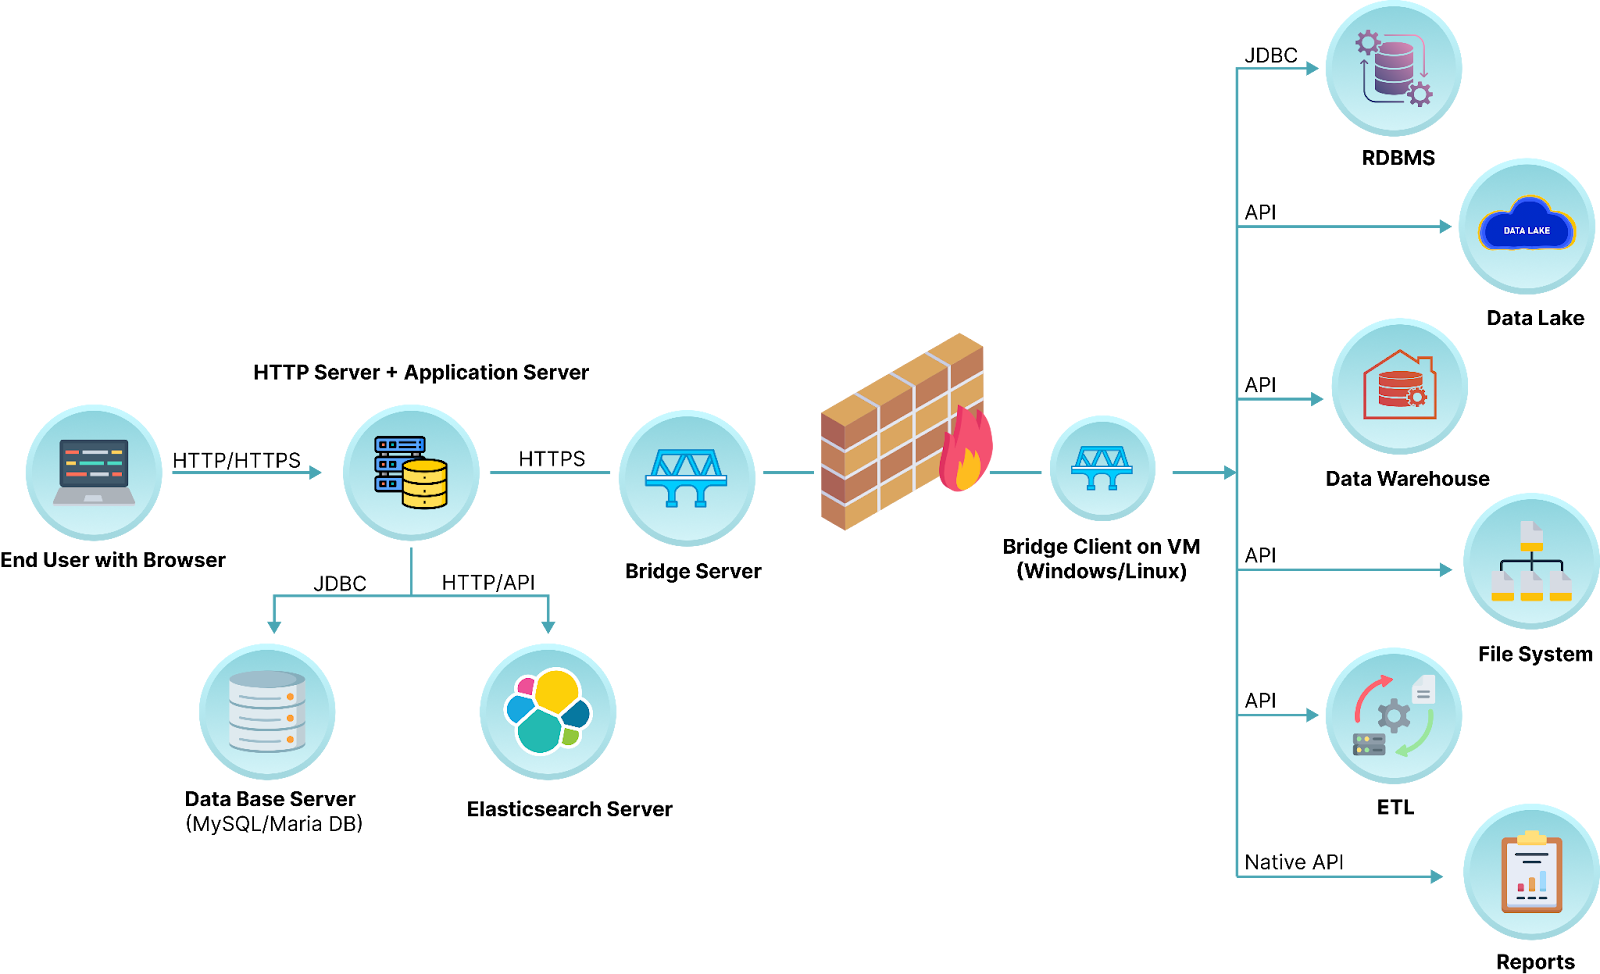
OvalEdge Bridge offers the following features:
- The OvalEdge platform can establish a bridge. Each Bridge server can supports 10 bridge clients, each bridge client can support any number of connectors.
- A bridge can host multiple connections like Oracle, MySQL, Postgres, etc.
- HTTPS is used to secure communication between the OvalEdge platform and the OvalEdge client (deployed/installed in client infrastructure)
- In the course of creating a bridge, the OvalEdge platform generates an SSL-enabled key store and makes it available for download.
- The communication between the bridge and OvalEdge server is a pull-based communication from the bridge, which keeps polling the server frequently for any jobs (crawling, query execution, etc.)
Bridge Installation
The Bridge Software installation is accomplished using the installation components available for download in the OvalEdge server, it is a one-time process performed for a specific bridge at the client location.
For more information, please refer to the Bridge Client Installation documentation.
Add Bridge
In OvalEdge, users have the flexibility to choose between two types of bridges: Nifi and Bridge Lite. This setting can be configured in the System Settings > Others Tab (bridge.type). Once configured, the selected bridge type becomes the default choice for adding bridges in OvalEdge.
- On the Bridge main page, click on the + icon. The Add Bridge pop-up window is displayed.
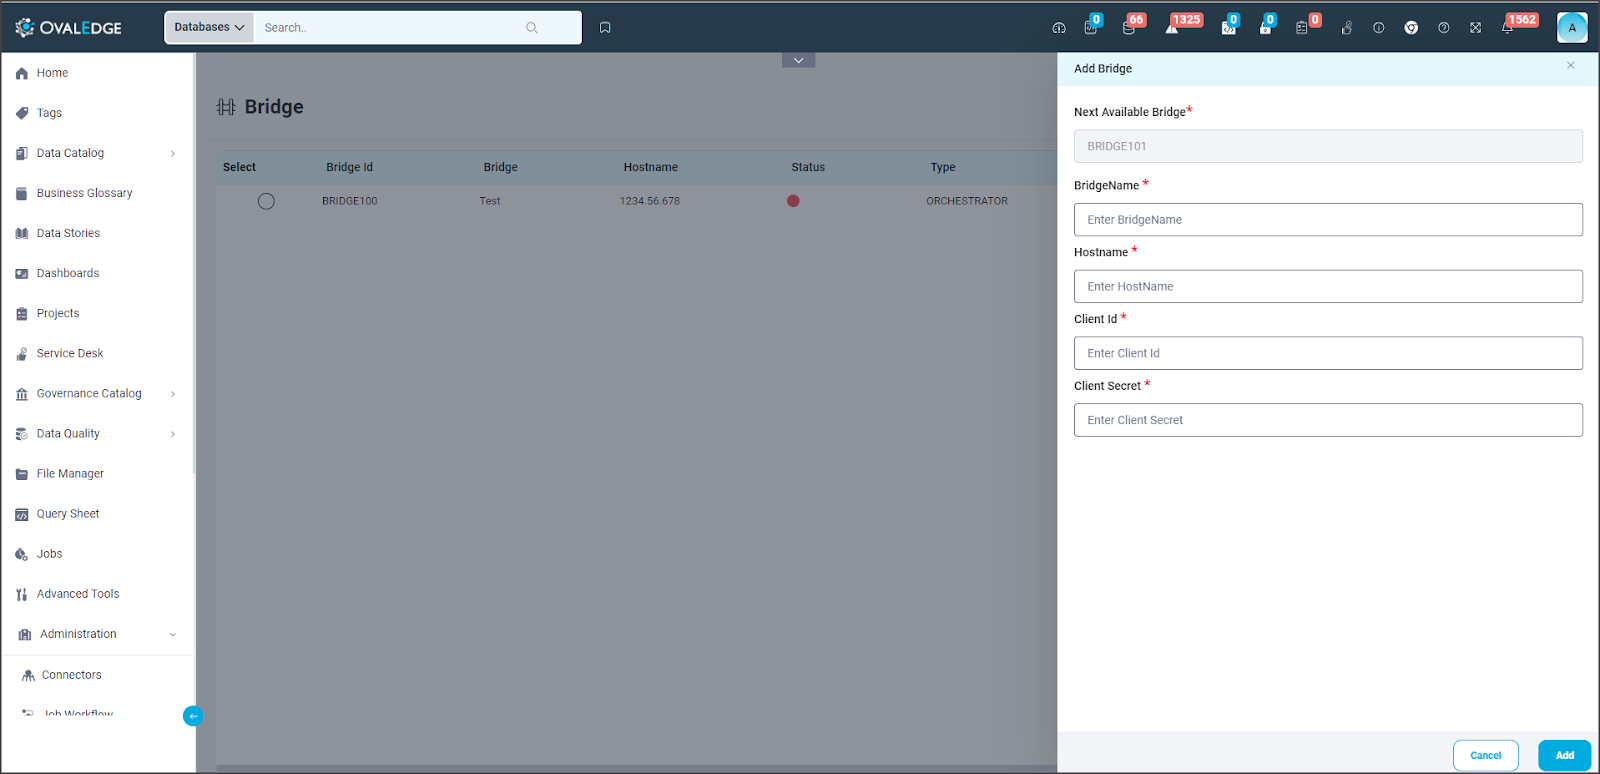
- By default, the Next Available Bridge is displayed, enter the Bridge Location Public IP Address and click on the Add button.
- After adding the bridge, the details are showcased on the Bridge main page.
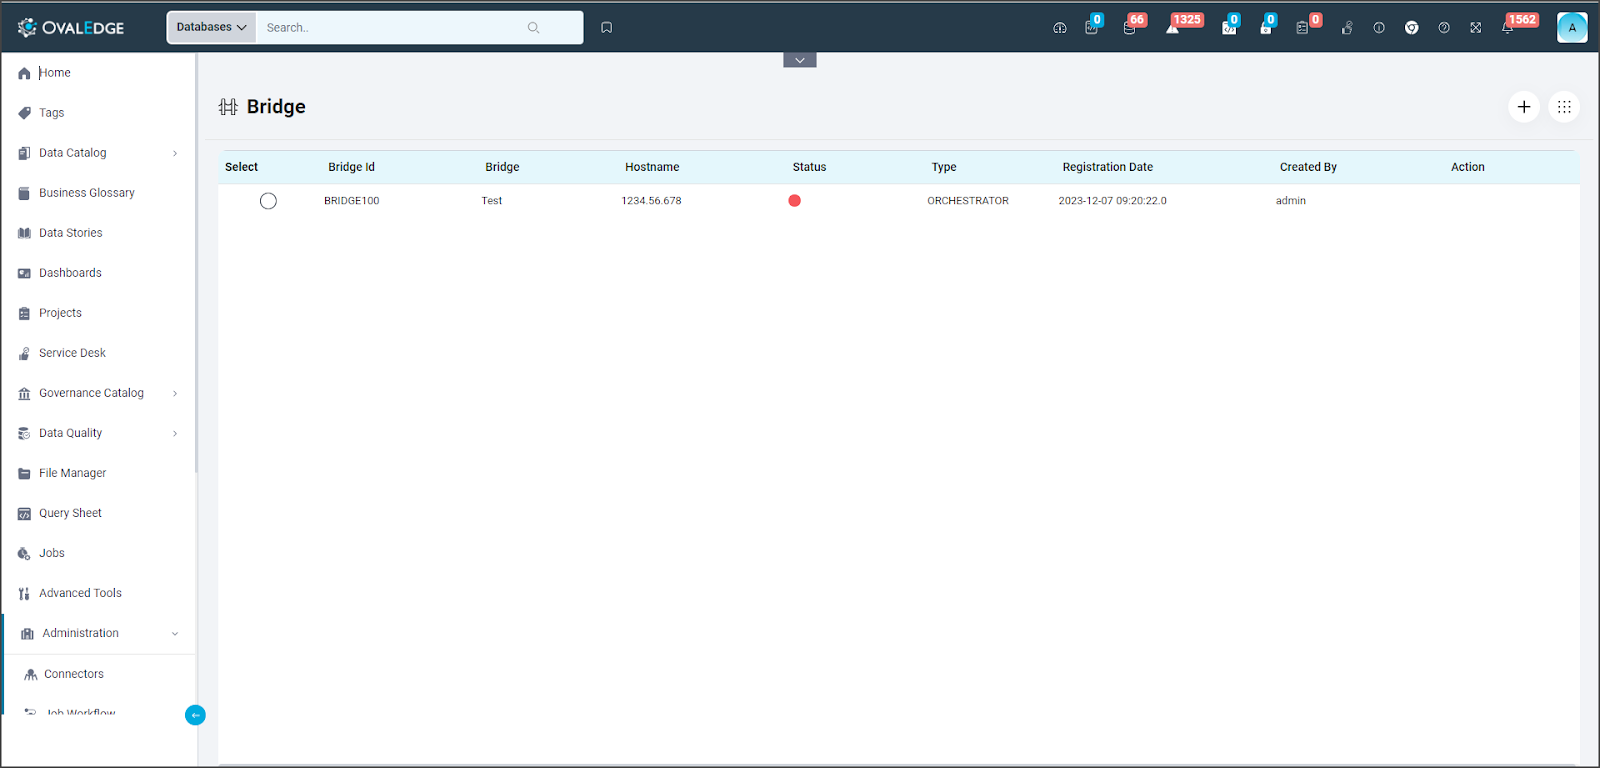
|
Column Name |
Description |
|
Bridge ID |
Displays the Bridge ID |
|
Bridge Name |
Displays the name of a Bridge |
|
IP |
Displays the IP address of Client Data Center |
|
Port |
Displays the Port of the connection |
|
Status |
Displays whether the bridge is connected or not |
|
Type |
Displays the type of the bridge Lite or Nifi |
|
Registration Date |
Displays the timestamp at which the bridge was registered. |
|
Created By |
Displays the name of the user who created bridge in OvalEdge |
Additional Actions on Bridge
Users can perform additional actions like Edit, Validate, and Delete a bridge by clicking on the 9-Dots and selecting the appropriate actions:
- Edit Bridge:
-
- Selecting this option directs the user to the Bridge creation page, where they can make necessary edits to the bridge details.
- After making changes, it is crucial to save and validate to ensure the accuracy of the updated information.
- Validate Bridge:
-
- Choosing this action initiates a thorough verification process in OvalEdge.
- The system checks all input parameters, and if they are accurate, it establishes a connection with the client server and validates the bridge.
- The outcome of this validation is promptly displayed on the main Bridge page, providing users with real-time status information.
- Delete Bridge:
-
- Opting for this action enables the user to remove a bridge from OvalEdge.
- This is a decisive step, and users should exercise caution, as selecting this option permanently deletes the bridge configuration.
Viewing Connectors
After adding a connector to OvalEdge, the connector main page provides essential details for easy reference.
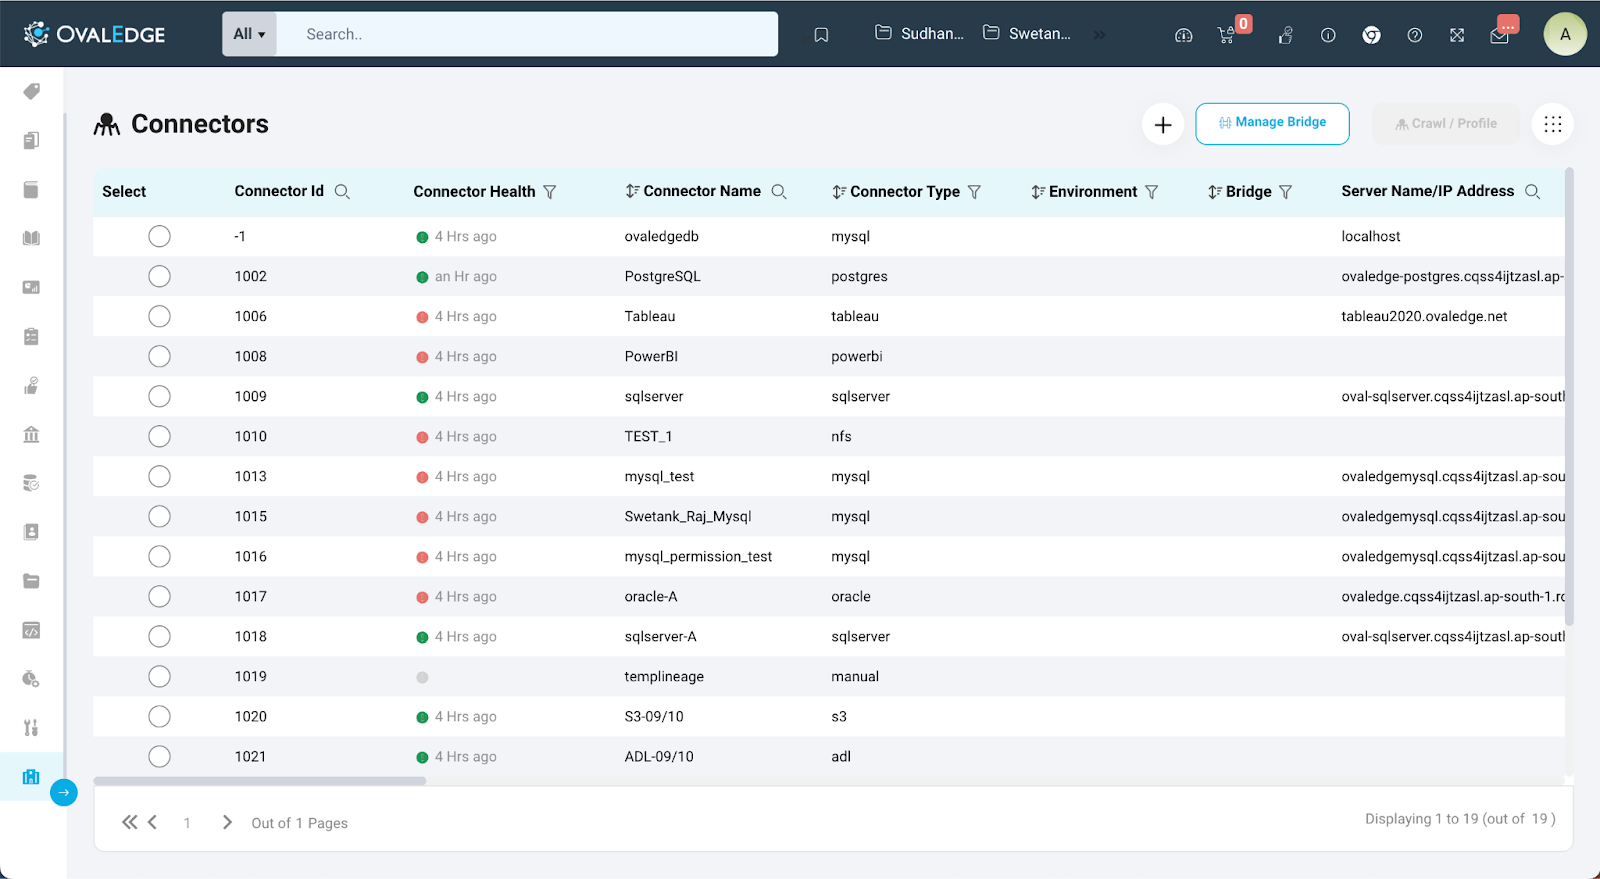
- Connector Id & Type:
-
- Connector Id: This unique identifier is assigned to each connector in OvalEdge.
- Connector Type: Represents the category or type of connector.
- Connector Health:
-
- Visualized by color:
- Red: Not Connected
- Green: Connected
- Grey: Only Saved, Not Attempted to Validate
- Clicking the color circle reveals validation history, specifying if it's a manual or automatic validation.
- Visualized by color:
- Environment:
- Indicates the environment associated with the connector.
- Configurable in System Settings -> Connector as 'connector.environment.'
- Defines client environments like development, stage, production, etc.
- Users can set different values separated by commas, creating a dropdown for the Environment attribute during connector creation.
- Status:
-
- Displays the status of the last crawl/profile job executed on the connector.
- Authorized Users & Roles:
-
- Lists roles and users authorized to access the connector.
- Configuration is available in the Security module under the Connectors tab
Connector Security
After adding a connector to OvalEdge, the connector main page provides crucial details for easy reference.
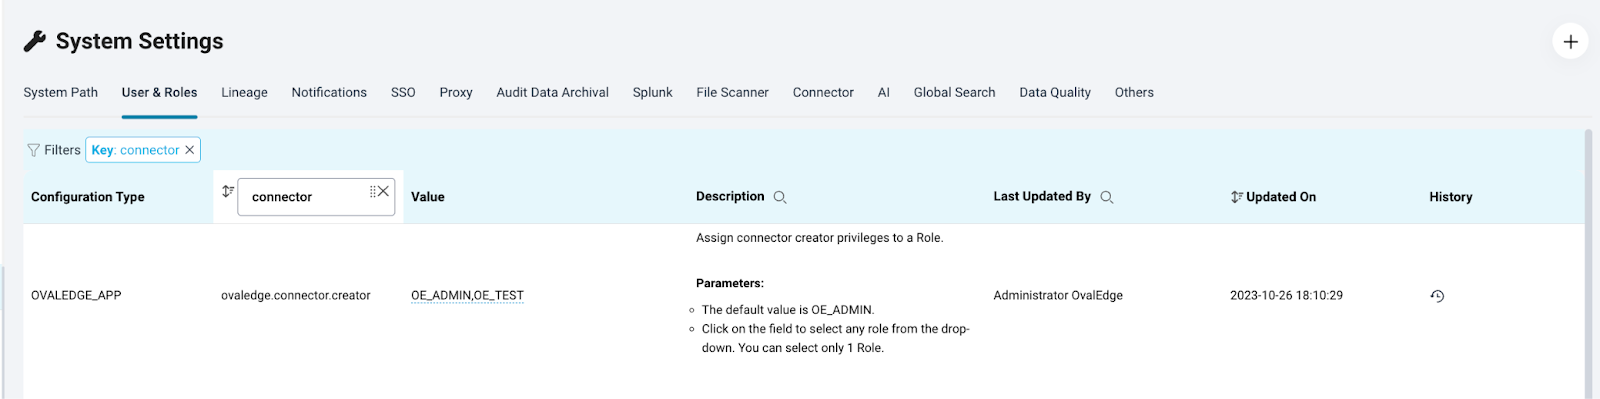
In OvalEdge, the initial step to add a connector involves defining an Administrator role or multiple roles tasked with the responsibility of creating and establishing connections. This is achieved through a configuration in System Settings, where a role with Author License type is specified to act as a "Connector Creator."
To configure this, navigate to the "Users & Roles" tab in System Settings and search for the key "ovaledge.connector.creator." The values defined for this key, typically roles with Author license type, designate individuals as Connector creators. When users with these roles log into the OvalEdge application, they will find the "Add New Connector (+)" option enabled on the Connectors Page, allowing them to create and manage connectors.
Creating a New Connector
Once a role with Connector creator privileges navigates to the Connectors page in Administration to establish a connection, they can click on "New Connector (+)" at the top-right and choose from any of the multiple connectors (systems) supported.
The Connector creator must fill in required fields which vary from system to system. Once the mandatory fields are entered, and the "Validate" button is clicked, the connection with that system is established.
A few mandatory fields common across all connectors include Administrator roles, Integration Administrator, and Security and Governance Administrator.
Editing a Connector, Connector Settings, Crawl & Profile Actions: Once a connector is created, tasks such as editing fields related to the connector, viewing and changing settings, or running crawl and profile actions can be performed solely by the Integration Administrator role, which is defined during the connector creation process.
Defining and Maintaining Security on Connector
After creating a Connection and crawling Metadata, OvalEdge ensures that a Role or User can use this Metadata only if specific Permissions are granted at each object level of the Connector. This is how OvalEdge ensures strong security measures.
The role, which can provide such permissions is an Administrator role known as Security & Governance Administrator.
Security & Governance Administrator (SGA)
SGA is an Administrator role with an Author license type, defined at the Connector creation level. SGA acts as Admin for this Connector alone, as in an organization, for different system types like RDBMS and Reporting tools, different admins can exist. An SGA would be getting the highest Meta and Data Permissions on this connector first. Later, an SGA can decide and provide various Metadata and Data Permissions to Roles and Users on each of the data assets asset in Connector. There can be multiple Security & Governance Administrators on a Connector, and they can be edited only from the Security page of Common Administration.
Integration Administrator(IA)
An Administrator role with Author license type, and is solely responsible for editing a Connector’s settings, Crawling, Profiling, Re-Crawl, Re-Profile, and Schedule Crawl/Profile. There can be multiple Integration Administrators on a Connector and they can be defined at the Connectors Edit page.
System Settings
The System Settings are designed to provide administrators and users with the flexibility to configure the behavior and display of the Connectors. These settings enable users to tailor their search experience, control the visibility of certain features, and fine-tune the search parameters according to their specific requirements. These settings can be configured from the Administration> System Settings in the following tabs.
Users & Roles Tab
|
Key |
Value |
Description |
|
ovaledge.connector.creator |
OE_ADMIN,ITMANAGER,S3HEAD,MP_ROLE |
By assigning the connector creator privilege to a role, users with that role will have the ability to create connections within OvalEdge. The default value is typically set to OE_ADMIN, but users can customize it by selecting an appropriate role from the Value drop-down menu. |
Others Tab
|
Key |
Value |
Description |
|
reports.crawl.starttime |
07:31:00 |
By defining a start time, users can schedule when the crawling process should be triggered, and this time is interpreted based on the server's time zone in OvalEdge. The default is empty, but users can set the value in the system time zone format. |
|
reports.crawl.endtime |
07:41:00 |
By defining an end time, users can schedule when the crawling process should be ended, and this time is interpreted based on the server's time zone in OvalEdge. The default is empty, but users can set the value in the system time zone format |
|
bridge.type |
rest |
By configuring the bridge type, you specify whether OvalEdge should use Bridge Lite with REST or NiFi for data movement. The default value is REST, but if the user sets the value to REST, then the Bridge Lite gets activated. If the user sets the value to NIFI, then the Bridge NiFi gets activated. |
Connector Tab
|
Key |
Value |
Description |
|
connector.environment |
QA,Prod,Dev,test |
This setting is client-specific, detailing various environments present at the client, such as development, stage, production, etc. Users are required to input different values, separated by commas. These values are then displayed as a dropdown for the Environment attribute on the connector creation page. |