A Business Glossary is a centralized repository of standardized terms that are specific to a company. Using standardized definitions increases Data Literacy since users can trust that they have the same meaning everywhere.
A Business Glossary serves as a touchstone between IT, business users, communicators, and anyone who makes decisions or uses data within the organization and provides a space for everyone to contribute to the definition of a term, what it is and isn’t, and where to find it in the data. It works to remove ambiguity and misuse of critical Terms and definitions.
A good Business Glossary enables the users to attach a Term to the data assets that present the information related to that term.
Terms
Terms are unique and standard definitions that define the important processes and concepts within an organization. A Term adds a business context to the data present at the enterprise level. Terms are applied to business domains that are used across an organization to reduce miscommunication and improve data-sharing.
The Terms can be associated with different data objects in the application to classify data objects, view related Terms/Objects and associated Objects, and locate object(s) easily.
A single Term can be applied to multiple data objects in the application. However, a data object can have only one Primary Term and multiple auxiliary Terms applied to it. A Term cannot be applied to objects with DAG tags.
Auxiliary Terms
Auxiliary Terms are Terms created under the Auxiliary domain to add additional business context to data objects. A data object can have one primary term and multiple auxiliary Terms applied to it. However, the Primary Term associations are applied to the data object in the conflicting Primary - Auxiliary term scenarios.
Auxiliary domains are created from the Administration > Security > Domains > + icon > Add New Domain pop-up > an Auxiliary checkbox is enabled in the bottom left.
Business Glossary Structure

- Business Glossary Terms are hierarchically created under different Domain, Domain Categories, and Subcategories.
- The different Classifications (Confidential, PII, Sensitive, Restrictive, External Use, Internal Use) configured under a Domain can be inherited to the Terms created under the domain. The classified Terms can be applied to data objects to classify data objects.
- A Term in both DRAFT and PUBLISHED status can be associated with a data object.
- You can manage data associations to Business logic and define the associations made to the Term by applying classifications, Governance Roles, and Data associations such as Copy Title to catalog, restrict or mask. You cannot apply any business logic to a Term in Draft status.
- A Term cannot be applied to Data objects that already have a Term or DAG applied to them.
Business Glossary Access Permissions
|
Actions |
Admin / Steward |
Meta Write Users |
Read-Only Users |
|
Add a Term |
Yes |
No |
No |
|
Suggest a Term |
Yes |
Yes |
Yes |
|
Publish |
Yes |
No |
No |
|
Request Publish |
Yes |
Yes |
Yes |
|
Draft Term |
Yes |
No |
No |
|
Edit Term Details |
Yes |
Yes |
No |
|
Associate Term to the data object(s) |
Yes |
Yes |
No |
|
Delete Term |
Yes |
No |
No |
Note 1: Users with Author & Analytical License type can only be selected for Governance Role Users. The Gov Role users i.e. Owner, Custodian, 4, 5, 6 by default gets Meta-Write privileges on the Term. A Business user cannot be assigned to a Gov Role.
Note 2: The Admin users and the Final Approver(s) configured in the Administration > Security > Approval Workflow > Suggest Term service request template can directly Suggest a Term or Publish a Term.
Meta-Read user screen interface
Users with Meta-Read permissions can only view the term details and cannot execute any actions on the term.
Meta-Write users screen Interface
Users with Meta-Write permissions can both view and edit the term details to apply business logic to the term and manage data objects accordingly.

Building Business Glossary Terms
Step 1 - Identify - Businesses need to create a Data Governance group. The function of the group is to identify and standardize the terms used in an organization.
Step 2 - Categorize - By identifying Terms, the governance group will recognize a large number of Terms that need to be identified and categorized.
Step 3 - Critical Terms - Through analysis, identify and consolidate the most important terms in your organization. Terms that associate with important processes or policies or represent sensitive content should be identified and marked accordingly.
Step 4 - Associate Terms to data assets or Classify - Once the Terms are identified and critical Terms are marked, the data assets can be organized and classify data to establish security around sensitive data.
Step 5 -Review - A Business Glossary is never complete; it is an iterative process. Terms can change and need to be reviewed and approved by the appropriate authorities.
Classifying Data Using Terms
In OvalEdge, the Terms govern the entire data objects. Terms created under a specific domain inherit the classifications configured at the domain level. At the Term level, the classifications can be selected and applied to the Term based on the business requirement. The Term can be associated with multiple data objects.
You can also run Recommendations on unassociated data objects at column-level. When the AI Recommendations are run on unassociated data objects, the algorithms in the backend work on Smart Score, data object profile, metadata, title, and other parameters to work out the object-term relevance. It picks the matching data objects in the applications that match the Current Term with Smart Score and Accept/Reject buttons. Based on the user's discretion, the Term can be applied to the data objects.
Tree View
The Tree view organizes all the created Terms in a hierarchical way Parent-Child (Domain - Term). It displays Terms under respective Domains, Categories, and Sub-categories for easy understanding.
Note: Terms in the Published state are only displayed in the hierarchy.
- A +Suggest Term icon is enabled in the top right corner to add or create new Terms to the Business Glossary.
- Click on any Term in the left panel to view brief insights on the Term in the right panel. Click on the View Details button navigates you to the Term Details.
- You can use the search filter enabled in the left panel to search for the Terms, sort the list alphabetically, and use Collapse All/Expand All the list to view Domain names or Domain along with Category / Sub-Category.

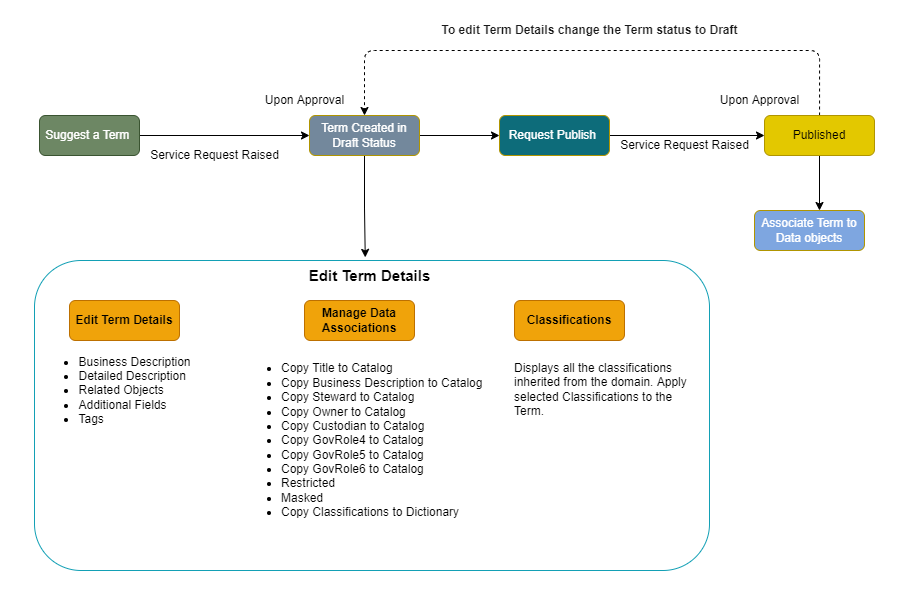
Suggest a Term
To create a Term, a service request has to be raised, and upon fulfillment of the request, a Term is created in Draft status.
- A + Suggest Term is enabled in the top right corner to add more Terms to the Business Glossary.
- Click the Suggest a Term button and a New Service Request Template is displayed with the following fields.
- Enter the new Term details in the fields provided:
- Summary
- Description
- Priority
- Select Domain - select a domain from the drop-down list.
- Business Glossary Name
- Business Description
- Associated Tag
- Click on the Submit button, and a request is sent to configured approvers, upon fulfillment of the request, the Term gets added to the Business Glossary in Draft status.
- Once the term is Published, it gets available to other users to associate with the data objects.
Note 1: The Domain name that users have access permissions to will only be visible in this drop-down list. Users will be able to add Glossary terms only to these domains. If the selected Domain has any Categories or Sub-Categories defined, then the additional Category/Sub-Category fields are displayed.
View Details
Click on the View Details button to view complete details of the selected Term.
Request Publish
Once a Term is created, and upon fulfillment of the request, a new Term is created in Draft status. To Publish the Term, the Request Publish button is enabled in the top right. Users with Meta-Write permissions, Admin users, and Governance Role users on a domain can request to publish a term created under that specific domain. Users cannot directly publish a Term.
- Click on the Request Publish button to see a pop-up.
- Enter the details in the field and click on the submit button.
- A notification is sent to the configured approvers. Upon approval, the requester of the Term gets notified about the Request Fulfillment and the Term gets published.

List View
The List View displays the Terms in the Business Glossary and associated details in a grid with different columns displaying Domain - Category - Sub-Category details of the Terms. Click on a Term to navigate to the Term detailed page.

|
Business Glossary Grid |
Description |
|
|
It is enabled in the top right corner to add more Terms to the Business Glossary. |
|
System View |
The selected view from the List of Views - My Views/ System Views/ Public Views are displayed. |
|
Configure View |
The Configure View icon is enabled in the top right corner to help self-customize the columns you wish to view on the Data Catalog objects page. Click on the Configure View button to see a pop-up window displayed on the screen to add/remove column fields that should appear in the main page grid. |
|
|
Click on the Reset icon to clear all the filters applied on the Table data grid columns. |
|
|
Nine Dots Actionable Items |
|
Domain |
Displays the name of the Domain associated with the Term. Use the filter to refine the search results. |
|
Category |
Displays the Domain Category associated with the Term. Use the filter to refine the search results. |
|
Sub-Category |
Displays the Sub-Category associated with the Term. Use the filter to refine the search results. |
|
Term |
Displays the Term Name. |
|
Business Description |
Displays the Business Description of the Term. Hover on to the field to see the Edit icon. Click on the Edit icon to edit the Business Description. |
|
Tags |
Displays the Tags applied to the Term. Hover on to the field to see the Edit icon. Click on the Edit icon to Add/Delete Tags. |
|
Status |
Displays whether the Term status is either Published or Draft. |
|
Steward |
Displays the Name of the Steward |
|
Custodian |
Displays the name of the Custodian. |
|
Owner |
Displays the name of the Owner. |
|
Created By |
Displays the name of the user who created the Term |
|
Created Date |
Displays the Date & Time on which the Term is created. |
|
Download Icon |
A download option is provided in the bottom right corner to download the Term details into .XLXS format. |


Add a Term
Users with OE_Admin role or stewards of the domain can only add a term directly.
Action Items - Bulk Terms
Publish
The Publish option is enabled only for Admin/Steward and the Final Approver of the associated workflow users. The Admin/Steward users can directly Publish a Term without raising a service request from the Term Detailed page (Term > Views Details button) using the Nine Dots > Publish option.
- Select Term(s) and click the Nine Dots to select the Publish option and the selected Term(s) get published in a single go.
Draft a Term
The Term(s) needs to be in a Draft status to edit the contents of the Term, such as editing Business Description, Tags, or Additional fields. When a Term is moved to Draft Status, the data associations or business logic (Copy title to catalog / Copy Gov Role to catalog / Masked /Restricted) applied to the data objects also gets removed from the data objects.
- In the Term details, click on the Nine dots button > Draft option.
- Select the Draft option, and a confirmation message is displayed to confirm the deletion.
- Click on the Save button to change the Term to Draft status.
You can bulk update multiple Terms to Draft status by selecting multiple Terms from the Business glossary page > Nine dots > Draft option. Select the Draft option to see a confirmation message. Click on the Save to change the Term(s) to Draft status.
Change Term Category
Term(s) with the same domain can be moved to different categories under the same Domain.
- In the Business Glossary Main page > Select Term(s) with the same Domain.
- Click on the Nine dots > Change Category option.
- Select the Change Category option.
- A Change Category pop-up window displays all the Categories created for the domain.
- Select the Category from the drop-down options, and the Term gets moved to the selected category.
Note: A Term Category can also be changed from the Term detailed page following the same instructions mentioned above.
Adding Tag(s) to a Term
Tags are search keywords given to data objects to improve data search and quick discovery of related data objects from the database. You can label a data object using Tags to group objects together to give more control and power to search within the application. You can apply Multiple Tags to a Term.
- In the Business Glossary page, select the Terms(s) to which tags are to be added.
- Once selected, click on the Nine dots icon to see the Add Tag option.
- An Add Tag pop-up window is displayed with a search filter enabled to search tags.
- Click on the + icon against the Tag name.
- Also, the +New button helps to add new Tags and will be displayed in the Tag drop-down list.
- Click on the Close button, and the selected Tag is applied to the object.
Note: Users with Meta-Write permissions add/remove tags to/from the term.

Removing Tag(s) from a Term
- In the Business Glossary page, select the Terms(s) to which tags are to be removed.
- Once selected, click on the Nine dots icon to see the Remove Tag option.
- A pop-up window is displayed with Assigned Tags. Click on the – icon against the Tag to remove the Tag.
Note: Users with Meta-Write permissions add/remove tags to/from the term.
Update Governance Roles
The Steward, Custodian, and Owner roles can be added or updated using the Update Governance Roles option.
- Go to the Business Glossary main page.
- Select the Term(s) you wish to update the Governance Roles.
- Click on the nine dots, and an Update Governance pop-up window is displayed.
- Select Steward/Custodian/Owner users from the drop-down list.
- Click on the Save button, and the Roles selected get associated with the Term.
Note: The Governance Roles can also be updated from the Term detailed page > nine dots icon.
Delete Terms
Select the Term(s) you want to delete and click on the nine dots icon to see the Delete Term option. Click the Delete Term option to see a confirmation message confirming the deletion. Click on the Ok button to delete the Terms(s).
Suggest a Term
To create a Term, a Service Request is raised, and upon fulfillment of the request, a Term is created in Draft status.
- A + Suggest Term is enabled in the top right corner to add more Terms to the Business Glossary.
- Click the Suggest a Term button, and a New Service Request Template is displayed with the following fields.
- Enter the new Term details in the fields provided:
- Summary
- Description
- Priority
- Select Domain - select a domain from the drop-down list.
- Business Glossary Name
- Business Description
- Associated Tag
- Click on the Submit button, and a request is sent to configured approvers, upon fulfillment of the request, the Term gets added to the Business Glossary in Draft status.
- Once the term is Published, it gets available to other users to associate with the data objects.
Note :
- The Domain name that users have access permissions to will only be visible in this drop-down list. Users will be able to add Glossary terms only to these domains. If the selected Domain has any Categories or Sub-Categories defined, then the additional Category/Sub-Category fields are displayed.
- The steward users and OE_ADMIN users set as final approval of the Service Request can directly Create or Suggest a Term.
Editing Term Details
The Term Details displays all the information related to a Term and its associations with data objects across the application and recommends the Term to data objects with no associated terms. It helps Manage Data Associations and Classifications.
The Term Detailed Page is further divided into different sections:
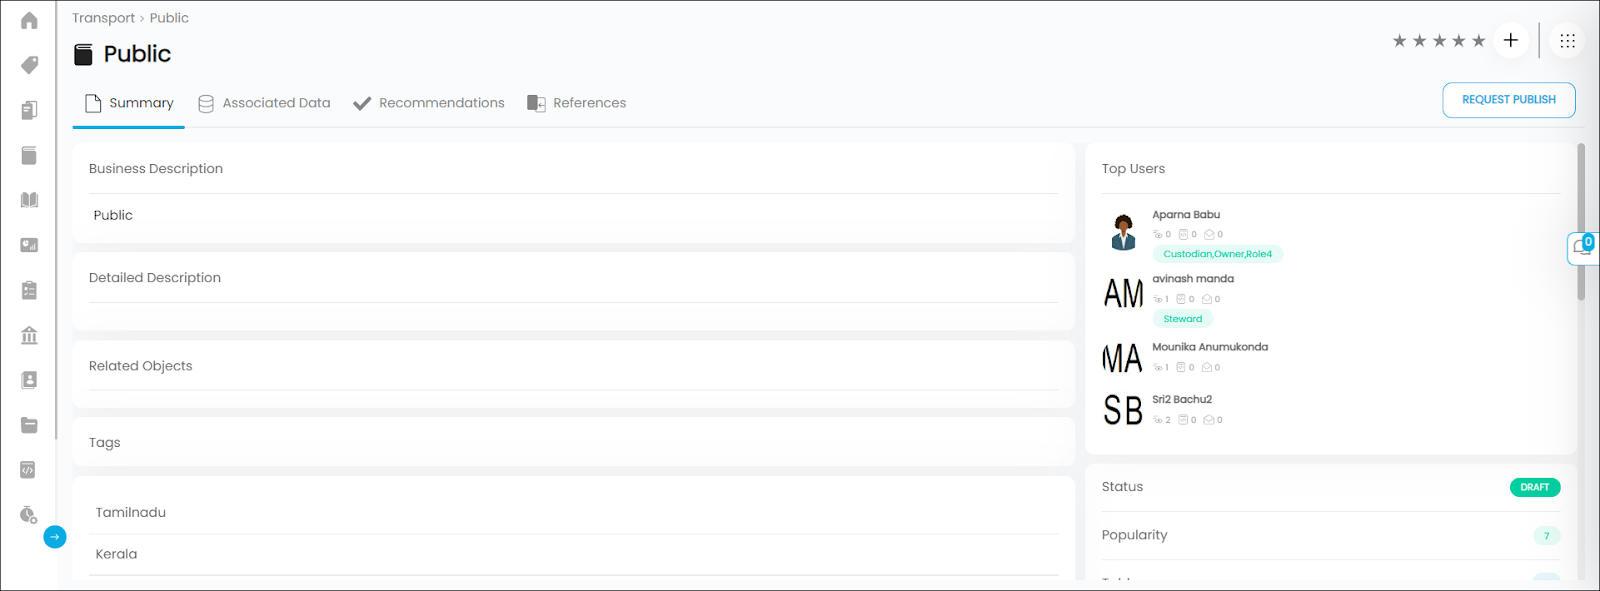
- Summary: The Summary displays all the details associated with the Term, such as Business & Detailed Description, Related objects, associated tags, additional fields, and more.
- Associated Data: It displays all the data objects having the same Term applied in respective Object Type tabs. It helps you manually add a data object using the + Add Table or + Add File button placed at the bottom left.
- Recommendations: It helps you run recommendations on the data objects with no Terms applied. When a Term Recommendation job is submitted, the system displays the Term suggestions against the data objects with Approve and Reject icons.
- References: It displays a list of all references made to the term from various data assets in the application. The benefit of having solid reference data is that you can confidently drill into subsets of your data to gain business insights
Summary
The Summary displays all the details associated with a Term, such as Business & Detailed Description, Related objects, associated tags, additional fields, and more
Business Description
A business description provides a clear understanding of the data objects (Tables/Files/Reports) and their function. It is descriptive information about the data object and its fields that will be helpful for business users. By default, the description box is empty, and the user can update it accordingly.
The Business description field is editable. Hover on to the field to view an edit icon. Click on the edit icon to view a text field that helps you edit/update the Business description. You can include images, links, videos, or tables, apply basic formatting to the text, and also add object references using @ annotation.
A History button helps you to view all the logs of changes made to the business description with an easy download option.
Note: Users with Meta-write access can only edit the Business Descriptions.
Detailed Description
It provides a more elaborative description of the Term to include aspects, facts, and additional information.
The Detailed description field is editable. Hover on to the field to see an edit icon. Click on the edit icon to view a text field to edit/update the detailed description. You can include images, links, videos, or tables, apply basic formatting to the text, and also add object references using @ annotation.
A History button helps you view all the logs of changes made to the Detailed Description with an easy download option.
Note: Users with Meta-write access can only edit the Detailed Descriptions.
Related Objects
The Related Objects display all the Term Relationships with other data objects in the application. Related Objects help users understand the current Term relationship with other Terms or data objects in the application. It helps relate similar Terms/data objects that provide more information about a concept or process in addition to what the current Term details provide.
For example, if the current Term is ‘Customer Orders’, you can relate to Terms ‘Purchase’, ‘Returns’, ‘Transactions’ or even link to Table objects that have Customer Order History.
Below mentioned is the list of data objects to which the current Term can be related to:
- Business Glossary (Term to Term relationship)
- Tables (Term to Table relationship)
- Files
- File Columns
- Reports
- Report Columns
- Queries
To add Related objects,
- Go to Term detailed page > Summary Page > Related Objects field.
- Hover on to Related object to see an edit icon. Click on the Edit icon to see a Related Data pop-up window displayed.
- Select the data object type to which you wish to add the existing Term.
- The right panel displays the existing/added related objects specific to the object type selected.
- Select a data object from the left panel, for instance, if Business Glossary is selected, a drop-down displays the list of all the Terms in the dropdown.
- Select the Relation Type to define the Term relation. It has a predefined list of Relationship Types in the drop-down listed below:
- Is related to
- Is synonyms
- calculates from
- Replaced by
- Replaced from
- Filtered by
- Filters
- Is before
- Is after
- Is duplicates.
- Click on the +icon against the Term to add the Term to the current Term. Likewise, any data objects (Table, File, Report Query) can be added to the Current Term. use the search filter to search for preferred objects.
- The Save Related Objects button gets enabled only when the Relation type is updated.
- The objects added are displayed in a list under the Related Objects field in the summary page.

Additional Fields
The Additional Fields (Text/Code/Number/Date) created from Custom Fields (Administration > Custom Fields > Business Glossary as Object Type) are displayed to add more metadata details or attribute details about the Term.
Note: Users with Meta-write access can only edit the Additional fields.
Top Users
Tops users are the most active users who have viewed, commented, and collaborated with the data; forts, and their scores are determined based on their roles and permissions.
Status
Displays whether the Term is Published or in Draft Status.
Popularity
Displays the popularity score.
Tables
It displays the count of Tables associated with the Term.
Columns
It displays the count of columns that are tagged to the Term.
Version
The version number displays the number of times the details of a specific Term is edited.
If there is a content change required for a business glossary term, a user can raise a service request to do this. The request submitted has to be approved to accept the necessary changes. Once the changes are reflected in the corresponding Business glossary term, the version count increments by 1.
Published By
Displays the name of the user who published the Term.
Published Date
Displays the Date & Time on which the Term is Published.
Managing Classifications on Terms
Classifications are used to classify assets based on various classifications specific to your organization. You can configure your own classification that is specific to your organization under domains. Classifications help users to group the Terms based on the sensitivity of the data, i.e., confidentiality, privacy, data sensitivity, or compliance regulation).
When a New Term is created, the defined classifications for the Domain are displayed in the Manage Classifications. A Term can have one or multiple classifications applied to it. So, when the Term is associated with data objects, the applied Term classifications are also applied to the data objects.
However, the Show Classification at Dictionary checkbox (Manage Associations Data field), if selected, helps display the classifications associated with the Term associated at the Table column level.
Note 1: Users with Meta-Write permissions can edit/apply classifications on the term.
Note 2: OE_Admin/Default Admin users can configure to add more classifications under a domain.

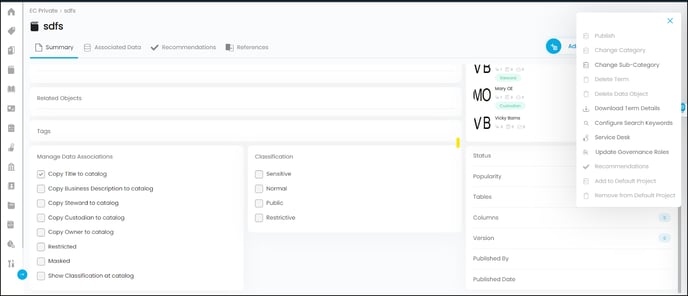
Manage Data Associations
Manage Data Associations helps apply the Term properties to the data objects. Also, establishing data ownership makes data assets easier to categorize and organize. Manage Data Associations helps update the new set of Governance Role users (Owner /Steward / Custodian / GovRole 4,5,6 on Data Catalog objects.
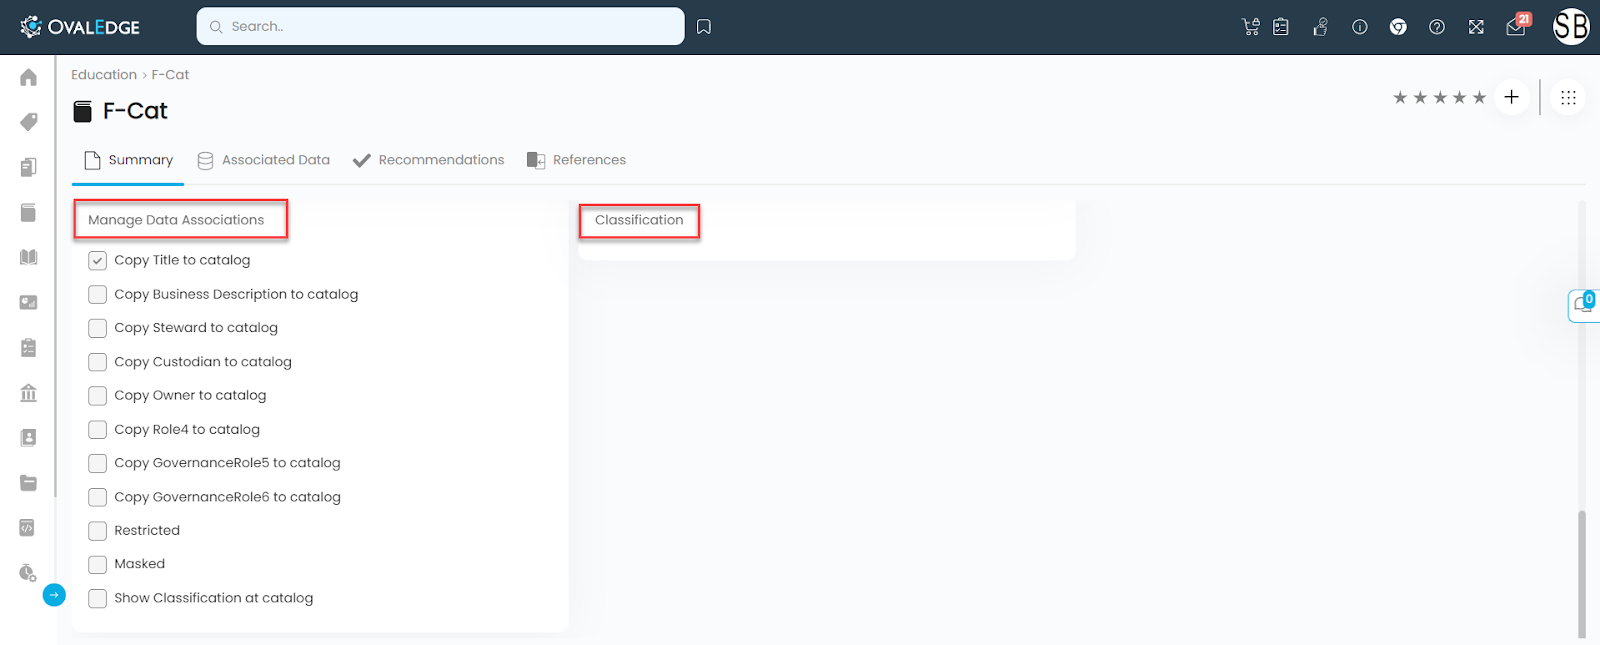
Copy Title to Catalog
When the Copy Title to Catalog option is selected, the Title of the data object gets overridden with the Term Title. To validate, go to Data Catalog > data object(table/column) to see the Term Title added as the Title to the data object. It helps business users find and locate the data objects easily for everyday business decisions.
Note: A Term can be edited and managed when in Draft Status. Terms cannot be edited in the Published state.
Copy Business Description to Data catalog
When the Copy Business Description to Catalog is selected, the Business Description of the data object gets overridden with the Business Description of the applied Term. It helps business users find and locate the data objects easily for everyday business decisions. To validate, go to the Data Catalog > Data object(Table/Column) to see the updated Business Description.
Note: A Term can be edited and managed when in Draft Status. Terms cannot be edited when in Published status.
- Copy Steward to catalog
- Copy Custodian to catalog
- Copy Owner to catalog
- Copy GovernanceRole4 to catalog
- Copy GovernanceRole5 to catalog
- Copy GovernanceRole6 to catalog
When a new term is created for a Domain, the Governance Roles (Steward, Owner, Custodian, GovRole 4,5,6) defined for the Domain are applied to the Term. when the same Term is applied to the data objects and the selecting the respective Copy Steward/Custodian/Owner/GovRole4,5,6 to catalog options, inherits or overrides the Gov Roles of the data object by those of the associated Terms.
Example:
If a data object has a set of Governance Roles defined (while crawling)
- Steward - Kim
- Owner - Tom
- Custodian - Harry
The Governance Roles configured to the Term are defined as
- Steward - Kale
- Owner - James
- Custodian - Dien
If the Copy Steward to catalog / Copy Custodian to catalog, and Copy Owner to catalog checkboxes are selected, the data object Gov roles get overridden with Steward - Kale, Owner - James, Custodian - Dien as Gov Roles.
Note: The Data Governance Roles can be applied to a Term in Draft status. You cannot update the governance roles if the Term is in Published status.
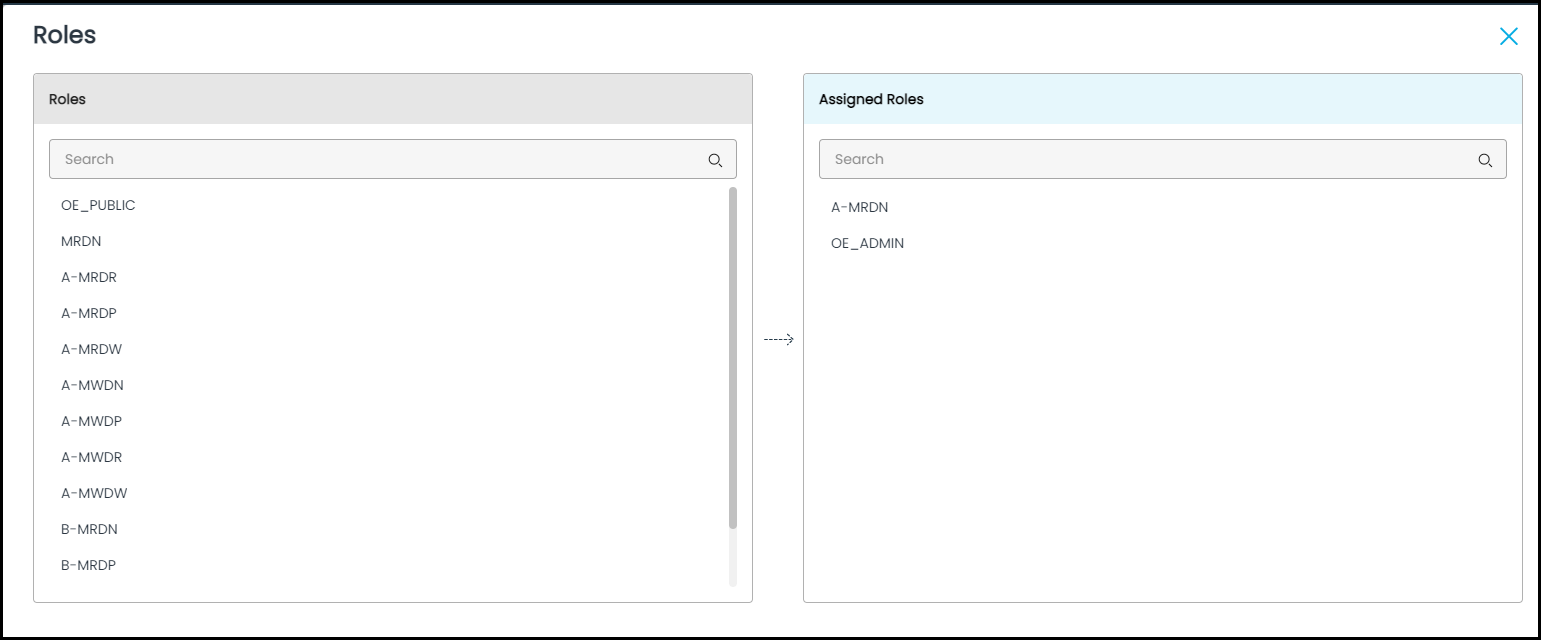
Restricted - Restrict access to data objects using Terms
The Restriction is a selective access control applied to columns having sensitive and confidential data (PII data). When the Restricted checkbox is selected from the Manage Associations Data, the entire column of the data object becomes invisible or inaccessible to the users.
However, access to the data object without applying restrictions can be configured.
- Hover on to the Restricted field to see an Edit Icon.
- Click on the edit icon, and a Roles pop-up window is displayed.
- You can select the user roles you wish to give access to the data object or column by clicking the +icon against the list of user roles in the left panel.
- The assigned users who can view the data objects without any restrictions are displayed in the right panel.
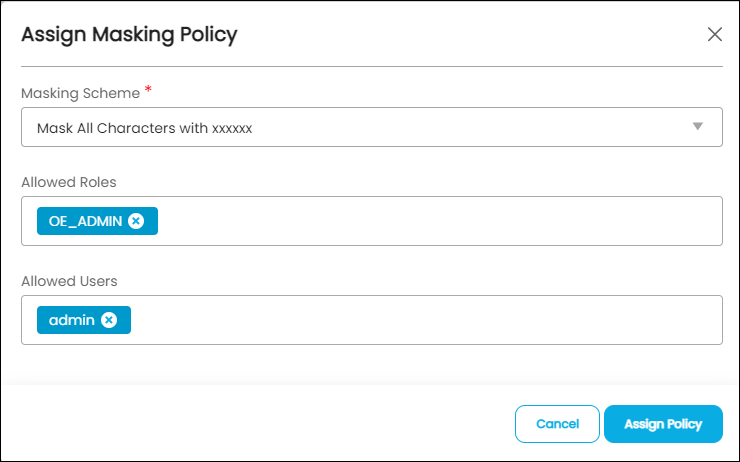
Masked - Apply Masking on data objects
PII information that is either sensitive or confidential should be encrypted for the purpose of data privacy and security. Masking enables column-level security using masking policies to selectively mask data with characters and numbers, null values, or xxxxx patterns to hide the original content. When the Masking checkbox is selected from the Manage Associations Data, the data objects to which the term is applied mask specific areas (Confidential details) of the column data.
Listed below are the different Masking policies OvalEdge supports:
- Mask alphanumeric characters with xxxx (abc@123 → xxx@xxx)
- Mask all characters with xxxxxx ((abc@123 → xxxxxx)
- Show last 4 characters ((abc@123 → xxx@123)
- Show first 4 characters (abc@123 → abc@xxx)
- Show blank (abc@123 → ‘ ‘)
To apply Masking to a column:
- Hover over the Masking field to see an edit icon.
- Click on the edit icon, and an ‘Assign Masking Policy’ pop-up window is displayed.
- The Allowed Roles & Allowed Users are the exclusive user roles and individual users that can view the data of the data object columns without any masking applied.
- Click on the Assign Policy, and the masking gets applied to the term-data object associations.
Masking Scenarios
Masking can be applied to columns in two ways:
- Using Terms > Masking Policies
- Administration > Security > Table Columns > Masking Policies
When Column-level Security Masking policies and Term level Masking policies conflict, the Term Masking Policy is Prioritized. Also, once Term level masking is applied, the security level masking enabled on the data objects gets disabled.
For Example: If a Table column has column level security enabled with Show blank masking policy applied to it and if a Term with Mask all characters with xxxxxx masking policy is associated with the same Table column. The Table column gets updated with the Term - Mask all characters with xxxxxx masking policy.
Below listed are the different Masking Policy scenarios that change with Term status (Initial Draft, Published, Draft).
|
Masking |
Masking Policy status |
|
Masking at column level - No Term applied to object |
|
|
Mask Policy applied at column-level |
Masking Policy at the column level security is enabled. |
|
Remove Masking Policy at column-level |
Data will not be masked. |
|
Masking applied at Term level - No Column Security applied |
|
|
Term in Draft/Published status without masking |
Data will not be masked |
|
Remove Masked /Unmasked Term |
Data will not be masked |
|
Term in the Published state with masking |
Masking policy is applied. |
|
Term moved to Draft status |
Masking Policy at the Term level will be intact even if the Term is moved to the Draft state. |
|
Masking applied at both the Column level and Term Level |
|
|
Column-level Masking is enabled, and the Term in the Draft /Published state without masking |
Masking Policy at the column level is enabled. |
|
Column level Masking enabled and Term in initial draft status i.e. (a newly created awaiting to be published) |
Applies column-level Masking policy. |
|
Column-level Masking Is enabled, and the Term is in Published status |
Masking Policy at the Term level is applied to the data object. |
|
Column-level Masking is enabled, and the Term moved to Draft status |
Masking Policy at the Term level will be intact even if the Term is moved to the Draft state. |
|
Column level Masking enabled and Term deleted, or Masking Policy removed from the Term. |
Data will not be masked, and the column security masking is also removed. |
|
If the existing Term is replaced with another Term in Draft status. |
It removes all the masking policies applied to the data object, even if any column security exits. |
Show classification at the dictionary
It displays the classifications associated with the Term at the Table column level. If the Term is configured with multiple classifications, then Show Classification at the dictionary checkbox (Manage Data Associations) must be selected to view the Classifications applied to the data objects.
Associated Data
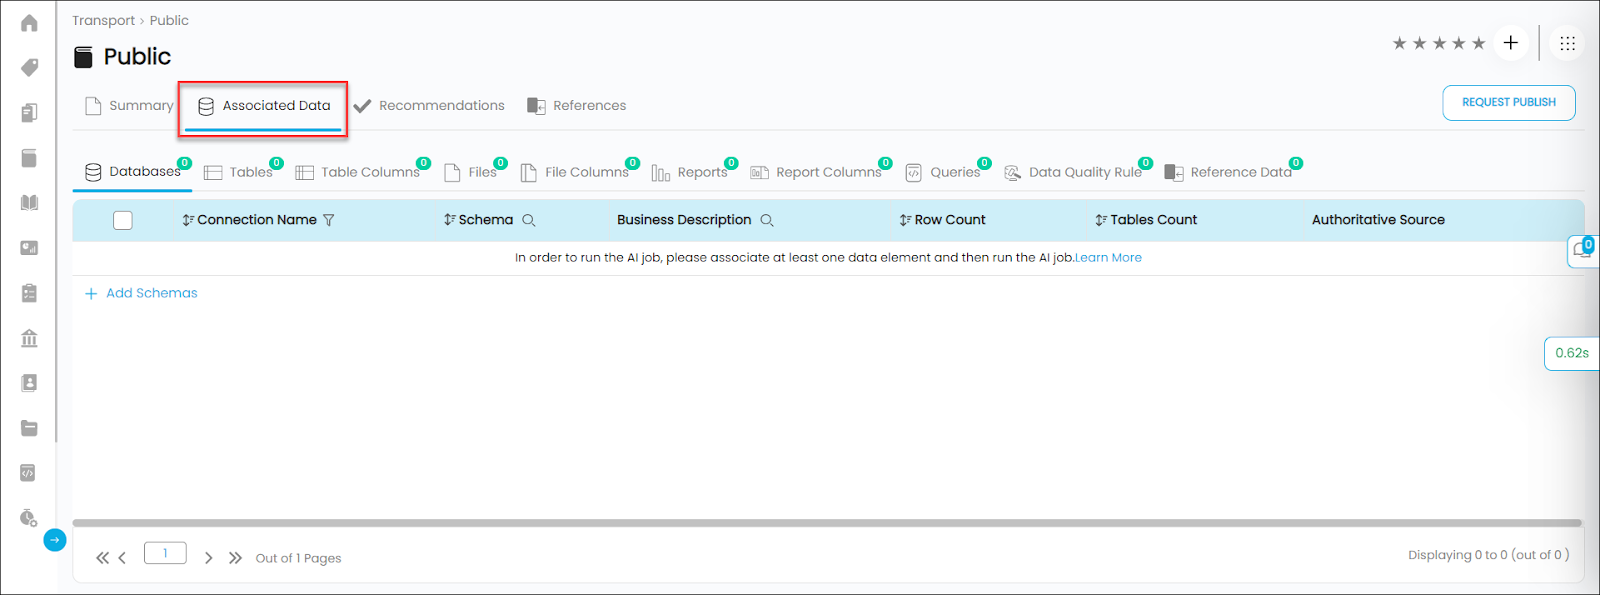
It displays the data objects having the same current Term applied in respective Object type columns.
- The count on each Object type tab displays the total number of data objects associated with the current Term - Databases / Tables / Table Columns / File / File Columns / Report / Report Columns / Queries / Data Quality Rule / Reference Data. The grid displays the data object details based on the object type selected.
- Additionally, it helps you to manually add a data object in the respective object type tab using the + Add Table or + Add File button placed at the bottom left. Click on the +Add data object button, and additional fields are displayed to select the Connection Name/ Table Name based on selection.
- Click the Save button to save the added data object to the respective object type grid.
Authoritative Source
Authoritative Source represents whether the object accurately matches the Business Glossary definition. If you think the data object added is a close match with the Term, click on the Star icon to set the data object as Authoritative Source.
AI Algorithms for Recommendations
There is detailed information in this document about why AI algorithms are used, how they work, how the parameters used to calculate the Smart Score are configured, and how to make use of the recommendations generated by them and schedule AI Recommendations to run at a specific time, either recurring or once-off.
AI Algorithms Overview
Terms are unique and standard definitions that define an organization's key processes, concepts, and data assets. Terms help to classify data objects and simplify data discovery. A single Term can be applied to multiple data objects. A data object, on the other hand, can only have one Primary Term and multiple auxiliary Terms applied to it.
Adding or associating terms to data objects manually can be a time-consuming and tedious task, especially when dealing with large amounts of data. This is where AI Algorithms can be useful in automating the process. The AI algorithm in OvalEdge can analyze data objects and recommend terms based on the Smart Score.
When a connection is crawled and new data objects are cataloged in the application, the AI Algorithms can be run and automatically recommend terms for data objects, which can save significant time and effort compared to the manual association.
However, the AI Algorithms only recommend Terms that are relevant to the data objects, it is up to the users to review and accept or reject the recommended terms. This allows users to ensure appropriate terms are associated with the data objects.
Recommendations are run based on a specific Term, and this Term is used to recommend data objects.
How AI Algorithms work
The AI recommendation algorithms work in the backend based on Smart Score, which works on the Name, Data, and Pattern of an object to determine the relevance of an object-term relevance. The relevant objects are recommended for the term.
Smart Score
Smart Score displays scores based on three parameters Name, Data, and Patterns.
- Name Score: It is calculated by matching the Name of the column with aggregated Names in the AI Model which generates a fuzzy score. A name in the model can be repeated more than once(Email:2), in such cases we add some weight to that score. Finally, max score among all is considered for the Fuzzy Score.
- Data Score - It is calculated by matching Top values with aggregated top values in the AI Model. The Top Values are of the object that are identified after profiling.
- Pattern Score - Pattern score is displayed based on the data patterns of the column with the ones existing in the AI Model.
Configuring Smart Score
The Smart score is a measure of term-object relevance or importance, calculated from the individual scores and the weightages of the three parameters: Name: Data: Pattern. This ratio is given by Administration > Configurations > Key > ai.recommendation.weightage parameter and the default value is 50:20:30 (Name: Data: Pattern).
Users can define the threshold value of the Smart score, and Term recommendations will be suggested for data objects with a score greater than or equal to the threshold defined. The threshold value can be configured from Administration > Configurations > Key > ai.match.score. The default value is set to 10.
Users can also define the maximum number of table columns on which AI Recommendations can be run using the Administration > Configurations > Key > aiterm.maxcolumns. The default value is set to 50,000. Users can enter any value to define the number of Table columns on which AI recommendations are to be run.
However, once any term recommendation is rejected for a data object, the rejected term will not be recommended again for that data object. The algorithm will give positive scores to associated objects and deduct scores on rejected objects.
How to run AI Recommendations
Step 1: Go to Business Glossary > select a Term > Term detailed page > Recommendations tab.

Step 2: Go to Unassociated Tab and select from the Object Type (Table/File) on which Recommendations are to be run.
Note: To get accurate Recommendations on unclassified data objects, the Associated Data must have at least one data object applied to a term. The system does not allow running the AI Recommendations if the Term is in Draft status.
If Unassociated data has more than 1M data object in that case, the user needs to select a filter and then run the job. If this is the case, show the message like this → More than 1M records exist, please select some.
Step 3: Click on the Run AI Job button on the top right and Run AI Job pop-up window is displayed on the screen to refine the recommendations.

- Exclude: This field helps to exclude columns from Recommendations based on the keyword entered. Enter the keywords or column names separated by commas.
Example: If you don't wish to see objects containing keywords such as “Prospect”, “Borrower”, “Age”, or “Dependants” which are irrelevant to the Term - enter the keywords in the “Exclude Table Columns Names Containing or Matching” section. Once the Run AI Recommendations job is executed and all the column names containing “Prospect”, “Borrower”, “Age”, or “Dependants”, will be excluded from the recommendations.
- Except: The column names entered in the field will be exempted from the above Exclude patterns. Recommendations will be processed for these exempted objects. Enter the keywords or column names separated by commas.
Example: As in the above example the user is excluding columns with keywords “Prospect”, and “Borrower” but the user requires a specific column with the name “Prospect_Age” in that case the user needs to add that column name in the except field.
Note: The Regex function is case-sensitive.
Step 4: A prompt message ‘Job submitted with a job ID’ is displayed. Refresh the screen and go to the Recommended tab. When a term recommendation job is submitted, the system displays the relevant data objects that match the Term.
Step 5: To apply Term to the data objects - select the data objects and click on the Nine Dots icon to select the Apply option and apply the Term to the selected data objects. Click the Reject option - to not apply the Term for the selected data objects. Users can individually Apply/Reject term recommendations for a data object by clicking on the appropriate icon.
Step 5: To validate - navigate to the associated data dictionary tab to verify the added data object.
Scheduling AI Recommendations
Term recommendations can also be scheduled to run at a specified time in the future or on a recurring basis.
- Go to Administration > Job Workflow.
- Click the + icon on the Job Workflow Information page to create a new job workflow template.
- Enter a Job Workflow name.
- Click the Job types and choose the Advanced Jobs, search for the Term Recommendations job> select to add to the workflow panel on the right.

- Users can also drag and drop the Jobs to the workflow space.
- Click on Save to the icon to save the Job Workflow.
- Click on the Schedule icon, it will display the calendar to define the schedule. Example: Every hour at 15 minutes past the hour, or 1st day of Every month at 1:30.
Note: By default, the calendar will add the system time. If multiple time zones are set up in the system, it will pick up the time as per the primary clock.

- Click on the schedule button to see the successful message on the screen.
- All the scheduled jobs will be displayed on the Administration > Schedule page, and the Job Workflow will be triggered at the scheduled time.
Note: A notification will be sent to the user who scheduled the job, once the Job is triggered. You can also view the history of the job workflow on the Jobs Page.
References
It displays a list of all references made to the term from various data assets in the application. The benefit of having solid reference data is that you can confidently drill into subsets of your data to gain business insights.
References are made using the @ notation where the text field editor exists in the application. Business Description text field, Technical Description text field, Endorsement Rating text field, Projects - Notes, Term - Business Description field, Collaboration Message field, and Data Stories are some of the Text fields from which the references can be made.
Action Items on Selected Term
Publish
The Publish option is enabled only for Admin/Steward users. The Admin/Steward users can Publish a Term from a Term Detailed page (Term > Views Details button) using the Nine Dots > Publish option.
You can publish a selected Term from the Term details page using the Nine Dots > Publish option after a confirmation message.
Draft status
The Term(s) needs to be in a Draft status to edit the contents of the Term, such as editing Business Description, Tags, or Additional fields. When a Term is moved to Draft Status, the data associations or business logic (Copy title to catalog / Copy Gov Role to catalog / Masked /Restricted) applied to the data objects also gets removed from the data objects.
- In the Term details, click on the Nine dots button > Draft option.
- Select the Draft option, and a confirmation message is displayed to confirm the deletion.
- Click on the Save button to change the Term to Draft status.
Request Content Change on Terms
You can raise a request to change the Term content, such as the business description, Associated tags to manage governance roles, associations, or classifications.
- Go to Business Glossary > select a Term > Term detailed page.
- Click on the Nine dots > Request Content Change option.
- You will be navigated to the Content Change Service Request Template.
- Enter the details in the fields.
- Summary: Enter a short note on why the service request has been raised.
- Description: Enter a detailed description of the request to include the data object details and permissions required.
- Priority: Set the Priority to High / Highest / Low / Lowest /Medium.
- Select Object: Select the Data object (Table/ File/ Reports) from the drop-down list. The Data object is by default displayed if the request is raised directly from the Data Object’s page.
- Business Description: You can edit/update the description of the selected Object in the Details field.
- Associated Tags: You can add/update additional tags to the selected Term using the +icon.
- Associated Terms: You can add/update additional Terms to the selected object.
- Additional Fields: You can update additional field value fields to the selected object.
- Click on the Submit button to create a new service desk ticket (Request ID) and is sent to the approver for the Approval of the request.
Report Data Quality issues on Terms
You can raise a request to change the Term content, such as the business description, Associated tags to manage governance roles, associations, or classifications.
- Go to Business Glossary > select a Term > Term detailed page.
- Click on the Nine dots > Request Content Change option.
- You will be navigated to the Content Change Service Request Template.
- Enter the details in the fields.
- Summary: Enter a short note on why the service request has been raised.
- Description: Enter a detailed description of the request to include the data object details and permissions required.
- Priority: Set the Priority to High / Highest / Low / Lowest /Medium.
- Select Object: Select the Data object (Table/ File/ Reports) from the drop-down list. The Data object is, by default, displayed if the request is raised directly from the Data Object’s page.
- Business Description: You can edit/update the description of the selected Object.
- Technical Description: You can edit/update the description of the selected Object.
- Associated Tags: You can add/update additional tags to the selected object to organize the Terms in OvalEdge for easy navigation.
- Associated Terms: You can add/update additional Terms to the selected object.
- Additional Fields: You can update additional field value fields to the selected object.
- Click on the Submit button to create a new service desk ticket (Request ID) and is sent to the approver for the Approval of the request.
Change Category
In the Business Glossary, the Term category can be changed in the following ways:
Method 1:
- In the Business Glossary main page > select the Term(s) with the same domain.
- Click on the Nine Dots icon and select the Change Category option.
- A Change Category pop-up window displays the different categories created for the domain.
- Select a Category from the drop-down options.
- Click on the Save to move the term to the selected category.
Method 2: Business Glossary > Term Detailed page > Nine dots > Change Category, follow the same instructions mentioned above to change the category of the Term.
Change Sub-Category
In the Business Glossary, there are two ways a term Category can be changed.
Method 1:
- In the Business Glossary main page > select the Term(s) with the same domain.
- Click on the Nine Dots icon and select the Change Sub-Category option.
- A pop-up window is displayed with the different Sub-Categories created under a category for the domain.
- Select a Sub-Category from the drop-down options.
- Click Save to move the term to the selected sub-category.
Method 2: Business Glossary > Term Detailed page > Nine dots > Change Sub-Category. Follow the same instructions mentioned above to change the sub-category of the Term.
Delete Term
To delete multiple Term(s) in a bulk,
- Go to Business Glossary > Main page > Select Term(s) > click the Nine dots > Delete Terms.
- A confirmation pop-up window is displayed.
- Click the Confirm button to delete the term(s).
To delete a single Term:
- Go to Business Glossary > select a Term > Term detailed page > click nine dots > Delete Terms.
- A confirmation pop-up window appears on the screen.
- Click the Confirm button to delete the term(s).
Delete Data Object
Select Delete Data Object deletes the data object associations with the Term.
Download Term Details
Select the option to download the current Term details into an Excel sheet .xlxs format where all the Term details are displayed in respective columns. You can download all the Terms using the Download icon enabled in the List View > bottom right corner.
Configure Search Keywords
Configure Search Keywords help to map relevant search keywords to the cataloged objects. It helps the end-users to search for the data they are looking for effectively. You need to know and identify the search keywords the end users might use to search for the data objects.
- In the Configure Search Keywords pop-up window, click on the Add the keyword button.
- Enter the keyword in the text field provided.
- Click on the Save button, and the keyword gets added to the Search Keyword grid.
- You can enable/disable the search keyword using the toggle.
- You can delete the search keyword using the Delete icon.
- Search Keywords with a minimum score of 3 are considered for the Elastic search.
- If the admin user configures the keyword, then the score is recorded as 3.
- If the non-admin user adds the keyword, the score is recorded as 1.
- If the admin user votes the keyword, the score gets additional three points added to it.
- If the non-admin user votes the keyword, the score gets an additional 1 point added to it.
Update Governance Roles
The Steward, Custodian, and Owner roles can be added or updated using the Update Governance Roles option.
- Go to the Business Glossary main page.
- Select the Term(s) you wish to update the Governance Roles.
- Click on the nine dots, and an Update Governance pop-up window is displayed.
- Select Steward/Custodian/Owner users from the drop-down list.
- Click Save, and the Roles selected get associated with the Term.
Update Governance Roles using Nine Dots
- The Governance Roles can also be updated from the Term detailed page > nine dots icon.
- When both DAG and Term are applied to a data object and DAG is removed - no roles will get updated.
- When both DAG and Term are applied to a data object - Term is removed - roles will be updated based on DAG applied.
Copyright © 2019, OvalEdge LLC, Peachtree Corners GA USA