In OvalEdge, there are multiple ways that are available to build lineage by connecting to queries, files, Server logs, and BI tools. OvalEdge uses Source code Parsing algorithms to parse various kinds of source code to build the lineage and relationships automatically. In this mode, lineage is built by the system by parsing all the available elements in the data catalog. The primary objects required for data lineage are datasets. These are parsed by the system to understand and build lineage. In OvalEdge, when building the lineage from queries, few queries might fail to parse the tables and columns associated with it to build the lineage. Those failed queries are viewed, manually corrected and processed using the “Build Auto Lineage” module.
- The License type : option availability is dependent on the license being used.
- To build the lineage first we need to crawl connection, while crawling connection with the License Type as Auto Lineage. When the license type is Standard user cannot auto build the lineage.
- The setting for auto-lineage is done in Crawler settings.
- Table Views & Columns
- Procedure, Functions, Triggers & View Source Code
- Relationship
- In the Crawler option, select the following checkboxes to build the lineage
- Select the database in Crawler view, click on 9 dots and select ‘Build Lineage’.
To learn how to build lineage for different source systems, see Crawler-->Fundamentals of Lineage.
There are two ways to build the lineage,
- Administration > Crawler > Select the connector with License type as “Auto Lineage” > click on 9 dots -> Build lineage
- Advanced Tools > Build Auto lineage> Select the connector to lineage
Navigating to Build Auto Lineage page
To build the lineage,
- Select Advanced tools.
- Select the Build Auto Lineage feature.

- Select the connection name from the drop-down.
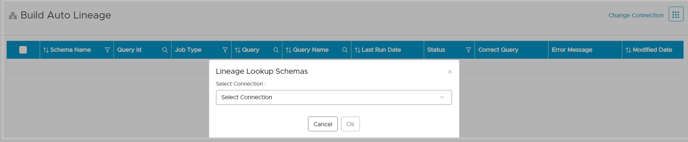
The connection name is the associated name of the database connection (from crawler page) for which queries are written and imported from either a file or server logs.
Server Name will be displayed and click on OK. It displays the count of queries loaded, queries processed, last job status, last run date.

Note: User can click on Change Connection to select another connection.
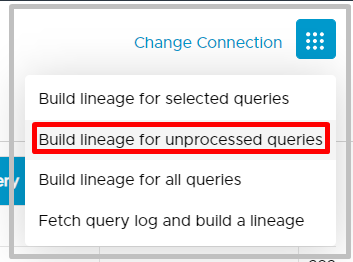
Build Lineage for Unprocessed Queries
This feature helps a user to build the lineage for the queries which are not yet processed. This will not consider the queries which have been processed for the lineage. Processed query will be excluded here.
- Navigate to Advanced Tools > Build Auto Lineage.
- Select a connection and then click on the 9 dots.
- Click on the Build Lineage for Unprocessed Queries. A pop-up message is displayed ‘Do you want to Build lineage for unprocessed queries?’
- Click on the Submit button to proceed.
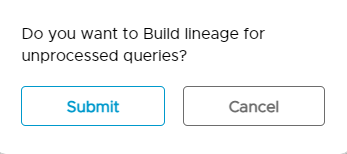
- For this, It displays a pop-up message as the job is submitted successfully.
Note: A user may navigate to Job module to see status of the jobs submitted
Build Lineage for All Queries
This feature allows users to process all the available queries including the queries for those lineage is already built. It will rebuild the lineage again.
- Click on the 9 dots, from the dropdown menu select the option to process build lineage for all queries. With this option all the source codes related to the selected connector shall be picked up and shall build the lineage.
- A job will be initialized when it selects and reprocess all source codes options and will process and build lineage for all the source codes.
Fetch Query Log and Build Lineage
Fetch Query Log feature allows users to fetch the query which is executed or processed in the backend and then build the lineage along with the queries available in. For this first set the crawler page for ‘Look back period’. Look back period feature allows, query box to save the queries for those specified number of days and allows users to fetch queries which have been processed in the backend for that number of days ago. For example lookback period can be set 1 day , 2 days or more. Maximum Look back period is 7 days.
To setup a look back period in the Crawler Page > Query Log Setting,
- First Setup the Crawler page.
- Navigate to Administration -> Crawler.
- Select a connection from the Crawler page.
- Click on the 9-dots.
- Click on the Settings.
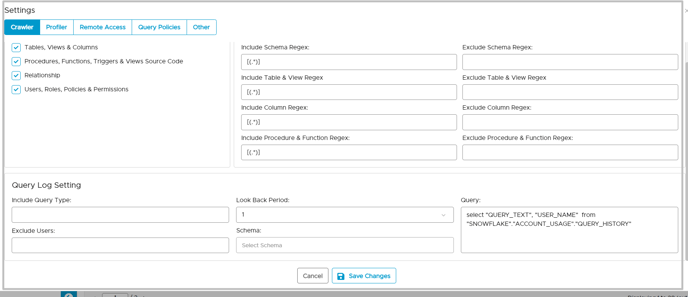
- Enter the look back period and click on the Save Changes to save the settings.
To build lineage by fetching query log,
- Navigate to Advanced Tools -> Build Auto Lineage.
- Select a connection and then click on the 9 dots.
- Click on the Fetch Query Log and Build Lineage. It displays a pop-up message as the job is submitted successfully. A user may navigate to the Job module to see the status of the jobs submitted.
Note: Now depending upon the setting of the look back period. It will fetch the query which is executed in the backend and then build the lineage, without doing any recrawling. Crawling will process all the query fetching from backend and make it available to the front end and then build the lineage accordingly.
Export and Import functionality using ovaledgeLab
The new feature export of lineages in the form of ZIP or JSON to the OvalEdge Labs is implemented to investigate the failed lineage at the clients’ environment. Here instead of accessing or requesting access for the client machine now we can just export the failed lineage and investigate in the OvalEdge Lab and once after investigation, the corrected lineage and manually build lineage are imported to the client’s environment. Along with export functionality, the existing matching algorithm for the tables has been improvised to build the lineage.
Export Source Code to File
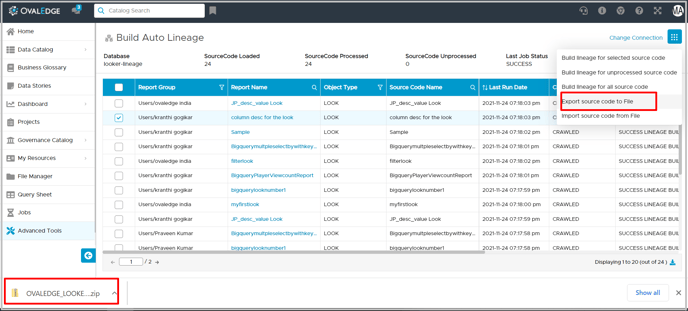
Using the export option provided in Build Lineage Screen | 9 dots, users can export the failed source codes in zip format and add them to the ticket and will be shared with OvalEdge Lab through HubSpot.
To Export source code to file,
- Select Advanced tools.
- Select the Build Auto Lineage feature.
- Select the connection name from the drop-down.
- Select the query and click on the 9-dots, Export source code to file
Note:
To make the instance ovaledgelab in the configurations key is.ovaledge.lab in true.
To make it client environment keep is.ovaledge.lab in false. - Select the “Process SQL Statement” and click on edit icon to enter the File Path
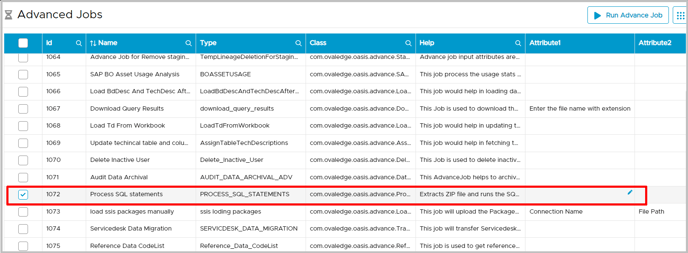
File Path : need to give the zip file path including the zip file name.
Password : provide username of the application.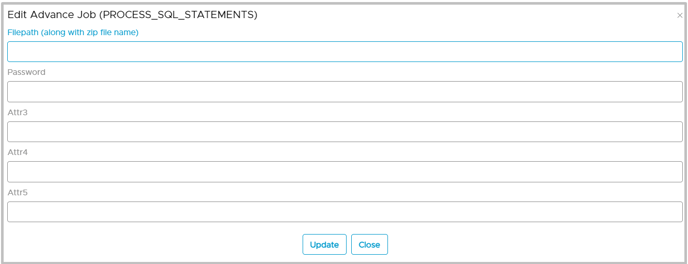
- Click on the Run Advanced Job button.
- A popup window appears, click on the Submit button.
- A pop-up window with a success message is displayed with Job Id.
Configuration Settings: Users need to set up the key (is.ovaledge.lab = true ) in the configuration module, before exporting the source code to the OvalEdge.
Import Source Code from File
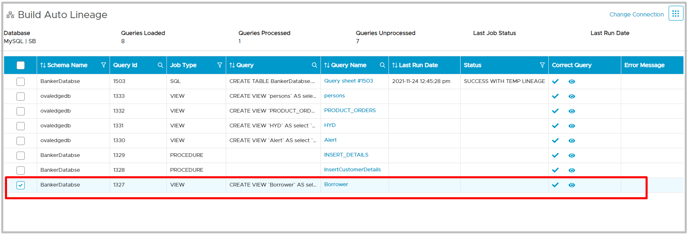
Using the ‘Import Source Code’ users can import a JSON file to fix the lineage query issue or to build lineage manually. A JSON file can be directly imported in the client environment. Once the JSON is imported, lineage source code status is displayed as shown below.
 Users can check if the lineage is correctly built or not. The query corrected in the OvalEdge lab is seen in the correct query screen.
Executing the Failed Queries
To build the lineage on failed queries,
-
Select Advanced tools.
-
Select the Build Auto Lineage feature.
-
Select the connection name from the drop-down.
The connection name is the associated name of the database connection (from crawler page) for which queries are written and imported from either a file or server logs.
-
Server Name will be displayed and click on OK.

-
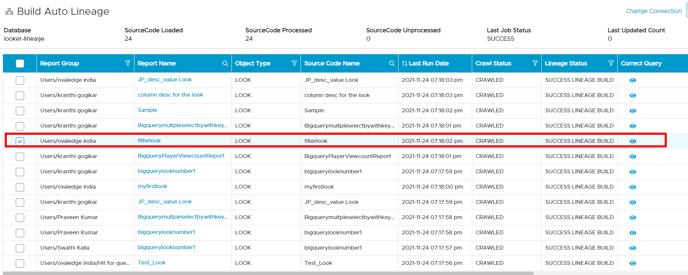
You will be able to view a list of failed queries.
-
Once the query is selected, click on the view
icon to view the query in the query window.
-
Choose a query and click
icon to view the query, manually correct it, and process the query.
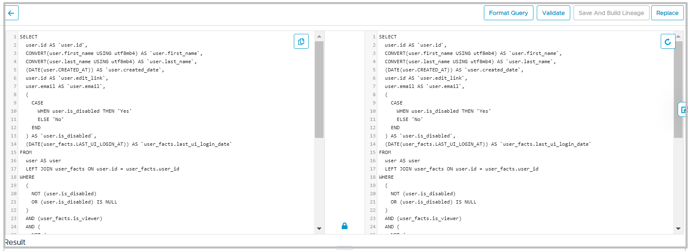
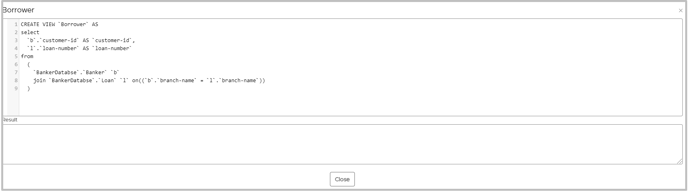
The query window is divided into two sections. The failed query is displayed on the left side of the window and an empty window on the right for the user to correct the query.
-
Copy the query by clicking on
icon.
-
The failed query gets copied to the right window.
-
Click on the Format Query button, if any query is written in an unstructured format.
-
Click on the Replace button to replace any syntax or text in the query.
-
It is used to replace a text or command or string with the code of a query. This replacement of any string will impact on a global level in the application. While building the lineage, it will check if any replace string is available, if it is available then it builds the lineage according to the new string (new syntax, text command or etc)
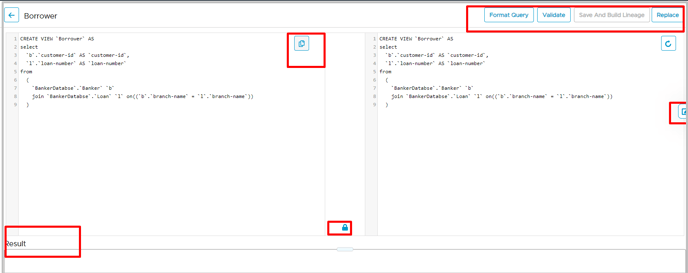
Note: Correct query window has Locking
feature to lock the scrolling of the page in the window. When the Lock is open, both the windows are able to scroll the content. When the lock is closed one window at a time can be scrolled.
-
To validate the query click Validate.
-
The resulting window at the bottom of the screen shows the error message.
-
Edit the query manually and re-select Validate.
-
Users can see the result as “Manually Corrected” (if the query is successfully parsed).
-
Then click “Save Auto Build Lineage” to build the lineage.
-
User will able to see the success message as “Query updated successfully”

Note: This will get reflected in the lineage tab for the selected data objects.
Lineage Shutter
Lineage Shutter is a new feature of adding a manual lineage to a query through the query correction. There could be a case when the user is aware of what could be the associations, relationships and data movements by examining the query, but unable to validate it through the query correction screen. In such cases, the user is provided with an option to build his own lineage on the queries. If the user is not aware of the building the lineage, user can simply export the query to Ovaledge Labs, where the CSM team will examine the query and build lineage on it and get back to them. Most of the time, users are not comfortable in sharing the machine to just validate and build lineage, so this feature might help them to save time and maintain their confidentiality.
To build lineage by using Lineage Shutter
- First of all, the user must crawl the source system to get queries or source codes, in order to build lineage.
- Next can select the connection on crawler
- Select Advanced tools.
- Select the Build Auto Lineage .
- Select the connection name from the drop-down.
- The connection name is the associated name of the database connection (from crawler page) for which queries are written and imported from either a file or server logs.
- Server Name will be displayed and click on OK.
- Click on the 9-dots option
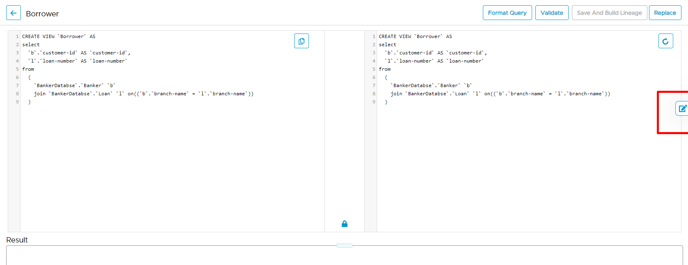
- Click on the Correct query button of the query for which the lineage is supposed to be built.
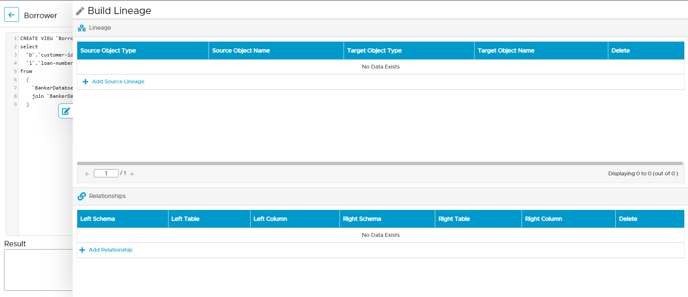
- Click on the Edit icon a shutter will pop up as below which enables the user to write his own lineage.

Note :
If you are an user at client and you want to build the lineage at your machine, you can click on build so that your inputs will be converted as Manual Lineage. If you are a user at Ovaledge Labs, you can just close the shutter after filling associations, relationships and lineage fields, no need to click on build. You can just validate the query and export the JSON to the Client.
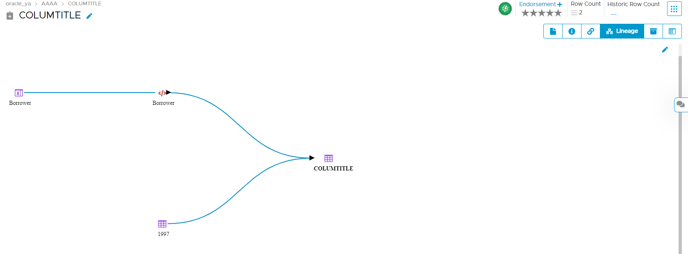
Validating the lineage Build for corrected Queries
Once the code in the failed queries has been adjusted using Adjust Code to Build Lineage feature, users can validate the lineage built by following the below steps:
- Select the Data Catalog module.
- Select the database Schema/table/table column or data object.
- Click on the table column and select the Lineage tab.
- Users can see the data transformation between the source and the destination data objects.