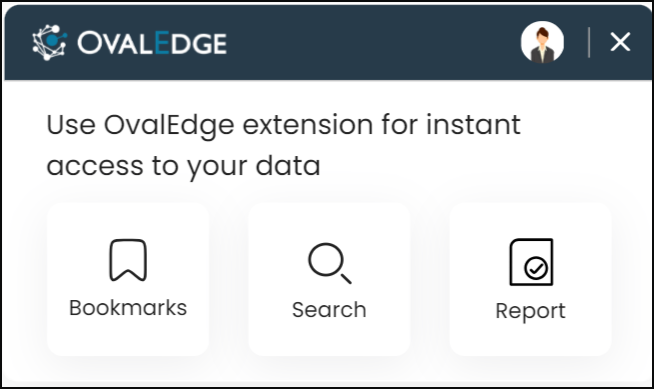
Why Browser Extension?
The Browser extension is a plugin that facilitates the integration between OvalEdge and other web-based applications intended to provide. This plugin enables users to access OvalEdge’s information within the environments by providing a range of functionalities allowing users to explore data catalog objects, and glossary terms, navigate through saved bookmarks, and report issues on data objects. The plugin also facilitates the validation of certification for specific tables or reports directly within the storage location of the report or table.
Setting up Browser Extension
Installing the Browser Extension
There are three ways the Browser extension can be installed on the Browser.
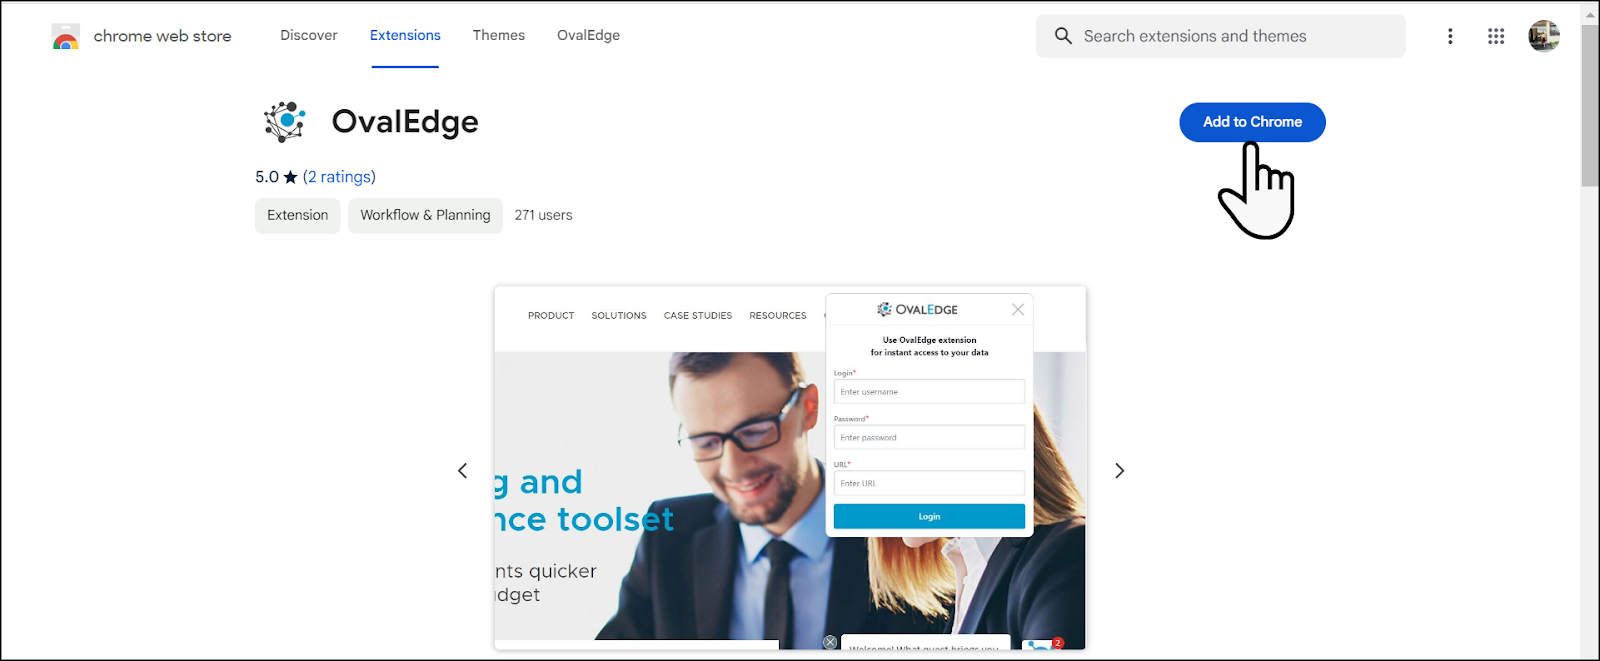
- The Browser Extension plugin can be directly added from the Chrome Store. Users can open the Chrome store website and search OvalEdge, which will display the OvalEdge plugin.

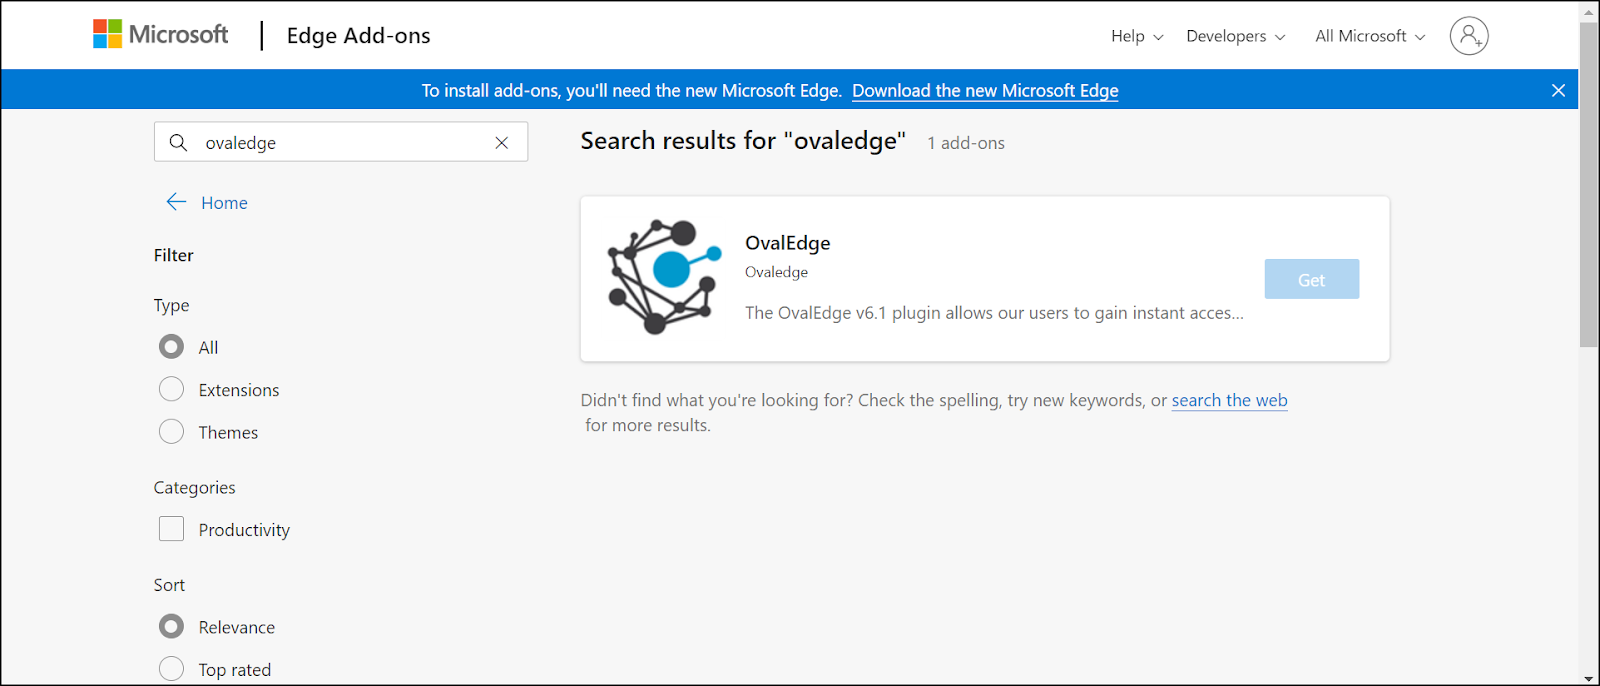
Note: The plugin can also be downloaded from the Microsoft Edge Store
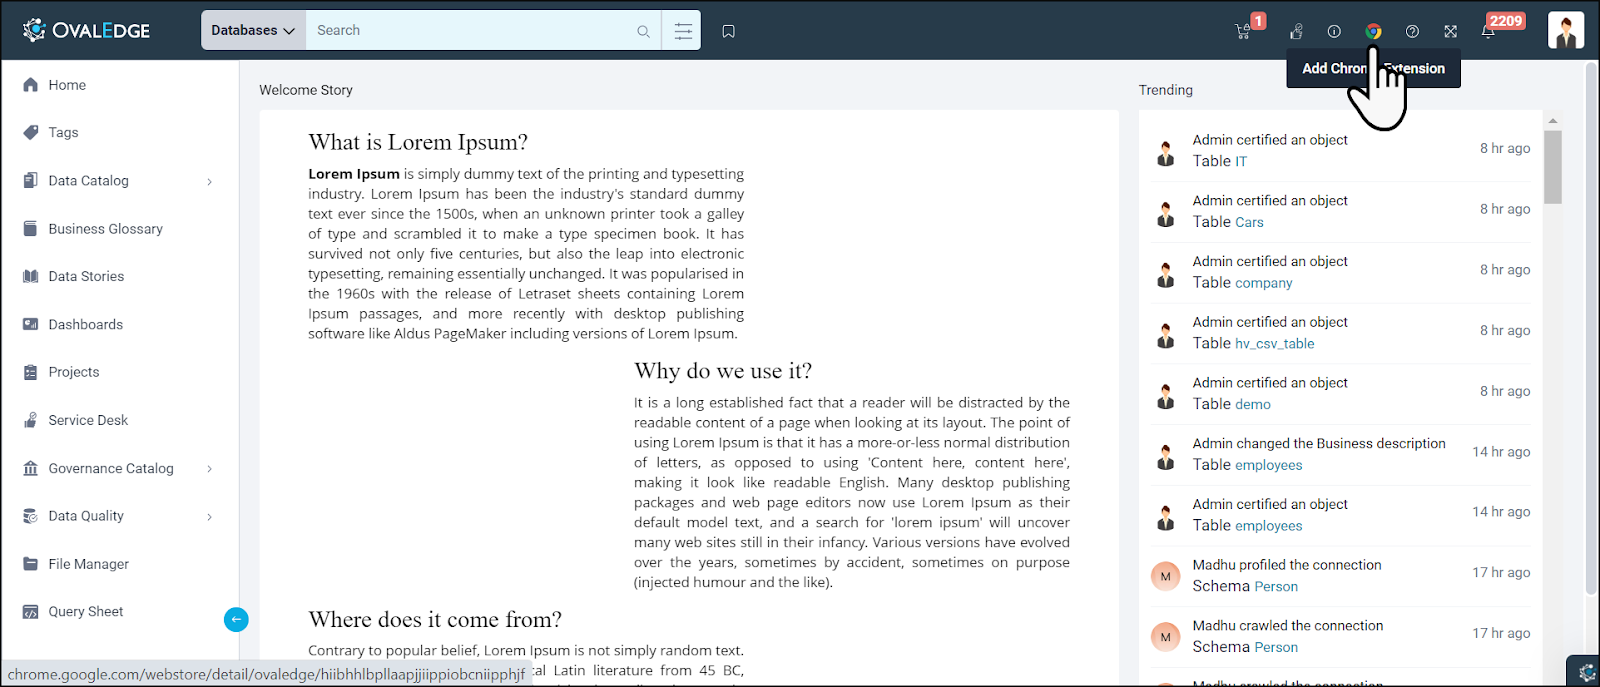
- It can be added by accessing the OvalEdge application on the header menu. “Add to Browser Extension” button is enabled by clicking upon which the users will be redirected to the Play Store OvalEdge plugin page.
- On the Edge Store OvalEdge plugin page, click on the "Add to Browser" button. A popup will appear, prompting users to add the plugin. Once added, users can pin the plugin to their browser for convenient access.
Browser Extension Login
Application URL & User Credentials
Once the OvalEdge server domain URL is provided it establishes a connection between the OvalEdge platform and the extension. Users need to click on the "Connect" button.

Users have the flexibility to log in through various methods, including user/password, API authentication, Azure AD, and OneLogin Single Sign-On (SSO).
- Direct Login: Provide the OvalEdge URL, User ID, and Password directly in the plugin login screen.
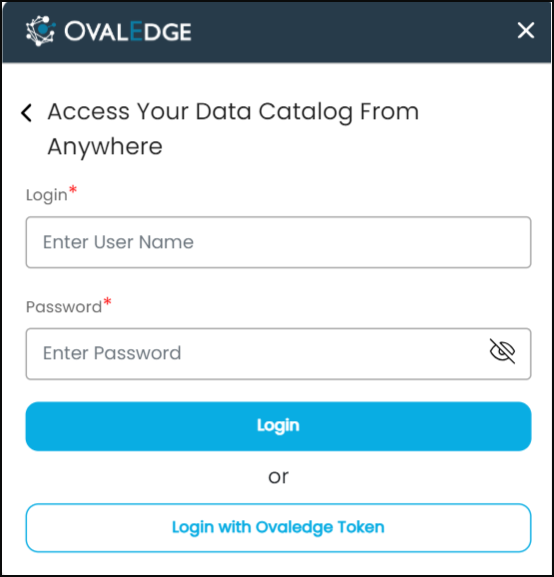
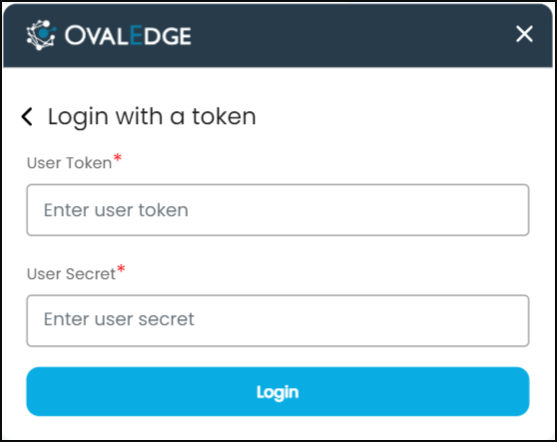
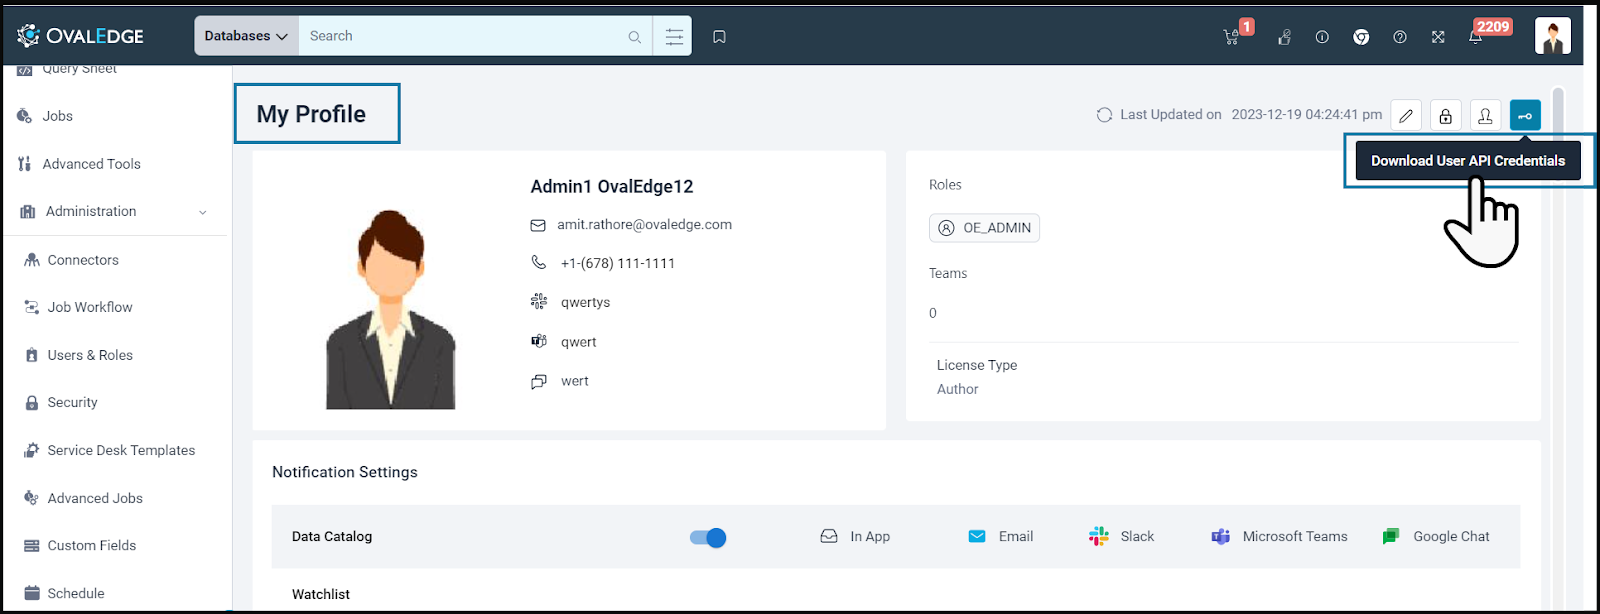
- API Authentication Token: Users can access the plugin by providing the API Authentication token accessible from the OvalEdge My profile details.
- OneLogin SSO: If using OneLogin Single Sign-On (SSO), follow the specific instructions provided in the reference document: OvalEdge_Chrome_Plugin_using_OneLogin
- AzureAD SSO: For AzureAD Single Sign-On (SSO), refer to the dedicated instructions in the document. OvalEdge_Chrome_Plugin_using_Azure AD
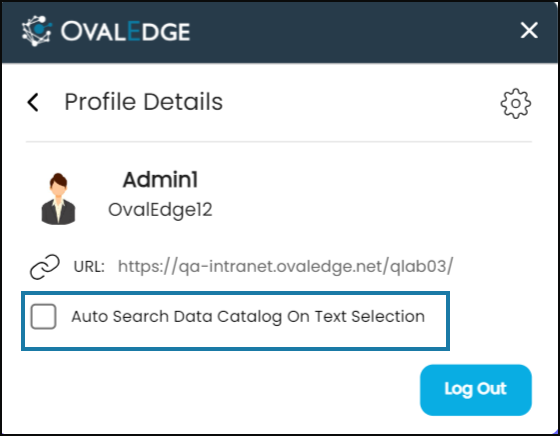
Profile Details
After a user logs into the Browser Extension of OvalEdge, users who login can view their profile details by clicking on the profile picture within the plugin. In the profile details section, users can view essential information such as the User Name, User ID, and OvalEdge Login URL.
Users can activate the “Auto-Search Data Catalog on Text Selection” option by selecting the corresponding checkbox. Once enabled, users can highlight any text within their browser. This action initiates an automatic search for the highlighted data objects or terms, providing quick access to relevant information with just a simple text selection.
Browser Extension Features
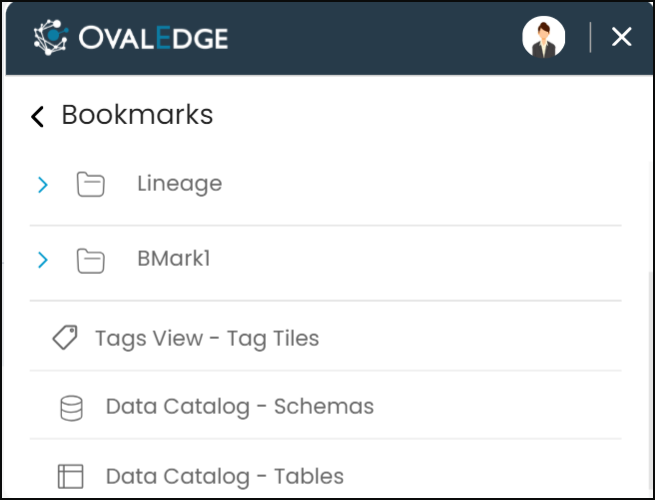
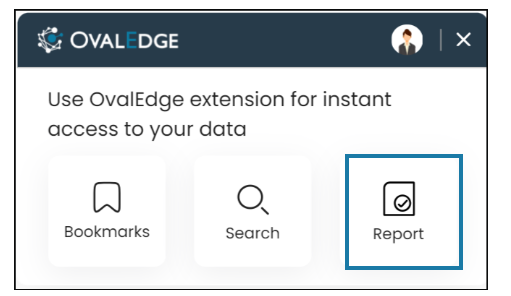
Viewing Bookmarks
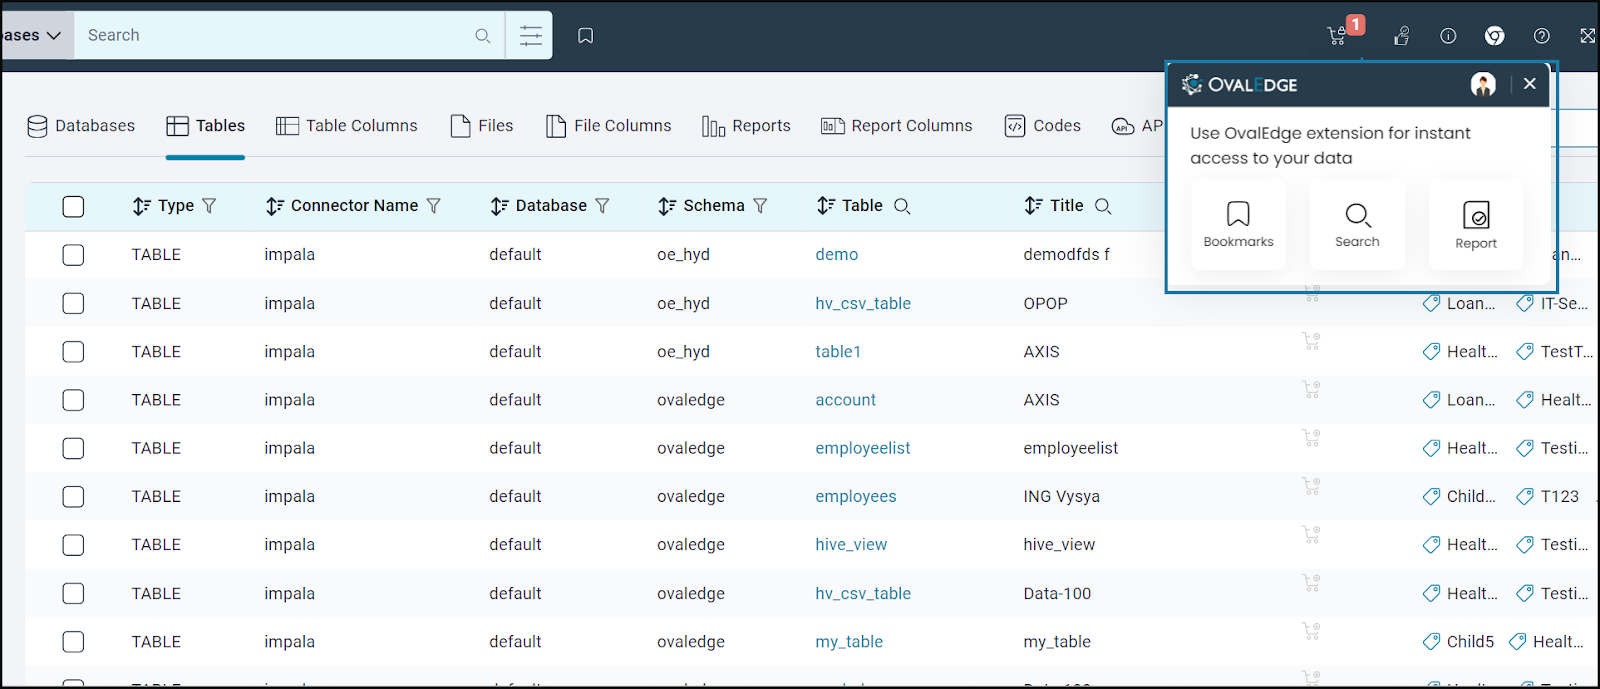
The OvalEdge application offers users a convenient way to bookmark any page by simply clicking on the bookmark icon in the top bar. This action adds the page to their Bookmarks, creating an organized system for quick reference to frequently visited or crucial pages within the application.
The OvalEdge Browser Extension seamlessly integrates with the user's account, providing quick and direct access to the bookmarked content saved within the OvalEdge application by the currently logged-in user. Users can explore these bookmark folders to find specific pages or content they've saved and with a simple click, they can directly access the corresponding application page.
Searching Terms & Data Objects
Explore & Suggest New Terms Using Plugin
The Browser Extension allows users to find Business Glossary Terms to which the currently logged-in user has access. Only terms within the user's accessible domains are displayed; not all terms are displayed. Access to the domain is mandatory for users to search and view terms.
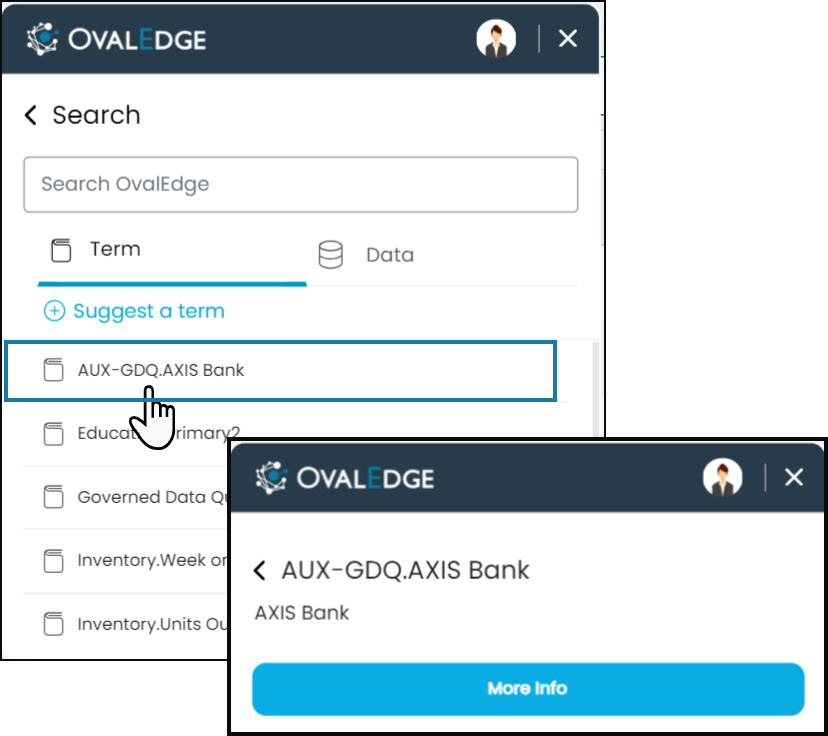
When users click the Search button in the Browser Extension, they are redirected to the search bar within the Terms tab. Here, they can exclusively search and find Published Glossary terms.
When a user selects any Term, a pop-up will appear displaying the Term’s name and its corresponding business description. Below these details, a 'More Info' button is presented, allowing users to access the Term Summary Page.
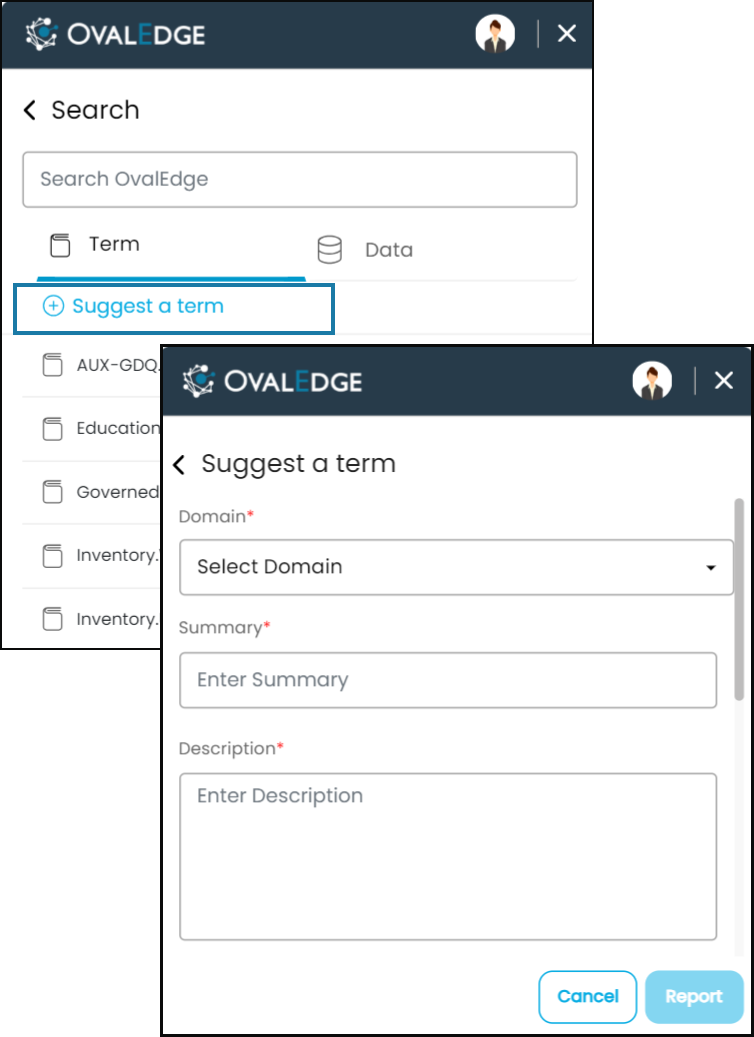
Suggest a Term
Users are given the flexibility to suggest a term by utilizing the 'Suggest a Term' option located within the Term section. Clicking on the ‘Suggest a Term’ button opens a pop-up where users are required to fill out information that includes:
- Summary (Mandatory): Concise overview of the suggested term for efficient identification.
- Description: Detailed explanation of the proposed term, including its context and usage.
- Priority (Mandatory): Importance level assigned to the term, guiding the order of consideration and implementation.
- Select Domain (Mandatory): Categorization of the term within specific Business Domains for effective organization.
- Category: A more precise grouping of the term inside a Domain to facilitate better understanding and searching.
- Sub Category: Further refinement of the term's grouping inside a Category.
- Term Name (Mandatory): Specific name or identifier proposed for the data term.
- Term Status (Mandatory): Suggested state for the term, indicating whether it is in Draft or Published state.
- Business Description (Mandatory): Comprehensive explanation of the term's business significance, clarifying its role and impact on organizational processes.
After saving the suggestion, a service request is triggered and sent out to designated approvers accessible from the Service Desk > My Requests section. The decision to approve or reject a suggestion is at the discretion of the approvers.
Explore Data Objects & Report Quality Issues
In addition to the 'Terms' tab, the plug-in also features a 'Data' tab, enabling users to perform searches for various Data Catalog objects such as Tables, Table Columns, Files, File Columns, Reports, Report Columns, APIs, API Attributes, Virtual Objects and Data Stories. Users must have appropriate access to the relevant data objects to find preferred objects within the plug-in.
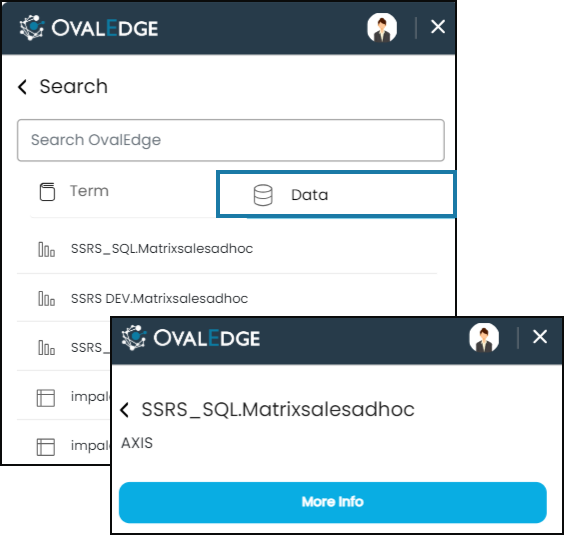
When a user selects any data object, a pop-up will appear displaying the data object name and its corresponding business description. Below these details, a 'More Info' button is presented, allowing users to access the Summary Page of that data object.
Furthermore, users can report or raise any issues related to the quality of the data object by utilizing the "Report Data Quality Issue" option provided.
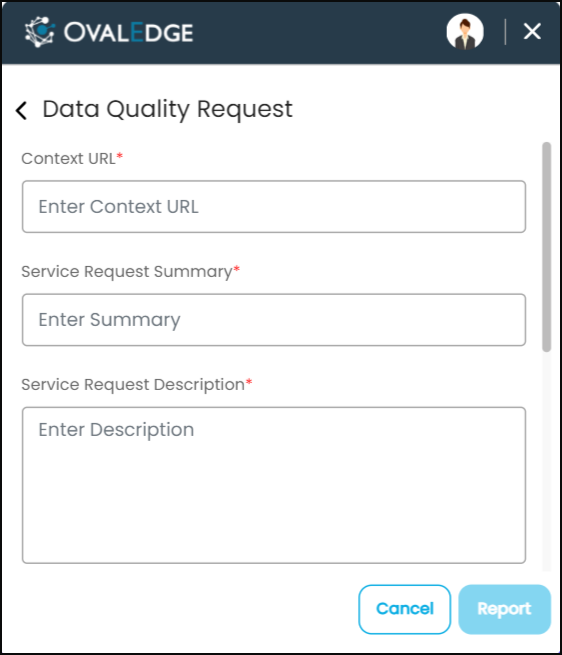
Report Data Quality Issues on a Data Object
Users have the option to report a quality issue on selected data objects by including the context URL of the application or website where they identified inconsistencies. The user needs to fill in the following details in the pop-up:
- Service Request Summary (Mandatory): A concise overview of the data quality issue being reported.
- Service Request Description (Mandatory): Detailed information outlining the specifics of the data quality problem.
- Potential Business Impact Amount: Enter the anticipated magnitude of the impact, providing a quantitative assessment of how the data quality issue may affect business processes, financial outcomes, or operational efficiency.
- Corrective Action: Specify the suggested actions or remedies to rectify the data issue. Specify any steps, changes, or interventions necessary to enhance data quality and mitigate potential impacts.
- Priority Fields (Mandatory): A selection indicating the urgency or importance of the data quality issue.
Once saved, the action triggers a service request to configured approvers, which can be accessed from the Service Desk > My Requests” section.
Report Context URLs
This feature allows raising any data quality issues on any provided web address (URL) of the application or website where the inconsistency in data is observed. For example, if a user finds a data discrepancy on a specific data object page within the OvalEdge application. Providing this URL helps in identifying and addressing the reported data quality problem within the relevant context. Users are also required to fill in the details as outlined in the template for reporting data quality issues for Data Objects.
Once saved, this action triggers a service desk request, which can be accessed in the My Requests section of the Service Desk.
View Certification Status
The Browser Extension feature streamlines the management and validation of certifications (Certify, Caution, Violation, Inactive) for tables and reports specific to connectors from the external tools.
To view and understand the certification status of the reports or tables in external instances such as Power BI or Tableau, the Context URL of the Power BI or Tableau must be provided.
In the OvalEdge, administrators can configure the Context URLs for selected connectors from the Administration > Connectors > [Selected Connector] > Settings > Others > Context URL. This helps to establish a connection between the Browser Extension and the OvalEdge application.

The Connectors that are currently supported are:
- PowerBI - Report Type
- Tableau - View Type
- Qlik Sense
- Delta Lake - Tables
Users can verify the certification status assigned to selected connector tables or reports at external instances like Tableau or PowerBI through the Browser plugin, promoting transparency and efficient data governance.
For example, if a report named "Quarterly Sales Report" in Power BI connector is certified within OvalEdge. At external instances like PowerBI, the authorized users upon integrating the Browser Extension, receive a pop-up notification informing them about the certification status applied to the report, and users can promptly report any issues they find.
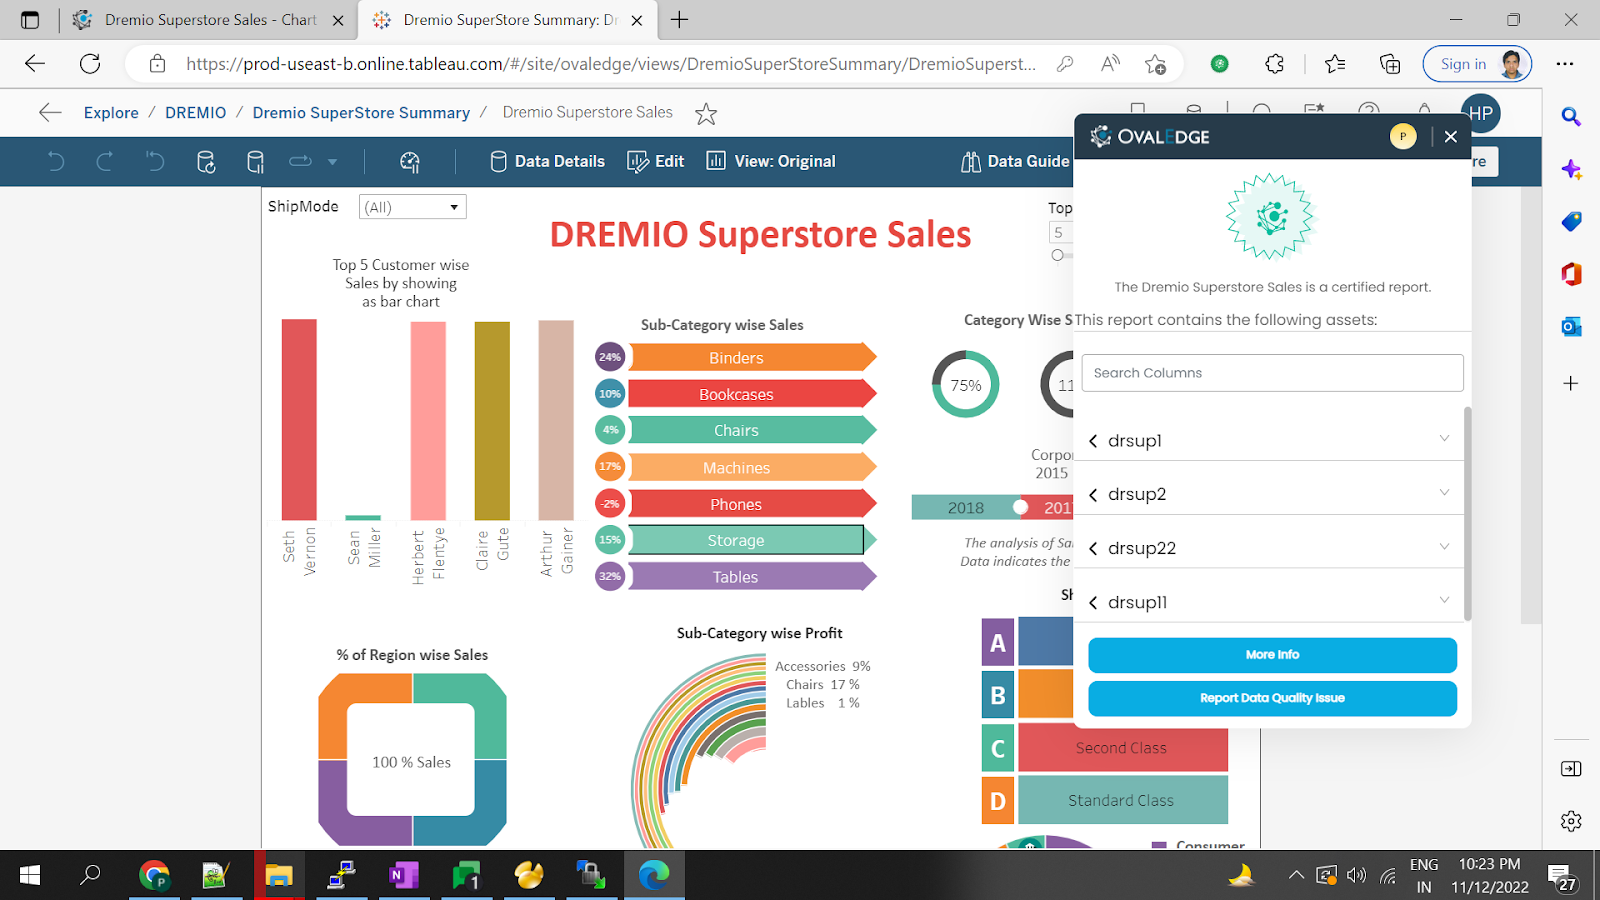
The image displays the Browser plugin displaying the certification status of a report within the Tableau instance.
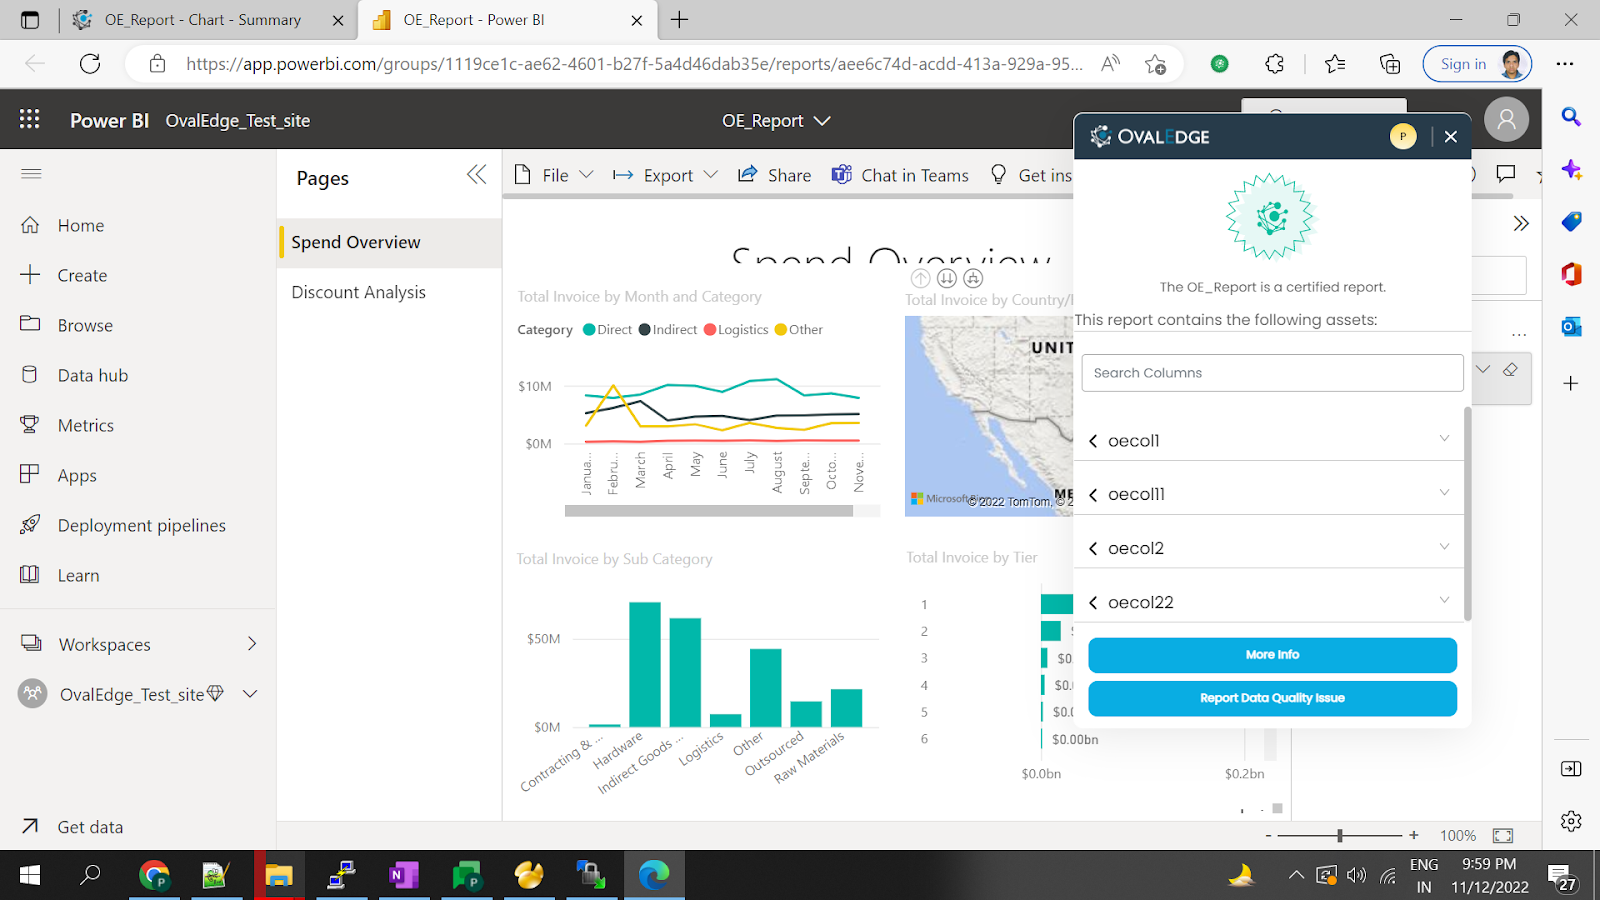
The image displays the Browser plugin displaying the certification status of a report within the PowerBI instance.