The deployment document provides an overview of the steps to deploy the OvalEdge application on the EKS Cluster using Terraform and Helm charts.
Prerequisites
The following are the prerequisite steps required for deploying the OvalEdge application on the EKS Cluster using Terraform and Helm charts.
- Install AWS CLI (Command Line Tool): It connects the AWS Cloud and Kubectl from the Command Line.
- Install Kubectl: It runs the deployment from the Kubectl Cluster.
- Install Terraform: It is used to create the AWS Resources.
- Install Helm: It is used to group all the Kubernetes Yaml Manifests into a single package.
- Setup AWS RDS (MySQL5.7): It is a database connection using the OvalEdge application.
- Setup EKS Cluster: It is a Kubernetes Cluster provided by the AWS.
- Create S3 Bucket in AWS: It stores the Terraform State files.
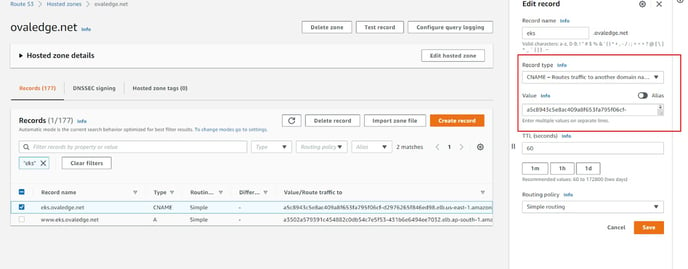
- Setup DNS Hosted Zones: It is used for mapping the Kubernetes Ingress into the domain (Ex: Route 53, Cloud Fair)
- Setup VPC: A virtual private cloud enables the user to launch the resources in the virtual network.
- Setup Shared File System: It is a file system shared among all the pods in the Kubernetes (Ex: NFS-Network File System)
- Create Security Group, pem file in AWS: It is used to allow the traffic of the particular network.
Download OvalEdge EKS Installation Packages
The following are the files provided by OvalEdge for the automated installation of OvalEdge on the AWS EKS Cluster:
- mysql_rds.zip: This contains Terraform scripts for setting up the OE database on RDS MySQL.
- oe_db_scripts.zip: This contains the SQL scripts to create the OE schema in the database.
- eks.zip: This contains the Terraform scripts for spinning up the EKS cluster and Secrets Manager.
- ovaledgehelmchart.zip: This contains the Helm charts for installing the OvalEdge application on the EKS cluster.
Note : eks, and ovaledgehelmchart zip files will be provided by OvalEdge.
Note :To download the EKS Installation Packages, click on the respective packages zip names.
Setup OvalEdge Database on RDS MySQL
Refer to the mysql_rds.zip, download and unzip the file.
Follow the steps below to set up the OvalEdge database on RDS MySQL and store the database details in the secret manager.
Step #1: In AWS, Spinup RDS using Terraform and change the variables.tfvars file accordingly.
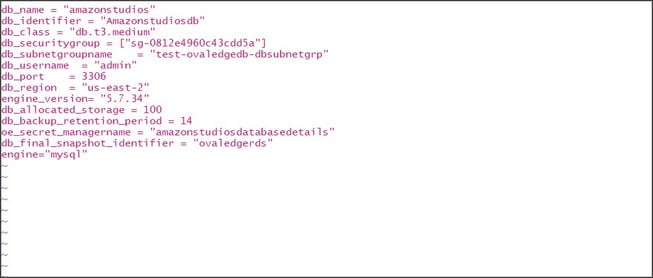
The following are the parameters mentioned in the above variables.tfvars file:
| Parameter Name | Description | Value |
| db_name | The name of the database in which the RDS needs to be created. Here only the alphanumeric characters and hyphens are allowed for mentioning the database name | ovaledgedb |
| db_identifier | The name of the RDS | ovaledge |
| db_class | The type of database instance which need to be created | db.t3.medium |
| db_securitygroup | The security group id created in the cloud | sg-0812e4960c4cdd5a |
| db_username | The master username used to login RDS | admin |
| db_port | The port number of the MySQL | 3306 |
| db_region | The region where the database needs to be created | us-east-2 |
| db_allocated_storage | The storage allocated for the database | 100 |
| db_secret_managername | The name of the secret manager which is used to create and store the user credentials | ovaledge |
For db_name, only alphanumeric characters and hyphens allowed in "name_prefix"
Step #2: Change the S3 bucket and region in the main.tf as displayed below.
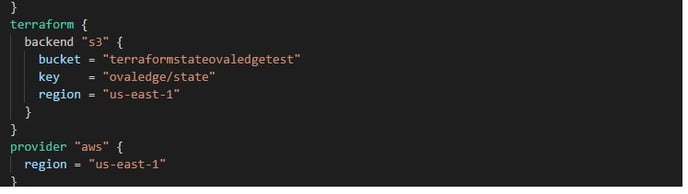
The following are the parameters mentioned in the above main.tf file:
| Parameter Name | Description | Value |
| bucket | The name of the S3 bucket created in the AWS for storing the state file | ovaledges3bucket |
| Key | The state file path created inside the bucket | ovaledge/state |
| region | The region where the S3 bucket needs to be created | us-east-1 |
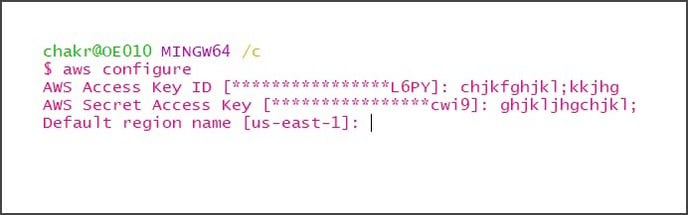
Step #3: Log in to AWS using the access, and secret keys with AWS configure command
Step#4: Validate the Terraform script using the Terraform init command.
Step #5: Get the deployment plan using the Terraform plan command.
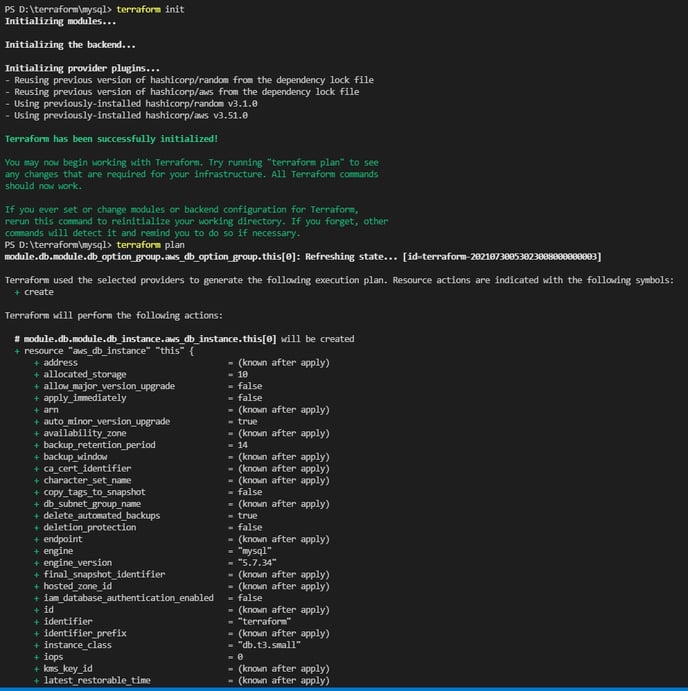
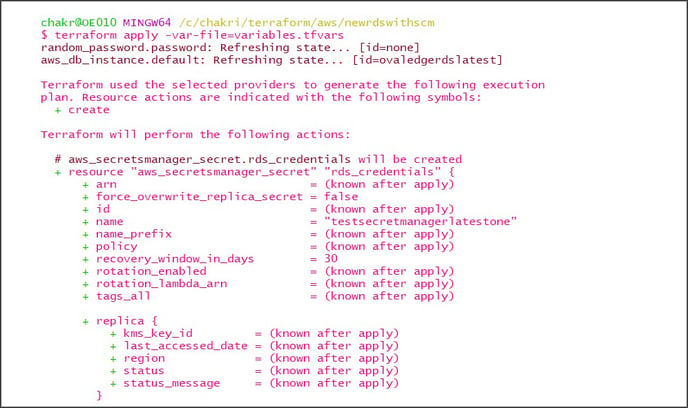
Step #6: Once after getting the plan of the deployment, enter the Terraform apply -var-file = variables.tfvars command
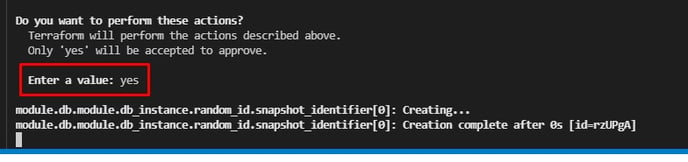
Step #7: Approve the deployment by entering the value as “yes.” ovaledge.
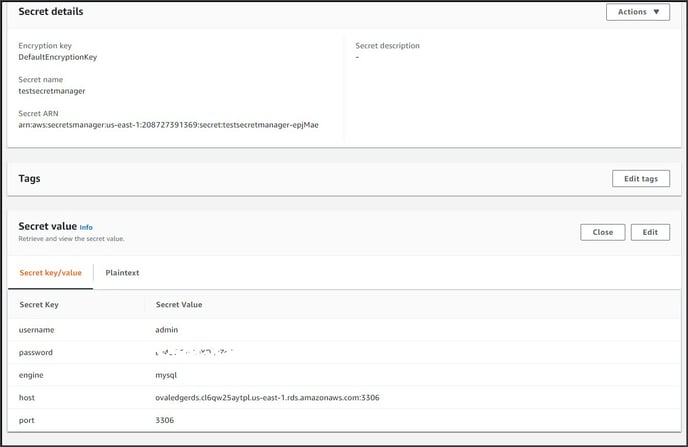
Step #8: Once after creating the RDS, the MySQL Endpoint, username, and password are automatically created and can be viewed in the secrets manager.
Step #9: Check on the RDS console for the RDS to be created.

Step #10: Connect to the created RDS through third-party tools.
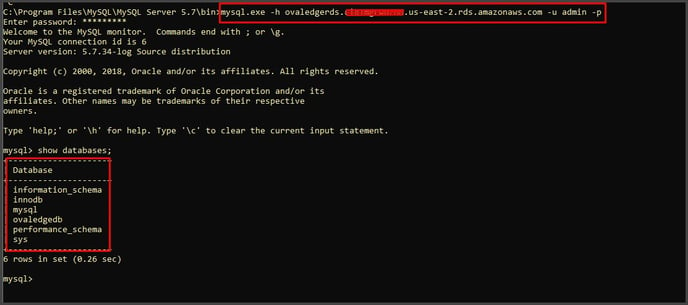
Step #11: Once connected to the RDS endpoint source, the OvalEdge scripts are provided as shown below and entered.

Setup EKS Cluster and Secrets Manager
Refer to the eks.zip. download and unzip the file.
Follow the steps given below to setup EKS Cluster and Secrets Manager:
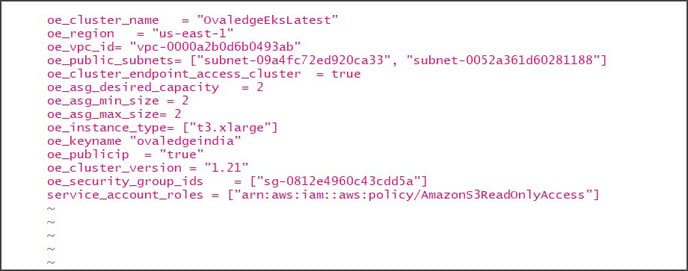
Step #1: In AWS, Spinup EKS Cluster and Secret Manager using Terraform and change the variables.tf file accordingly.
The following are the parameters mentioned in the above variables.tfvars file:
|
Parameter Name |
Description |
Value |
|
oe_cluster_name |
The name of the EKS Cluster |
ovaledgeEKS |
|
oe_region |
The region where the EKS Cluster is created |
us-east-1 |
|
oe_vpc_id |
The identification for the VPC where the EKS Cluster needs to be created |
vpc-0000a2b0d69d |
|
oe_public_subnets |
The subnets created within the VPC |
subnet-09afc72 |
|
oe_asg_desired_capacity |
The current nodes existing in the EKS Cluster |
2 |
|
oe_asg_min_size |
The minimum number of nodes required for the EKS Cluster |
1 |
|
oe_asg_max_size |
The maximum number of nodes required for the EKS Cluster |
3 |
|
oe_instance_type |
The type of worker instance which needs to be created for the EKS Cluster |
t3.xlarge |
|
oe_keyname |
The private key of the instances where the user access |
ovaledge |
|
oe_publicip |
It is used to access the node with or without a VPN. The “true” represents without a VPN, and the “false” represents with a VPN |
true or false |
|
oe_cluster_version |
The version of the EKS Cluster |
1.21 |
|
oe_security_group_ids |
The security group ids which are created in the cloud |
[“sg-0812e4960ce”] |
|
service_account_roles |
The service_account_roles are mentioned with all the policies of the services used to connect the OvalEdge application using the role-based authentication process. |
["arn:as:iam::aws:policy/AmazonS3ReadOnlyAccess"] |
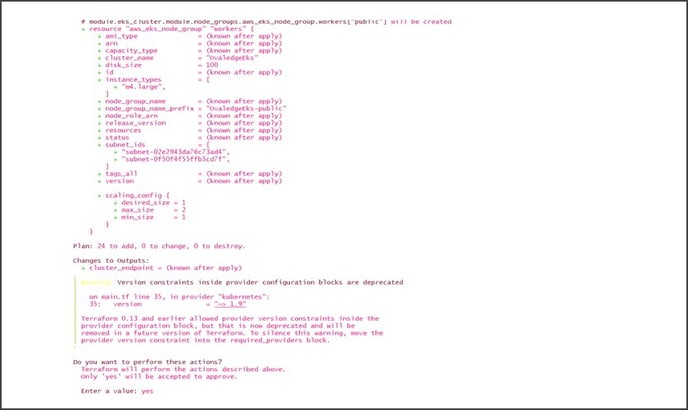
Step #2: Run the Terraform script using Terraform init commands
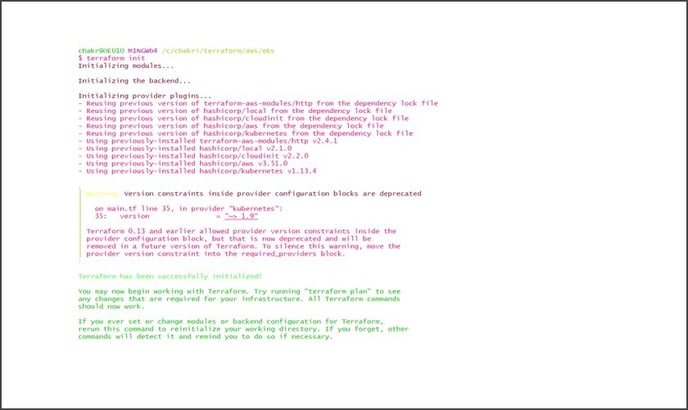
Step #3: Once after validating the Terraform, apply the Terraform scripts using Terraform apply
-var-file=variables.tfvars commands.
Step #4: Once after completion of the Terraform installation process, check the EKS Cluster, IAM
Role and Identity Provider in AWS
EKS Cluster

EKS Roles 
EKS Provider
Step #5: Connect to EKS Cluster using the below command
Aws eks update-kubeconfig --name OvaledgeEks

Step #6: Check whether the EKS Cluster nodes are ready or not using the below command:
Kubectl get nodes

Setup IAM Role
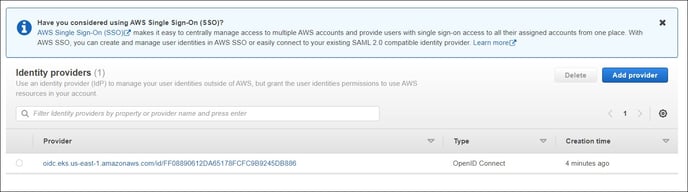
Create Identity provider and IAM role to attach them to the EKS pods. To create the Identity provider and IAM role, complete the following steps:
Step #1: Click on the Access Management module in the AWS IAM Dashboard. The sub-modules associated with Access Management are displayed.
Step #2:In the Access Management, click on the Identify Providers sub-module. The Identify Providers page is displayed.
Step #3: In AWS, at the EKS Cluster configuration page, copy the OpenID Connect provider URL from the EKS Cluster Configuration.
Step #4: Click on the Add provider button on the Identify Providers page. The Configure Provider page is displayed.
Step #5: In the Configure Provider page, select the OpenID Connect option and paste the copied OpenID Connect provider URL in the select Provider URL textbox.
Step #6: Enter sts.amazonaws.com in the Audience textbox.
Step #7: Once after entering the Provider URL and Audience details, click on the Create button. The entered details are saved and displayed on the Identify providers page.
Step #8: Validate the Provider URL and Provider Type on the Identify providers page.
Step #9: In AWS, create a role with Web Identify for the newly created Provider Type.
Step #10: Navigate to the Create Role page and click on the Web Identify tab. The Choose a web identify provider section is displayed.
Step #11: In Choose a web identity provider section, select the newly created provider and audience details from the Identify Provider and Audience dropdowns.
Step #12: Navigate to the newly created role and edit the trust relationship
Step #13: Click on the Trust relationship tab on the Roles page. The Edit trust relationship button is displayed.
Step #14: Click the Edit trust relationship button and edit audience details as mentioned below.
This is the default namespace with service account name app.
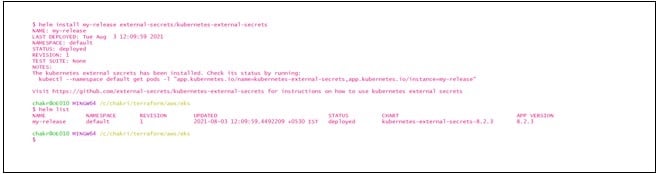
Setup External Secrets
Follow the steps given below to setup External Secrets:
Step #1: Install the external secrets using the below helm command
helm repo add external-secrets

https://external-secrets.github.io/kubernetes-external-secrets/

helm install [RELEASE_NAME] external-secrets/kubernetes-external-secrets
Using external-secrets charts we can get the environmental variables from secret manager service in AWS.
Step #2: Create a secret for tls certificate and key using the below command:
kubectl create secret generic nginx-certs-keys

--from-file=<FilePath>/MyCertificate.crt

--from-file=<FilePath>/MyKey.key
The <FilePath> is the path where the MyCertificates.crt and MyKey.key are located.
Step#3: Create secret for ingress using below command
kubectl create secret tls test-tls --key="tls.key" --cert="tls.crt"
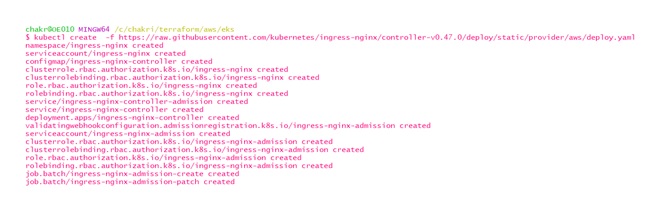
Step #4: Install nginx ingress controller using the below command
kubectl create -f
https://raw.githubusercontent.com/
kubernetes/ingress-nginx/controller-v0.47.0/deploy/static/provider/aws/deploy.yaml
Step #5: Change the configurations in values.yaml file and deploy the helm chart.
Step #6: Run the below command:
Helm install chartname chartpath
Step #7: Check external secrets are getting created or not using the below command
Kubectl get es
If there is any permission issue, navigate to that role and provide the secret manager access. Here edit the trust relationship and give access to the AWS user:
{ "Version": "2012-10-17", "Statement": [ { "Effect": "Allow", "Principal": { "AWS": "arn:aws:iam::479930578883:user/chakri" }, "Action": "sts:AssumeRole", "Condition": {} } ] }
Step #8: Delete the helm chart and recreate it again using the below command:
Helm delete ovaledgehelmchartfinal
See this article EKS Installation Guide using Helm Charts to know more about AWS EKS installation using Helm charts for further steps.
Install OvalEdge
Refer to the ovaledgehemlchart.zip. download and unzip this file.
The OvalEdge provides the sample helm chart files for automating the deployment on the AWS EKS service.
Update OvalEdge Configuration
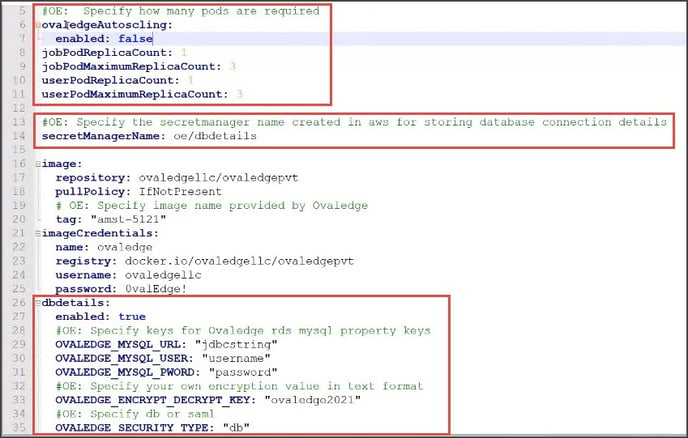
Refer to the values.yaml file.
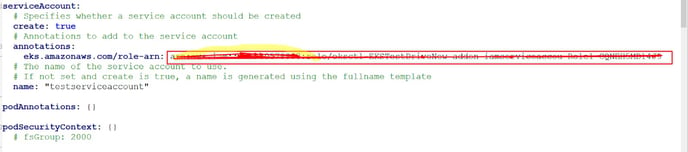
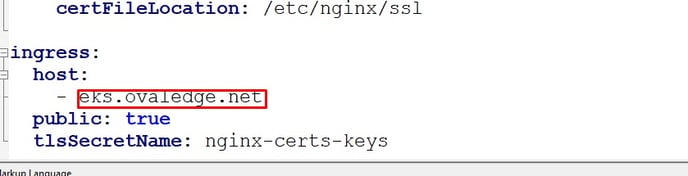
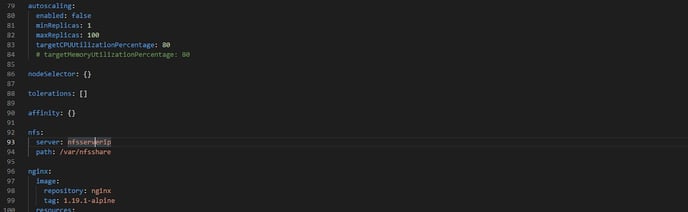
Update the values in the file to match the environment in which OvalEdge is being deployed. Here the properties which need to be modified are bordered by a red box below <Screenshot#1>
Step #1: Job pod replicas:- Job pod replicas count. The minimum number of job pods is set up with a minimum value of “1”.
- Job pod maximum replicas count
- User pod replicas count. The minimum number of user pods is set up with a minimum value of “1”.
- User pod maximum replicas count
-
-
- If the OvalEdge Autoscaling is enabled to “True,” then the Job and User pods will scale according to the minimum and maximum replicas count, based on the parameters specified or otherwise, by default, the replicas count is set to minimum.
- The target parameters for horizontal pod autoscaling can be configured in hpcjob.yaml and hpcui.yaml.
-
Step #4: Environment values:
Step #5: IAM Role:
Step #6: Host Name:
Step #7: Shared storage NFS:
Install OvalEdge
Step #1: Connect to the EKS cluster created for the deployment.Step #2: Deploy the helm chart to complete the installation and run the following command in the command line:
Note: helm install ovaledgehelmchartfinal <path to helm charts folder>
Step #3: Get the ingress of the application using the below command.
kubectl get ing

Step #4: Map the ingress address with the ingress route name in the row 53 service.