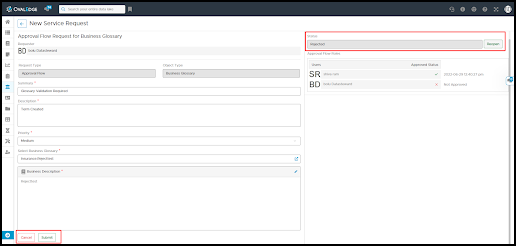
An Approval Workflow routes a service request to one or more users for their approval or rejection. The Admin user can configure the approval workflow to provide access to various Service Requests types (Access/Content change/Report Data Quality issue/ Build Lineage /Content Change/Business Term Approval/NewAsset Request and others). OvalEdge provides multiple Approval Workflow Process options so that each organization can design its Workflow based on its needs.
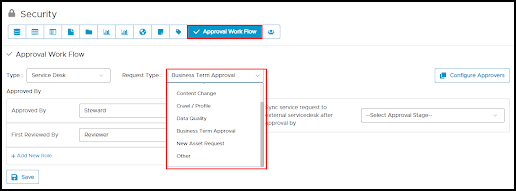
- Approvers are the default approver set for the selected Request Type.
- The approvers selected in the Configure Approvers pop-up are displayed under Approved By drop-down options.
- Single or multiple users (Team) can be added to the Approvers list.
- The configured approver(s) are notified when the Approval Workflow is initiated.
- We can configure the Approvers by clicking on the Configure Approvers where we need to specify the request type and thereafter we can select/deselect the Allowed approvers. Please refer to the screenshot below.
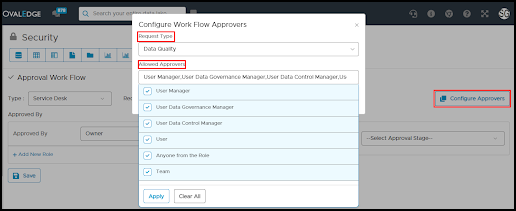
- If you require multiple users to approve the request, you could choose the following options:
Anyone from the Role - This will only require approval from any one user from the role to approve the service request.
User Roles - This will require approval from any user for the service request to be approved.
Team - This will require approval from any user for the service request to be approved. A checkbox is provided to enable approval from everyone on the Team. Once the approver approves a request, the request automatically moves to another user in the following line (Team). Once the final approver approves the request, the service request gets approved.
- If the Admin user is one of the users in the Team or Anyone from the Role group, and if the admin user approves a service request - the ticket gets into Resolved state based on the Configurations set in Administration > Configuration >Others> Key - approvalflow.admin.supersede is set to True. If one of the approvers rejects a service request immediately stops the approval process and the service request is marked as ‘Rejected’. A record of rejection can be viewed on the Governance Catalog > Service Desk > My Requests/ All Requests page.
- However, if the Configuration set in Administration > Configuration >Others> Key - approvalflow.admin.supersede is set to False, then even if the admin user approves the ticket, the ticket is moved to the next-in-line user till the end of the approval process. In the workflow, if any user rejects the ticket, then the ticket owner can able to Reopen the same ticket. The admin user can modify the approval workflow before the rejected ticket is reopened.
To set up an Approval Workflow for a Service Request:
- Go to Administration > Security > Approval Workflow.
- Select a Request Type and Request Object Type from the drop-down options.
- For every request type selected, default Approvers are by default set as mentioned below:
-
- Access, Data Owner is the default Approver
- Build Lineage, choose a particular user or a user role
- Content Change, Data Steward is the default Approver
- Crawl/Profile, choose a specific user or a user role
- Data Quality, Data Steward, is the default Approver
- Business Term Approval, Steward is the default Approver
- New Data Asset, Data Owner is the default Approver
- Other, Data Steward is the default Approver
-
- The approvers selected in the Configure Approvers pop-up are displayed under Approved By drop-down options.

- Admin users can configure multiple levels of approval workflow based on the requirement.
- Upon selection, click the Save button to save the approval workflow.
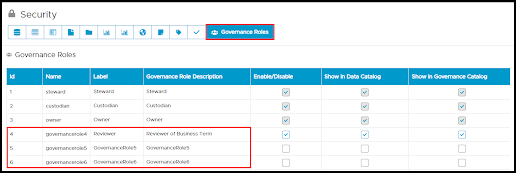
- We can also use the Governance roles which are available in the security module these are the custom-designed roles where we can set a role name with respect to your organization.
- These governance roles can be modified and configured by the admin users.
- Roles can be enabled/disabled (show in Datacatalog, Governance catalog, Default in Domain) by clicking on the respective checkbox.
Business Term Approval
The newly created Term will be in Draft status until it is published. To Publish a Term the approval from the default approver i.e. Steward or configured approvers is mandatory.
-
Whenever a new Term is created using Suggest a Term button on the Business Glossary page, the default Steward (configured while creating the Domain under which the Term is created) will get notified of the newly created Term.
-
The default approver for Business Term is the Steward. However, OE_ADMINS can configure an approval workflow from the Administration > Security > Approve Workflow module to add single or multiple users (Team) to approve the Service Request. Additionally, users with admin roles can approve a service request.
Note: All the notifications will be seen in the Notification toggle and in the My Resources > Inbox (i.e services alerts and All messages)
- Once notified of the Term creation, the Steward can Publish the Term in draft status using the Publish button enabled in the Term detailed page. Click Publish to see an Add Purpose of Initiating Workflow pop-up displayed on the screen.

-
Upon entering the Purpose in the text field and submitting the workflow by the Steward, a New Service Request is created.
- The configured users (single or multiple users (Team)/ user roles/ Anyone from the group) are notified of the service request for their Approval or Rejection).
- If multiple users are configured to approve the Term, then the approval process continues until all the levels of approvers are completed as per the Workflow.
- You can view the status of the Workflow and configured approvers queued Approvers (multiple users or next line approvers) configured to the service request from the Service Desk.
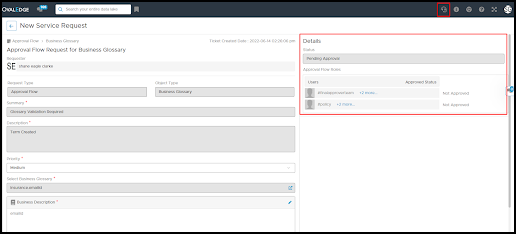
- Once the complete approval flow is completed, the final steward will be notified regarding successful approval or the Rejection of Publishing the term.
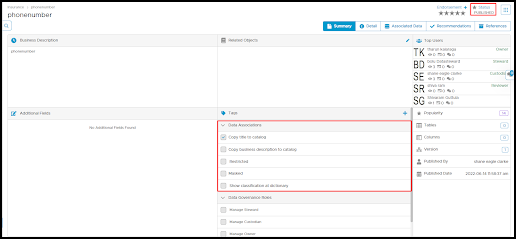
- Once approved, the term is successfully published and the business rules applied to the associated data objects will be applied to the term.
- If rejected, the Steward can reopen the service request ticket, edit the service request and Submit the request by following the same approval workflow process mentioned above.
